Tag Archives: Azure Functions

.NET 5, Blazor and more in 2021!

By Shahed C on January 4, 2021

Update: Due to new personal commitments and more work commitments in 2021, I wasn’t able to make much progress with my weekly C# A-Z series on dev.to/shahedc.
For now, I’ll focus on some new content for my regular blog (this blog, WakeUpAndCode.com) and hope to revisit the A-Z series with .NET 6.

Original Post:

I published my first ASP .NET Core A-Z series on WakeUpAndCode.com back in 2019, from January to June 2019. I followed this with a new A-Z series in 2020, simultaneously mirroring the posts on dev.to as well.

Going forward, my next A-Z series will cover 26 topics covering various C# language features. The C# A-Z series will be featured exclusively on my dev.to site under the .NET org:

Preview of C# A to Z series on DEV

Meanwhile, this site (WakeUpAndCode.com) will continue to feature new ASP .NET Core content based on .NET 5, Blazor and more! To get a sneak peak of what’s to come, check out my guest appearance on the .NET Docs Show (livestreamed Dec 7, 2020). You may jump ahead to 58:05 in the video for the sneak peek:

The above video teases my upcoming cinematic visualizer app, which will allow the end user to connect the dots within a cinematic universe, e.g. the Marvel Cinematic Universe. The source code will allow any .NET developer to learn more about C# and .NET 5, ASP .NET Core, Entity Framework, Azure App Service, Bot Framework, Azure Functions, and more!

High-Level Diagram of Cinematic Visualizer

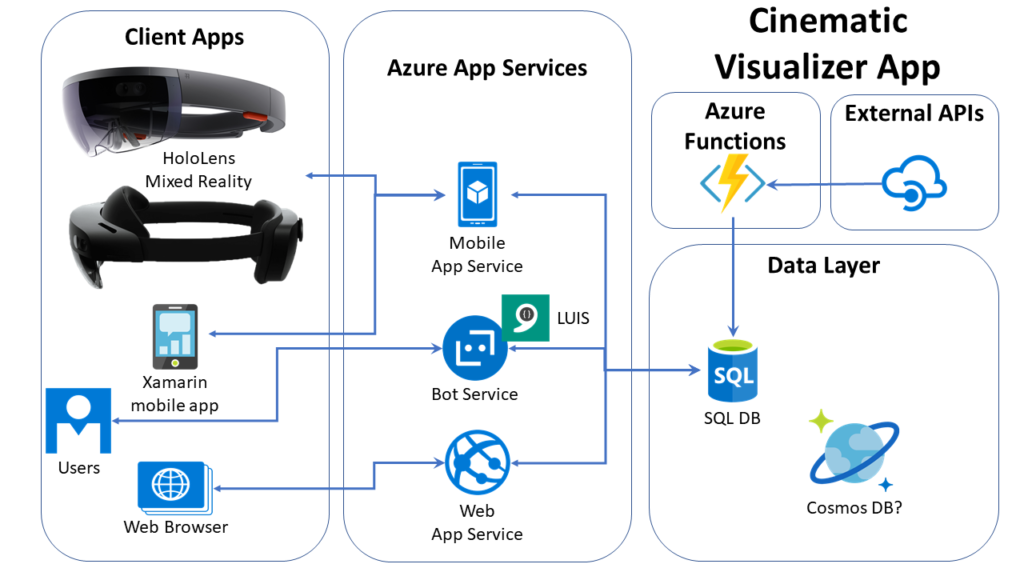
The goal of the web app is to make use of all 3 project styles available in ASP .NET Core:

  • MVC (Model View Controller)
  • Razor Pages
  • Blazor
ASP .NET Core web architecture

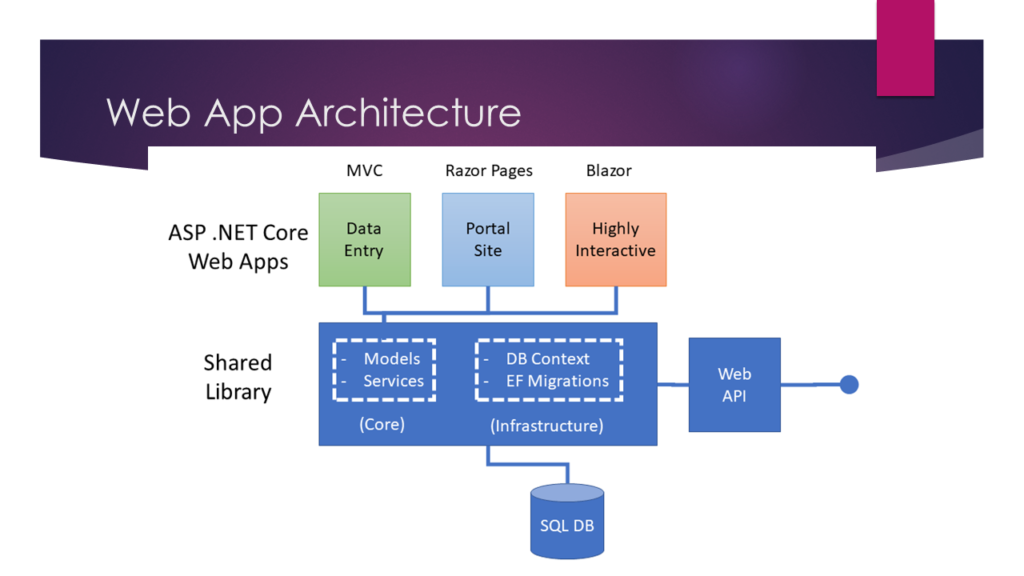
Developers frequently ask the developer community (and Microsoft) whether a particular web project type is preferred over the other. Last year’s blog series built upon the NetLearner web app by duplicating identical functionality across all three project types. This year, the cinematic visualizer app will attempt to use each project type of something specific.

  • MVC for data entry
  • Razor Pages for the Portal site
  • Blazor for the highly interactive portion

The above choices aren’t necessarily prescriptive for the type of web apps they will demonstrate. However, they should provide a starting point when developing ASP .NET Core web applications.

Azure Functions @ Philly DevOps 2017

By Shahed C on October 17, 2017

I presented Azure Functions at Philly DevOps on Tue October 17, 2017. Here is the presentation material with the slides, links and my contact information.

azure-function-logo

Download PPTX or view slideshow below

SlideShare: https://www.slideshare.net/shahedC3000/going-serverless-with-azure-functions-80886075

Whether you’re new to cloud computing or have been using various cloud services over the years, Azure Functions opens the door to new workflows for development, deployment, devops and scaling. Learn about how you can go serverless with Azure Functions using a web browser, code editor or a full blown IDE.


Azure Functions – Dev Workflow

By Shahed C on May 24, 2017

If you’re looking for new ways to put your code in the cloud, look no further than serverless code deployments with Azure Functions! If you need some tutorials and basic information to get started, check out the following links first, especially the Quick Login page.

Azure Functions

Special Thanks: I’d like to give credit to my awesome colleague Joe Raio, who walked me through these steps during a hackathon project.

Useful Links

The rest of this blog post will focus on how you can develop Azure Functions without being tied to a web browser. You’ll learn how to write the code on your own dev machine, which will enable you to easily commit/push your code into any source code repository.

Step 0: Install Node.js if you haven’t done so already

Download Node.js from the following URL. This includes npm.

Step 1: Install the Azure-CLI npm package

Get more information at the following URL:

In a brand new folder, run the following command from a command line:

> npm i -g azure-functions-cli 
This folder can reside anywhere in your project’s folder structure, to ensure that you can easily check in your code into source control.
UPDATE: There is a newer URL for the Azure Functions CLI, now called Core Tools:

The install command is now:

npm i -g azure-functions-core-tools

Step 2: Create a new Azure Function locally

In the same folder, run the following command to create a new Function App locally:
> func init
Now, run the following command to create a new Function within your Function App.
> func new
Next:
  • Select a language, e.g. C#
  • Select a template, e.g. HttpTriggerWithParameters
  • Enter a name for your new Function, e.g. “MyFunction”, which will create a subfolder using the Function’s name.

Step 3: Observe the folder structure and its files.

Open the folder in your code editor, e.g. Visual Studio Code and take a look at the folder structure. For my C# function, here’s what I can expect in my function’s subfolder:
  • readme.md is a typical “Readme” file, in markdown format, useful for Github repos.
  • run.csx is contains the code for your Azure Function
  • function.json defines the function bindings and other configuration settings

In the Function App’s main folder, the appsettings.js file will be shared by all the functions in this Function App. You can update this settings file by pulling down the actual settings file from your a Function App in your Azure account.

Step 4: Log in to Azure from the command line

Type the following command at the command line:

> func azure login

Follow the onscreen prompts and instructions to log in to your Azure account. If you have two-factor authentication enabled, make sure you have your verification method ready for a quick login process.

Step 5: Get a list of Function Apps in your Azure account

Type the following command at the command line:

> func azure functionapp list

Step 6: Import your App Settings from the cloud

Type the following command at the command line:

> func azure functionapp fetch-app-settings <fn-app-name>

Make sure that you replace the placeholder <fn-app-name> with your own function app’s name. If you have the settings file open locally (e.g. in VS Code), you’ll notice that local file gets updated automatically!

Step 7: Run your function locally (optional)

If you want to run your function locally, type the following command at the command line:

> func host start

This should start the function locally and display the local URL with port number. Use this URL and port number to run it in a web browser and provide parameters via the QueryString. Note that QueryString parameters start with a “?” but subsequent parameters are separated by “&” ampersand characters.

Step 8: Publish back to Azure

Each time you want to publish your Function to Azure, type the following command at the command line:

> func azure functionapp publish <fn-app-name>

Once again, make sure that you replace the placeholder <fn-app-name> with your own function app’s name.

Step 9: Enable CORS for your Function App

If your Function App is hosted in Azure, you will need to enable CORS to ensure that it can be called from JavaScript code with a different origin. For step by step instructions, follow the guide at:

Conclusion

Now you’re ready to use your function from anywhere: directly in a web browser, from a mobile app, web app and more!