This is the fifth of a new series of posts on ASP .NET Core 3.1 for 2020. In this series, we’ll cover 26 topics over a span of 26 weeks from January through June 2020, titled ASP .NET Core A-Z! To differentiate from the 2019 series, the 2020 series will mostly focus on a growing single codebase (NetLearner!) instead of new unrelated code snippets week.
Previous post:
NetLearner on GitHub:
- Repository: https://github.com/shahedc/NetLearnerApp
- v0.5-alpha release: https://github.com/shahedc/NetLearnerApp/releases/tag/v0.5-alpha
In this Article:
- E is for EF Core Relationships
- Classes and Relationships
- One to One
- One to Many
- Many to Many
- References
E is for EF Core Relationships
In my 2018 series, we covered EF Core Migrations to explain how to add, remove and apply Entity Framework Core Migrations in an ASP .NET Core web application project. In this article, we’ll continue to look at the newer 2020 NetLearner project, to identify entities represented by C# model classes and the relationships between them.
- NetLearner on GitHub: https://github.com/shahedc/NetLearnerApp
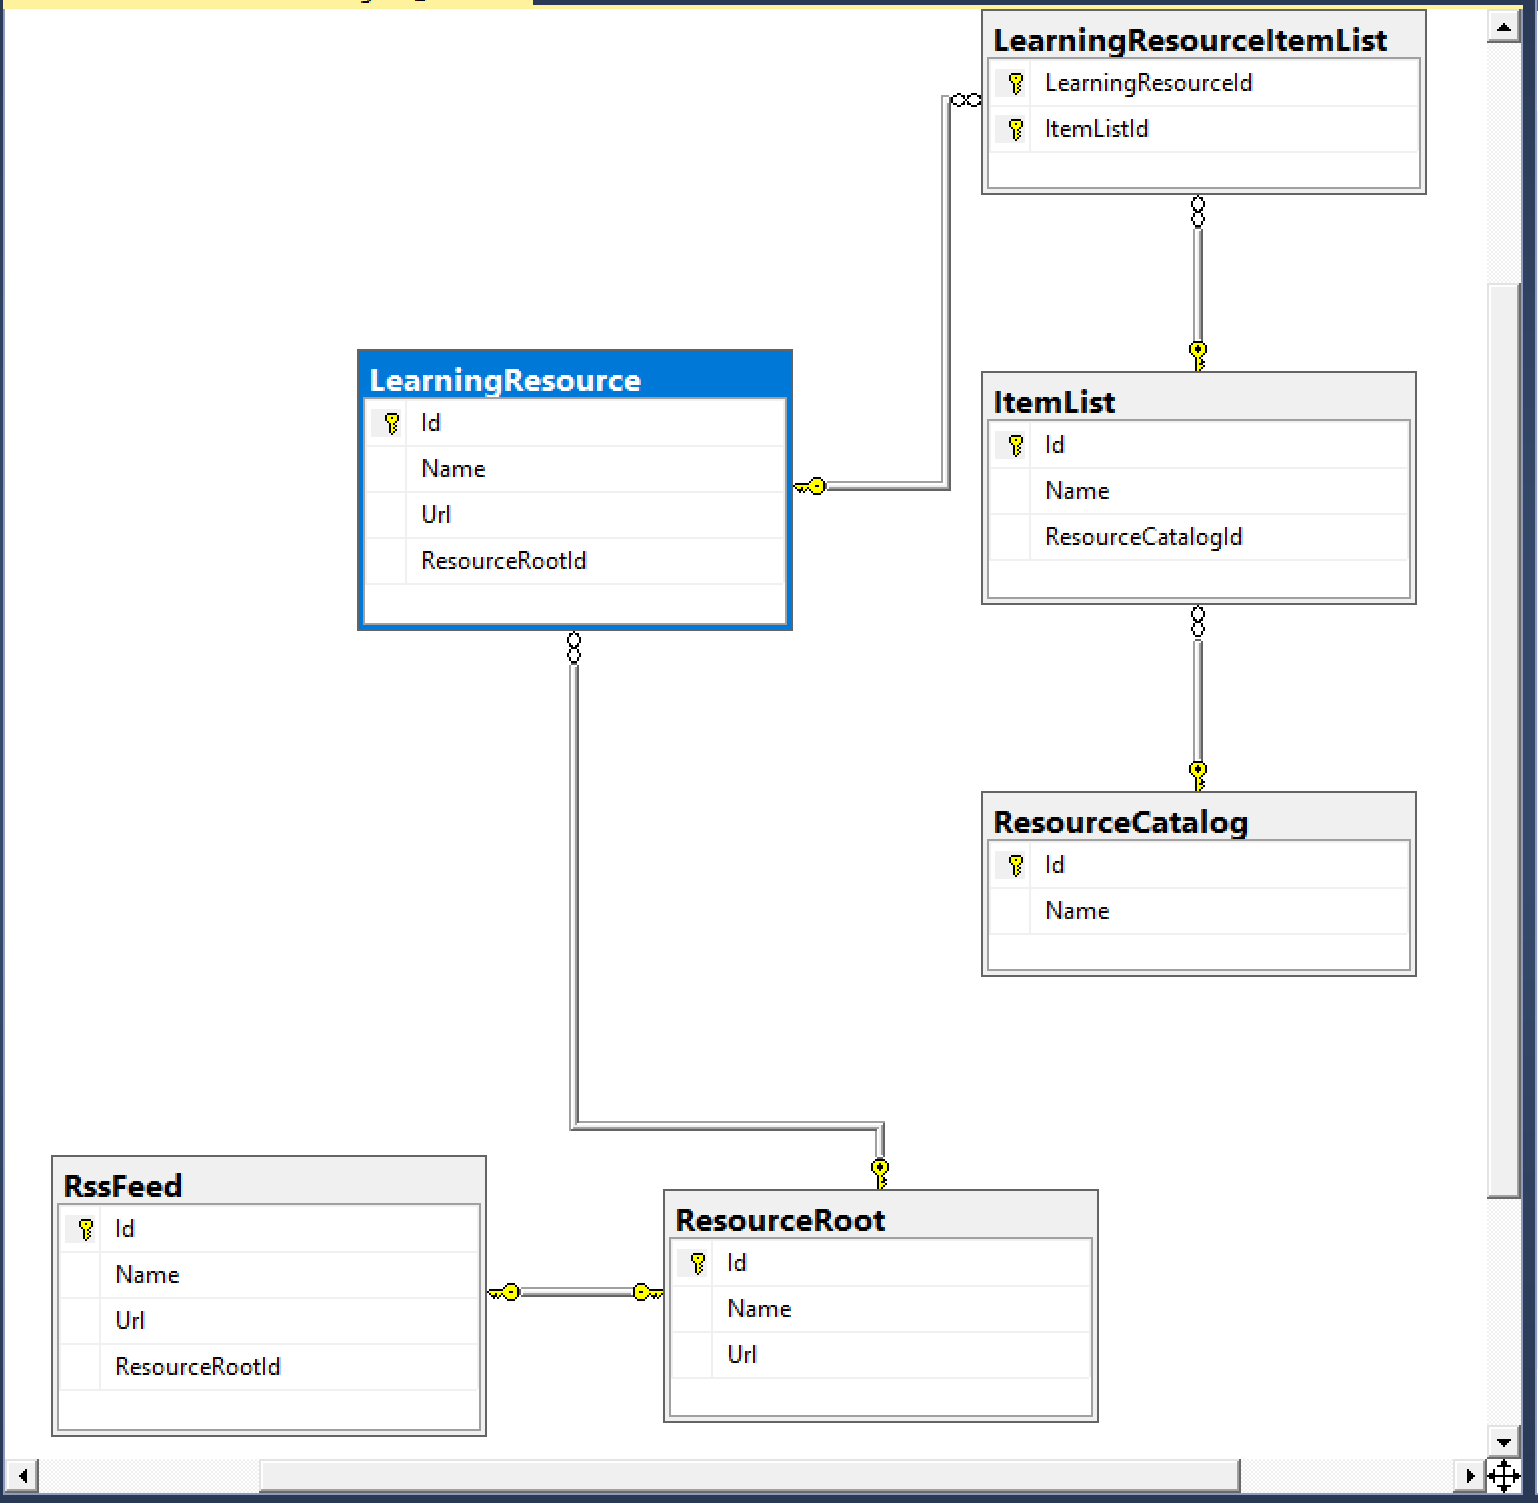
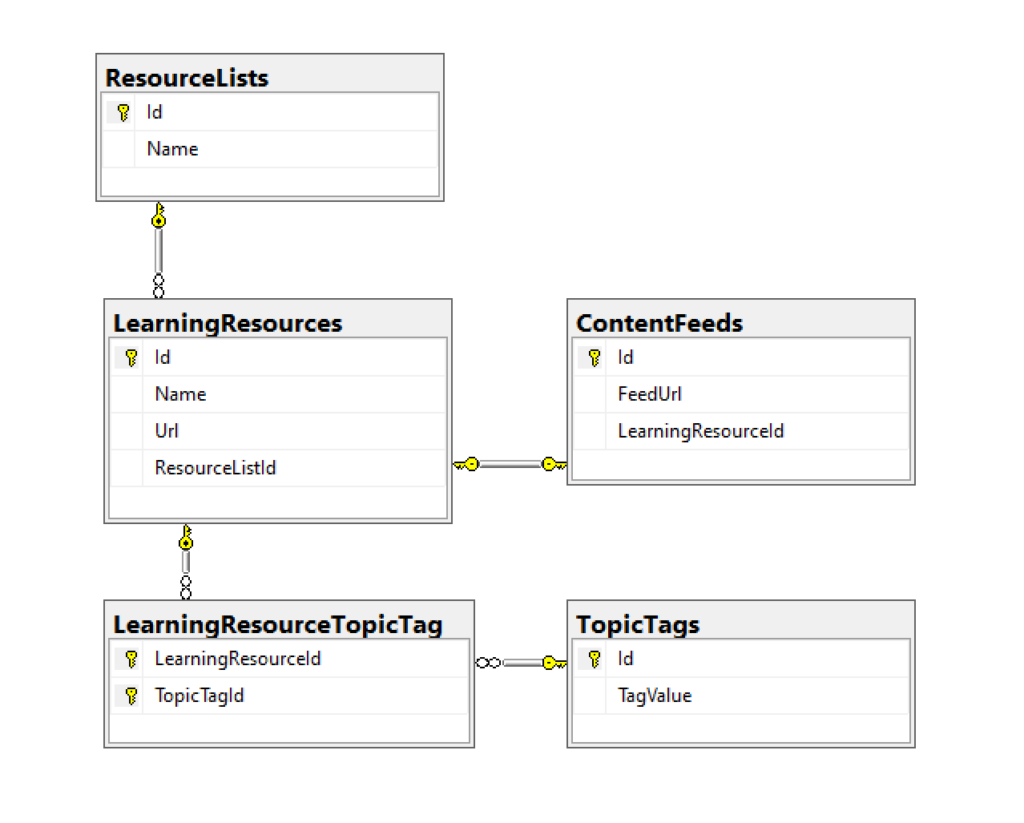
NOTE: Please note that NetLearner is a work in progress as of this writing, so its code is subject to change. The UI web apps still needs work (and will be updated at a later date) but the current version has the following models with the relationships shown below:
Classes and Relationships
The heart of the application is the LearningResource class. This represents any online learning resource, such as a blog post, single video, podcast episode, ebook, etc that can be accessed with a unique URL.
public class LearningResource
{
    public int Id { get; set; }

    [DisplayName("Resource")]
    public string Name { get; set; }


    [DisplayName("URL")]
    [DataType(DataType.Url)]
    public string Url { get; set; }

    public int ResourceListId { get; set; }
    [DisplayName("In List")]
    public ResourceList ResourceList { get; set; }

    public ContentFeed ContentFeed { get; set; }

    public List<LearningResourceTopicTag> LearningResourceTopicTags { get; set; }
}
The ContentFeed class represents the RSS Feed (or channel information) for an online resource, a URL that can be used to retrieve more information about the online resource, if available.
public class ContentFeed
{
    public int Id { get; set; }

    [DisplayName("Feed URL")]
    public string FeedUrl { get; set; }

    public int LearningResourceId { get; set; }
    public LearningResource LearningResource { get; set; }
}
The ResourceList class represents a logical container for learning resources in the system. It is literally a list of items, where the items are your learning resources.
public class ResourceList
{
    public int Id { get; set; }

    public string Name { get; set; }

    public List<LearningResource> LearningResources { get; set; }
}
The TopicTag class represents a single “tag” value that can be used to categorize online resources. Possibly values could be “.NET Core”, “ASP.NET Core” and so on.
public class TopicTag
{
    public int Id { get; set; }

    [DisplayName("Tag")]
    public string TagValue { get; set; }

    public List<LearningResourceTopicTag> LearningResourceTopicTags { get; set; }
}
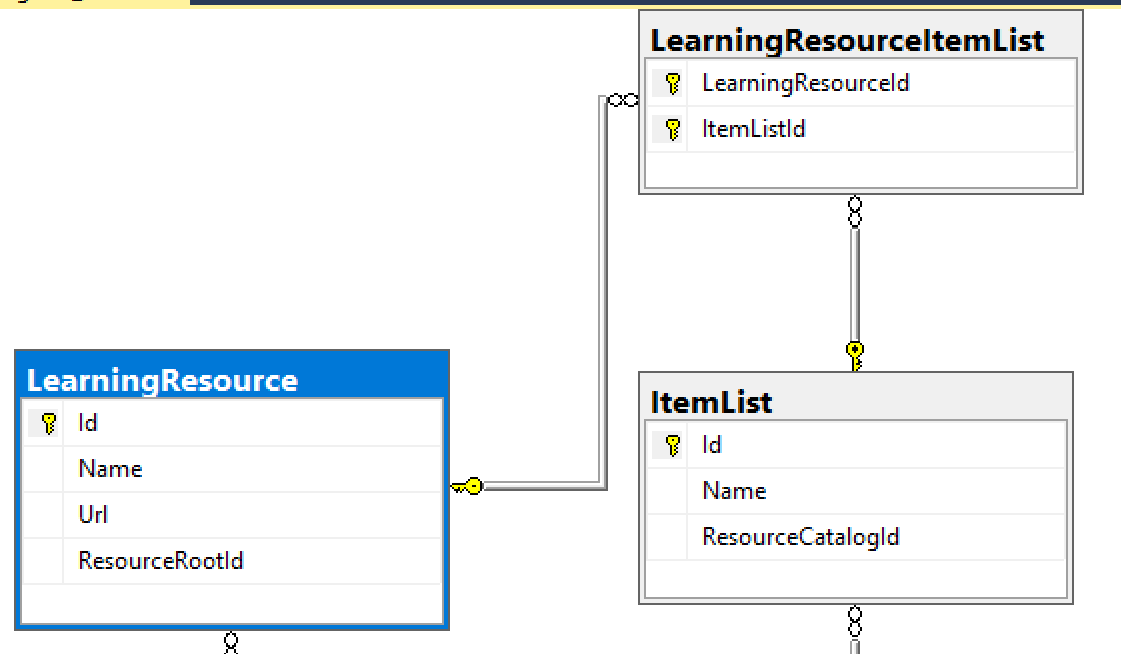
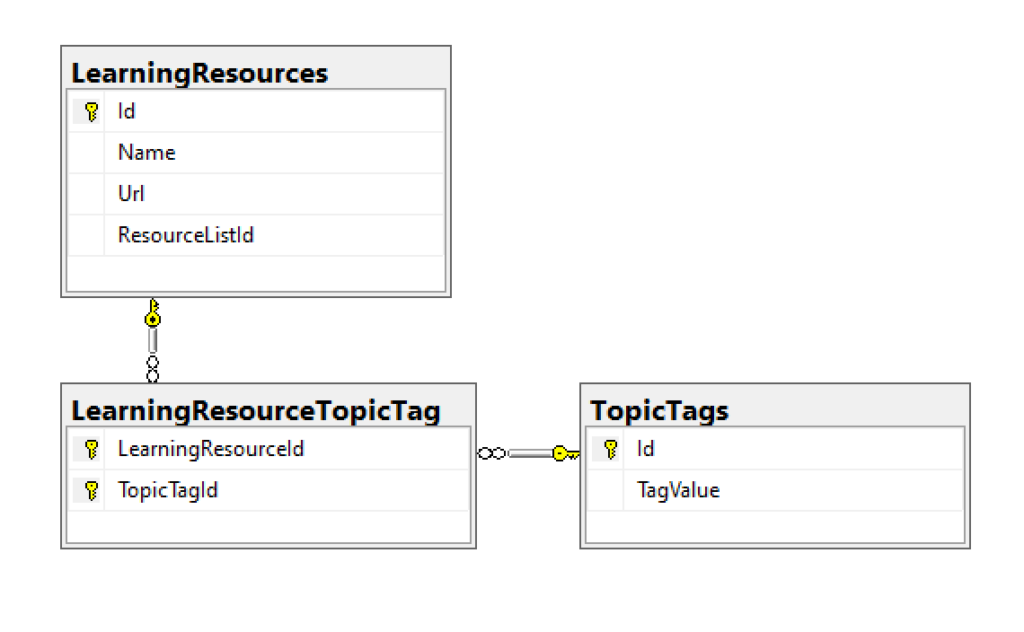
At this point, you may have noticed both the LearningResource and TopicTag classes contain a List<T> property of LearningResourceTopicTag. If you browse the database diagram, you will notice that this table appears as a connection between the two aforementioned tables, to establish a many-to-many relationship. (more on this later)
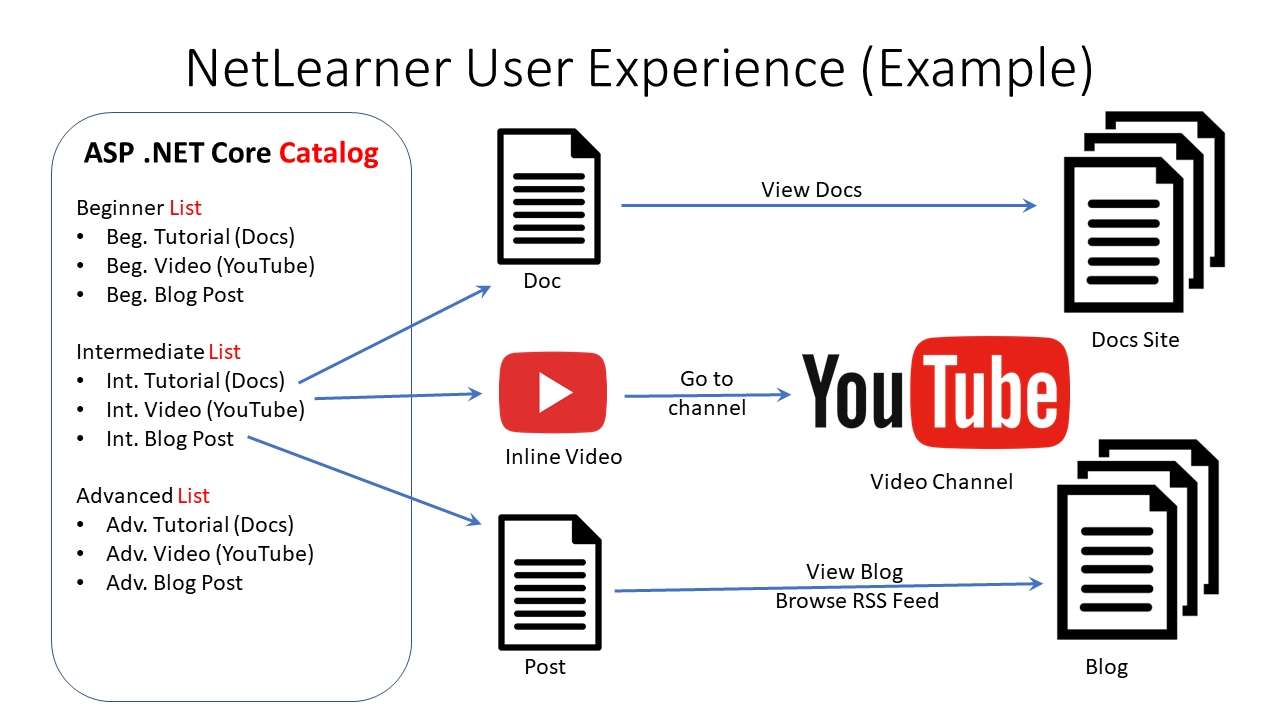
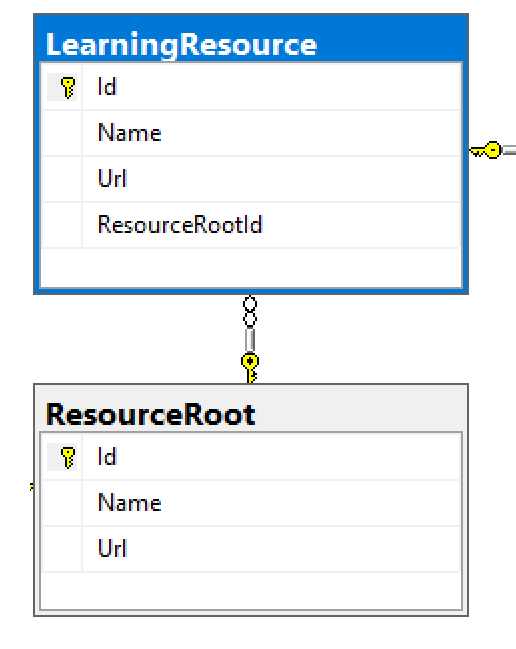
The following diagram shows an example of how the a LearningResource (e.g. link to a doc/video) is a part of a ResourceList, while each LearningResource also has a link back to its root site, channel or RSS feed (via ContentFeed).
One to One
Having looked through the above entities and relationships, we can see that each LearningResource has a ContentFeed. This is an example of a 1-to-1 relationship. For example:
- Learning Resource = Wake Up and Code! blog site
- Content Feed = RSS Feed for blog site
In the two classes, we see the following code:
public class LearningResource
{
    public int Id { get; set; }

    [DisplayName("Resource")]
    public string Name { get; set; }


    [DisplayName("URL")]
    [DataType(DataType.Url)]
    public string Url { get; set; }

    public int ResourceListId { get; set; }
    [DisplayName("In List")]
    public ResourceList ResourceList { get; set; }

    public ContentFeed ContentFeed { get; set; }

    public List<LearningResourceTopicTag> LearningResourceTopicTags { get; set; }
}
public class ContentFeed
{
    public int Id { get; set; }

    [DisplayName("Feed URL")]
    public string FeedUrl { get; set; }

    public int LearningResourceId { get; set; }
    public LearningResource LearningResource { get; set; }
}
Each Learning Resource has a corresponding Content Feed, so the LearningResource class has a property for ContentFeed. That’s pretty simple. But in the ContentFeed class, you don’t necessarily need a property pointing back to the LearningResource . In fact, all you need is a LearningResourceId property. EF Core will ensure that LearningResource.Id points to ContentFeed.LearningResourceId in the database. But to help with object-property navigation in your code, it is useful to include an actual LearningResource object in the ContentFeed class to point back to LearningResource.
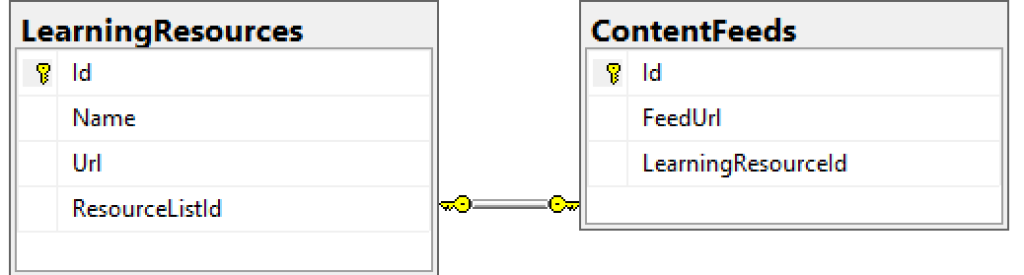
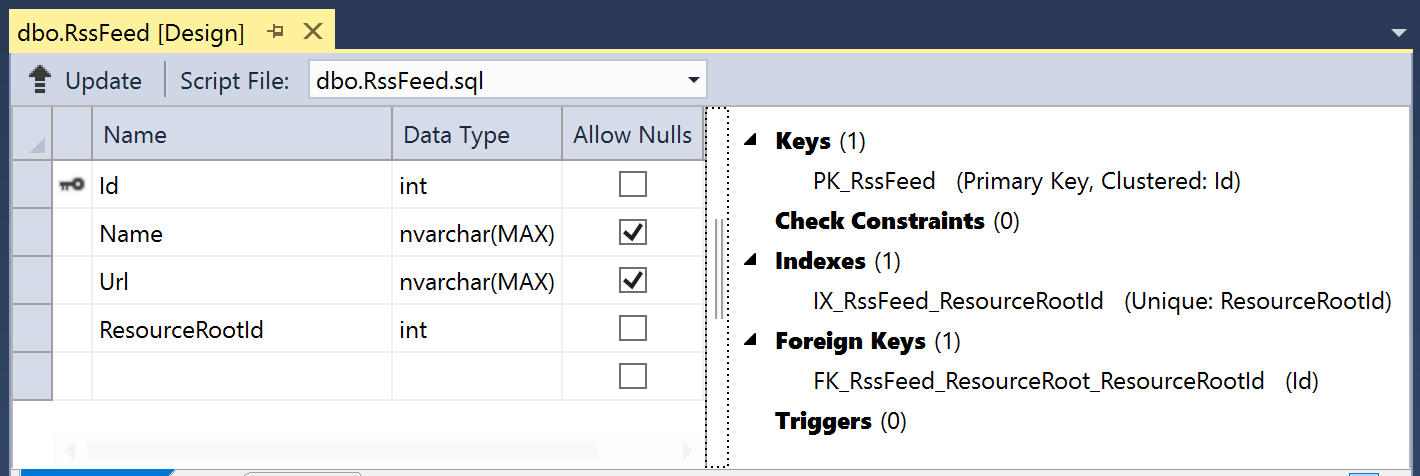
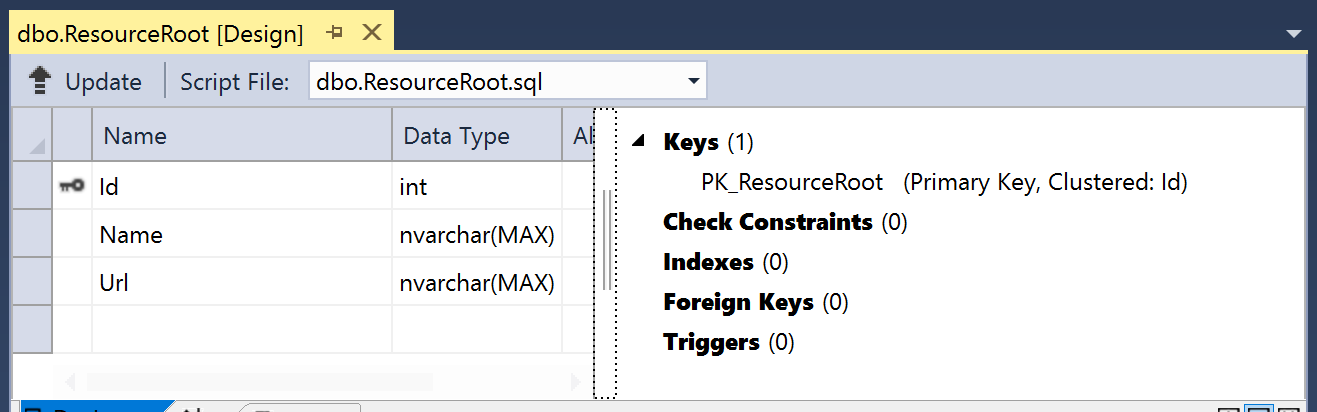
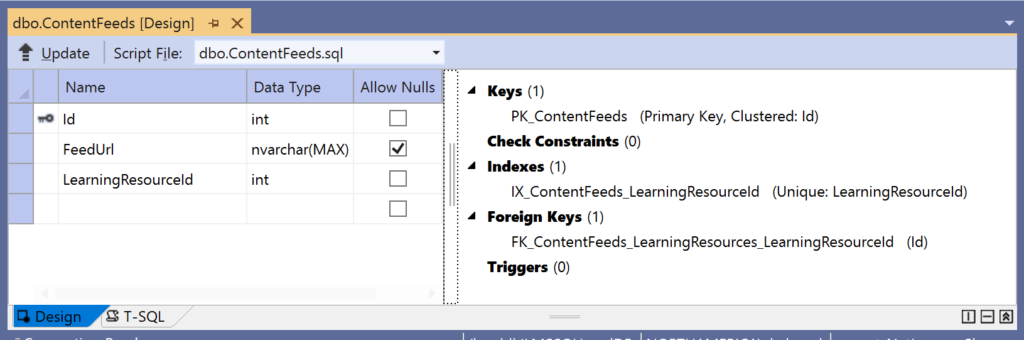
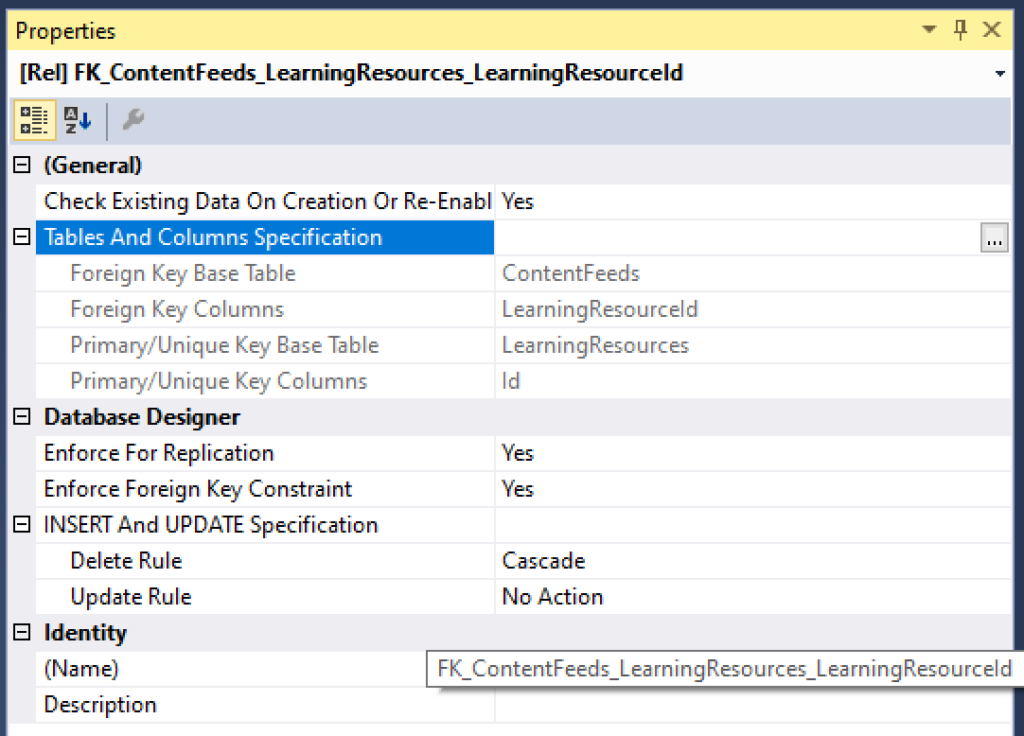
Another way of looking at the One-to-One relationship is to view the constraints of each database entity in the visuals below. Note that both tables have an Id field that is a Primary Key (inferred by EF Core) while the ContentFeeds table also has a Foreign Key for the LearningResourceId field used for the constraint in the relationship.
One to Many
Next, let’s take a look at the One-to-Many relationship for each ResourceList that has zero or more LearningResources. For example:
- Resource List = ASP .NET Core Blogs (parent container)
- Learning Resource = ASP .NET Core A-Z Blog Series (single URL)
In the two classes, we see the following code:
public class ResourceList
{
    public int Id { get; set; }

    public string Name { get; set; }

    public List<LearningResource> LearningResources { get; set; }
}
public class LearningResource
{
    public int Id { get; set; }

    [DisplayName("Resource")]
    public string Name { get; set; }


    [DisplayName("URL")]
    [DataType(DataType.Url)]
    public string Url { get; set; }

    public int ResourceListId { get; set; }
    [DisplayName("In List")]
    public ResourceList ResourceList { get; set; }

    public ContentFeed ContentFeed { get; set; }

    public List<LearningResourceTopicTag> LearningResourceTopicTags { get; set; }
}
Each Resource List has zero or more Learning Resources, so the ResourceList class has a List<T> property for LearningResources. This is even simpler than the previously described 1-to-1 relationship. In the LearningResource class, you don’t necessarily need a property pointing back to the ResourceList. But once again, to help with object-property navigation in your code, it is useful to include an actual ResourceList object in the LearningResource class to point back to ResourceList.
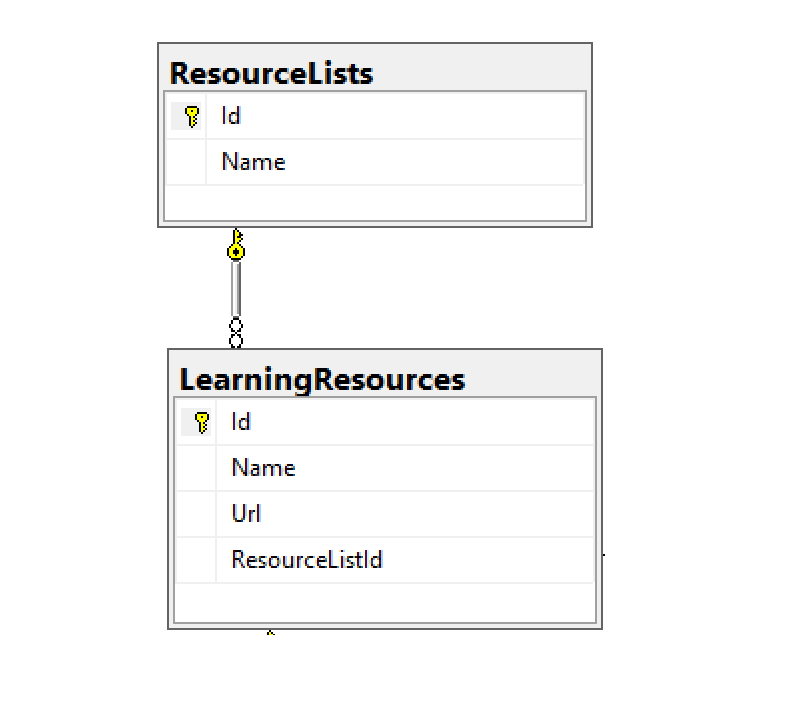
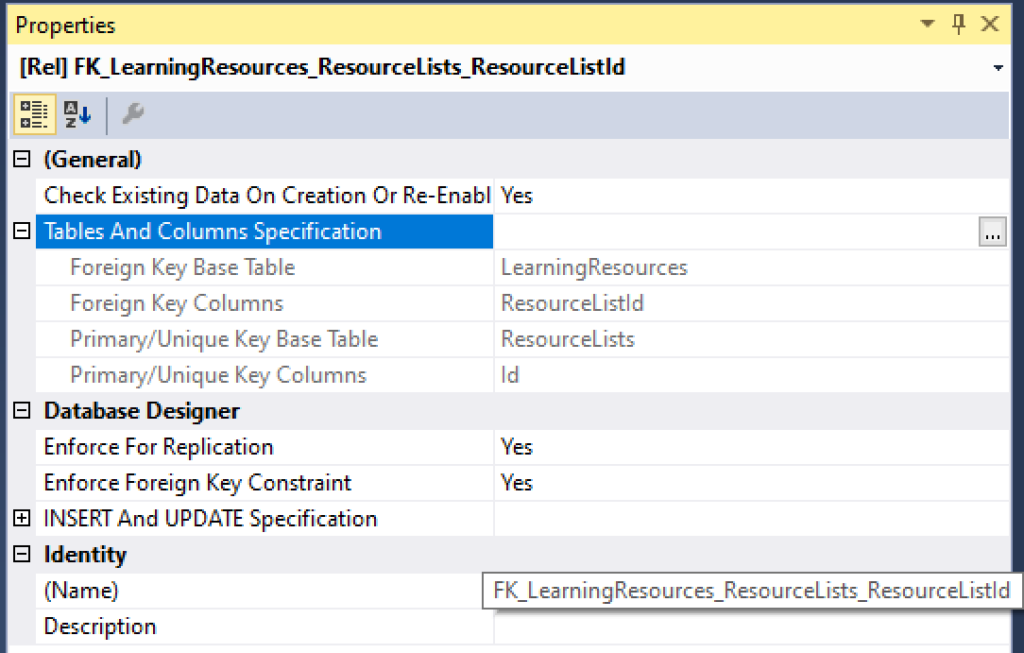
Another way of looking at the One-to-Many relationship is to view the constraints of each database entity in the visuals below. Note that both tables have an Id field that is a Primary Key (once again, inferred by EF Core) while the ResourceLists table also has a Foreign Key for the ResourceListsId field used for the constraint in the relationship.
Many to Many
Finally, let’s also take a look at a Many-to-Many relationship, for each TopicTag and LearningResource, either of which can have many of the other. For example:
- Topic Tag = “ASP .NET Core” (tag as a text description)
- Learning Resource = Specific blog post on site (single URL)
This relationship is a little more complicated than all of the above, as we will need a “join table” to connect the two tables in question. Not only that, we will have to describe the entity in the C# code with connections to both tables we would like to connect with this relationship.
In the two classes we would like to connect, we see the following code:
public class TopicTag
{
    public int Id { get; set; }

    [DisplayName("Tag")]
    public string TagValue { get; set; }

    public List<LearningResourceTopicTag> LearningResourceTopicTags { get; set; }
}
public class LearningResource
{
    public int Id { get; set; }

    [DisplayName("Resource")]
    public string Name { get; set; }


    [DisplayName("URL")]
    [DataType(DataType.Url)]
    public string Url { get; set; }

    public int ResourceListId { get; set; }
    [DisplayName("In List")]
    public ResourceList ResourceList { get; set; }

    public ContentFeed ContentFeed { get; set; }

    public List<LearningResourceTopicTag> LearningResourceTopicTags { get; set; }
}
Next, we have the LearningResourceTopicTag class as a “join entity” to connect the above:
public class LearningResourceTopicTag
{
    public int LearningResourceId { get; set; }
    public LearningResource LearningResource { get; set; }

    public int TopicTagId { get; set; }
    public TopicTag TopicTag { get; set; }

}
This special class has the following properties:
- LearningResourceId: integer value, pointing back to LearningResource.Id
- LearningResource: optional “navigation” property, reference back to connected LearningResource entity
- TopicTagId: integer value, pointing back to TopicTag.Id
- TopicTag: optional “navigation” property, reference back to connected TopicTag entity
To learn more about navigation properties, check out the official docs at:
- Relationships – EF Core: https://docs.microsoft.com/en-us/ef/core/modeling/relationships
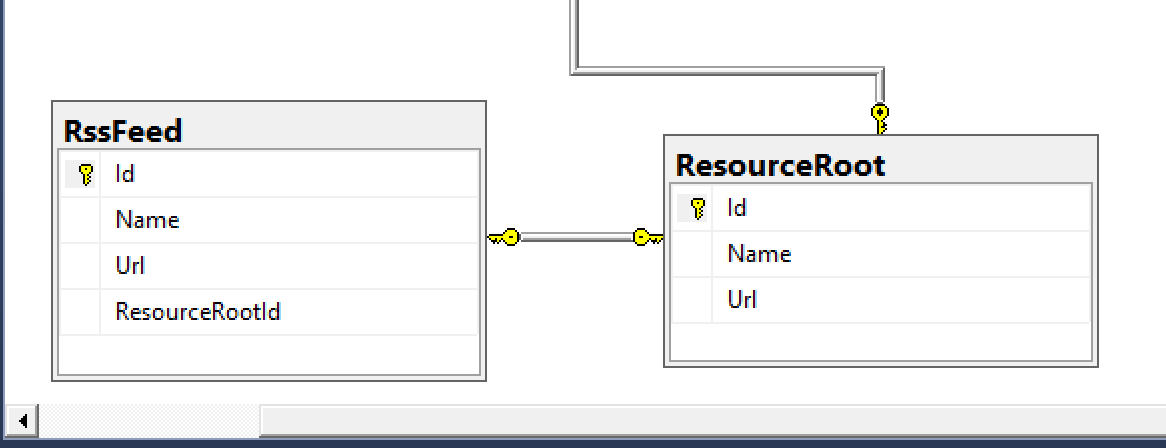
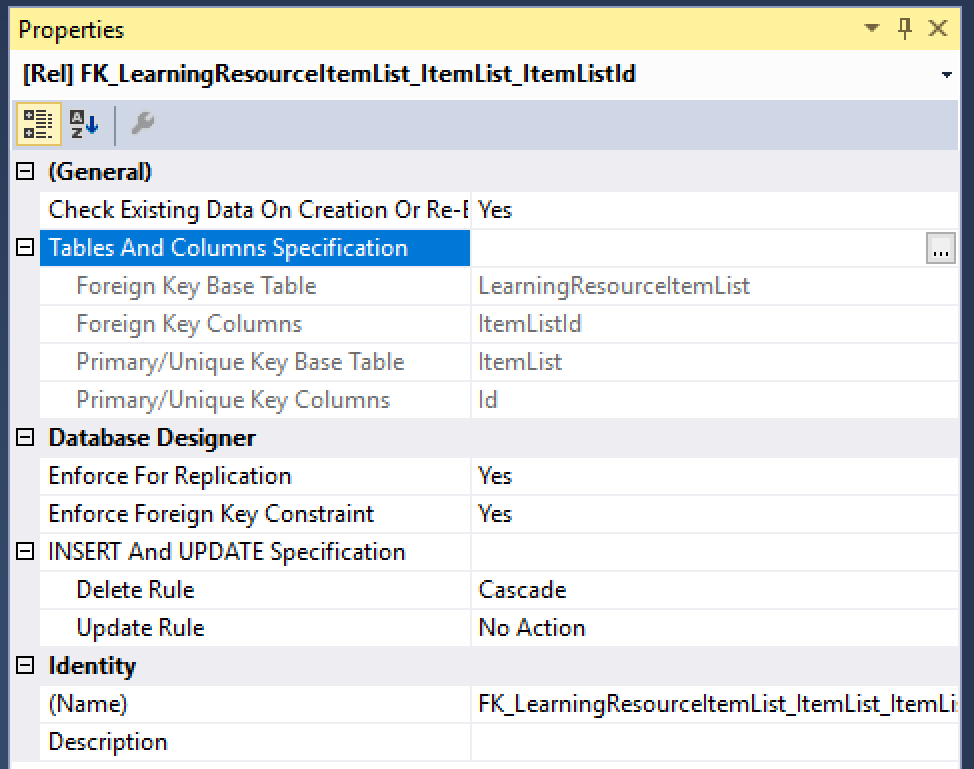
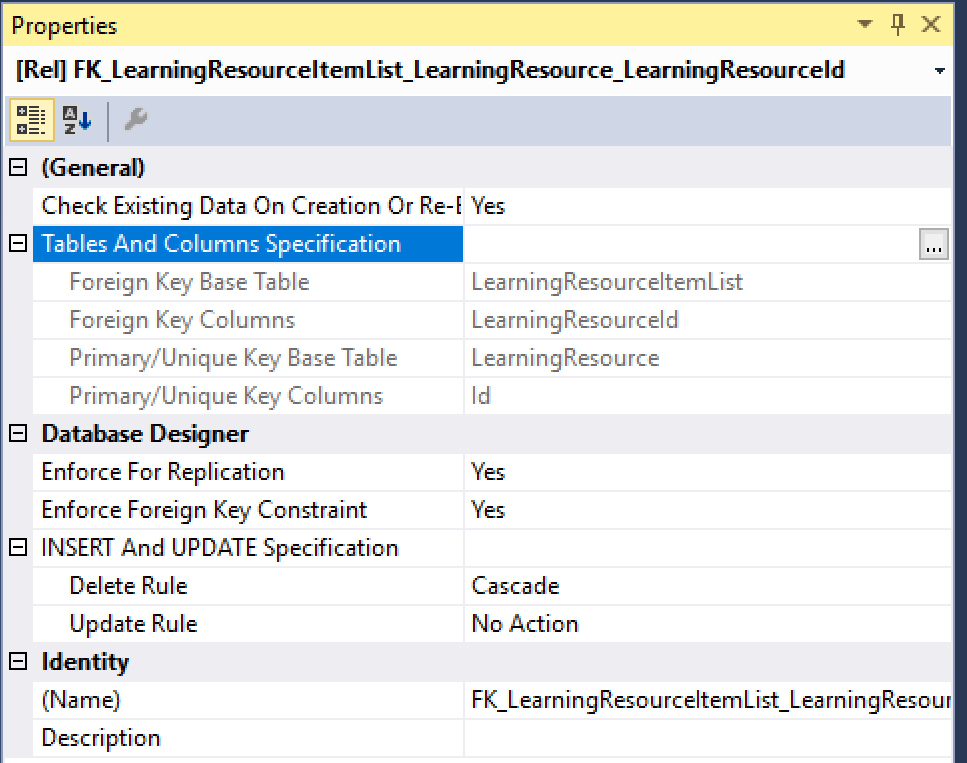
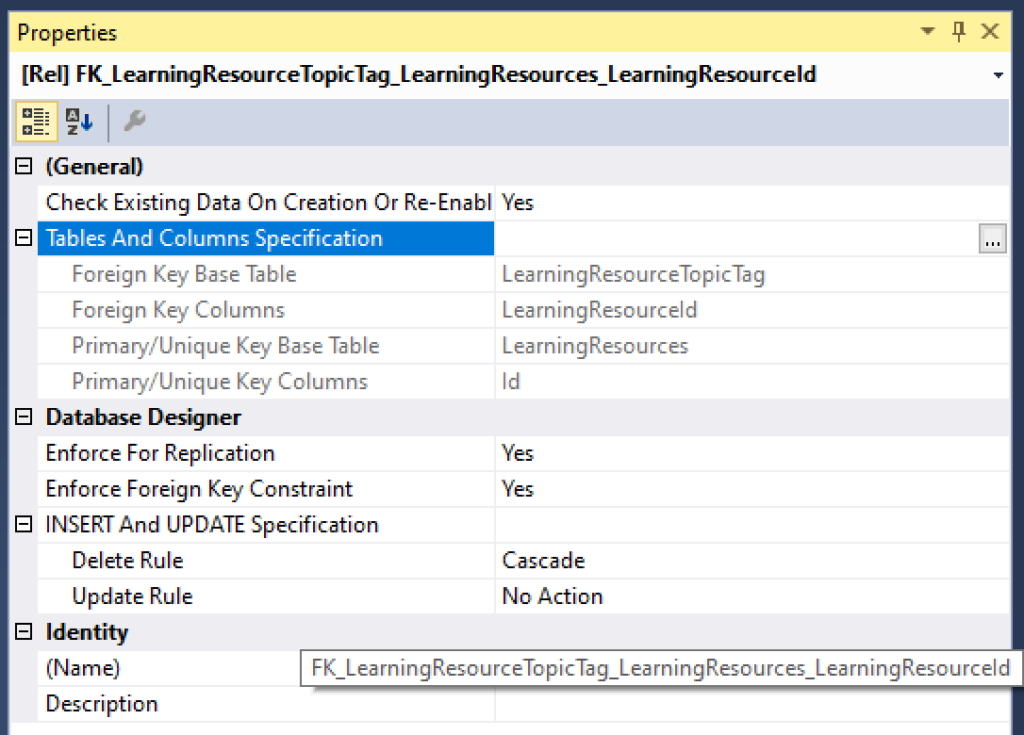
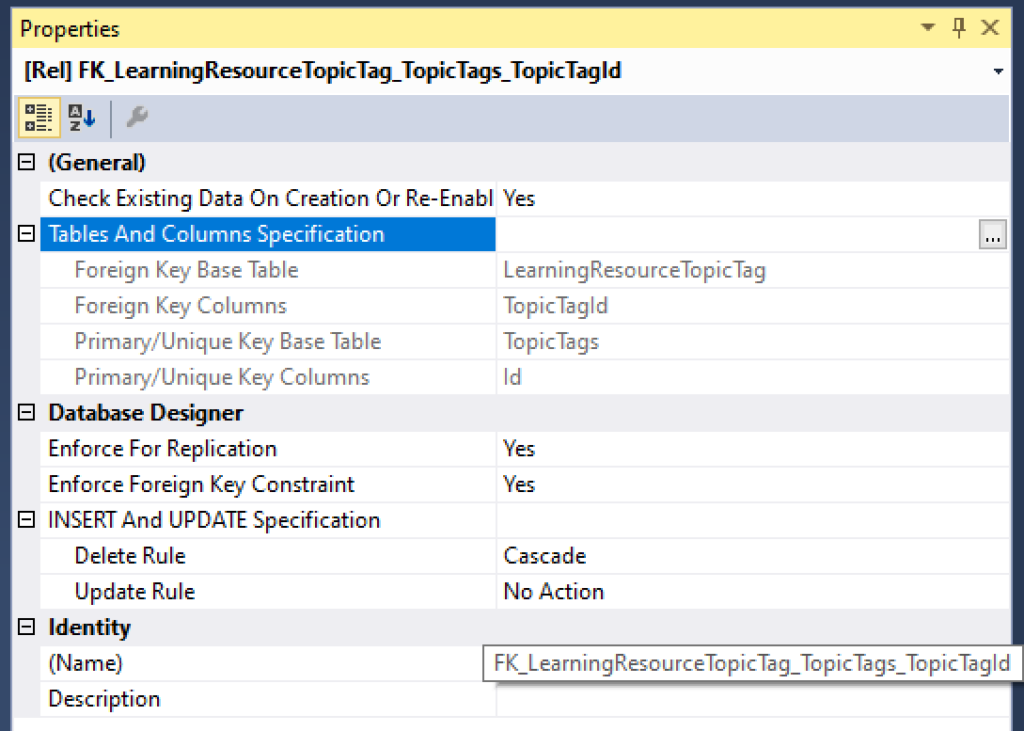
Another way of looking at the Many-to-Many relationship is to view the constraints of each database entity in the visuals below. Note that the two connected tables both have an Id field that is a Primary Key (yes, inferred by EF Core!) while the LearningResourceTopicTag table has a Composite Key for the TopicTagId and LearningResourceId fields used for the constraints in the relationship.
The composite key is described in the LibDbContext class inside the OnModelCreating() method:
public class LibDbContext : IdentityDbContext
{
    ...
    protected override void OnModelCreating(ModelBuilder modelBuilder)
    {
       ...
       modelBuilder.Entity<LearningResourceTopicTag>()
        .HasKey(lrtt => new { lrtt.LearningResourceId, lrtt.TopicTagId });
    }
}
Here, the HasKey() method informs EF Core that the entity LearningResourceTopicTag has a composite key defined by both LearningResourceId and TopicTagId.
References
For more information, check out the list of references below.
- Relationships – EF Core: https://docs.microsoft.com/en-us/ef/core/modeling/relationships
- Keys – EF Core: https://docs.microsoft.com/en-us/ef/core/modeling/keys
- Introduction to Relationships: https://www.learnentityframeworkcore.com/relationships
- Julie Lerman on Pluralsight: https://app.pluralsight.com/profile/author/julie-lerman
- 3.1 Getting Started: https://www.pluralsight.com/courses/getting-started-entity-framework-core
- (For reference) 2.0 Mappings: https://www.pluralsight.com/courses/e-f-core-2-beyond-the-basics-mappings
For detailed tutorials that include both Razor Pages and MVC, check out the official tutorials below:
- New database – EF Core: https://docs.microsoft.com/en-us/ef/core/get-started/aspnetcore/new-db?tabs=visual-studio
- Existing Database – EF Core: https://docs.microsoft.com/en-us/ef/core/get-started/aspnetcore/existing-db
- ASP.NET Core MVC with EF Core: https://docs.microsoft.com/en-us/aspnet/core/data/ef-mvc
- ASP.NET Core Razor Pages with EF Core: https://docs.microsoft.com/en-us/aspnet/core/data/ef-rp

 A – Z of ASP .NET Core!