This is the twelfth of a series of posts on ASP .NET Core in 2019. In this series, we’ll cover 26 topics over a span of 26 weeks from January through June 2019, titled A-Z of ASP .NET Core!
 A – Z of ASP .NET Core!
In this Article:
- L is for Logging in ASP .NET Core
- Log Messages
- Logging Providers
- JSON Configuration
- Log Categories
- Exceptions in Logs
- Structured Logging with Serilog
- References
L is for Logging in ASP .NET Core
You could write a fully functional ASP .NET Core web application without any logging. But in the real world, you should use some form of logging. This blog post provides an overview of how you can use the built-in logging functionality in ASP .NET Core web apps. While we won’t go deep into 3rd-party logging solutions such as Serilog in this article (stay tuned for a future article on that topic), you should definitely consider a robust semantic/structured logging solution for your projects.
To follow along, take a look at the sample project on Github:
![]() Logging Sample: https://github.com/shahedc/AspNetCoreLoggingSample
Logging Sample: https://github.com/shahedc/AspNetCoreLoggingSample
Logging in ASP .NET Core
Log Messages
The simplest log message includes a call to the extension method ILogger.Log() by passing on a LogLevel and a text string. Instead of passing in a LogLevel, you could also call a specific Log method such as LogInformation() for a specific LogLevel. Both examples are shown below:
// Log() method with LogLevel passed in
_logger.Log(LogLevel.Information, "some text");

// Specific LogXX() method, e.g. LogInformation()
_logger.LogInformation("some text");
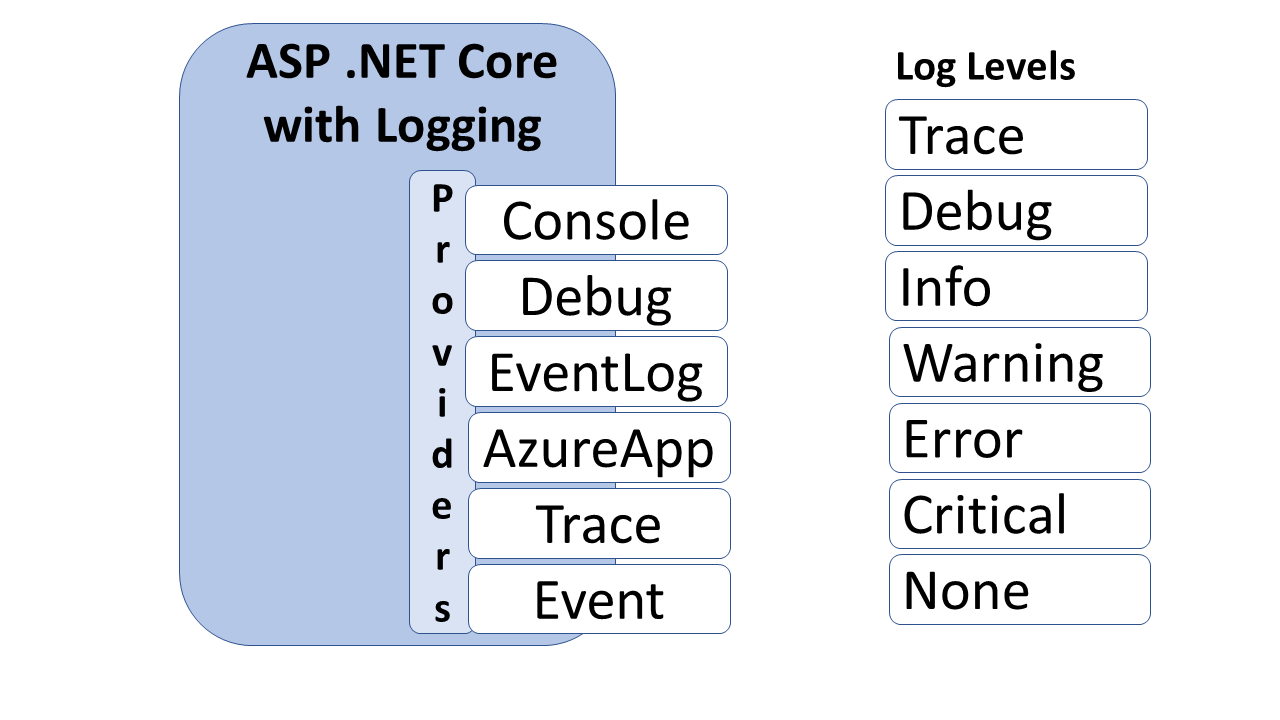
LogLevel values include Trace, Debug, Information, Warning, Error, Critical and None. These are all available from the namespace Microsoft.Extensions.Logging. For a more structured logging experience, you should also pass in meaningful variables/objects following the templated message string, as all the Log methods take in a set of parameters defined as “params object[] args”.
public static void Log (
   this ILogger logger, LogLevel logLevel, string message, params object[] args);
This allows you to pass those values to specific logging providers, along with the message itself. It’s up to each logging provider on how those values are captured/stored, which you can also configure further. You can then query your log store for specific entries by searching for those arguments. In your code, this could look something like this:
_logger.LogInformation("some text for id: {someUsefulId}", someUsefulId);
Even better, you can add your own EventId for each log entry. You can facilitate this by defining your own set of integers, and then passing an int value to represent an EventId. The EventId type is a struct that includes an implicit operator, so it essentially calls its own constructor with whatever int value you provide.
_logger.LogInformation(someEventId, "some text for id: {someUsefulId}", someUsefulId);
In the sample project, we can see the use of a specific integer value for each EventId, as shown below:
// Step X: kick off something here
_logger.LogInformation(LoggingEvents.Step1KickedOff, "Step {stepId} Kicked Off.", stepId);

// Step X: continue processing here
_logger.LogInformation(LoggingEvents.Step1InProcess, "Step {stepId} in process...", stepId);

// Step X: wrap it up
_logger.LogInformation(LoggingEvents.Step1Completed, "Step {stepId} completed!", stepId);
The integer values can be whatever you want them to be. An example is shown below:
public class LoggingEvents
{
   public const int ProcessStarted = 1000;

   public const int Step1KickedOff = 1001;
   public const int Step1InProcess = 1002;
   public const int Step1Completed = 1003;
   ...
}
Logging Providers
The default template-generated web apps include a call to CreateDefaultBuilder() in Program.cs, which automatically includes adds the Console and Debug providers. As of ASP.NET Core 2.2, the EventSource provider is also automatically added by the default builder.
 public static IWebHostBuilder CreateWebHostBuilder(string[] args) =>
    WebHost.CreateDefaultBuilder(args)
      .UseStartup<Startup>();
NOTE: As mentioned in an earlier post in this blog series, the Web Host Builder will be replaced by the Generic Host Builder with the release of .NET Core 3.0.
If you wish to add your own set of logging providers, you can expand the call to CreateDefaultBuilder(), clear the default providers, and then add your own. The built-in providers now include Console, Debug, EventLog, AzureAppServices, TraceSource and EventSource.
public static IWebHostBuilder CreateWebHostBuilder(
   string[] args) => WebHost.CreateDefaultBuilder(args)
      .UseStartup<Startup>()
      .ConfigureLogging(logging =>
      {
         // clear default logging providers
         logging.ClearProviders();

         // add built-in providers manually, as needed
         logging.AddConsole();
         logging.AddDebug();
         logging.AddEventLog();
         logging.AddEventSourceLogger();
         logging.AddTraceSource(sourceSwitchName);
      });
The screenshots below show the log results viewable in Visual Studio’s Debug Window and in the Windows 10 Event Viewer. Note that the EventId’s integer values (that we had defined) are stored in the EventId field as numeric value in the Windows Event Viewer log entries.
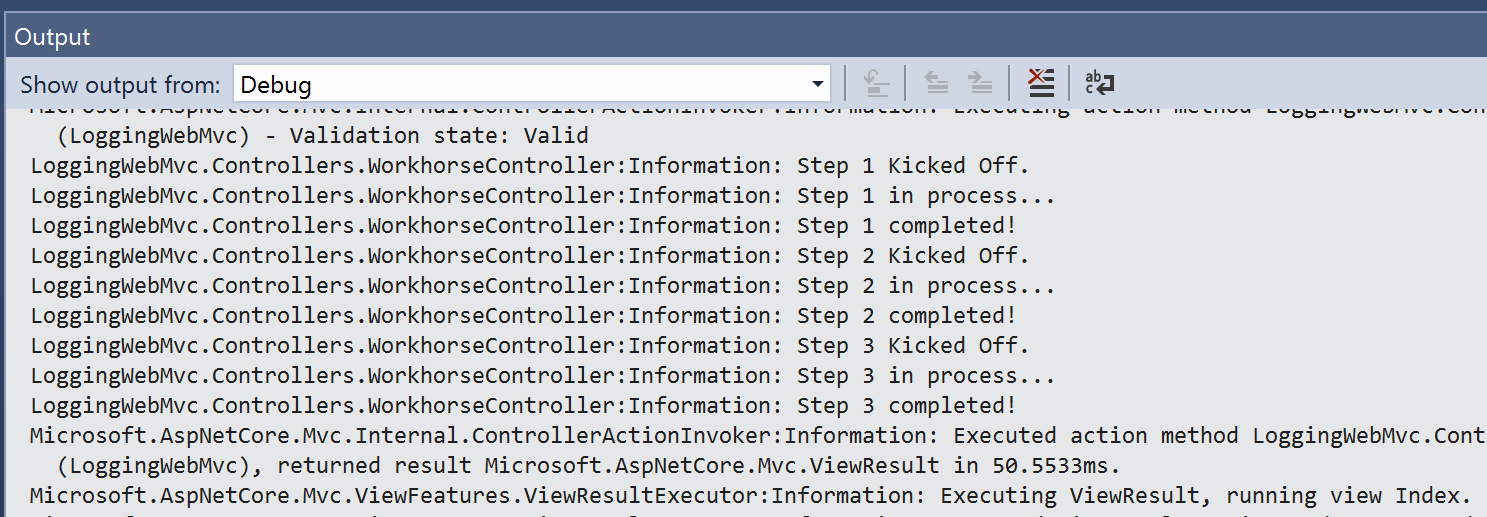
Logging: VS2017 Debug Window

Logging; Windows Event Viewer
For the Event Log provider, you’ll also have to add the following NuGet package and corresponding using statement:
Microsoft.Extensions.Logging.EventLog
For the Trace Source provider, a “source switch” can be used to determine if a trace should be propagated or ignored. For more information on the Trace Source provider and the Source Switch it uses check out the official docs at:
- SourceSwitch Class (System.Diagnostics): https://docs.microsoft.com/en-us/dotnet/api/system.diagnostics.sourceswitch
For more information on adding logging providers and further customization, check out the official docs at:
- Add Providers section of Logging in ASP.NET Core: https://docs.microsoft.com/en-us/aspnet/core/fundamentals/logging#add-providers
But wait a minute, what happened to the Azure App Services provider mentioned earlier? Why isn’t there a call to add it as a logging provider? Well, you should be aware that there is a method for adding Azure Web App Diagnostics as a logging provider:
logging.AddAzureWebAppDiagnostics();
However, you would only have to call this AddAzureWebAppDiagnostics() method if you’re targeting .NET Framework. You shouldn’t call it if targeting .NET Core. With .NET Core 3.0, ASP.NET Core will run only on .NET Core so you don’t have to worry about this at all. When you deploy the web app to Azure App Service, this logging provider is automatically available for your use. (We will cover this in more detail in a future blog post.)
JSON Configuration
One way to configure each Logging Provider is to use your appsettings.json file. Depending on your environment, you could start with appsettings.Development.json or App Secrets in development, and then use environment variables, Azure Key Vault in other environments. You may refer to earlier blog posts from 2018 and 2019 for more information on the following:
- Your Web App Secrets in ASP .NET Core: https://wakeupandcode.com/your-web-app-secrets-in-asp-net-core/
- Key Vault for ASP .NET Core Web Apps: https://wakeupandcode.com/key-vault-for-asp-net-core-web-apps/
In your local JSON config file, your configuration uses the following syntax:
{
   "Logging": {
      "LogLevel": {
         "Default": "Debug",
         "Category1": "Information",
         "Category2": "Warning"
      },
      "SpecificProvider":
      {
         "ProviderProperty": true
      }
   }
}
The configuration for LogLevel sets one or more categories, including the Default category when no category is specified. Additional categories (e.g. System, Microsoft or any custom category) may be set to one of the aforementioned LogLevel values.
The LogLevel block can be followed by one or more provider-specific blocks (e.g. Console) to set its properties, e.g. IncludeScopes. Such an example is shown below.
{
   "Logging": {
      "LogLevel": {
         "Default": "Debug",
         "System": "Information",
         "Microsoft": "Information"
      },
      "Console":
      {
         "IncludeScopes": true
      }
   }
}
To set logging filters in code, you can use the AddFilter () method for specific providers or all providers in your Program.cs file. The following syntax can be used to add filters for your logs.
WebHost.CreateDefaultBuilder(args)
   .UseStartup<Startup>()
   .ConfigureLogging(logging =>
      logging.AddFilter("Category1", LogLevel.Level1)
         .AddFilter<SomeProvider>("Category2", LogLevel.Level2));
In the above sample, the following placeholders can be replaced with:
- CategoryX: System, Microsoft, custom categories
- LogLevel.LevelX: Trace, Debug, Information, Warning, Error, Critical, None
- SomeProvider: Debug, Console, other providers
Log Categories
To set a category when logging an entry, you may set the string value when creating a logger. If you don’t set a value explicitly, the fully-qualified namespace + class name is used. In the WorkhorseController class seen in your example, the log results seen in the Debug window and Event Viewer were seen to be:
LoggingWebMvc.Controllers.WorkhorseController
This is the category name created using the controller class name passed to the constructor in WorkHoseController as shown below:
private readonly ILogger _logger;

public WorkhorseController(ILogger<WorkhorseController> logger)
{
   _logger = logger;
}
If you wanted to set this value yourself, you could change the code to the following:
private readonly ILogger _logger;

public WorkhorseController(ILoggerFactory logger)
{
   _logger = logger.CreateLogger("LoggingWebMvc.Controllers.WorkhorseController");
}
The end results will be the same. However, you may notice that there are a couple of differences here:
- Instead of ILogger<classname> we are now passing in an ILoggerFactory type as the logger.
- Instead of just assigning the injected logger to the private _logger variable, we are now calling the factory method CreateLogger() with the desired string value to set the category name.
Exceptions in Logs
In addition to EventId values and Category Names, you may also capture Exception information in your application logs. The various Log extensions provide an easy way to pass an exception by passing the Exception object itself.
try
{
   // try something here
   throw new Exception();
} catch (Exception someException)
{
   _logger.LogError(eventId, someException, "Trying step {stepId}", stepId);
   // continue handling exception
}
Checking the Event Viewer, we may see a message as shown below. The LogLevel is shown as “Error” because we used the LogError() extension method in the above code, which is forcing an Exception to be thrown. The details of the Exception is displayed in the log as well.
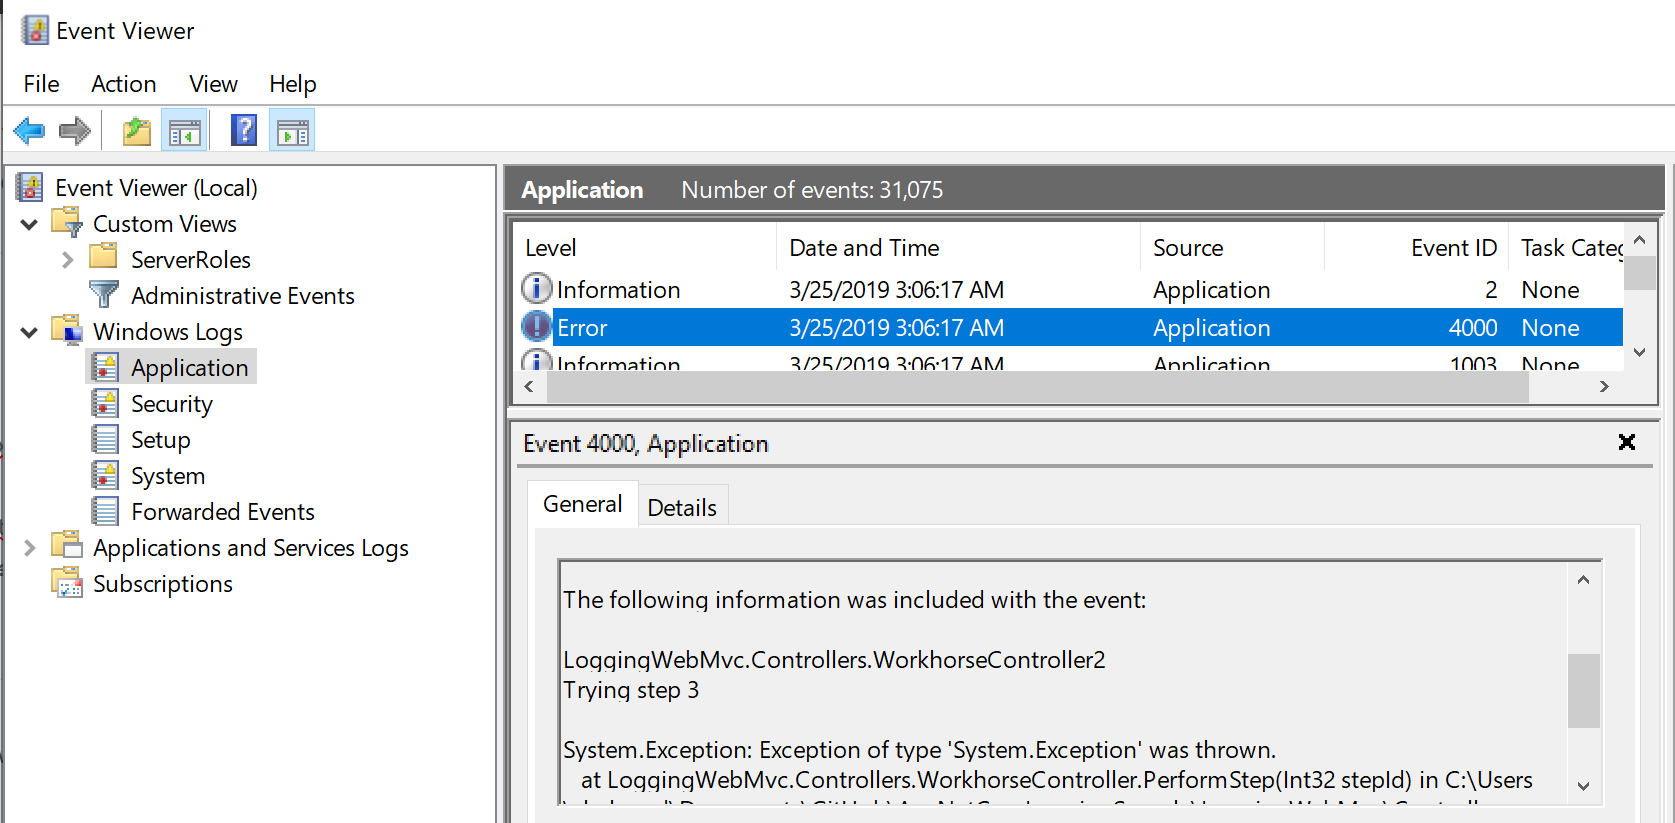
Logging; Exception in Event Viewer
Structured Logging with Serilog
At the very beginning, I mentioned the possibilities of structured logging with 3rd-party providers. There are many solutions that work with ASP .NET Core, including (but not limited to) elmah, NLog and Serilog. Here, we will take a brief look at Serilog.
Similar to the built-in logging provider described throughout this article, you should include variables to assign template properties in all log messages, e.g.
Log.Information("This is a message for {someVariable}", someVariable);
To make use of Serilog, you’ll have to perform the following steps:
- grab the appropriate NuGet packages: Serilog, Hosting, various Sinks, e,g, Console
- use the Serilog namespace, e.g. using Serilog
- create a new LoggerConfiguration() in your Main() method
- call UseSerilog() when creating your Host Builder
- write log entries using methods from the Log static class.
For more information on Serilog, check out the following resources:
- Getting Started: https://github.com/serilog/serilog/wiki/Getting-Started
- Writing Log Events: https://github.com/serilog/serilog/wiki/Writing-Log-Events
- Serilog Tutorial for .NET Logging: https://stackify.com/serilog-tutorial-net-logging/
- Adding Serilog to the ASP.NET Core Generic Host: https://andrewlock.net/adding-serilog-to-the-asp-net-core-generic-host/
- Asp.Net Core 2 Logging With Serilog: http://hamidmosalla.com/2018/02/15/asp-net-core-2-logging-with-serilog-and-microsoft-sql-server-sink/
References
- Logging in ASP.NET Core: https://docs.microsoft.com/en-us/aspnet/core/fundamentals/logging/
- ASP.NET Core Logging with Azure App Service and Serilog: https://devblogs.microsoft.com/aspnet/asp-net-core-logging/
- Creating a rolling file logging provider for ASP.NET Core 2.0: https://andrewlock.net/creating-a-rolling-file-logging-provider-for-asp-net-core-2-0/amp/
- Explore .NET trace logs in Azure Application Insights with ILogger: https://docs.microsoft.com/en-us/azure/azure-monitor/app/ilogger
- Azure Application Insights for ASP.NET Core: https://docs.microsoft.com/en-us/azure/azure-monitor/app/asp-net-core
- Don’t let ASP.NET Core Console Logging Slow your App down: https://weblog.west-wind.com/posts/2018/Dec/31/Dont-let-ASPNET-Core-Default-Console-Logging-Slow-your-App-down