In This Article:
- Introduction
- Why Share Code Across Projects/Assemblies?
- Creating a Shared Library
- Using the Shared Library
- Running the Samples
- Conclusion
- References
Introduction
It’s been a while since I’ve published a standalone blog post on WakeUpAndCode.com. If you’ve been following the posts on this website, you may be familiar with my 2018 (surprise!) Happy New Year series and 2019 A-Z series on various ASP .NET Core topics. This led to a free ebook, which itself was generated by a .NET Core Worker Service.
Going forward, you can expect a 2020 A-Z series that will use ASP .NET Core 3.1 (LTS). The upcoming series will contain new and improved versions of the topics explored in the 2019 series, including Build 2020 coverage.
For now, this one-off blog post will discuss code-sharing for ASP .NET Core developers. For demonstrative purposes, the sample code accompanying this article includes code that is derived from the code snippets provided on the following blog:
- CRUD using Blazor and EF Core: https://www.blogofpi.com/crud-using-blazor-and-entity-framework-core/
Kudos to the author (aka PI Blogger) for this great intro article!
- Shared Library Sample: https://github.com/shahedc/WebAppsWithSharedLib
Why Share Code Across Projects/Assemblies?
There are multiple reasons why you may want to share code between multiple projects/assemblies.
- Code reuse: This should be pretty self-explanatory. You shouldn’t have to rewrite the same code more than once. Placing reusable code in a shared library enables code reuse.
- Multiple front-ends: In the sample code, there are multiple web apps, all using the same data layer. Splitting into separate assemblies allows you to develop multiple web apps in their own projects/assemblies.
- Separate deployments: You can deploy each assembly independent of one another.
Even if you’re just working on a single web app (just Blazor, or a web app that combines Blazor+MVC+Razor Pages), you can still benefit from this type of “physical” code separation. Note that this approach is not required for “separation of concerns”. The nature of ASP .NET Core web applications make them possible to implement separation of concerns, even if everything is in a single project (such as the one generated by the official VS2019 project templates).
NOTE: This article will focus on the creation of a shared library project to hold a shared database context, EF Core migrations, models and services. In your application, you can go further by separating your domain objects and related items into their own project/assembly.
For an official guide on ASP .NET Core architecture, download this free ebook and its sample code. The eShopOnWeb sample includes the “business layer” with domain entities under ApplicationCore, the “data layer” with data context + migrations under Infrastucture, and the “presentation layer” with its MVC components under Web.
- About the guide: https://docs.microsoft.com/en-us/dotnet/architecture/modern-web-apps-azure/
- Download page: https://dotnet.microsoft.com/learn/aspnet/architecture
- Sample source Code: https://github.com/dotnet-architecture/eShopOnWeb/tree/master/src
Also, here’s a recent quote from author Steve Smith:
- Tweet: https://twitter.com/ardalis/status/1207301716347150336
- Quote: “Separating things by project ensures decisions about dependency direction are enforced by the compiler, helping avoid careless mistakes. Separating into projects isn’t solely about individually deploying or reusing assemblies.”
Creating a shared library
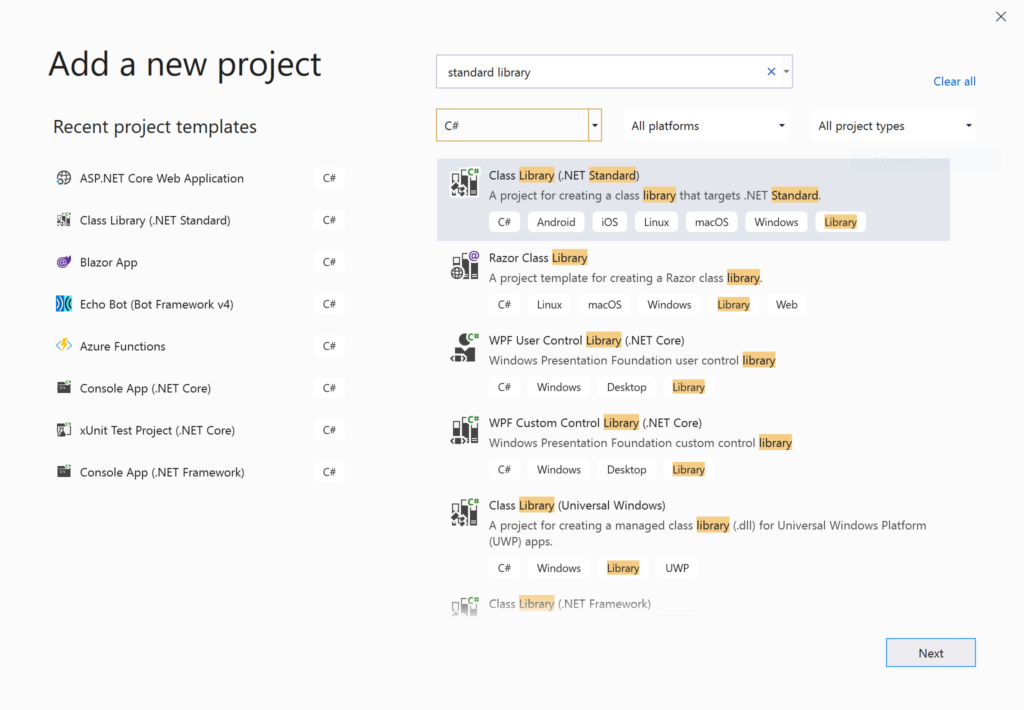
The quickest way to create a shared library project is to use the built-in project templates. Create a project of type .NET Standard 2.1 using either Visual Studio 2019 or CLI commands for use with VS Code.
To add the new project in Visual Studio 2019:
- Add | New Project
- Select the template for Class Library (.NET Standard)
- Click Next
- Name your project and select a location
- Click Create
Verify that the shared library is a Class Library project targeting .NET Standard 2.1. Check out the official docs to learn more about how to pick a version of .NET Standard for your class libraries.
- .NET Standard: https://docs.microsoft.com/en-us/dotnet/standard/net-standard#net-implementation-support
To verify the target version in Visual Studio 2019:
- Right-click your shared library project in Solution Explorer
- Select Properties in the popup context menu
- In the Application section, select a “Target framework” value of “.NET Standard 2.1”.
- Edit your .csproj project file manually to verify that the correct target framework is being used.
<PropertyGroup>
   <TargetFramework>netstandard2.1</TargetFramework>
</PropertyGroup>
If using the .NET CLI, type the following command:
>dotnet new classlib -f netstandard2.1
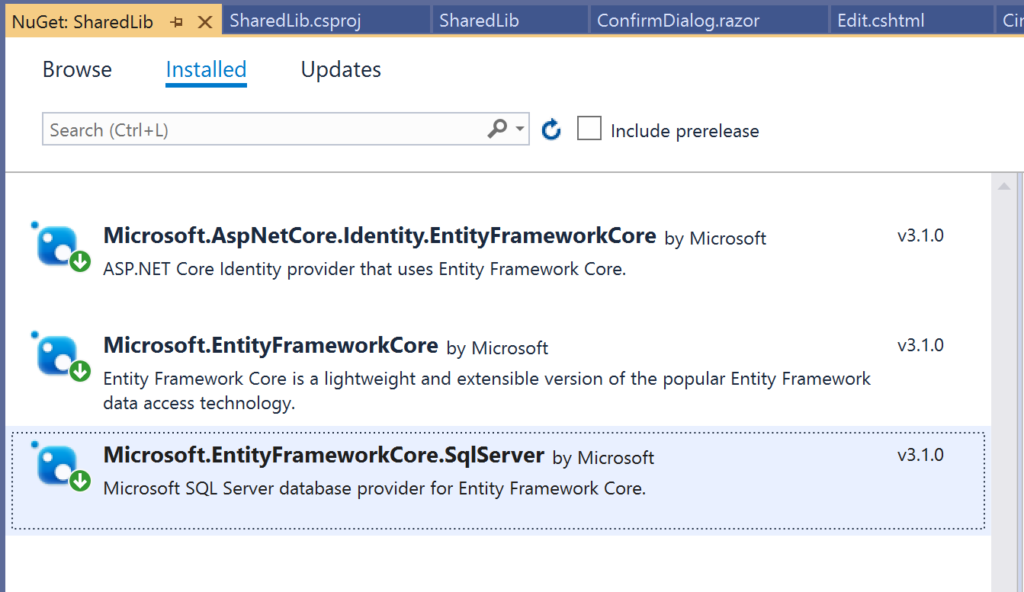
As of .NET Core 3.0, Entity Framework Core is now available via NuGet. As a result, you must add the following packages manually.
- Microsoft.EntityFrameworkCore
- Microsoft.AspNetCore.Identity.EntityFrameworkCore
- Microsoft.EntityFrameworkCore.SqlServer
To add EF Core in Visual Studio 2019:
- In Solution Explorer, right-click your shared library project
- Select “Manage NuGet Packages…”
- Search for the aforementioned packages and install v3.1 for each
To create a new database context in the shared library project:
- Create a “Data” folder at the root level of the project folder
- In the Data folder, create a new public class named “LibDbContext” that inherits from “IdentityDbContext”
- Create a “Models” folder at the root level of the project folder
- In the Models folder, add one or more model classes, to be used by your web application project(s)
- In the context class, add one or more DbSet<T> properties
Your shared context class LibDbContext should now look like the following snippet:
using Microsoft.AspNetCore.Identity.EntityFrameworkCore;
using Microsoft.EntityFrameworkCore;
using SharedLib.Models;

namespace SharedLib.Data
{
    public class LibDbContext : IdentityDbContext
    {
        public LibDbContext(DbContextOptions<LibDbContext> options)
            : base(options)
        {
        }

        protected LibDbContext()
        {

        }

        public DbSet<CinematicItem> CinematicItems { get; set; }

    }
}
In this case, the one DbSet property represents a collection of CinematicItems defined in its own CinematicItem model class file:
using System;

namespace SharedLib.Models
{
   public class CinematicItem
   {
      public int Id { get; set; }

      public string Name { get; set; }

      public string Description { get; set; }

      public int Phase { get; set; }

      public DateTime ReleaseDate { get; set; }
   }
}
Note that the new database context in the shared library is a replacement for any database context you may already have in your web app projects. In fact, you’ll have to edit your Startup.cs file in each web app project to ensure that it is using the correct database context.
Using the Shared Library
If you are starting a brand new web project, you can start with an auto-generated template. You could create an empty web project and add everything manually as needed. But it may be easier to start with a standard web template and remove/edit items as necessary.
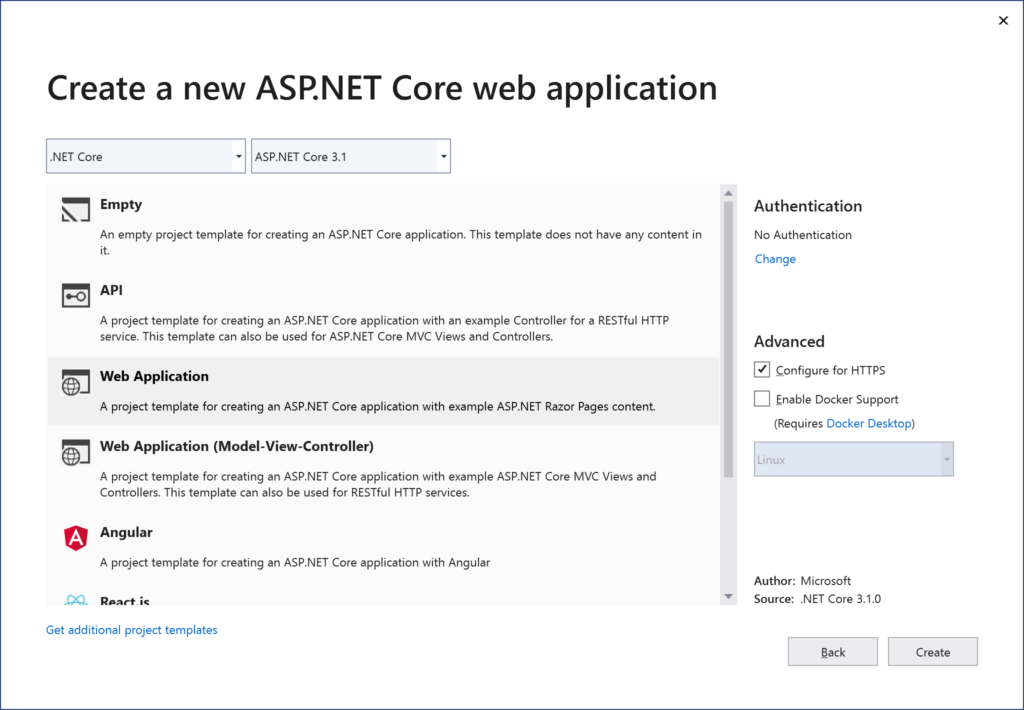
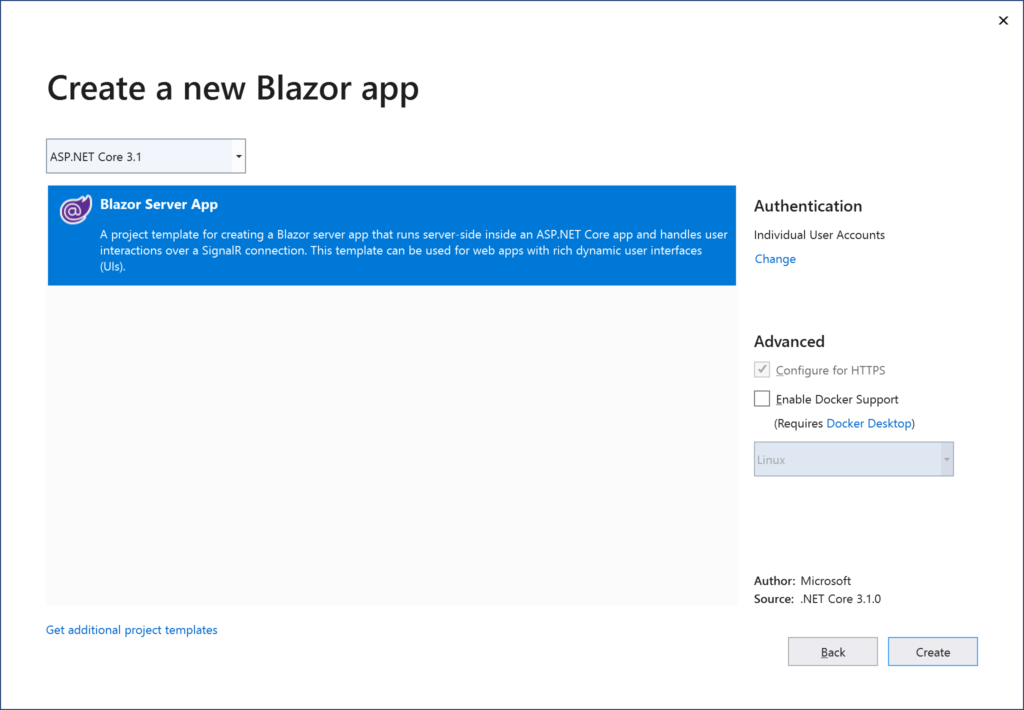
To create a new web project in Visual Studio 2019:
- Add | New Project
- Select the template
- For Blazor, select Blazor App
- For MVC or Razor Pages, select ASP .NET Core Web Application
- Click Next
- Name your project and select a location
- Click Create
- Select .NET Core, ASP .NET Core 3.1, and a project template
- For Blazor, select Blazor Server App
- For Razor Pages, select Web Application
- For MVC, select Web Application (Model-View-Controller)
- For Authentication, change “No Authentication” to “Individual User Accounts”
- Under Advanced, leave the checkbox checked for “Configure for HTTPS”
Following the above steps will add a new database context and an initial migration. Since we will be using our shared library instead, let’s do some cleanup in each web project you created.
In each web project, add the Shared Library as a dependency:
- In Solution Explorer, right-click Dependencies for a web project
- Click Add Reference under Dependencies
- Select the shared library project
- Click Ok
- Repeat for each web project
In each web project, update the Startup.cs class:
- Replace any mentions of ApplicationDbContext with LibDbContext
- Expand the UseSqlServer method call to refer to the connection string and db context in the shared assembly
services.AddDbContext<LibDbContext>(options =>
{
   options
      .UseSqlServer(Configuration.GetConnectionString("DefaultConnection"),
         assembly =>
         assembly.MigrationsAssembly
            (typeof(LibDbContext).Assembly.FullName));
});

services.AddDefaultIdentity<IdentityUser>(
   options =>
      options.SignIn.RequireConfirmedAccount = true)
         .AddEntityFrameworkStores<LibDbContext>();
Perform some additional cleanup in each web project:
- Delete the template-generated ApplicationDbContext class
- Delete any initial migrations in the Migrations folder
- In the Startup.cs class, remove any using statements that mention the .Data namespace in your web project
- Add a using statement referring to the .Data namespace in your shared library project, e.g. SharedLib.Data
- Make a similar change in your partial view “_ViewImports.chstml” if applicable
- If you have more than one web project, use the ConnectionString value from the first appsettings.json file and reuse it in the other web app projects.
- BUT WAIT: beyond any initial sample, always use app secrets during development to avoid connection strings in appsettings.json files. For Azure-deployed web projects, use Key Vault or environment variables in your App Service.
Running the Samples
In order to run the web app samples, clone the following repository:
- Shared Library Sample: https://github.com/shahedc/WebAppsWithSharedLib
Here, you will find 4 projects:
- SharedLib: shared library project
- WebAppBlazor: Blazor server-side web project
- WebAppMvc: MVC web project
- WebAppPages: Razor Pages web project
To create a local copy of the database:
- Open the solution file in Visual Studio 2019
- In the Package Manager Console panel, change the Default Project to “SharedLib” to ensure that EF Core commands are run against the correct project
- In the Package Manager console, run the Update-Database command
- Verify that there are no errors upon database creation
To run the samples from Visual Studio 2019:
- Run each web project one after another
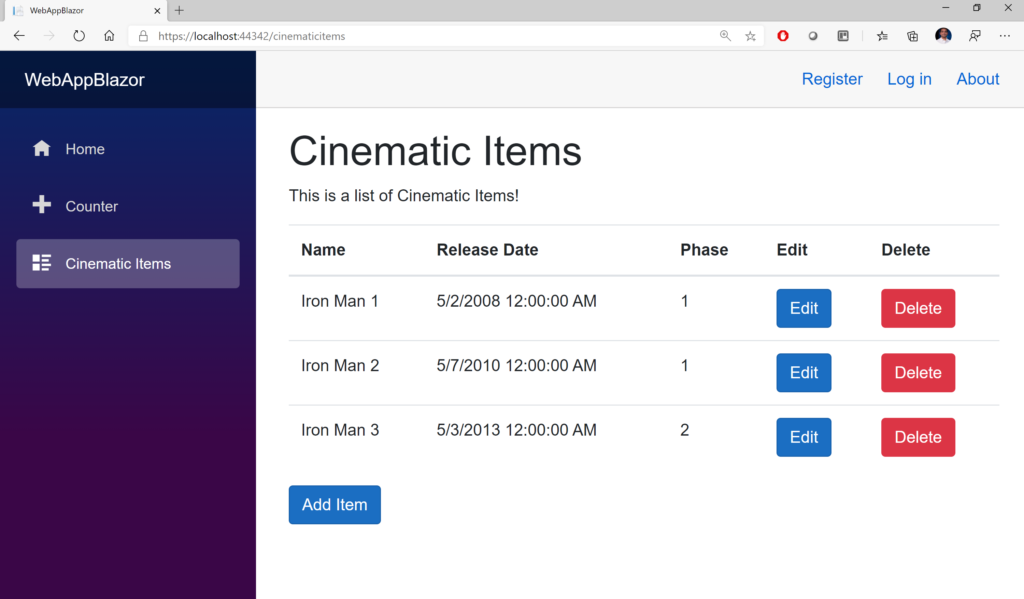
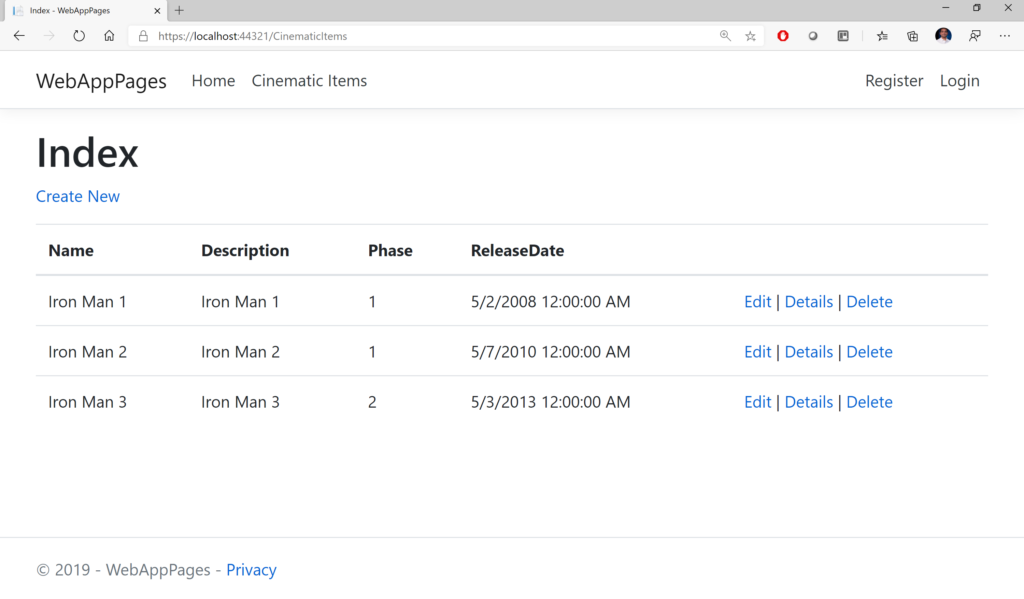
- Navigate to the Cinematic Items link in the navigation menu
- Add/Edit/Delete items in any of the web apps
- Verify that your data changes are reflected no matter which web app you use

NOTE: During Blazor development, editing a Razor component may not always trigger the proper Intellisense help in the containing Page. You may have to clean+rebuild solution or even reopen the solution in VS2019.
Conclusion
In this article, we covered the following:
- Creation of a shared library project for use in one or more ASP .NET Core web apps
- Some reasons for such an approach
- Steps required to use the shared library
- Sample projects to see the shared library in action
References
- .NET Standard: https://docs.microsoft.com/en-us/dotnet/standard/net-standard#net-implementation-support
- ASP .NET Core Docs: https://docs.microsoft.com/en-us/aspnet/core/getting-started/
- Blazor Docs: https://docs.microsoft.com/en-us/aspnet/core/blazor/get-started
- CRUD using Blazor and EF Core: https://www.blogofpi.com/crud-using-blazor-and-entity-framework-core/
- Nate B’s Little ASP .NET Core Book: https://recaffeinate.co/book/
- Michael Washington’s Blazor Book: http://blazorhelpwebsite.com/Market/Books/AnIntroductiontoBuildingApplicationswithBlazor.aspx
- Using EF Core in a Separate Class Library: https://dotnetthoughts.net/using-ef-core-in-a-separate-class-library/
- Should you split your ASP.NET MVC project into multiple projects? – https://programmingwithmosh.com/net/should-you-split-your-asp-net-mvc-project-into-multiple-projects/
- Web App Secrets: https://wakeupandcode.com/your-web-app-secrets-in-asp-net-core/
- Key Vault: https://wakeupandcode.com/key-vault-for-asp-net-core-web-apps/
- App Service: https://wakeupandcode.com/deploying-asp-net-core-to-azure-app-service/
Pingback: The Morning Brew - Chris Alcock » The Morning Brew #2897
Pingback: Dew Drop – December 17, 2019 (#3094) | Morning Dew
This was a really helpful article, thank you so much – I’m now hooked on your series…
Thanks for reading, glad you enjoyed it!
Pingback: Hello ASP .NET Core v3.1! | Wake Up And Code!
Hi Shahed – I’m having a few issues both when I try to create and share my own DbContext – and also with your downloaded code – and I can’t work out where it’s going wrong.
For example – in the CinematicItemsController.cs file (in the MVC project), the LibDbContext cannot be resolved – it’s as though they do not exist. The references are there – the Using statements are there – the project even builds and runs – but any reference to LibDbContext is highlighted in red and there is no intellisense within visual studio.
It’s the same in the Blazor app – builds/runs but cannot resolve anything relating to the LibDbContext.
Thanks for any help you can offer.
Can you clarify if you’re able to run my Github sample as is? Also when you created your own, can you share your version of the project so that I can take a look?
Thank you so much for taking the time to reply Shahed . Your sample runs perfectly, i was having problems with Visual Studio not being able to resolve LibDbContext and therefore losing all intellisense HOWEVER – looking at it again today (with a fresh head 🙂 I can see that it’s actually the Resharper plugin that cannot resolve LibDbContext. I have just disabled Resharper and the errors go away. Very odd – I will have to try and work out why Resharper does not like the referenced project.
Again, thank you so much and apologies for not realising this sooner and wasting your time.
in case it helps anyone else using Resharper – update to latest version (ReSharper 3.1) which extends core 3.1 support …
Pingback: Authentication & Authorization in ASP .NET Core 3.1 | Wake Up And Code!