This is the second of a new series of posts on ASP .NET Core for 2019. In this series, we’ll cover 26 topics over a span of 26 weeks from January through June 2019, titled A-Z of ASP .NET Core!
 A – Z of ASP .NET Core!
In this Article:
- B is for Blazor
- Entry Point and Configuration
- Client-Side Application
- LifeCycle Methods
- Updating the UI
- Next Steps
- References
B is for Blazor
In a previous post, I covered various types of Pages that you will see when developing ASP .NET Core web applications. In this article, we will take a look at a Blazor sample and see how it works. Blazor (Browser + Razor) is an experimental .NET web framework which allows you to write full-stack C# .NET web applications that run in a web browser, using WebAssembly.
NOTE: Server-slide Blazor (aka Razor Components) allows you to run your Blazor app on the server, while using SignalR for the connection to the client, but we will focus on client-only Blazor in this article.
To get started by yourself, follow the official instructions to set up your development environment and then build your first app. In the meantime, you may download the sample code from my GitHub repo.
![]() Blazor projects on GitHub: https://github.com/shahedc/BlazorDemos
Blazor projects on GitHub: https://github.com/shahedc/BlazorDemos
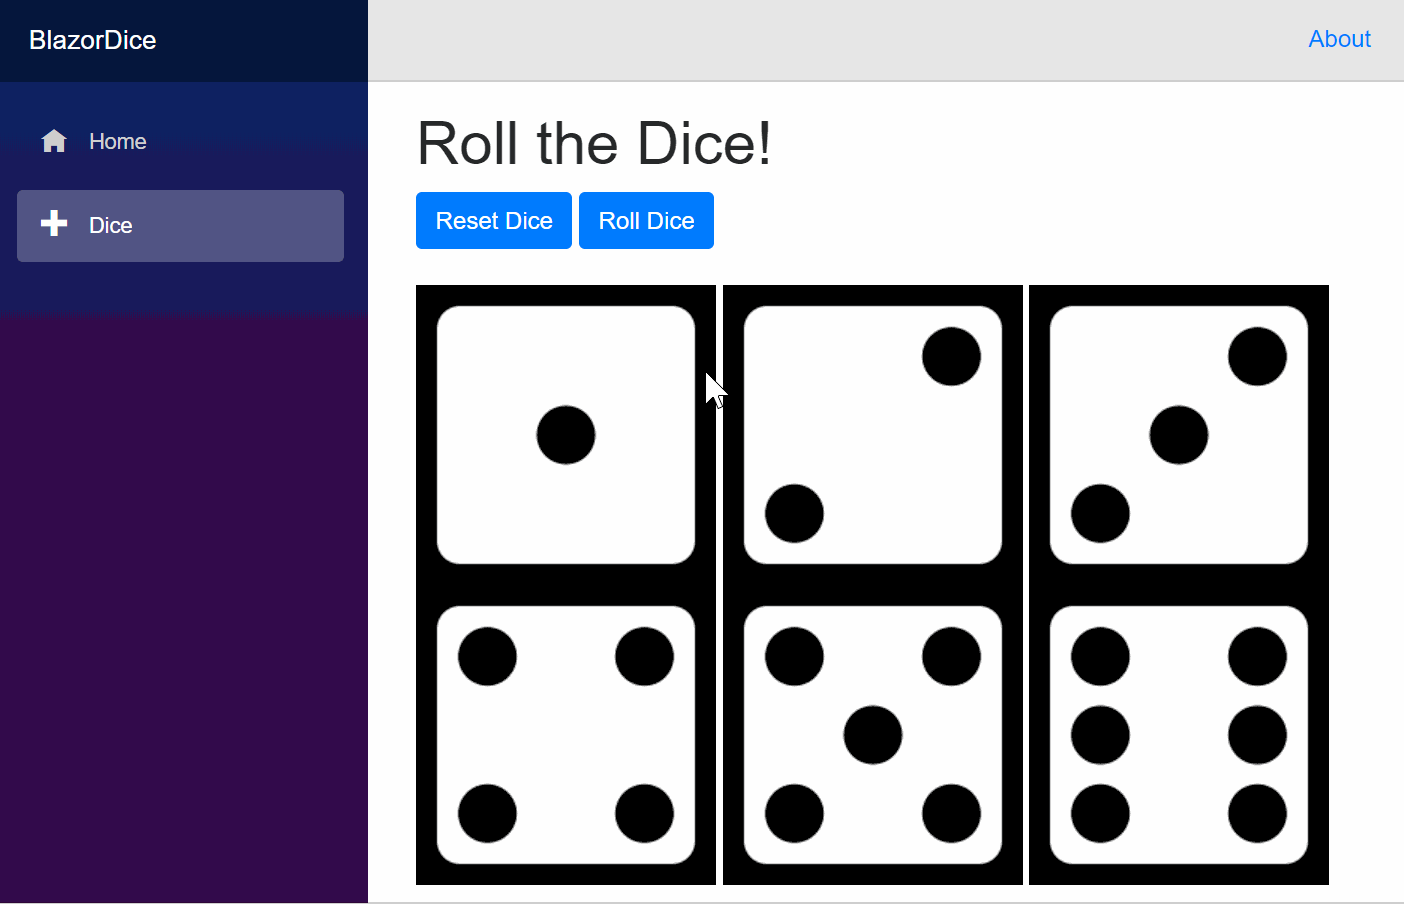
Specifically, take a look at the Blazor Dice project, which you can use to generate random numbers using dice graphics. The GIF below illustrates the web app in action!
Entry Point and Configuration
Let’s start with Program.cs, the entry point of your application. Just like any ASP .NET Core web application, there is a Main method that sets up the entry point. A quick call to CreateHostBuilder() in the same file ensures that two things will happen: The Blazor Web Assembly Host will call its own CreateDefaultBuilder() method (similar to how it works in a typical ASP .NET Core web application) and it will also call UseBlazorStartup() to identify the Startup class where the application is configured.
public class Program
{
   public static void Main(string[] args)
   {
      CreateHostBuilder(args).Build().Run();
   }

   public static IWebAssemblyHostBuilder CreateHostBuilder(string[] args) =>
      BlazorWebAssemblyHost.CreateDefaultBuilder()
      .UseBlazorStartup<Startup>();
}
Note that the Startup class doesn’t have to be called Startup, but you do have to tell your application what it’s called. In the Startup.cs file, you will see the familiar ConfigureServices() and Configure() methods, but you won’t need any of the regular MVC-related lines of code that set up the HTTP pipeline for an MVC (or Razor Pages) application. Instead, you just need a minimum of 1 line of code that adds the client side “App”. (This is different for server-hosted apps.)
public class Startup
{
   public void ConfigureServices(IServiceCollection services)
   {
   }

   public void Configure(IBlazorApplicationBuilder app)
   {
      app.AddComponent<App>("app");
   }
}
Note that the Configure() method takes in an app object of type IBlazorApplicationBuilder, unlike the usual IApplicationBuilder we see in regular ASP .NET Core web apps. When it adds the App component, it specifies the client-side app with the name “app” in double quotes.
UPDATE: In the above statement, I’m referring to “app” as “the client-side app”. In the comments section, I explained to a reader (Jeff) how this refers to the HTML element in index.html, one of the 3 locations where you would have to change the name if you want to rename it. Another reader (Issac) pointed out that “app” should be described as “a DOM Element Selector Identifier for the element” in that HTML file, which Angular developers should also recognize. Issac is correct, as it refers to the <app> element in the index.html file.
NAME CHANGES: Issac also pointed out that “IBlazorApplicationBuilder has already become IComponentsApplicationBuilder”. This refers to recent name changes on Jan 18, 2019. I will periodically make changes to the articles and code samples in this series. In the meantime, please refer to the following GitHub commit:
- [Commit] Rename IBlazorApplicationBuilder->IComponentsApplicationBuilder: https://github.com/aspnet/AspNetCore/commit/c901cc069d644ce9b7a6d93c53895155df3ab276
- [PR] Naming and template updates: https://github.com/aspnet/AspNetCore/pull/6843
NOTE: There is an App.cshtml file in the project root that specifies the AppAssembly as a temporary measure, but the app config in this file is expected to move to Program.cs at a future date.
Client-Side Application
This “app” is defined in index.html, which lives in the wwwroot folder along with other static files.
<html>
...
<body>
 <app>Loading...</app>
 <script src="_framework/blazor.webassembly.js"></script>
</body>
</html>
The HTML in the index page has two things worth noting: an <app> tag with some placeholder text, followed by a <script> tag with a reference to the Blazor JavaScript code that allows you to run your .NET code in the browser via WebAssembly.
Blazor’s page components can be used to create the UI and interaction, starting with one or more @page directives that define the page routes, followed by HTML elements and C# code to interact with those elements. Take, for example, the Index.cshtml file in the Pages folder:
@page "/"
<h1>Hello, Developers!</h1>
Get ready to roll the dice!
<NavLink class="nav-link" href="dice">
   <span>Try it now!</span>
</NavLink>
In the above code for Index.cshtml, the @page directive indicates that this this is a Page (a type of Blazor component) and the “/” single slash character indicates that this is the root page for your application. A component can have multiple routes if desired.
The <NavLink> tag is a helper class that generates an <a> tag hyperlink for your browser. In this case, the href attribute points to another route “dice” in the application, defined in Dice.cshtml (shown below).
@page "/dice"

... HTML elements

@functions {
   // client-side C# code
}
In the above code for Dice.cshtml, once again the @page directive defines a route “/dice” that defines how you can arrive on this page. There are a couple of <button> elements that generate client-side HTML buttons, yet can trigger C# code with onclick handlers. The rest of the file contains C# code wrapped in a @functions{} block to be loaded in the browser.
The @ symbols in the onclick handlers allow you to call C# code from the HTML buttons, to reset the dice and roll a new set of dice:
<button class="btn btn-primary" onclick="@ResetDice">Reset Dice</button>
<button class="btn btn-primary" onclick="@RollDice">Roll Dice</button>
The <div> elements that follow contain placeholder images for six dice images, with src attributes defined by a C# array of strings. The dice images are named dice1.png through dice6.png.
 <img id="dice0" src="@diceImage[0]" />
 <img id="dice1" src="@diceImage[1]" />
 <img id="dice2" src="@diceImage[2]" />
 <img id="dice3" src="@diceImage[3]" />
 <img id="dice4" src="@diceImage[4]" />
 <img id="dice5" src="@diceImage[5]" />
The @functions block defines the aforementioned string array of dice images, along with other necessary variables.
 int[] diceArray = new int[] { 1, 2, 3, 4, 5, 6 };
 string[] diceImage = new string[6];
 string dicePrefix = "/images/dice";
 string diceSuffix = ".png";
LifeCycle Methods
The @functions block continues with an (overridden) OnInit() method, which can be used to initialize anything when the page first loads. In this case, it calls ResetDIce() to reset the dice images.
 protected override void OnInit()
 {
    ResetDice();
 }
Blazor’s Lifecycle methods for a component include the following:
- OnInit(): invoked after receiving initial params
- OnInitAsync(): async alternative to OnInit();
- OnParametersSet(): called after receiving params from its parent, after OnInit()
- OnParametersSetAsync(): async alternative to OnParametersSet();
- OnAfterRender(): called after each render
- OnAfterRenderAsync(): async alternative to OnAfterRender()
- ShouldRender(): used to suppress subsequent rendering of the component
- StateHasChanged(): called to indicate that state has changed, can be triggered manually
Updating the UI
The rest of the C# code in Dice.cshtml includes methods to update the UI by changing the src property of each image. This is accomplished by the following:
void ResetDice()
{
   for (int diceIndex = 0; diceIndex < diceArray.Length; diceIndex++)
   {
      diceImage[diceIndex] = GetDicePath(diceIndex + 1);
   }
}

void RollDice()
{
   Random rnd = new Random();
   int[] randomDice = diceArray.OrderBy(x => rnd.Next()).ToArray();

   for (int diceIndex = 0; diceIndex < diceArray.Length; diceIndex++)
   {
      diceImage[diceIndex] = GetDicePath(randomDice[diceIndex]);
   }
}
In the above C# code, the method ResetDice() loops through the predefined dice array and updates each diceImage element to update its respective src property. The RollDice() method generate a random series of dice values and then loops through the aforementioned array of dice to update each dice image to a random value from the random dice set.
Finally, we have the helper method GetDicePath(), which simply builds a path to a dice image by concatenating the path, filename and extension into a single string.
 string GetDicePath(int diceValue)
 {
    return $"{dicePrefix}{diceValue}{diceSuffix}";
 }
Once again, here is the end result, illustrated in a GIF:
Next Steps
There is so much more to learn about this exciting new experimental framework. Blazor’s reusable components can take various forms, including Pages (that you’ve just seen,) dialogs and forms.
In addition to client-side apps, you can also host Blazor apps on the server-side from within an ASP .NET Core web app. Converting your client-side app to a server-hosted app requires some minor code changes. Server-side Blazor (aka Razor Components) is expected to appear within the .NET Core 3.0 release in 2019.
Since everything is loaded in the browser via WebAssembly, you can use your browser’s F12 Developer Tools to inspect and debug your C# code. You can also call existing JavaScript libraries using JavaScript interop.
References
- Official Blazor Website: https://blazor.net
- Blazor 0.5.0 (July 2018) announcement: https://blogs.msdn.microsoft.com/webdev/2018/07/25/blazor-0-5-0-experimental-release-now-available/
- Blazor 0.6.0 (Oct 2018) announcement: https://blogs.msdn.microsoft.com/webdev/2018/10/02/blazor-0-6-0-experimental-release-now-available/
- Blazor 0.7.0 (Nov 2018) announcement: https://blogs.msdn.microsoft.com/webdev/2018/11/15/blazor-0-7-0-experimental-release-now-available/
- Blazor and more at Ignite (Nov 2018): https://myignite.techcommunity.microsoft.com/sessions/65901
- Learn Blazor: https://learn-blazor.com/
- Blazor on CodeDaze: https://codedaze.io/blazor/
- AdrienTorris’ collection of awesome Blazor resources: https://github.com/AdrienTorris/awesome-blazor
From Ignite (Nov 2018): https://www.youtube.com/watch?v=Yb-N0TmEq_Y
Pingback: Dew Drop - January 15, 2019 (#2878) - Morning Dew
Hi,
According to you: “When it adds the App component, it specifies the client-side app with the name “app” in double quotes.”. However, I have changed the “app” to some other names but it didn’t work. Here is what I have done:
1. In the Startup.cs file, change
public void Configure(IBlazorApplicationBuilder blazorapp)
{
blazorapp.AddComponent(“app”);
}
to
public void Configure(IBlazorApplicationBuilder blazorapp)
{
blazorapp.AddComponent(“myTestingApp”);
}
2. In the Index.html file, change
Loading…
to
Loading…
It didn’t work. Is there something I have missed?
Thanks,
Hi Jeff, the word “app” would have to be updated in 3 files:
1. In your Configure() method (in Startup.cs):
app.AddComponent("myTestingApp"); 2. In your index.html static file (under wwwroot)
<myTestingApp>Loading...</myTestingApp>3. Multiple locations in your site.css file (under wwwroot/css)
myTestingApp {

    position: relative;

    display: flex;

    flex-direction: column;

}
@media (min-width: 768px) {
myTestingApp {
flex-direction: row;
}
Very good! It works wonderfully. Thanks a lot!
Jeff says: When it adds the App component, it specifies the client-side app with the name “app” in double quotes
You’re wrong. “app” is a DOM Element Selector identifier for the element into which your component are rendered as HTML… It is identically used in Angular.
Incidentally, IBlazorApplicationBuilder has already become IComponentsApplicationBuilder
Hope this helps…
Thanks for your comment. Check out my response to another comment (from another reader Jeff) where I explain that “app” refers to the DOM Element in index.html. I’ll reword the incorrect phrasing in the article itself to reflect what you just pointed out.
Also, thanks for pointing out the name change from IBlazorApplicationBuilder to IComponentsApplicationBuilder. I’ll be editing this blog series periodically to ensure accuracy, so I appreciate the correction.
I’m trying to implement Google authentication in my app but I’m tripping over the difference between IBlazorApplicationBuilder and IApplicationBuilder when trying to use app.UseAuthentication()….Can you advise on the best path forward?
Hi Daniel, I haven’t tried this myself, but another developer (Michael Washington) has a relevant tweet and blog post that may be useful. Feel free to contact him directly with questions on Google auth for Blazor apps.
Tweet: https://twitter.com/adefwebserver/status/1087542120917884928?s=21
Website: http://lightswitchhelpwebsite.com/Blog/tabid/61/EntryId/4323/Google-Authentication-in-Server-Side-Blazor-Razor-Components.aspx
Pingback: .NET Core 3.0, VS2019 and C# 8.0 for ASP .NET Core developers | Wake Up And Code!
Pingback: Razor Pages in ASP .NET Core | Wake Up And Code!
Pingback: Summarizing Build 2019 + SignalR Service for ASP .NET (Core) Developers | Wake Up And Code!
Pingback: Blazor Full-Stack Web Dev in ASP .NET Core 3.1 | Wake Up And Code!