This is the third of a new series of posts on ASP .NET Core. This week, we’ll be looking at various types of Pages you may encounter in an ASP .NET Core web app:
- Razor Pages (new as of v2.0)
- the experimental Blazor (C# in the browser!)
- the more familiar MVC Views (aka Razor Views)
If you already know how to create each type of project, feel free to jump past section 3B below.

Before you begin
Before you begin, make sure you download an IDE or code editor to open and run the code samples. My recommendations are below:
A. Visual Studio Code: https://code.visualstudio.com
B. Visual Studio 2017 (v15.8 or later): https://visualstudio.microsoft.com/vs/

To get the latest SDK, download .NET Core v2.1 or higher:
![]() .NET Core Download: https://www.microsoft.com/net/download
.NET Core Download: https://www.microsoft.com/net/download
To use Blazor in Visual Studio 2017, you must install the ASP .NET Core Blazor Language Services extension from the Visual Studio Marketplace:
![]() Blazor extension: https://marketplace.visualstudio.com/items?itemName=aspnet.blazor
Blazor extension: https://marketplace.visualstudio.com/items?itemName=aspnet.blazor
The instructions below will cover both Command Line Interface (CLI) commands and IDE/editor steps to create, build and run the code samples.
![]() Sample code: https://github.com/shahedc/PagesDemo
Sample code: https://github.com/shahedc/PagesDemo
1A. Create a new Razor project using CLI
To create a new Razor web project, run the following CLI command.
> dotnet new razor -o <OUTPUT-PROJECT-FOLDER>
Replace the placeholder text <OUTPUT-PROJECT-FOLDER> with your own project name, so that the project can be created within a subfolder with that name. You should see a confirmation message upon completion.
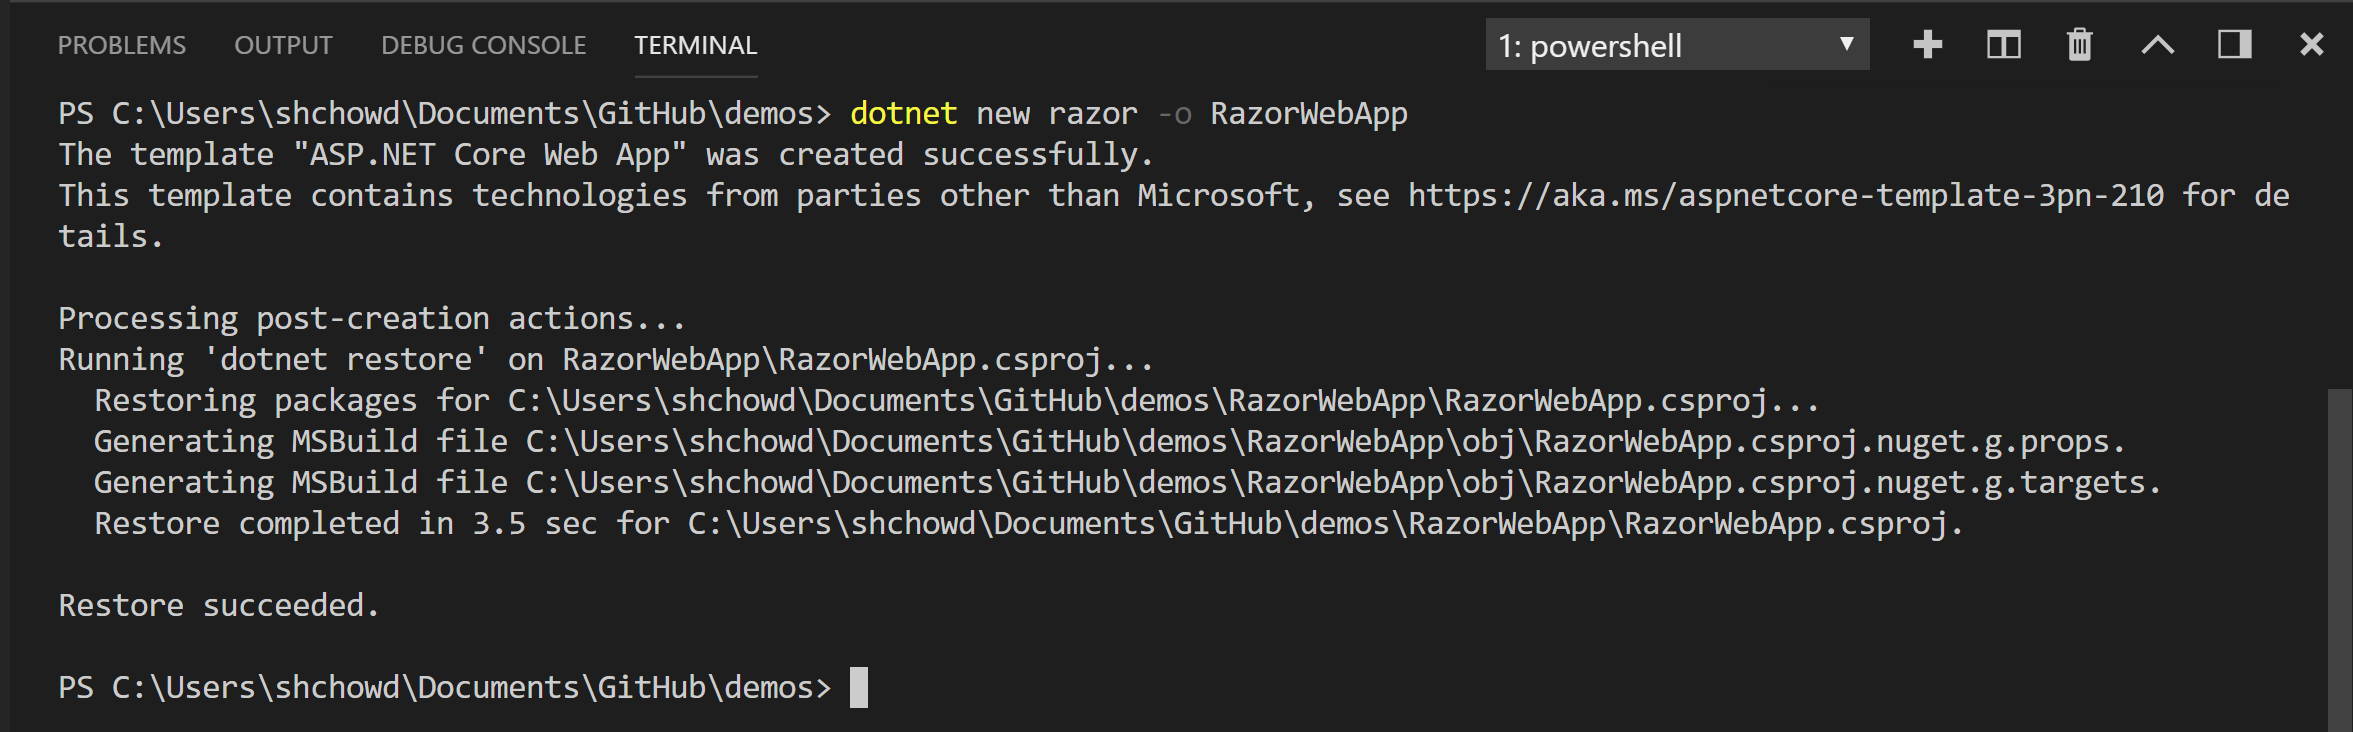
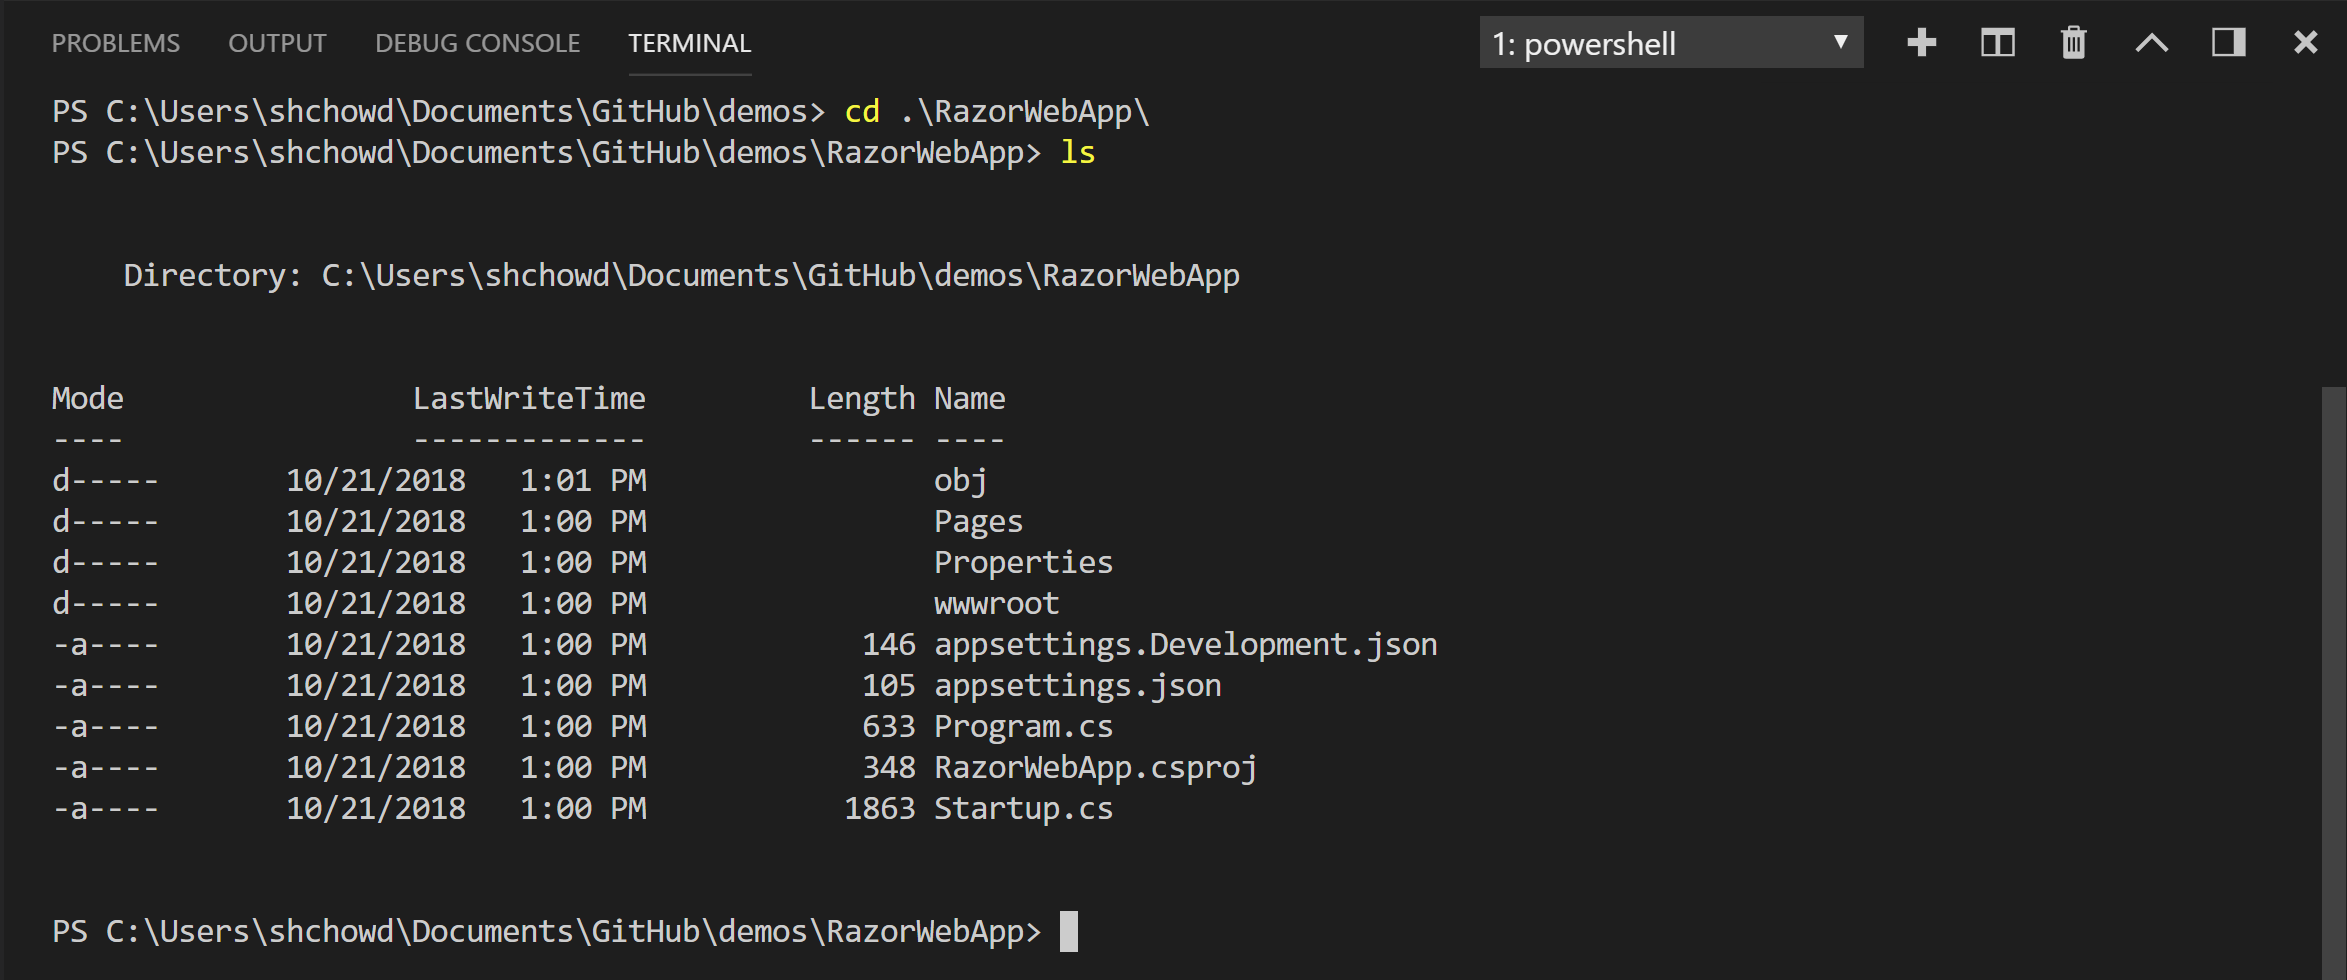
The contents of the new folder should now contain a .csproj project file, Startup.cs, Program.cs and Pages subfolder with sample Razor Pages.
1B. Create a new Razor project using Visual Studio 2017
To create a new Razor project in Visual Studio 2017:
- Click File | New | Project
- Select the ASP .NET Core Web Application template
- check under Visual C# and then Web or .NET Core
- Enter a project name, a (new) location and solution name.
- Select the Web Application template under ASP .NET Core 2.1.
- Leave the checkboxes with their default selections (Docker unchecked, HTTPS checked) and click OK to create the project.
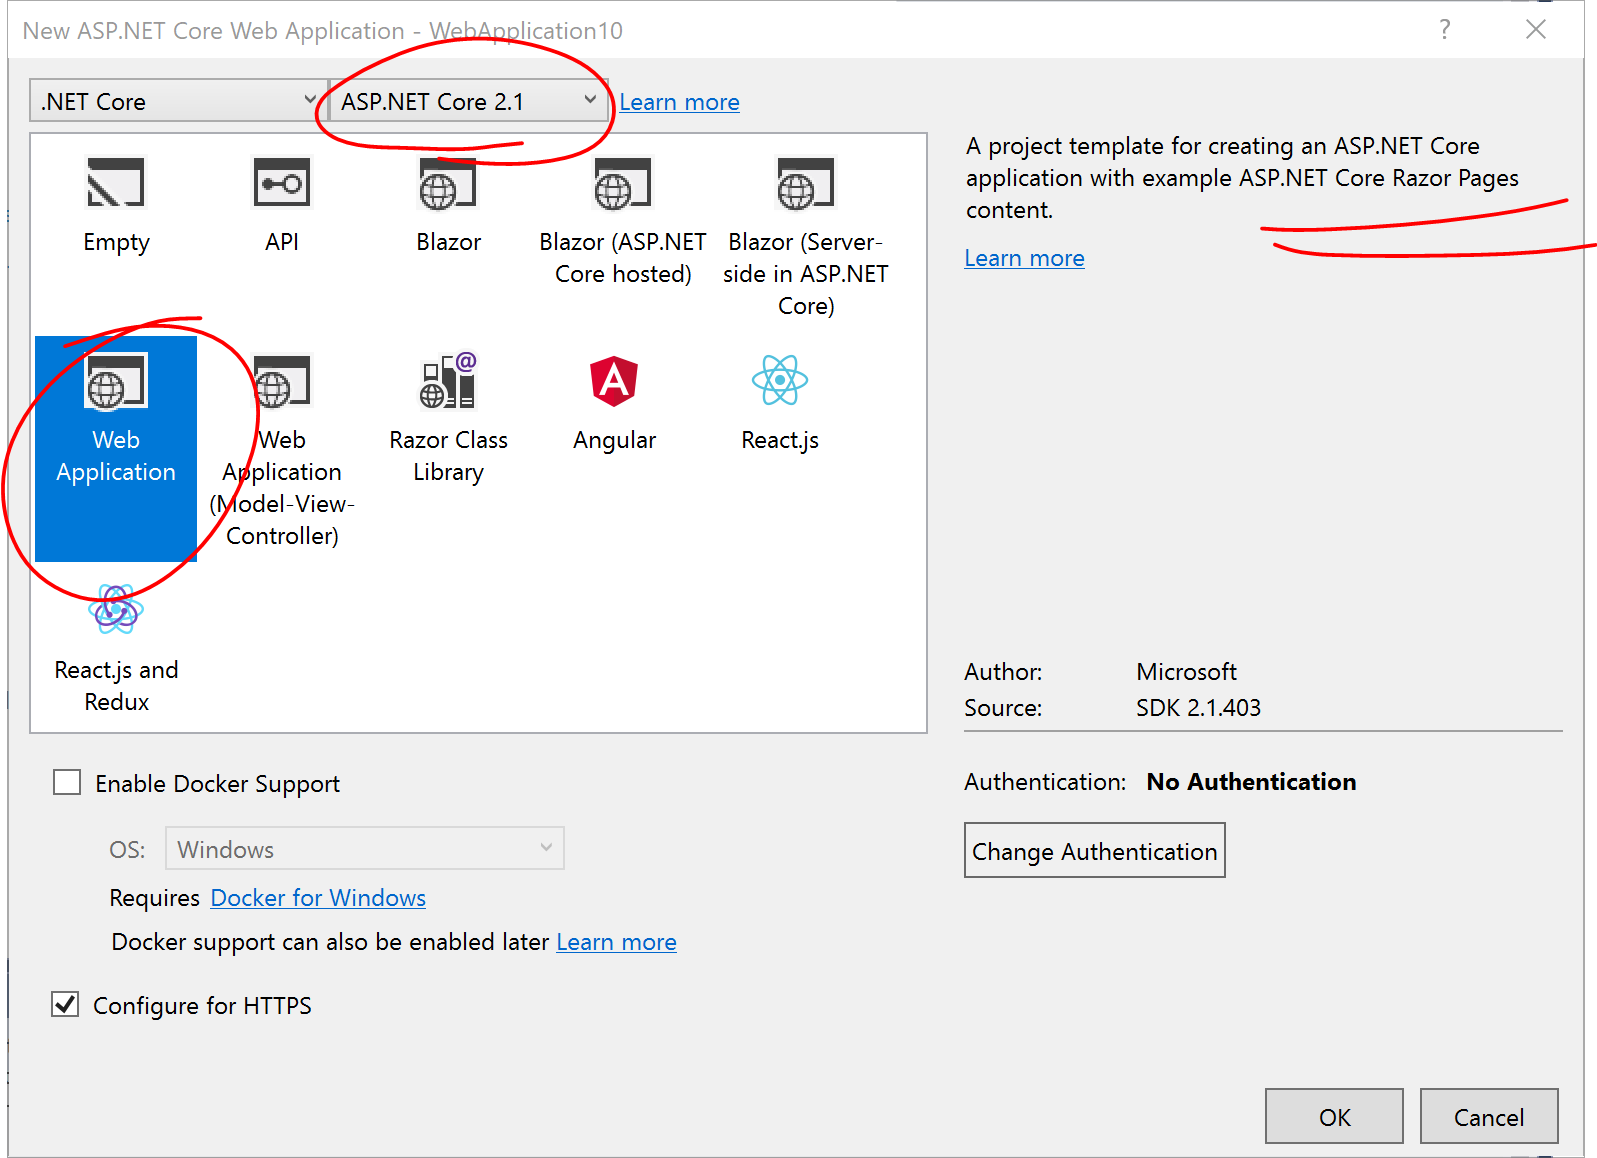
Even though the word “Razor” may not appear in the template name, the description on the right makes it clear that this is the Razor template. The other Web App template includes traditional MVC models, views and controllers without any Razor Pages in it.
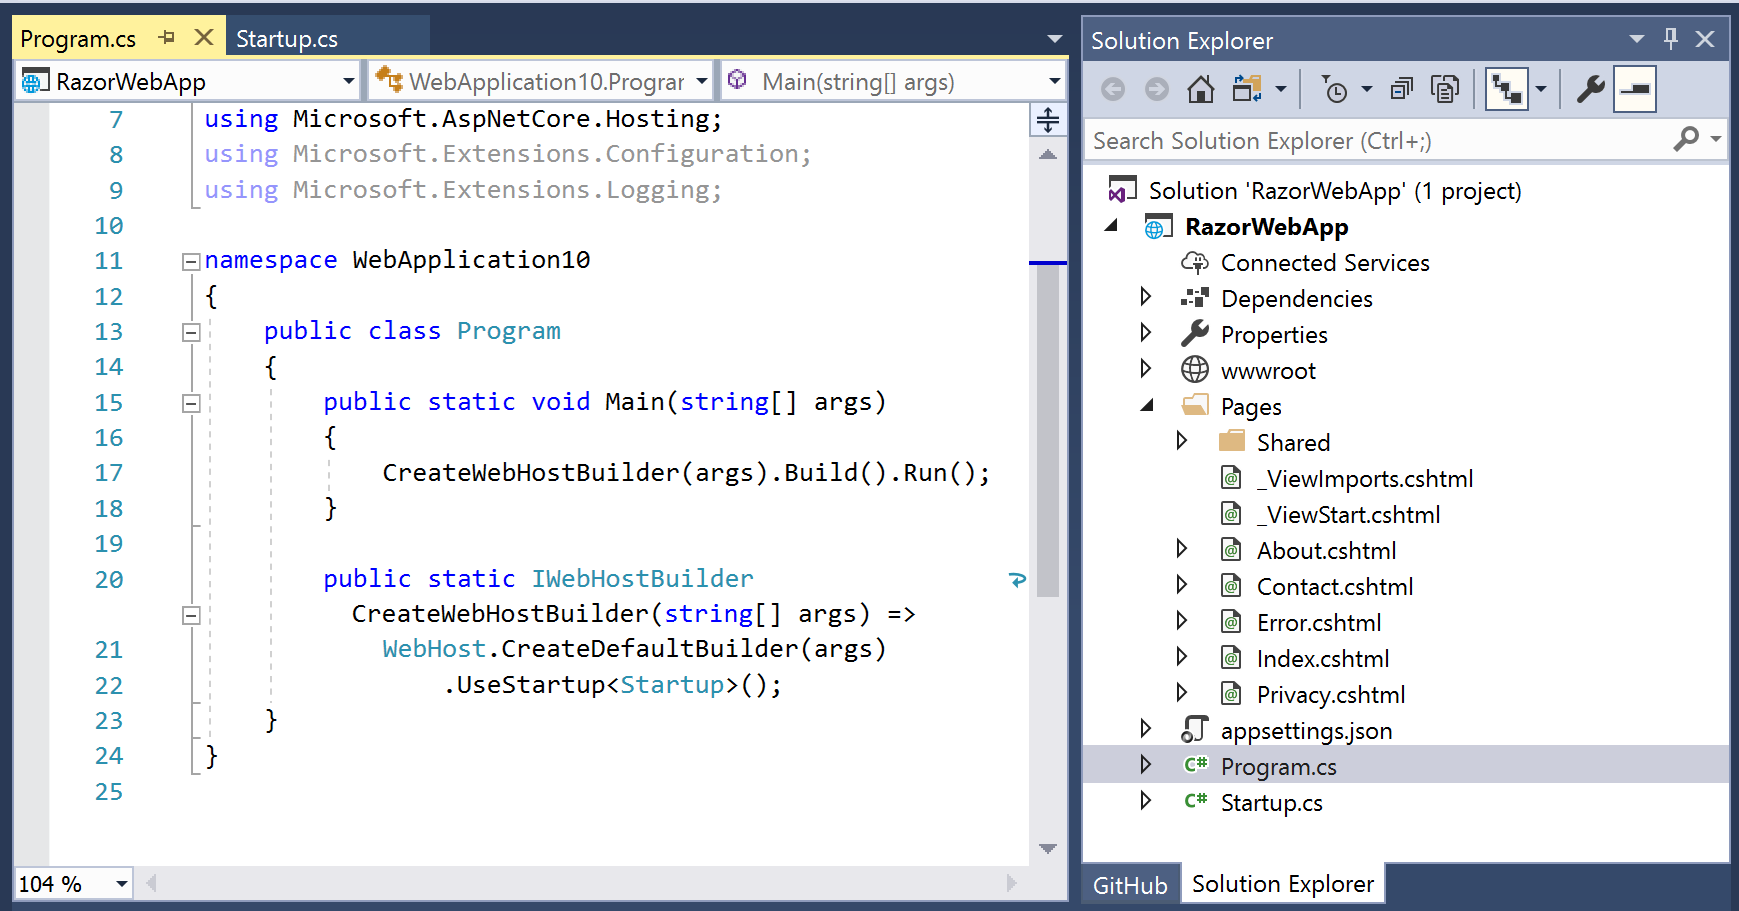
Once the (.csproj) project has been created, you should see the following in Solution Explorer: Startup.cs, Program.cs and Pages subfolder with sample Razor Pages.
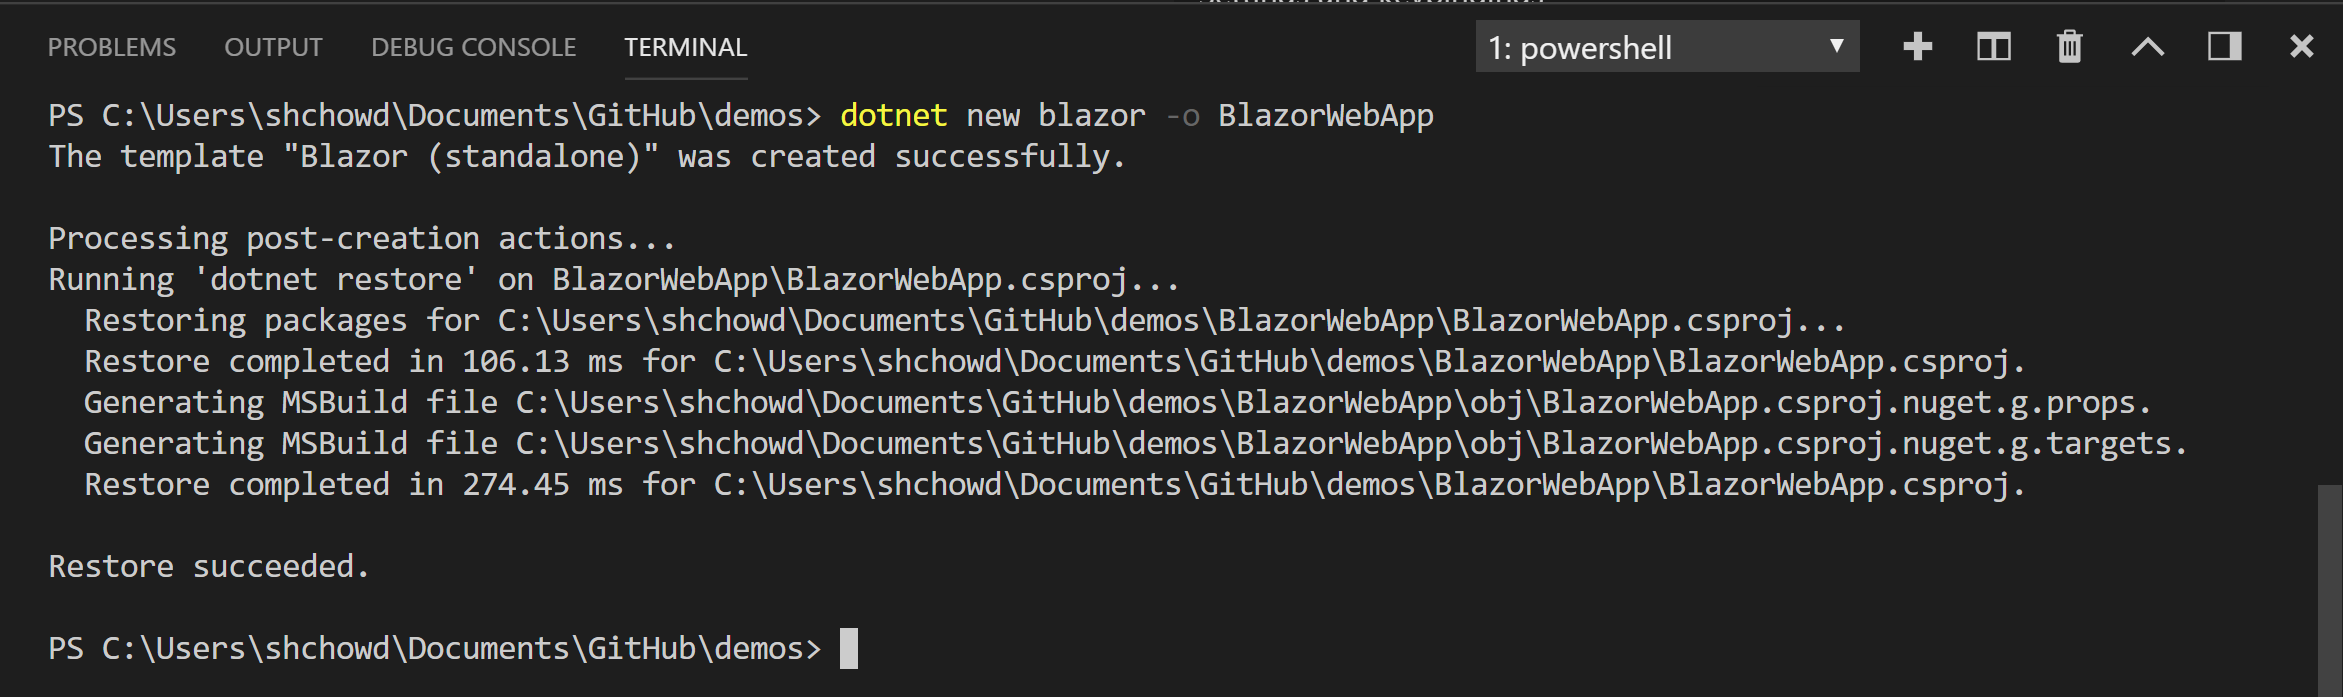
2A. Create a new Blazor project using CLI
To create a new Blazor web project, run the donet new command for the “blazor” template. Make sure you’re in the correct folder location, where you’d like to create the new project. If you haven’t installed it yet, install the (experimental) Blazor template first.
> dotnet new -i Microsoft.AspNetCore.Blazor.Templates
After the template has been installed, run the following command after replacing the placeholder output folder name with your own value.
> dotnet new blazor -o <OUTPUT_PROJECT_FOLDER>
If you’re interested in learning more about the different kinds of project types for Blazor, read the following:
- Official Blazor documentation: https://blazor.net/docs
- Telerik article: https://www.telerik.com/blogs/a-breakdown-of-blazor-project-types
The above article mentions the following Blazor project types:
- Blazor Client-side: “the HTML is delivered to browser via the Blazor framework on the client”
- Blazor Full-Stack: “added ASP.NET Core hosting and Web API and a Shared project for common application logic”
- Blazor Server-Side (aka Razor Components): “Blazor utilizes the browser as a “thin-client” by deploying a SignalR JavaScript application to the client.”
2B. Create a new Blazor project using Visual Studio 2017
To create a new Blazor project in Visual Studio 2017:
- Click File | New | Project
- Select the ASP .NET Core Web Application template
- check under Visual C# and then Web or .NET Core
- Enter a project name, a (new) location and solution name.
- Select the Blazor template under ASP .NET Core 2.1.
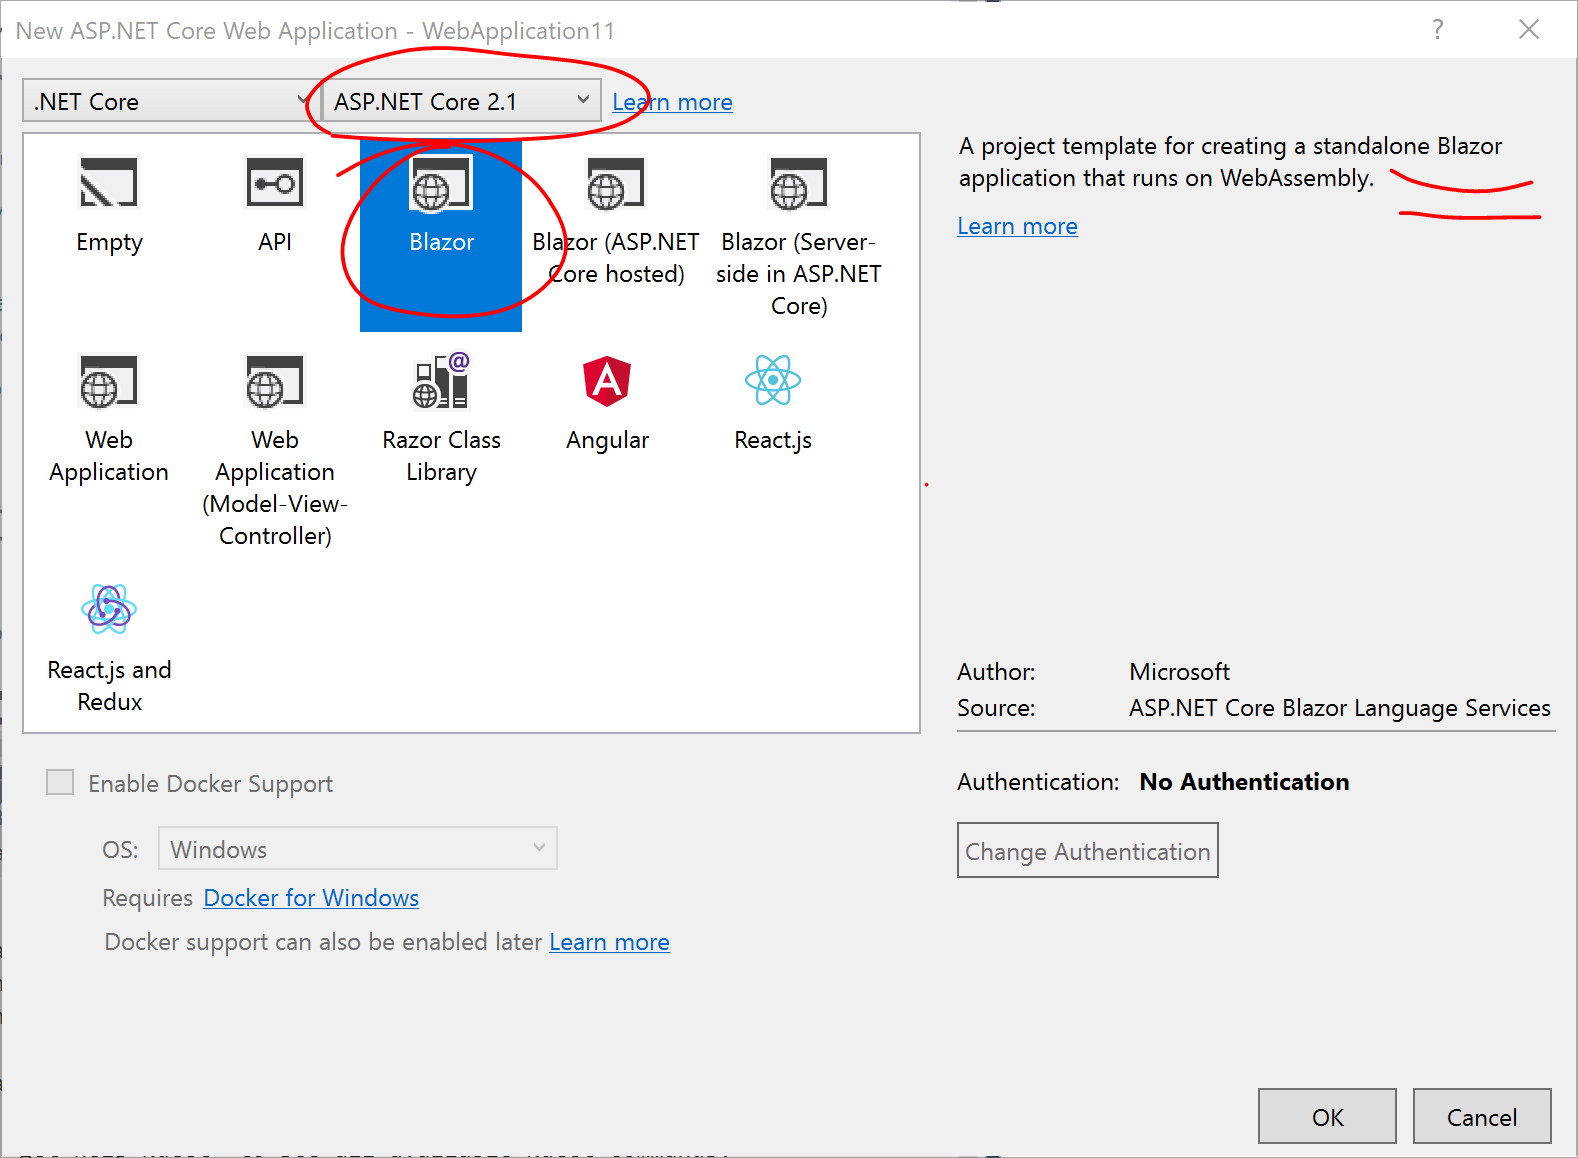
Ignore the other Blazor project templates for now, but feel free to revisit the article mentioned in the previous section to learn more about them.
Once the (.csproj) project has been created, you should see the following in Solution Explorer: Startup.cs, Program.cs and Pages subfolder with sample pages.
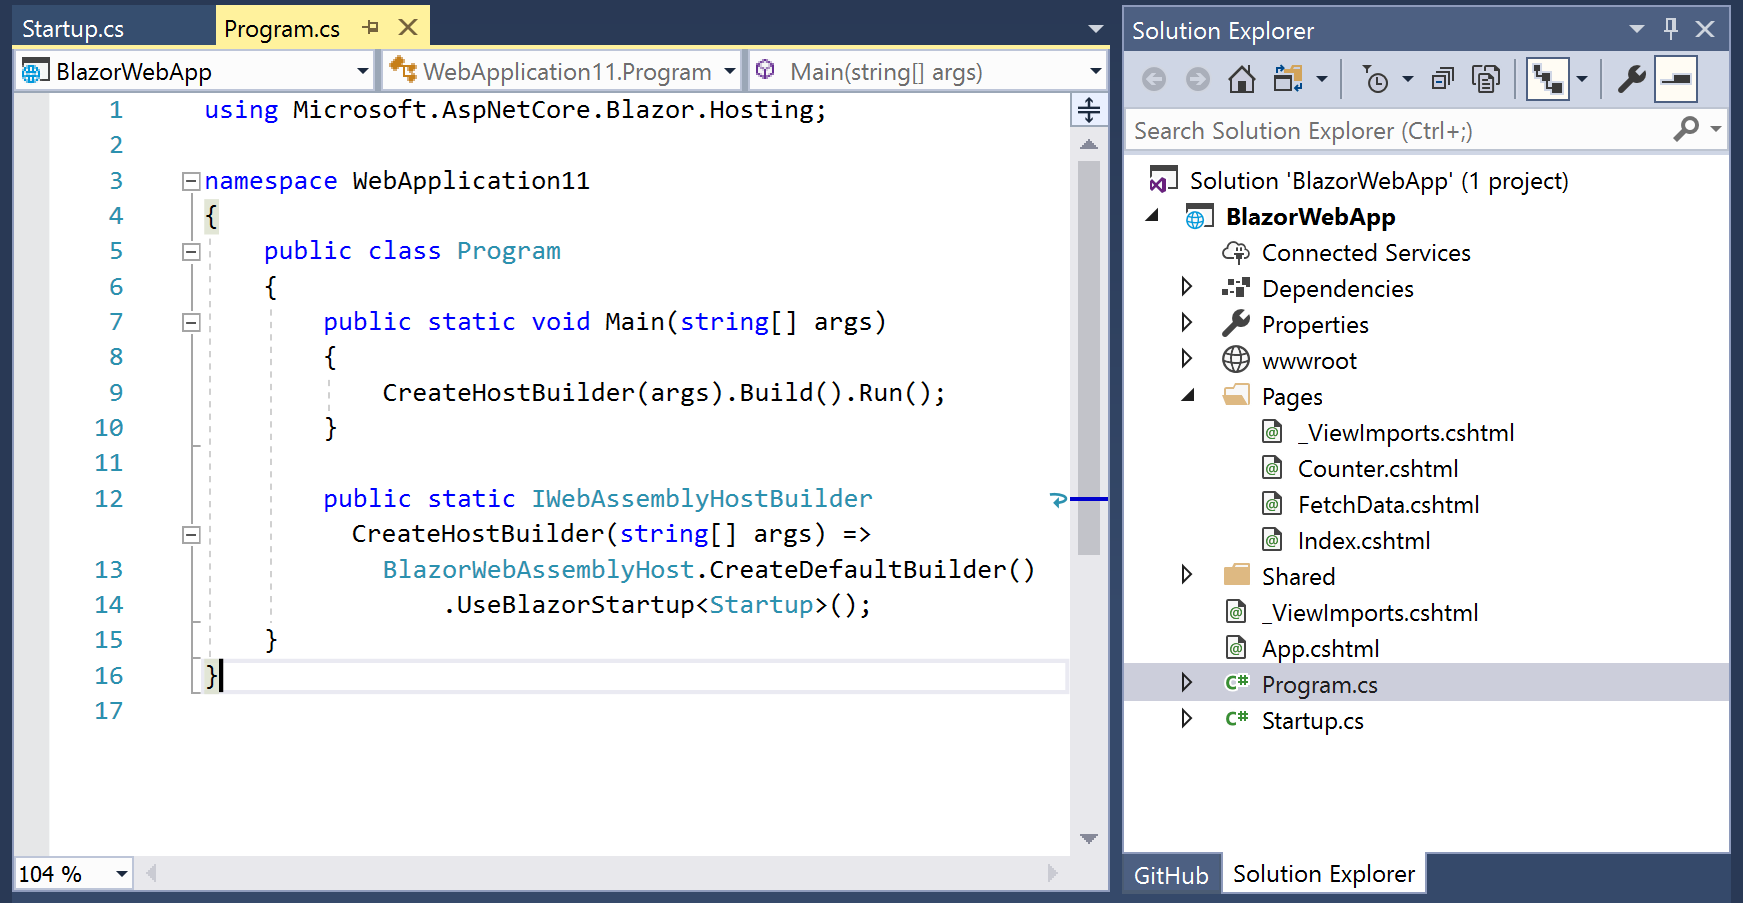
Note the call to .UseBlazorStartup in the Program class that helps to initialize the Blazor application middleware. This could also have been initialized in the Configure() method of Startup.cs by a call to app.UseBlazor<Client.Program>() where app is an IBlazorApplicationBuilder.
3A. Create a new MVC Web App project using CLI
To create a new MVC web project, run the following CLI command.
> dotnet new mvc -o <OUTPUT-PROJECT-FOLDER>
Replace the placeholder text <OUTPUT-PROJECT-FOLDER> with your own project name, so that the project can be created within a subfolder with that name. You should see a confirmation message upon completion.
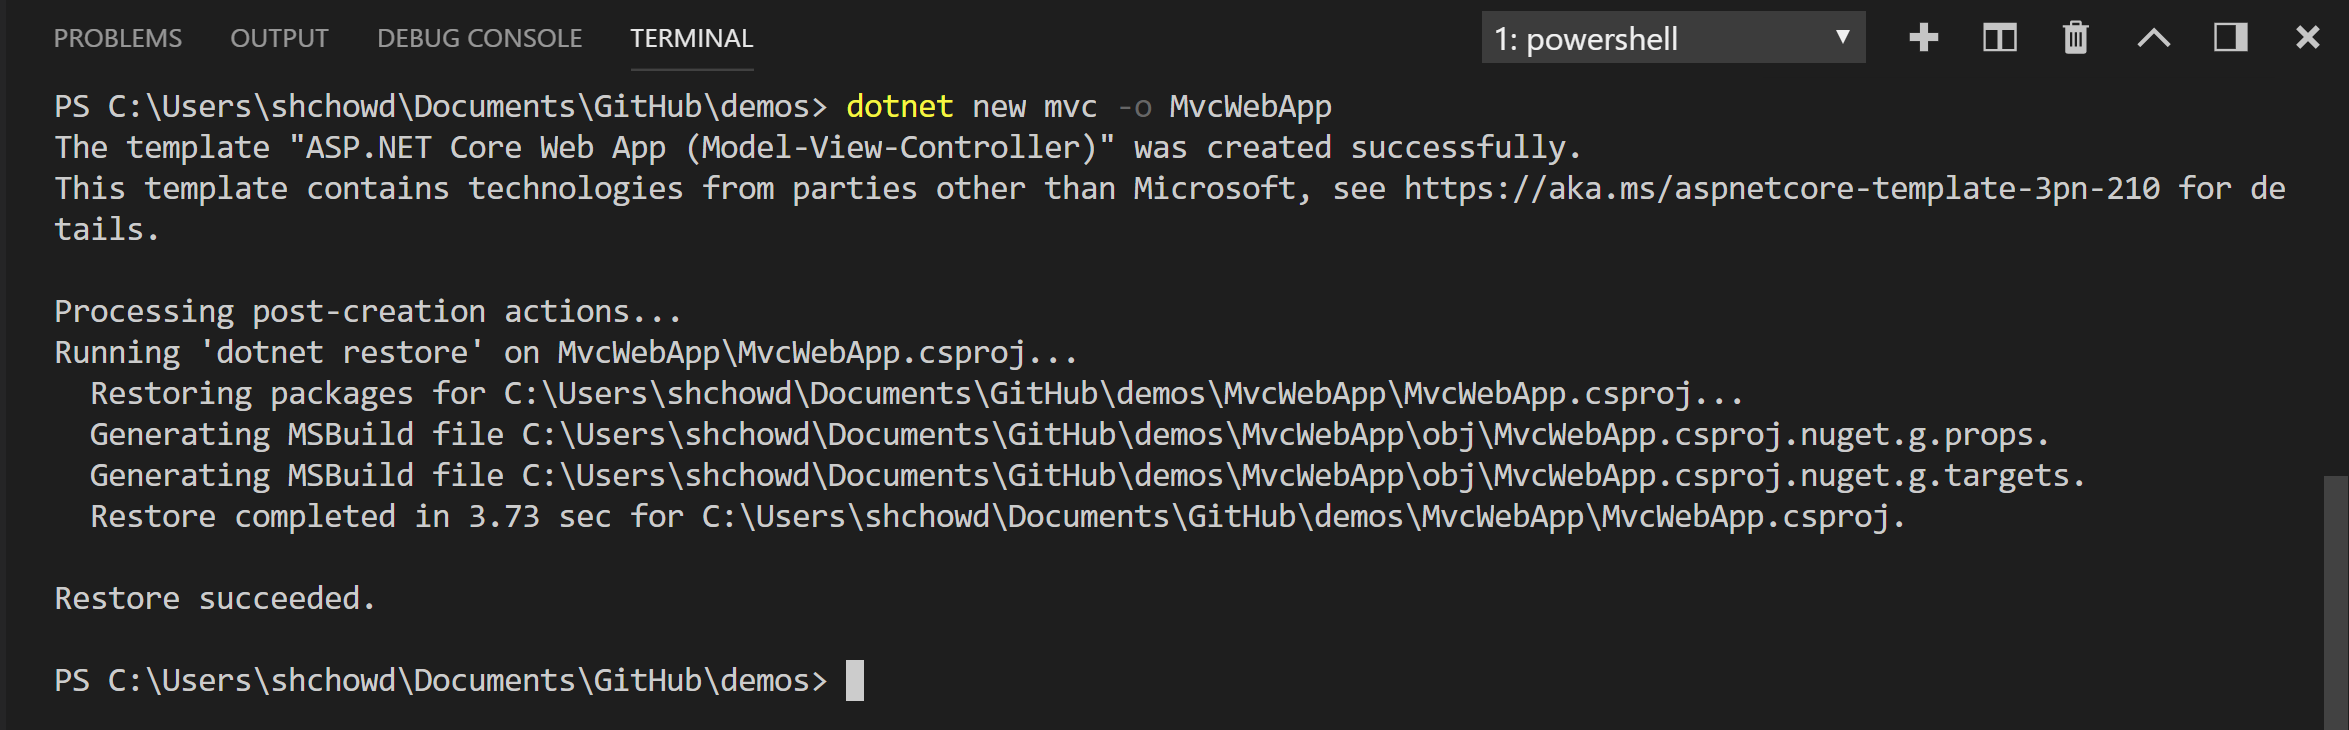
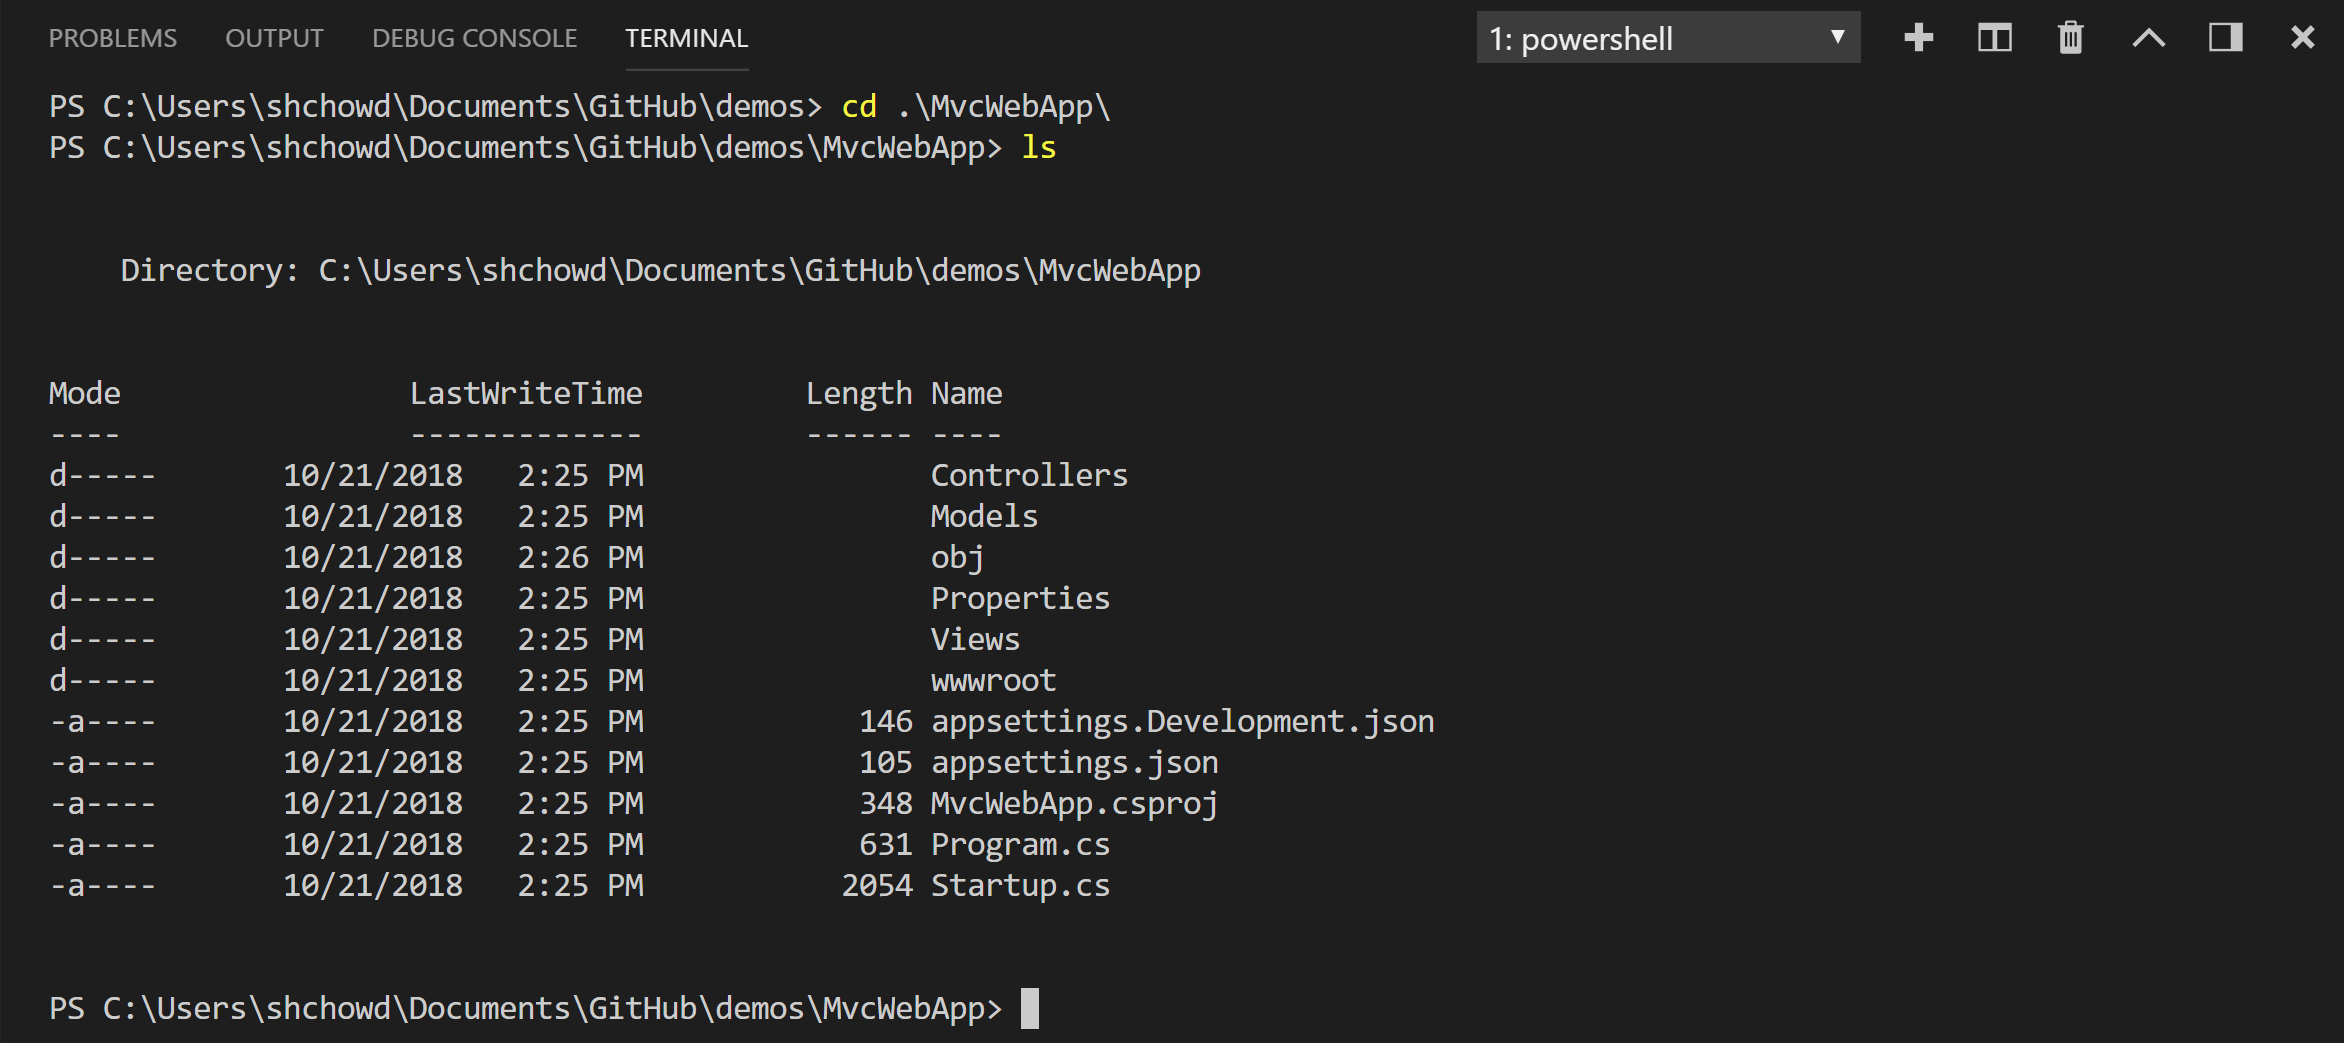
The contents of the new folder should now contain a .csproj project file, Startup.cs, Program.cs and subfolders for traditional ASP .NET Controllers, Models and Views.
3B. Create a new MVC Web App project using Visual Studio 2017
To create a new MVC Web App project in Visual Studio 2017:
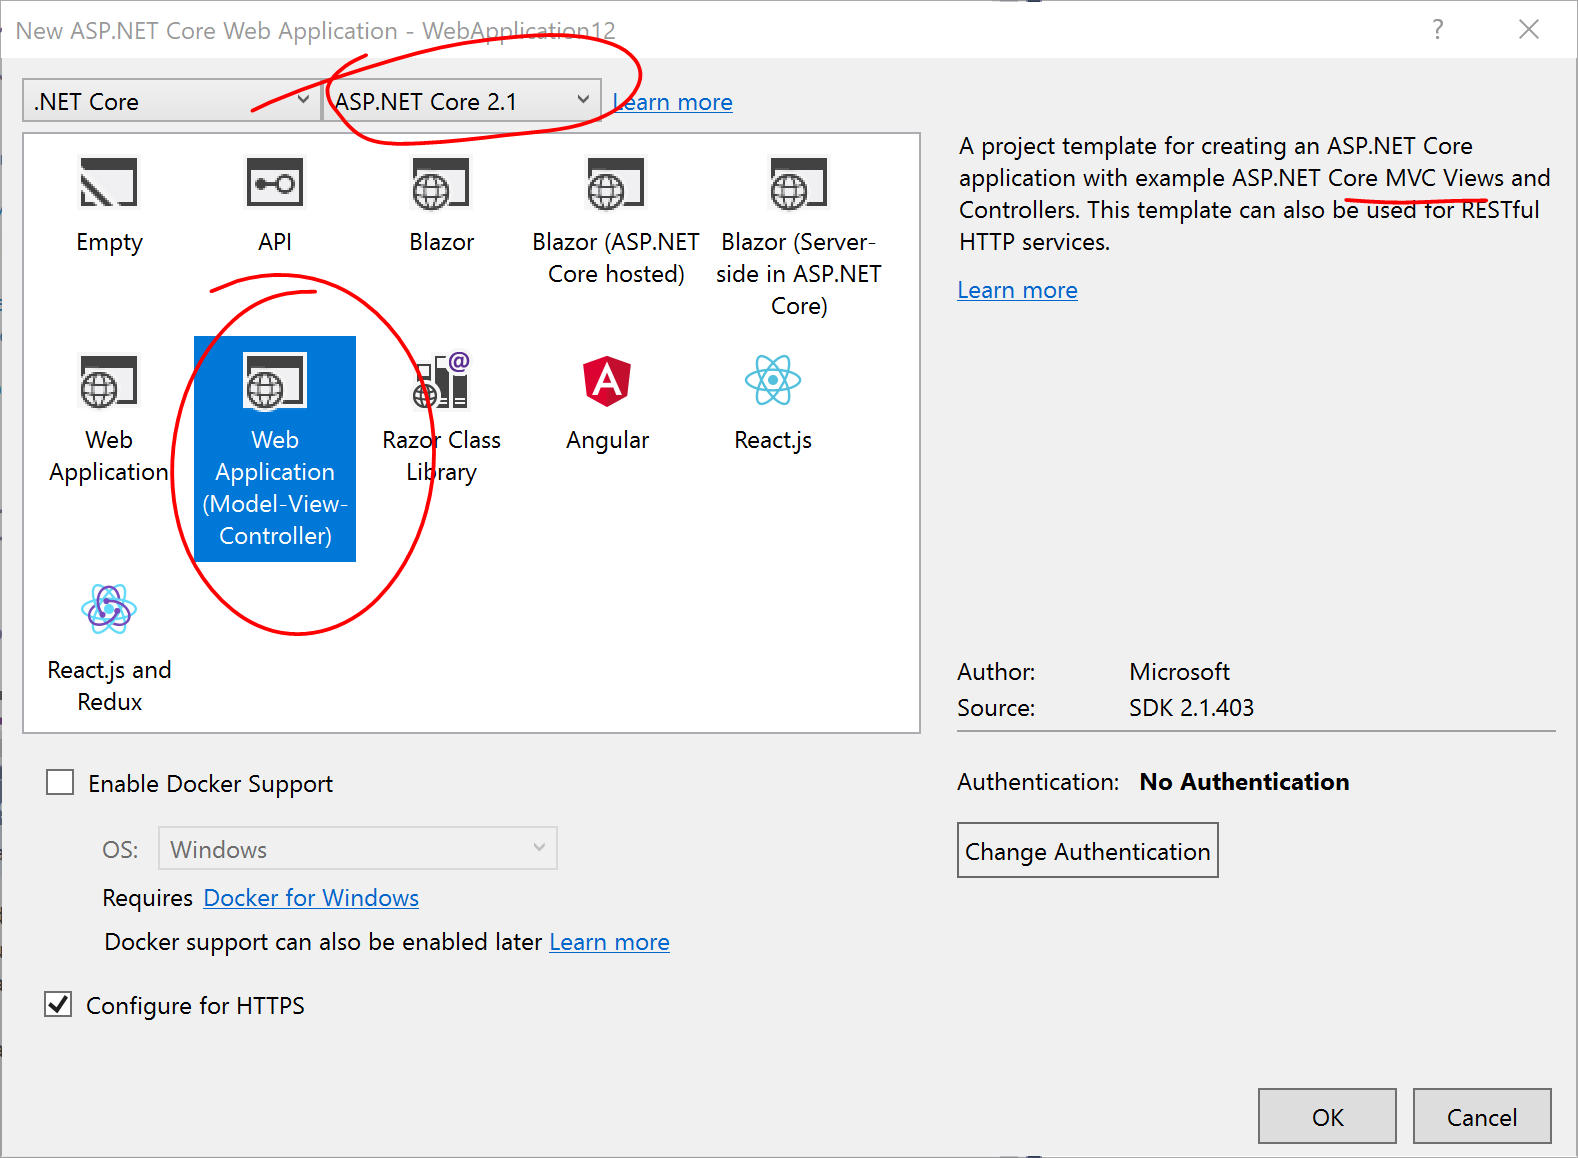
- Click File | New | Project
- Select the ASP .NET Core Web Application template
- check under Visual C# and then Web or .NET Core
- Enter a project name, a (new) location and solution name.
- Select the Web Application (MVC) template under ASP .NET Core 2.1.
- Leave the checkboxes with their default selections (Docker unchecked, HTTPS checked) and click OK to create the project.
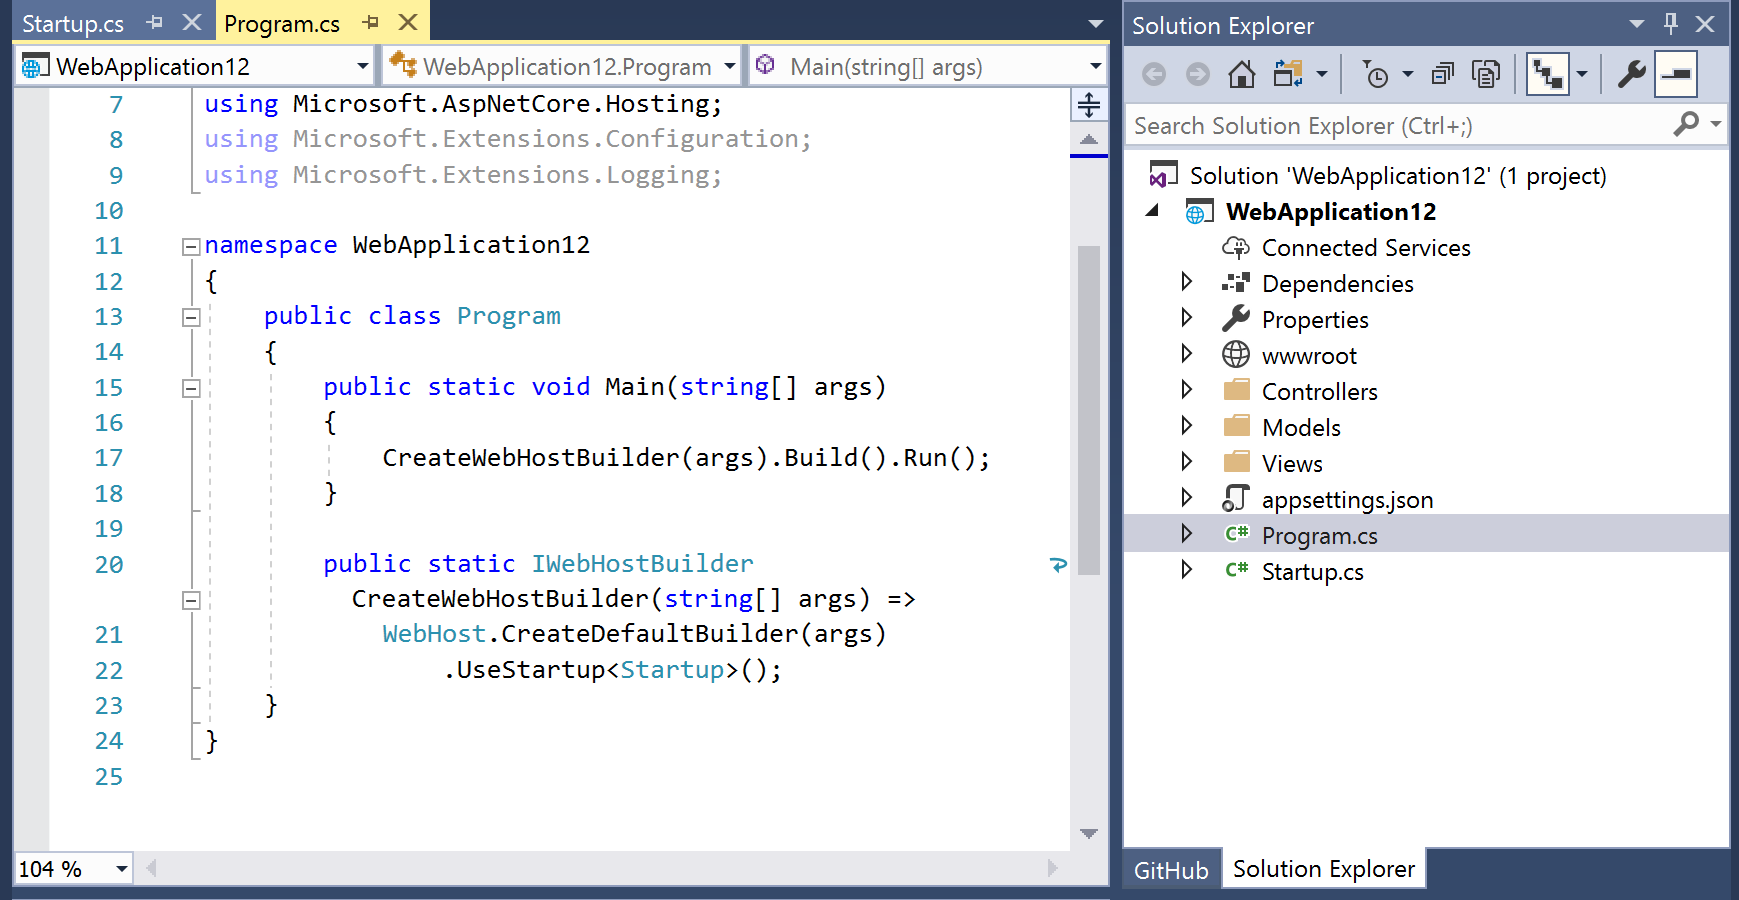
Once the (.csproj) project has been created, you should see the following in Solution Explorer: Startup.cs, Program.cs and MVC subfolders identical to what gets created with the equivalent CLI command.
4. Build and Run each project
Regardless of how you have created each project, you can switch back and forth between Visual Studio Code and Visual Studio 2017. The main difference is that VS Code navigates through project folders and doesn’t use a solution file. VS 2017, on the other hand, allows you to organize one or more projects in a solution file. If you open a .csproj file in VS 2017 without a solution, trying to save it will prompt you to save a new .sln solution file as well.
To build and run each project in VS Code using the CLI in the Terminal, you should be familiar with the following commands.
> dotnet build
> dotnet restore
> dotnet run
These three commands will help you build the current project, restore dependencies and run the project, respectively. Note that the run command will automatically build the project and resolve dependencies, so it can be executed by itself.
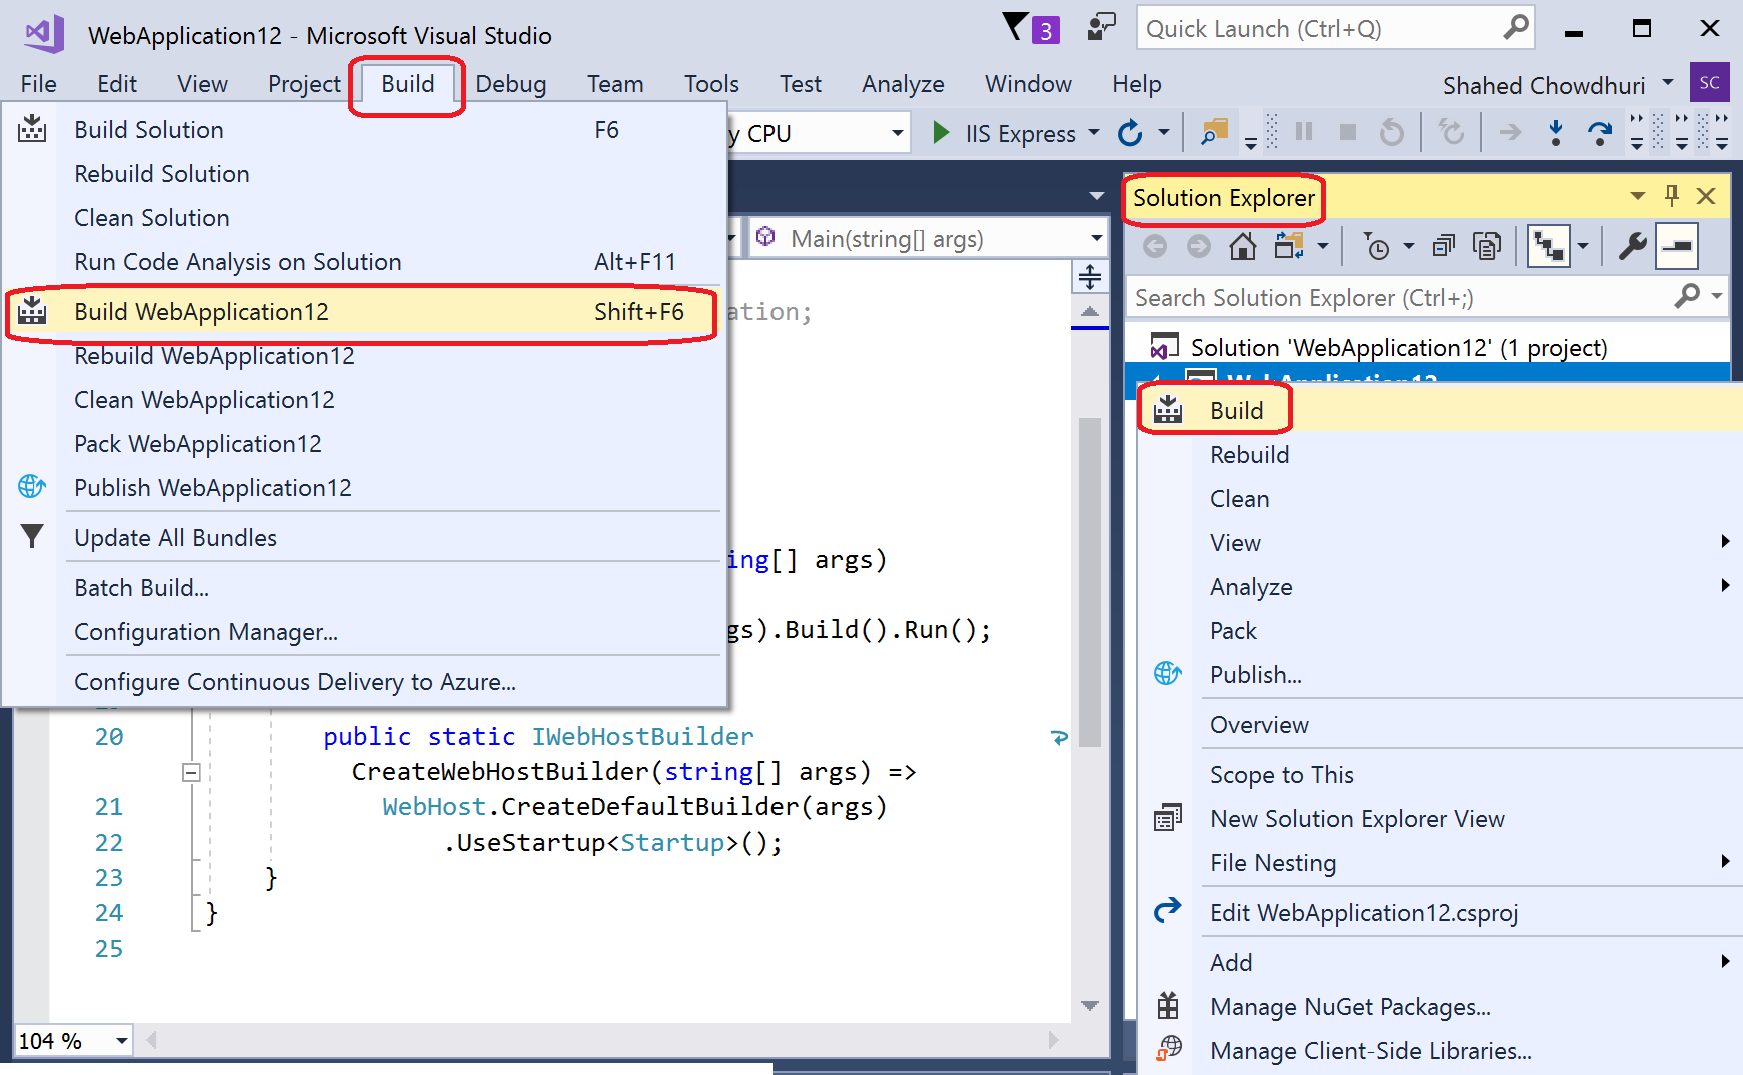
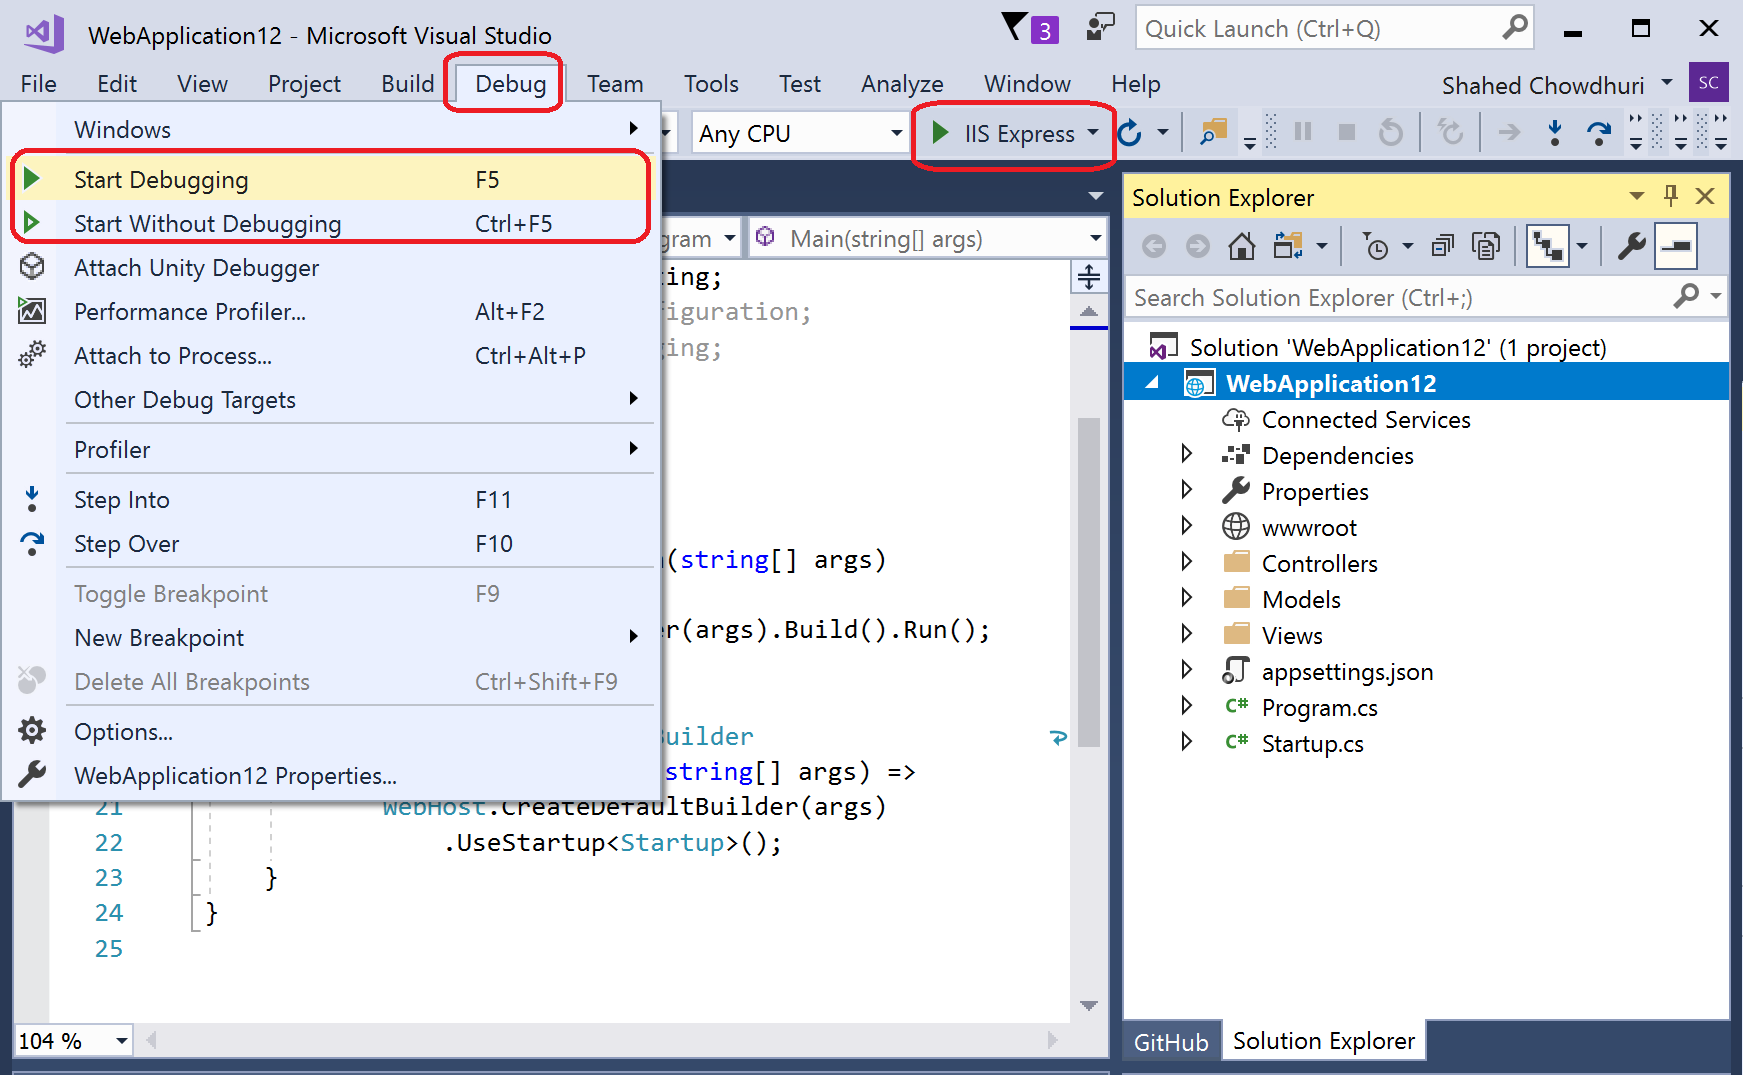
To build each project in VS 2017, click Build Solution or Build <project> from the Build menu in the top menubar. You may also right-click a project in the Solution Explorer to click Build or Rebuild. You may also use the keyboard shortcuts shown
To run each project in VS 2017, click Start (with our Without Debugging) from the Debug menu in the top menubar. You may also click the green triangular Play button to debug immediately in your browser of choice. You may also use the keyboard shortcuts shown.
5. What does the code do?
Razor Pages Explained
First of all, it’s important to realize that Razor Pages is not ASP .NET Web Forms all over again. It just makes it simpler to build web applications without all the additional organizational structure for Models, Views and Controllers.
Take a look at the code for the Razor web app in the following repo and browse the Pages subfolder:
https://github.com/shahedc/PagesDemo/tree/master/RazorWebApp
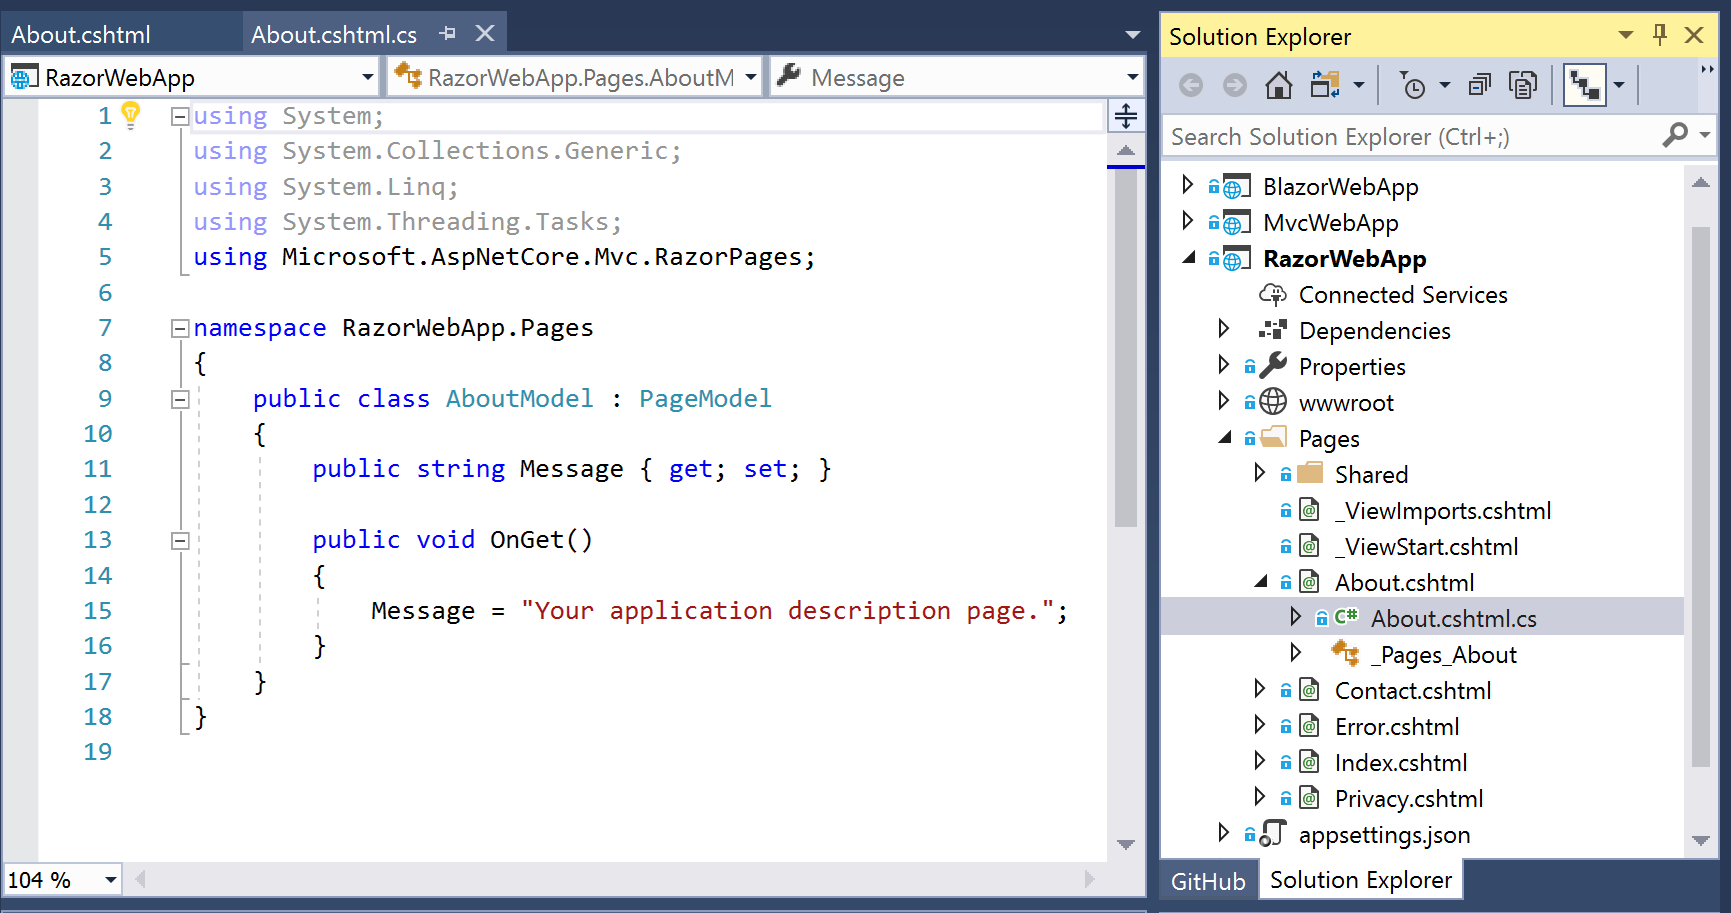
In the About page, you will find some code that looks similar to a typical MVC view. The first difference is the @page directive, which turns the file into an MVC action, allowing it to handle requests directly, without the need for a separate Controller class.
@page
@model AboutModel
@{
 ViewData["Title"] = "About";
}
<h2>@ViewData["Title"]</h2>
<h3>@Model.Message</h3>

<p>Use this area to provide additional information.</p>
The @model directive allows the page to use AboutModel view model as you may expect, so that you can refer to properties such as Model.Message in the body of the page. In the corresponding C# file for this About page, you’ll find a simple C# model that contains both Model properties and page handler methods such as OnGet() which responds to an HTTP GET request for the page.
public class AboutModel : PageModel
{
   public string Message { get; set; }

   public void OnGet()
   {
       Message = "Your application description page.";
   }
}
In an IDE like VS 2017, you’ll find the corresponding C# .cs code file nested below the .cshtml page it controls. The naming conventions make it easier to associate linked items.
In the Startup.cs file, the call to services.AddMvc() in the ConfigureServices() method includes the necessary support for Razor Pages and controllers. For more information on Razor Pages, check out the official docs:
Blazor Explained
Blazor is a portmanteau of Browser + Razor. It makes good use of Razor syntax for HTML and C# and lets you run C# code in your browser with WebAssembly. So where does the L come from? Maybe it’s because it’s like Lightning and allows you to speed up your web development by doing fullstack C# from front to back. 😀
Let’s start with the root page of the Blazor project, by looking at Index.cshtml.
@page "/"
<h1>Hello, world!</h1>
Welcome to your new app.
<SurveyPrompt Title="How is Blazor working for you?" />
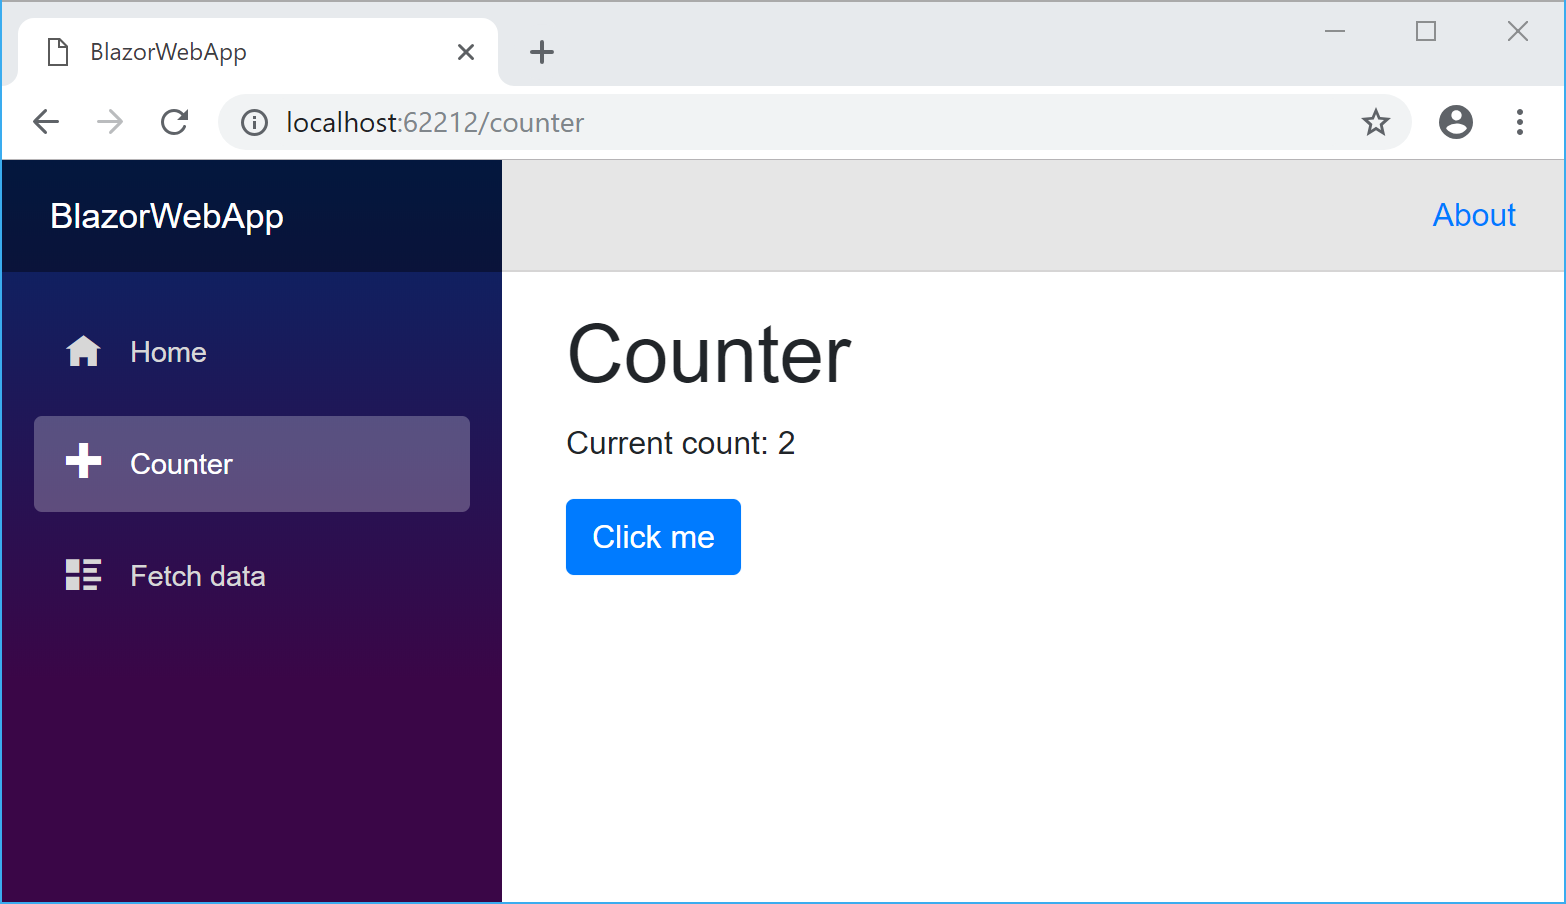
The @page directive here sets up the page and also the “/” default route for when the application is loaded. Note the SurveyPrompt tag here. This component is defined in a Shared file, SurveyPrompt.cshtml, while the navigation menu is defined in NavMenu.cshtml, which handles the functionality of the collapsible menu. The nav menu, in turn, contains a link to the “counter” route, which is defined in a Counter.cshtml page.
@page "/counter"
<h1>Counter</h1>
<p>Current count: @currentCount</p>

<button class="btn btn-primary" onclick="@IncrementCount">Click me</button>

@functions {
   int currentCount = 0;
   void IncrementCount()
   {
      currentCount++;
   }
}
This is where the magic happens. The HTML <button> element contains a client-side onclick event, that triggers a C# method called IncrementCount(). This may look like a server-side method to a seasoned ASP .NET MVC developer, but Blazor allows this HTML button to use a typical JavaScript event to call a method defined in C#.
Run the sample Blazor app to see the counter in action.
How does it accomplish this magical feat? According to the Blazor FAQ, “Running .NET in the browser is made possible by a relatively new standardized web technology called WebAssembly. WebAssembly is a ‘portable, size- and load-time-efficient format suitable for compilation to the web.’ Code compiled to WebAssembly can run in any browser at native speeds. To run .NET binaries in a web browser, we use a .NET runtime (specifically Mono) that has been compiled to WebAssembly.”
There’s so much to learn about Blazor, I would highly recommend watching this video from Daniel Roth during dotnetconf 2018, available on YouTube:
- Blazor (dotnetconf 2018): https://youtu.be/61qmX5eAPwI
MVC Views Explained
Razor Views in MVC (not to be confused with the all aforementioned Razor Pages) have been around the longest in the life of ASP .NET, and also have a more complex structure compared to the newer web app View technologies explained above. Just take a look at the MVC sample app and compare it to the Razor sample app.
https://github.com/shahedc/PagesDemo/tree/master/MvcWebApp
Each Razor view in an MVC web app is simple enough. However, it’s the plumbing behind it that makes it more time-consuming to set up, even for a simple page. Before an MVC View page can be displayed, you would have to set up a Controller to handle browser requests, an optional Model to represent properties that will be viewed/edited on the page, and of course the Razor view that displays the page. An example would be the About view page:
@{
 ViewData["Title"] = "About";
}
<h2>@ViewData["Title"]</h2>
<h3>@ViewData["Message"]</h3>

<p>Use this area to provide additional information.</p>
Note that an MVC View does not need any @page directive or similar directive to declare what it is. The .cshtml file extension allows it to be processed as an MVC View, and by convention, it needs to be located within a subfolder named after its corresponding Controller (e.g. Home), nested below the “Views” folder. The Home controller has an About() method that returns the View page as its default View().
public IActionResult About()
{
   ViewData["Message"] = "Your application description page.";
   return View();
}
All this magic happens due to this use of standard conventions and the call to app.UseMvc() in Startup.cs, which maps the default route to allow the user to browse to /Home/About.
app.UseMvc(routes =>
{
   routes.MapRoute(
      name: "default",
      template: "{controller=Home}/{action=Index}/{id?}");
});
When using a Razor view in an ASP .NET MVC web app, you’ll have to write client-side JavaScript to run any code in the browser. This makes Blazor a game-changer, allowing you to write C# code both on the client and server, and possibly share code libraries as well.
6. When should I use each?
If you’re already familiar with MVC, feel free to use what you know best as it will continue to be supported. But if have some free time to learn something new, you owe it to yourself to check out Razor Pages, which is fairly new, as of ASP .NET Core 2.0.
If you really want to try out something new and exciting, definitely use Blazor for a full-stack C# experience in web development. It’s still experimental as of late 2018, so don’t expect to use it in production just yet, but do keep an eye on the ASP .NET Core roadmap.
7. Can I mix and match the new Razor Pages with the old Razor views?
Try to use Razor Pages to simplify your code structure where it makes sense, but feel free to have typical MVC controllers and views if you wish. You should definitely have this discussion with your team members and collaborators to figure out what works best for your project(s) at this time.
Pingback: Dew Drop - October 22, 2018 (#2828) - Morning Dew
Blazer is a technology which uses web assembly for running an application. It uses ASP.NET Core to build the application and has many similarities to the current UI Framework languages, like React or Angular.
For a C# developer, it is a great platform to build an application, especially, a single page application. Although it is not available for the production system yet, an exciting time is ahead with this for sure.
Yep, exciting times ahead with Blazor and ASP .NET Core! 🙂
Pingback: Your First Razor UI Library with ASP .NET Core | Wake Up And Code!
Pingback: Blazor Full-Stack Web Dev in ASP .NET Core | Wake Up And Code!
Pingback: Razor Pages in ASP .NET Core | Wake Up And Code!