
This is the twenty-first of a new series of posts on ASP .NET Core 3.1 for 2020. In this series, we’ll cover 26 topics over a span of 26 weeks from January through June 2020, titled ASP .NET Core A-Z! To differentiate from the 2019 series, the 2020 series will mostly focus on a growing single codebase (NetLearner!) instead of new unrelated code snippets week.
Previous post:
NetLearner on GitHub:
- Repository: https://github.com/shahedc/NetLearnerApp
- v0.21-alpha release: https://github.com/shahedc/NetLearnerApp/releases/tag/v0.21-alpha
In this Article:
- U is for Unit Testing
- Setting up Unit Testing
- Facts, Theories and Inline Data
- Asserts and Exceptions
- Running Tests
- Custom Names and Categories
- Next Steps
- References
U is for Unit testing
Whether you’re practicing TDD (Test-Driven Development) or writing your tests after your application code, there’s no doubt that unit testing is essential for web application development. When it’s time to pick a testing framework, there are multiple alternatives such as xUnit.net, NUnit and MSTest. This article will focus on xUnit.net because of its popularity (and similarity to its alternatives) when compared to the other testing frameworks.
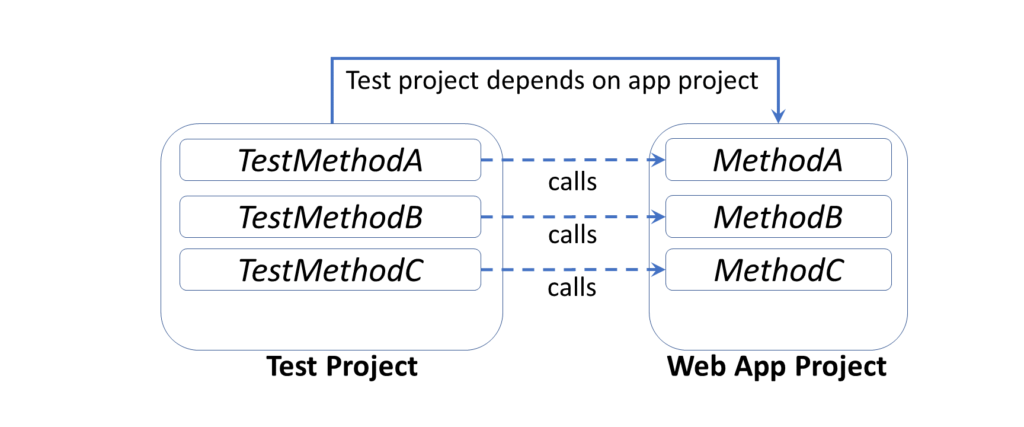
In a nutshell: a unit test is code you can write to test your application code. Your web application will not have any knowledge of your test project, but your test project will need to have a dependency of the app project that it’s testing.
Here are some poll results, from asking 500+ developers about which testing framework they prefer, showing xUnit.net in the lead (from May 2019).
- Twitter poll: https://twitter.com/shahedC/status/1131337874903896065
A similar poll on Facebook also showed xUnit.net leading ahead of other testing frameworks. If you need to see the equivalent attributes and assertions, check out the comparison table provided by xUnit.net:
- Comparing xUnit.net to other frameworks: https://xunit.net/docs/comparisons
To follow along, take a look at the test projects on Github:
- Shared Library tests: https://github.com/shahedc/NetLearnerApp/tree/main/src/NetLearner.SharedLib.Tests
- MVC tests: https://github.com/shahedc/NetLearnerApp/tree/main/src/NetLearner.Mvc.Tests
- Razor Pages tests: https://github.com/shahedc/NetLearnerApp/tree/main/src/NetLearner.Pages.Tests
- Blazor tests: https://github.com/shahedc/NetLearnerApp/tree/main/src/NetLearner.Blazor.Tests
Setting up Unit Testing
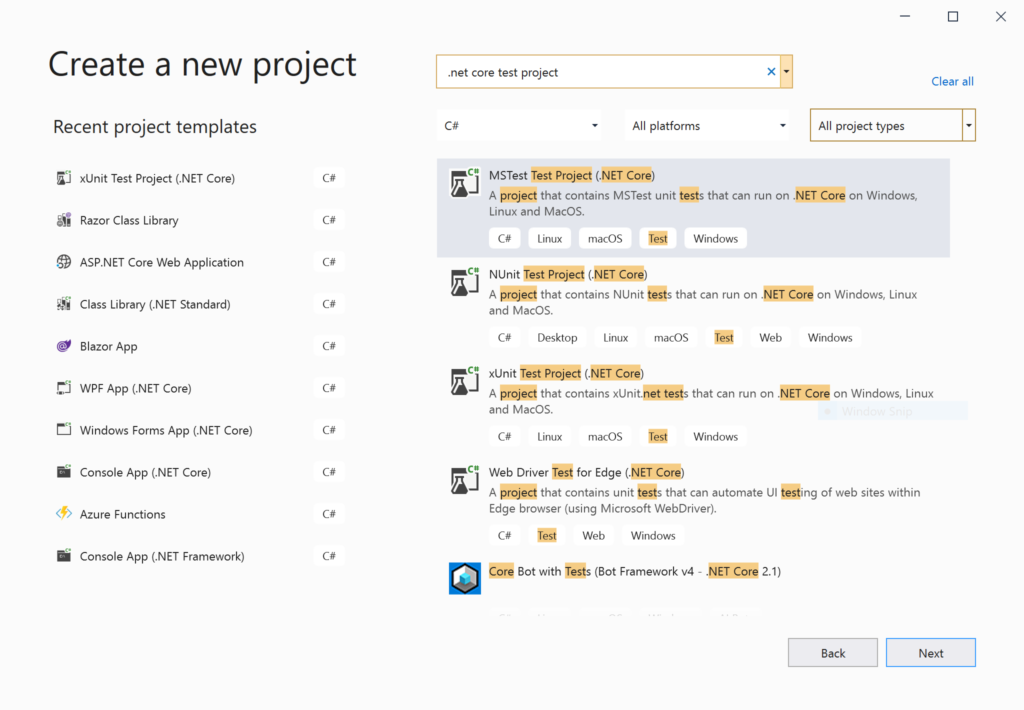
The quickest way to set up unit testing for an ASP .NET Core web app project is to create a new test project using a template. This creates a cross-platform .NET Core project that includes one blank test. In Visual Studio 2019, search for “.net core test project” when creating a new project to identify test projects for MSTest, XUnit and NUnit. Select the XUnit project to follow along with the NetLearner samples.
The placeholder unit test class includes a blank test. Typically, you could create a test class for each application class being tested. The simplest unit test usually includes three distinct steps: Arrange, Act and Assert.
- Arrange: Set up the any variables and objects necessary.
- Act: Call the method being tested, passing any parameters needed
- Assert: Verify expected results
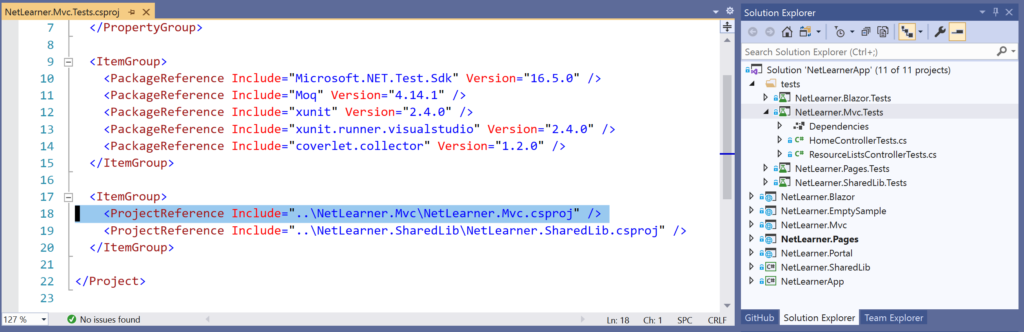
The unit test project should have a dependency for the app project that it’s testing. In the test project file NetLearner.Mvc.Tests.csproj, you’ll find a reference to NetLearner.Mvc.csproj.
...
<ItemGroup>
   <ProjectReference Include="..\NetLearner.Mvc\NetLearner.Mvc.csproj" />
</ItemGroup>
...
In the Solution Explorer panel, you should see a project dependency of the reference project.
If you need help adding reference projects using CLI commands, check out the official docs at:
- Unit testing C# code in .NET Core using dotnet test and xUnit: https://docs.microsoft.com/en-us/dotnet/core/testing/unit-testing-with-dotnet-test#creating-the-test-project
Facts, Theories and Inline Data
When you add a new xUnit test project, you should get a simple test class (UnitTest1) with an empty test method (Test1). This test class should be a public class and the test method should be decorated with a [Fact] attribute. The attribute indicates that this is a test method without any parameters, e.g. Test1().
public class UnitTest1
{
   [Fact]
   public void Test1()
   {

   }
}
In the NetLearner Shared Library test project, you’ll see a test class (ResourceListServiceTests.cs) with a series of methods that take 1 or more parameters. Instead of a [Fact] attribute, each method has a [Theory] attribute. In addition to this primary attribute, each [Theory] attribute is followed by one of more [InlineData] attributes that have sample argument values for each method parameter.
[Theory(DisplayName = "Add New Resource List")]
[InlineData("RL1")]
public async void TestAdd(string expectedName)
{
   ...
}
In the code sample, each occurrence of [InlineData] should reflect the test method’s parameters, e.g.
- [InlineData(“RL1”)] –> this implies that expectedName = “RL1”
NOTE: If you want to skip a method during your test runs, simply add a Skip parameter to your Fact or Theory with a text string for the “Reason”.
e.g.
- [Fact(Skip=”this is broken”)]
- [Theory(Skip=”we should skip this too”)]
Asserts and Exceptions
Back to the 3-step process, let’s explore the TestAdd() method and its method body.
public async void TestAdd(string expectedName)
{
    var options = new DbContextOptionsBuilder<LibDbContext>()
        .UseInMemoryDatabase(databaseName: "TestNewListDb").Options;

    // Set up a context (connection to the "DB") for writing
    using (var context = new LibDbContext(options))
    {
        // 1. Arrange
        var rl = new ResourceList
        {
            Name = "RL1"
        };

        // 2. Act
        var rls = new ResourceListService(context);
        await rls.Add(rl);
    }

    using (var context = new LibDbContext(options))
    {
        var rls = new ResourceListService(context);
        var result = await rls.Get();

        // 3. Assert
        Assert.NotEmpty(result);
        Assert.Single(result);
        Assert.NotEmpty(result.First().Name);
        Assert.Equal(expectedName, result.First().Name);
    }
}
- During the Arrange step, we create a new instance of an object called ResourceList which will be used during the test.
- During the Act step, we create a ResourceListService object to be tested, and then call its Add() method to pass along a string value that was assigned via InlineData.
- During the Assert step, we compare the expectedName (passed by InlineData) with the returned result (obtained from a call to the Get method in the service being tested).
The Assert.Equal() method is a quick way to check whether an expected result is equal to a returned result. If they are equal, the test method will pass. Otherwise, the test will fail. There is also an Assert.True() method that can take in a boolean value, and will pass the test if the boolean value is true.
For a complete list of Assertions in xUnit.net, refer to the Assertions section of the aforementioned comparison table:
- Assertions in unit testing frameworks: https://xunit.net/docs/comparisons#assertions
If an exception is expected, you can assert a thrown exception. In this case, the test passes if the exception occurs. Keep in mind that unit tests are for testing expected scenarios. You can only test for an exception if you know that it will occur, e.g.
Exception ex = Assert
    .Throws<SpecificException>(() => someObject.MethodBeingTested(x, y));
The above code tests a method named MethodBeingTested() for someObject being tested. A SpecificException() is expected to occur when the parameter values x and y are passed in. In this case, the Act and Assert steps occur in the same statement.
NOTE: There are some differences in opinion whether or not to use InMemoryDatabase for unit testing. Here are some viewpoints from .NET experts Julie Lerman (popular Pluralsight author) and Nate Barbettini (author of the Little ASP .NET Core book):
- Julie Lerman: “If you use it wisely and are benefiting (not as a replacement for integration tests) then they are AOK in my mind.”
- Nate Barbettini: “I still might use InMemory for early rapid prototyping work, but no longer use it for testing. I don’t let any unit tests talk to the DB (pure classes and methods under test only), and no longer use InMemory for integration tests.”
- Discussion on GitHub: https://github.com/dotnet/efcore/issues/18457
Running Tests
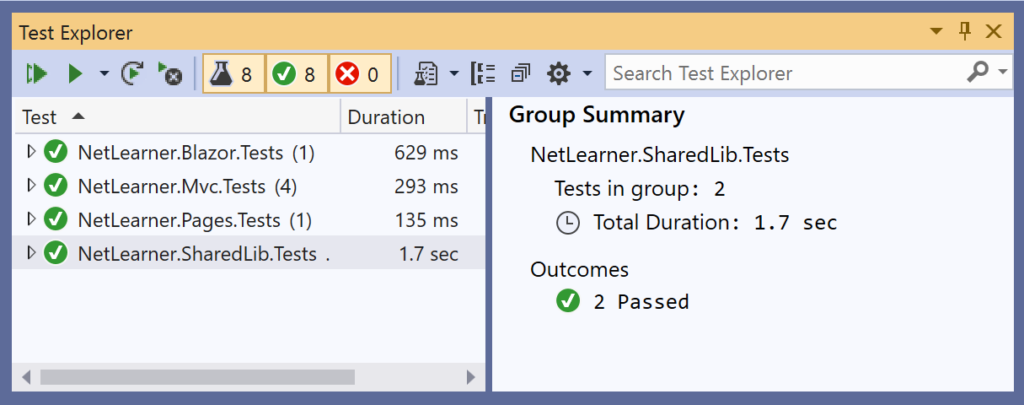
To run your unit tests in Visual Studio, use the Test Explorer panel.
- From the top menu, click Test | Windows | Test Explorer
- In the Test Explorer panel, click Run All
- Review the test status and summary
- If any tests fail, inspect the code and fix as needed.
To run your unit tests with a CLI Command, run the following command in the test project folder:
> dotnet test
The results may look something like this:
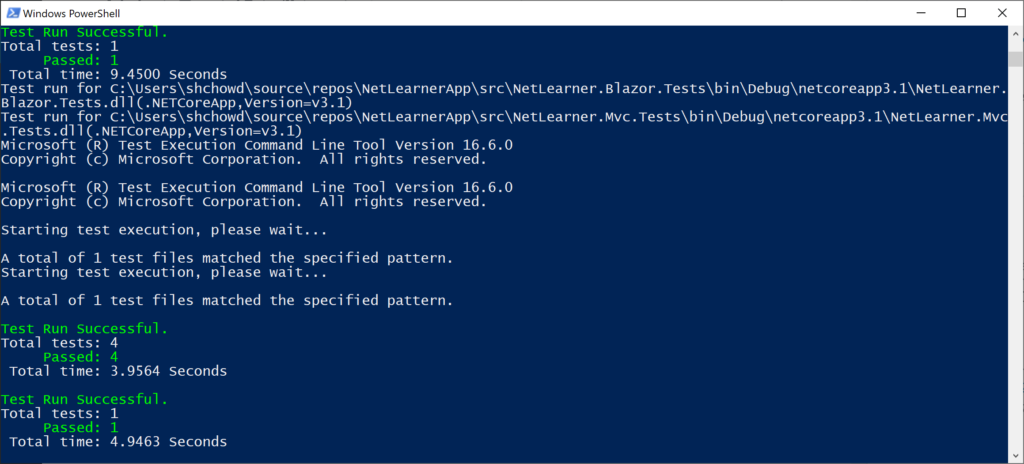
As of xUnit version 2, tests can automatically run in parallel to save time. Test methods within a class are considered to be in the same implicit collection, and so will not be run in parallel. You can also define explicit collections using a [Collection] attribute to decorate each test class. Multiple test classes within the same collection will not be run in parallel.
For more information on collections, check out the official docs at:
- Running Tests in Parallel: https://xunit.net/docs/running-tests-in-parallel
NOTE: Visual Studio includes a Live Unit Testing feature that allows you to see the status of passing/failing tests as you’re typing your code. This feature is only available in the Enterprise Edition of Visual Studio.
Custom Names and Categories
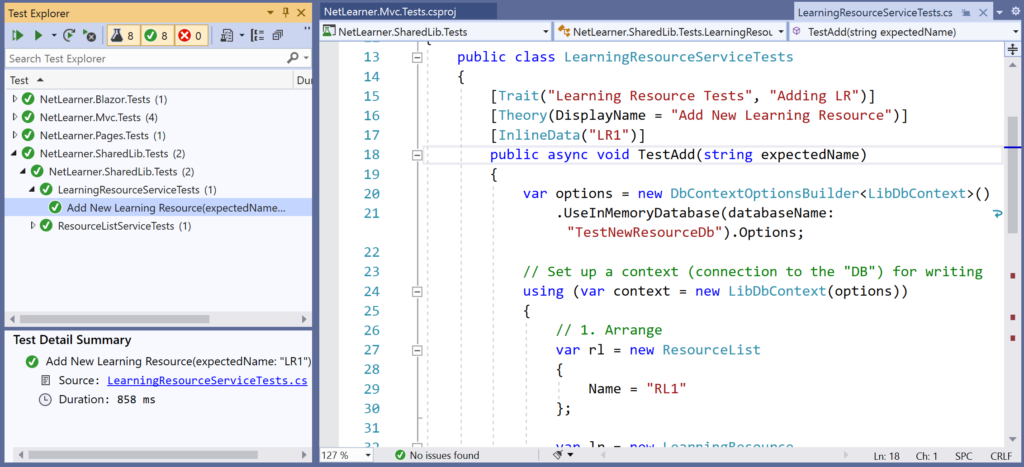
You may have noticed a DisplayName parameter when defining the [Theory] attribute in the code samples. This parameter allows you to defined a friendly name for any test method (Fact or Theory) that can be displayed in the Test Explorer. For example:
[Theory(DisplayName = "Add New Learning Resource")]
Using the above attribute above the TestAdd() method will show the friendly name “Add New Learning Resource” in the Test Explorer panel during test runs.
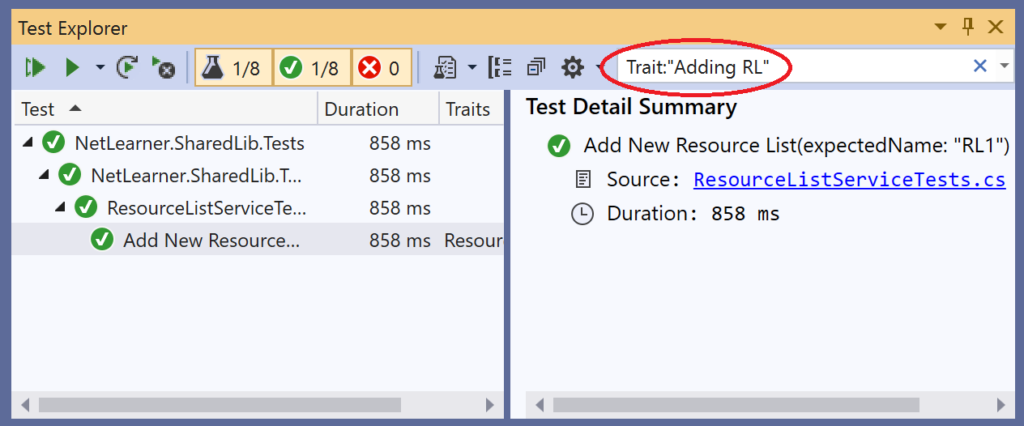
Finally, consider the [Trait] attribute. This attribute can be use to categorize related test methods by assigning an arbitrary name/value pair for each defined “Trait”. For example (from LearningResource and ResourceList tests, respectively):
[Trait("Learning Resource Tests", "Adding LR")]
public void TestAdd() { ... }

[Trait("Resource List Tests", "Adding RL")]
public void TestAdd { ... }
Using the above attribute for the two TestAdd() methods will categorize the methods into their own named “category”, e.g. Learning Resource Tests and Resource List Tests. This makes it possible to filter just the test methods you want to see, e.g. Trait: “Adding RL”
Next Steps: Mocking, Integration Tests and More!
There is so much more to learn with unit testing. You could read several chapters or even an entire book on unit testing and related topics. To continue your learning in this area, consider the following:
- MemberData: use the MemberData attribute to go beyond isolated test methods. This allows you to reuse test values for multiples methods in the test class.
- ClassData: use the ClassData attribute to use your test data in multiple test classes. This allows you to specify a class that will pass a set of collections to your test method.
For more information on the above, check out this Nov 2017 post from Andrew Lock:
- Creating parameterised tests in xUnit with [InlineData], [ClassData], and [MemberData]: https://andrewlock.net/creating-parameterised-tests-in-xunit-with-inlinedata-classdata-and-memberdata/
To go beyond Unit Tests, consider the following:
- Mocking: use a mocking framework (e.g. Moq) to mock external dependencies that you shouldn’t need to test from your own code.
- Integration Tests: use integration tests to go beyond isolated unit tests, to ensure that multiple components of your application are working correctly. This includes databases and file systems.
- UI Tests: test your UI components using a tool such as Selenium WebDriver or IDE in the language of your choice, e.g. C#. For browser support, you may use Chrome or Firefox extensions, so this includes the new Chromium-based Edge browser.
While this article only goes into the shared library, the same concepts carry over into the testing of each individual web app project (MVC, Razor Pages and Blazor). Refer to the following documentation and blog content for each:
- MVC unit tests in ASP .NET Core: https://docs.microsoft.com/en-us/aspnet/core/mvc/controllers/testing?view=aspnetcore-3.1
- Razor Pages unit tests in ASP.NET Core: https://docs.microsoft.com/en-us/aspnet/core/test/razor-pages-tests
- Blazor unit tests with bUnit (Preview): https://www.telerik.com/blogs/unit-testing-blazor-components-bunit-justmock
Refer to the NetLearner sample code for unit tests for each web project:
- MVC Controller: https://github.com/shahedc/NetLearnerApp/blob/main/src/NetLearner.Mvc.Tests/ResourceListsControllerTests.cs
- Razor Pages: https://github.com/shahedc/NetLearnerApp/blob/main/src/NetLearner.Pages.Tests/ResourceListPageTests.cs
- Blazor: https://github.com/shahedc/NetLearnerApp/blob/main/src/NetLearner.Blazor.Tests/BlazorTest.cs
In order to set up a shared service object to be used by the controller/page/component being tested, Moq is used to mock the service. For more information on Moq, check out their official documentation on GitHub:
- Moq on GitHub: https://github.com/Moq/moq4/wiki/Quickstart
For the Blazor testing project, the following references were consulted:
- Telerik Blazor Testing Guide (using bUnit beta 6): https://www.telerik.com/blogs/unit-testing-blazor-components-bunit-justmock
- bUnit on GitHub (currently at beta 7): https://github.com/egil/bunit
NOTE: Due to differences between bUnit beta 6 and 7, there are some differences between the Blazor guide and the NetLearner tests on Blazor. I started off with the Blazor guide, but made some notable changes.
- Instead of starting with a Razor Class Library template for the test project, I started with the xUnit Test Project template.
- There was no need to change the test project’s target framework from .NET Standard to .NET Core 3.1 manually, since the test project template was already Core 3.1 when created.
- As per the bUnit guidelines, the test class should no longer be derived from the ComponentTestFixture class, which is now obsolete: https://github.com/egil/bunit/blob/6c66cc2c77bc8c25e7a2871de9517c2fbe6869dd/src/bunit.web/ComponentTestFixture.cs
- Instead, the test class is now derived from the TestContext class, as seen in the bUnit source code: https://github.com/egil/bunit/blob/6c66cc2c77bc8c25e7a2871de9517c2fbe6869dd/src/bunit.web/TestContext.cs
References
- Getting started: .NET Core with command line > xUnit.net: https://xunit.net/docs/getting-started/netcore/cmdline
- Running Tests in Parallel > xUnit.net: https://xunit.net/docs/running-tests-in-parallel
- Unit testing C# code in .NET Core using dotnet test and xUnit: https://docs.microsoft.com/en-us/dotnet/core/testing/unit-testing-with-dotnet-test
- Test controller logic in ASP.NET Core: https://docs.microsoft.com/en-us/aspnet/core/mvc/controllers/testing
- Integration tests in ASP.NET Core: https://docs.microsoft.com/en-us/aspnet/core/test/integration-tests
- Razor Pages unit tests in ASP.NET Core: https://docs.microsoft.com/en-us/aspnet/core/test/razor-pages-tests
- Unit testing in .NET Core and .NET Standard – .NET Core: https://docs.microsoft.com/en-us/dotnet/core/testing/
- Integration tests with default Web Application Factory: https://docs.microsoft.com/en-us/aspnet/core/test/integration-tests?view=aspnetcore-3.1#basic-tests-with-the-default-webapplicationfactory
- Introducing the .NET Core Unit Testing Framework (or: Why xUnit?): https://visualstudiomagazine.com/articles/2018/11/01/net-core-testing.aspx?m=1
- Writing xUnit Tests in .NET Core: https://visualstudiomagazine.com/articles/2018/11/01/xunit-tests-in-net-core.aspx
- Live Unit Testing – Visual Studio: https://docs.microsoft.com/en-us/visualstudio/test/live-unit-testing
- Mocks Aren’t Stubs: https://martinfowler.com/articles/mocksArentStubs.html
- Mocking in .NET Core Tests with Moq: http://dontcodetired.com/blog/post/Mocking-in-NET-Core-Tests-with-Moq
- Moq – Unit Test In .NET Core App Using Mock Object: https://www.c-sharpcorner.com/article/moq-unit-test-net-core-app-using-mock-object/
- Fake Data with Bogus: https://github.com/bchavez/Bogus
Pingback: Dew Drop – May 26, 2020 (#3204) | Morning Dew
Pingback: The Morning Brew - Chris Alcock » The Morning Brew #3001
As someone who has been unit testing for more than 20 years now, I feel your fixation on XUnit is unwarranted. it may be popular according to a very small survey, but it is not actually better. The comparison table is particularly unfair. For example, there are many more attributes that NUnit has that XUnit has no equivalents for. They are often useful in bringing legacy code under test. NUnit does not require the [TestFixture] attribute either, and has not for some years now.
The lack of assertions in XUnit forces very poor assertions to be written, e.g.
Assert.IsTrue(x > y);
This is very poor unit test coding. I highly recommend using FluentAssertions instead of native assertions for all the testing frameworks, but it is essential when using XUnit, as it’s own assertions are so lacking.
Despite the XUnit author’s opinion, setup and teardown methods are far clearer than constructors and destructors, and the various levels of each (before/after each test, before/after any test in a fixture, before/after all tests) are far easier to implement in NUnit. While not much used in greenfield projects, they are essential when bringing legacy code under test.
Also, your unit test example has multiple problems. A clue to beginner-level unit testing is the use of // Arrange, // Act, //Assert comments. If it is not clear from reading the code which line(s) are for what, then your test is badly written.
In this case the test is far too long. Partly this is because of the setup is very long. (BTW, the first line under the //Act comment is actually setup.) It is also because there are multiple assertions. This is generally bad practice. In your case you only actually need one assertion, that your list only contains the object you expect. This is easy to achieve with FluentAssertions, and is also possible with NUnit constraints. XUnit has no native support for that.
There is no need to test that the list is not empty, or test the count specifically, or that the name field of the first record is not null. If any of those things are not true then the test should fail anyway. (As an aside, in my mind, this also implies that your business logic that will use ResourceListService will need to do far too much null checking. But that’s a different discussion.)
Also, your naming needs work. There is no need to use the word “test” in a test. We already know this is a test from the attribute. A good convention is to use descriptive names, where you say what behaviour you expect. This helps enormously when, down the track, a test fails. It’s essential to be able to tell whether the test failed because required behaviour is broken, or whether the behaviour under test should change.
Your variable names need to be descriptive, and using the same variable name twice in different scopes (and indeed having two different scopes in the first place), is not helping clarity.
Finally, there is a bug in your code, that means I would not expect this test to pass, except by fluke. You have a parameter called “expectedName”, which you use in the assertion. However, you have hard-coded the name during your setup steps, so trying any other name will cause the test to fail.
This is probably an indication that you have not followed the “Red/Green/Refactor” mantra of TDD. You must ensure that your tests can fail!
To sum up:
– XUnit is not better than NUnit (although this opinion is often held by unit testing newbies, including some influential Microsoftees)
– Regardless of test framework, use FluentAssertions
– Never use IsTrue/IsFalse for anything other than boolean properties or function return values
– Write short, clear tests
– Naming is even more important in tests. This is your true documentation. Treat it that way!
– Make sure your tests can fail!!
Thanks for the detailed comments, Jim! My choice of XUnit is heavily influenced by my personal experiences. One of the reasons why I blog, is to hear from the community, so that I can get opposing viewpoints and important feedback such as yours. I’ve approved your comment for all readers to see.
Also: when I get some free time, I’ll make the necessary corrections and improvements (whatever is possible with XUnit that is)
Pingback: YAML-defined CI/CD for ASP .NET Core 3.1 | Wake Up And Code!