This is the twenty-second of a series of posts on ASP .NET Core in 2019. In this series, we’ll cover 26 topics over a span of 26 weeks from January through June 2019, titled A-Z of ASP .NET Core!
 A – Z of ASP .NET Core!
In this Article:
- V is for Validation
- Validation Attributes
- Server-Side Validation
- Client-Side Validation
- Client to Server with Remote Validation
- Custom Attributes
- References
V is for Validation
To build upon a previous post on Forms and Fields in ASP .NET Core, this post covers Validation in ASP .NET Core. When a user submits form field values, proper validation can help build a more user-friendly and secure web application. Instead of coding each view/page individually, you can simply use server-side attributes in your models/viewmodels.
NOTE: As of ASP .NET Core 2.2, validation may be skipped automatically if ASP .NET Core decides that validation is not needed. According to the “What’s New” release notes, this includes primitive collections (e.g. a byte[] array or a Dictonary<string, string> key-value pair collection)
This article will refer to the following sample code on GitHub:
![]() Validation Sample App: https://github.com/shahedc/ValidationSampleApp
Validation Sample App: https://github.com/shahedc/ValidationSampleApp
Validation Attributes
To implement model validation with [Attributes], you will typically use Data Annotations from the System.ComponentModel.DataAnnotations namespace. The list of attribute does go beyond just validation functionality though. For example, the DataType attribute takes a datatype parameter, used for inferring the data type and used for displaying the field on a view/page (but does not provide validation for the field).
Common attributes include the following
- Range: lets you specify min-max values, inclusive of min and max
- RegularExpression: useful for pattern recognition, e.g. phone numbers, zip/postal codes
- Required: indicates that a field is required
- StringLength: sets the maximum length for the string entered
- MinLength: sets the minimum length of an array or string data
From the sample code, here is an example from the CinematicItem model class:
public class CinematicItem
{
   public int Id { get; set; }

   [Range(1,100)]
   public int Score { get; set; }

   [Required]
   [StringLength(100)]
   public string Title { get; set; }

   [StringLength(255)]
   public string Synopsis { get; set; }

   [DataType(DataType.Date)]
   [DisplayName("Available Date")]
   public DateTime AvailableDate { get; set; }

   [Required]
   [DisplayName("Movie/Show/etc")]
   public CIType CIType { get; set; }
}
From the above code, you can see that:
- The value for Score can be 1 or 100 or any integer in between
- The value for Title is a required string, needs to be less than 100 characters
- The value for Synopsis can be left blank, but has to be less than 100 characters.
- The value for AvailableDate is displayed as “Available Date” (with a space)
- Because of the DataType provided, AvailableDate is displayed as a selectable date in the browser
- The value for CIType (short for Cinematic Item Type) is displayed as “Movie/Show/etc” and is displayed as a selectable value obtained from the CIType data type (which happens to be an enumerator. (shown below)
public enum CIType
{
   Movie,
   Series,
   Short
}
Here’s what it looks like in a browser when validation fails:
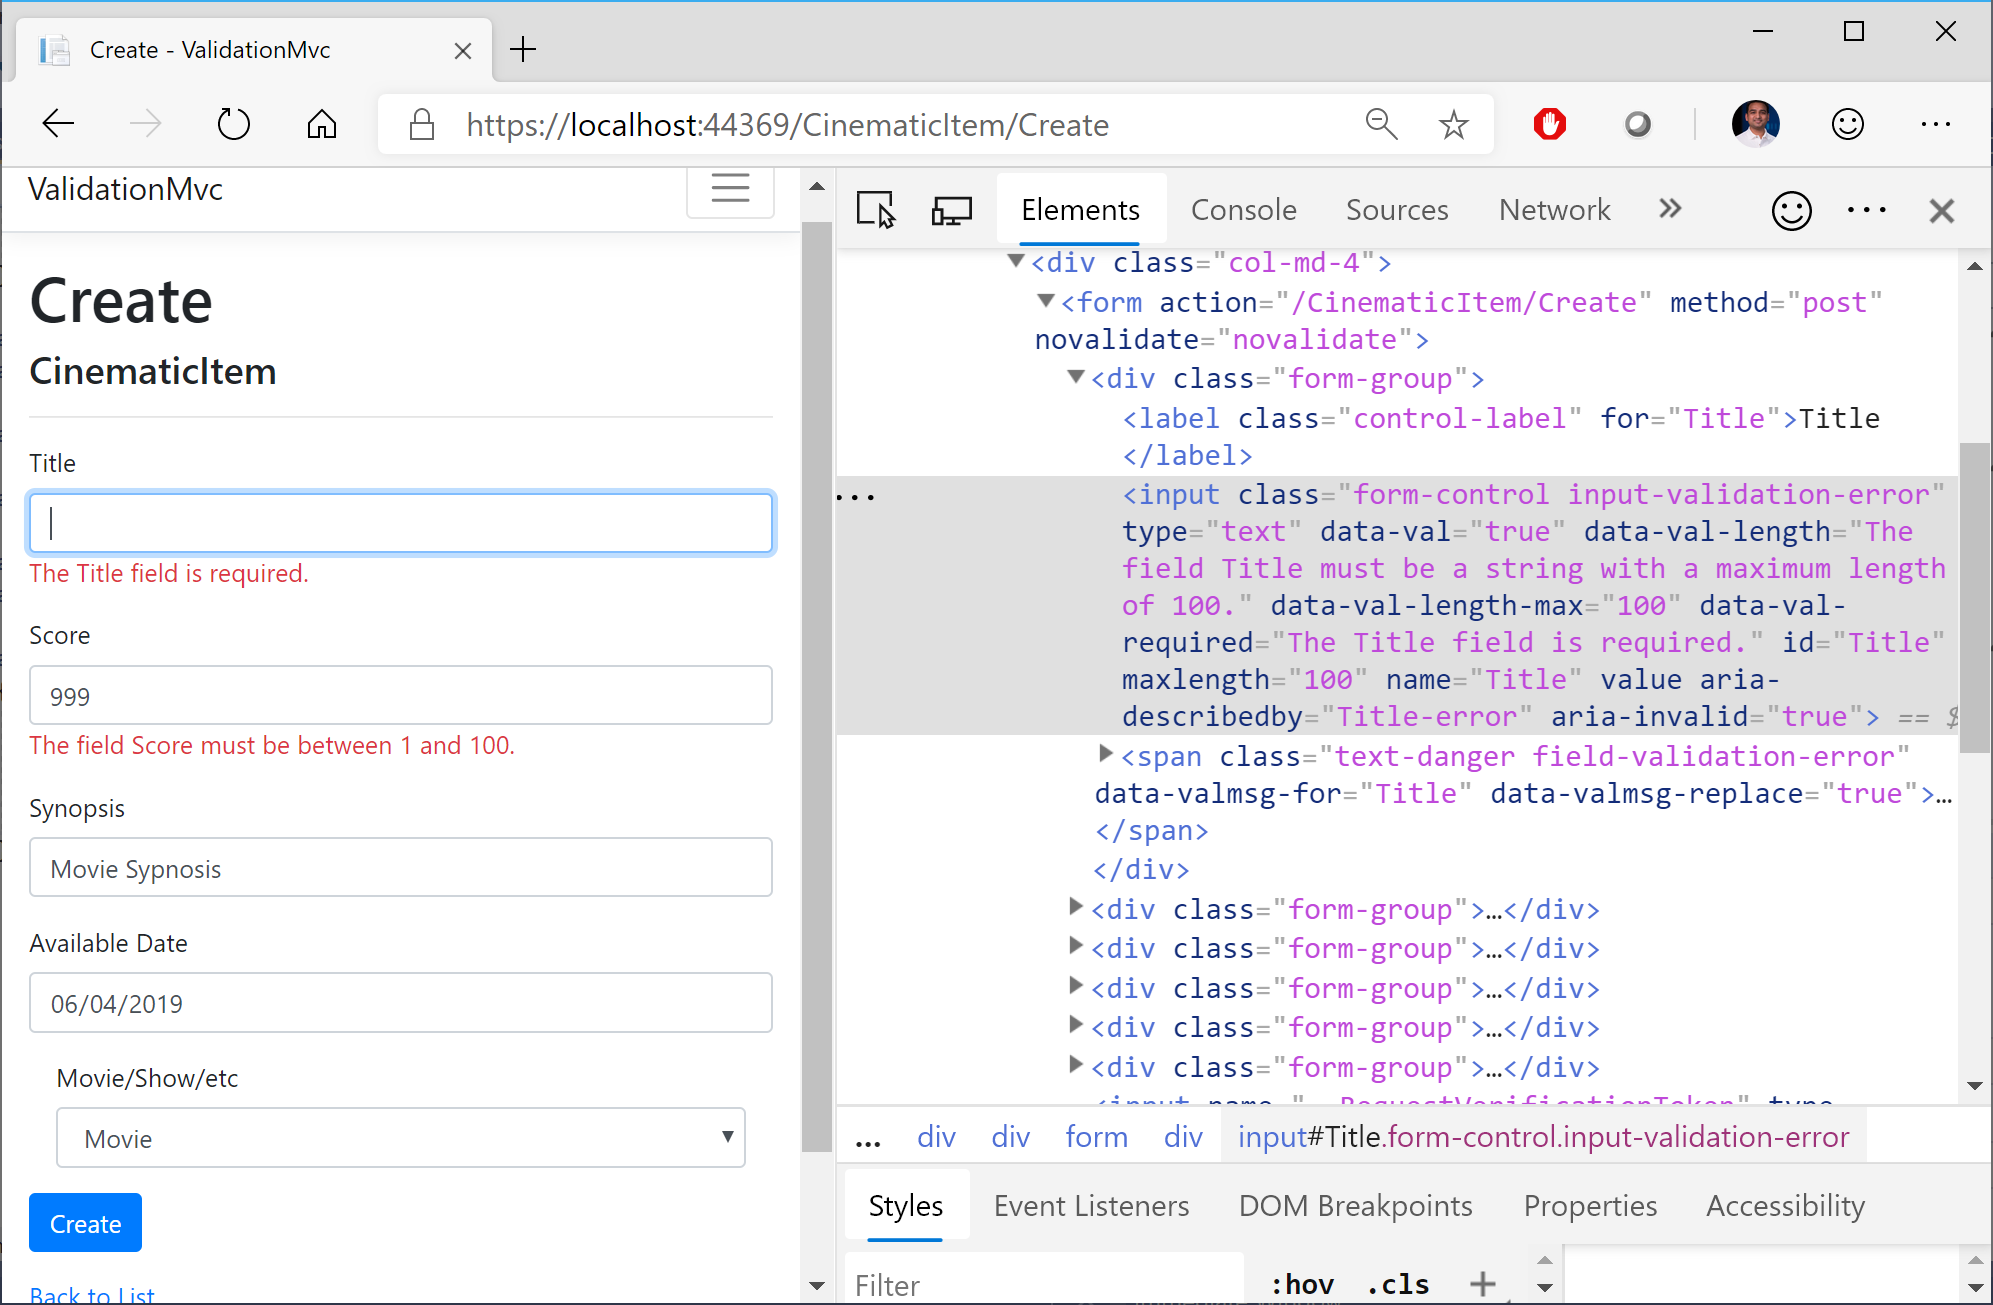
The validation rules make it easier for the user to correct their entries before submitting the form.
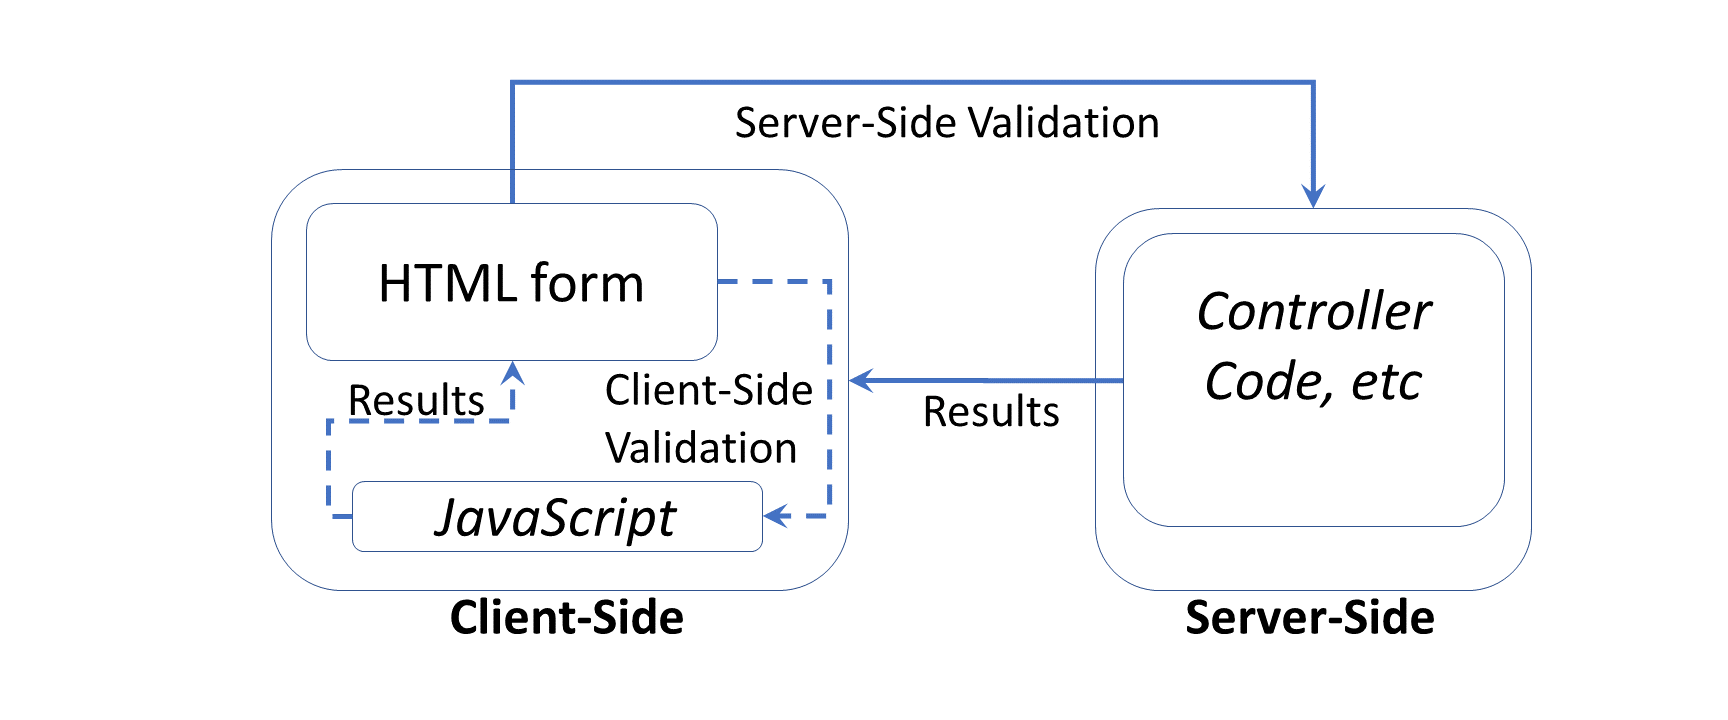
Server-Side Validation
Validation occurs before an MVC controller action (or equivalent handler method for Razor Pages) takes over. As a result, you should check to see if the validation has passed before continuing next steps.
e.g. in an MVC controller
[HttpPost]
[ValidateAntiForgeryToken]
public async Task<IActionResult> Create(...)
{
   if (ModelState.IsValid)
   {
      // ...
      return RedirectToAction(nameof(Index));
   }
   return View(cinematicItem);
}
e.g. in a Razor Page’s handler code:
public async Task<IActionResult> OnPostAsync()
{
   if (!ModelState.IsValid)
   {
      return Page();
   }

   //...
   return RedirectToPage("./Index");
}
Note that ModelState.IsValid is checked in both the Create() action method of an MVC Controller or the OnPostAsync() handler method of a Razor Page’s handler code. If IsValid is true, perform actions as desired. If false, reload the current view/page as is.
Client-Side Validation
It goes without saying that you should always have server-side validation. All the client-side validation in the world won’t prevent a malicious user from sending a GET/POST request to your form’s endpoint. Cross-site request forgery in the Form tag helper does provide a certain level of protection, but you still need server-side validation. That being said, client-side validation helps to catch the problem before your server receives the request, while providing a better user experience.
When you create a new ASP .NET Core project using one of the built-in templates, you should see a shared partial view called _ValidationScriptsPartial.cshtml. This partial view should include references to jQuery unobtrusive validation, as shown below:
<environment include="Development">
   <script src="~/lib/jquery-validation/dist/jquery.validate.js"></script>
   <script src="~/lib/jquery-validation-unobtrusive/jquery.validate.unobtrusive.js"></script>
</environment>
If you create a scaffolded controller with views/pages, you should see the following reference at the bottom of your page or view.
e.g. at the bottom of Create.cshtml view
@section Scripts {
   @{await Html.RenderPartialAsync("_ValidationScriptsPartial");}
}
e.g. at the bottom of the Create.cshtml page
@section Scripts {
   @{await Html.RenderPartialAsync("_ValidationScriptsPartial");}
}
Note that the syntax is identical whether it’s an MVC view or a Razor page. That being said, you may want to disable client-side validation. This is accomplished in different ways, whether it’s for an MVC view or a Razor page.
From the official docs, the following code should be used within the ConfigureServices() method of your Startup.cs class, to set ClientValidationEnabled to false in your HTMLHelperOptions configuration.
services.AddMvc().AddViewOptions(options =>
{
   if (_env.IsDevelopment())
   {
      options.HtmlHelperOptions.ClientValidationEnabled = false;
   }
});
Also mentioned in the official docs, the following code can be used for your Razor Pages, within the ConfigureServices() method of your Startup.cs class.
services.Configure<HtmlHelperOptions>(o => o.ClientValidationEnabled = false);
Client to Server with Remote Validation
If you need to call a server-side method while performing client-side validation, you can use the [Remote] attribute on a model property. You would then pass it the name of a server-side action method which returns an IActionResult with a true boolean result for a valid field. This [Remote] attribute is available in the Microsoft.AspNetCore.Mvc namespace, from the Microsoft.AspNetCore.Mvc.ViewFeatures NuGet package.
The model property would look something like this:
[Remote(action: "MyActionMethod", controller: "MyControllerName")]
public string MyProperty { get; set; }
In the controller class, (e.g. MyControllerName), you would define an action method with the name specified in the [Remote] attribute parameters, e.g. MyActionMethod.
[AcceptVerbs("Get", "Post")]
public IActionResult MyActionMethod(...)
{
   if (TestForFailureHere())
   {
      return Json("Invalid Error Message");
   }
   return Json(true);
}
You may notice that if the validation fails, the controller action method returns a JSON response with an appropriate error message in a string. Instead of a text string, you can also use a false, null, or undefined value to indicate an invalid result. If validation has passed, you would use Json(true) to indicate that the validation has passed.
So, when would you actually use something like this? Any scenario where a selection/entry needs to be validated by the server can provide a better user experience by providing a result as the user is typing, instead of waiting for a form submission. For example: imagine that a user is buying online tickets for an event, and selecting a seat number displayed on a seating chart. The selected seat could then be displayed in an input field and then sent back to the server to determine whether the seat is still available or not.
Custom Attributes
In addition to all of the above, you can simply build your own custom attributes. If you take a look at the classes for the built-in attributes, e.g. RequiredAttribute, you will notice that they also extend the same parent class:
- System.ComponentModel.DataAnnotations.ValidationAttribute
You can do the same thing with your custom attribute’s class definition:
public class MyCustomAttribute: ValidationAttribute
{
   // ...
}
The parent class ValidationAttribute, has a virtual IsValid() method that you can override to return whether validation has been calculated successfully (or not).
public class MyCustomAttribute: ValidationAttribute
{
   // ...
   protected override ValidationResult IsValid(
      object value, ValidationContext validationContext)
   {
      if (TestForFailureHere())
      {
         return new ValidationResult("Invalid Error Message");
      }

      return ValidationResult.Success;
   }
}
You may notice that if the validation fails, the IsValid() method returns a ValidationResult() with an appropriate error message in a string. If validation has passed, you would return ValidationResult.Success to indicate that the validation has passed.
References
- Add validation to an ASP.NET Core MVC app: https://docs.microsoft.com/en-us/aspnet/core/tutorials/first-mvc-app/validation
- Model validation in ASP.NET Core MVC and Razor Pages: https://docs.microsoft.com/en-us/aspnet/core/mvc/models/validation
- System.ComponentModel.DataAnnotations Namespace: https://docs.microsoft.com/en-us/dotnet/api/system.componentmodel.dataannotations
- ValidationAttribute Class (System.ComponentModel.DataAnnotations): https://docs.microsoft.com/en-us/dotnet/api/system.componentmodel.dataannotations.validationattribute
One more nice option for validation in ASP .NET Core is using the “Fluent Validation” (a popular .NET library for building strongly-typed validation rules): https://fluentvalidation.net/aspnet#asp-net-core
Aah yes, I was expecting this to be the first comment here. 🙂 I had planned a section for FluentValidation, had it in my original outline and notes but removed it in the final draft late last night.
Thanks for sharing the link!
It could be a separate post about that I believe. Maybe just out of this series.
hi Dmitri
thanks for this article
good stuff about validation
Hi Evan, this is Shahed (the author of this article) 🙂
Pingback: The Morning Brew - Chris Alcock » The Morning Brew #2760
Thanks for writing this post !
Pingback: Domain-Driven Design and Entity Framework Core – two years on – The Reformed Programmer