Monthly Archives: March 2020

Middleware in ASP .NET Core 3.1

By Shahed C on March 30, 2020

This is the thirteenth of a new series of posts on ASP .NET Core 3.1 for 2020. In this series, we’ll cover 26 topics over a span of 26 weeks from January through June 2020, titled ASP .NET Core A-Z! To differentiate from the 2019 series, the 2020 series will mostly focus on a growing single codebase (NetLearner!) instead of new unrelated code snippets week.

Previous post:

NetLearner on GitHub:

In this Article:

M is for Middleware in ASP .NET Core

If you’ve been following my blog series (or if you’ve done any work with ASP .NET Core at all), you’ve already worked with the Middleware pipeline. When you create a new project using one of the built-in templates, your project is already supplied with a few calls to add/configure middleware services and then use them. This is accomplished by adding the calls to the Startup.cs configuration methods.

ASP .NET Core 3.1  Middleware Pipeline
ASP .NET Core 3.1 Middleware Pipeline

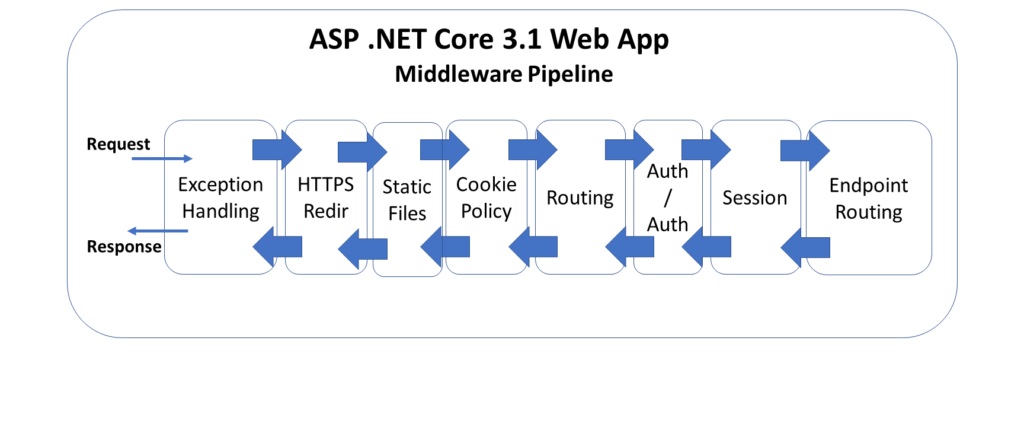
The above diagram illustrates the typical order of middleware layers in an ASP .NET Core web application. The order is very important, so it is necessary to understand the placement of each request delegate in the pipeline.

  • Exception Handling
  • HTTPS Redirection
  • Static Files
  • Cookie Policy
  • Routing
  • Authentication
  • Authorization
  • Session
  • Endpoint Routing

How It Works

When an HTTP request comes in, the first request delegate handles that request. It can either pass the request down to the next in line or short-circuit the pipeline by preventing the request from propagating further. This is use very useful across multiple scenarios, e.g. serving static files without the need for authentication, handling exceptions before anything else, etc.

The returned response travels back in the reverse direction back through the pipeline. This allows each component to run code both times: when the request arrives and also when the response is on its way out.

Here’s what the Configure() method may look like, in a template-generated Startup.cs file:

public void Configure(IApplicationBuilder app, IWebHostEnvironment env)
{
    if (env.IsDevelopment())
    {
        app.UseDeveloperExceptionPage();
    }
    else
    {
        app.UseExceptionHandler("/Error");
        app.UseHsts();
    }

    app.UseHttpsRedirection();
    app.UseStaticFiles();
    app.UseCookiePolicy(); // manually added

    app.UseAuthentication();
    app.UseAuthorization();

    app.UseSession(); // manually added

    app.UseEndpoints(endpoints =>
    {
        // map MVC routes, Razor Pages, Blazor Hub
    });
}

You may add calls to UseCookiePolicy() and UseSession()  manually, as these aren’t included in the template-generated project. The endpoint configuration will vary depending on the type of project template you start with: MVC, Razor Pages or Blazor, which you can mix and match. You may also enable authentication and HTTPS when creating the template.

Adding a new project in VS2019

In order to configure the use of the Session middleware, you may add the following code in your ConfigureServices() method:

public void ConfigureServices(IServiceCollection services)
{
...
    services.AddDistributedMemoryCache();
    services.AddSession(options =>
    {
        options.IdleTimeout = TimeSpan.FromSeconds(10);
        options.Cookie.HttpOnly = true;
        options.Cookie.IsEssential = true;
    });
...
}

The calls to AddDistributedMemoryCache() and AddSession() ensure that we have enabled a (memory cache) backing store for the session and then prepared the Session middleware for use.

Built-In Middleware

The information below explains how the built-in middleware works, and why the order is important. The UseXYZ() methods are merely extension methods that are prefixed with the word “Use” as a useful convention, making it easy to discover Middleware components when typing code. Keep this in mind mind when developing custom middleware.

Exception Handling:

  • UseDeveloperExceptionPage() & UseDatabaseErrorPage(): used in development to catch run-time exceptions
  • UseExceptionHandler(): used in production for run-time exceptions

Calling these methods first ensures that exceptions are caught in any of the middleware components that follow. For more information, check out the detailed post on Handling Errors in ASP .NET Core, earlier in this series.

HSTS & HTTPS Redirection:

  • UseHsts(): used in production to enable HSTS (HTTP Strict Transport Security Protocol) and enforce HTTPS.
  • UseHttpsRedirection(): forces HTTP calls to automatically redirect to equivalent HTTPS addresses.

Calling these methods next ensure that HTTPS can be enforced before resources are served from a web browser. For more information, check out the detailed post on Protocols in ASP .NET Core: HTTPS and HTTP/2.

Static Files:

  • UseStaticFiles(): used to enable static files, such as HTML, JavaScript, CSS and graphics files. Called early on to avoid the need for authentication, session or MVC middleware.

Calling this before authentication ensures that static files can be served quickly without unnecessarily triggering authentication middleware. For more information, check out the detailed post on JavaScript, CSS, HTML & Other Static Files in ASP .NET Core.

Cookie Policy:

  • UseCookiePolicy(): used to enforce cookie policy and display GDPR-friendly messaging

Calling this before the next set of middleware ensures that the calls that follow can make use of cookies if consented. For more information, check out the detailed post on Cookies and Consent in ASP .NET Core.

Authentication, Authorization & Sessions:

  • UseAuthentication(): used to enable authentication and then subsequently allow authorization.
  • UseSession(): manually added to the Startup file to enable the Session middleware.

Calling these after cookie authentication (but before the endpoint routing middleware) ensures that cookies can be issued as necessary and that the user can be authenticated before the endpoint routing kicks in. For more information, check out the detailed post on Authentication & Authorization in ASP .NET Core.

Endpoint Routing:

  • UseEndpoints(): usage varies based on project templates used for MVC, Razor Pages and Blazor.
  • endpoints.MapControllerRoute(): set the default route and any custom routes when using MVC.
  • endpoints.MapRazorPages(): sets up default Razor Pages routing behavior
  • endpoints.BlazorHub(): sets up Blazor Hub

To create your own custom middleware, check out the official docs at:

Branching out with Run, Map & Use

The so-called “request delegates” are made possible with the implementation of three types of extension methods:

  • Run: enables short-circuiting with a terminal middleware delegate
  • Map: allows branching of the pipeline path
  • Use: call the next desired middleware delegate

If you’ve tried out the absolute basic example of an ASP .NET Core application (generated from the Empty template), you may have seen the following syntax in your Startup.cs file.

public void Configure(IApplicationBuilder app, IWebHostEnvironment env)
{
    ...
    app.UseEndpoints(endpoints => 
    {
        endpoints.MapGet("/", async (context) =>
        {
            await context.Response.WriteAsync("Hello World!");
        });
     }); 
}

You can use an alternative approach to terminate the pipeline, by calling app.Use() and then triggering the next middleware component with a call to next(context) as shown below. If there is no call to next(), then it essentially short-circuits the middleware pipeline.

public void Configure(IApplicationBuilder app, IWebHostEnvironment env)
{
    // ...
    // Approach 1: terminal middleware
    app.Use(next => async context =>
    {
        if (context.Request.Path == "/")
        {
            await context.Response.WriteAsync("Hello and goodbye!");
            return;
        }
        await next(context);
    });
    app.UseRouting();
    app.UseEndpoints(...); // Approach 2: routing
}

Finally, there is the Map() method, which creates separate forked paths/branches for your middleware pipeline and multiple terminating ends. Check out the official documentation on mapped branches for more information:

In the Configure() method, each call to app.Map() establishes a separate branch that can be triggered with the appropriate relative path. Each handler method then contains its own terminating map.Run() method.

In the official sample:

  • accessing /map1 in an HTTP request will call HandleMapTest1()
  • accessing /map2 in an HTTP request will call HandleMapTest2()
  • accessing the / root of the web application will call the default terminating Run() method
  • specifying an invalid path will also call the default Run() method

References

Logging in ASP .NET Core 3.1

By Shahed C on March 24, 2020

This is the twelfth of a new series of posts on ASP .NET Core 3.1 for 2020. In this series, we’ll cover 26 topics over a span of 26 weeks from January through June 2020, titled ASP .NET Core A-Z! To differentiate from the 2019 series, the 2020 series will mostly focus on a growing single codebase (NetLearner!) instead of new unrelated code snippets week.

Previous post:

NetLearner on GitHub:

In this Article:

L is for Logging in ASP .NET Core

You could write a fully functional ASP .NET Core web application without any logging. But in the real world, you should use some form of logging. This blog post provides an overview of how you can use the built-in logging functionality in ASP .NET Core web apps. While we won’t go deep into 3rd-party logging solutions such as Serilog in this article, you should definitely consider a robust semantic/structured logging solution for your projects.

Logging providers in ASP .NET Core 3.1

Log Messages

The simplest log message includes a call to the extension method ILogger.Log()  by passing on a LogLevel and a text string. Instead of passing in a LogLevel, you could also call a specific Log method such as LogInformation() for a specific LogLevel. Both examples are shown below:

// Log() method with LogLevel passed in 
_logger.Log(LogLevel.Information, "some text");

// Specific LogXX() method, e.g. LogInformation()
_logger.LogInformation("some text");

LogLevel values include Trace, Debug, Information, Warning, Error, Critical and None. These are all available from the namespace Microsoft.Extensions.Logging. For a more structured logging experience, you should also pass in meaningful variables/objects following the templated message string, as all the Log methods take in a set of parameters defined as “params object[] args”.

public static void Log (
   this ILogger logger, LogLevel logLevel, string message, params object[] args);

This allows you to pass those values to specific logging providers, along with the message itself. It’s up to each logging provider on how those values are captured/stored, which you can also configure further. You can then query your log store for specific entries by searching for those arguments. In your code, this could look something like this:

_logger.LogInformation("some text for id: {someUsefulId}", someUsefulId);

Even better, you can add your own EventId for each log entry. You can facilitate this by defining your own set of integers, and then passing an int value to represent an EventId. The EventId type is a struct that includes an implicit operator, so it essentially calls its own constructor with whatever int value you provide.

_logger.LogInformation(someEventId, "some text for id: {someUsefulId}", someUsefulId);

In the NetLearner.Portal project, we can see the use of a specific integer value for each EventId, as shown below:

// Step X: kick off something here
_logger.LogInformation(LoggingEvents.Step1KickedOff, "Step {stepId} Kicked Off.", stepId);

// Step X: continue processing here
_logger.LogInformation(LoggingEvents.Step1InProcess, "Step {stepId} in process...", stepId);

// Step X: wrap it up
_logger.LogInformation(LoggingEvents.Step1Completed, "Step {stepId} completed!", stepId);

The integer values can be whatever you want them to be. An example is shown below:

public class LoggingEvents
{
   public const int ProcessStarted = 1000; 

   public const int Step1KickedOff = 1001;
   public const int Step1InProcess = 1002;
   public const int Step1Completed = 1003; 
   ...
}

Logging Providers

The default template-generated web apps include a call to CreateDefaultBuilder() in Program.cs, which automatically adds the Console and Debug providers. As of ASP.NET Core 2.2, the EventSource provider is also automatically added by the default builder. When on Windows, the EventLog provider is also included.

 public static IHostBuilder CreateHostBuilder(string[] args) =>
    Host.CreateDefaultBuilder(args)
      .ConfigureWebHostDefaults(webBuilder =>
      {
         webBuilder.UseStartup<Startup>();
      });

NOTE: As mentioned in an earlier post in this blog series, the now-deprecated Web Host Builder has been replaced by the Generic Host Builder with the release of .NET Core 3.0.

If you wish to add your own set of logging providers, you can expand the call to CreateDefaultBuilder(), clear the default providers, and then add your own. The built-in providers now include ConsoleDebug, EventLog, TraceSource and EventSource.

public static IHostBuilder CreateHostBuilder(
   string[] args) => Host.CreateDefaultBuilder(args)  
      .ConfigureWebHostDefaults(webBuilder =>
      {
         webBuilder.UseStartup<Startup>();
      })
      .ConfigureLogging(logging =>  
      {  
         // clear default logging providers
         logging.ClearProviders();  

         // add built-in providers manually, as needed 
         logging.AddConsole();   
         logging.AddDebug();  
         logging.AddEventLog();
         logging.AddEventSourceLogger();
         logging.AddTraceSource(sourceSwitchName); 
      });

The screenshots below show the log results viewable in Visual Studio’s Debug Window and in the Windows 10 Event Viewer. Note that the EventId’s integer values (that we had defined) are stored in the EventId field as numeric value in the Windows Event Viewer log entries.

 VS2019 Output panel showing debug messages
VS2019 Output panel showing debug messages
Windows Event Viewer showing log data

For the Event Log provider, you’ll also have to add the following NuGet package and corresponding using statement:

Microsoft.Extensions.Logging.EventLog

For the Trace Source provider, a “source switch” can be used to determine if a trace should be propagated or ignored. For more information on the Trace Source provider and the Source Switch it uses check out the official docs at:

For more information on adding logging providers and further customization, check out the official docs at:

JSON Configuration

One way to configure each Logging Provider is to use your appsettings.json file. Depending on your environment, you could start with appsettings.Development.json or App Secrets in development, and then use environment variables, Azure Key Vault in other environments. You may refer to earlier blog posts from 2018 and 2019 for more information on the following:

In your local JSON config file, your configuration uses the following syntax:

{
   "Logging": {
      "LogLevel": {
         "Default": "Debug",
         "Category1": "Information",
         "Category2": "Warning"
      },
      "SpecificProvider":
      {
         "ProviderProperty": true
      }
   }
}

The configuration for LogLevel sets one or more categories, including the Default category when no category is specified. Additional categories (e.g. System, Microsoft or any custom category) may be set to one of the aforementioned LogLevel values.

The LogLevel block can be followed by one or more provider-specific blocks (e.g. Console) to set its properties, e.g. IncludeScopes. Such an example is shown below.

{
   "Logging": {
      "LogLevel": {
         "Default": "Debug",
         "System": "Information",
         "Microsoft": "Information"
      },
      "Console":
      {
         "IncludeScopes": true
      }
   }
}

To set logging filters in code, you can use the AddFilter () method for specific providers or all providers in your Program.cs file. The following syntax can be used to add filters for your logs.

  .ConfigureLogging(logging =>
      logging.AddFilter("Category1", LogLevel.Level1)
         .AddFilter<SomeProvider>("Category2", LogLevel.Level2));

In the above sample, the following placeholders can be replaced with:

  • CategoryX: System, Microsoft, custom categories
  • LogLevel.LevelX: Trace, Debug, Information, Warning, Error, Critical, None
  • SomeProvider: Debug, Console, other providers

To set the EventLog level explicitly, add a section for “EventLog” with the default minimum “LogLevel” of your choice. This is useful for Windows Event Logs, because the Windows Event Logs are logged for Warning level or higher, by default.

{
   "Logging": {
     "LogLevel": {
       "Default": "Debug"
     },
     "EventLog": {
       "LogLevel": {
         "Default": "Information"
       }
     }
   }
 }

Log Categories

To set a category when logging an entry, you may set the string value when creating a logger. If you don’t set a value explicitly, the fully-qualified namespace + class name is used. In the WorkhorseModel class seen in The NetLearner.Portal project, the log results seen in the Debug window started with:

NetLearner.Portal.Pages.WorkhorseModel

This is the category name created using the class name passed to the constructor in WorkhorseModel as shown below:

private readonly ILogger _logger; 

public WorkhorseModel(ILogger<WorkhorseModel> logger)
{
   _logger = logger;
}

If you wanted to set this value yourself, you could change the code to the following:

private readonly ILogger _logger; 

public WorkhorseModel(WorkhorseModel logger)
{
   _logger = logger.CreateLogger("NetLearner.Portal.Pages.WorkhorseModel");
}

The end results will be the same. However, you may notice that there are a couple of differences here:

  1. Instead of ILogger<classname> we are now passing in an ILoggerFactory type as the logger.
  2. Instead of just assigning the injected logger to the private _logger variable, we are now calling the factory method CreateLogger() with the desired string value to set the category name.

Exceptions in Logs

In addition to EventId values and Category Names, you may also capture Exception information in your application logs. The various Log extensions provide an easy way to pass an exception by passing the Exception object itself.

try 
{
   // try something here
   throw new Exception();
} catch (Exception someException)
{
   _logger.LogError(eventId, someException, "Trying step {stepId}", stepId);
   // continue handling exception
}

Checking the Event Viewer, we may see a message as shown below. The LogLevel is shown as “Error” because we used the LogError() extension method in the above code, which is forcing an Exception to be thrown. The details of the Exception is displayed in the log as well.

Windows Event Viewer showing error log entry

Structured Logging with Serilog

At the very beginning, I mentioned the possibilities of structured logging with 3rd-party providers. There are many solutions that work with ASP .NET Core, including (but not limited to) elmahNLog and Serilog. Here, we will take a brief look at Serilog.

Similar to the built-in logging provider described throughout this article, you should include variables to assign template properties in all log messages, e.g.

Log.Information("This is a message for {someVariable}", someVariable);

To make use of Serilog, you’ll have to perform the following steps:

  1. grab the appropriate NuGet packages: SerilogHosting, various Sinks, e,g, Console
  2. use the Serilog namespace, e.g. using Serilog
  3. create a new LoggerConfiguration() in your Main() method
  4. call UseSerilog() when creating your Host Builder
  5. write log entries using methods from the Log static class.

For more information on Serilog, check out the following resources:

References

Key Vault for ASP .NET Core 3.1 Web Apps

By Shahed C on March 16, 2020

This is the eleventh of a new series of posts on ASP .NET Core 3.1 for 2020. In this series, we’ll cover 26 topics over a span of 26 weeks from January through June 2020, titled ASP .NET Core A-Z! To differentiate from the 2019 series, the 2020 series will mostly focus on a growing single codebase (NetLearner!) instead of new unrelated code snippets week.

Previous post:

NetLearner on GitHub:

In this Article:

K is for Key Vault for ASP .NET Core 3.1 Web Apps

In my 2018 blog series, we covered the use of User Secrets for your ASP .NET Core web application projects. This is useful for storing secret values locally during development. However, we need a cloud-based scalable solution when deploying web apps to Azure. This article will cover Azure Key Vault as a way to store and retrieve sensitive information in Azure and access them in your web application.

You will need an Azure subscription to create and use your own Key Vault and App Service.

Using Key Vault from Azure for your Web Apps

Setting up Key Vault in Azure

Before you can use Key Vault in the cloud, you will have to set it up in Azure for your use. This can be done in various ways:

  • Azure Portal: log in to the Azure Portal in a web browser.
  • Azure CLI: use Azure CLI commands on your development machine.
  • Visual Studio: use the VS IDE on your development machine.

To use the Azure Portal: create a new resource, search for Key Vault, click Create and then follow the onscreen instructions. Enter/select values for the following for the key vault:

  • Subscription: select the desired Azure subscription
  • Resource Group: select a resource group or create a new one
  • Name: alphanumeric, dashes allowed, cannot start with number
  • Region: select the desired region
  • Pricing Tier: select the appropriate pricing tier (Standard, Premium)
  • Soft Delete: enable/disable
  • Retention Period: enter retention period (in days)
  • Purge protection: enable/disable
Key Vault creation screen on Azure Portal

If you need help with the Azure Portal, check out the official docs at:

To use the Azure CLI: authenticate yourself, run the appropriate commands to create a key vault, add keys/secrets/certificates and then authorize an application to use your keys/secrets.

To create a new key vault, run “az keyvault create” followed by a name, resource group and location, e.g.

az keyvault create --name "MyKeyVault" --resource-group "MyRG" --location "East US"

To add a new secret, run “az keyvault secret set“, followed by the vault name, a secret name and the secret’s value, e.g.

az keyvault secret set --vault-name "MyKeyVault" --name "MySecretName" --value "MySecretValue"

If you need help with the Azure CLI, check out the official docs at:

To use Visual Studio, right-click your project in Solution Explorer, click Add | Connected Service, select “Secure Secrets with Azure Key Vault” and follow the onscreen instructions.

If you need help with Visual Studio, check out the official docs at:

Add a Connected Service in Visual Studio

Once created, the Key Vault and its secret names (and values) can be browsed in the Azure Portal, as seen in the screenshots below:

Key Vault details
Key Vault creation in Azure Portal
Creating a secret for Azure Key Vault

NOTE: If you create a secret named “Category1–MySecret”, this syntax specifies a category “Category1” that contains a secret “MySecret.”

Retrieving Key Vault Secrets

Before you deploy your application to Azure, you can still access the Key Vault using Visual Studio during development. This is accomplished by using your Visual Studio sign-in identity. Even if you have multiple levels of configuration to retrieve a secret value, the app will use the config sources in the following order:

  • first, check the Key Vault.
  • if Key Vault not found, check secrets.json file
  • finally, check the appsettings.json file.

There are a few areas in your code you need to update, in order to use your Key Vault:

  1. Install the nuget packages AppAuthentication, KeyVault and AzureKeyVault NuGet libraries.
    • Microsoft.Azure.Services.AppAuthentication
    • Microsoft.Azure.KeyVault
    • Microsoft.Extensions.Configuration.AzureKeyVault
  2. Update Program.cs to configure your application to use Key Vault
  3. Inject an IConfiguration object into your controller (MVC) or page model (Razor Pages, shown below)
  4. Access specific secrets using the IConfiguration object, e.g. _configuration[“MySecret”]

Below is an example of Program.cs using the WebHostBuilder’s ConfigureAppConfiguration() method to configure Key Vault. The keyVaultEndpoint is the fully-qualified domain name of your Key Vault that you created in Azure.

...
using Microsoft.Azure.KeyVault;
using Microsoft.Azure.Services.AppAuthentication;
using Microsoft.Extensions.Configuration;
using Microsoft.Extensions.Configuration.AzureKeyVault;
...
public static IHostBuilder CreateHostBuilder(string[] args) =>
   Host.CreateDefaultBuilder(args)
      .ConfigureAppConfiguration((ctx, builder) =>
      {
         var keyVaultEndpoint = GetKeyVaultEndpoint();
         if (!string.IsNullOrEmpty(keyVaultEndpoint))
         {
            var azureServiceTokenProvider = new AzureServiceTokenProvider();
            var keyVaultClient = new KeyVaultClient(
               new KeyVaultClient.AuthenticationCallback(
                  azureServiceTokenProvider.KeyVaultTokenCallback));
               builder.AddAzureKeyVault(
                  keyVaultEndpoint, keyVaultClient, new DefaultKeyVaultSecretManager());
         }
      }
   ).ConfigureWebHostDefaults(webBuilder =>
   {
      webBuilder.UseStartup<Startup>();
   }); 

private static string GetKeyVaultEndpoint() => "https://<VAULT_NAME>.vault.azure.net/";

NOTEPlease note that usage of Web Host Builder in ASP .NET Core 2.x has been replaced by the Generic Host Builder in .NET Core 3.x.

Below is an example of of a Page Model for a Razor Page, e.g. SecretPage.cshtml.cs in the sample app

...
using Microsoft.Extensions.Configuration;
public class SecretPageModel : PageModel
{
   public IConfiguration _configuration { get; set; }
   public string Message1 { get; set; }
   public string Message2 { get; set; }
   public string Message3 { get; set; } 

   public SecretPageModel(IConfiguration configuration)
   {
      _configuration = configuration;
   }

   public void OnGet()
   {
      Message1 = "My 1st key val = " + _configuration["MyKeyVaultSecret"];
      Message2 = "My 2nd key val = " + _configuration["AnotherVaultSecret"];
      Message3 = "My 3nd key val ? " + _configuration["NonExistentSecret"];
   }
}

In the above code, the configuration object is injected into the Page Model’s SecretPageModel()The values are retrieved from the collection in the OnGet() method and assigned to string properties. In the code below, the string properties are accessed from the model class in the corresponding Razor Page, SecretPage.cshtml.

@page
@model KeyVaultSample.Pages.SecretPageModel
...
<p>
 @Model.Message1
</p> 

<p>
 @Model.Message2
</p> 

<p>
 @Model.Message3
</p>

Finally, viewing the page allows you to navigate to the Secret Page to view the secret values. Note that I’ve only created 2 secret values before deploying this instance, so the 3rd value remains blank (but without generating any errors).

 SecretPage showing secrets retrieved from Key Vault
SecretPage showing secrets retrieved from Key Vault

Managed Service Identity

There are multiple ways to deploy your ASP .NET Core web app to Azure, including Visual Studio, Azure CLI or a CI/CD pipeline integrated with your source control system. If you need help deploying to Azure App Service, check out the following article from this blog series:

You can set up your Managed Service Identity in various ways:

  • Azure Portal: log in to the Azure Portal and add your app
  • Azure CLI: use Azure CLI commands to set up MSI
  • Visual Studio: use the VS IDE while publishing

Once you’ve created your App Service (even before deploying your Web App to it), you can use the Azure Portal to add your app using Managed Service Identity. In the screenshots below, I’ve added my sample app in addition to my own user access.

  • In the Access Policies section of the Key Vault, you may add one or more access policies.
  • In the Identity section of the App Service, you may update the System-Assigned setting to “On” and make a note of the Object ID, which is defined as a “Unique identifier assigned to this resource, when it’s registered with Azure Active Directory
Key Vault Access Policies
Key Vault App Service Identity

To use the Azure CLI to authorize an application to access (or “get”) a key vault, run “az keyvault set-policy“, followed by the vault name, the App ID and specific permissions. This is equivalent to enabling the Managed Service Identity for your Web App in the Azure Portal.

az keyvault set-policy --name "MyKeyVault" --spn <APP_ID> --secret-permissions get

To use Visual Studio to use your key vault after deployment, take a look at the Publish screen when deploying via Visual Studio. You’ll notice that there is an option to Add Dependencies, including Azure Key Vault. After you’ve added and enabled Key Vault for your application, the option will change to say “Configure” and “Manage Key Vault”.

Add Dependencies during Publish from Visual Studio
Select Azure Key Vault from list of dependencies

After adding via Visual Studio during the Publish process, your Publish Profile (profile – Web Deploy.pubxml) and Launch Settings profiles (launchSettings.json) should contain the fully qualified domain name for your Key Vault in Azure. You should not include these files in your source control system.

References

JavaScript, CSS, HTML & Other Static Files in ASP .NET Core 3.1

By Shahed C on March 9, 2020

This is the tenth of a new series of posts on ASP .NET Core 3.1 for 2020. In this series, we’ll cover 26 topics over a span of 26 weeks from January through June 2020, titled ASP .NET Core A-Z! To differentiate from the 2019 series, the 2020 series will mostly focus on a growing single codebase (NetLearner!) instead of new unrelated code snippets week.

Previous post:

NetLearner on GitHub:

In this Article:

J is for JavaScript, CSS, HTML & Other Static Files

NOTEthis article will teach you how to include and customize the use of static files in ASP .NET Core web applications. It is not a tutorial on front-end web development.

If your ASP .NET Core web app has a front end – whether it’s a collection of MVC Views or a Single-Page Application (SPA) – you will need to include static files in your application. This includes (but is not limited to): JavaScript, CSS, HTML and various image files.

When you create a new web app using one of the built-in templates (MVC, Razor Pages or Blazor), you should see a “wwwroot” folder in the Solution Explorer. This points to a physical folder in your file system that contains the same files seen from Visual Studio. However, this location can be configured, you can have multiple locations with static files, and you can enable/disable static files in your application if desired. In fact, you have to “opt in” to static files in your middleware pipeline.

ASP .NET Core 3.1 middleware pipeline diagram

You can browse the (template-generated) sample app (with static files) on GitHub at the following location:

Configuring Static Files via Middleware

Let’s start by observing the Startup.cs configuration file, from any of the web projects. We’ve seen this file several times throughout this blog series. In the Configure() method, you’ll find the familiar method call to enable the use of static files.

public void Configure(IApplicationBuilder app, IHostingEnvironment env)
{
   ...
   app.UseStaticFiles();
   ...
}

This call to app.UseStaticFiles() ensures that static files can be served from the designated location, e.g. wwwroot. In fact, this line of code looks identical whether you look at the Startup.cs file in an MVC, Razor Pages or Blazor project.

It’s useful to note the placement of this line of code. It appears before app.UseRouting() and app.UseEndpoints(), which is very important. This ensures that static file requests can be processed and sent back to the web browser without having to touch the application routing middleware. This becomes even more important when authentication is used.

Take a look at any of the web projects to observe the authentication added to them. In the code below, you can see the familiar call to app.UseStaticFiles() once again. However, there is also a call to app.UseAuthentication(). It’s important for the authentication call to appear after the call to use static files. This ensure that the authentication process isn’t triggered when it isn’t needed.

public void Configure(IApplicationBuilder app, IHostingEnvironment env)
{
   ...
   app.UseStaticFiles();
   ...
   app.UseAuthentication();
   ...
   app.UseMvc(...);
}

By using the middleware pipeline in this way, you can “short-circuit” the pipeline when a request has been fulfilled by a specific middleware layer. If a static file has been successfully served using the Static Files middleware, it prevents the next layers of middleware (i.e. authentication, routing, etc) from processing the request.

NOTE: if you need to secure any static files, e.g. private images, you can consider a cloud solution such as Azure Blob Storage to store the files. The files can then be served from within the application, instead of actual static files. You could also serve secure files (from outside the wwwroot location) as a FileResult() object returned from an action method that has an [Authorize] attribute.

Customizing Locations for Static Files

It may be convenient to have the default web templates create a location for your static files and also enable the use of those static files. As you’ve already seen, enabling static files isn’t magic. Removing the call to app.useStaticFiles() will disable static files from being served. In fact, the location for static files isn’t magic either.

In a previous post, we had discussed how the Program.cs file includes a call to CreateDefaultBuilder() to set up your application:

public class Program
{
   ...
   public static IHostBuilder CreateHostBuilder(string[] args) =>
      Host.CreateDefaultBuilder(args)
         .ConfigureWebHostDefaults(webBuilder => 
         {
            webBuilder.UseStartup<Startup>();
         });
}

Behind the scenes, this method call sets the “content root” to the current directory, which contains the “wwwroot” folder, your project’s “web root”. These can both be customized.

Host.CreateDefaultBuilder(args).UseContentRoot("c:\\<content-root>")
  • To change the web root within your content root, you can also configure it while building the host, e.g.
webBuilder.UseWebRoot("<content-root>")

You may also use the call to app.UseStaticFiles() to customize an alternate location to serve static files. This allows you to serve additional static files from a location outside of the designated web root.

...
using Microsoft.Extensions.FileProviders;
using System.IO;
...
public void Configure(IApplicationBuilder app)
{
   ...
   app.UseStaticFiles(new StaticFileOptions
   {
      FileProvider = new PhysicalFileProvider(
         Path.Combine(env.ContentRootPath, "AltStaticRoot")),
         RequestPath = "/AltStaticFiles"
   });
}

Wait a minute… why does it look like there are two alternate locations for static files? There is a simple explanation:

  • In the call to Path.Combine(), the “AltStaticRoot” is an actual folder in your current directory. This Path class and its Combine() method are available in the System.IO namespace.
  • The “AltStaticFiles” value for RequestPath is used as a root-level “virtual folder” from which images can be served. The PhysicalFileProvider class is available in the Microsoft.Extensions.FileProviders namespace.

The following markup may be used in a .cshtml file to refer to an image, e.g. MyImage01.png:

<img src="~/AltStaticFiles/MyImages/MyImage01.png" />

The screenshot below shows an example of an image loaded from an alternate location.

VS 2019 showing image loaded from alternate location
Visual Studio showing image loaded from alternate location

The screenshot below shows a web browser displaying such an image.

Web Browser showing image loaded from alternate location

Preserving CDN Integrity

When you use a CDN (Content Delivery Network) to serve common CSS and JS files, you need to ensure that the integrity of the source code is reliable. You can rest assured that ASP .NET Core has already solved this problem for you in its built-in templates. Let’s take a look at the shared Identity pages, e.g. _ValidationScriptsPartial.cshtml in the Razor sample code.

<environment include="Development">
  <script src="~/Identity/lib/jquery-validation/dist/jquery.validate.js"></script> 
</environment>

<environment exclude="Development">
 <script  
src="https://ajax.aspnetcdn.com/ajax/jquery.validate/1.17.0/jquery.validate.min.js"
asp-fallback-src="~/Identity/lib/jquery-validation/dist/jquery.validate.min.js"
asp-fallback-test="window.jQuery && window.jQuery.validator"
crossorigin="anonymous"
integrity="sha384-rZfj/ogBloos6wzLGpPkkOr/gpkBNLZ6b6yLy4o+ok+t/SAKlL5mvXLr0OXNi1Hp">
    </script> 
</environment>

Right away, you’ll notice that there are two conditional <environment> blocks in the above markup. The first block is used only during development, in which the jQuery Validate file is obtained from your local copy. When not in development (e.g. staging, production, etc), the jQuery Validate file is obtained from a CDN.

You could use an automated hash-generation tool to generate the SRI (Subresource Integrity) hash values, but you would have to manually copy the value into your code. You can try out the newer LibMan (aka Library Manager) for easily adding and updating your client-side libraries.

LibMan (aka Library Manager)

The easiest way to use LibMan is to use the built-in features available in Visual Studio. Using LibMan using the IDE is as easy as launching it from Solution Explorer. Specify the provider from the library you want, and any specific files you want from that library.

If you’ve already read my SignalR article from my 2018 blog series, you may recall the steps to add a client library via LibMan (aka Library Manager):

  • Right-click project in Solution Explorer
  • Select Add | Client-Side Library

In the popup that appears, select/enter the following:

  • Provider: choose from cdnjs, filesystem, unpkg
  • Library search term, e.g. @microsoft/signalr@latest to pick the latest stable version of the SignalR client-side library
  • Files: At a minimum, choose specific files, e.g. signalr.js and/or its minified equivalent
  • Target Location: modify the target location folder tree as desired
Adding a client-side library

For more on LibMan (using VS or CLI), check out the official docs:

In any case, using LibMan will auto-populate a “libman.json” manifest file, which you can also inspect and edit manually. The aforementioned SignalR article also includes a real-time polling web app sample. You can view its libman.json file or the newer NetLearner.Portal app’s libman.json file to observe its syntax for using a SignalR client library.

{
  "version": "1.0",
  "defaultProvider": "unpkg",
  "libraries": [
    {
      "library": "@microsoft/signalr@latest",
      "destination": "wwwroot/lib/signalr/",
      "files": [
        "dist/browser/signalr.js"
      ]
    }
  ]
}

Every time you save the libman.json file, it will trigger LibMan’s restore process. This pulls down the necessary libraries from their specified source, and adds them to your local file system. If you want to trigger this restore process manually, you can always choose the “Restore Client-Side Libraries” option by right-clicking the libman.json file in Solution Explorer.

What About NPM or WebPack?

If you’ve gotten this far, you may be wondering: “hey, what about NPM or WebPack?”

It’s good to be aware that LibMan is a not a replacement for your existing package management systems. In fact, the Single-Page Application templates in Visual Studio (for Angular and React) currently use npm and WebPack. LibMan simply provides a lightweight mechanism to include client-side libraries from external locations.

For more information on WebPack in ASP .NET Core, I would recommend these 3rd-party articles:

References

IIS Hosting for ASP .NET Core 3.1 Web Apps

By Shahed C on March 2, 2020

This is the ninth of a new series of posts on ASP .NET Core 3.1 for 2020. In this series, we’ll cover 26 topics over a span of 26 weeks from January through June 2020, titled ASP .NET Core A-Z! To differentiate from the 2019 series, the 2020 series will mostly focus on a growing single codebase (NetLearner!) instead of new unrelated code snippets week.

Previous post:

NetLearner on GitHub:

In this Article:

I is for IIS Hosting

If you’ve been reading my weekly blog posts in this series (or you’ve worked with ASP .NET Core), you probably know that ASP .NET Core web apps can run on multiple platforms. Since Microsoft’s IIS (Internet Information Services) web server only runs on Windows, you may be wondering why we would need to know about IIS-specific hosting at all.

Well, we don’t need IIS to run ASP .NET Core, but there are some useful IIS features you can take advantage of. In fact, ASP .NET Core v2.2 introduced in-process hosting in IIS with the ASP .NET Core module, which continues to be available in v3.1. You can run your app either in-process or out of process.

Here’s a little background, from the 2.2 release notes of what’s new:

“In earlier versions of ASP.NET Core, IIS serves as a reverse proxy. In 2.2, the ASP.NET Core Module can boot the CoreCLR and host an app inside the IIS worker process (w3wp.exe). In-process hosting provides performance and diagnostic gains when running with IIS.” 

NOTE: The actual web.config file has been intentionally left out from the above repo, and replaced with a placeholder file (for reference), web.config.txt. When you follow the configuration steps outlined below, the actual web.config file will be generated with the proper settings.

In-Process vs Out-of-Process

Developing for IIS

In order to develop for IIS on your local development machine while working with Visual Studio, you should complete the following steps:

  1. Install/Enable IIS locally: add IIS via Windows Features setup
  2. Configure IIS: add website with desired port(s)
  3. Enable IIS support in VS: include dev-time IIS support during setup
  4. Configure your web app: enable HTTPS, add launch profile for IIS

NOTE: If you need help with any of the above steps, you may follow the detailed guide in the official docs:

After Step 1 (IIS installation), the list of Windows Features should show that IIS and many of its components have been installed.

IIS components in Windows Features

During and after Step 2 (IIS configuration), my newly added website looks like the screenshots shown below:

Add Website in IIS Manager
Browse Website Folder via IIS Manager

For Step 3 (IIS support in VS) mentioned above, make sure you select the “Development time IIS support” option under the “ASP .NET and web development” workload. These options are shown in the screenshot below:

Development time IIS Support in VS2019 ASP .NET workload

After Step 4 (web app config), I can run the web application locally on IIS. Check out the next section to learn more about your web application configuration. In addition to the .csproj settings, you’ll also need a web.config file in addition to your appsettings.json file. You may also need to start VS2019 with Admin privileges before attempting to debug against IIS.

Optionally, you could set up a VM on Azure with IIS enabled and deploy to that web server. If you need some help with the setup, you can select a pre-configured Windows VM with IIS pre-installed from the Azure Portal.

If you need help with creating an Azure VM with IIS, check out the following resources:

IIS Configuration in Visual Studio

After completing Step 4 using the instructions outlined above, let’s observe the following (in the NetLearner.Portal web app project:

  • Profile: Debug tab in project properties
  • Project: .csproj settings
  • Settings: launchSettings.json
  • Config: web.config file

Profile: With your web project open in Visual Studio, right-click the project in Solution Explorer, and then click Properties. Click the Debug tab to see the newly-added IIS-specific profile. Recall that the Hosting Model offers 3 options during the creation of this profile: Default, In-Process and Out-of-process.

Settings: Under the Properties node in the Solution Explorer, open the launchSettings.json file. Here, you can see all the settings for your newly-created IIS-specific Profile. You can manually add/edit settings directly in this file without having to use the Visual Studio UI.

launchSettings.json file, showing IIS Profile settings

Config: You may recognize the XML-based web.config file from previous versions of ASP .NET, but the project’s settings and dependencies are now spread across multiple files, such as the .csproj file and appsettings.json config file. For ASP .NET Core projects, the web.config file is only used specifically for an IIS-hosted environment. In this file, you may configure the ASP .NET Core Module that will be used for your IIS-hosted web application.

web.config file, showing hosting model, e.g. InProcess

Once your web app is configured, you can run it from Visual Studio using the profile you created previously. In order to run it using a specific profile, click the tiny dropdown next to the green Run/Debug button to select the desired profile. Then click the button itself. This should launch the application in your web browser, pointing to localhost running on IIS, e.g. https://localhost/<appname>

VS2019 with IIS Profile selected
Web browser showing web app running in IIS

ASP .NET Core Module

Now that your IIS server environment has been set up (either locally or in the cloud), let’s learn about the ASP .NET Core Module. This is a native IIS module that plugs into the actual IIS pipeline (not to be confused with your web app’s request pipeline). It allows you to host your web app in one of two ways:

  • In-process: the web app is hosted inside the IIS worker process, i.e. w3wp.exe (previously known as the World Wide Web Publishing Service)
  • Out of process: IIS forwards web server requests to the web app, which uses Kestrel (the cross-platform web server included with ASP .NET Core)

As you’ve seen in an earlier section, this setting is configured in the web.config file:

<aspNetCore processPath="C:\Users\REPLACE_SOMEUSER\source\repos\NetLearnerApp\src\NetLearner.Portal\bin\Debug\netcoreapp3.1\NetLearner.Portal.exe" arguments="" stdoutLogEnabled="false" hostingModel="InProcess">

The lists below shows shows some notable differences between hosting in-process vs out of process.

In-Process vs Out-of-Process. compared

How you configure your app is up to you. For more details on the module and its configuration settings, browse through the information available at:

BONUS: Publishing to a VM with IIS

You can publish your ASP .NET Core web app to a Virtual Machine (either on your network or in Azure) or just any Windows Server you have access to. There are several different options:

Here are some prerequisites to be aware of:

  • IIS must be pre-installed on the server with relevant ports enabled
  • WebDeploy must be installed (which you would normally have on your local dev machine)
  • The VM must have a DNS name configured (Azure VMs can have fully qualified domain names, e.g. <machinename>.eastus.cloudapp.azure.com)

References