Update: Due to new personal commitments and more work commitments in 2021, I wasn’t able to make much progress with my weekly C# A-Z series on dev.to/shahedc. For now, I’ll focus on some new content for my regular blog (this blog, WakeUpAndCode.com) and hope to revisit the A-Z series with .NET 6.
Original Post:
I published my first ASP .NET Core A-Z series on WakeUpAndCode.com back in 2019, from January to June 2019. I followed this with a new A-Z series in 2020, simultaneously mirroring the posts on dev.to as well.
Going forward, my next A-Z series will cover 26 topics covering various C# language features. The C# A-Z series will be featured exclusively on my dev.to site under the .NET org:
Meanwhile, this site (WakeUpAndCode.com) will continue to feature new ASP .NET Core content based on .NET 5, Blazor and more! To get a sneak peak of what’s to come, check out my guest appearance on the .NET Docs Show (livestreamed Dec 7, 2020). You may jump ahead to 58:05 in the video for the sneak peek:
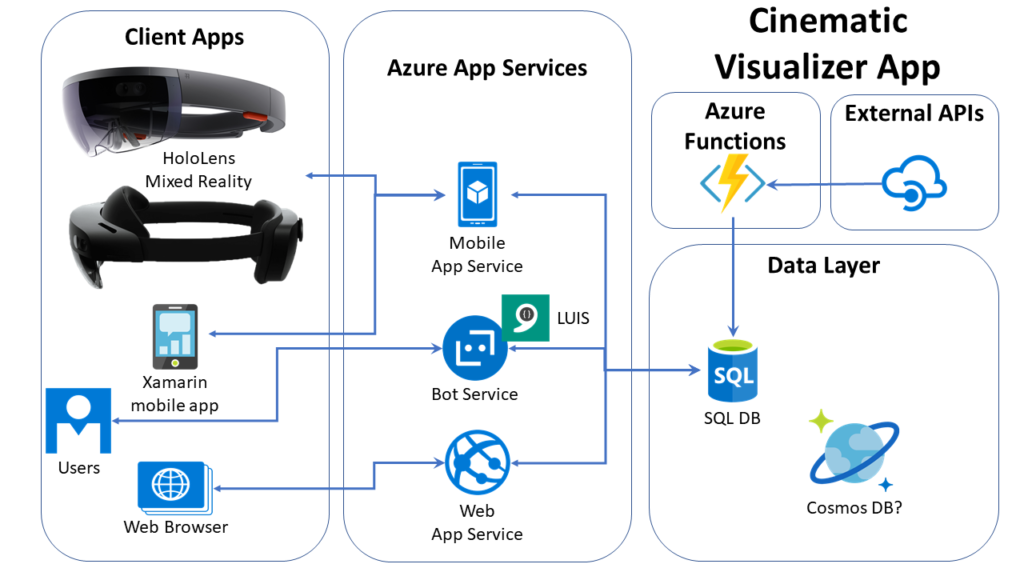
The above video teases my upcoming cinematic visualizer app, which will allow the end user to connect the dots within a cinematic universe, e.g. the Marvel Cinematic Universe. The source code will allow any .NET developer to learn more about C# and .NET 5, ASP .NET Core, Entity Framework, Azure App Service, Bot Framework, Azure Functions, and more!
High-Level Diagram of Cinematic Visualizer
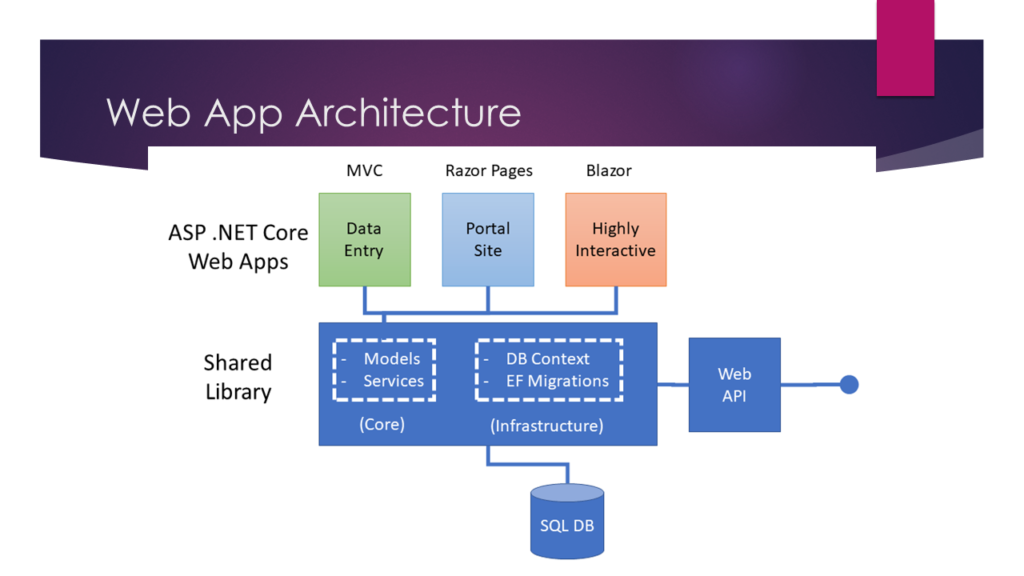
The goal of the web app is to make use of all 3 project styles available in ASP .NET Core:
MVC (Model View Controller)
Razor Pages
Blazor
ASP .NET Core web architecture
Developers frequently ask the developer community (and Microsoft) whether a particular web project type is preferred over the other. Last year’s blog series built upon the NetLearner web app by duplicating identical functionality across all three project types. This year, the cinematic visualizer app will attempt to use each project type of something specific.
MVC for data entry
Razor Pages for the Portal site
Blazor for the highly interactive portion
The above choices aren’t necessarily prescriptive for the type of web apps they will demonstrate. However, they should provide a starting point when developing ASP .NET Core web applications.
Have you always wanted to start your own dev blog? Do you have one now? Do you blog regularly or is your blog inactive at the moment? I asked these questions via a Twitter Poll and got a variety of responses.
No matter where you are in your software development career, this blog post will help you on your blogging journey. Format your content, improve the material and promote it far and wide. Below are some tips I came up with, based on my personal experience blogging about .NET topics.
If you’re looking for my ASP .NET Core A-Z Blog Series, you may go directly to the following URL:
TIP #1: Format your blog content into sections with HTML headings.
HTML headings aren’t just for visual appeal. They can be used by screen readers to identify when a new section begins. They can also be used by search engines to identify those sections to be displayed in search engine results.
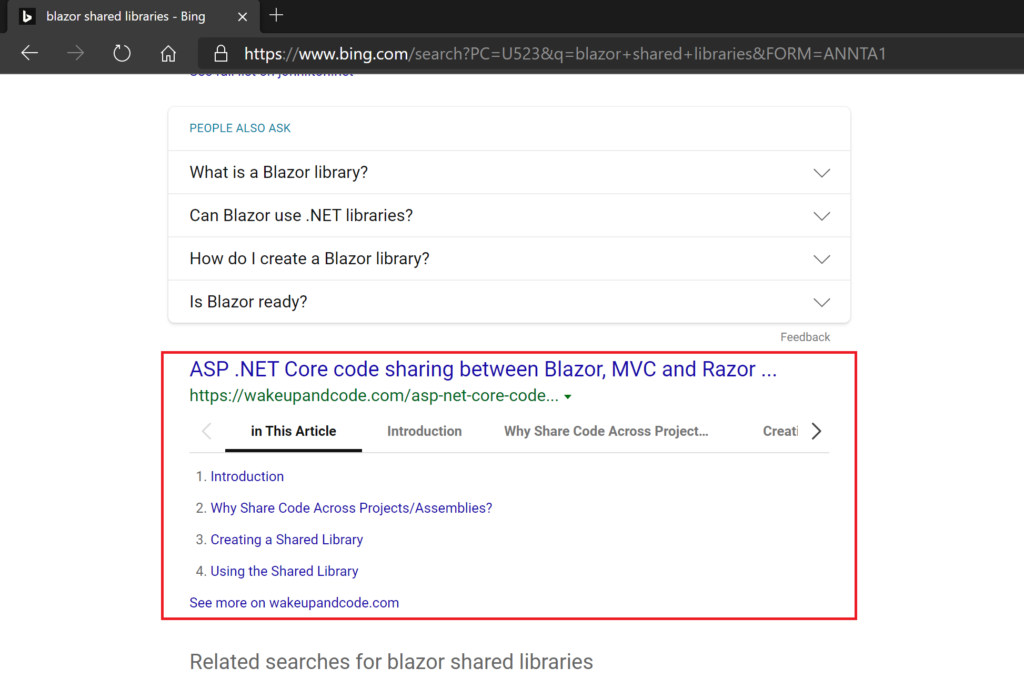
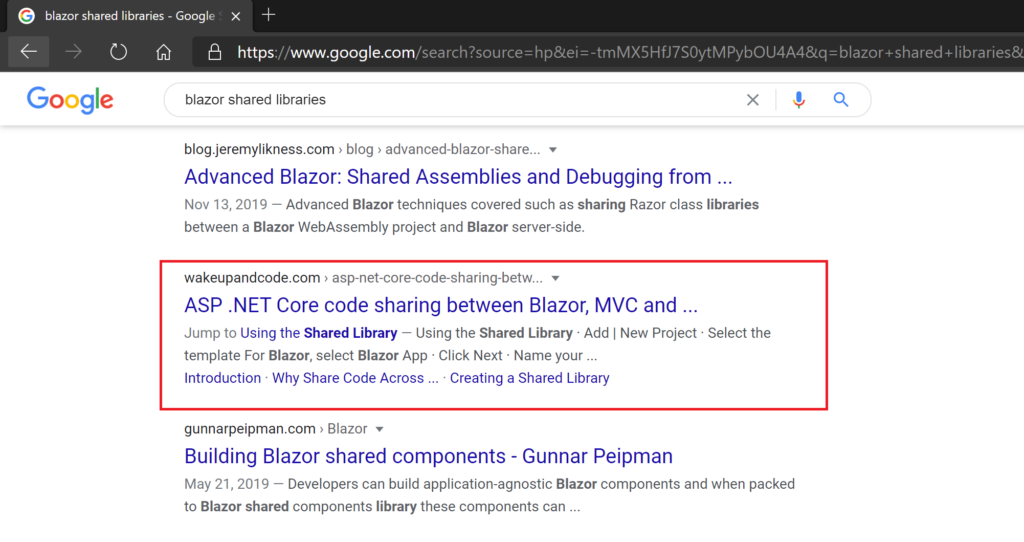
Take a look at these search results when you search for “Blazor shared libraries” in Bing and Google.
As you scroll through the first page of results, you’ll notice that the excerpt for my blog includes rich formatting for sections and their headings, where applicable.
On Bing, the H1 headings are extracted into clickable tabbed headers in the search results.
On Google, the H1 headings are displayed as clickable links underneath the excerpt, while a “Jump to” link is provided to jump directly to the relevant section.
2. Regular Frequency
TIP #2: Publish new content with regular frequency.
If you publish only one blog post, you may get lucky if some Internet users stumble upon your blog. But if you publish blog posts more often, especially with a predictable frequency, you may get repeat visitors who look forward to new content.
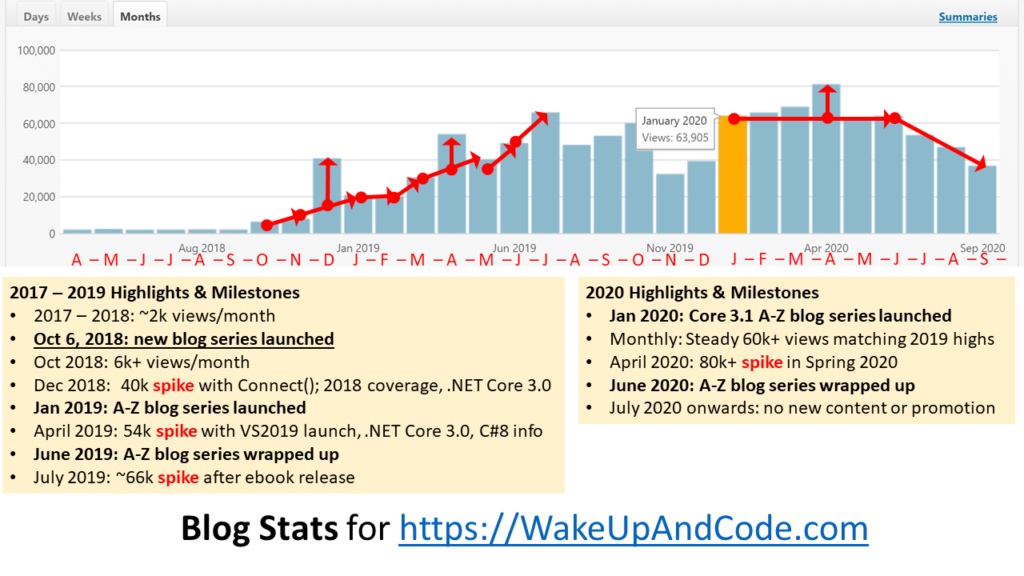
Take a look at my blog statistics from 2018 through 2020, to see how regular blog posts brought new/repeat visitors to my site.
Before October 2018, I barely had 2,000 views per month, as I did not publish any new/exciting content. I was mostly using my blog to upload my PowerPoint slides after a live presentation.
In late 2018, I published my first ASP .NET Core blog series, which ended up becoming a surprise HAPPY NEW YEAR series (revealed in December 2018). The 2018 series spiked in December 2018 (40k views) with .NET Core 3.0 coverage around Connect(); 2018.
From January 2019 through June 2019, I introduced my weekly A-Z series for various ASP .NET Core topics. This series resulted in gradual increase in viewership, including a spike (54k views) around the launch of Visual Studio 2019 and C# 8.0.
In July 2019, I released my free A-Z ebook, compiled from the 2018 A-Z series. This resulted in another spike (66k views) after the ebook was released, itself auto-generated using a .NET Core 3.0 Worker Service.
From January 2020 through June 2020, I published a new weekly A-Z series for similar ASP .NET Core topics. This now-annual series resulted in a steady level of views (60k+ views) each month that hovered near the previous year’s highs.
Around April 2020, there was a spike (80k+ views) which was a new record for my blog.
After July 2020, there was no new content, and the viewership continued to decline each month.
I’m currently planning new content for 2021, to focus on .NET 5 and C# 9 topics.
3. Relevant Content
TIP #3: Publish new content that is relevant to your intended audience.
It’s not just enough to format your content and publish with regular frequency. You should also try to maintain one or more themes for your blog, so that your readers can have an idea of what to expect.
In my case: I came up with topics that would be useful and relevant for a .NET developer, especially developers working with ASP .NET Core web apps and related technologies.
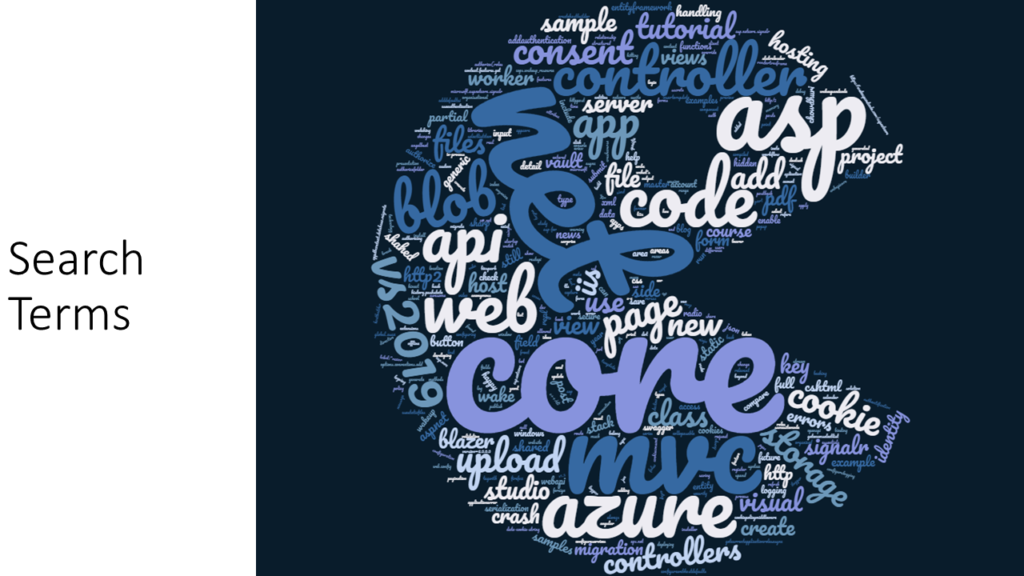
Take a look at the word cloud below to see popular search terms that led developers to my blog in 2019:
Word Cloud of Search Terms
From the word cloud above, you can see that people searched for terms like ASP .NET Core, MVC, Controllers, Web API, cookie, storage, VS2019, hosting, signalr, tutorial and many more search terms!
4. Advertising & Promotion
TIP #4: Promote your work!
If a developer writes a blog in the forest, but there’s no one around to read it, did they even write a blog? This age-old philosophical question should help you think about ways to promote your work. But advertising isn’t just about spending money on online advertisements. In fact, I’ve personally found that it’s not worth it for me to spend any money on advertising.
Your mileage may vary.
Let me explain: I’ve never advertised my blog on Google or Bing (or any other search platform). Yet, my blog appears in top search results quite frequently. Organic search results are worth more to me than any paid results.
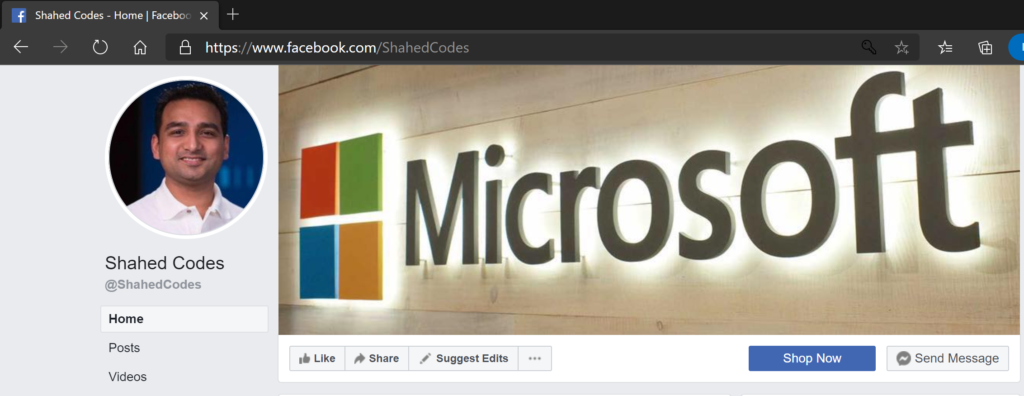
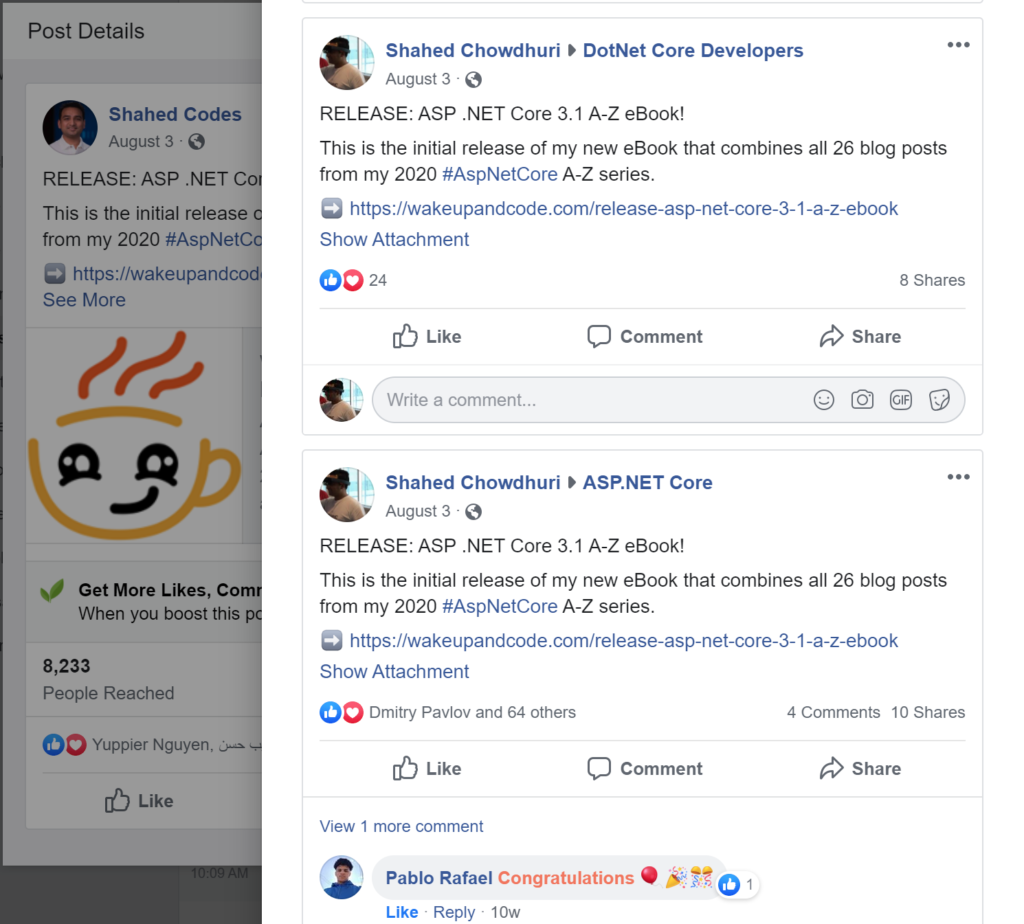
As for social media, I’ve launched a Facebook page called Shahed Codes:
This page has less than 1,000 followers as of this writing, yet I get a lot more views on my blog. That’s because I promote the posts from Shahed Codes in a couple of Facebook groups with a large number of .NET developers. I had briefly tried advertising on Facebook, but the engagement from free developer groups are significantly higher than any engagement for paid ads.
5. Facebook Groups
TIP #5: Consider sharing your work with other developers on Facebook.
Speaking of Facebook groups, there are countless Facebook groups dedicated to various topics related to software development. In my case, I joined a handful of .NET groups such as:
In the above screenshot, the post was shared to both DotNetCore Developers and ASP .NET Core groups, which resulted in over 8,000 people reached, just from a handful of shares. This reach would not have been possible if the original post wasn’t shared beyond the Shahed Codes page.
With permission from a group founder/admin, I shared my weekly posts from Shahed Codes to both of these groups, once for every new post. In case your readers have any feedback or follow-up questions, be prepared to respond to other developers who reach out to you.
You may also get request for 1:1 communications via private messages. Personally, I don’t have the bandwidth to help other developers via private messages, so I usually ask them to ask their questions in public posts/comments. I’ll try to help if time permits, but this approach also allows others to chime in as well.
To verify the thumbnail (or update the cached image), you may use the Facebook Link Sharing Debugger (aka Facebook URL Linter):
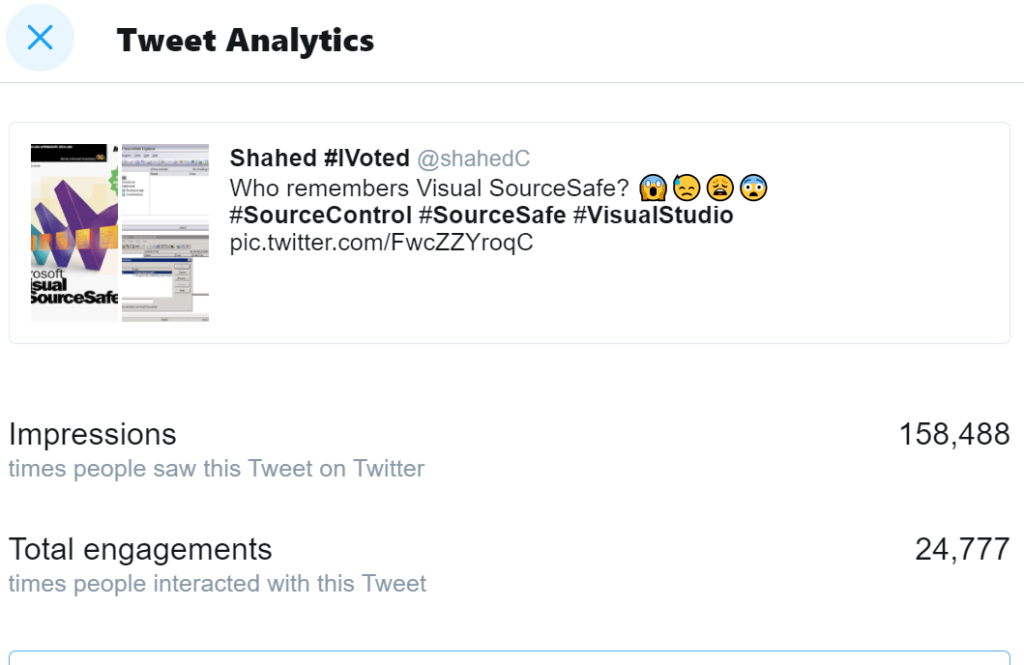
The first rule of Twitter is that there are no rules on Twitter. I’ve had a Twitter account since 2009, but rediscovered it in 2018, when I started sharing my weekly blog posts on Twitter.
My post popular post of all time made 1.8M impressions around the world, with a silly joke tweet in 2018. My post popular post in 2020 was a thoughtful tweet that resonated with a lot of people around the world, with 310k+ impressions. Somewhere in between, a nostalgic tweet about Visual SourceSafe made 158k+ impressions. My tweets about my dev blog posts usually reach much fewer people than any of these numbers.
That being said, the value of Twitter comes from the interactions with other developers. This includes Twitter users who are already using the technology you’re writing about, and others who are just starting out. Best of all, we can learn something from each other.
Every time you share your content on Twitter (with a few #hashtags if appropriate), you may reach new readers who are interested in your content. Just like on Facebook, you may get questions and feedback from others who are curious to learn more.
CAUTION: Inevitably, you may also get nasty comments from people who have nothing better to do with their time. Use your time wisely. If it’s constructive criticism, think about how you may use their feedback to improve your content. If they’re just being mean for no good reason, take a step back and ignore/mute/block the person as needed.
Note that URLs shared on Twitter may be converted to a t.co short URL in the post itself… BUT, the displayed URL should still show up as the correct URL. If the URL is too long, it may be truncated when displayed. The displayed thumbnail will also display a preview image and the domain of the clickable URL.
To verify the thumbnail (or update the cached image), you may use the Twitter Card Validator:
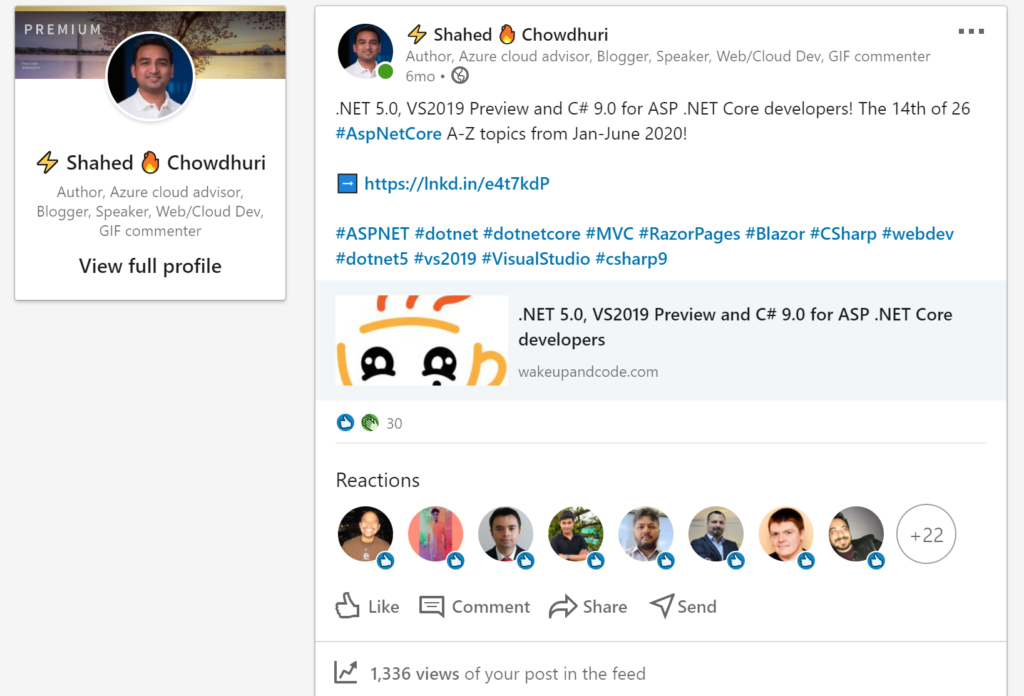
TIP #7: Reach out to others in your professional network and beyond.
You may not be active on LinkedIn, but it’s quite likely that you have a LinkedIn account. Depending on where your connections live, they are mostly likely active around the clock, day and night. If you haven’t been on LinkedIn for a while, try to visit the site/app occasionally to see when more people in your network are likely to view your future posts.
I’m not very active on LinkedIn myself, but I did share my weekly blog posts on the professional social network. This allowed me to reach additional .NET developers who may not be aware of my content posted to Twitter and Facebook. If I’ve worked with them before, it’s likely that they might be interested in the new content I’m sharing.
Similar to Twitter: Note that URLs shared on LinkedIn will be converted to a lnkd.in short URL in the post itself. This short URL may not be visible if it’s the last line of your post. To ensure that this URL appears as a clickable link in the post, add some additional text after the URL. The displayed thumbnail will also display a preview image and the top-level domain of the clickable URL.
To verify the thumbnail (or update the cached image), you may use the LinkedIn Post Inspector:
TIP #8: Update incorrect/outdated content but not too much.
By the time you read this post, some of the above content may become outdated. This is true for any dev blog post or tech book. What you do with outdated content is up to you. You could keep revising your content to correct obsolete/inaccurate sections, but that could prove to be an exercise in futility.
Worse yet, any posts or articles (your own or from others) may become inaccurate if they’re pointing to your updated content at the same old URL. To counter this, I suggest making only minor edits, including typo corrections and the addition of brief important notes to call out outdated content.
To publish new content that deviates significantly from the original content, I would suggest publishing a brand new blog post each time. This will let you pick a new SEO-friendly URL and create a new post that doesn’t mess with any references to the original post.
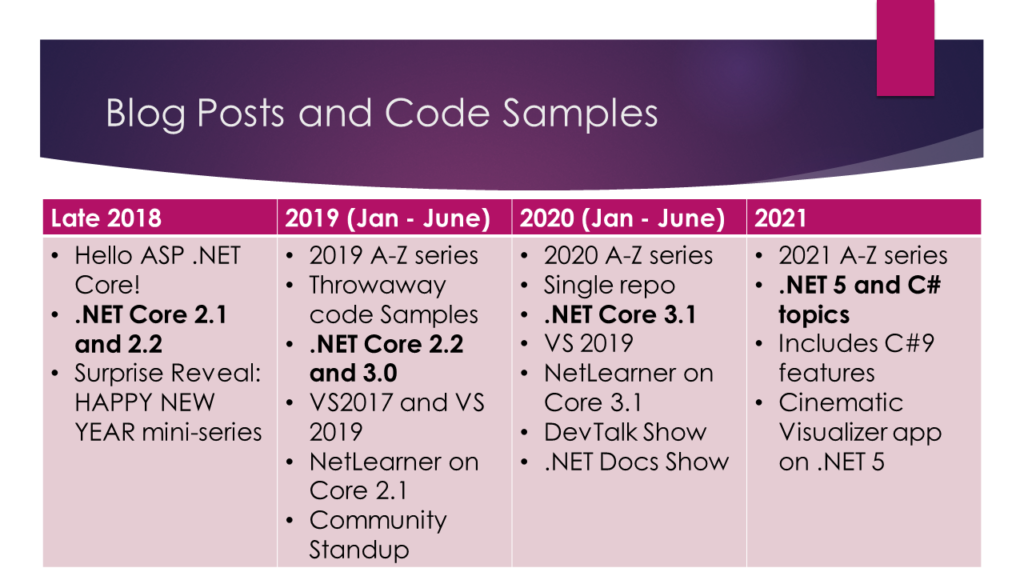
This is how I ended up with a new A-Z series for each year (2019 and 2020) so far.
The 2019 series started with .NET Core 2.2 and Visual Studio 2017, but got upgraded to .NET Core 3.0 and Visual Studio 2019 along the way.
With the new .NET release schedule (annual November releases), the 2020 series was able to maintain a single .NET version (.NET Core 3.1) and a single IDE version (Visual Studio 2019) throughout its publishing history.
.NET Versions and IDE versions over the years
9. Code Samples
TIP #9: Provide code samples, preferably linked to a public repository.
Back in 2018, my code samples were all over the place, in my GitHub repository:
In 2019, I decided to introduce a new web app called NetLearner. The goal was to update this repo as much as possible, but my code samples were still spread out across multiple repositories.
In 2020, I decided to introduce a new version of NetLearner, built on .NET Core 3.1. Better yet, I wrote a mini-series of “prelude” posts before the A-Z series to discuss the project structure and the purpose of the NetLearner project.
From January to June 2020, I continued to built the NetLearner app every week, with 26 releases over 26 weeks. As of October 2020, the alpha version has been deployed to a public website, to demonstrate its features:
TIP #10: Use YouTube videos to complement your blog posts.
My work has been featured on various YouTube channels, including the official .NET Community Standup and (coming soon) the .NET Docs show. I’ve also appeared on the Philly-based Dev Talk Show.
I do have my own YouTube channel, where I’ve published C# video tutorials many years ago. Going forward, I plan to publish new dev content on my YouTube channel:
I hope you’ve enjoyed this writeup and found something useful that you can implement in your own blogging journey. Feel free to reach out with any follow-up questions if you need any guidance for blogging.
As promised, below is the initial release of the ASP .NET Core 3.1 A-Z ebook. This combines the 26 blog posts from the series of ASP .NET Core articles on this website.
ASP .NET Core 3.1 A-Z ebook cover
You can find the complete ebook on GitHub using one of the links below:
The cover image was generated using the Canva mobile app
The 2020 eBook is still a work in progress 🙂
I’m using my Worker Service sample to auto-generate Word documents from each blog post by converting each article’s HTML into Word format using MariGold.OpenXHTML
After some tweaking, images have been manually resized using a Macro in the Word document. Automatic resizing doesn’t seem to work between HTML to Word conversions, but feel free to submit a Pull Request if you have suggestions on how to fix it.
Animated GIF images don’t work in the ebook, so a link to each original source has been included where they appear in a few chapters.
This is the twenty-fifth of a new series of posts on ASP .NET Core 3.1 for 2020. In this series, we’ll cover 26 topics over a span of 26 weeks from January through June 2020, titled ASP .NET Core A-Z! To differentiate from the 2019 series, the 2020 series will mostly focus on a growing single codebase (NetLearner!) instead of new unrelated code snippets week.
If you haven’t heard of it yet, YAML is yet another markup language. No really, it is. YAML literally stands for Yet Another Markup Language. If you need a reference for YAML syntax and how it applies to Azure DevOps Pipelines, check out the official docs:
NOTE: Before using the aforementioned YAML sample in an Azure DevOps project, please replace any placeholder values and rename the file to remove the .txt suffix.
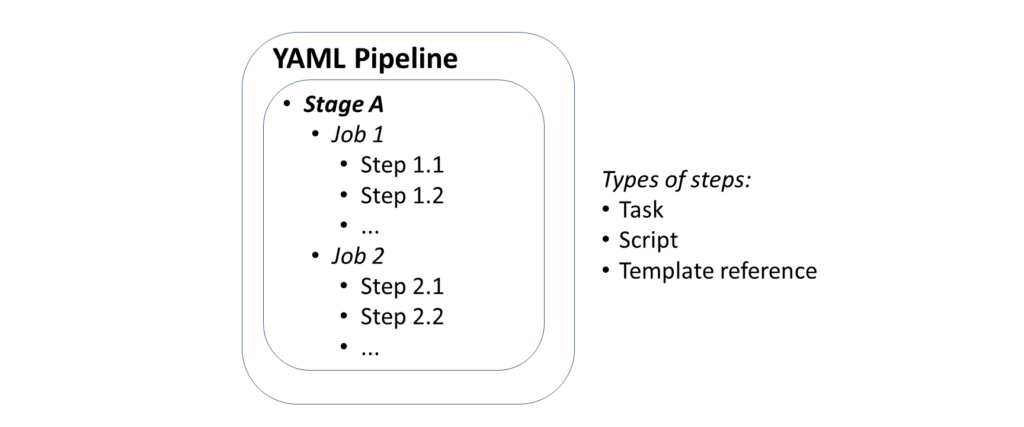
In the context of Azure DevOps, you can use Azure Pipelines with YAML to make it easier for you set up a CI/CD pipeline for Continuous Integration and Continuous Deployment. This includes steps to build and deploy your app. Pipelines consist of stages, which consist of jobs, which consists of steps. Each step could be a script or task. In addition to these options, a step can also be a reference to an external template to make it easier to create your pipelines.
DevOps Pipeline in YAML
Getting Started With Pipelines
To get started with Azure Pipelines in Azure DevOps:
Select your repo, e.g. a specific GitHub repository
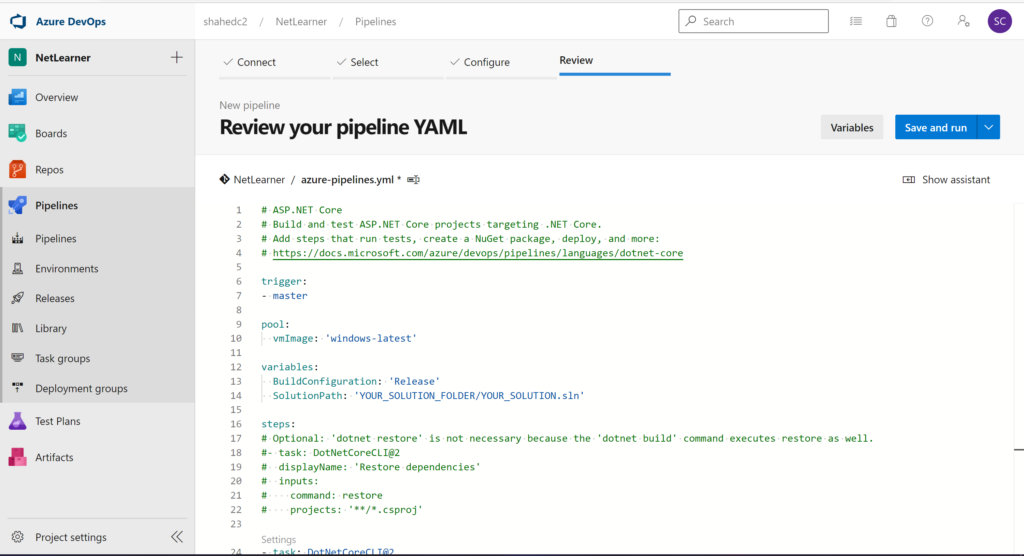
Configure your YAML
Review your YAML and Run it
From here on forward, you may come back to your YAML here, edit it, save it, and run as necessary. You’ll even have the option to commit your YAML file “azure-pipelines.yml” into your repo, either in the master branch or in a separate branch (to be submitted as a Pull Request that can be merged).
YAML file in Azure DevOps
If you need more help getting started, check out the official docs and Build 2019 content at:
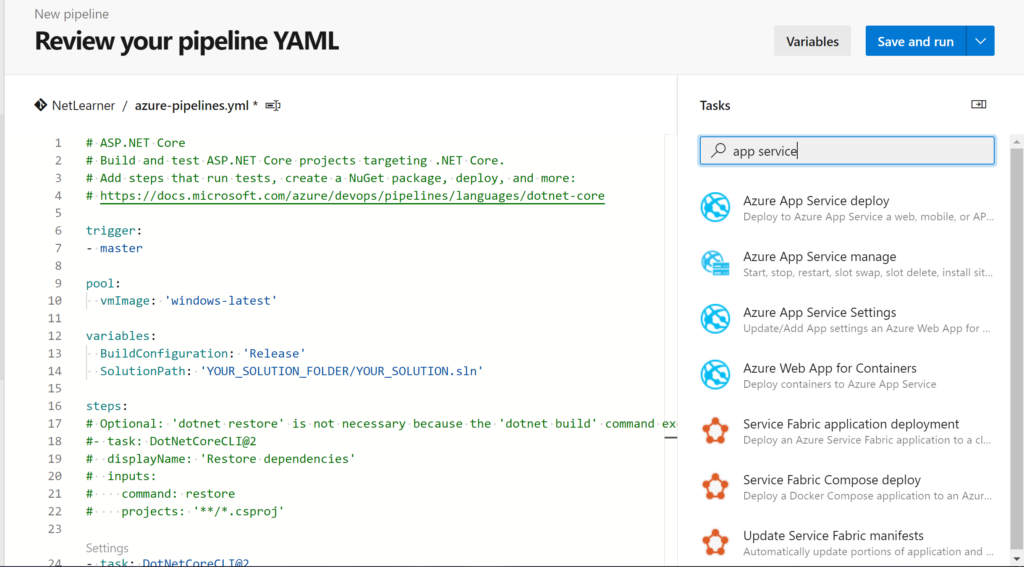
To add pre-written snippets to your YAML, you may use the Task Assistant side panel to insert a snippet directly into your YAML file. This includes tasks for .NET Core builds, Azure App Service deployment and more.
Task Assistant in Azure DevOps
OS/Environment and Runtime
From the sample repo, take a look at the sample YAML code sample “azure-pipelines.yml.txt“. Near the top, there is a definition for a “pool” with a “vmImage” set to ‘windows-latest’.
pool:
 vmImage: 'windows-latest'
If I had started off with the default YAML pipeline configuration for a .NET Core project, I would probably get a vmImage value set to ‘ubuntu-latest’. This is just one of many possible values. From the official docs on Microsoft-hosted agents, we can see that Microsoft’s agent pool provides at least the following VM images across multiple platforms, e.g.
Windows Server 2019 with Visual Studio 2019 (windows-latest OR windows-2019)
Windows Server 2016 with Visual Studio 2017 (vs2017-win2016)
Ubuntu 18.04 (ubuntu-latest OR ubuntu-18.04)
Ubuntu 16.04 (ubuntu-16.04)
macOS X Mojave 10.14 (macOS-10.14)
macOS X Catalina 10.15 (macOS-latest OR macOS-10.15)
In addition to the OS/Environment, you can also set the .NET Core runtime version. This may come in handy if you need to explicitly set the runtime for your project.
Once you’ve set up your OS/environment and runtime, you can restore (dependencies) and build your project. Restoring dependencies with a command is optional since the Build step will take care of the Restore as well. To build a specific configuration by name, you can set up a variable first to define the build configuration, and then pass in the variable name to the build step.
variables:
  BuildConfiguration: 'Release'
  SolutionPath: 'YOUR_SOLUTION_FOLDER/YOUR_SOLUTION.sln'

steps:
# Optional: 'dotnet restore' is not necessary because the 'dotnet build' command executes restore as well.
#- task: DotNetCoreCLI@2
#  displayName: 'Restore dependencies'
#  inputs:
#    command: restore
#    projects: '**/*.csproj'

- task: DotNetCoreCLI@2
  displayName: 'Build web project'
  inputs:
    command: 'build'
    projects: $(SolutionPath)
In the above snippet, the BuildConfiguration is set to ‘Release’ so that the project is built for its ‘Release’ configuration. The displayName is a friendly name in a text string (for any step) that may include variable names as well. This is useful for observing logs and messages during troubleshooting and inspection.
NOTE: You may also use script steps to make use of dotnet commands with parameters you may already be familiar with, if you’ve been using .NET Core CLI Commands. This makes it easier to run steps without having to spell everything out.
steps:
- task: DotNetCoreCLI@2
 inputs:
 command: restore
 projects: '**/*.csproj'
 feedsToUse: config
 nugetConfigPath: NuGet.config
 externalFeedCredentials: <Name of the NuGet service connection>
Note that you can set your own values for an external NuGet feed to restore dependencies for your project. Once restored, you may also customize your build steps/tasks.
Although unit testing is not required for a project to be compiled and deployed, it is absolutely essential for any real-world application. In addition to running unit tests, you may also want to measure your code coverage for those unit tests. All these are possible via YAML configuration.
From the official docs, here is a snippet to run your unit tests, that is equivalent to a “dotnet test” command for your project:
Once again, the above snippet uses the “dotnet test” command, but also adds the –collect option to enable the data collector for your test run. The text string value that follows is a friendly name that you can set for the data collector. For more information on “dotnet test” and its options, check out the docs at:
The above snippet runs a “dotnet publish” command with the proper configuration setting, followed by an output location, e.g. Build.ArtifactStagingDirectory. The value for the output location is one of many predefined build/system variables, e.g. System.DefaultWorkingDirectory, Build.StagingDirectory, Build.ArtifactStagingDirectory, etc. You can find out more about these variables from the official docs:
Note that there is a placeholder text string for the Azure Subscription ID. If you use the Task Assistant panel to add a “Azure App Service Deploy” snippet, you will be prompted to select your Azure Subscription, and a Web App location to deploy to, including deployment slots if necessary.
The PublishBuildArtifacts task uploads the package to a file container, ready for deployment. After your artifacts are ready, a zip file will become available in a named container, e.g. ‘drop’.
# Optional step if you want to deploy to some other system using a Release pipeline or inspect the package afterwards
- task: PublishBuildArtifacts@1
  displayName: 'Publish Build artifacts'
  inputs:
    PathtoPublish: '$(Build.ArtifactStagingDirectory)'
    ArtifactName: 'drop'
    publishLocation: 'Container'
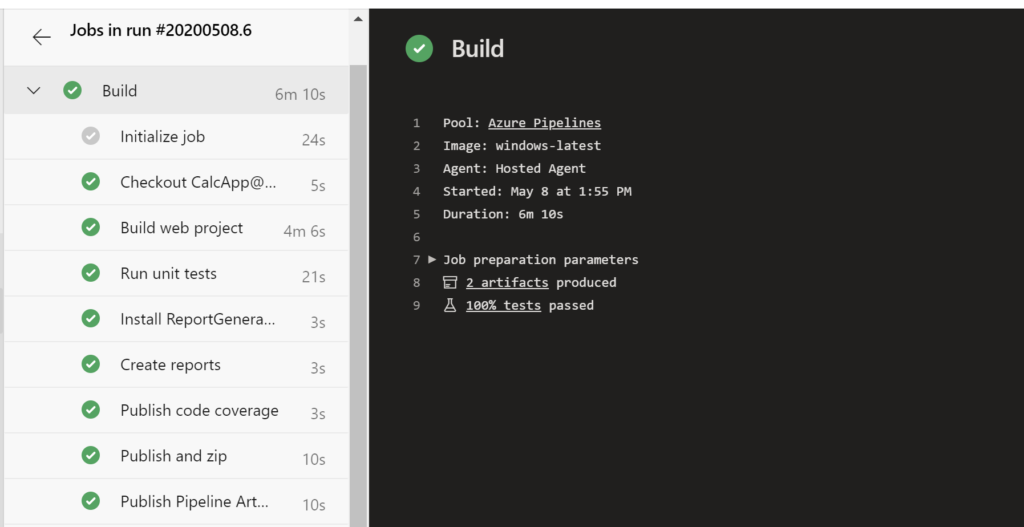
You may use the Azure DevOps portal to inspect the progress of each step and troubleshoot any failed steps. You can also drill down into each step to see the commands that are running in the background, followed by any console messages.
Azure DevOps success messages
NOTE: to set up a release pipeline with multiple stages and optional approval conditions, check out the official docs at:
Now that you’ve set up your pipeline, how does this all get triggered? If you’ve taken a look at the sample YAML file, you will notice that the first command includes a trigger, followed by the word “master”. This ensures that the pipeline will be triggered every time code is pushed to the corresponding code repository’s master branch. When using a template upon creating the YAML file, this trigger should be automatically included for you.
trigger:- master
To include more triggers, you may specify triggers for specific branches to include or exclude.
Finally here are some tips and tricks when using YAML to set up CI/CD using Azure Pipelines:
Snippets: when you use the Task Assistant panel to add snippets into your YAML, be careful where you are adding each snippet. It will insert it wherever your cursor is positioned, so make sure you’ve clicked into the correction location before inserting anything.
Order of tasks and steps: Verify that you’ve inserted (or typed) your tasks and steps in the correct order. For example: if you try to deploy an app before publishing it, you will get an error.
Indentation: Whether you’re typing your YAML or using the snippets (or some other tool), use proper indentation. You will get syntax errors of the steps and tasks aren’t indented correctly.
Proper Runtime/OS: Assign the proper values for the desired runtime, environment and operating system.
Publish: Don’t forget to publish before attempting to deploy the build.
Artifacts location: Specify the proper location(s) for artifacts when needed.
Authorize Permissions: When connecting your Azure Pipeline to your code repository (e.g. GitHub repo) and deployment location (e.g. Azure App Service), you will be prompted to authorize the appropriate permissions. Be aware of what permissions you’re granting.
Private vs Public: Both your Project and your Repo can be private or public. If you try to mix and match a public Project with a private Repo, you may get the following warning message: “You selected a private repository, but this is a public project. Go to project settings to change the visibility of the project.”
This is the twenty-fourth of a new series of posts on ASP .NET Core 3.1 for 2020. In this series, we’ll cover 26 topics over a span of 26 weeks from January through June 2020, titled ASP .NET Core A-Z! To differentiate from the 2019 series, the 2020 series will mostly focus on a growing single codebase (NetLearner!) instead of new unrelated code snippets week.
XML (eXtensible Markup Language) is a popular document format that has been used for a variety of applications over the years, including Microsoft Office documents, SOAP Web Services, application configuration and more. JSON (JavaScript Object Notation) was derived from object literals of JavaScript, but has also been used for storing data in both structured and unstructured formats, regardless of the language used. In fact, ASP .NET Core applications switched from XML-based .config files to JSON-based .json settings files for application configuration.
Returning XML/JSON format from a Web API
Returning JsonResult and IActionResult
Before we get into XML output for your Web API, let’s start off with JSON output first, and then we’ll get to XML. If you run the Web API sample project in the NetLearner repository, you’ll notice a LearningResourcesController.cs file that represents a “Learning Resources Controller” that exposes API endpoints. These endpoints can serve up both JSON and XML results of Learning Resources, i.e. blog posts, tutorials, documentation, etc.
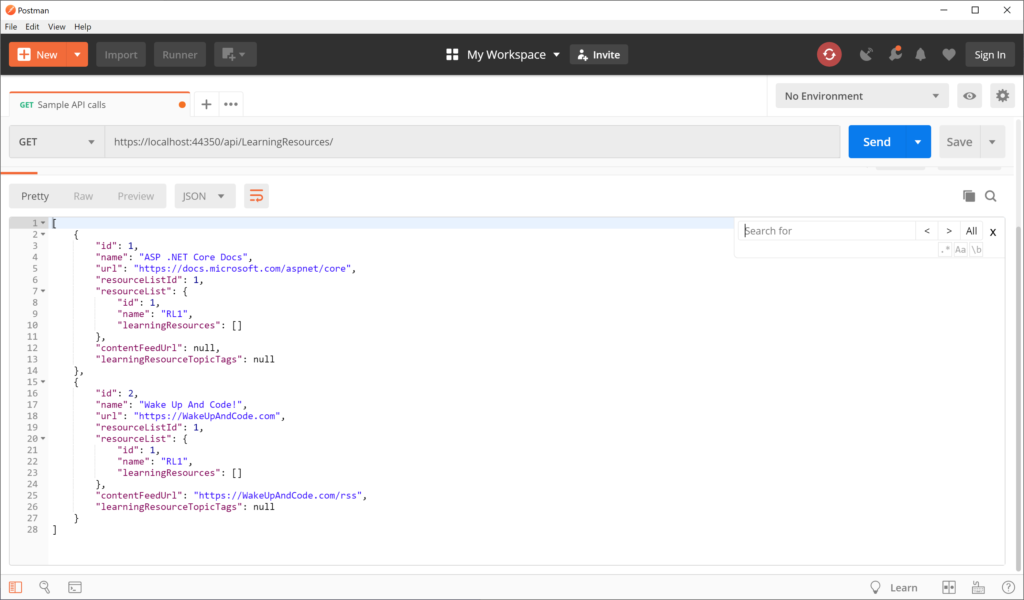
Run the application and navigate to the following endpoint in an API testing tool, e.g. Postman:
  // GET: api/LearningResources
 [HttpGet]
 public JsonResult Get()
 {
    return new JsonResult(_sampleRepository.LearningResources());
 }
In this case, the Json() method returns a JsonResult object that serializes a list of Learning Resources. For simplicity, the _sampleRepository object’s LearningResources() method (in SampleRepository.cs) returns a hard-coded list of LearningResource objects. Its implementation here isn’t important, because you would typically retrieve such values from a persistent data store, preferably through some sort of service class.
public List<LearningResource> LearningResources()
{
   ...
   return new List<LearningResource>
   {
      new LearningResource
      {
         Id= 1,
         Name= "ASP .NET Core Docs",
         Url = "https://docs.microsoft.com/aspnet/core",
         ...
      },
      ...
   }
}
The JSON result looks like the following, where a list of learning resources are returned:
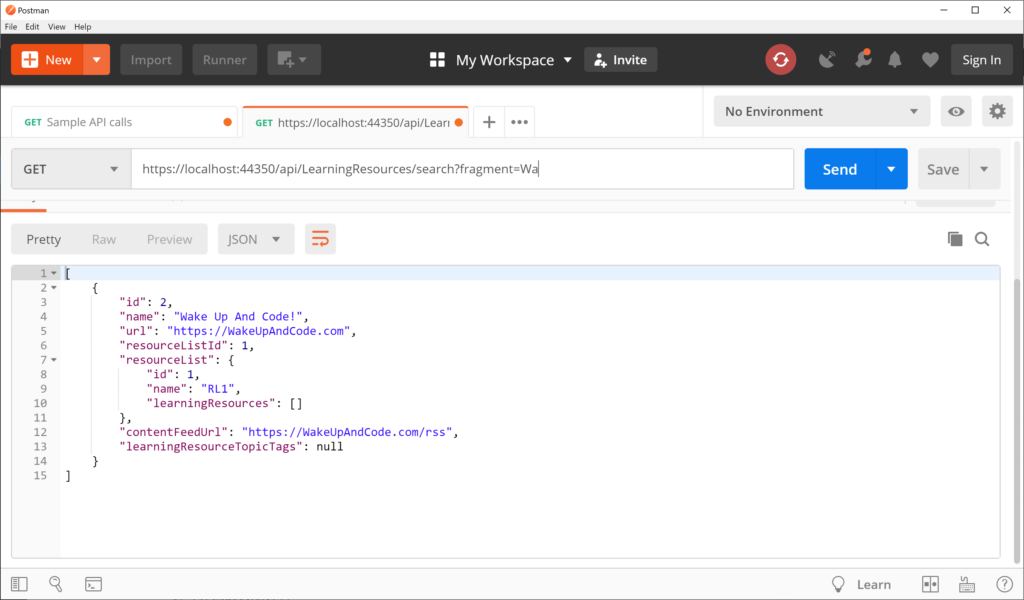
Instead of specifically returning a JsonResult, you could also return a more generic IActionResult, which can still be interpreted as JSON. Run the application and navigate to the following endpoint, to include the action method “search” folllowed by a QueryString parameter “fragment” for a partial match.
This triggers a GET request by calling the LearningResourceController‘s Search() method, with its fragment parameter set to “Wa” for a partial text search:
// GET: api/LearningResources/search?fragment=Wa
[HttpGet("Search")]
public IActionResult Search(string fragment)
{
   var result = _sampleRepository.GetByPartialName(fragment);
   if (!result.Any())
   {
      return NotFound(fragment);
   }
   return Ok(result);
}
In this case, the GetByPartialName() method returns a List of LearningResources objects that are returned as JSON by default, with an HTTP 200 OK status. In case no results are found, the action method will return a 404 with the NotFound() method.
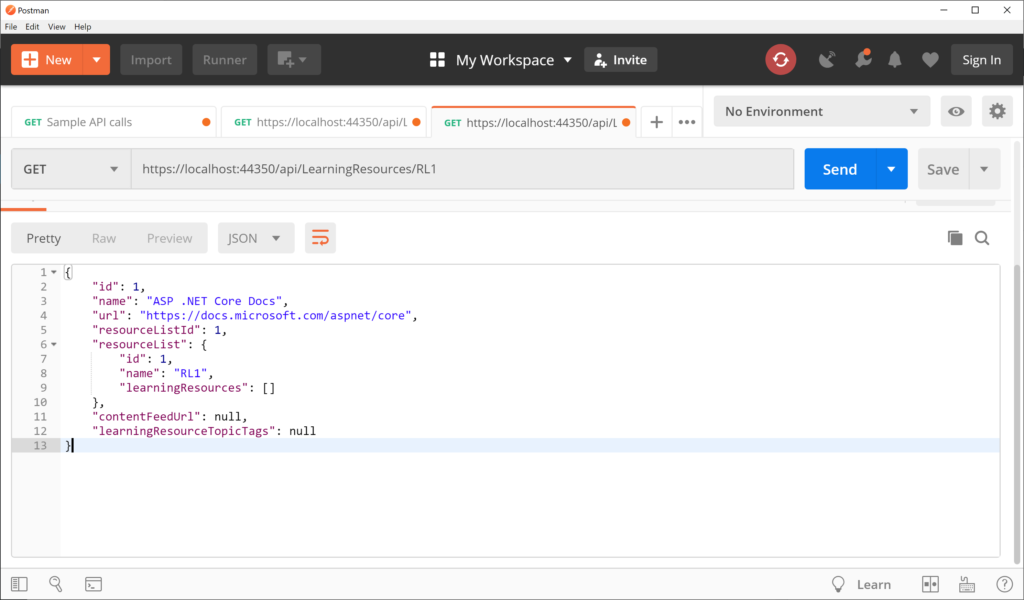
An overloaded version of the Get() method takes in a “listName” string parameter to filter results by a list name for each learning resource in the repository. Instead of returning a JsonResult or IActionResult, this one returns a complex object (LearningResource) that contains properties that we’re interested in.
// GET api/LearningResources/RL1
[HttpGet("{listName}")]
public LearningResource Get(string listName)
{
   return _sampleRepository.GetByListName(listName);
}
The GetByListName() method in the SampleRepository.cs class simply checks for a learning resource by the listName parameter and returns the first match. Again, the implementation is not particularly important, but it illustrates how you can pass in parameters to get back JSON results.
While the application is running, navigate to the following endpoint:
https://localhost:44350/api/LearningResources/RL1
Sample JSON data with property filter
This triggers another GET request by calling the LearningResourcesController‘s overloaded Get() method, with the listName parameter. When passing the list name “RL1”, this returns one item, as shown below:
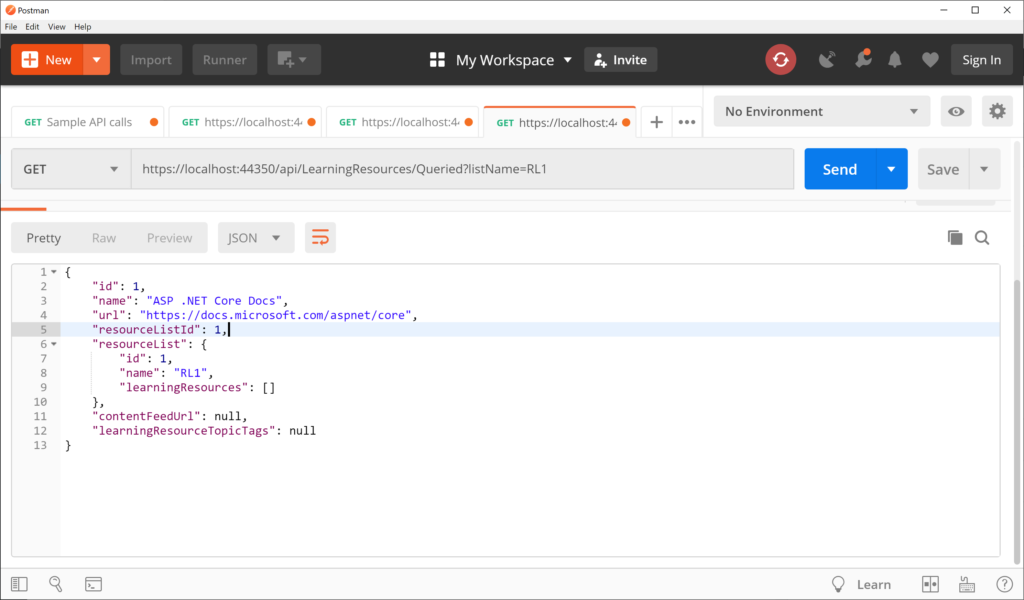
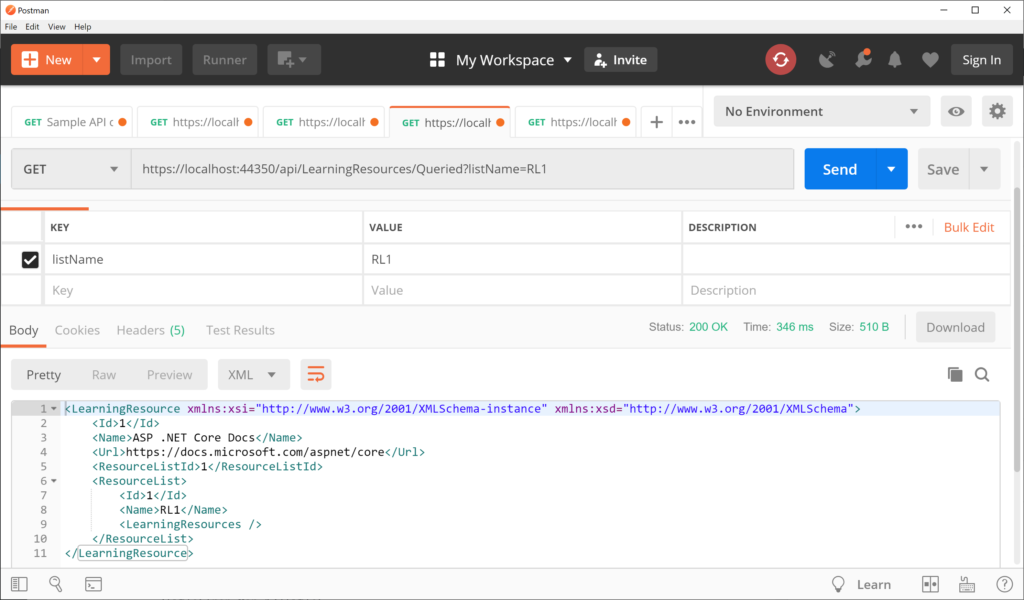
Another example with a complex result takes in a similar parameter via QueryString and checks for an exact match with a specific property. In this case the Queried() action method calls the repository’s existing GetByListName() method to find a specific learning resource by its matching list name.
This triggers a GET request by calling the LearningResourcesController‘s Queried() method, with the listName parameter. When passing the list name “RL1”, this returns one item, as shown below:
As you can see, the above result is in JSON format for the returned object.
XML Output
Wait a minute… with all these JSON results, when will we get to XML output? Not to worry, there are multiple ways to get XML results while reusing the above code. First, update your Startup.cs file’s ConfigureServices() to include a call to services.AddControllers().AddXmlSeralizerFormatters():
public void ConfigureServices(IServiceCollection services)
{
   ...
   services.AddControllers()
    .AddXmlSerializerFormatters();
   ...
}
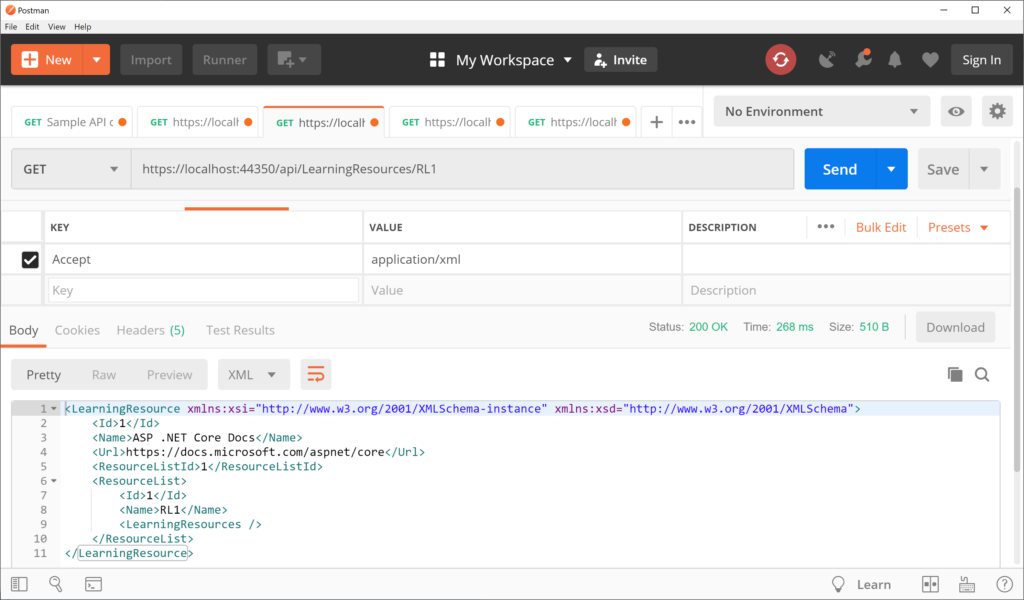
In Postman, set the request’s Accept header value to “application/xml” before requesting the endpoint, then run the application and navigate to the following endpoint once again:
https://localhost:44350/api/LearningResources/RL1
XML-formatted results in Postman without code changes
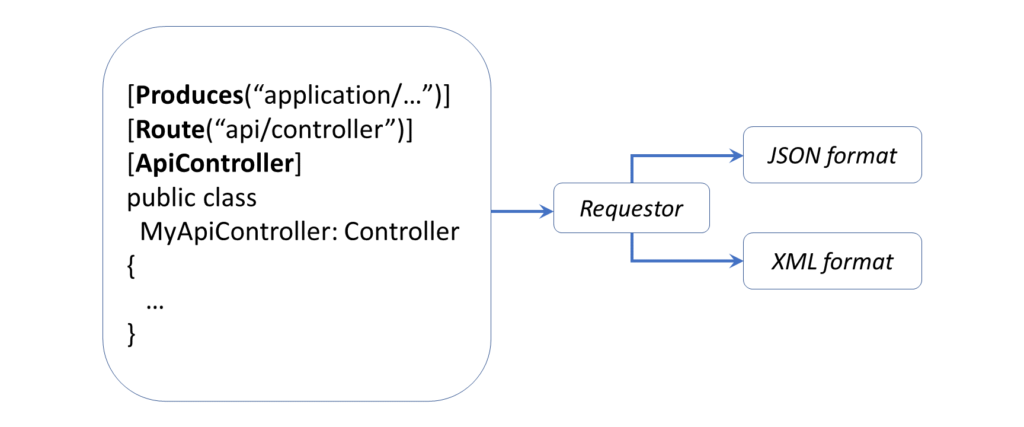
Since the action method returns a complex object, the result can easily be switched to XML simply by changing the Accept header value. In order to return XML using an IActionResult method, you should also use the [Produces] attribute, which can be set to “application/xml” at the API Controller level.
[Produces("application/xml")]
[Route("api/[controller]")]
[ApiController]
public class LearningResourcesController : ControllerBase
{
   ...
}
Then revisit the following endpoint, calling the search action method with the fragment parameter set to “ir”:
At this point, it is no longer necessary to set the Accept header to “application/xml” (in Postman) during the request, since the [Produces] attribute is given priority over it.
XML-formatted output using Produces attribute
This should produces the following result , with a LearningResource object in XML:
As for the first Get() method returning JsonResult, you can’t override it with the [Produces] attribute or the Accept header value to change the result to XML format.