This is the twenty-third of a new series of posts on ASP .NET Core 3.1 for 2020. In this series, we’ll cover 26 topics over a span of 26 weeks from January through June 2020, titled ASP .NET Core A-Z! To differentiate from the 2019 series, the 2020 series will mostly focus on a growing single codebase (NetLearner!) instead of new unrelated code snippets week.
Previous post:
NetLearner on GitHub:
- Repository: https://github.com/shahedc/NetLearnerApp
- v0.23-alpha release: https://github.com/shahedc/NetLearnerApp/releases/tag/v0.23-alpha
NOTE: The Worker Service sample is a meta project that generates Word documents from blog posts, to auto-generate an ebook from this blog series. You can check out the code in the following experimental subfolder, merged from a branch:
In this Article:
- W is for Worker Service
- New Worker Service Project
- Program and BackgroundService
- Logging in a Worker Service
- Running the Worker Service
- References
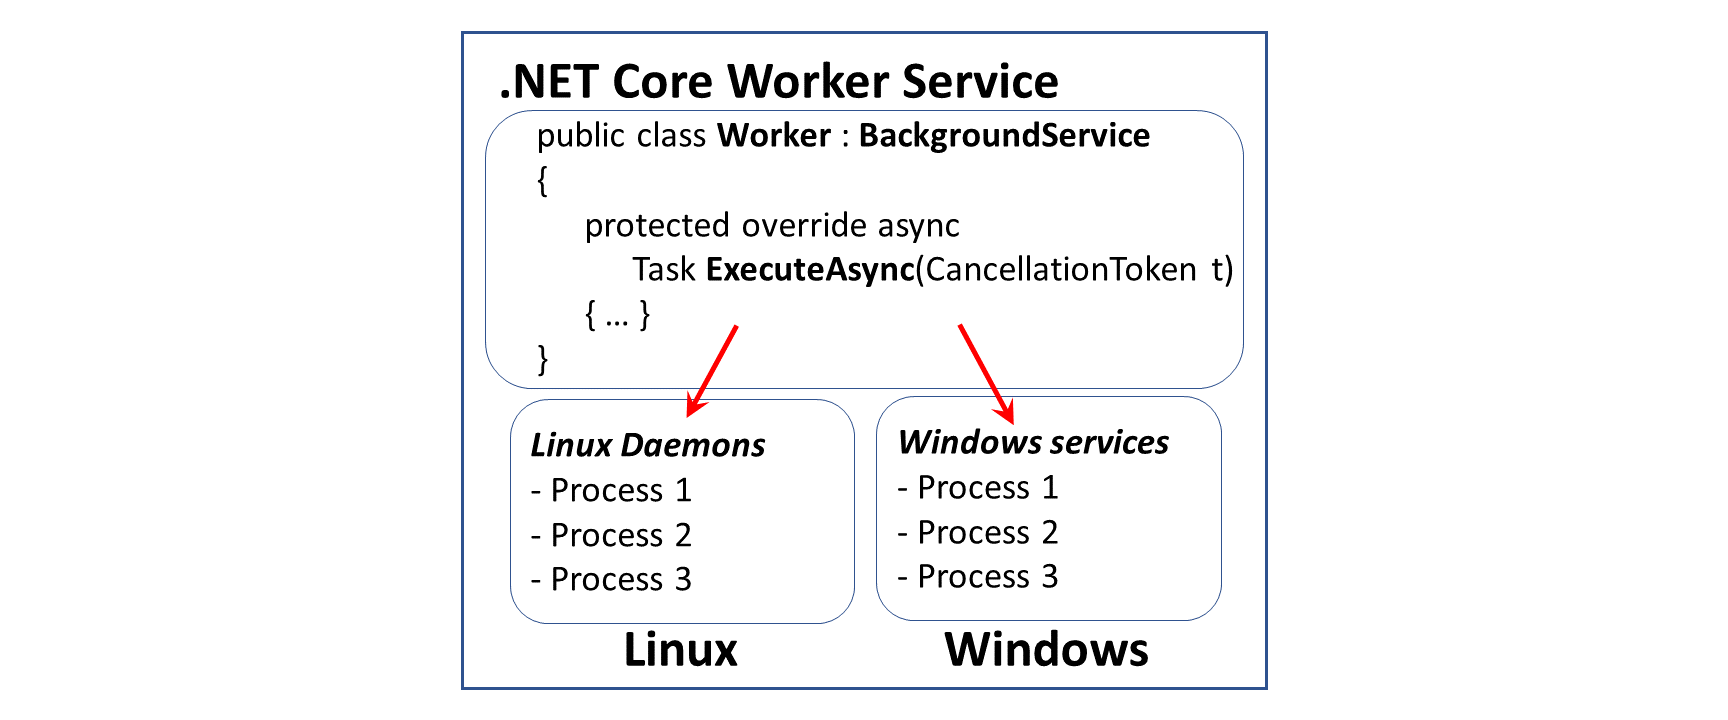
W is for Worker Service
When you think of ASP .NET Core, you probably think of web application backend code, including MVC and Web API. MVC Views and Razor Pages also allow you to use backend code to generate frontend UI with HTML elements. The all-new Blazor goes one step further to allow client-side .NET code to run in a web browser, using WebAssembly. And finally, we now have a template for Worker Service applications.
Released with ASP .NET Core 3.0, the new project type was introduced in ASP .NET Core early previews. Although the project template was initially listed under the Web templates, it has since been relocated one level up in the New Project wizard. This is a great way to create potentially long-running cross-platform services in .NET Core. This article covers the Windows operating system.
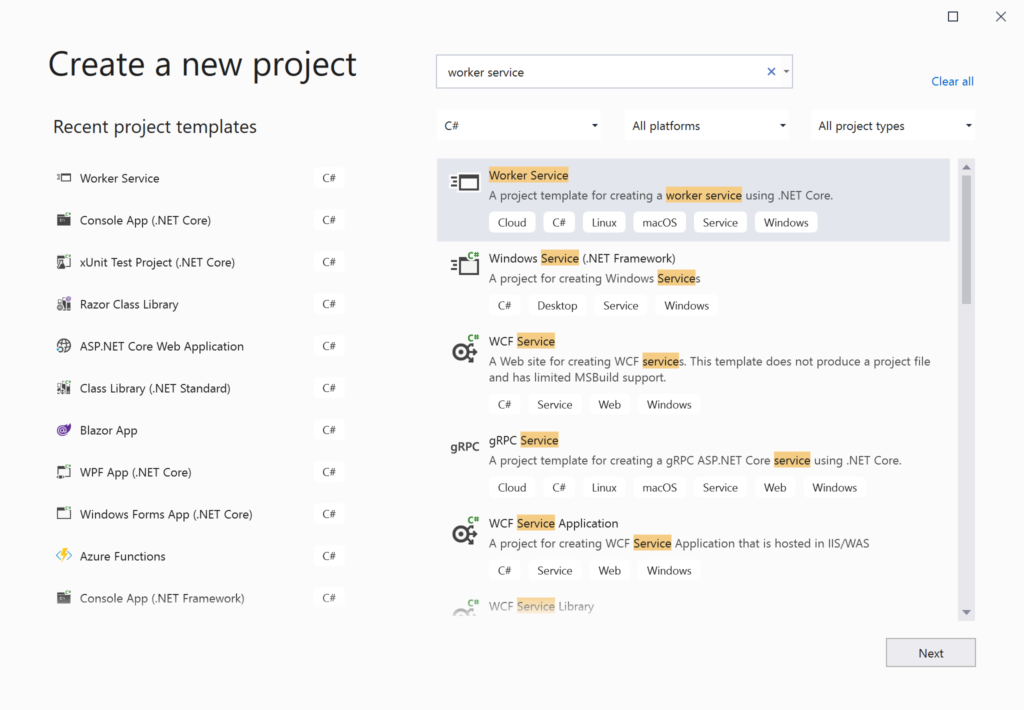
New Worker Service Project
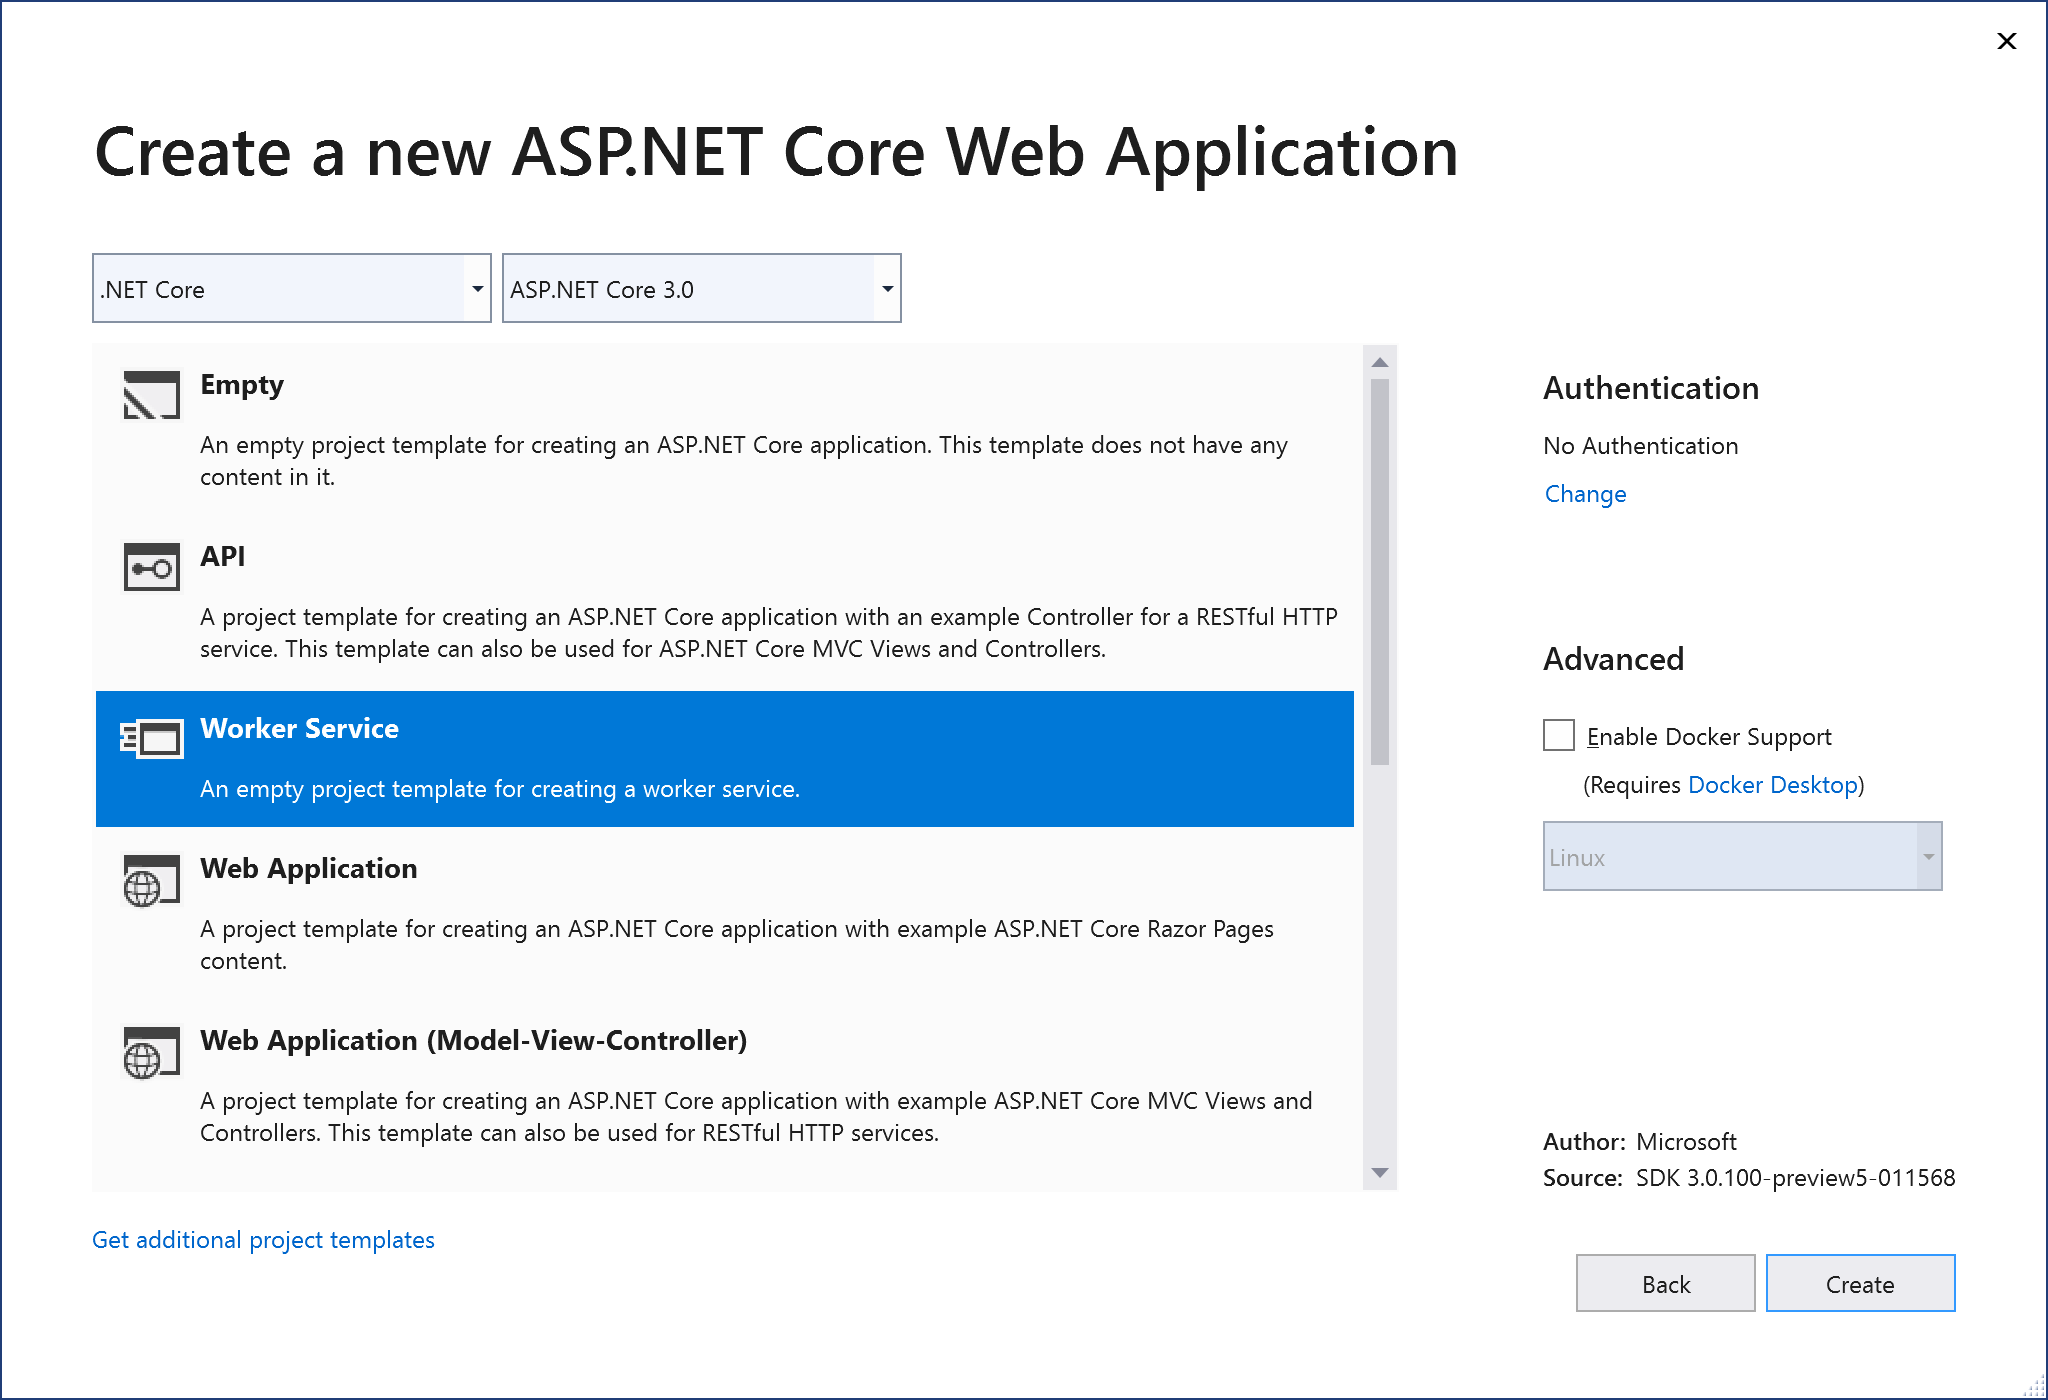
The quickest way to create a new Worker Service project in Visual Studio 2019 is to use the latest template available with .NET Core 3.1. You may also use the appropriate dotnet CLI command.
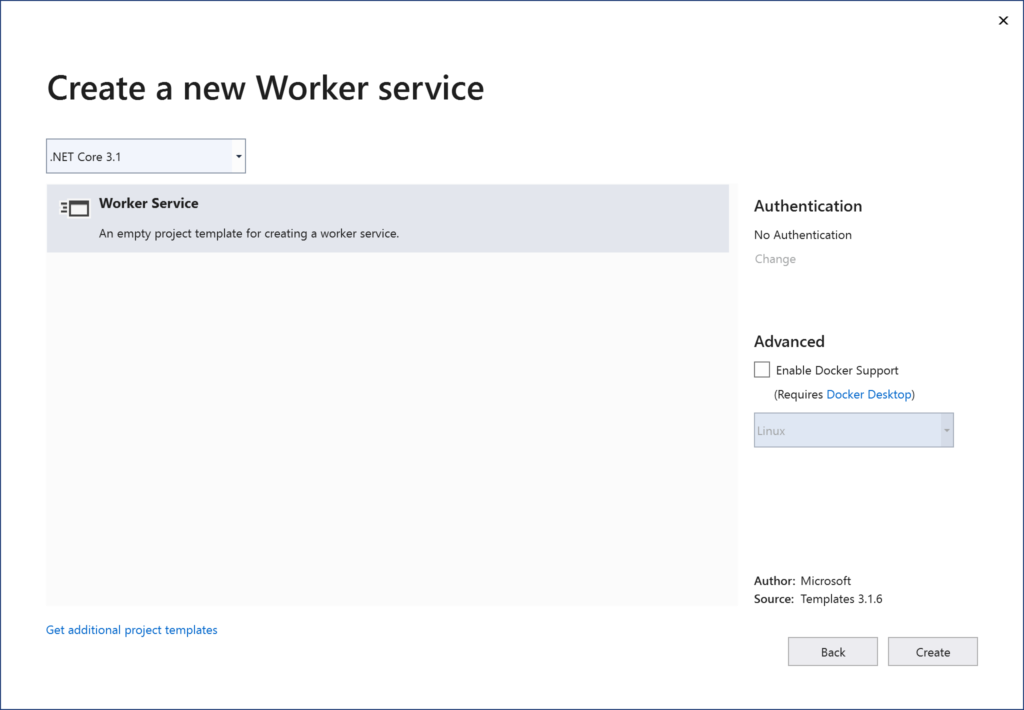
Launch Visual Studio and select the Worker service template as shown below. After selecting the location, verify the version number (e.g. .NET Core 3.1) to create the worker service project.
To use the Command Line, simply use the following command:
> dotnet new worker -o myproject
where -o is an optional flag to provide the output folder name for the project.
You can learn more about this template at the following location:
- Worker Service template: https://docs.microsoft.com/en-us/aspnet/core/fundamentals/host/hosted-services?view=aspnetcore-3.1&tabs=visual-studio#worker-service-template
Program and BackgroundService
The Program.cs class contains the usual Main() method and a familiar CreateHostBuilder() method. This can be seen in the snippet below:
public class Program
{
   public static void Main(string[] args)
   {
      CreateHostBuilder(args).Build().Run();
   }

   public static IHostBuilder CreateHostBuilder(string[] args) =>
      Host.CreateDefaultBuilder(args)
      .ConfigureServices(hostContext, services =>
      {
         services.AddHostedService<Worker>();
      });
 }
Things to note:
- The Main method calls the CreateHostBuilder() method with any passed parameters, builds it and runs it.
- As of ASP .NET Core 3.0, the Web Host Builder has been replaced by a Generic Host Builder. The so-called Generic Host Builder was covered in an earlier blog post in this series.
- CreateHostBuilder() creates the host and configures it by calling AddHostService<T>, where T is an IHostedService, e.g. a worker class that is a child of BackgroundService
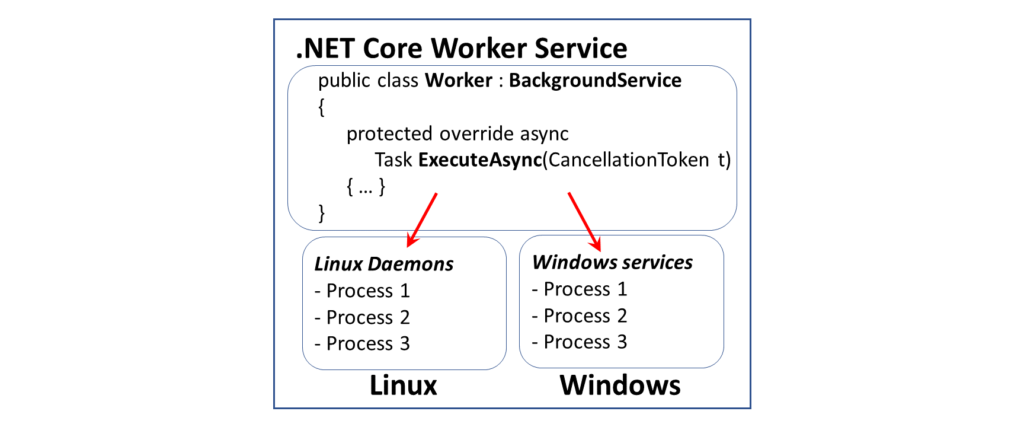
The worker class, Worker.cs, is defined as shown below:
public class Worker : BackgroundService
{
   // ...

   protected override async Task ExecuteAsync(CancellationToken stoppingToken)
   {
      // do stuff here
   }
}
Things to note:
- The worker class implements the BackgroundService class, which comes from the namespace Microsoft.Extensions.Hosting
- The worker class can then override the ExecuteAsync() method to perform any long-running tasks.
In the sample project, a utility class (DocEngine.cs) is used to convert a web page (e.g. a blog post or article) into a Word document for offline viewing. Fun fact: when this A-Z series wraps up, the blog posts will be assembled into a free ebook, by using this DocMaker, which uses some 3rd-party NuGet packages to generate the Word document.
Logging in a Worker Service
Logging in ASP .NET Core has been covered in great detail in an earlier blog post in this series. To get a recap, take a look at the following writeup:
- Logging in ASP .NET Core 3.1: https://wakeupandcode.com/logging-in-asp-net-core-3-1/
To use Logging in your Worker Service project, you may use the following code in your Program.cs class:
using Microsoft.Extensions.Logging;
public static IHostBuilder CreateHostBuilder(string[] args) =>
 Host.CreateDefaultBuilder(args)
 .ConfigureLogging(loggerFactory => loggerFactory.AddEventLog())
 .ConfigureServices((hostContext, services) =>
 {
    services.AddHostedService<Worker>();
 });
- Before using the extension method, add its NuGet package to your project:
- Microsoft.Extensions.Logging.EventLog
- Add the appropriate namespace to your code:
- using Microsoft.Extensions.Logging;
- Call the method ConfigureLogging() and call the appropriate logging method, e.g. AddEventLog()
The list of available loggers include:
- AddConsole()
- AddDebug()
- AddEventLog()
- AddEventSourceLogger()
The Worker class can then accept an injected ILogger<Worker> object in its constructor:
private readonly ILogger<Worker> _logger;

public Worker(ILogger<Worker> logger)
{
   _logger = logger;
}
Running the Worker Service
NOTE: Run Powershell in Administrator Mode before running the commands below.
Before you continue, add a call to UseWindowsService() in your Program class, or verify that it’s already there. To call UseWindowsService(), the following package must be installed in your project: Microsoft.Extensions.Hosting.WindowsServices
The official announcement and initial document referred to UseServiceBaseLifetime() in an earlier preview. This method was renamed to UseWindowsService() before release.
   public static IHostBuilder CreateHostBuilder(string[] args) =>
      Host.CreateDefaultBuilder(args)
      .UseWindowsService()
      .ConfigureServices(hostContext, services =>
      {
         services.AddHostedService<Worker>();
      });
According to the code documentation, UseWindowsService() does the following:
- Sets the host lifetime to WindowsServiceLifetime
- Sets the Content Root
- Enables logging to the event log with the application name as the default source name
You can run the Worker Service in various ways:
- Build and Debug/Run from within Visual Studio.
- Publish to an exe file and run it
- Run the sc utility (from Windows\System32) to create a new service
To publish the Worker Service as an exe file with dependencies, run the following dotnet command:
dotnet publish -o C:\path\to\project\pubfolder
The -o parameter can be used to specify the path to a folder where you wish to generate the published files. It could be the path to your project folder, followed by a new subfolder name to hold your published files, e.g. pubfolder. Make a note of your EXE name, e.g. MyProjectName.exe but omit the pubfolder from your source control system.
To create a new service, run sc.exe from your System32 folder and pass in the name of the EXE file generated from the publish command.
> C:\Windows\System32\sc create MyServiceName binPath=C:\path\to\project\pubfolder\MyProjectName.exe
When running the sample manually, you should see some logging messages, as shown below:
info: DocMaker.Worker[0]
 Making doc 1 at: 06/09/2020 00:09:52 -04:00
Making your document...
info:  DocMaker.Worker[0]
 Making doc 2 at: 06/09/2020 00:10:05 -04:00
Making your document...
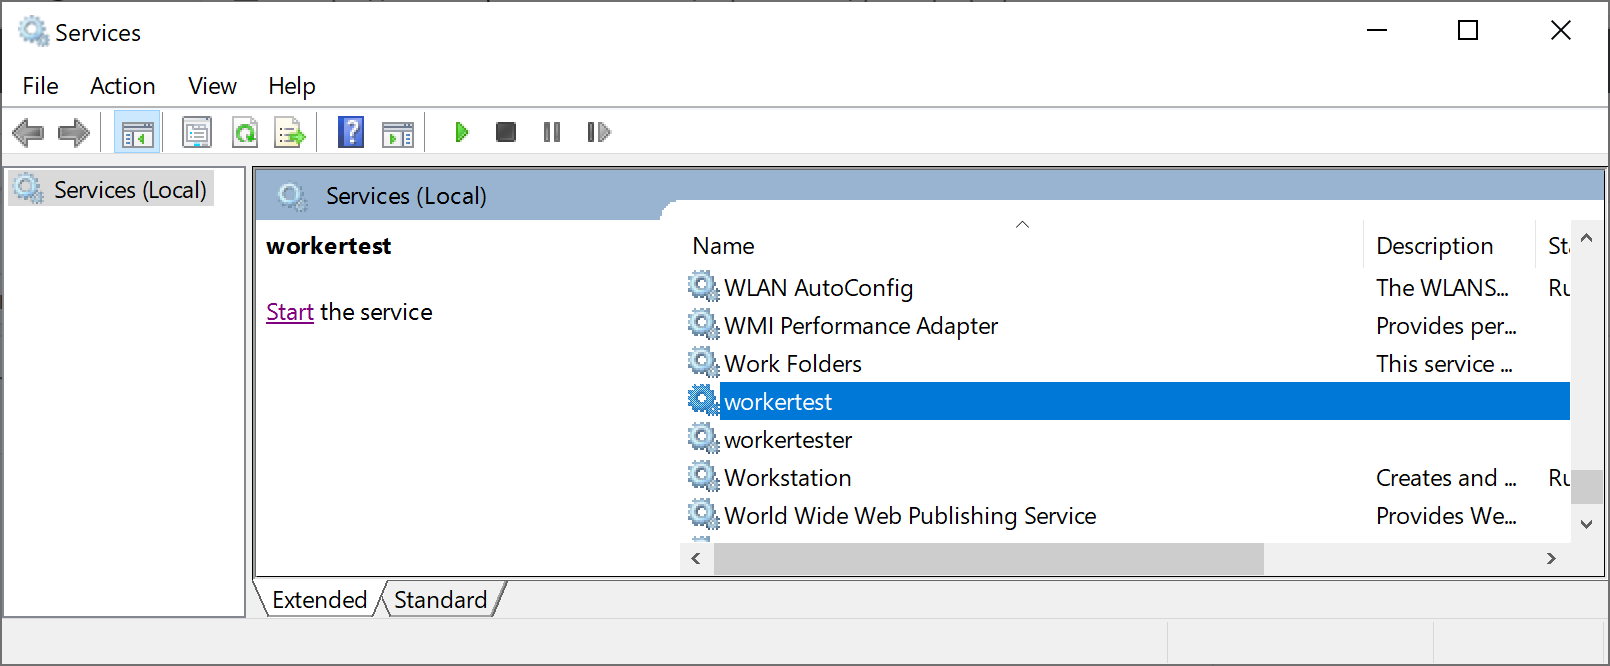
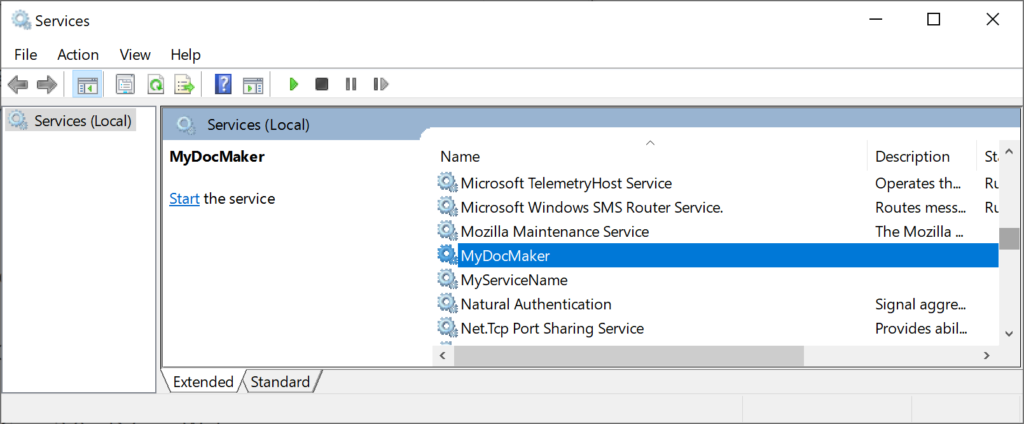
After the service is installed, it should show up in the operating system’s list of Windows Services:
NOTE: When porting to other operating systems, the call to UseWindowsService() is safe to leave as is. It doesn’t do anything on a non-Windows system.
References
- .NET Core Workers as Windows Services: https://devblogs.microsoft.com/aspnet/net-core-workers-as-windows-services/
- Worker Service template in .NET Core 3.0: https://gunnarpeipman.com/dotnet-core-worker-service/
- Worker Service Template in .NET Core 3.0 – DZone Web Dev: https://dzone.com/articles/worker-service-template-in-net-core-30
- .NET Core Workers in Azure Container Instances: https://devblogs.microsoft.com/aspnet/dotnet-core-workers-in-azure-container-instances/
- Background tasks with hosted services: https://docs.microsoft.com/en-us/aspnet/core/fundamentals/host/hosted-services
 A – Z of ASP .NET Core!