Tag Archives: Razor Pages

Tag Helper Authoring in ASP .NET Core 3.1

By Shahed C on May 18, 2020

This is the twentieth of a new series of posts on ASP .NET Core 3.1 for 2020. In this series, we’ll cover 26 topics over a span of 26 weeks from January through June 2020, titled ASP .NET Core A-Z! To differentiate from the 2019 series, the 2020 series will mostly focus on a growing single codebase (NetLearner!) instead of new unrelated code snippets week.

Previous post:

NetLearner on GitHub:

NOTE: The NetLearner suite of apps doesn’t currently use custom tag helpers in the main branch, so you can check out the new sample code in the experimental subfolder, merged from a branch:

In this Article:

T is for Tag Helper Authoring

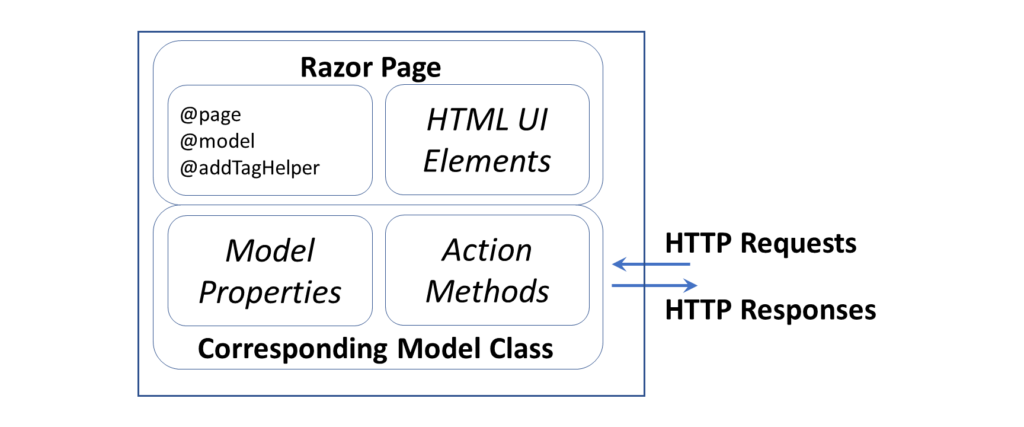
Tag Helpers are very useful for ASP .NET Core developers in creating HTML elements with server-side attributes. They work equally well in both Razor Pages and MVC views. Better yet, the syntax allows a front-end developer to easily customize the UI, with HTML/CSS knowledge.

If you need a refresher on built-in tag helpers in ASP .NET Core, you may revisit an earlier post in this series:

Tag Helpers in ASP .NET Core

Authoring your own tag helpers is as easy as implementing the ITagHelper interface. To make things easier, the TagHelper class (which already implements the aforementioned interface) can be extended to build your custom tag helpers.

Custom Tag Helpers

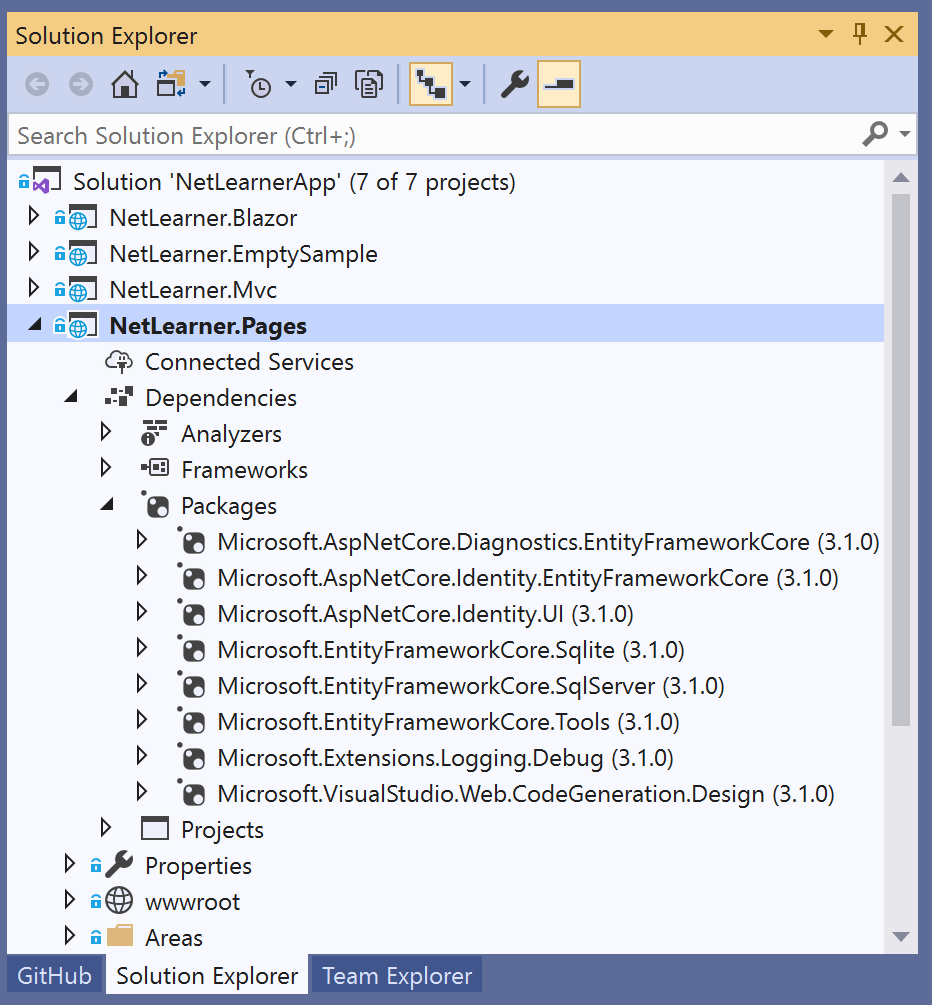
As with most concepts introduced in ASP .NET Core, it helps to use named folders and conventions to ease the development process. In the case of Tag Helpers, you should start with a “TagHelpers” folder at the root-level of your project for your convenience. You can save your custom tag helper classes in this folder.

This blog post and its corresponding code sample builds upon the official tutorial for authoring tag helpers. While the official tutorial was originally written to cover instructions for MVC views, this blog post takes a look at a Razor Page example. The creation of Tag Helpers involves the same process in either case. Let’s start with the synchronous and asynchronous versions of a Tag Helper that formats email addresses.

The class EmailTagHelper.cs defines a tag helper that is a subclass of the TagHelper class, saved in the “TagHelpers” folder. It contains a Process() method that changes the output of the HTML tag it is generating.

public class EmailTagHelper : TagHelper
{
   ...
   // synchronous method, CANNOT call output.GetChildContentAsync();
   public override void Process(TagHelperContext context, TagHelperOutput output)
   {
      // ...
   } 
} 

The class AsyncEmailTagHelper.cs defines a tag helper that is also a subclass of the TagHelper class, saved in the aforementioned “TagHelpers” folder. It contains a ProcessAsync() method, which has a different signature (returns Task object instead of void) and grabs the child content from the output using output.GetChildContentAsync();

public class AsyncEmailTagHelper : TagHelper
{
   ...
   // ASYNC method, REQUIRED to call output.GetChildContentAsync();
   public override async Task ProcessAsync(TagHelperContext context, TagHelperOutput output)
   {
      // ... 
   }
}

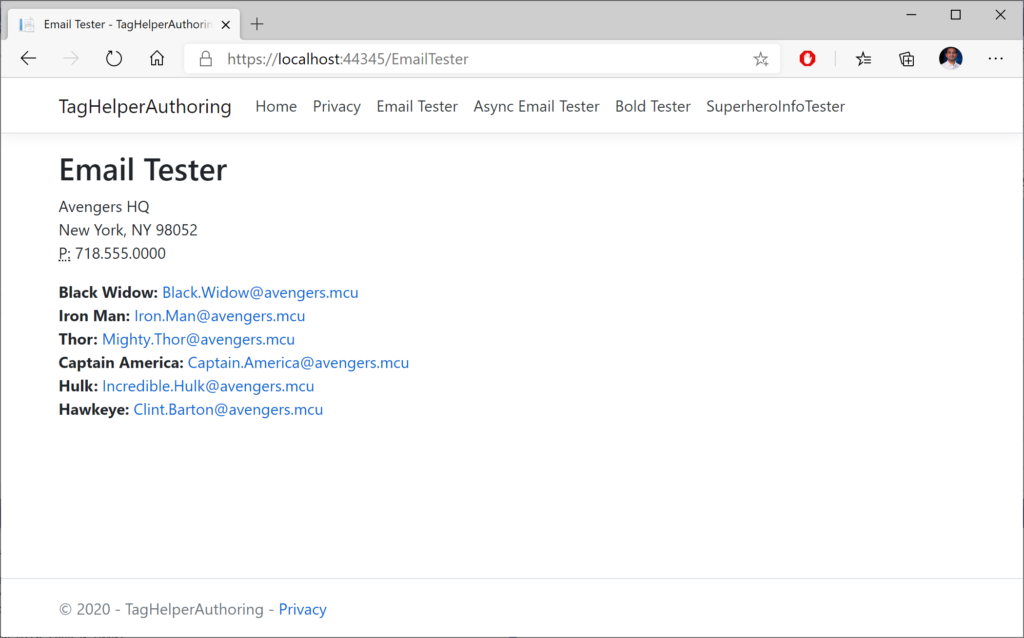
In order to use the tag helper in a Razor Page, simply add a using statement for the Tag Helper’s namespace, and then include a custom HTML tag that has the same name as the Tag Helper’s class name (without the TagHelper suffix). For the Email and AsyncEmail Tag Helpers, the corresponding tags in your Razor Page would be <email> and <async-email> respectively.

In the EmailTester.cshtml page:

<email mail-to="Black.Widow"></email>

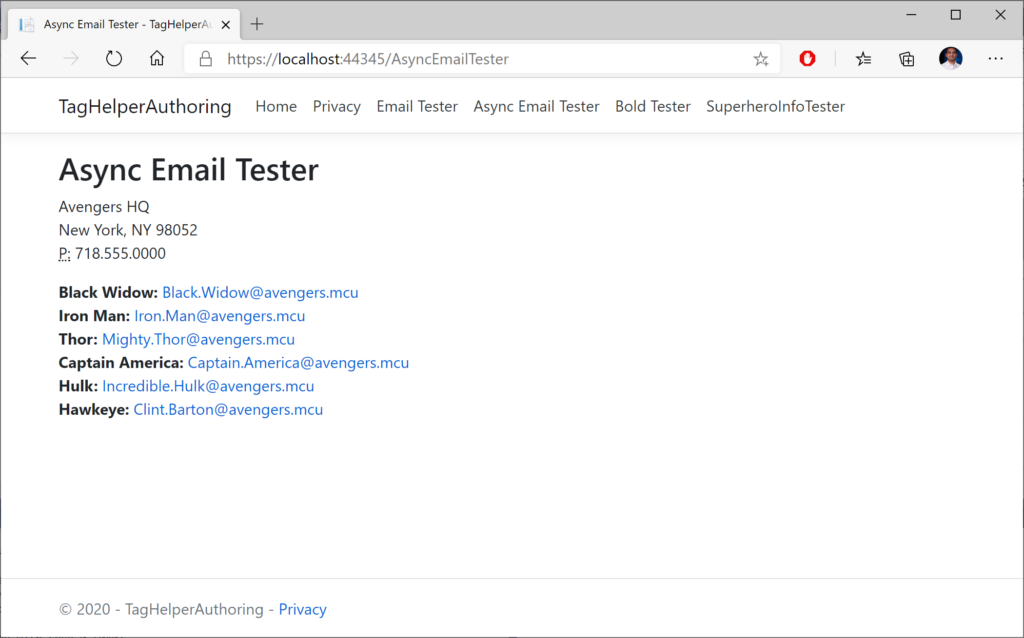
In the AsyncEmailTester.cshtml page:

<async-email>Black.Widow</async-email>

Note that the PascalCase capitalization in the class name corresponds to a lowercase tag in kebab-case. In a browser, the end result includes a clickable email link from the Razor Pages. Both the non-async and async version of the methods produce similar end results.

Email tag helper in a browser
Async Email tag helper in a browser

Setting Attributes and Content

So how does the Process() method convert your custom tags into valid HTML tags? It does that in a series of steps.

  1. Set the HTML element as the tag name to replace it with, e.g. <a>
  2. Set each attribute within that HTML element, e.g. href
  3. Set HTML Content within the tags.

The process involved is slightly different between the synchronous and asynchronous versions of the Process method. In the synchronous EmailTagHelper.cs class, the Process() method does the following:

// 1. Set the HTML element
output.TagName = "a"; 

// 2. Set the href attribute
output.Attributes.SetAttribute("href", "mailto:" + address);

// 3. Set HTML Content
output.Content.SetContent(address);

In the asynchronous AsyncEmailTagHelper.cs class, the ProcessAsync() method does the following:

// 1. Set the HTML element
output.TagName = "a"; 

var content = await output.GetChildContentAsync();
var target = content.GetContent() + "@" + EmailDomain;

// 2. Set the href attribute within that HTML element, e.g. href
output.Attributes.SetAttribute("href", "mailto:" + target);

// 3. Set HTML Content
output.Content.SetContent(target);

The difference between the two is that the async method gets the output content asynchronously with some additional steps. Before setting the attribute in Step 2, it grabs the output content from GetChildContentAsync() and then uses content.GetContent() to extract the content before setting the attribute with output.Attributes.SetAttribute(). 

Updating Pre/Post Content

This section recaps the BoldTagHelper explained in the docs tutorial, by consolidating all the lessons learned. In the BoldTagHelper.cs class from the sample, you can see the following code:

[HtmlTargetElement("bold")]
[HtmlTargetElement(Attributes = "bold")]
public class BoldTagHelper : TagHelper
{
   public override void Process(TagHelperContext context, TagHelperOutput output)
   {
      output.Attributes.RemoveAll("bold");
      output.PreContent.SetHtmlContent("<strong>");
      output.PostContent.SetHtmlContent("</strong>");
   }
}

Let’s go over what the code does, line by line:

  • The [HtmlTargetElement] attribute forces a Tag Helper to target a specific element, e.g. [HtmlTargetElement(“bold”)], which will target a <bold> tag in a Razor Page or MVC View.
  • When one or more attributes are specified, e.g. [HtmlTargetElement(Attributes = “bold”)], the Tag Helper targets a bold attribute within an element, e.g. <p bold>
  • Combining the above one after the other gives you an OR condition, in which either scenario can be matched.
  • Combining them in a single [HtmlTargetElement] creates an AND condition, which would match a bold tag with a bold attribute, which is not very useful, e.g. [HtmlTargetElement(“bold”, Attributes = “bold”)]

Here is a snippet the corresponding Razor Page for testing the above scenario, BoldTester.cshtml:

<p bold>This paragraph uses a P tag with a bold attribute. 
Using a tag helper, the entire paragraph should be displayed with bold text.</p>

<bold>This statement uses a custom bold tag to be displayed in bold.</bold>

The tag helper affects both fragments, as seen in the screenshot below:

Bold tag helper in a browser

The statements in the Process() method accomplish the following:

  • The RemoveAll() method from output.Attributes removes the “bold” attribute within the tag, as it is essentially acting as a placeholder.
  • The SetHtmlContent() from output.PreContent adds an opening <strong> tag  inside the enclosing element, i.e. just after <p> or <bold>
  • The SetHtmlContent() from output.Postontent adds a closing </strong> tag  insidethe enclosing element, i.e. just before </p> or </bold>

Passing Complex Objects

What if you want to pass a more complex object, with properties and objects within it? This can be done by defining a C# model class, e.g. SuperheroModel.cs, that can be initialized inside in the Page Model class (SuperheroInfoTester.cshtml.cs) and then used in a Razor Page (SuperheroInfoTester.cshtml). The tag helper (SuperheroTagHelper.cs) then brings it all together by replacing <superhero> tags with whatever SuperHeroModel info is passed in.

Let’s take a look at all its parts, and how it all comes together.

Object ModelSuperheroModel.cs

public class SuperheroModel
{
   public string LastName { get; set; }
   public string FirstName { get; set; }
   public string SuperName { get; set; }
   public bool HasSurvived { get; set; }

   public bool ShowInfoWithSpoilers { get; set; }
}

Razor PageSuperheroInfoTester.cshtml

@page
@model SuperheroInfoTesterModel

... 

<h3>Black Widow Info:</h3>
<div condition="@Model.blackWidowInfo.ShowInfoWithSpoilers">
 <superhero hero-info="Model.blackWidowInfo" />
</div>
...

Page Model for Razor PageSuperheroInfoTester.cshtml.cs

public class SuperheroInfoTesterModel : PageModel
{
   public SuperheroModel blackWidowInfo { get; set; }
   // ...

   public void OnGet()
   {
      blackWidowInfo = new SuperheroModel
      {
         // ...
      }
      // ...
   }
}

Superhero Tag HelperSuperheroTagHelper.cs

public class SuperheroTagHelper : TagHelper
{
   public SuperheroModel HeroInfo { get; set; }

   public override void Process(TagHelperContext context, TagHelperOutput output)
   {
     // ...
   }
}

Going through the above code:

  1. The tag helper is named SuperheroTagHelper, implying that it can be used for <superhero> tags in a Razor Page, e.g. SuperHeroInfoTester.cshtml
  2. The tag helper also contains a SuperheroModel object called HeroInfo, which allows a hero-info attribute, i.e. <superhero hero-info=”Model.property”>
  3. The SuperheroModel class contains various public properties that provide information about a specific superhero.
  4. The SuperHeroInfoTesterModel page model class includes an OnGet() method that initializes multiple SuperheroModel objects, to be displayed in the Razor Page.

Inside the tag helper, the Process() method takes care of replacing the <superhero> tag with a <section> tag:

public override void Process(TagHelperContext context, TagHelperOutput output)
{
   string htmlContent = $@"<ul><li><strong>First Name:</strong> {HeroInfo.FirstName}</li>
<li><strong>Last Name:</strong> {HeroInfo.LastName}</li>
<li><strong>Superhero Name:</strong> {HeroInfo.SuperName}</li>
<li><strong>Survived Endgame? </strong> {HeroInfo.HasSurvived}</li></ul>";
 
   output.TagName = "section";
   output.Content.SetHtmlContent(htmlContent);
   output.TagMode = TagMode.StartTagAndEndTag; 
}

After initializing some HTML content to display a <ul> list, the above code in the Process() method accomplishes the following:

  1. Set the HTML element as the tag name to replace it with, e.g. <section>
  2. Set HTML Content within the tags.
  3. Set Tag Mode to include both start and end tags, e.g. <section> … </section>

End Result in Browser:

Superhero tag helper in a browser

In a web browser, you can see that that the <superhero> tag has been converted into a <section> tag with <ul> content.

Handling Conditions

When you want to handle a UI element in different ways based on certain conditions, you may use a ConditionTagHelper. In this case, a condition is used to determine whether spoilers for the popular movie Avengers: Endgame should be displayed or not. If the spoiler flag is set to false, the character’s info is not displayed at all.

@page
@model SuperheroInfoTesterModel
...
<div condition="@Model.blackWidowInfo.ShowInfoWithSpoilers">
 <superhero hero-info="Model.blackWidowInfo" />
</div>
...

In the above code from the SuperheroInfoTester.cshtml page:

  • the <div> includes a condition that evaluates a boolean value, e.g. Model.blackWidowInfo.ShowInfoWithSpoilers
  • the Model object comes from the @model defined at the top of the page
  • the boolean value of ShowInfoWithSpoilers determines whether the <div> is displayed or not.

References

Razor Pages in ASP .NET Core 3.1

By Shahed C on May 4, 2020

This is the eighteenth of a new series of posts on ASP .NET Core 3.1 for 2020. In this series, we’ll cover 26 topics over a span of 26 weeks from January through June 2020, titled ASP .NET Core A-Z! To differentiate from the 2019 series, the 2020 series will mostly focus on a growing single codebase (NetLearner!) instead of new unrelated code snippets week.

Previous post:

NetLearner on GitHub:

In this Article:

R is for Razor Pages

Razor Pages were introduced in ASP .NET Core v2.0, and briefly covered in my 2018 series, and with more detail in my 2019 A-Z series. To complement this updated post in 2020, you may also refer to a previous posts in this series to learn more about Forms and Fields (specifically the Razor Pages section).

Built on top of MVC in ASP .NET Core, Razor Pages allows you to simplify the way you organize and code your web apps. Your Razor Pages may coexist along with a backend Web API and/or traditional MVC views backed by controllers. Razor Pages are typically backed by a corresponding .cs class file, which represents a Model for the Page with Model Properties and Action Methods that represent HTTP Verbs. You can even use your Razor knowledge to work on Blazor fullstack web development.

Razor Page with various elements, attributes and properties

Core 3.x Packages

To follow along, take a look at the NetLearner Razor Pages project on Github:

Let’s start by taking a look at this 3.1 (LTS) project. The snippet below shows a .csproj for the sample app. This was created by starting with the Core 3.1 Razor Pages Template in VS2019 and then updating it to view/edit data from the shared NetLearner database.

<Project Sdk="Microsoft.NET.Sdk.Web">

  <PropertyGroup>
    <TargetFramework>netcoreapp3.1</TargetFramework>
    <UserSecretsId>aspnet-NetLearner.Pages-38D1655D-B03D-469A-9E4E-5DDDED554242</UserSecretsId>
  </PropertyGroup>

  <ItemGroup>
    <Compile Remove="Data\**" />
    <Content Remove="Data\**" />
    <EmbeddedResource Remove="Data\**" />
    <None Remove="Data\**" />
  </ItemGroup>


  <ItemGroup>
    <PackageReference Include="Microsoft.AspNetCore.Diagnostics.EntityFrameworkCore" Version="3.1.0" />
    <PackageReference Include="Microsoft.AspNetCore.Identity.EntityFrameworkCore" Version="3.1.0" />
    <PackageReference Include="Microsoft.AspNetCore.Identity.UI" Version="3.1.0" />
    <PackageReference Include="Microsoft.EntityFrameworkCore.Sqlite" Version="3.1.0" />
    <PackageReference Include="Microsoft.EntityFrameworkCore.SqlServer" Version="3.1.0" />
    <PackageReference Include="Microsoft.EntityFrameworkCore.Tools" Version="3.1.0" />
    <PackageReference Include="Microsoft.Extensions.Logging.Debug" Version="3.1.0" />
    <PackageReference Include="Microsoft.VisualStudio.Web.CodeGeneration.Design" Version="3.1.0" />
  </ItemGroup>


  <ItemGroup>
    <ProjectReference Include="..\NetLearner.SharedLib\NetLearner.SharedLib.csproj" />
  </ItemGroup>

</Project>


For ASP .NET Core 3.x projects, both NewtonsoftJson and EF Core have been removed from the ASP .NET Core shared framework. Instead, they are available as NuGet packages that can be included via <PackageReference> tags in the .csproj project file.

This is reflected in the Solution Explorer, where the Dependencies tree may show NewtonsoftJson and/or EF Core packages nested under the NuGet node, if you use them in your project.

Dependencies in Solution Explorer

If you need a refresher on the new changes for ASP .NET Core 3.x, refer to the following:

Page Syntax

To develop Razor Pages, you can reuse syntax from MVC Razor Views, including Tag Helpers, etc. For more information on Tag Helpers, stay tuned for an upcoming post in this series. The code snippet below shows a typical Razor page, e.g. Index.cshtml:

@page
@model IndexModel
@{
 ViewData["Title"] = "Home page";
}

<!-- HTML content, with Tag Helpers, model attributes -->

Here is a quick recap of what a Razor Page is made of:

  1. Each Razor Page starts with an @page directive to indicate that it’s a Razor Page. This is different from Razor Views in MVC, which should not start with @page.
  2. The @page directive may be followed by an @model directive. This identifies the corresponding C# model class, typically located in the same folder as the .cshtml page itself.
  3. (Optional) You can include server-side code within an @{} block.
  4. The rest of the page should include any HTML content you would like to display. This includes any server-side Tag Helpers and Model attributes.

Running the Razor Pages web project from NetLearner shows a list of Learning Resources at the following URL:

e.g.  https://localhost:44343/ResourceLists

NetLearner's ResourceLists page
NetLearner’s ResourceLists page

Model Binding

The .cs model class associated  with the page includes both the model’s attributes, as well as action methods for HTTP Verbs. In a way, it consolidates the functionality of an MVC Controller and C# viewmodel class, within a single class file.

The simplest way to use model binding in a Razor Page use to use the [BindProperty] attribute on properties defined in the model class. This may include both simple and complex objects. In the sample, the Movie property in the CreateModel class is decorated with this attribute as shown below:

[BindProperty]
public ResourceList ResourceList { get; set; }

Note that [BindProperty] allows you to bind properties for HTTP POST requests by default. However, you will have to explicitly opt-in for HTTP GET requests. This can be accomplished by including an optional boolean parameter (SupportsGet) and setting it to True, e.g.

[BindProperty(SupportsGet = true)]
public string SearchString { get; set; }

This may come in handy when passing in QueryString parameters to be consumed by your Razor Page. Parameters are optional and are part of the route used to access your Razor Pages.

To use the Model’s properties, you can use the syntax Model.Property to refer to each property by name. Instead of using the name of the model, you have to use the actual word “Model” in your Razor Page code.

e.g. a page’s model could have a complex object…

public ResourceList ResourceList { get; set; }

Within the complex object, e.g. the shared ResourceList class has a public Id property:

public int Id { get; set; }

In the Razor Page that refers to the above model, you can refer to Model.Movie.ID by name:

@page
@model NetLearner.Pages.DetailsModel
...
<a asp-page="./Edit" asp-route-id="@Model.ResourceList.Id">Edit this List</a>

In this particular example, the <a> anchor tag is generated with a link to the Edit page with a route that uses a specific Movie ID value. The link points to the Edit page in the current subfolder (i.e. “ResourceLists”), indicated by the period and slash in the path. The generated HTML looks like the following:

<a href="/ResourceLists/Edit?id=1">Edit this List</a>
Details page in browser with HTML source

Page Parameters

Page parameters can be included with the @page directive at the top of the page. To indicate that a parameter is optional, you may include a trailing ? question mark character after the parameter name. You may also couple the parameter names with a data type, e.g. int for integers.

@page "{id}"

@page "{id?}"

@page "{id:int?}"

The above snippet shows 3 different options for an id parameter, an optional id parameter and an integer-enforced id parameter. In the C# model code, a property named id can be automatically bound to the page parameter by using the aforementioned [BindProperty] attribute.

In the sample, the  SearchString property in the IndexModel class for ResourceLists shows this in action.

[BindProperty(SupportsGet = true)]
public string SearchString { get; set; }

The corresponding page can then define an optional searchString parameter with the @page directive. In the HTML content that follows, Input Tag Helpers can be used to bind an HTML field (e.g. an input text field) to the field.

@page "{searchString?}"
...
Title: <input type="text" asp-for="SearchString" />

Page Routing

As you may have guessed, a page parameter is setting up route data, allowing you to access the page using a route that includes the page name and parameter:

e.g. https://servername/PageName/?ParameterName=ParameterValue

In the sample project, browsing to the ResourceLists page with the search string “videos” includes any search results that include the term “videos”, as shown in the following screenshot.

e.g.  https://localhost:44343/ResourceLists?SearchString=videos

Index page for Resource Lists with ?SearchString parameter

Here, the value for SearchString is used by the OnGetAsync() method in the Index.cshtml.cs class for ResourceLists. In the code snippet below, you can see that a LINQ Query filters the movies by a subset of movies where the Title contains the SearchString value. Finally, the list of movies is assigned to the Movie list object.

...
public IList<ResourceList> ResourceList { get;set; }
...
public async Task OnGetAsync()
{
   ...
   if (!string.IsNullOrEmpty(SearchString))
   {
      resourceLists = resourceLists.Where(s => s.Name.Contains(SearchString));
   }
   ...
   ResourceList = await resourceLists.ToListAsync();
}

By convention, all Razor Pages should be in a root-level “Pages” folder. Think of this “Pages” folder as a virtual root of your web application. To create a link to a Razor Page, you may link to the name of a Razor Page at the root level (e.g. “/Index”) or a Razor Page within a subfolder (e.g. “/ResourceLists/Index” as seen in the shared _Layout.cshtml file).

<a class="nav-link text-dark" asp-area="" asp-page="/Index">Home</a>

<a class="nav-link text-dark" asp-area="" asp-page="/ResourceLists/Index">Lists</a>
Navigation links in Razor Pages, from Layout page

Handler Methods

The OnGetAsync() method seen in the previous method is triggered when the Razor Page is triggered by an HTTP GET request that matches its route data. In addition to OnGetAsync(), you can find a complete list of Handler Methods that correspond to all HTTP verbs. The most common ones are for GET and POST:

  • OnGet() or OnGetAsync for HTTP GET
  • OnPost() or OnPostAsync for HTTP POST

When using the Async alternatives for each handler methods, you should return a Task object (or void for the non-async version). To include a return value, you should return a Task<IActionResult> (or IActionResult for the non-async version).

public void OnGet() {}
public IActionResult OnGet() {}
public async Task OnGetAsync() {}

public void OnPost() {}
public IActionResult OnPost() {}
public async Task<IActionResult> OnPostAsync() {}

To implement custom handler methods, you can handle more than one action in the same HTML form. To accomplish this, use the asp-page-handler attribute on an HTML <button> to handle different scenarios.

<form method="post">
 <button asp-page-handler="Handler1">Button 1</button>
 <button asp-page-handler="Handler2">Button 2</button>
</form>

To respond to this custom handlers, the exact handler names (e.g. Handler1 and Handler2) need to be included after OnPost in the handler methods. The snippet below shows the corresponding examples for handling the two buttons.

public async Task<IActionResult> OnPostHandler1Async()
{
   //...
}
public async Task<IActionResult> OnPostHandler2Info()
{
   // ...
}

NOTE: if you need to create a public method that you don’t have to be recognized as a handler method, you should decorate such a method with the [NonHandler] attribute.

References

Authentication & Authorization in ASP .NET Core 3.1

By Shahed C on January 6, 2020
ASP .NET Core A-Z Series

This is the first of a new series of posts on ASP .NET Core 3.1 for 2020. In this series, we’ll cover 26 topics over a span of 26 weeks from January through June 2020, titled ASP .NET Core A-Z! To differentiate from the 2019 series, the 2020 series will mostly focus on a growing single codebase (NetLearner!) instead of new unrelated code snippets week.

If you need some guidance before you get started with this series, check out my late 2019 posts, which serve as a prelude to the 2020 series:

NetLearner on GitHub:

In this Article:

A is for Authentication & Authorization

Authentication and Authorization are two different things, but they also go hand in hand. Think of Authentication as letting someone into your home and Authorization as allowing your guests to do specific things once they’re inside (e.g. wear their shoes indoors, eat your food, etc). In other words, Authentication lets your web app’s users identify themselves to get access to your app and Authorization allows them to get access to specific features and functionality.

In this article, we will take a look at the NetLearner app, on how specific pages can be restricted to users who are logged in to the application. Throughout the series, I will try to focus on new code added to NetLearner or build a smaller sample app if necessary.

Authentication in ASP .NET Core

The quickest way to add authentication to your ASP .NET Core app is to use one of the pre-built templates with one of the Authentication options. The examples below demonstrate both the CLI commands and Visual Studio UI.

Here are the CLI Commands for MVC, Razor Pages and Blazor (Server), respectively:

> dotnet new mvc --auth Individual -o mvcsample
> dotnet new webapp --auth Individual -o pagessample
> dotnet new blazorserver --auth Individual -o blazorsample 

Things to note:

  • The dotnet new command is followed by the template name (mvc, webapp, blazorserver).
  • The –auth option allows you to specify the authentication type, e.g. Individual
  • The -o option is an optional parameter that provides the output folder name for the project to be created in.

Here is the opening dialog in Visual Studio 2019, for creating a new project with Authentication:

Change Authentication upon creating a new project
 Select Authentication Type
Select Authentication Type

The above example uses “Individual” authentication, which offers a couple of options:

  • Store user accounts in-app: includes a local user accounts store
  • Connect to an existing user store in the cloud: connect to an existing Azure AD B2C application

Even if I choose to start with a local database, I can update the connection string to point to a SQL Server instance on my network or in the cloud, depending on which configuration is being loaded. If you’re wondering where your Identity code lives, check out my 2019 post on Razor UI Libraries, and jump to the last bonus section where Identity is mentioned.

From the documentation, the types of authentication are listed below.

  • None: No authentication
  • Individual: Individual authentication
  • IndividualB2C: Individual authentication with Azure AD B2C
  • SingleOrg: Organizational authentication for a single tenant
  • MultiOrg: Organizational authentication for multiple tenants
  • Windows: Windows authentication

To get help information about Authentication types, simply type ––help after the ––auth flag, e.g.

> dotnet new webapp --auth --help

Authentication in NetLearner

Within my NetLearner MVC app, the following snippets of code are added to the Startup.cs configuration:

public void ConfigureServices(IServiceCollection services)
{
...
   services.AddDbContext<LibDbContext>(options =>
   {
      options
         .UseSqlServer(Configuration.GetConnectionString("DefaultConnection"),
         assembly =>
         assembly.MigrationsAssembly
            (typeof(LibDbContext).Assembly.FullName));
   });

   services.AddDefaultIdentity<IdentityUser>(options => options.SignIn.RequireConfirmedAccount = true)
   .AddEntityFrameworkStores<LibDbContext>();
...
}
public void Configure(IApplicationBuilder app, IHostingEnvironment env)
{
...
 app.UseStaticFiles();
...
 app.UseAuthentication();
 app.UseAuthorization(); 
...
 app.Endpoints(...);
}

In the above, note that:

  • The ConfigureServices() method has calls to services.AddDbContext and server.AddDefaultIdentity. The call to add a DB Context will vary depending on which data store you choose for authentication. The call to AddDefaultIdentity ensures that your app calls AddIdentity, AddDefaultUI and AddDefaultTokenProviders to add common identity features and user Register/Login functionality.
  • The Configure() method has calls to app.UseAuthentication and app.UseAuthorization to ensure that authentication and authorization are used by your web app. Note that this appears after app.UseStaticFiles() but before app.UseEndpoints() to ensure that static files (html, css, js, etc) can be served without any authentication but MVC application-controlled routes and views/pages will follow authentication rules.
  • Similar to the MVC web project, you can also browse the Startup.cs file for the equivalent Razor Pages and Blazor web app projects.

Authorization in ASP.NET Core (MVC)

Even after adding authentication to a web app using the project template options, we can still access many parts of the application without having to log in. In order to restrict specific parts of the application, we will implement Authorization in our app.

If you’ve already worked with ASP .NET Core MVC apps before, you may be familiar with the [Authorize] attribute. This attribute can be added to a controller at the class level or even to specific action methods within a class.

[Authorize]
public class SomeController1: Controller
{
   // this controller class requires authentication
   // for all action methods
   public ActionResult SomeMethod()
   {
      //
   } 
}

public class SomeController2: Controller
{
   public ActionResult SomeOpenMethod()
   {
   }

   [Authorize]
   public ActionResult SomeSecureMethod()
   {
      // this action method requires authentication
   }
}

Well, what about Razor Pages in ASP .NET Core? If there are no controller classes, where would you add the [Authorize] attribute?

Authorization in ASP.NET Core (Razor Pages)

For Razor Pages, the quickest way to add Authorization for your pages (or entire folders of pages) is to update your ConfigureServices() method in your Startup.cs class, by calling AddRazorPagesOptions() after AddMvc(). The NetLearner configuration includes the following code:

services.AddRazorPages()
     .AddRazorPagesOptions(options =>
     {
         options.Conventions.AuthorizePage("/LearningResources/Create");
         options.Conventions.AuthorizePage("/LearningResources/Edit");
         options.Conventions.AuthorizePage("/LearningResources/Delete");
         options.Conventions.AuthorizePage("/ResourceLists/Create");
         options.Conventions.AuthorizePage("/ResourceLists/Edit");
         options.Conventions.AuthorizePage("/ResourceLists/Delete");
         options.Conventions.AllowAnonymousToPage("/Index");
     });

The above code ensures that the CRUD pages for Creating, Editing and Deleting any of the LearningResources are only accessible to someone who is currently logged in. Each call to AuthorizePage() includes a specific page name identified by a known route. In this case, the LearningResources folder exists within the Pages folder of the application.

Finally, the call to AllowAnonymousPage() ensures that the app’s index page (at the root of the Pages folder) is accessible to any user without requiring any login.

If you still wish to use the [Authorize] attribute for Razor Pages, you may apply this attribute in your PageModel classes for each Razor Page, as needed. If I were to add it to one of my Razor Pages in the LearningResources folder, it could look like this:

[Authorize]
public class CreateModel : PageModel
{
    ...
}

Authorization in Blazor

In a Blazor project, you can wrap elements in an <AuthorizeView> component, which may contain nested elements named <Authorized>, <NotAuthorized> and <Authorizing>.

<AuthorizeView>
   <Authorized Context="Auth">
     authorized elements go here
   </Authorized>
   <NotAuthorized>
     anonymous-accessed elements
   </NotAuthorized>
   <Authorizing>
     waiting message...
   </Authorizing>
</AuthorizeView>

The root element here has the following characteristics:

  • <AuthorizeView> element used as a container for nested elements
  • Optional role attribute, e.g. <AuthorizeView Roles=”Admin,RoleA”> used to set a comma-separated list roles that will be used to determine who can view the authorized nested elements
  • Optional context attribute, e.g. <AuthorizeView Context=”Auth”> to define a custom context, to avoid any conflicts with nested comments

The nested elements represent the following:

  • Authorized: shown to users who have been authorized to view and interact with these elements
  • NotAuthorized: shown to users who have not been authorized
  • Authorizing: temporary message shown while authorization is being processed

Testing Authorization in NetLearner

When I run my application, I can register and log in as a user to create new Learning Resources. On first launch, I have to apply migrations to create the database from scratch. Please refer to my 2018 post on EF Core Migrations to learn how you can do the same in your environment.

NOTE: the registration feature for each web app has been disabled by default. To enable registration, please do the following:

  1. Locate scaffolded Identity pages under /Areas/Identity/Pages/Account/
  2. In Register.cshtml, update the page to include environments in addition to Development, if desired.
  3. In Register.cshtml.cs, replace [Authorize] with [AllowAnonymous] to allow access to registration

Here are the screenshots of the Create page for a user who is logged in:

NetLearner MVC: Create New Resource
 NetLearner Razor Pages: Create New Resource
NetLearner Razor Pages: Create New Resource
  NetLearner Blazor: Create New Resource
NetLearner Blazor: Create New Resource

Here’s a screenshot of the page that an “anonymous” user sees when no one is logged in, indicating that the user has been redirected to the Login page. Note that all 3 web apps (MVC, Razor Pages and Blazor) have similar Identity pages. To allow manual customization, they were also auto-generated via scaffolding and included in all 3 projects.

NetLearner: Log in
NetLearner: Log in

Here are the screenshots showing the list of Learning Resources, visible to anyone whether they’re logged in or not:

 NetLearner MVC: List of Learning Resources
NetLearner MVC: List of Learning Resources
  NetLearner Razor Pages: List of Learning Resources
NetLearner Razor Pages: List of Learning Resources
   NetLearner Blazor: List of Learning Resources
NetLearner Blazor: List of Learning Resources

Other Authorization Options

Razor Pages have multiple ways of restricting access to pages and folders, including the following methods (as described in the official docs):

  • AuthorizePage: Require authorization to access a page
  • AuthorizeFolder: Require authorization to access a folder of pages
  • AuthorizeAreaPage: Require authorization to access an area page
  • AuthorizeAreaFolder: Require authorization to access a folder of areas
  • AllowAnonymousToPage: Allow anonymous access to a page
  • AllowAnonymousToFolder: Allow anonymous access to a folder of pages

You can get more information on all of the above methods at the following URL:

References

To learn more about Authentication, Authorization and other related topics (e.g. Roles and Claims), check out the official docs:

NetLearner on ASP .NET Core 3.1

By Shahed C on December 30, 2019

In This Article:

NetLearner: What is it?

NetLearner is an ASP .NET Core web app to allow any user to consolidate multiple learning resources all under one umbrella. The codebase itself is a way for new/existing .NET developers to learn ASP .NET Core, while a deployed instance of NetLearner can be used as a curated link-sharing web application.

NetLearner on GitHub: https://github.com/shahedc/NetLearnerApp

Restrictions

Registration for each web app has been disabled by default. To enable registration, please do the following:

  1. Locate scaffolded Identity pages under /Areas/Identity/Pages/Account/
  2. In Register.cshtml, update the page to include environments in addition to Development, if desired.
  3. In Register.cshtml.cs, replace [Authorize] with [AllowAnonymous] to allow access to registration

Architecture

The current version of NetLearner on Github includes a shared .NET Standard Class Library, used by multiple web app projects. The web apps include:

  • MVC: familiar to most ASP .NET developers
  • Razor Pages: relatively new in ASP .NET
  • Blazor: the latest offering from ASP .NET
NetLearner Archicture: Web App + API

Future updates will also include:

  • Web API, exposed for use by other consumers
  • JavaScript front-end web app(s)

Note that an ASP .NET Core web app can contain various combinations of all of the above. However, the purpose of the NetLearner application code is to demonstrate how to achieve similar results using all of the above. So, each of the web app projects will be developed in parallel, using a shared library.

Shared Library

The shared library is a .NET Standard 2.1 library. This version was selected because .NET Core 3.x supports .NET Standard 2.1, as seen in the official documentation.

.NET Standard: https://docs.microsoft.com/en-us/dotnet/standard/net-standard

The shared library contains the following:

  • Database Context: for use by Entity Framework Core
  • Migrations: for EF Core to manage the (SQL Server) db
  • Models: db entities, used by web apps
  • Services: service classes to handle CRUD operations

Using terms from Clean Architecture references, you may think of the DB Context and Migrations as part of the Infrastructure code, while the Models and Services are part of the Core code. For simplicity, these are all kept in a single library. In your own application, you may split them up into separate assemblies named Core and Infrastructure.

Running the Application

In order to run the web app samples, clone the following repository:

NetLearnerhttps://github.com/shahedc/NetLearnerApp

Here, you will find at least 4 projects:

  1. NetLearner.SharedLib: shared library project
  2. NetLearner.Blazor: Blazor server-side web project
  3. NetLearner.Mvc: MVC web project
  4. NetLearner.Pages: Razor Pages web project

To create a local copy of the database:

  1. Open the solution file in Visual Studio 2019
  2. In the Package Manager Console panel, change the Default Project to “NetLearner.SharedLib” to ensure that EF Core commands are run against the correct project
  3. In the Package Manager console, run the Update-Database command
  4. Verify that there are no errors upon database creation

To run the samples from Visual Studio 2019:

  1. Run each web project one after another
  2. Navigate to the links in the navigation menu, e.g. Lists and Resources
  3. Add/Edit/Delete items in any of the web apps
  4. Create one or more lists
  5. Create one more resources, assign each to a list
  6. Verify that your data changes are reflected no matter which web app you use
NetLearner MVC: Resource Lists
NetLearner MVC: Learning Resources

NetLearner Razor Pages: Resource Lists
  NetLearner Razor Pages: Learning Resources
NetLearner Razor Pages: Learning Resources
   NetLearner Blazor: Resource Lists
NetLearner Blazor: Resource Lists
    NetLearner Blazor: Learning Resources
NetLearner Blazor: Learning Resources

What’s Next?

In 2020, you can expect a new A-Z weekly blog series to cover 26 different topics from January through June 2020. To get a sneak peek of what’s to come, take a peek at the 2019 A-Z series.

ASP .NET Core code sharing between Blazor, MVC and Razor Pages

By Shahed C on December 16, 2019

In This Article:

Introduction

It’s been a while since I’ve published a standalone blog post on WakeUpAndCode.com. If you’ve been following the posts on this website, you may be familiar with my 2018 (surprise!) Happy New Year series and 2019 A-Z series on various ASP .NET Core topics. This led to a free ebook, which itself was generated by a .NET Core Worker Service.

Going forward, you can expect a 2020 A-Z series that will use ASP .NET Core 3.1 (LTS). The upcoming series will contain new and improved versions of the topics explored in the 2019 series, including Build 2020 coverage.

For now, this one-off blog post will discuss code-sharing for ASP .NET Core developers. For demonstrative purposes, the sample code accompanying this article includes code that is derived from the code snippets provided on the following blog:

Kudos to the author (aka PI Blogger) for this great intro article!

Why Share Code Across Projects/Assemblies?

There are multiple reasons why you may want to share code between multiple projects/assemblies.

  1. Code reuse: This should be pretty self-explanatory. You shouldn’t have to rewrite the same code more than once. Placing reusable code in a shared library enables code reuse.
  2. Multiple front-ends: In the sample code, there are multiple web apps, all using the same data layer. Splitting into separate assemblies allows you to develop multiple web apps in their own projects/assemblies.
  3. Separate deployments: You can deploy each assembly independent of one another.

Even if you’re just working on a single web app (just Blazor, or a web app that combines Blazor+MVC+Razor Pages), you can still benefit from this type of “physical” code separation. Note that this approach is not required for “separation of concerns”. The nature of ASP .NET Core web applications make them possible to implement separation of concerns, even if everything is in a single project (such as the one generated by the official VS2019 project templates).

NOTE: This article will focus on the creation of a shared library project to hold a shared database context, EF Core migrations, models and services. In your application, you can go further by separating your domain objects and related items into their own project/assembly.

For an official guide on ASP .NET Core architecture, download this free ebook and its sample code. The eShopOnWeb sample includes the “business layer” with domain entities under ApplicationCore, the “data layer” with data context + migrations under Infrastucture, and the “presentation layer” with its MVC components under Web.

Also, here’s a recent quote from author Steve Smith:

  • Tweet: https://twitter.com/ardalis/status/1207301716347150336
  • Quote: “Separating things by project ensures decisions about dependency direction are enforced by the compiler, helping avoid careless mistakes. Separating into projects isn’t solely about individually deploying or reusing assemblies.”

Creating a shared library

The quickest way to create a shared library project is to use the built-in project templates. Create a project of type .NET Standard 2.1 using either Visual Studio 2019 or CLI commands for use with VS Code.

To add the new project in Visual Studio 2019:

  1. Add | New Project
  2. Select the template for Class Library (.NET Standard)
  3. Click Next
  4. Name your project and select a location
  5. Click Create
Add New Project dialog

Verify that the shared library is a Class Library project targeting .NET Standard 2.1. Check out the official docs to learn more about how to pick a version of .NET Standard for your class libraries.

To verify the target version in Visual Studio 2019:

  1. Right-click your shared library project in Solution Explorer
  2. Select Properties in the popup context menu
  3. In the Application section, select a “Target framework” value of “.NET Standard 2.1”.
  4. Edit your .csproj project file manually to verify that the correct target framework is being used.
<PropertyGroup>
<TargetFramework>netstandard2.1</TargetFramework>
</PropertyGroup>

If using the .NET CLI, type the following command:

>dotnet new classlib -f netstandard2.1

As of .NET Core 3.0, Entity Framework Core is now available via NuGet. As a result, you must add the following packages manually.

  • Microsoft.EntityFrameworkCore
  • Microsoft.AspNetCore.Identity.EntityFrameworkCore
  • Microsoft.EntityFrameworkCore.SqlServer

To add EF Core in Visual Studio 2019:

  1. In Solution Explorer, right-click your shared library project
  2. Select “Manage NuGet Packages…”
  3. Search for the aforementioned packages and install v3.1 for each
EF Core Nuget Packages

To create a new database context in the shared library project:

  1. Create a “Data” folder at the root level of the project folder
  2. In the Data folder, create a new public class named “LibDbContext” that inherits from “IdentityDbContext”
  3. Create a “Models” folder at the root level of the project folder
  4. In the Models folder, add one or more model classes, to be used by your web application project(s)
  5. In the context class, add one or more DbSet<T> properties

Your shared context class LibDbContext should now look like the following snippet:

using Microsoft.AspNetCore.Identity.EntityFrameworkCore;
using Microsoft.EntityFrameworkCore;
using SharedLib.Models;

namespace SharedLib.Data
{
public class LibDbContext : IdentityDbContext
{
public LibDbContext(DbContextOptions<LibDbContext> options)
: base(options)
{
}

protected LibDbContext()
{

}

public DbSet<CinematicItem> CinematicItems { get; set; }

}
}

In this case, the one DbSet property represents a collection of CinematicItems defined in its own CinematicItem model class file:

using System;

namespace SharedLib.Models
{
public class CinematicItem
{
public int Id { get; set; }

public string Name { get; set; }

public string Description { get; set; }

public int Phase { get; set; }

public DateTime ReleaseDate { get; set; }
}
}

Note that the new database context in the shared library is a replacement for any database context you may already have in your web app projects. In fact, you’ll have to edit your Startup.cs file in each web app project to ensure that it is using the correct database context.

Using the Shared Library

If you are starting a brand new web project, you can start with an auto-generated template. You could create an empty web project and add everything manually as needed. But it may be easier to start with a standard web template and remove/edit items as necessary.

To create a new web project in Visual Studio 2019:

  1. Add | New Project
  2. Select the template
    1. For Blazor, select Blazor App
    2. For MVC or Razor Pages, select ASP .NET Core Web Application
  3. Click Next
  4. Name your project and select a location
  5. Click Create
  6. Select .NET Core, ASP .NET Core 3.1, and a project template
    1. For Blazor, select Blazor Server App
    2. For Razor Pages, select Web Application
    3. For MVC, select Web Application (Model-View-Controller)
  7. For Authentication, change “No Authentication” to “Individual User Accounts”
  8. Under Advanced, leave the checkbox checked for “Configure for HTTPS”
New Project: Web Application
New Project: Blazor Server App

Following the above steps will add a new database context and an initial migration. Since we will be using our shared library instead, let’s do some cleanup in each web project you created.

In each web project, add the Shared Library as a dependency:

  1. In Solution Explorer, right-click Dependencies for a web project
  2. Click Add Reference under Dependencies
  3. Select the shared library project
  4. Click Ok
  5. Repeat for each web project

In each web project, update the Startup.cs class:

  1. Replace any mentions of ApplicationDbContext with LibDbContext
  2. Expand the UseSqlServer method call to refer to the connection string and db context in the shared assembly
services.AddDbContext<LibDbContext>(options =>
{
options
.UseSqlServer(Configuration.GetConnectionString("DefaultConnection"),
assembly =>
assembly.MigrationsAssembly
(typeof(LibDbContext).Assembly.FullName));
});

services.AddDefaultIdentity<IdentityUser>(
options =>
options.SignIn.RequireConfirmedAccount = true)
.AddEntityFrameworkStores<LibDbContext>();

Perform some additional cleanup in each web project:

  1. Delete the template-generated ApplicationDbContext class
  2. Delete any initial migrations in the Migrations folder
  3. In the Startup.cs class, remove any using statements that mention the .Data namespace in your web project
  4. Add a using statement referring to the .Data namespace in your shared library project, e.g. SharedLib.Data
  5. Make a similar change in your partial view “_ViewImports.chstml” if applicable
  6. If you have more than one web project, use the ConnectionString value from the first appsettings.json file and reuse it in the other web app projects.
  7. BUT WAIT: beyond any initial sample, always use app secrets during development to avoid connection strings in appsettings.json files. For Azure-deployed web projects, use Key Vault or environment variables in your App Service.

Running the Samples

In order to run the web app samples, clone the following repository:

Here, you will find 4 projects:

  1. SharedLib: shared library project
  2. WebAppBlazor: Blazor server-side web project
  3. WebAppMvc: MVC web project
  4. WebAppPages: Razor Pages web project

To create a local copy of the database:

  1. Open the solution file in Visual Studio 2019
  2. In the Package Manager Console panel, change the Default Project to “SharedLib” to ensure that EF Core commands are run against the correct project
  3. In the Package Manager console, run the Update-Database command
  4. Verify that there are no errors upon database creation

To run the samples from Visual Studio 2019:

  1. Run each web project one after another
  2. Navigate to the Cinematic Items link in the navigation menu
  3. Add/Edit/Delete items in any of the web apps
  4. Verify that your data changes are reflected no matter which web app you use
Sample: Blazor Web App
Sample: MVC Web App
Sample: Razor Pages Web App

NOTE: During Blazor development, editing a Razor component may not always trigger the proper Intellisense help in the containing Page. You may have to clean+rebuild solution or even reopen the solution in VS2019.

Conclusion

In this article, we covered the following:

  • Creation of a shared library project for use in one or more ASP .NET Core web apps
  • Some reasons for such an approach
  • Steps required to use the shared library
  • Sample projects to see the shared library in action

References