Monthly Archives: June 2020

Zero-Downtime* Web Apps for ASP .NET Core 3.1

By Shahed C on June 29, 2020

This is the twenty-sixth of a new series of posts on ASP .NET Core 3.1 for 2020. In this series, we’ve covered 26 topics over a span of 26 weeks from January through June 2020, titled ASP .NET Core A-Z! To differentiate from the 2019 series, the 2020 series mostly focused on a growing single codebase (NetLearner!) instead of new unrelated code snippets week.

Previous post:

NetLearner on GitHub:

In this Article:

Z is for Zero-Downtime* Web Apps for ASP .NET Core

If you’ve made it this far in this ASP .NET Core A-Z series, hopefully you’ve learned about many important topics related to ASP .NET Core web application development. As we wrap up this series with a look at tips and tricks to attempt zero-downtime, this last post itself has its own lettered A-F mini-series: Availability, Backup & Restore, CI/CD, Deployment Slots, EF Core Migrations and Feature Flags.

Deploying to Staging Slots in AsuApp Service

NOTE: While it may not be possible to get 100% availability 24/7/365, you can ensure a user-friendly experience free from (or at least with minimal) interruptions, by following a combination of the tips and tricks outlined below. This write-up is not meant to be a comprehensive guide. Rather, it is more of an outline with references that you can follow up on, for next steps.

Availability

To improve the availability of your ASP .NET Core web app running on Azure, consider running your app in multiple regions for HA (High Availability). To control traffic to/from your website, you may use Traffic Manager to direct web traffic to a standby/secondary region, in case the primary region is unavailable.

Consider the following 3 options when running a web app in multiple Azure regions. In these scenarios, the primary region is always active and the secondary region may be passive (as a hot or cold standby) or active. When both are active, web requests are load-balanced between the two regions.

 OptionsPrimary RegionSecondary Region
AActivePassive, Hot Standby
BActivePassive, Cold Standby
CActiveActive

For more information on achieving High Availability (HA) in multiple regions, check out the official docs at:

If you’re running your web app in a Virtual Machine (VM) instead of Azure App Service, you may also consider Availability Sets. This helps build redundancy in your Web App’s architecture, when you have 2 or more VMs in an Availability Set. For added resiliency, use Azure Load Balancer with your VMs to load-balance incoming traffic. As an alternative to Availability Sets, you may also use Availability Zones to counter any failures within a datacenter.

Backup & Restore

Azure’s App Service lets you back up and restore your web application, using the Azure Portal or with Azure CLI commands. Note that this requires your App Service to be in at least the Standard or Premium tier, as it is not available in the Free/Shared tiers. You can create backups on demand when you wish, or schedule your backups as needed. If your site goes down, you can quickly restore your last good backup to minimize downtime.

App Service: Backups

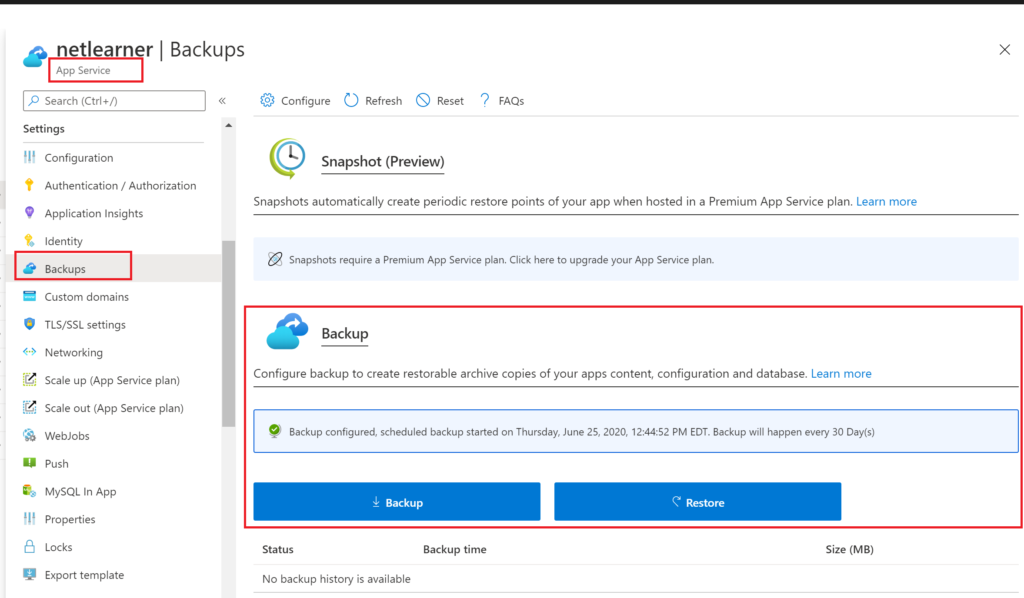
NOTE: You may use the new Snapshots feature to “automatically create perioidic restore points of your app”. However, this feature is only available in a Premium App Service Plan.

In addition to the app itself, the backup process also backs up the Web App’s configuration, file contents and the database connected to your app. Database types include SQL DB (aka SQL Server PaaS), MySQL and PostgreSQL. Note that these backups include a complete backup, and not incremental/delta backups.

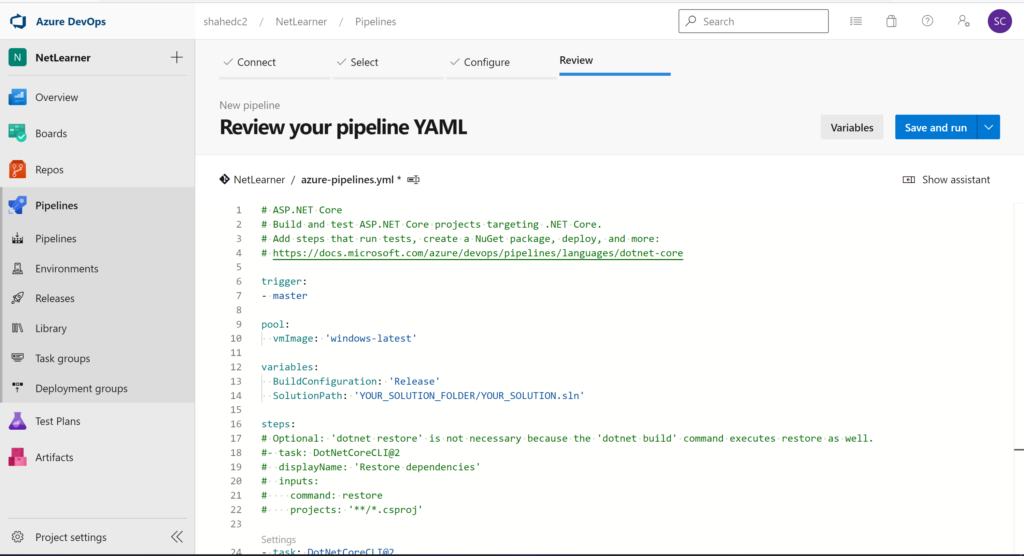
Continuous Integration & Continuous Deployment

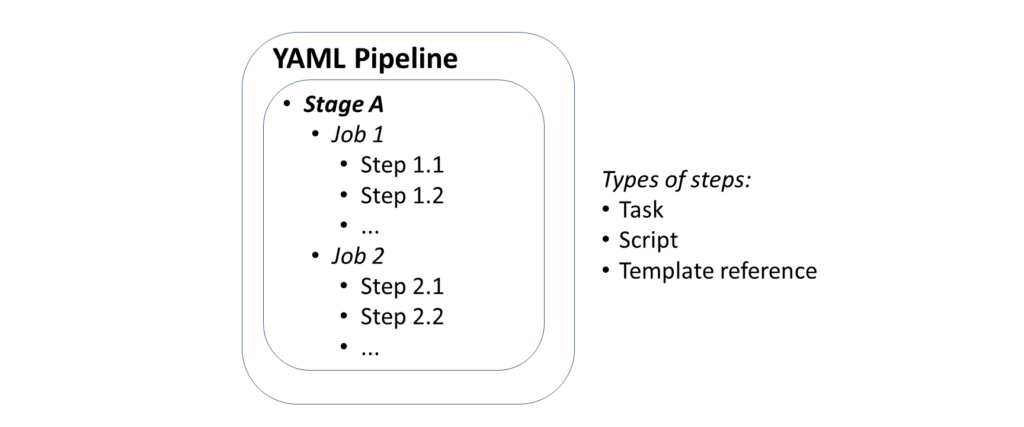
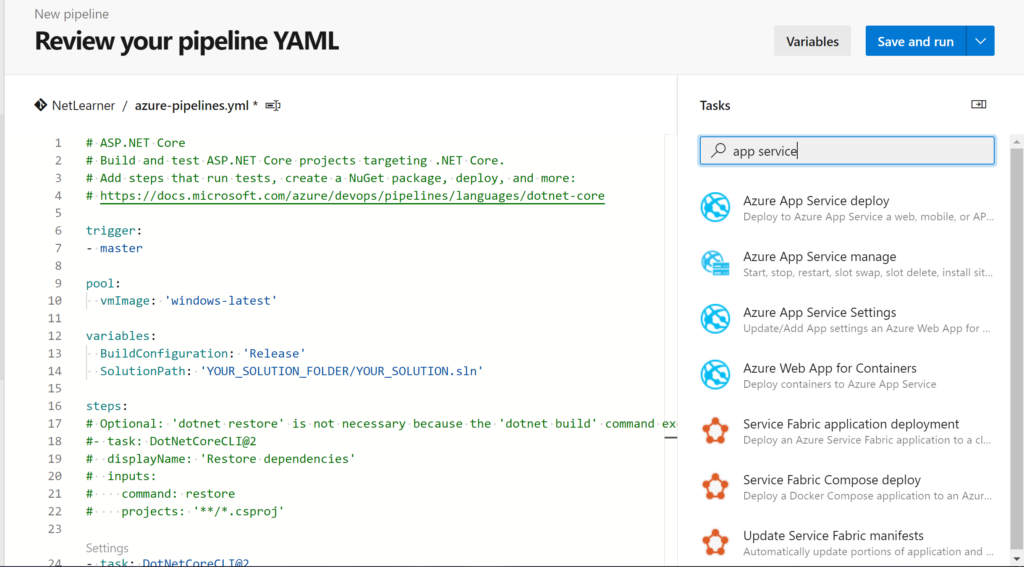
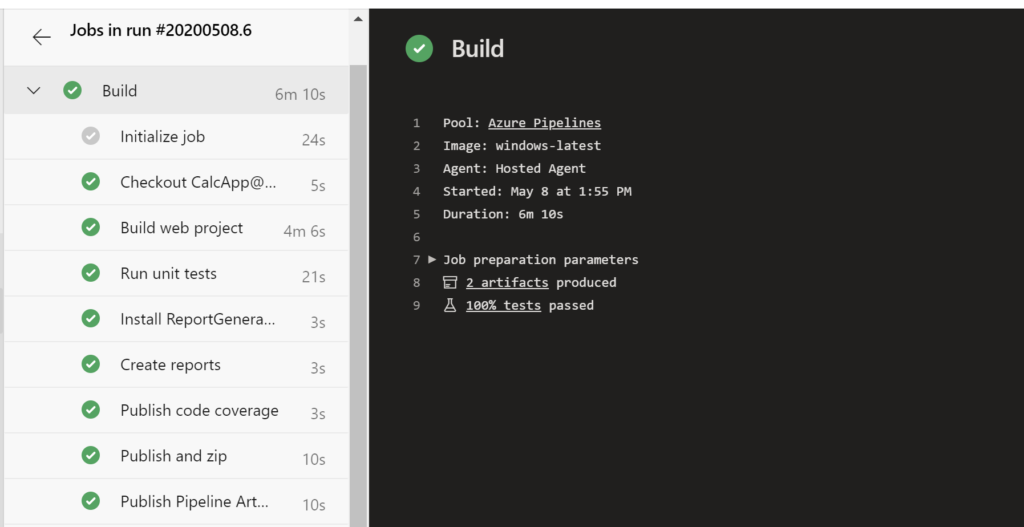
In the previous post, we covered CI/CD with YAML pipelines. Whether you have to fix an urgent bug quickly or just deploy a planned release, it’s important to have a proper CI/CD pipeline. This allows you to deploy new features and fixes quickly with minimal downtime.
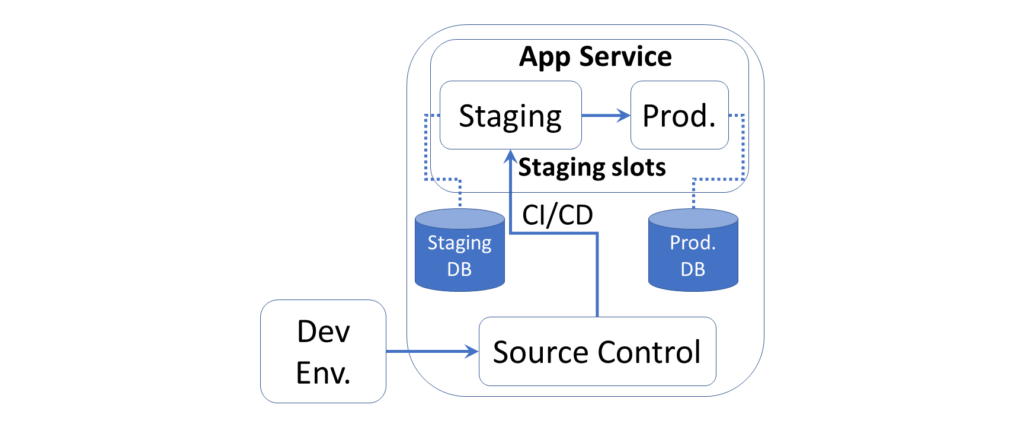
YAML Sample in Azure DevOps

Deployment Slots

Whether you’re deploying your Web App to App Service for the first time or the 100th time, it helps to test out your app before releasing to the public. Deployment slots make it easy to set up a Staging Slot, warm it up and swap it immediately with a Production Slot. Swapping a slot that has already been warmed up ahead of time will allow you to deploy the latest version of your Web App almost immediately.

Deployment Slots in Azure App Service

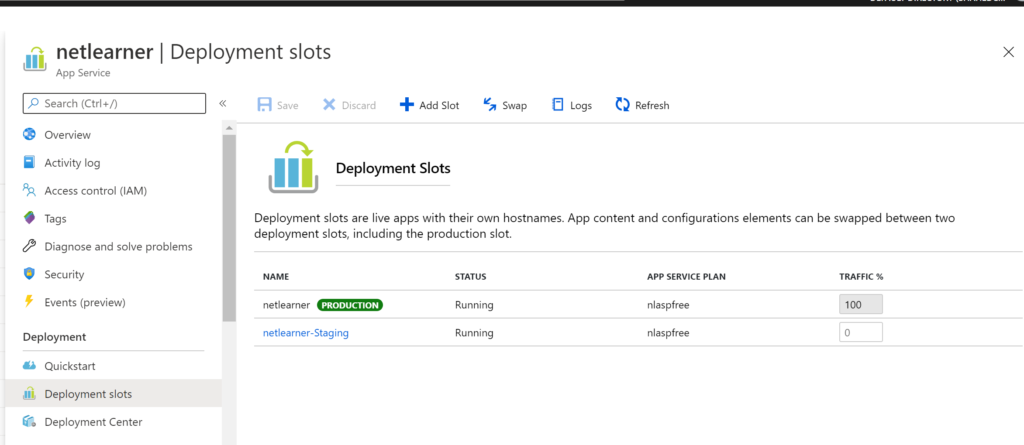
Note that Deployment Slots are only available in Standard, Premium or Isolated App Service tiers, not in the Free/Shared tiers. You can combine Deployment Slots with your CI/CD pipelines to ensure that your automated deployments end up in the intended slots.

EF Core Migrations in Production

We covered EF Core Migrations in a previous post, which is one way of upgrading your database in various environments (including production). But wait, is it safe to run EF Core Migrations in a production environment? Even though you can use auto-generated EF Core migrations (written in C# or outputted as SQL Scripts), you may also modify your migrations for your needs.

I would highly recommend reading Jon P Smith‘s two-part series on “Handling Entity Framework Core database migrations in production”:

What you decide to do is up to you (and your team). I would suggest exploring the different options available to you, to ensure that you minimize any downtime for your users. For any non-breaking DB changes, you should be able to migrate your DB easily. However, your site may be down for maintenance for any breaking DB changes.

Feature Flags

Introduced by the Azure team, the Microsoft.FeatureManagement package allows you to add Feature Flags to your .NET application. This enables your web app to include new features that can easily be toggled for various audiences. This means that you could potentially test out new features by deploying them during off-peak times, but toggling them to become available via app configuration.

To install the package, you may use the following dotnet command:

>dotnet add package Microsoft.FeatureManagement --version 2.0.0

If you prefer the Package Manager Console in Visual Studio, you may also use the following PowerShell command:

>Install-Package Microsoft.FeatureManagement -Version 2.0.0

By combining many/all of the above features, tips and tricks for your Web App deployments, you can release new features while minimizing/eliminating downtime. If you have any new suggestions, feel free to leave your comments.

References

YAML-defined CI/CD for ASP .NET Core 3.1

By Shahed C on June 24, 2020

This is the twenty-fifth of a new series of posts on ASP .NET Core 3.1 for 2020. In this series, we’ll cover 26 topics over a span of 26 weeks from January through June 2020, titled ASP .NET Core A-Z! To differentiate from the 2019 series, the 2020 series will mostly focus on a growing single codebase (NetLearner!) instead of new unrelated code snippets week.

Previous post:

NetLearner on GitHub:

In this Article:

Y is for YAML-defined CI/CD for ASP .NET Core

If you haven’t heard of it yet, YAML is yet another markup language. No really, it is. YAML literally stands for Yet Another Markup Language. If you need a reference for YAML syntax and how it applies to Azure DevOps Pipelines, check out the official docs:

In the NetLearner repository, check out the sample YAML code:

NOTE: Before using the aforementioned YAML sample in an Azure DevOps project, please replace any placeholder values and rename the file to remove the .txt suffix.

In the context of Azure DevOps, you can use Azure Pipelines with YAML to make it easier for you set up a CI/CD pipeline for Continuous Integration and Continuous Deployment. This includes steps to build and deploy your app. Pipelines consist of stages, which consist of jobs, which consists of steps. Each step could be a script or task. In addition to these options, a step can also be a reference to an external template to make it easier to create your pipelines.

DevOps Pipeline in YAML

Getting Started With Pipelines

To get started with Azure Pipelines in Azure DevOps:

  1. Log in at: https://dev.azure.com
  2. Create a Project for your Organization
  3. Add a new Build Pipeline under Pipelines | Builds
  4. Connect to your code location, e.g. GitHub repo
  5. Select your repo, e.g. a specific GitHub repository
  6. Configure your YAML
  7. Review your YAML and Run it

From here on forward, you may come back to your YAML here, edit it, save it, and run as necessary. You’ll even have the option to commit your YAML file “azure-pipelines.yml” into your repo, either in the master branch or in a separate branch (to be submitted as a Pull Request that can be merged).

YAML file in Azure DevOps

If you need more help getting started, check out the official docs and Build 2019 content at:

To add pre-written snippets to your YAML, you may use the Task Assistant side panel to insert a snippet directly into your YAML file. This includes tasks for .NET Core builds, Azure App Service deployment and more.

Task Assistant in Azure DevOps

OS/Environment and Runtime

From the sample repo, take a look at the sample YAML code sample “azure-pipelines.yml.txt“. Near the top, there is a definition for a “pool” with a “vmImage” set to ‘windows-latest’.

pool:
 vmImage: 'windows-latest'

If I had started off with the default YAML pipeline configuration for a .NET Core project, I would probably get a vmImage value set to ‘ubuntu-latest’. This is just one of many possible values. From the official docs on Microsoft-hosted agents, we can see that Microsoft’s agent pool provides at least the following VM images across multiple platforms, e.g.

  • Windows Server 2019 with Visual Studio 2019 (windows-latest OR windows-2019)
  • Windows Server 2016 with Visual Studio 2017 (vs2017-win2016)
  • Ubuntu 18.04 (ubuntu-latest OR ubuntu-18.04)
  • Ubuntu 16.04 (ubuntu-16.04)
  • macOS X Mojave 10.14 (macOS-10.14)
  • macOS X Catalina 10.15 (macOS-latest OR macOS-10.15)

In addition to the OS/Environment, you can also set the .NET Core runtime version. This may come in handy if you need to explicitly set the runtime for your project.

steps:
- task: DotNetCoreInstaller@0
 inputs:
 version: '3.1.0'

Restore and Build

Once you’ve set up your OS/environment and runtime, you can restore (dependencies) and build your project. Restoring dependencies with a command is optional since the Build step will take care of the Restore as well. To build a specific configuration by name, you can set up a variable first to define the build configuration, and then pass in the variable name to the build step.

variables:
  BuildConfiguration: 'Release'
  SolutionPath: 'YOUR_SOLUTION_FOLDER/YOUR_SOLUTION.sln'

steps:
# Optional: 'dotnet restore' is not necessary because the 'dotnet build' command executes restore as well.
#- task: DotNetCoreCLI@2
#  displayName: 'Restore dependencies'
#  inputs:
#    command: restore
#    projects: '**/*.csproj'

- task: DotNetCoreCLI@2
  displayName: 'Build web project'
  inputs:
    command: 'build'
    projects: $(SolutionPath)

In the above snippet, the BuildConfiguration is set to ‘Release’ so that the project is built for its ‘Release’ configuration. The displayName is a friendly name in a text string (for any step) that may include variable names as well. This is useful for observing logs and messages during troubleshooting and inspection.

NOTE: You may also use script steps to make use of dotnet commands with parameters you may already be familiar with, if you’ve been using .NET Core CLI Commands. This makes it easier to run steps without having to spell everything out.

variables:
 buildConfiguration: 'Release'

steps:
- script: dotnet restore

- script: dotnet build --configuration $(buildConfiguration)
 displayName: 'dotnet build $(buildConfiguration)'

From the official docs, here are some more detailed steps for restore and build, if you wish to customize your steps and tasks further:

steps:
- task: DotNetCoreCLI@2
 inputs:
 command: restore
 projects: '**/*.csproj'
 feedsToUse: config
 nugetConfigPath: NuGet.config 
 externalFeedCredentials: <Name of the NuGet service connection>

Note that you can set your own values for an external NuGet feed to restore dependencies for your project. Once restored, you may also customize your build steps/tasks.

steps:
- task: DotNetCoreCLI@2
 displayName: Build
 inputs:
 command: build
 projects: '**/*.csproj'
 arguments: '--configuration Release'

Unit Testing and Code Coverage

Although unit testing is not required for a project to be compiled and deployed, it is absolutely essential for any real-world application. In addition to running unit tests, you may also want to measure your code coverage for those unit tests. All these are possible via YAML configuration.

From the official docs, here is a snippet to run your unit tests, that is equivalent to a “dotnet test” command for your project:

steps:
- task: DotNetCoreCLI@2
 inputs:
 command: test
 projects: '**/*Tests/*.csproj'
 arguments: '--configuration $(buildConfiguration)'

Also, here is another snippet to collect code coverage:

steps:
- task: DotNetCoreCLI@2
 inputs:
 command: test
 projects: '**/*Tests/*.csproj'
 arguments: '--configuration $(buildConfiguration) --collect "Code coverage"'

Once again, the above snippet uses the “dotnet test” command, but also adds the –collect option to enable the data collector for your test run. The text string value that follows is a friendly name that you can set for the data collector. For more information on “dotnet test” and its options, check out the docs at:

Publish and Deploy

Finally, it’s time to package and deploy your application. In this example, I am deploying my web app to Azure App Service.

- task: DotNetCoreCLI@2
  displayName: 'Publish and zip'
  inputs:
    command: publish
    publishWebProjects: False
    projects: $(SolutionPath)
    arguments: '--configuration $(BuildConfiguration) --output $(Build.ArtifactStagingDirectory)'
    zipAfterPublish: True

- task: AzureWebApp@1
  displayName: 'Deploy Azure Web App'
  inputs:
    azureSubscription: '<REPLACE_WITH_AZURE_SUBSCRIPTION_INFO>'
    appName: <REPLACE_WITH_EXISTING_APP_SERVICE_NAME>
    appType: 'webApp'
    package: $(Build.ArtifactStagingDirectory)/**/*.zip

The above snippet runs a “dotnet publish” command with the proper configuration setting, followed by an output location, e.g. Build.ArtifactStagingDirectory. The value for the output location is one of many predefined build/system variables, e.g. System.DefaultWorkingDirectory, Build.StagingDirectory, Build.ArtifactStagingDirectory, etc. You can find out more about these variables from the official docs:

Note that there is a placeholder text string for the Azure Subscription ID. If you use the Task Assistant panel to add a “Azure App Service Deploy” snippet, you will be prompted to select your Azure Subscription, and a Web App location to deploy to, including deployment slots if necessary.

The PublishBuildArtifacts task uploads the package to a file container, ready for deployment. After your artifacts are ready, a zip file will become available in a named container, e.g. ‘drop’.

# Optional step if you want to deploy to some other system using a Release pipeline or inspect the package afterwards
- task: PublishBuildArtifacts@1
  displayName: 'Publish Build artifacts'
  inputs:
    PathtoPublish: '$(Build.ArtifactStagingDirectory)'
    ArtifactName: 'drop'
    publishLocation: 'Container'

You may use the Azure DevOps portal to inspect the progress of each step and troubleshoot any failed steps. You can also drill down into each step to see the commands that are running in the background, followed by any console messages.

Azure DevOps success messages

NOTE: to set up a release pipeline with multiple stages and optional approval conditions, check out the official docs at:

Triggers, Tips & Tricks

Now that you’ve set up your pipeline, how does this all get triggered? If you’ve taken a look at the sample YAML file, you will notice that the first command includes a trigger, followed by the word “master”. This ensures that the pipeline will be triggered every time code is pushed to the corresponding code repository’s master branch. When using a template upon creating the YAML file, this trigger should be automatically included for you.

trigger: 
- master

To include more triggers, you may specify triggers for specific branches to include or exclude.

trigger:
 branches:
 include:
 - master
 - releases/*
 exclude:
 - releases/old*

Finally here are some tips and tricks when using YAML to set up CI/CD using Azure Pipelines:

  • Snippets: when you use the Task Assistant panel to add snippets into your YAML, be careful where you are adding each snippet. It will insert it wherever your cursor is positioned, so make sure you’ve clicked into the correction location before inserting anything.
  • Order of tasks and steps: Verify that you’ve inserted (or typed) your tasks and steps in the correct order. For example: if you try to deploy an app before publishing it, you will get an error.
  • Indentation: Whether you’re typing your YAML or using the snippets (or some other tool),  use proper indentation. You will get syntax errors of the steps and tasks aren’t indented correctly.
  • Proper Runtime/OS: Assign the proper values for the desired runtime, environment and operating system.
  • Publish: Don’t forget to publish before attempting to deploy the build.
  • Artifacts location: Specify the proper location(s) for artifacts when needed.
  • Authorize Permissions: When connecting your Azure Pipeline to your code repository (e.g. GitHub repo) and deployment location (e.g. Azure App Service), you will be prompted to authorize the appropriate permissions. Be aware of what permissions you’re granting.
  • Private vs Public: Both your Project and your Repo can be private or public. If you try to mix and match a public Project with a private Repo, you may get the following warning message: “You selected a private repository, but this is a public project. Go to project settings to change the visibility of the project.” 

References

XML + JSON Output for Web APIs in ASP .NET Core 3.1

By Shahed C on June 22, 2020

This is the twenty-fourth of a new series of posts on ASP .NET Core 3.1 for 2020. In this series, we’ll cover 26 topics over a span of 26 weeks from January through June 2020, titled ASP .NET Core A-Z! To differentiate from the 2019 series, the 2020 series will mostly focus on a growing single codebase (NetLearner!) instead of new unrelated code snippets week.

Previous post:

NetLearner on GitHub:

In this Article:

X is for XML + JSON Output

XML (eXtensible Markup Language) is a popular document format that has been used for a variety of applications over the years, including Microsoft Office documents, SOAP Web Services, application configuration and more. JSON (JavaScript Object Notation) was derived from object literals of JavaScript, but has also been used for storing data in both structured and unstructured formats, regardless of the language used. In fact, ASP .NET Core applications switched from XML-based .config files to JSON-based .json settings files for application configuration.

Returning XML/JSON format from a Web API

Returning JsonResult and IActionResult

Before we get into XML output for your Web API, let’s start off with JSON output first, and then we’ll get to XML. If you run the Web API sample project in the NetLearner repository, you’ll notice a LearningResourcesController.cs file that represents a “Learning Resources Controller” that exposes API endpoints. These endpoints can serve up both JSON and XML results of Learning Resources, i.e. blog posts, tutorials, documentation, etc.

Run the application and navigate to the following endpoint in an API testing tool, e.g. Postman:

  • https://localhost:44350/api/LearningResources
Sample JSON data in Postman

This triggers a GET request by calling the LearningResourcesController‘s Get() method:

  // GET: api/LearningResources
 [HttpGet]
 public JsonResult Get()
 {
    return new JsonResult(_sampleRepository.LearningResources());
 }

In this case, the Json() method returns a JsonResult object that serializes a list of Learning Resources. For simplicity, the _sampleRepository object’s LearningResources() method (in SampleRepository.cs) returns a hard-coded list of LearningResource objects. Its implementation here isn’t important, because you would typically retrieve such values from a persistent data store, preferably through some sort of service class.

public List<LearningResource> LearningResources()
{
   ... 
   return new List<LearningResource>
   {
      new LearningResource
      {
         Id= 1,
         Name= "ASP .NET Core Docs",
         Url = "https://docs.microsoft.com/aspnet/core",
         ...
      },
      ... 
   }
}

The JSON result looks like the following, where a list of learning resources are returned:

[
    {
        "id": 1,
        "name": "ASP .NET Core Docs",
        "url": "https://docs.microsoft.com/aspnet/core",
        "resourceListId": 1,
        "resourceList": {
            "id": 1,
            "name": "RL1",
            "learningResources": []
        },
        "contentFeedUrl": null,
        "learningResourceTopicTags": null
    },
    {
        "id": 2,
        "name": "Wake Up And Code!",
        "url": "https://WakeUpAndCode.com",
        "resourceListId": 1,
        "resourceList": {
            "id": 1,
            "name": "RL1",
            "learningResources": []
        },
        "contentFeedUrl": "https://WakeUpAndCode.com/rss",
        "learningResourceTopicTags": null
    }
]

Instead of specifically returning a JsonResult, you could also return a more generic IActionResult, which can still be interpreted as JSON. Run the application and navigate to the following endpoint, to include the action method “search” folllowed by a QueryString parameter “fragment” for a partial match.

  • https://localhost:44350/api/LearningResources/search?fragment=Wa
 Sample JSON data with search string
Sample JSON data with search string

This triggers a GET request by calling the LearningResourceController‘s Search() method, with its fragment parameter set to “Wa” for a partial text search:

// GET: api/LearningResources/search?fragment=Wa
[HttpGet("Search")]
public IActionResult Search(string fragment)
{
   var result = _sampleRepository.GetByPartialName(fragment);
   if (!result.Any())
   {
      return NotFound(fragment);
   }
   return Ok(result);
}

In this case, the GetByPartialName() method returns a List of LearningResources objects that are returned as JSON by default, with an HTTP 200 OK status. In case no results are found, the action method will return a 404 with the NotFound() method.

public List<LearningResource> GetByPartialName(string nameSubstring)
{
   return LearningResources()
      .Where(lr => lr.Title
         .IndexOf(nameSubstring, 0, StringComparison.CurrentCultureIgnoreCase) != -1)
      .ToList();
}

The JSON result looks like the following, which includes any learning resource that partially matches the string fragment provided:

[
    {
        "id": 2,
        "name": "Wake Up And Code!",
        "url": "https://WakeUpAndCode.com",
        "resourceListId": 1,
        "resourceList": {
            "id": 1,
            "name": "RL1",
            "learningResources": []
        },
        "contentFeedUrl": "https://WakeUpAndCode.com/rss",
        "learningResourceTopicTags": null
    }
]

Returning Complex Objects

An overloaded version of the Get() method takes in a “listName” string parameter to filter results by a list name for each learning resource in the repository. Instead of returning a JsonResult or IActionResult, this one returns a complex object (LearningResource) that contains properties that we’re interested in.

// GET api/LearningResources/RL1
[HttpGet("{listName}")]
public LearningResource Get(string listName)
{
   return _sampleRepository.GetByListName(listName);
}

The GetByListName() method in the SampleRepository.cs class simply checks for a learning resource by the listName parameter and returns the first match. Again, the implementation is not particularly important, but it illustrates how you can pass in parameters to get back JSON results.

public LearningResource GetByListName(string listName)
{
   return LearningResources().FirstOrDefault(lr => lr.ResourceList.Name == listName);
}

While the application is running, navigate to the following endpoint:

  • https://localhost:44350/api/LearningResources/RL1
Sample JSON data with property filter

This triggers another GET request by calling the LearningResourcesController‘s overloaded Get() method, with the listName parameter. When passing the list name “RL1”, this returns one item, as shown below:

{
    "id": 1,
    "name": "ASP .NET Core Docs",
    "url": "https://docs.microsoft.com/aspnet/core",
    "resourceListId": 1,
    "resourceList": {
        "id": 1,
        "name": "RL1",
        "learningResources": []
    },
    "contentFeedUrl": null,
    "learningResourceTopicTags": null
}

Another example with a complex result takes in a similar parameter via QueryString and checks for an exact match with a specific property. In this case the Queried() action method calls the repository’s existing GetByListName() method to find a specific learning resource by its matching list name.

// GET: api/LearningResources/queried?listName=RL1
[HttpGet("Queried")]
public LearningResource Queried(string listName)
{
 return _sampleRepository.GetByListName(listName);
}

While the application is running, navigate to the following endpoint:

  • https://localhost:44350/api/LearningResources/Queried?listName=RL1
Sample JSON data with QueryString parameter

This triggers a GET request by calling the LearningResourcesController‘s Queried() method, with the listName parameter. When passing the list name “RL1”, this returns one item, as shown below:

{
    "id": 1,
    "name": "ASP .NET Core Docs",
    "url": "https://docs.microsoft.com/aspnet/core",
    "resourceListId": 1,
    "resourceList": {
        "id": 1,
        "name": "RL1",
        "learningResources": []
    },
    "contentFeedUrl": null,
    "learningResourceTopicTags": null
}

As you can see, the above result is in JSON format for the returned object.

XML Output

Wait a minute… with all these JSON results, when will we get to XML output? Not to worry, there are multiple ways to get XML results while reusing the above code. First, update your Startup.cs file’s ConfigureServices() to include a call to services.AddControllers().AddXmlSeralizerFormatters():

public void ConfigureServices(IServiceCollection services)
{
   ...
   services.AddControllers()
    .AddXmlSerializerFormatters();
   ...
}

In Postman, set the request’s Accept header value to “application/xml” before requesting the endpoint, then run the application and navigate to the following endpoint once again:

  • https://localhost:44350/api/LearningResources/RL1
XML-formatted results in Postman without code changes

This should provide the following XML results:

<LearningResource xmlns:xsi="http://www.w3.org/2001/XMLSchema-instance" xmlns:xsd="http://www.w3.org/2001/XMLSchema">
    <Id>1</Id>
    <Name>ASP .NET Core Docs</Name>
    <Url>https://docs.microsoft.com/aspnet/core</Url>
    <ResourceListId>1</ResourceListId>
    <ResourceList>
        <Id>1</Id>
        <Name>RL1</Name>
        <LearningResources />
    </ResourceList>
</LearningResource>

Since the action method returns a complex object, the result can easily be switched to XML simply by changing the Accept header value. In order to return XML using an IActionResult method, you should also use the [Produces] attribute, which can be set to “application/xml” at the API Controller level.

[Produces("application/xml")]
[Route("api/[controller]")]
[ApiController]
public class LearningResourcesController : ControllerBase
{
   ...
}

Then revisit the following endpoint, calling the search action method with the fragment parameter set to “ir”:

  • https://localhost:44350/api/LearningResources/Queried?listName=RL1

At this point, it is no longer necessary to set the Accept header to “application/xml” (in Postman) during the request, since the [Produces] attribute is given priority over it.

XML-formatted output using Produces attribute

This should produces the following result , with a LearningResource object in XML:

<LearningResource xmlns:xsi="http://www.w3.org/2001/XMLSchema-instance" xmlns:xsd="http://www.w3.org/2001/XMLSchema">
    <Id>1</Id>
    <Name>ASP .NET Core Docs</Name>
    <Url>https://docs.microsoft.com/aspnet/core</Url>
    <ResourceListId>1</ResourceListId>
    <ResourceList>
        <Id>1</Id>
        <Name>RL1</Name>
        <LearningResources />
    </ResourceList>
</LearningResource>

As for the first Get() method returning JsonResult, you can’t override it with the [Produces] attribute or the Accept header value to change the result to XML format.

To recap, the order of precedence is as follows:

  1. public JsonResult Get()
  2. [Produces(“application/…”)]
  3. Accept: “application/…”

References

Worker Service in .NET Core 3.1

By Shahed C on June 17, 2020

This is the twenty-third of a new series of posts on ASP .NET Core 3.1 for 2020. In this series, we’ll cover 26 topics over a span of 26 weeks from January through June 2020, titled ASP .NET Core A-Z! To differentiate from the 2019 series, the 2020 series will mostly focus on a growing single codebase (NetLearner!) instead of new unrelated code snippets week.

Previous post:

NetLearner on GitHub:

NOTE: The Worker Service sample is a meta project that generates Word documents from blog posts, to auto-generate an ebook from this blog series. You can check out the code in the following experimental subfolder, merged from a branch:

In this Article:

W is for Worker Service

When you think of ASP .NET Core, you probably think of web application backend code, including MVC and Web API. MVC Views and Razor Pages also allow you to use backend code to generate frontend UI with HTML elements. The all-new Blazor goes one step further to allow client-side .NET code to run in a web browser, using WebAssembly. And finally, we now have a template for Worker Service applications.

Released with ASP .NET Core 3.0, the new project type was introduced in ASP .NET Core early previews. Although the project template was initially listed under the Web templates, it has since been relocated one level up in the New Project wizard. This is a great way to create potentially long-running cross-platform services in .NET Core. This article covers the Windows operating system.

Cross-platform .NET Core Worker Service

New Worker Service Project

The quickest way to create a new Worker Service project in Visual Studio 2019 is to use the latest template available with .NET Core 3.1. You may also use the appropriate dotnet CLI command.

Launch Visual Studio and select the Worker service template as shown below. After selecting the location, verify the version number (e.g. .NET Core 3.1) to create the worker service project.

Worker Service template in Visual Studio 2019
Worker Service on .NET Core 3.1

To use the Command Line, simply use the following command:

> dotnet new worker -o myproject

where -o is an optional flag to provide the output folder name for the project.

You can learn more about this template at the following location:

Program and BackgroundService

The Program.cs class contains the usual Main() method and a familiar CreateHostBuilder() method. This can be seen in the snippet below:

public class Program
{
   public static void Main(string[] args)
   {
      CreateHostBuilder(args).Build().Run();
   }

   public static IHostBuilder CreateHostBuilder(string[] args) =>
      Host.CreateDefaultBuilder(args)
      .ConfigureServices(hostContext, services =>
      {
         services.AddHostedService<Worker>();
      });
 }

Things to note:

  1. The Main method calls the CreateHostBuilder() method with any passed parameters, builds it and runs it.
  2. As of ASP .NET Core 3.0, the Web Host Builder has been replaced by a Generic Host Builder. The so-called Generic Host Builder was covered in an earlier blog post in this series.
  3. CreateHostBuilder() creates the host and configures it by calling AddHostService<T>, where T is an IHostedService, e.g. a worker class that is a child of BackgroundService

The worker class, Worker.cs, is defined as shown below:

public class Worker : BackgroundService
{
   // ...
 
   protected override async Task ExecuteAsync(CancellationToken stoppingToken)
   {
      // do stuff here
   }
}

Things to note:

  1. The worker class implements the BackgroundService class, which comes from the namespace Microsoft.Extensions.Hosting
  2. The worker class can then override the ExecuteAsync() method to perform any long-running tasks.

In the sample project, a utility class (DocEngine.cs) is used to convert a web page (e.g. a blog post or article) into a Word document for offline viewing. Fun fact: when this A-Z series wraps up, the blog posts will be assembled into a free ebook, by using this DocMaker, which uses some 3rd-party NuGet packages to generate the Word document.

Logging in a Worker Service

Logging in ASP .NET Core has been covered in great detail in an earlier blog post in this series. To get a recap, take a look at the following writeup:

To use Logging in your Worker Service project, you may use the following code in your Program.cs class:

using Microsoft.Extensions.Logging;
public static IHostBuilder CreateHostBuilder(string[] args) =>
 Host.CreateDefaultBuilder(args)
 .ConfigureLogging(loggerFactory => loggerFactory.AddEventLog())
 .ConfigureServices((hostContext, services) =>
 {
    services.AddHostedService<Worker>();
 });
  1. Before using the extension method, add its NuGet package to your project:
    • Microsoft.Extensions.Logging.EventLog
  2. Add the appropriate namespace to your code:
    • using Microsoft.Extensions.Logging;
  3. Call the method ConfigureLogging() and call the appropriate logging method, e.g. AddEventLog()

The list of available loggers include:

  • AddConsole()
  • AddDebug()
  • AddEventLog()
  • AddEventSourceLogger()

The Worker class can then accept an injected ILogger<Worker> object in its constructor:

private readonly ILogger<Worker> _logger;

public Worker(ILogger<Worker> logger)
{
   _logger = logger;
}

Running the Worker Service

NOTE: Run Powershell in Administrator Mode before running the commands below.

Before you continue, add a call to UseWindowsService() in your Program class, or verify that it’s already there. To call UseWindowsService(), the following package must be installed in your project: Microsoft.Extensions.Hosting.WindowsServices

The official announcement and initial document referred to UseServiceBaseLifetime() in an earlier preview. This method was renamed to UseWindowsService() before release.

   public static IHostBuilder CreateHostBuilder(string[] args) =>
      Host.CreateDefaultBuilder(args)
      .UseWindowsService()
      .ConfigureServices(hostContext, services =>
      {
         services.AddHostedService<Worker>();
      });

According to the code documentation, UseWindowsService() does the following:

  1. Sets the host lifetime to WindowsServiceLifetime
  2. Sets the Content Root
  3. Enables logging to the event log with the application name as the default source name

You can run the Worker Service in various ways:

  1. Build and Debug/Run from within Visual Studio.
  2. Publish to an exe file and run it
  3. Run the sc utility (from Windows\System32) to create a new service

To publish the Worker Service as an exe file with dependencies, run the following dotnet command:

dotnet publish -o C:\path\to\project\pubfolder

The -o parameter can be used to specify the path to a folder where you wish to generate the published files. It could be the path to your project folder, followed by a new subfolder name to hold your published files, e.g. pubfolder. Make a note of your EXE name, e.g. MyProjectName.exe but omit the pubfolder from your source control system.

To create a new service, run sc.exe from your System32 folder and pass in the name of the EXE file generated from the publish command.

> C:\Windows\System32\sc create MyServiceName binPath=C:\path\to\project\pubfolder\MyProjectName.exe

When running the sample manually, you should see some logging messages, as shown below:

info: DocMaker.Worker[0]
 Making doc 1 at: 06/09/2020 00:09:52 -04:00
Making your document...
info:  DocMaker.Worker[0]
 Making doc 2 at: 06/09/2020 00:10:05 -04:00
Making your document...

After the service is installed, it should show up in the operating system’s list of Windows Services:

Windows Services, showing custom Worker Service

NOTE: When porting to other operating systems, the call to UseWindowsService() is safe to leave as is. It doesn’t do anything on a non-Windows system.

References

Validation in ASP .NET Core 3.1

By Shahed C on June 15, 2020

This is the twenty-second of a new series of posts on ASP .NET Core 3.1 for 2020. In this series, we’ll cover 26 topics over a span of 26 weeks from January through June 2020, titled ASP .NET Core A-Z! To differentiate from the 2019 series, the 2020 series will mostly focus on a growing single codebase (NetLearner!) instead of new unrelated code snippets week.

Previous post:

NetLearner on GitHub:

In this Article:

V is for Validation

To build upon a previous post on Forms and Fields in ASP .NET Core, this post covers Validation in ASP .NET Core. When a user submits form field values, proper validation can help build a more user-friendly and secure web application. Instead of coding each view/page individually, you can simply use server-side attributes in your models/viewmodels.

NOTE: As of ASP .NET Core 2.2, validation may be skipped automatically if ASP .NET Core decides that validation is not needed. According to the “What’s New” release notes, this includes primitive collections (e.g. a byte[] array or a Dictonary<string, string> key-value pair collection)

Validation in ASP .NET Core

Validation Attributes

To implement model validation with [Attributes], you will typically use Data Annotations from the System.ComponentModel.DataAnnotations namespace. The list of attribute does go beyond just validation functionality though. For example, the DataType attribute takes a datatype parameter, used for inferring the data type and used for displaying the field on a view/page (but does not provide validation for the field).

Common attributes include the following

  • Range: lets you specify min-max values, inclusive of min and max
  • RegularExpression: useful for pattern recognition, e.g. phone numbers, zip/postal codes
  • Required: indicates that a field is required
  • StringLength: sets the maximum length for the string entered
  • MinLength: sets the minimum length of an array or string data

From the sample code, here is an example from the LearningResource model class in NetLearner‘s shared library:

public class LearningResource
{
    public int Id { get; set; }

    [DisplayName("Resource")]
    [Required]
    [StringLength(100)]
    public string Name { get; set; }


    [DisplayName("URL")]
    [Required]
    [StringLength(255)]
    [DataType(DataType.Url)]
    public string Url { get; set; }

    public int ResourceListId { get; set; }
    [DisplayName("In List")]
    public ResourceList ResourceList { get; set; }

    [DisplayName("Feed Url")]
    public string ContentFeedUrl { get; set; }

    public List<LearningResourceTopicTag> LearningResourceTopicTags { get; set; }
}

From the above code, you can see that:

  • The value for Name is a required string, needs to be less than 100 characters
  • The value for Url is a required string, needs to be less than 255 characters
  • The value for ContentFeedUrl can be left blank, but has to be less than 255 characters.
  • When the DataType is provided (e.g. DataType.Url, Currency, Date, etc), the field is displayed appropriately in the browser, with the proper formatting
  • For numeric values, you can also use the [Range(x,y)] attribute, where x and y sets the minimum and maximum values allowed for the number

Here’s what it looks like in a browser when validation fails:

Validation errors in NetLearner.MVC
Validation errors in NetLearner.Pages
Validation errors in NetLearner.Blazor

The validation rules make it easier for the user to correct their entries before submitting the form.

  • In the above scenario, the “is required” messages are displayed directly in the browser through client-side validation.
  • For field-length restrictions, the client-side form will automatically prevent the entry of string values longer than the maximum threshold
  • If a user attempts to circumvent any validation requirements on the client-side, the server-side validation will automatically catch them.

In the MVC and Razor Pages web projects, the validation messages are displayed with the help of <div> and <span> elements, using asp-validation-summary and asp-validation-for.

NetLearner.Mvc: /Views/LearningResources/Create.cshtml

<div asp-validation-summary="ModelOnly" class="text-danger"></div>
 <div class="form-group">
     <label asp-for="Name" class="control-label"></label>
     <input asp-for="Name" class="form-control" />
     <span asp-validation-for="Name" class="text-danger"></span>
 </div>

NetLearner.Pages: /Pages/LearningResources/Create.cshtml

<div asp-validation-summary="ModelOnly" class="text-danger"></div>
 <div class="form-group">
     <label asp-for="LearningResource.Name" class="control-label"></label>
     <input asp-for="LearningResource.Name" class="form-control" />
     <span asp-validation-for="LearningResource.Name" class="text-danger"></span>
 </div>

In the Blazor project, the “The DataAnnotationsValidator component attaches validation support using data annotations” and “The ValidationSummary component summarizes validation messages”.

NetLearner.Blazor: /Pages/ResourceDetail.razor

<EditForm Model="@LearningResourceObject" OnValidSubmit="@HandleValidSubmit">
     <DataAnnotationsValidator />
     <ValidationSummary />

For more information on Blazor validation, check out the official documentation at:

Server-Side Validation

Validation occurs before an MVC controller action (or equivalent handler method for Razor Pages) takes over. As a result, you should check to see if the validation has passed before continuing next steps.

e.g. in an MVC controller

[HttpPost]
[ValidateAntiForgeryToken]
public async Task<IActionResult> Create(...)
{
   if (ModelState.IsValid)
   {
      // ... 
      return RedirectToAction(nameof(Index));
   }
   return View(...);
}

e.g. in a Razor Page’s handler code:

public async Task<IActionResult> OnPostAsync()
{
   if (!ModelState.IsValid)
   {
      return Page();
   }

   //... 
   return RedirectToPage(...);
}

Note that ModelState.IsValid is checked in both the Create() action method of an MVC Controller or the OnPostAsync() handler method of a Razor Page’s handler code. If IsValid is true, perform actions as desired. If false, reload the current view/page as is.

In the Blazor example, the OnValidSubmit event is triggered by <EditForm> when a form is submitted, e.g.

<EditForm Model="@SomeModel" OnValidSubmit="@HandleValidSubmit">

The method name specified refers to a C# method that handles the form submission when valid.

private async void HandleValidSubmit()
{
   ...
}

Client-Side Validation

It goes without saying that you should always have server-side validation. All the client-side validation in the world won’t prevent a malicious user from sending a GET/POST request to your form’s endpoint. Cross-site request forgery in the Form tag helper does provide a certain level of protection, but you still need server-side validation. That being said, client-side validation helps to catch the problem before your server receives the request, while providing a better user experience.

When you create a new ASP .NET Core project using one of the built-in templates for MVC or Razor Pages, you should see a shared partial view called _ValidationScriptsPartial.cshtml. This partial view should include references to jQuery unobtrusive validation, as shown below:

<script src="~/lib/jquery-validation-unobtrusive/jquery.validate.unobtrusive.min.js"></script>

If you create a scaffolded controller with views/pages, you should see the following reference at the bottom of your page or view.

e.g. at the bottom of Create.cshtml view

@section Scripts {
   @{await Html.RenderPartialAsync("_ValidationScriptsPartial");}
}

e.g. at the bottom of the Create.cshtml page

@section Scripts {
   @{await Html.RenderPartialAsync("_ValidationScriptsPartial");}
}

Note that the syntax is identical whether it’s an MVC view or a Razor page. If you ever need to disable client-side validation for some reason, that can be accomplished in different ways, whether it’s for an MVC view or a Razor page. (Blazor makes use of the aforementioned EditForm element in ASP .NET Core to include built-in validation, with the ability to track whether a submitted form is valid or invalid.)

From the official docs, the following code should be used within the ConfigureServices() method of your Startup.cs class, to set ClientValidationEnabled to false in your HTMLHelperOptions configuration.

services.AddMvc().AddViewOptions(options =>
{
   if (_env.IsDevelopment())
   {
      options.HtmlHelperOptions.ClientValidationEnabled = false;
   }
});

Also mentioned in the official docs, the following code can be used for your Razor Pages, within the ConfigureServices() method of your Startup.cs class.

services.Configure<HtmlHelperOptions>(o => o.ClientValidationEnabled = false);

Client to Server with Remote Validation

If you need to call a server-side method while performing client-side validation, you can use the [Remote] attribute on a model property. You would then pass it the name of a server-side action method which returns an IActionResult with a true boolean result for a valid field. This [Remote] attribute is available in the Microsoft.AspNetCore.Mvc namespace, from the Microsoft.AspNetCore.Mvc.ViewFeatures NuGet package.

The model property would look something like this:

[Remote(action: "MyActionMethod", controller: "MyControllerName")]
public string MyProperty { get; set; }

In the controller class, (e.g. MyControllerName), you would define an action method with the name specified in the [Remote] attribute parameters, e.g. MyActionMethod. 

[AcceptVerbs("Get", "Post")]
public IActionResult MyActionMethod(...)
{
   if (TestForFailureHere())
   {
      return Json("Invalid Error Message");
   }
   return Json(true);
}

You may notice that if the validation fails, the controller action method returns a JSON response with an appropriate error message in a string. Instead of a text string, you can also use a false, null, or undefined value to indicate an invalid result. If validation has passed, you would use Json(true) to indicate that the validation has passed.

So, when would you actually use something like this? Any scenario where a selection/entry needs to be validated by the server can provide a better user experience by providing a result as the user is typing, instead of waiting for a form submission. For example: imagine that a user is buying online tickets for an event, and selecting a seat number displayed on a seating chart. The selected seat could then be displayed in an input field and then sent back to the server to determine whether the seat is still available or not.

Custom Attributes

In addition to all of the above, you can simply build your own custom attributes. If you take a look at the classes for the built-in attributes, e.g. RequiredAttribute, you will notice that they also extend the same parent class:

  • System.ComponentModel.DataAnnotations.ValidationAttribute

You can do the same thing with your custom attribute’s class definition:

public class MyCustomAttribute: ValidationAttribute 
{
   // ...
}

The parent class ValidationAttribute, has a virtual IsValid() method that you can override to return whether validation has been calculated successfully (or not).

public class MyCustomAttribute: ValidationAttribute 
{
   // ...
   protected override ValidationResult IsValid(
      object value, ValidationContext validationContext)
   {
      if (TestForFailureHere())
      {
         return new ValidationResult("Invalid Error Message");
      }
      
      return ValidationResult.Success;
   }
}

You may notice that if the validation fails, the IsValid() method returns a ValidationResult() with an appropriate error message in a string. If validation has passed, you would return ValidationResult.Success to indicate that the validation has passed.

References