Category Archives: Azure

Logging in ASP .NET Core

By Shahed C on March 25, 2019

This is the twelfth of a series of posts on ASP .NET Core in 2019. In this series, we’ll cover 26 topics over a span of 26 weeks from January through June 2019, titled A-Z of ASP .NET Core!

ASPNETCoreLogo-300x267 A – Z of ASP .NET Core!

In this Article:

L is for Logging in ASP .NET Core

You could write a fully functional ASP .NET Core web application without any logging. But in the real world, you should use some form of logging. This blog post provides an overview of how you can use the built-in logging functionality in ASP .NET Core web apps. While we won’t go deep into 3rd-party logging solutions such as Serilog in this article (stay tuned for a future article on that topic), you should definitely consider a robust semantic/structured logging solution for your projects.

To follow along, take a look at the sample project on Github:

Web Logging Sample: https://github.com/shahedc/AspNetCoreLoggingSample

Logging in ASP .NET Core

Logging in ASP .NET Core

Log Messages

The simplest log message includes a call to the extension method ILogger.Log()  by passing on a LogLevel and a text string. Instead of passing in a LogLevel, you could also call a specific Log method such as LogInformation() for a specific LogLevel. Both examples are shown below:

// Log() method with LogLevel passed in 
_logger.Log(LogLevel.Information, "some text");

// Specific LogXX() method, e.g. LogInformation()
_logger.LogInformation("some text");

LogLevel values include Trace, Debug, Information, Warning, Error, Critical and None. These are all available from the namespace Microsoft.Extensions.Logging. For a more structured logging experience, you should also pass in meaningful variables/objects following the templated message string, as all the Log methods take in a set of parameters defined as “params object[] args”.

public static void Log (
   this ILogger logger, LogLevel logLevel, string message, params object[] args);

This allows you to pass those values to specific logging providers, along with the message itself. It’s up to each logging provider on how those values are captured/stored, which you can also configure further. You can then query your log store for specific entries by searching for those arguments. In your code, this could look something like this:

_logger.LogInformation("some text for id: {someUsefulId}", someUsefulId);

Even better, you can add your own EventId for each log entry. You can facilitate this by defining your own set of integers, and then passing an int value to represent an EventId. The EventId type is a struct that includes an implicit operator, so it essentially calls its own constructor with whatever int value you provide.

_logger.LogInformation(someEventId, "some text for id: {someUsefulId}", someUsefulId);

In the sample project, we can see the use of a specific integer value for each EventId, as shown below:

// Step X: kick off something here
_logger.LogInformation(LoggingEvents.Step1KickedOff, "Step {stepId} Kicked Off.", stepId);

// Step X: continue processing here
_logger.LogInformation(LoggingEvents.Step1InProcess, "Step {stepId} in process...", stepId);

// Step X: wrap it up
_logger.LogInformation(LoggingEvents.Step1Completed, "Step {stepId} completed!", stepId);

The integer values can be whatever you want them to be. An example is shown below:

public class LoggingEvents
{
   public const int ProcessStarted = 1000; 

   public const int Step1KickedOff = 1001;
   public const int Step1InProcess = 1002;
   public const int Step1Completed = 1003; 
   ...
}

Logging Providers

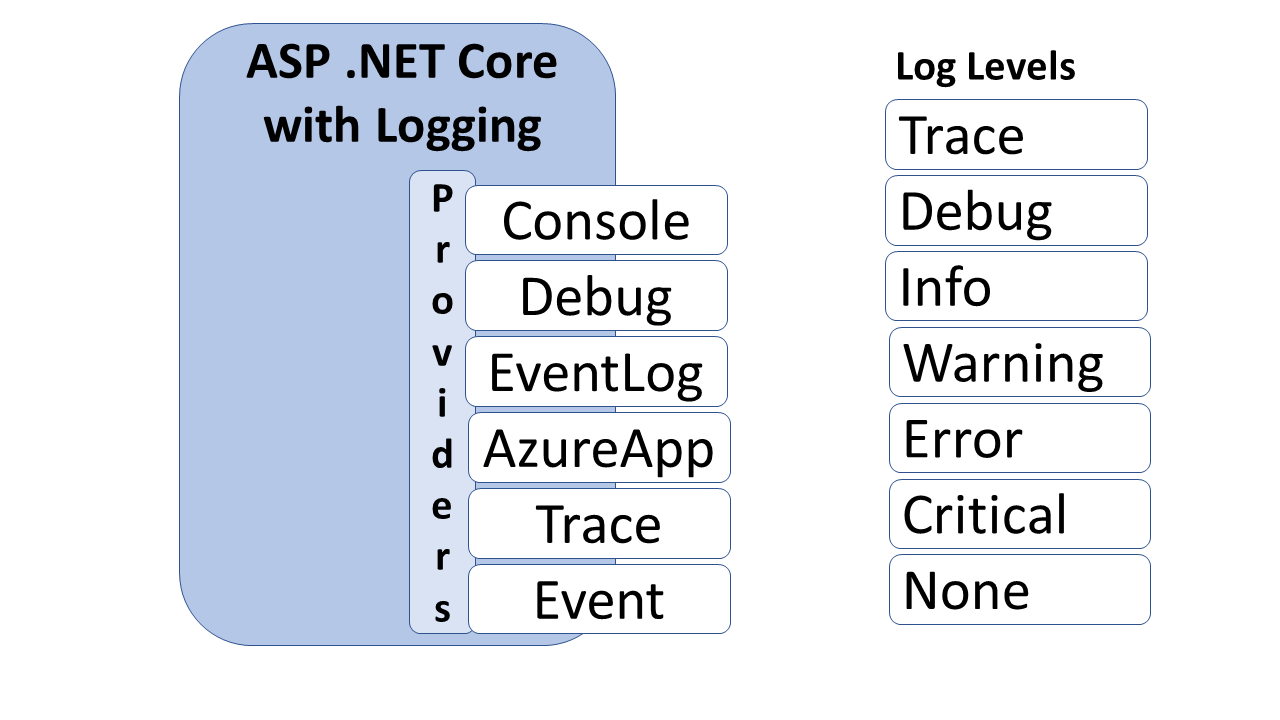
The default template-generated web apps include a call to CreateDefaultBuilder() in Program.cs, which automatically includes adds the Console and Debug providers. As of ASP.NET Core 2.2, the EventSource provider is also automatically added by the default builder.

 public static IWebHostBuilder CreateWebHostBuilder(string[] args) =>
    WebHost.CreateDefaultBuilder(args)
      .UseStartup<Startup>();

NOTE: As mentioned in an earlier post in this blog series, the Web Host Builder will be replaced by the Generic Host Builder with the release of .NET Core 3.0.

If you wish to add your own set of logging providers, you can expand the call to CreateDefaultBuilder(), clear the default providers, and then add your own. The built-in providers now include Console, Debug, EventLog, AzureAppServices, TraceSource and EventSource.

public static IWebHostBuilder CreateWebHostBuilder(
   string[] args) => WebHost.CreateDefaultBuilder(args) 
      .UseStartup<Startup>()  
      .ConfigureLogging(logging =>  
      {  
         // clear default logging providers
         logging.ClearProviders();  

         // add built-in providers manually, as needed 
         logging.AddConsole();   
         logging.AddDebug();  
         logging.AddEventLog();
         logging.AddEventSourceLogger();
         logging.AddTraceSource(sourceSwitchName);
      });

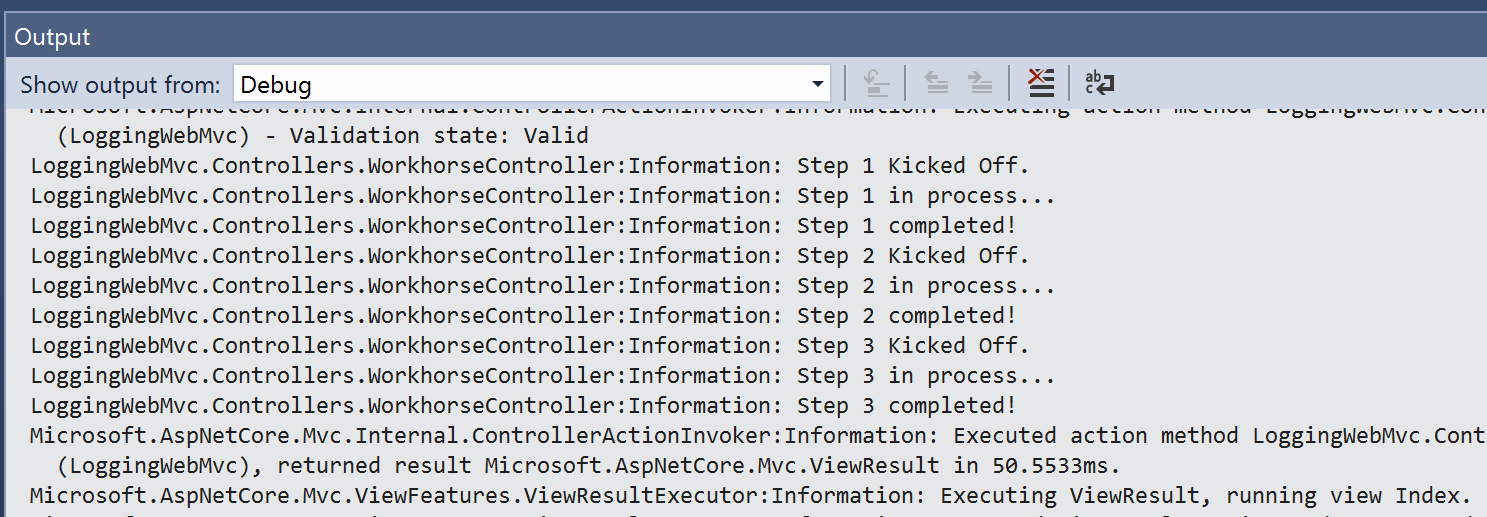
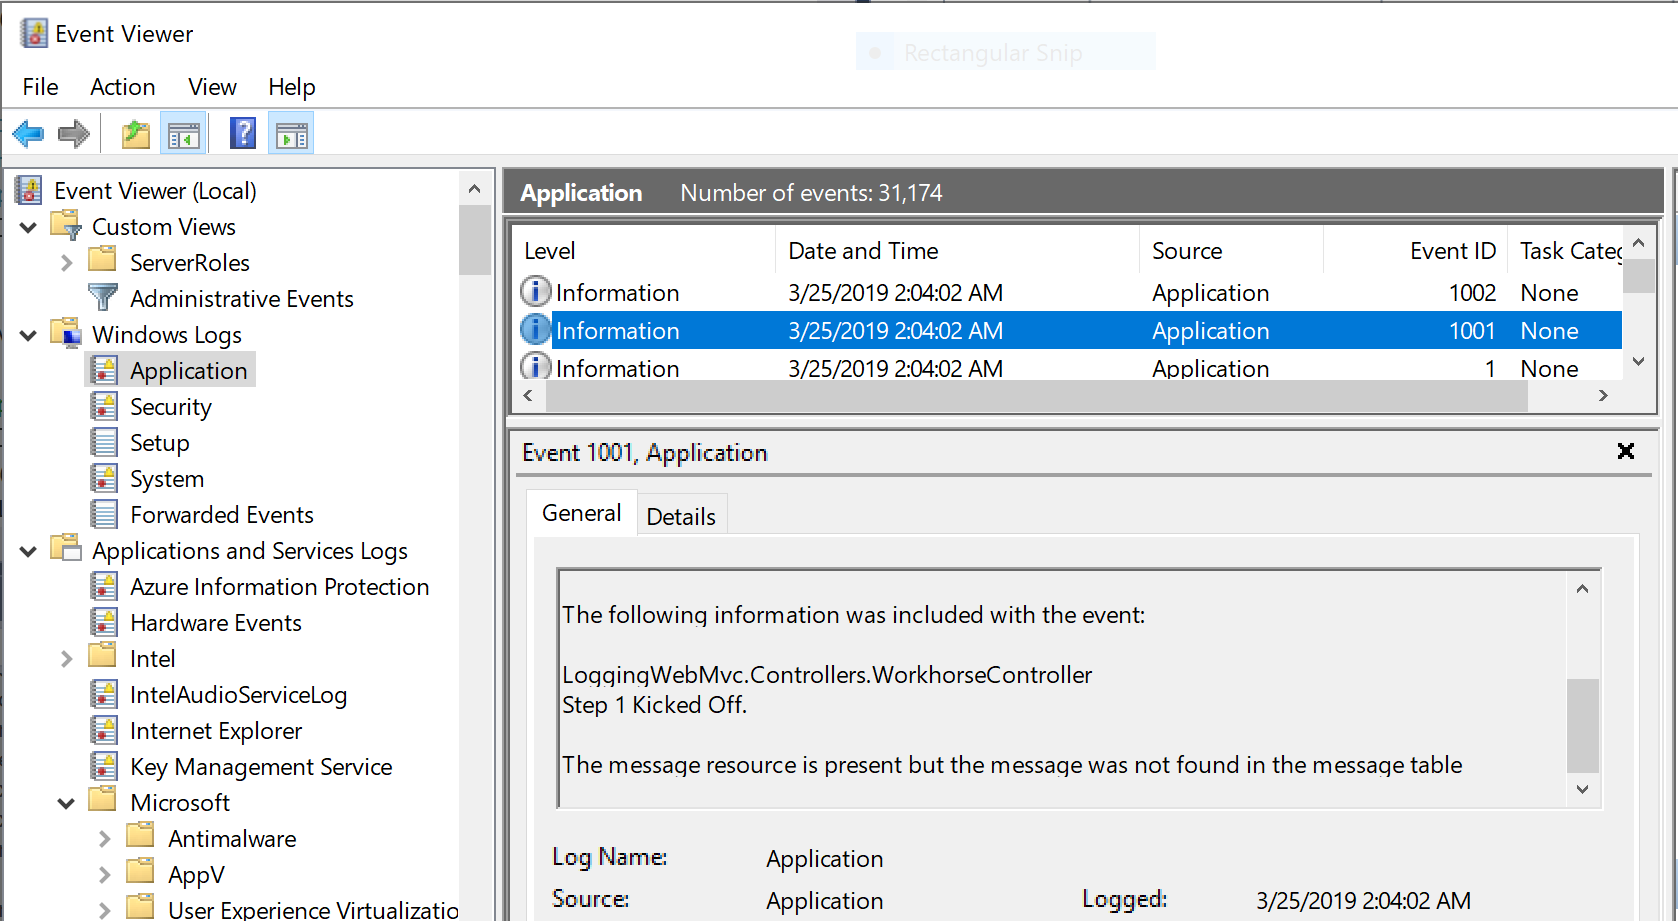
The screenshots below show the log results viewable in Visual Studio’s Debug Window and in the Windows 10 Event Viewer. Note that the EventId’s integer values (that we had defined) are stored in the EventId field as numeric value in the Windows Event Viewer log entries.

Logging: VS2017 Debug Window

Logging: VS2017 Debug Window

Logging; Windows Event Viewer

Logging; Windows Event Viewer

For the Event Log provider, you’ll also have to add the following NuGet package and corresponding using statement:

Microsoft.Extensions.Logging.EventLog

For the Trace Source provider, a “source switch” can be used to determine if a trace should be propagated or ignored. For more information on the Trace Source provider and the Source Switch it uses check out the official docs at:

For more information on adding logging providers and further customization, check out the official docs at:

But wait a minute, what happened to the Azure App Services provider mentioned earlier? Why isn’t there a call to add it as a logging provider? Well, you should be aware that there is a method for adding Azure Web App Diagnostics as a logging provider:

logging.AddAzureWebAppDiagnostics();

However, you would only have to call this AddAzureWebAppDiagnostics() method if you’re targeting .NET Framework. You shouldn’t call it if targeting .NET Core. With .NET Core 3.0, ASP.NET Core will run only on .NET Core so you don’t have to worry about this at all. When you deploy the web app to Azure App Service, this logging provider is automatically available for your use. (We will cover this in more detail in a future blog post.)

JSON Configuration

One way to configure each Logging Provider is to use your appsettings.json file. Depending on your environment, you could start with appsettings.Development.json or App Secrets in development, and then use environment variables, Azure Key Vault in other environments. You may refer to earlier blog posts from 2018 and 2019 for more information on the following:

In your local JSON config file, your configuration uses the following syntax:

{
   "Logging": {
      "LogLevel": {
         "Default": "Debug",
         "Category1": "Information",
         "Category2": "Warning"
      },
      "SpecificProvider":
      {
         "ProviderProperty": true
      }
   }
}

The configuration for LogLevel sets one or more categories, including the Default category when no category is specified. Additional categories (e.g. System, Microsoft or any custom category) may be set to one of the aforementioned LogLevel values.

The LogLevel block can be followed by one or more provider-specific blocks (e.g. Console) to set its properties, e.g. IncludeScopes. Such an example is shown below.

{
   "Logging": {
      "LogLevel": {
         "Default": "Debug",
         "System": "Information",
         "Microsoft": "Information"
      },
      "Console":
      {
         "IncludeScopes": true
      }
   }
}

To set logging filters in code, you can use the AddFilter () method for specific providers or all providers in your Program.cs file. The following syntax can be used to add filters for your logs.

WebHost.CreateDefaultBuilder(args)
   .UseStartup<Startup>()
   .ConfigureLogging(logging =>
      logging.AddFilter("Category1", LogLevel.Level1)
         .AddFilter<SomeProvider>("Category2", LogLevel.Level2));

In the above sample, the following placeholders can be replaced with:

  • CategoryX: System, Microsoft, custom categories
  • LogLevel.LevelX: Trace, Debug, Information, Warning, Error, Critical, None
  • SomeProvider: Debug, Console, other providers

Log Categories

To set a category when logging an entry, you may set the string value when creating a logger. If you don’t set a value explicitly, the fully-qualified namespace + class name is used. In the WorkhorseController class seen in your example, the log results seen in the Debug window and Event Viewer were seen to be:

LoggingWebMvc.Controllers.WorkhorseController

This is the category name created using the controller class name passed to the constructor in WorkHoseController as shown below:

private readonly ILogger _logger; 

public WorkhorseController(ILogger<WorkhorseController> logger)
{
   _logger = logger;
}

If you wanted to set this value yourself, you could change the code to the following:

private readonly ILogger _logger; 

public WorkhorseController(ILoggerFactory logger)
{
   _logger = logger.CreateLogger("LoggingWebMvc.Controllers.WorkhorseController");
}

The end results will be the same. However, you may notice that there are a couple of differences here:

  1. Instead of ILogger<classname> we are now passing in an ILoggerFactory type as the logger.
  2. Instead of just assigning the injected logger to the private _logger variable, we are now calling the factory method CreateLogger() with the desired string value to set the category name.

Exceptions in Logs

In addition to EventId values and Category Names, you may also capture Exception information in your application logs. The various Log extensions provide an easy way to pass an exception by passing the Exception object itself.

try 
{
   // try something here
   throw new Exception();
} catch (Exception someException)
{
   _logger.LogError(eventId, someException, "Trying step {stepId}", stepId);
   // continue handling exception
}

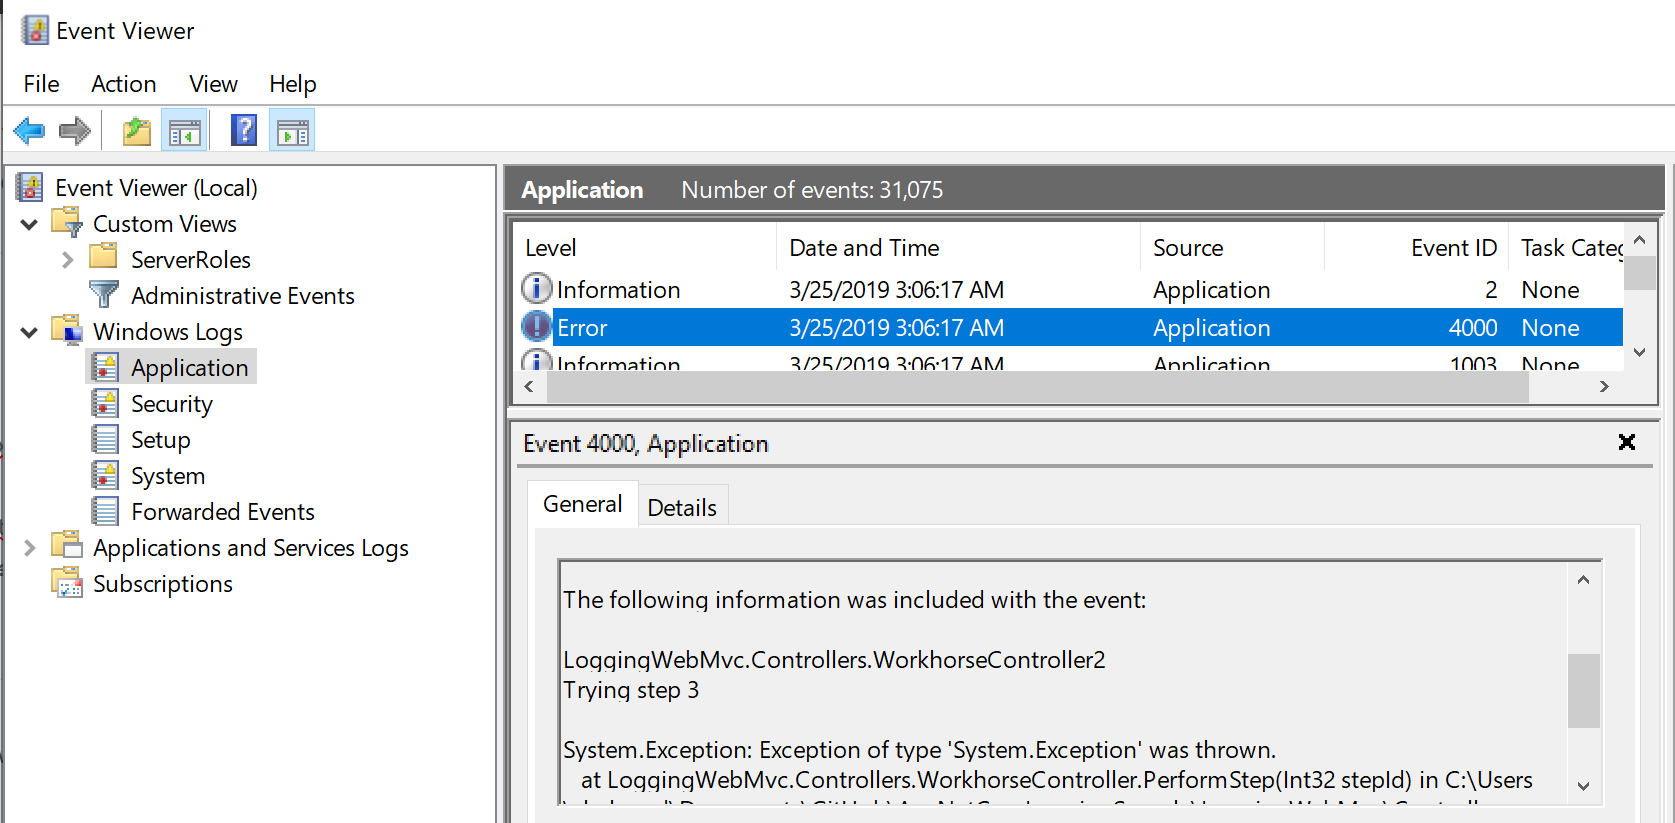
Checking the Event Viewer, we may see a message as shown below. The LogLevel is shown as “Error” because we used the LogError() extension method in the above code, which is forcing an Exception to be thrown. The details of the Exception is displayed in the log as well.

Logging; Exception in Event Viewer

Logging; Exception in Event Viewer

Structured Logging with Serilog

At the very beginning, I mentioned the possibilities of structured logging with 3rd-party providers. There are many solutions that work with ASP .NET Core, including (but not limited to) elmah, NLog and Serilog. Here, we will take a brief look at Serilog.

Similar to the built-in logging provider described throughout this article, you should include variables to assign template properties in all log messages, e.g.

Log.Information("This is a message for {someVariable}", someVariable);

To make use of Serilog, you’ll have to perform the following steps:

  1. grab the appropriate NuGet packages: Serilog, Hosting, various Sinks, e,g, Console
  2. use the Serilog namespace, e.g. using Serilog
  3. create a new LoggerConfiguration() in your Main() method
  4. call UseSerilog() when creating your Host Builder
  5. write log entries using methods from the Log static class.

For more information on Serilog, check out the following resources:

References


Key Vault for ASP .NET Core Web Apps

By Shahed C on March 18, 2019

This is the eleventh of a series of posts on ASP .NET Core in 2019. In this series, we’ll cover 26 topics over a span of 26 weeks from January through June 2019, titled A-Z of ASP .NET Core!

ASPNETCoreLogo-300x267 A – Z of ASP .NET Core!

In this Article:

K is for Key Vault for ASP .NET Core Web Apps

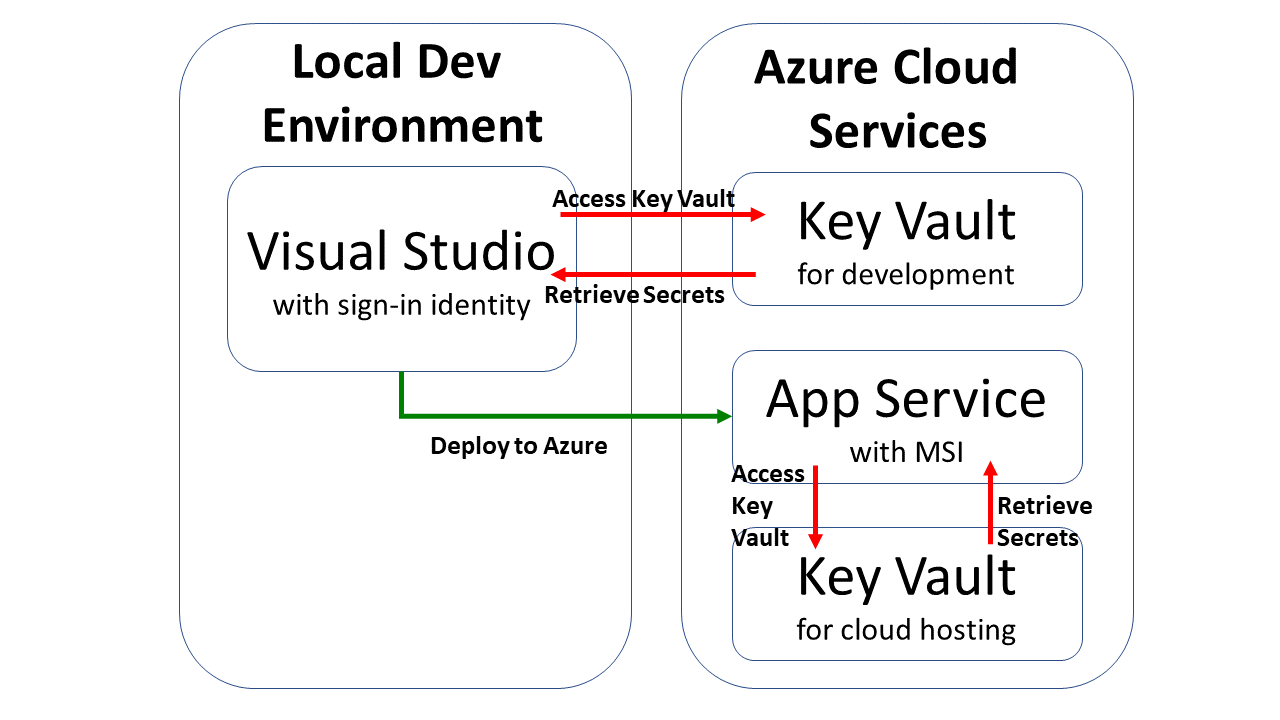
In my 2018 blog series, we covered the use of User Secrets for your ASP .NET Core web application projects. This is useful for storing secret values locally during development. However, we need a cloud-based scalable solution when deploying web apps to Azure. This article will cover Azure Key Vault as a way to store and retrieve sensitive information in Azure and access them in your web application.

You may download the following sample project to follow along with Visual Studio. You may need to apply migrations if you wish to use the optional authentication features with a data store in the sample app.

Web Key Vault Sample: https://github.com/shahedc/AspNetCoreKeyVaultSample

You will also need an Azure subscription to create and use your own Key Vault and App Service.

Blog-Diagram-KeyVault

Setting up Key Vault in Azure

Before you can use Key Vault in the cloud, you will have to set it up in Azure for your use. This can be done in various ways:

  • Azure Portal: log in to the Azure Portal in a web browser.
  • Azure CLI: use Azure CLI commands on your development machine.
  • Visual Studio: use the VS IDE on your development machine.

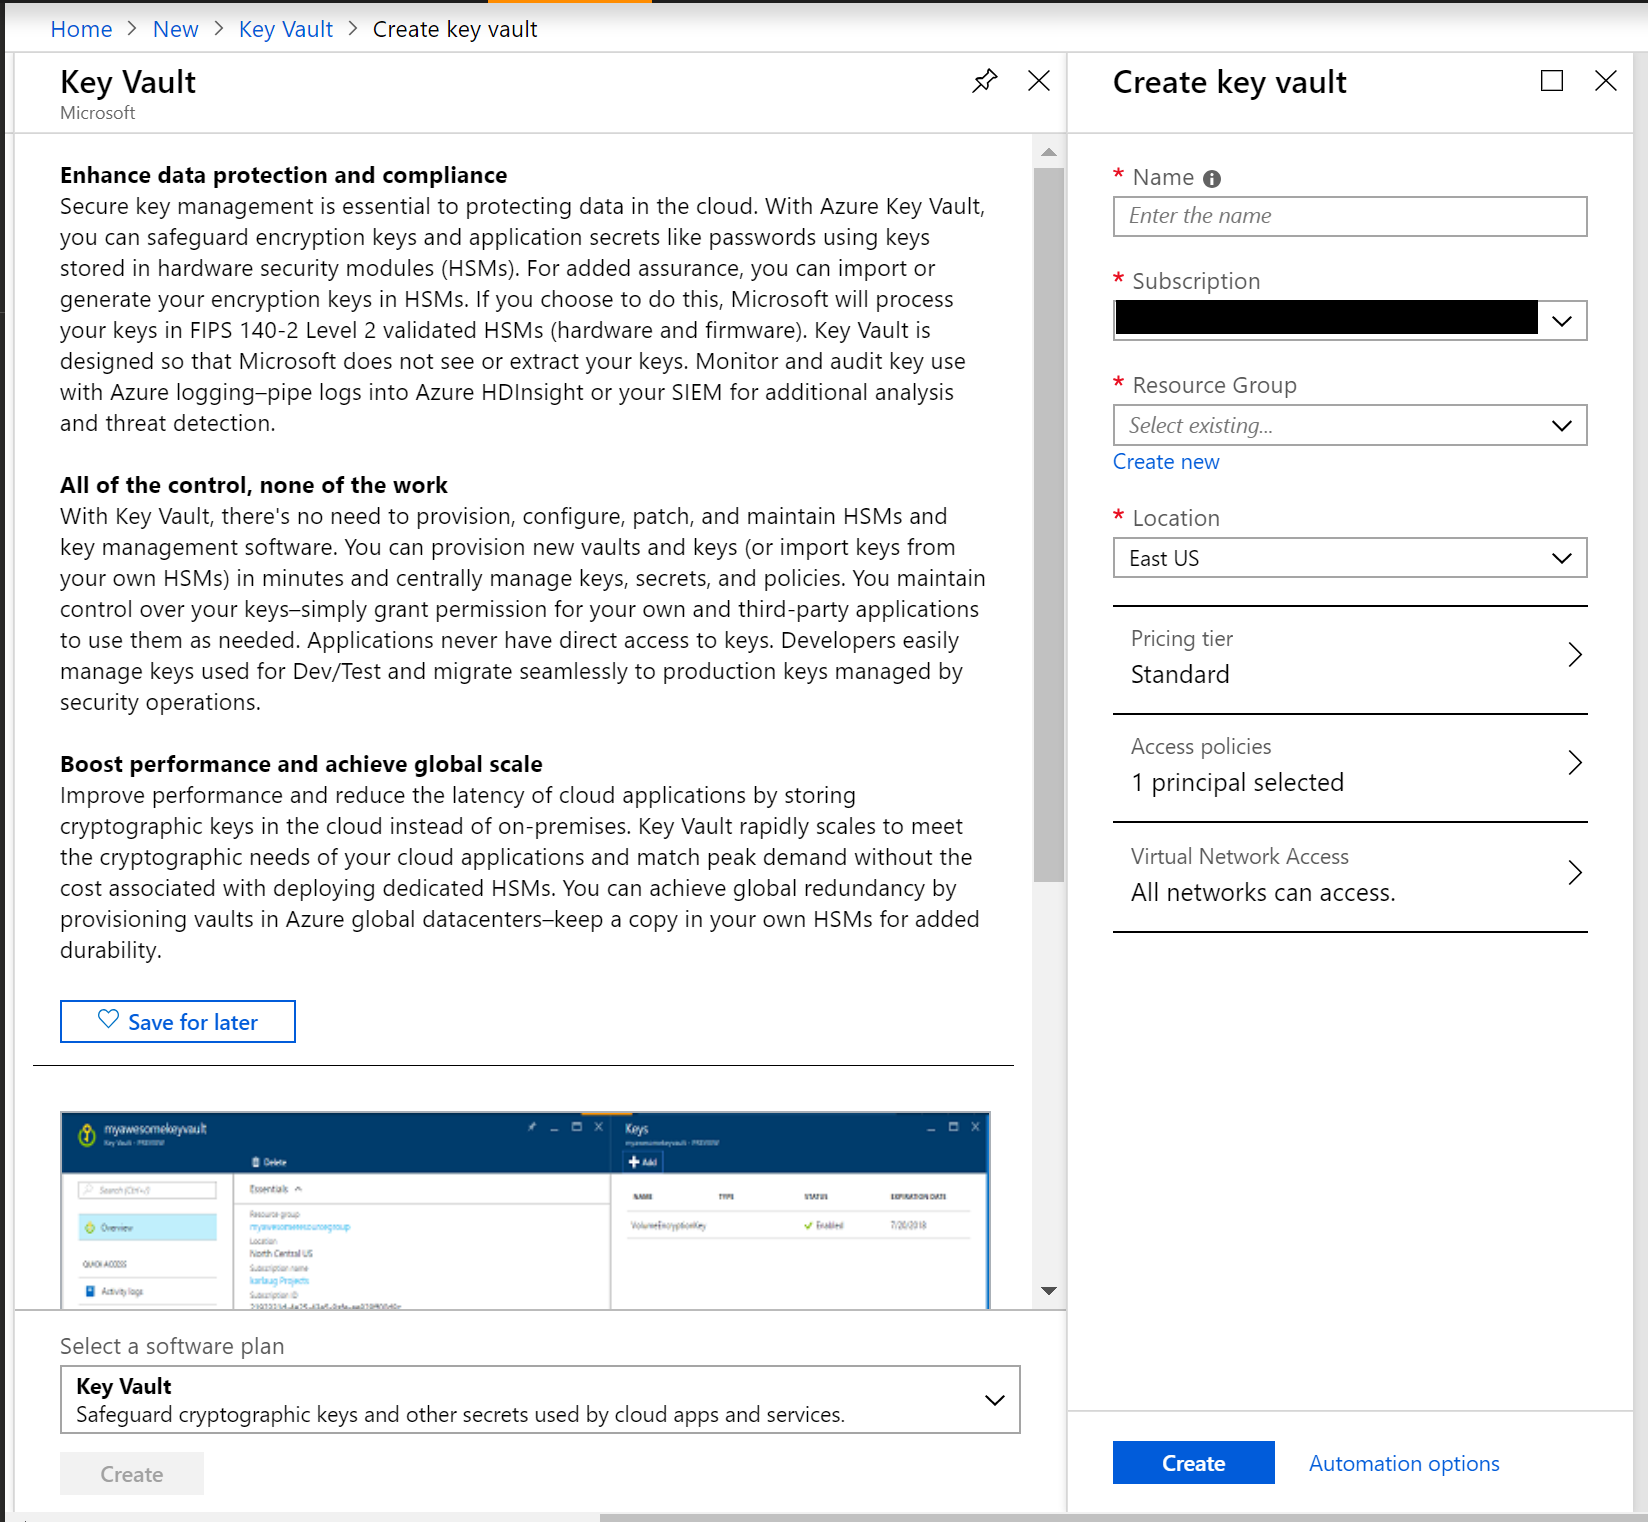
To use the Azure Portal: create a new resource, search for Key Vault, click Create and then follow the onscreen instructions. Enter/select values for the following for the key vault:

  • Name: alphanumeric, dashes allowed, cannot start with number
  • Subscription: select the desired Azure subscription
  • Resource Group: select a resource group or create a new one
  • Location: select the desired location
  • Pricing Tier: select the appropriate pricing tier (Standard, Premium)
  • Access policies: select/create one or more access policies with permissions
  • Virtual Network Access: select all (or specific) networks to allow access

KeyVault-Create-Portal

If you need help with the Azure Portal, check out the official docs at:

To use the Azure CLI: authenticate yourself, run the appropriate commands to create a key vault, add keys/secrets/certificates and then authorize an application to use your keys/secrets.

To create a new key vault, run “az keyvault create” followed by a name, resource group and location, e.g.

az keyvault create --name "MyKeyVault" --resource-group "MyRG" --location "East US"

To add a new secret, run “az keyvault secret set“, followed by the vault name, a secret name and the secret’s value, e.g.

az keyvault secret set --vault-name "MyKeyVault" --name "MySecretName" --value "MySecretValue"

If you need help with the Azure CLI, check out the official docs at:

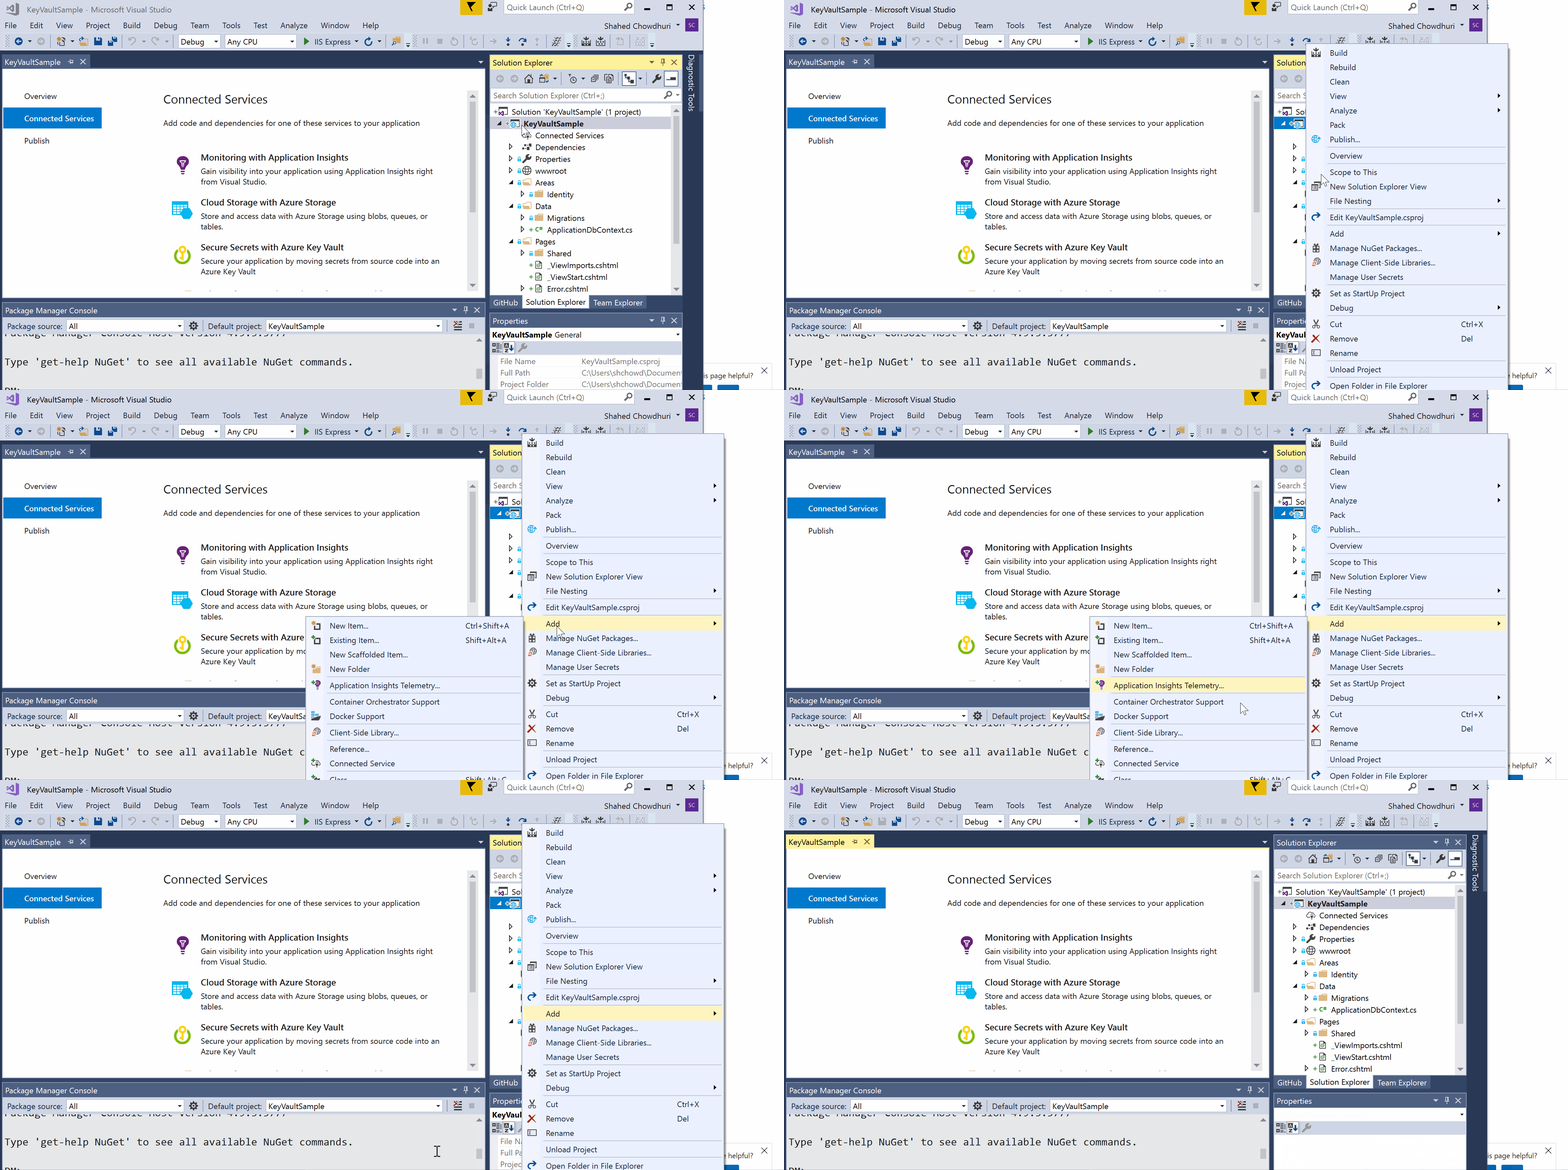
To use Visual Studio, right-click your project in Solution Explorer, click Add | Connected Service, select “Secure Secrets with Azure Key Vault” and follow the onscreen instructions.

vs2017-add-connservice

If you need help with Visual Studio, check out the official docs at:

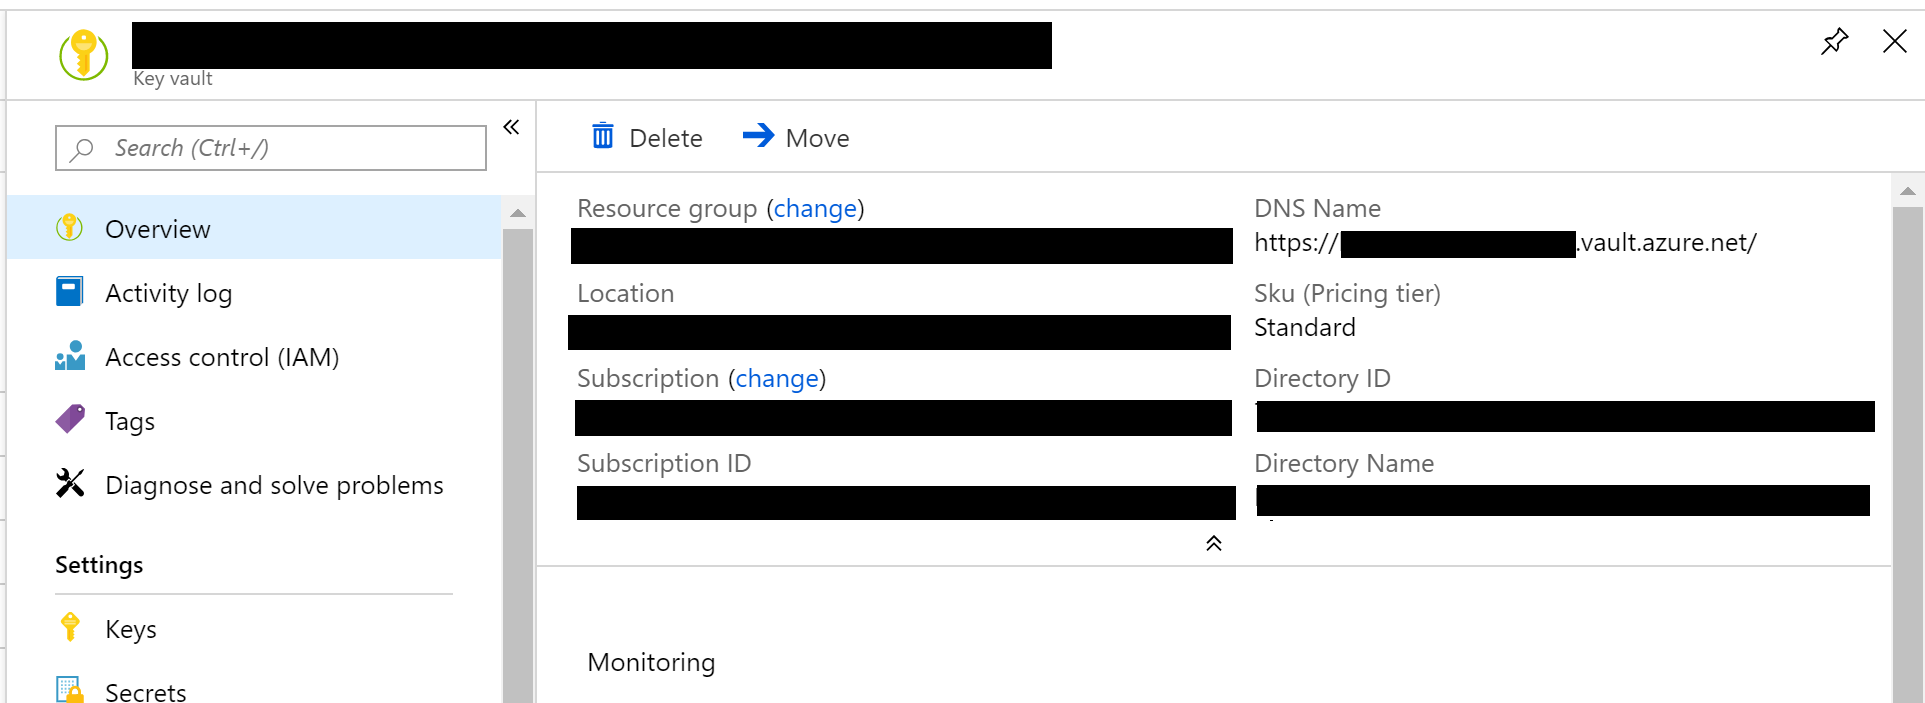
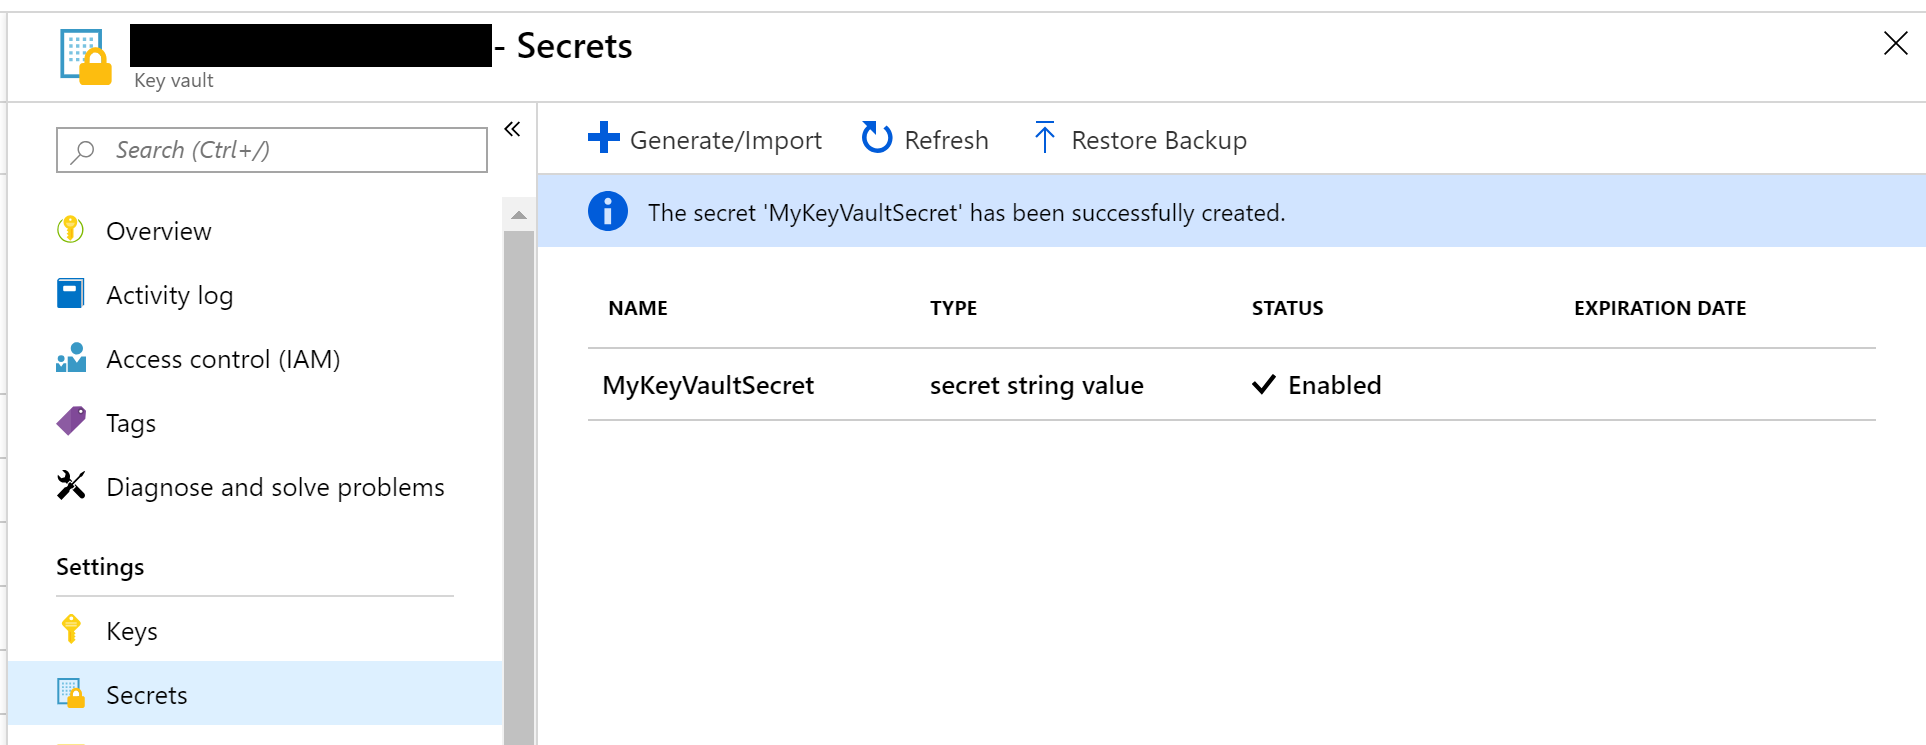
Once created, the Key Vault and its secret names (and values) can be browsed in the Azure Portal, as seen in the screenshots below:

Key Vault Details

Key Vault Details

Secret in Key Vault

Secret in Key Vault

NOTE: If you create a secret named “Category1–MySecret”, this syntax specifies a category “Category1” that contains a secret “MySecret.”

Retrieving Key Vault Secrets

Before you deploy your application to Azure, you can still access the Key Vault using Visual Studio during development. This is accomplished by using your Visual Studio sign-in identity. Even if you have multiple levels of configuration to retrieve a secret value, the app will use the config sources in the following order:

  • first, check the Key Vault.
  • if Key Vault not found, check secrets.json file
  • finally, check the appsettings.json file.

There are a few areas in your code you need to update, in order to use your Key Vault:

  1. Install the nuget packages AppAuthentication and KeyVault NuGet libraries.
    • Microsoft.Azure.Services.AppAuthentication
    • Microsoft.Azure.KeyVault
  2. Update Program.cs to configure your application to use Key Vault
  3. Inject an IConfiguration object into your controller (MVC) or page model (Razor Pages, shown below)
  4. Access specific secrets using the IConfiguration object, e.g. _configuration[“MySecret”]

Below is an example of Program.cs using the WebHostBuilder’s ConfigureAppConfiguration() method to configure Key Vault. The keyVaultEndpoint is the fully-qualified domain name of your Key Vault that you created in Azure.

...
using Microsoft.Azure.KeyVault;
using Microsoft.Azure.Services.AppAuthentication;
using Microsoft.Extensions.Configuration;
using Microsoft.Extensions.Configuration.AzureKeyVault;
...
public static IWebHost BuildWebHost(string[] args) =>
   WebHost.CreateDefaultBuilder(args)
      .ConfigureAppConfiguration((ctx, builder) =>
      {
         var keyVaultEndpoint = GetKeyVaultEndpoint();
         if (!string.IsNullOrEmpty(keyVaultEndpoint))
         {
            var azureServiceTokenProvider = new AzureServiceTokenProvider();
            var keyVaultClient = new KeyVaultClient(
               new KeyVaultClient.AuthenticationCallback(
                  azureServiceTokenProvider.KeyVaultTokenCallback));
               builder.AddAzureKeyVault(
                  keyVaultEndpoint, keyVaultClient, new DefaultKeyVaultSecretManager());
         }
      }
   ).UseStartup<Startup>()
   .Build(); 

private static string GetKeyVaultEndpoint() => "https://<VAULT_NAME>.vault.azure.net/";

NOTE: Please note that the Web Host Builder in ASP .NET Core 2.x will be replaced by the Generic Host Builder in .NET Core 3.0.

Below is an example of of a Page Model for a Razor Page, e.g. SecretPage.cshtml.cs in the sample app

...
using Microsoft.Extensions.Configuration;
public class SecretPageModel : PageModel
{
   public IConfiguration _configuration { get; set; }
   public string Message1 { get; set; }
   public string Message2 { get; set; }
   public string Message3 { get; set; } 

   public SecretPageModel(IConfiguration configuration)
   {
      _configuration = configuration;
   }

   public void OnGet()
   {
      Message1 = "My 1st key val = " + _configuration["MyKeyVaultSecret"];
      Message2 = "My 2nd key val = " + _configuration["AnotherVaultSecret"];
      Message3 = "My 3nd key val ? " + _configuration["NonExistentSecret"];
   }
}

In the above code, the configuration object is injected into the Page Model’s SecretPageModel()The values are retrieved from the collection in the OnGet() method and assigned to string properties. In the code below, the string properties are accessed from the model class in the corresponding Razor Page, SecretPage.cshtml.

@page
@model KeyVaultSample.Pages.SecretPageModel
...
<p>
 @Model.Message1
</p> 

<p>
 @Model.Message2
</p> 

<p>
 @Model.Message3
</p>

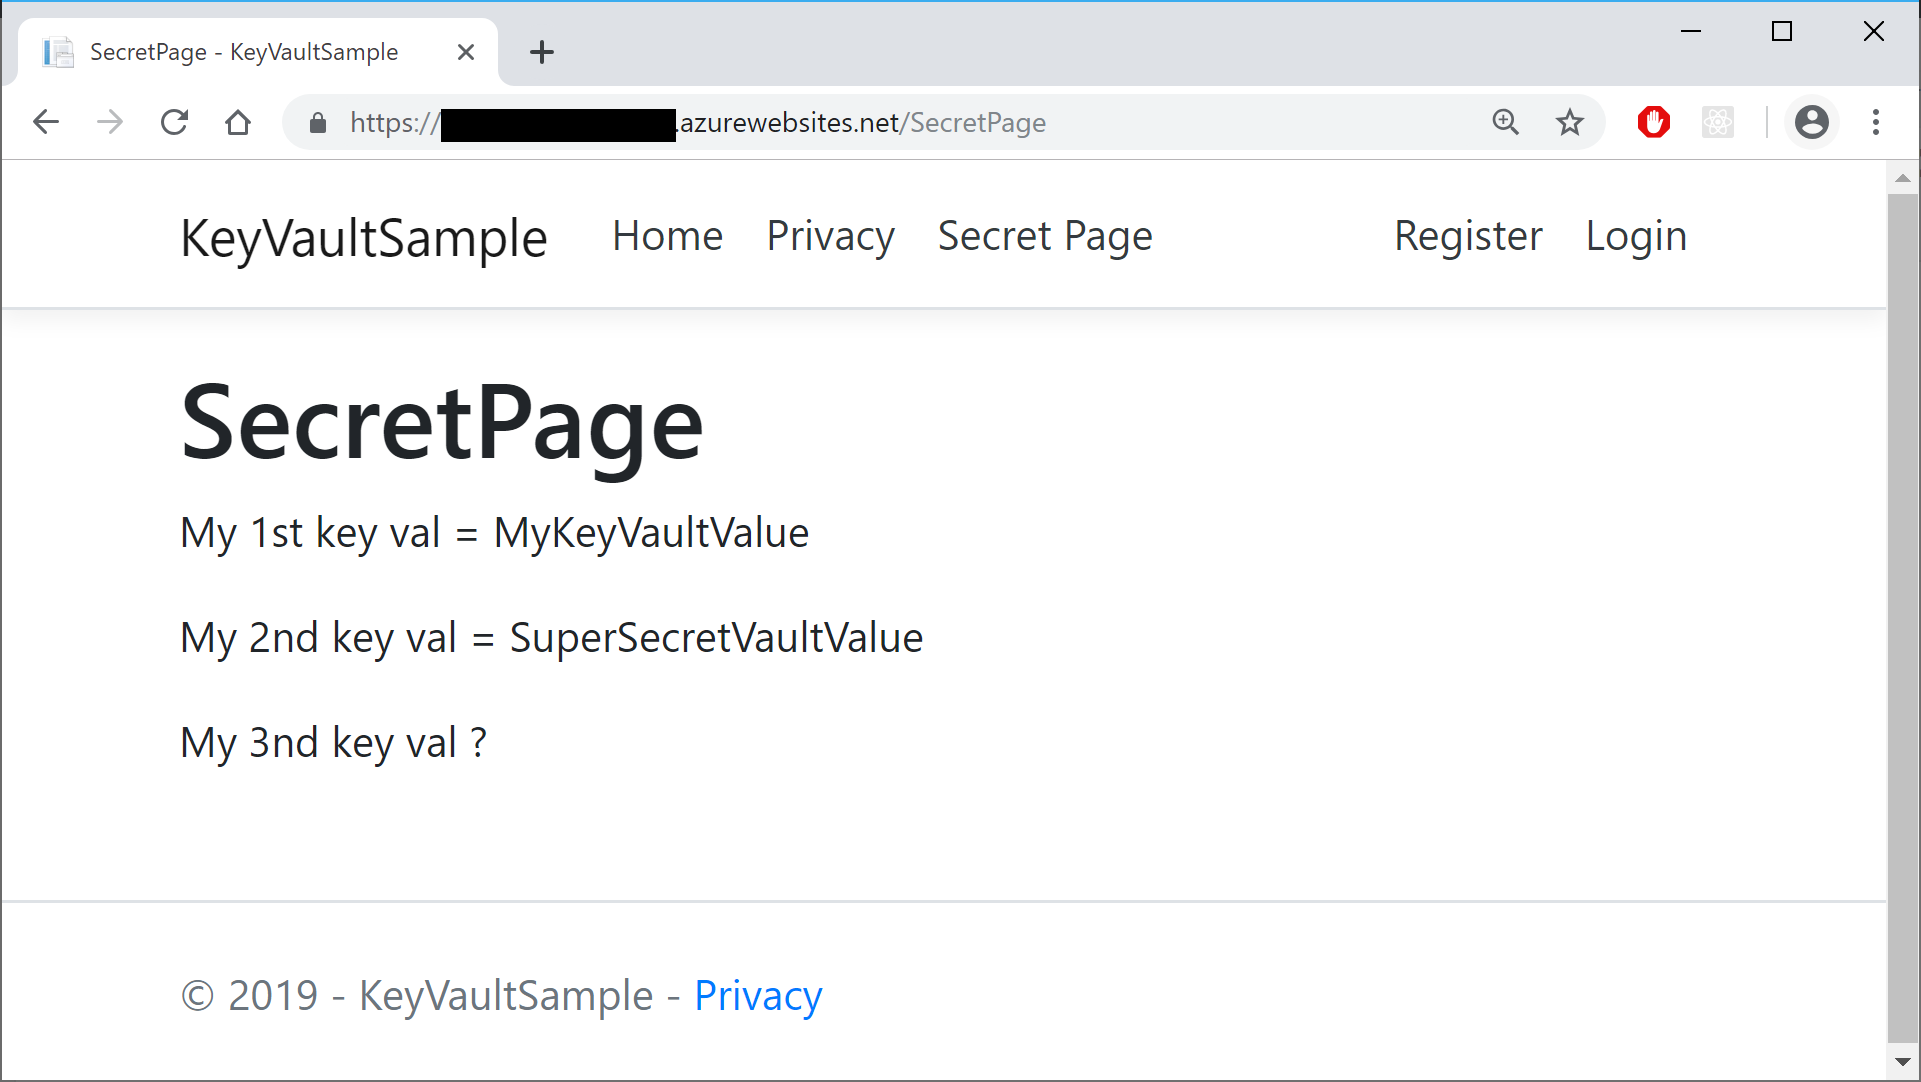
Finally, viewing the page allows you to navigate to the Secret Page to view the secret values. Note that I’ve only created 2 secret values before deploying this instance, so the 3rd value remains blank (but without generating any errors).

KeyVault-Browser-Values

Managed Service Identity

There are multiple ways to deploy your ASP .NET Core web app to Azure, including Visual Studio, Azure CLI or a CI/CD pipeline integrated with your source control system. If you need help deploying to Azure App Service, check out the following article from this blog series:

You can set up your Managed Service Identity in various ways:

  • Azure Portal: log in to the Azure Portal and add your app
  • Azure CLI: use Azure CLI commands to set up MSI
  • Visual Studio: use the VS IDE while publishing

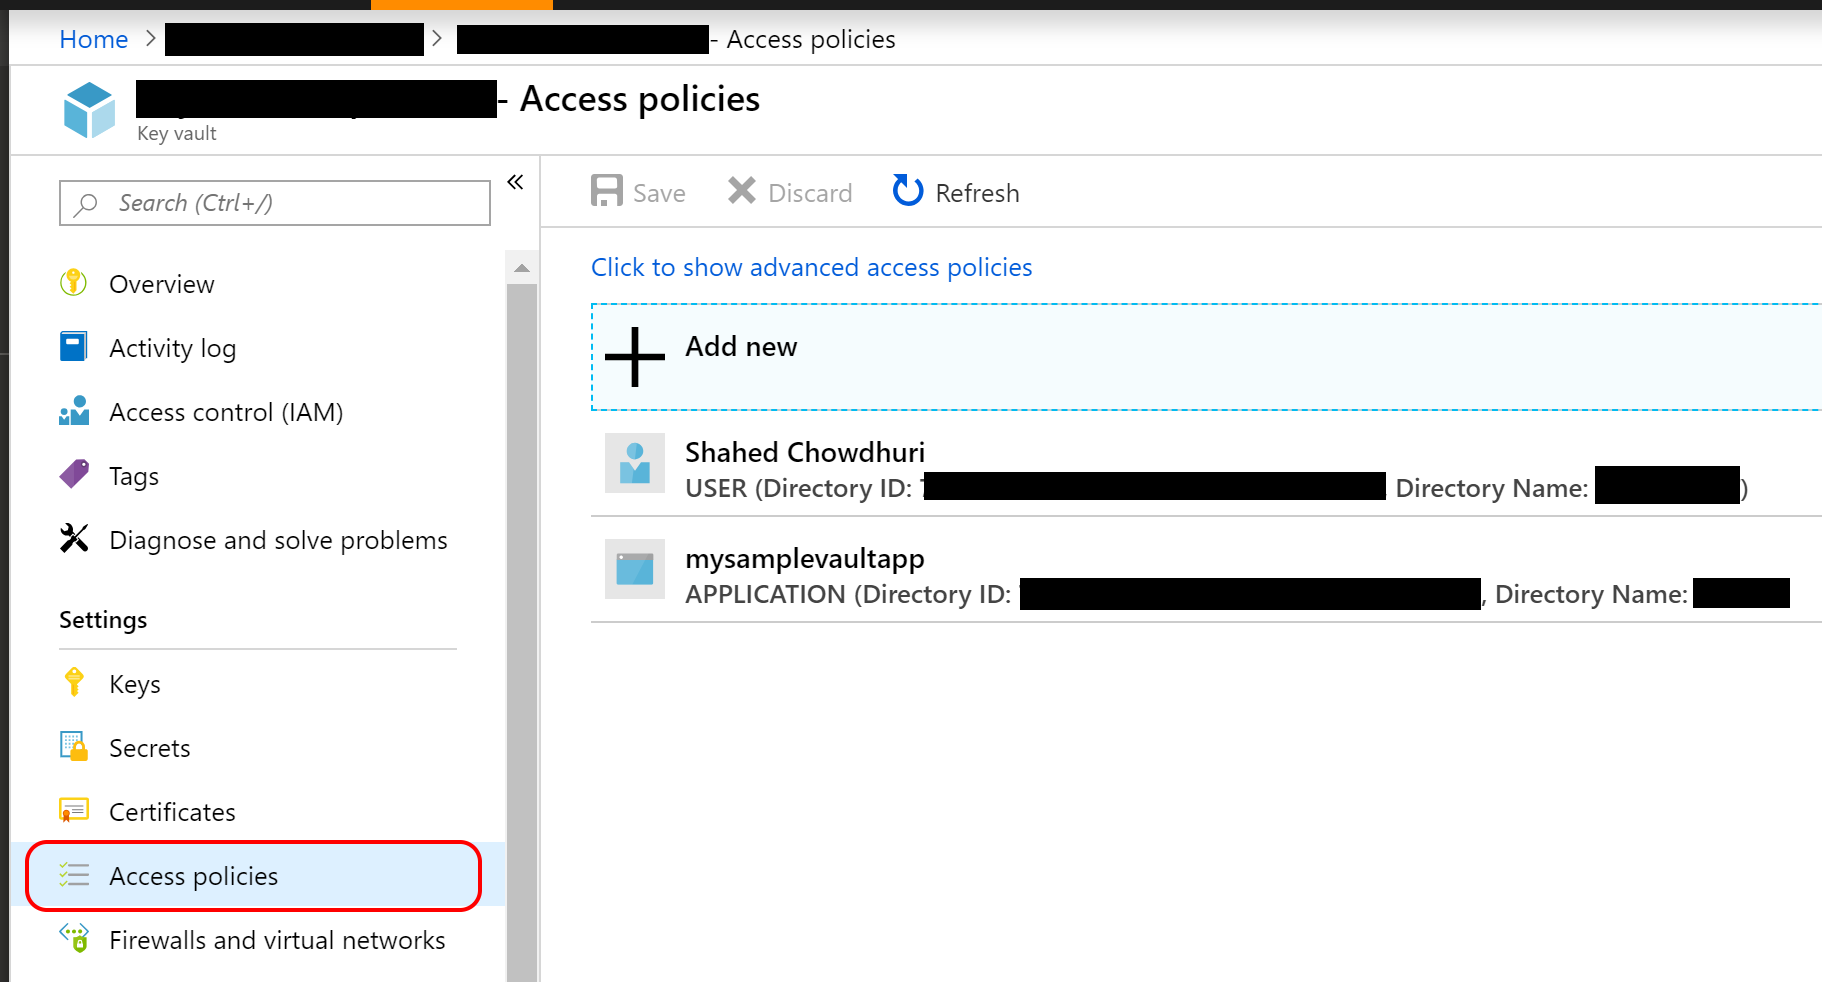
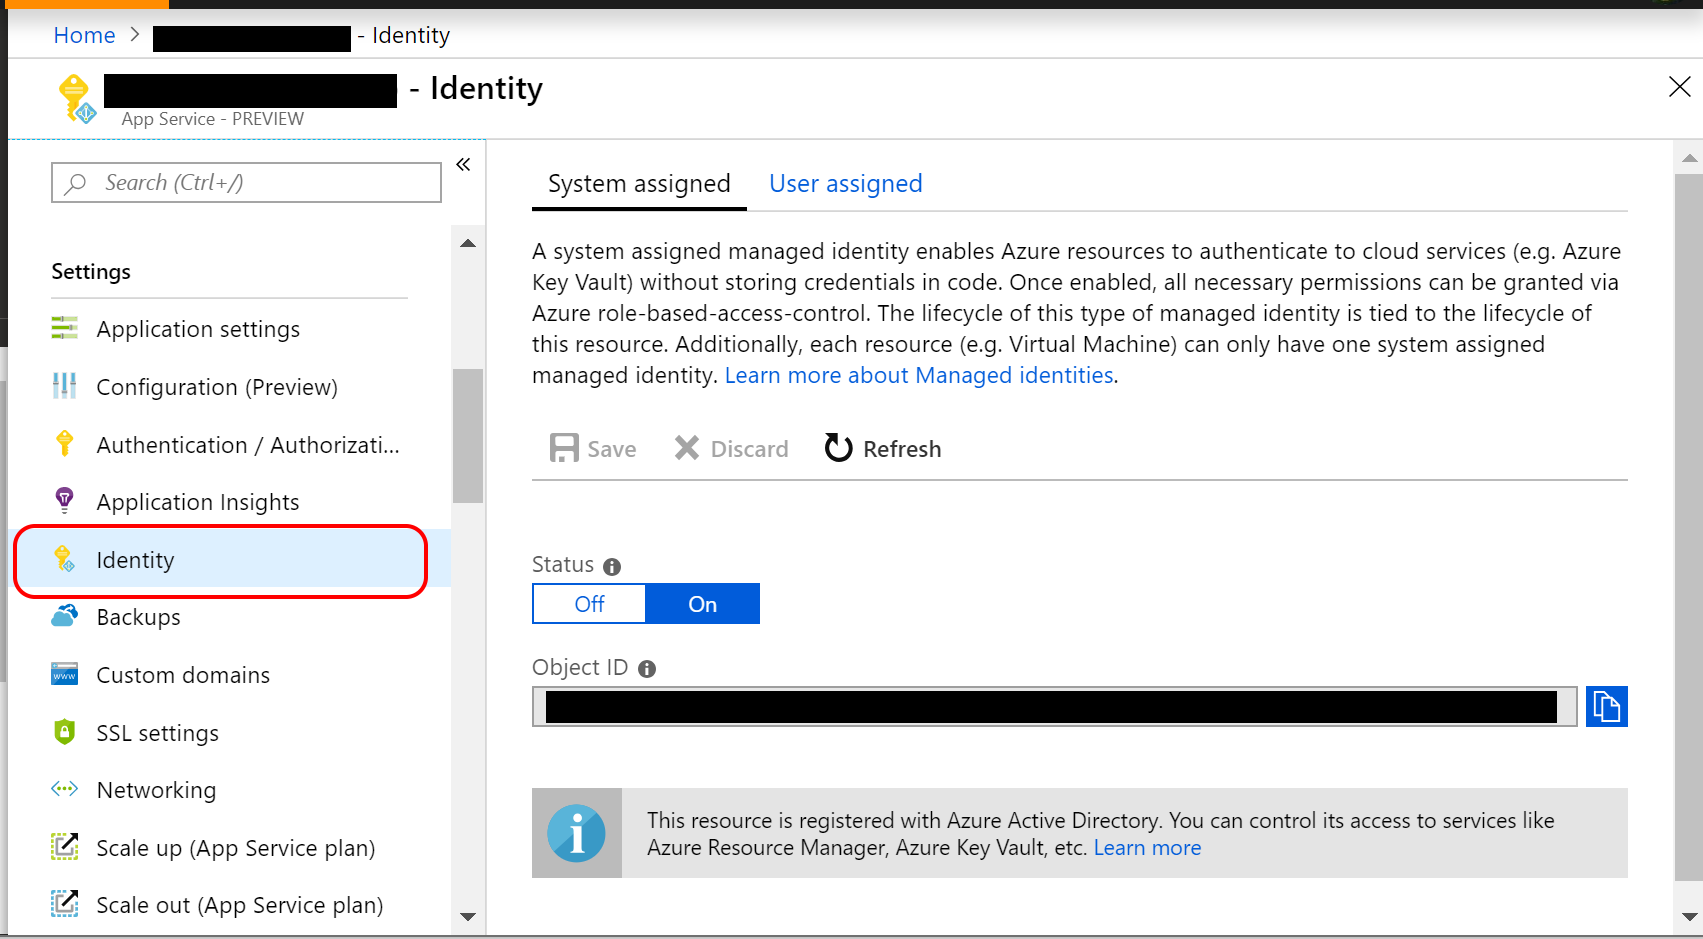
Once you’ve created your App Service (even before deploying your Web App to it), you can use the Azure Portal to add your app using Managed Service Identity. In the screenshots below, I’ve added my sample app in addition to my own user access.

  • In the Access Policies section of the Key Vault, you may add one or more access policies.
  • In the Identity section of the App Service, you may update the System-Assigned setting to “On” and make a note of the Object ID, which is defined as a “Unique identifier assigned to this resource, when it’s registered with Azure Active Directory
KeyVault-AccessPolicies

KeyVault-AccessPolicies

AppService-Identity

AppService-Identity

To use the Azure CLI to authorize an application to access (or “get”) a key vault, run “az keyvault set-policy“, followed by the vault name, the App ID and specific permissions. This is equivalent to enabling the Managed Service Identity for your Web App in the Azure Portal.

az keyvault set-policy --name "MyKeyVault" --spn <APP_ID> --secret-permissions get

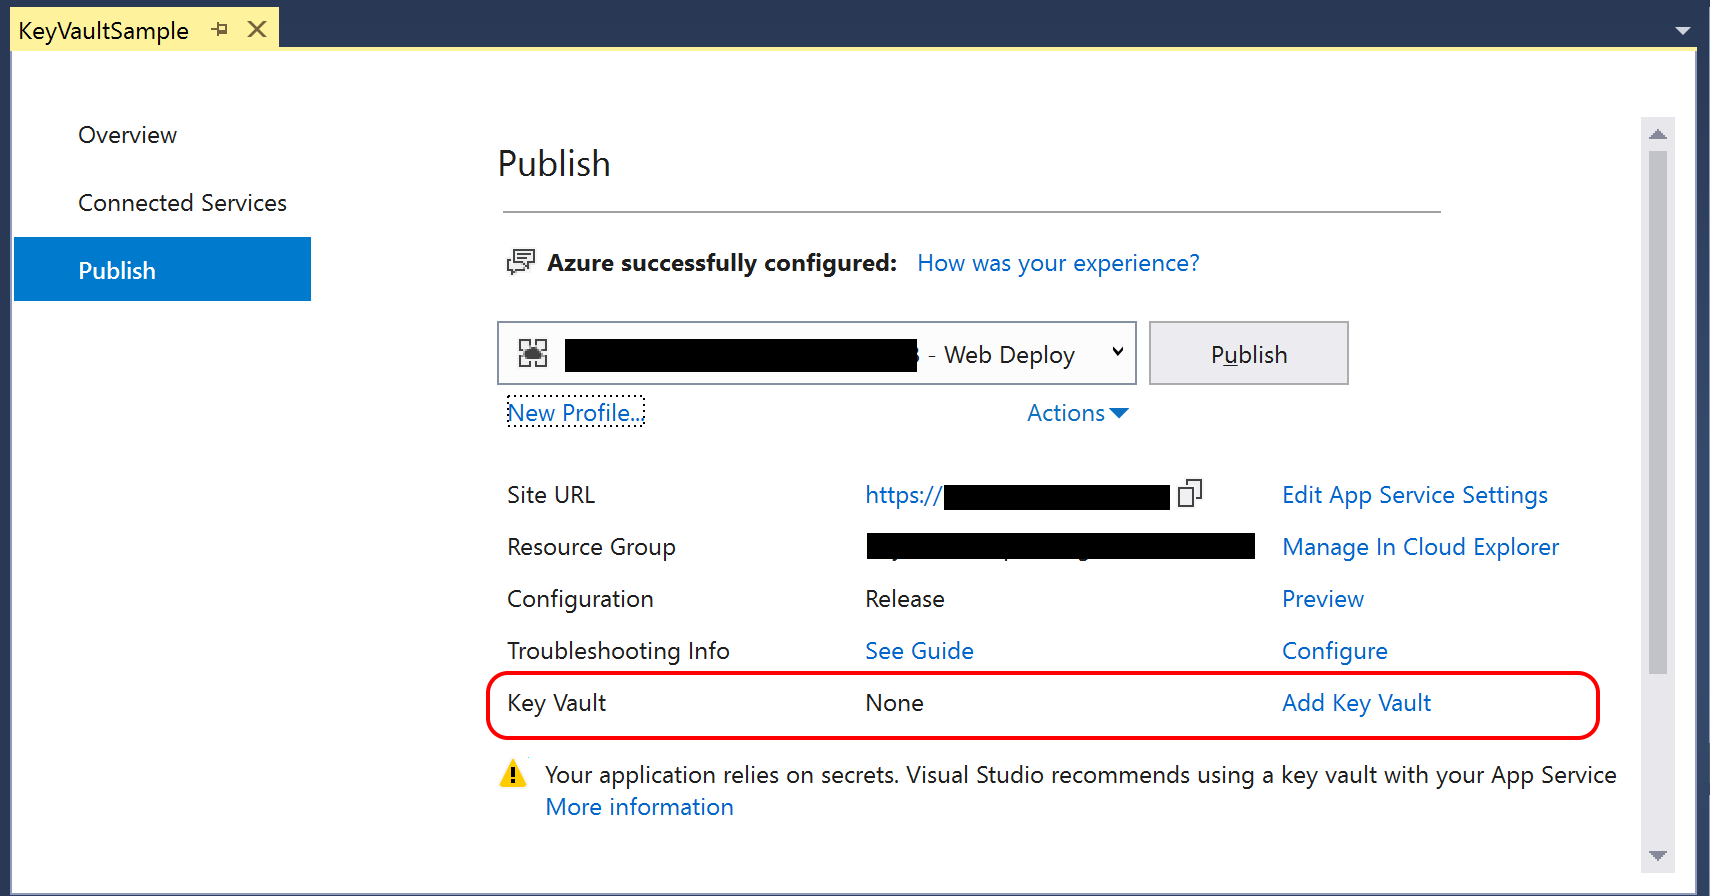
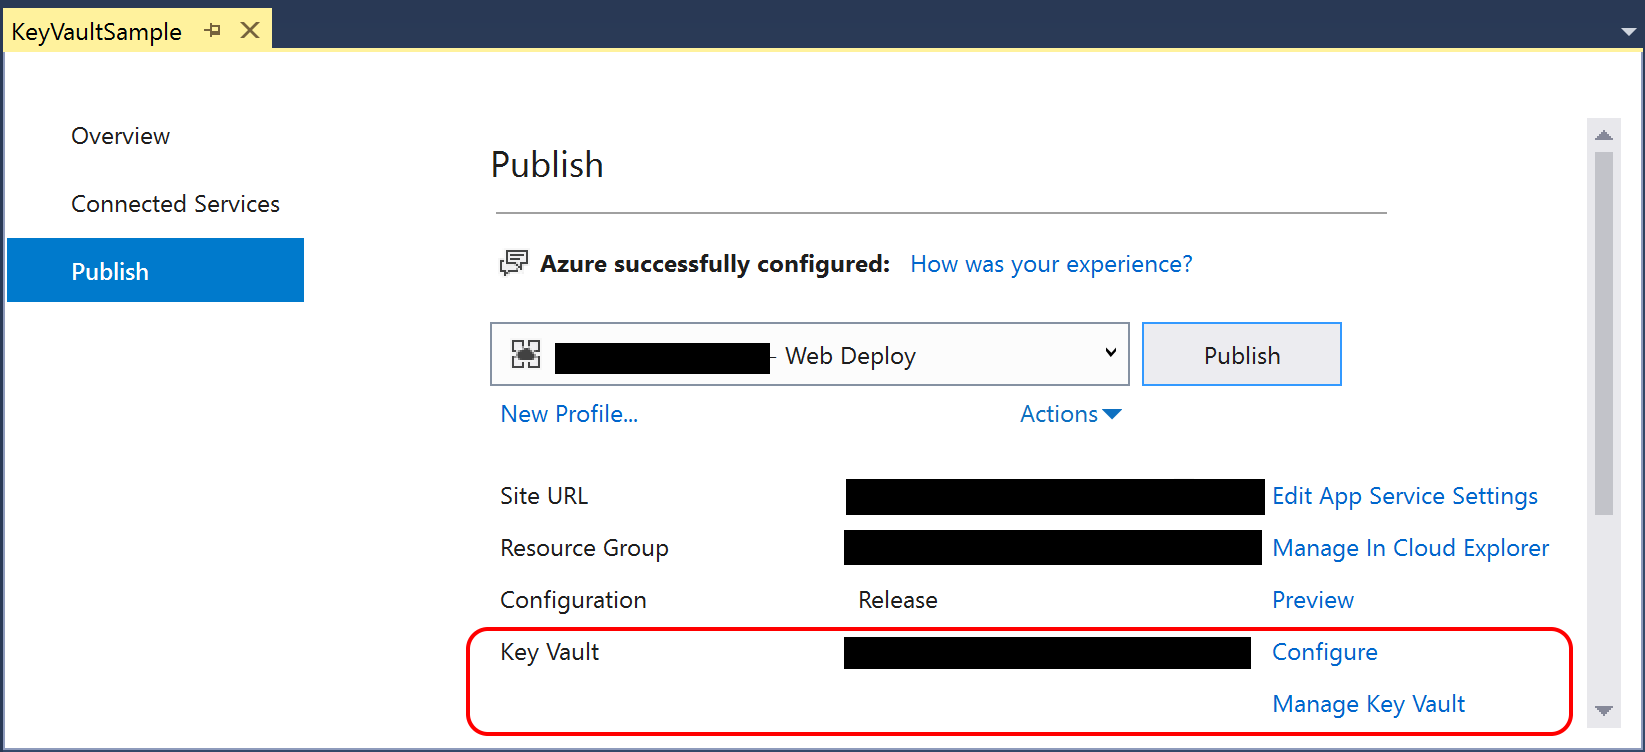
To use Visual Studio to use your key vault after deployment, take a look at the Publish screen when deploying via Visual Studio. You’ll notice that there is an option to “Add Key Vault” if it hasn’t been added yet. After you’ve added and enabled Key Vault for your application, the option will change to say “Configure” and “Manage Key Vault”.

KeyVault-BeforeAdd

Publish (before adding Key Vault)

KeyVault-Publish

Publish (Manage Key Vault after adding it)

After adding via Visual Studio during the Publish process, your Publish Profile (profile – Web Deploy.pubxml) and Launch Settings profiles (launchSettings.json) should contain the fully qualified domain name for your Key Vault in Azure. You should not include these files in your source control system.

References


Handling Errors in ASP .NET Core

By Shahed C on February 25, 2019

This is the eighth of a series of posts on ASP .NET Core in 2019. In this series, we’ll cover 26 topics over a span of 26 weeks from January through June 2019, titled A-Z of ASP .NET Core!

ASPNETCoreLogo-300x267 A – Z of ASP .NET Core!

In this Article:

This article will refer to the following sample code on GitHub:

Web Error Handling Samples: https://github.com/shahedc/ErrorHandlingWeb

H is for Handling Errors

Unless you’re perfect 100% of the time (who is?), you’ll most likely have errors in your code. If your code doesn’t build due to compilation errors, you can probably correct that by fixing the offending code. But if your application encounters runtime errors while it’s being used, you may not be able to anticipate every possible scenario.

Runtime errors may cause Exceptions, which can be caught and handled in many programming languages. Unit tests will help you write better code, minimize errors and create new features with confidence. In the meantime, there’s the good ol’ try-catch-finally block, which should be familiar to most developers.

NOTE: You may skip to the next section below if you don’t need this refresher.

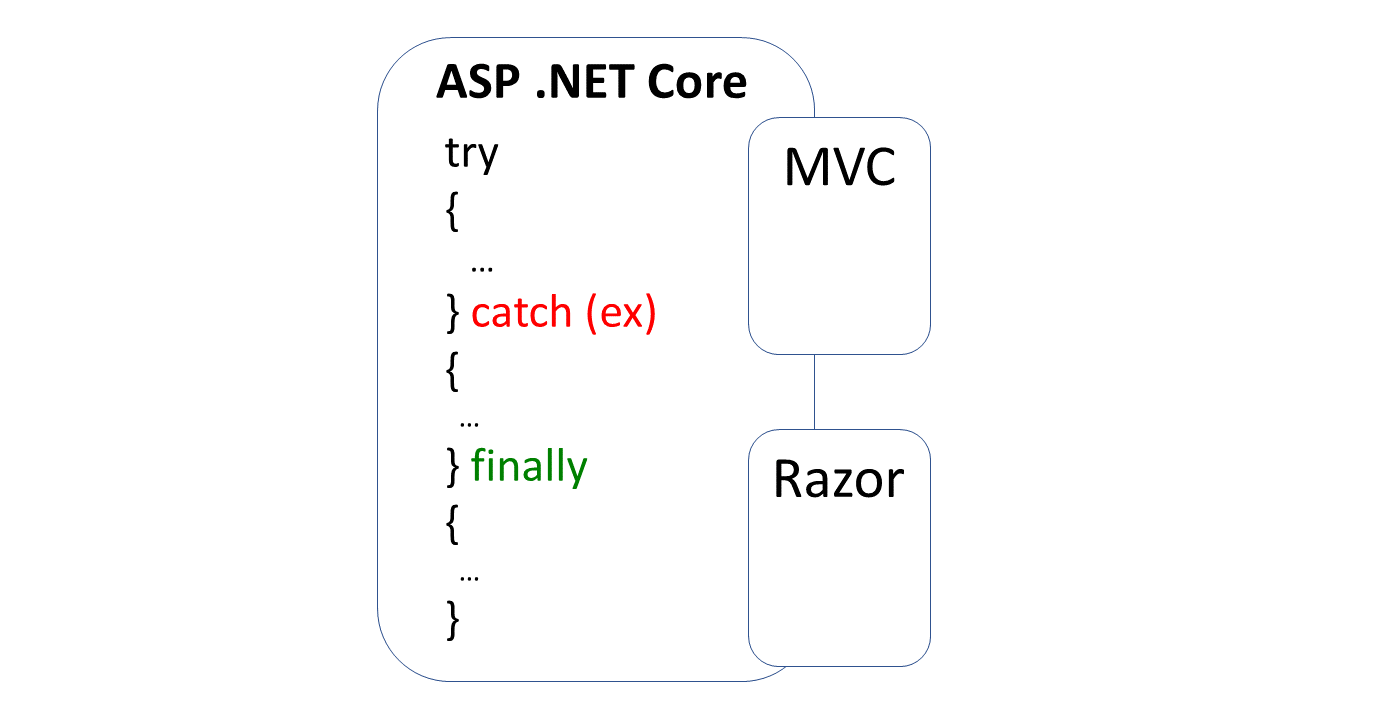
Blog-Diagram-errors

Exceptions with Try-Catch-Finally

The simplest form of a try-catch block looks something like this:

try
{
   // try something here

} catch (Exception ex)
{
  // catch an exception here
}

You can chain multiple catch blocks, starting with more specific exceptions. This allows you to catch more generic exceptions toward the end of your try-catch code.  In a string of catch() blocks, only the caught exception (if any) will cause that block of code to run.

try
{
   // try something here

} catch (IOException ioex)
{
  // catch specific exception, e.g. IOException

} catch (Exception ex)
{
  // catch generic exception here

}

Finally, you can add the optional finally block. Whether or not an exception has occurred, the finally block will always be executed.

try
{
   // try something here

} catch (IOException ioex)
{
  // catch specific exception, e.g. IOException

} catch (Exception ex)
{
  // catch generic exception here

} finally
{
   // always run this code

}

Try-Catch-Finally in Sample App

In the MVC sample app, the Reader Controller uses a Data Service from a shared .NET Standard Library to read from a data file that may exist in the Web App’s static files. It displays a view with some hard-coded data and tries to replace some data with additional information obtained from the data file.

// hard-code some data
var data1 = new DataItem
{
 Id = 1,
 SomeData = "data 1 initialized"
}; 
var data2 = new DataItem
{
 Id = 2,
 SomeData = "data 2 initialized"
}; 
var data3 = new DataItem
{
 Id = 3,
 SomeData = "data 3 initialized"
};

Then, try to read some data from a data file, to replace information in the data model.

// get data from file if possible
try
{ // Open the text file using a stream reader.
 var webRoot = _env.WebRootPath;
 var file = System.IO.Path.Combine(webRoot, @"data\datafile.txt");

 using (StreamReader sr = new StreamReader(file))
 {
 // Read the stream to a string, overwrite some data
 data2.SomeData = sr.ReadToEnd();
 }
}
catch (IOException ioException)
{
 data2.SomeData = $"IO Error: {ioException.Message}";
}
catch (Exception exception)
{
 data2.SomeData = $"Generic Error: {exception.Message}";
}
finally
{
 data3.SomeData = "All done!";
}

In the above code, you can see a series of try-catch blocks, ending with a finally block:

  1. try to read the file and overwrite some data in the 2nd data object.
  2. catch an IOException, capture the error message
  3. catch a generic Exception if a different exception has occurred, capture the generic error message
  4. finally, overwrite some data in the 3rd data object whether or not any errors have occurred.

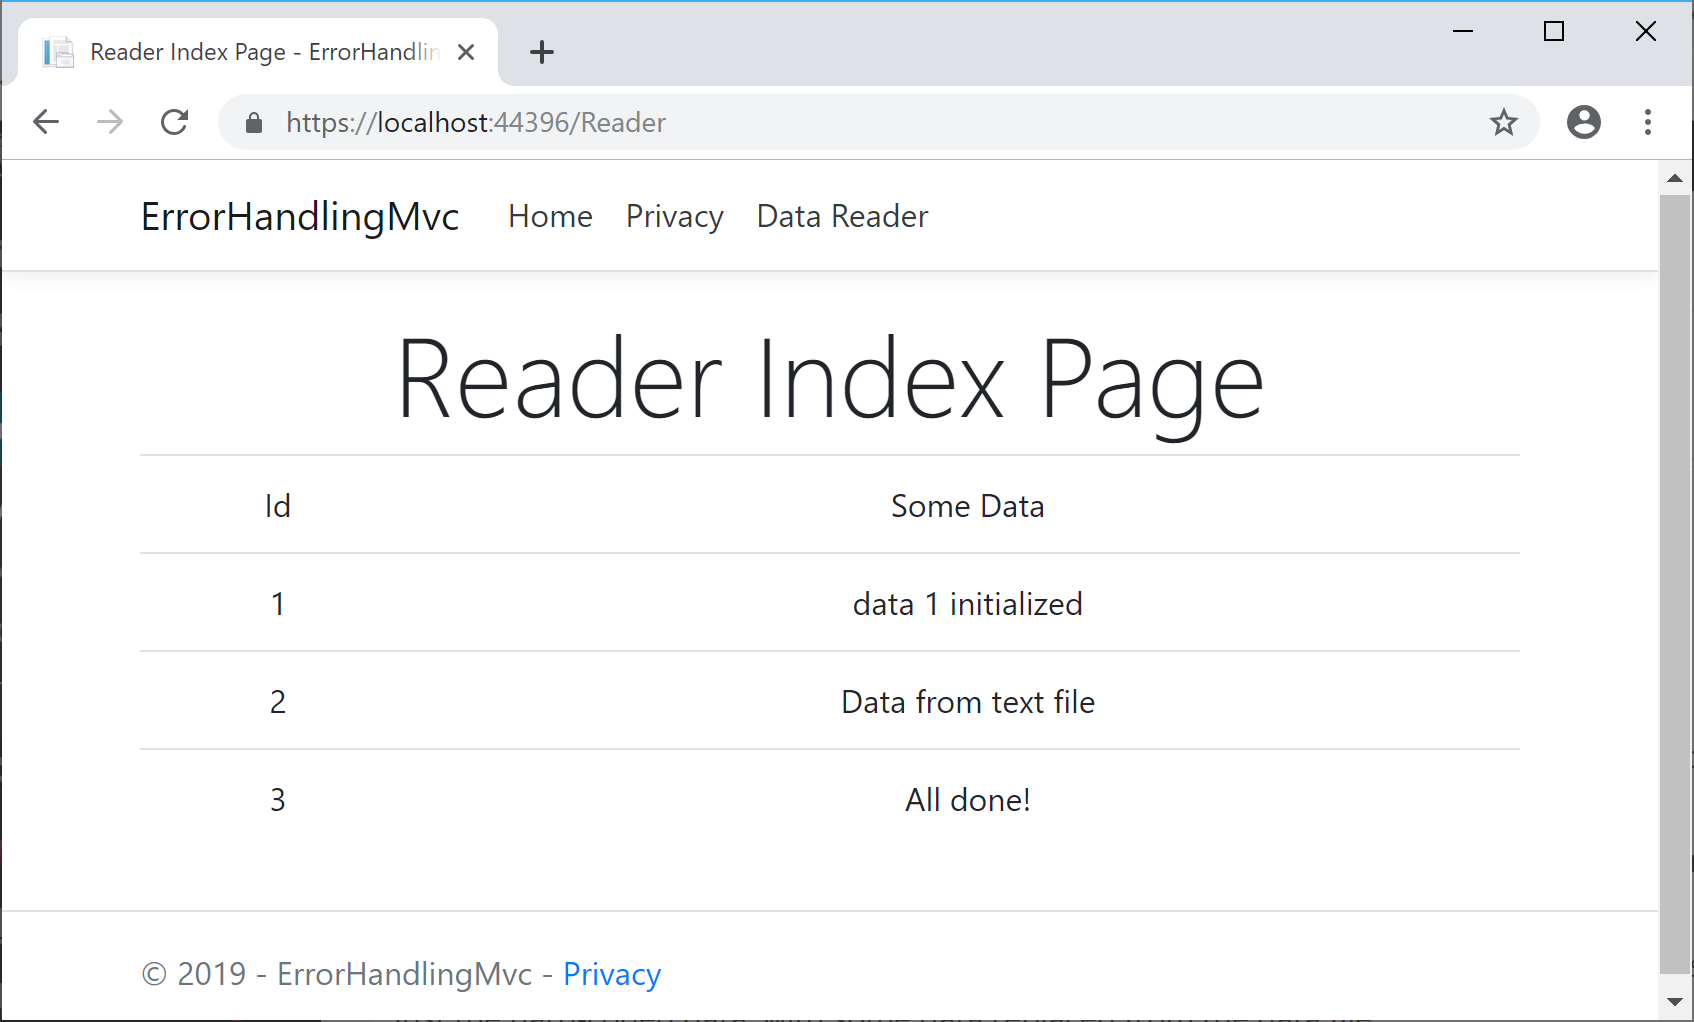
Run the MVC app and navigate to the Reader Controller. If there are no errors, you should see just the hard-coded data, with some data replaced from the data file.

ErrorApp-Success

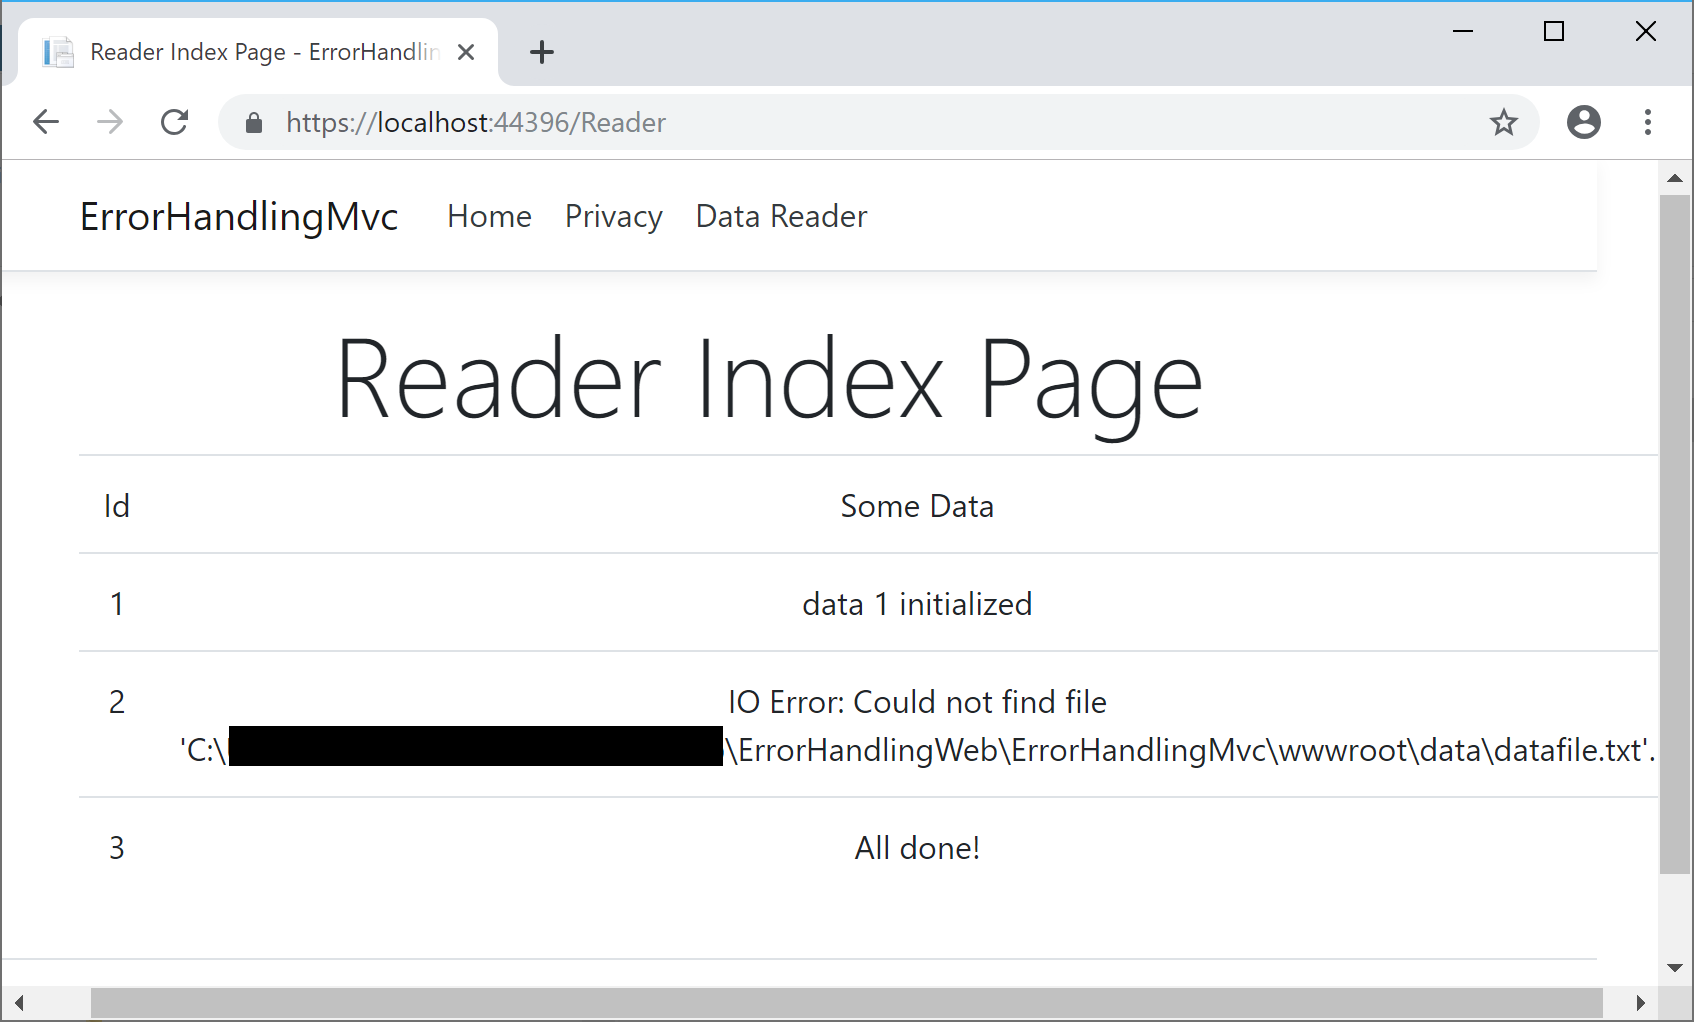
If you rename/delete the data file, then run the program again, you should see an error message as well. This reflects the IOException that occurred while attempting to read a missing file.

ErrorApp-IOError

Error Handling for MVC

In ASP .NET Core MVC web apps, unhandled exceptions are typically handled in different ways, depending on whatever environment the app is running in. The default template uses the DeveloperExceptionPage middleware in a development environment but redirects to a shared Error view in non-development scenarios. This logic is implemented in the Configure() method of the Startup.cs class.

if (env.IsDevelopment())
{
   app.UseDeveloperExceptionPage();
}
else
{
   app.UseExceptionHandler("/Home/Error");
   ...
}

The DeveloperExceptionPage middleware can be further customized with DeveloperExceptionPageOptions properties, such as FileProvider and SourceCodeLineCount.

var options = new DeveloperExceptionPageOptions
{
   SourceCodeLineCount = 2
};  
app.UseDeveloperExceptionPage(options);

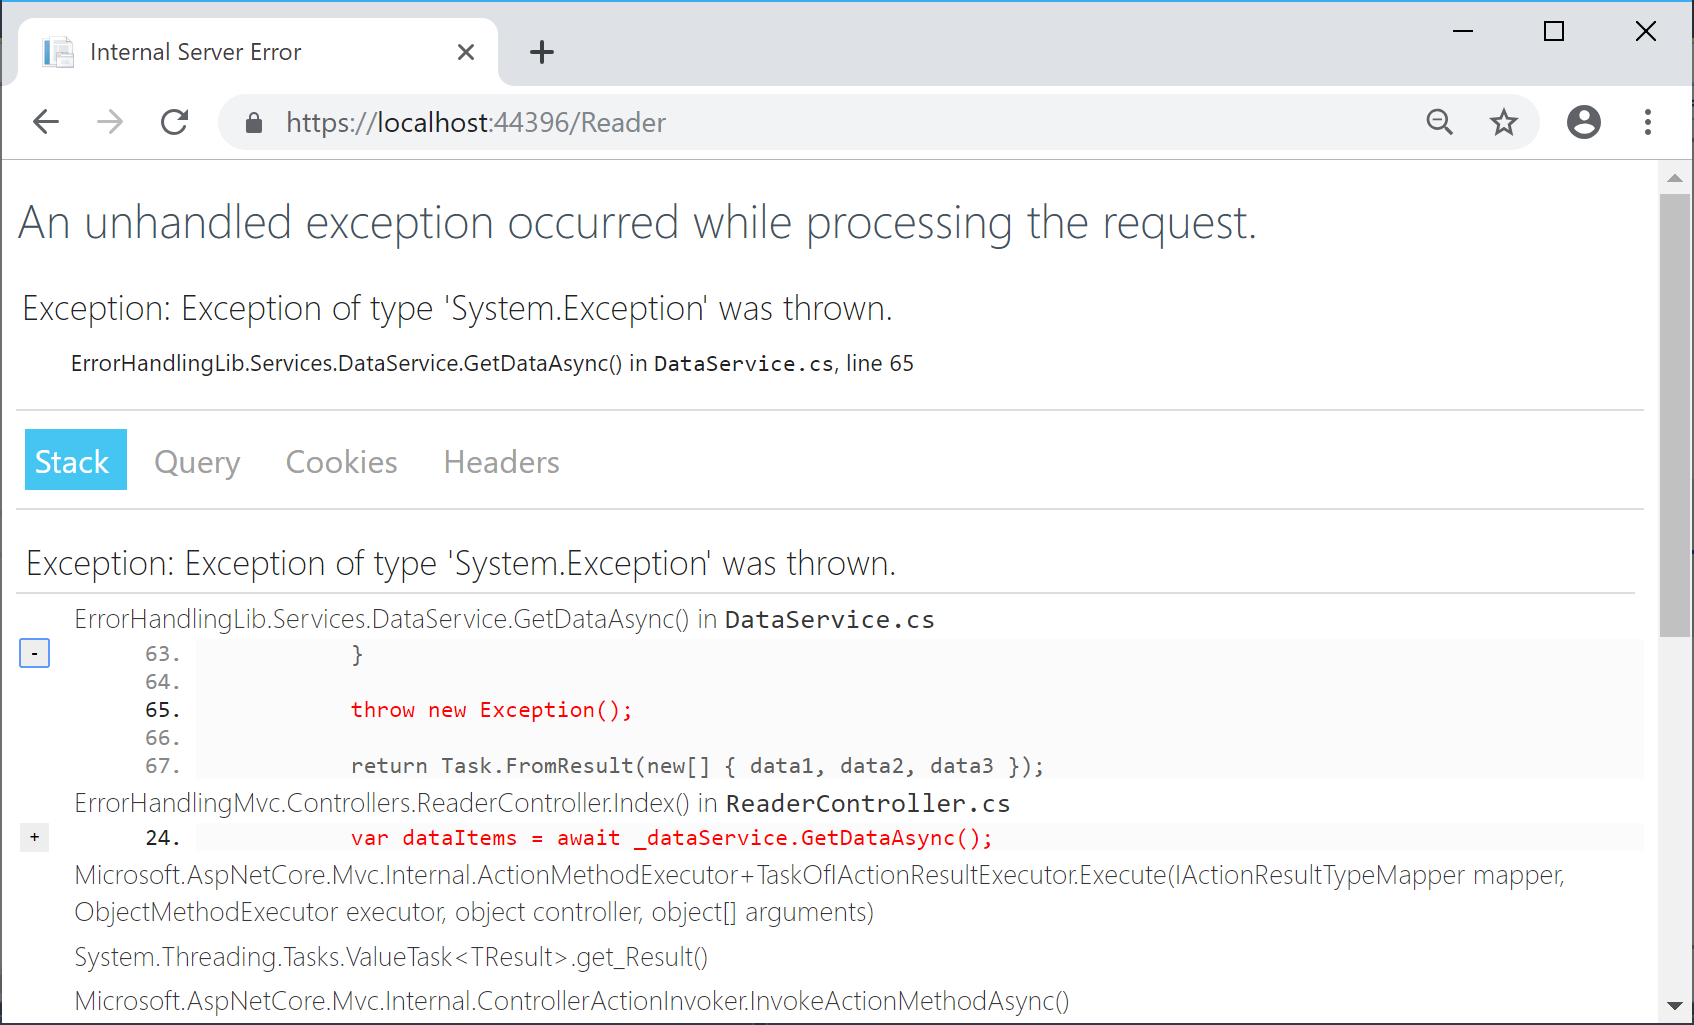
Using the snippet shown above, the error page will show the offending line in red, with a variable number of lines of code above it. The number of lines is determined by the value of SourceCodeLineCount, which is set to 2 in this case. In this contrived example, I’m forcing the exception by throwing a new Exception in my code.

ErrorApp-MvcError-Dev-SourceLine

For non-dev scenarios, the shared Error view can be further customized by updating the Error.cshtml view in the Shared subfolder. The ErrorViewModel has a ShowRequestId boolean value that can be set to true to see the RequestId value.

@model ErrorViewModel
@{
   ViewData["Title"] = "Error";
}

<h1 class="text-danger">Error.</h1>
<h2 class="text-danger">An error occurred while processing your request.</h2>

@if (Model.ShowRequestId)
{
<p>
<strong>Request ID:</strong> <code>@Model.RequestId</code>
</p>
}

<h3>header content</h3>
<p>text content</p> 

In the MVC template’s Home Controller, the Error() action method sets the RequestId to the current Activity.Current.Id if available or else it uses HttpContext.TraceIdentifier. These values can be useful during debugging.

[ResponseCache(Duration = 0, Location = ResponseCacheLocation.None, NoStore = true)]
public IActionResult Error()
{
   return View(new ErrorViewModel { 
      RequestId = Activity.Current?.Id ?? HttpContext.TraceIdentifier 
   });
}

UPDATE:

Wait… what about Web API in ASP .NET Core? After posting this article in a popular ASP .NET Core group on Facebook, I got some valuable feedback from the admin:

Dmitry Pavlov: “For APIs there is a nice option to handle errors globally with the custom middleware https://code-maze.com/global-error-handling-aspnetcore – helps to get rid of try/catch-es in your code. Could be used together with FluentValidation and MediatR – you can configure mapping specific exception types to appropriate status codes (400 bad response, 404 not found, and so on to make it more user friendly and avoid using 500 for everything). “

For more information on the aforementioned items, check out the following resources:

Later on in this series, we’ll cover ASP .NET Core Web API in more detail, when we get to “W is for Web API”. Stay tuned!

Error Handling for Razor Pages

Since Razor Pages still use the MVC middleware pipeline, the exception handling is similar to the scenarios described above. For starters, here’s what the Configure() method looks like in the Startup.cs file for the Razor Pages web app sample.

if (env.IsDevelopment())
{
   app.UseDeveloperExceptionPage();
}
else
{
   app.UseExceptionHandler("/Error");
   ...
}

In the above code, you can see the that development environment uses the same DeveloperExceptionPage middleware. This can be customized using the same techniques outlined in the previous section for MVC pages, so we won’t go over this again.

As for the non-dev scenario, the exception handler is slightly different for Razor Pages. Instead of pointing to the Home controller’s Error() action method (as the MVC version does), it points to the to the /Error page route. This Error.cshtml Razor Page found in the root level of the Pages folder.

@page
@model ErrorModel
@{
   ViewData["Title"] = "Error";
}

<h1 class="text-danger">Error.</h1>
<h2 class="text-danger">An error occurred while processing your request.</h2>

@if (Model.ShowRequestId)
{
    <p>
        <strong>Request ID:</strong> <code>@Model.RequestId</code>
    </p>
}

<h3>custom header text</h3>
<p>custom body text</p>

The above Error page for looks almost identical to the Error view we saw in the previous section, with some notable differences:

  • @page directive (required for Razor Pages, no equivalent for MVC view)
  • uses ErrorModel (associated with Error page) instead of ErrorViewModel (served by Home controller’s action method)

Logging Errors

To log errors in ASP .NET Core, you can use the built-in logging features or 3rd-party logging providers. In ASP .NET Core 2.x, the use of CreateDefaultBuilder() in Program.cs takes of care default Logging setup and configuration (behind the scenes).

public static IWebHostBuilder CreateWebHostBuilder(string[] args) =>
   WebHost.CreateDefaultBuilder(args)
      .UseStartup<Startup>();

NOTE: The Web Host Builder is being replaced by the Generic Host Builder in ASP .NET Core 3.0, but you can expect similar initial behavior. For more information on Generic Host Builder, take a look at the previous blog post in this series: Generic Host Builder in ASP .NET Core.

The host sets up the logging configuration for you, e.g.:

.ConfigureLogging((hostingContext, logging) =>
{
   logging.AddConfiguration(hostingContext.Configuration.GetSection("Logging"));
   logging.AddConsole();
   logging.AddDebug();
   logging.AddEventSourceLogger();
})

Since ASP .NET Core is open-source, you can find the above snippet (or something similar) on Github. Here is a link to the 2.2 release of WebHost:

To make use of error logging (in addition to other types of logging) in your MVC web app, you may call the necessary methods in your controller’s action methods. Here, you can log various levels of information, warnings and errors at various severity levels.

As seen in the snippet below, you have to do the following in your MVC Controller that you want to add Logging to:

  1. Add using statement for Logging namespace
  2. Add a private readonly variable for an ILogger object
  3. Inject an ILogger<model> object into the constructor
  4. Assign the private variable to the injected variable
  5. Call various log logger methods as needed.
...
using Microsoft.Extensions.Logging;

public class MyController: Controller
{
   ...
   private readonly ILogger _logger; 

   public MyController(..., ILogger<MyController> logger)
   {
      ...
      _logger = logger;
   }
   
   public IActionResult MyAction(...)
   {
      _logger.LogTrace("log trace");
      _logger.LogDebug("log debug");
      _logger.LogInformation("log info");
      _logger.LogWarning("log warning");
      _logger.LogError("log error");
      _logger.LogCritical("log critical");
   }
}

In Razor Pages, the logging code will go into the Page’s corresponding Model class. As seen in the snippet below, you have to do the following to the Model class that corresponds to a Razor Page:

  1. Add using statement for Logging namespace
  2. Add a private readonly variable for an ILogger object
  3. Inject an ILogger<model> object into the constructor
  4. Assign the private variable to the injected variable
  5. Call various log logger methods as needed.
...
using Microsoft.Extensions.Logging;

public class MyPageModel: PageModel
{
   ...
   private readonly ILogger _logger;

   public MyPageModel(..., ILogger<MyPageModel> logger)
   {
      ...
      _logger = logger; 
   }
   ...
   public void MyPageMethod() 
   {
      ... 
      _logger.LogInformation("log info"); 
      _logger.LogError("log error");
      ...
   }
} 

You may have noticed that Steps 1 through 5 are pretty much identical for MVC and Razor Pages. This makes it very easy to quickly add all sorts of logging into your application, including error logging.

Transient fault handling

Although it’s beyond the scope of this article, it’s worth mentioning that you can avoid transient faults (e.g. temporary database connection losses) by using some proven patterns, practices and existing libraries. To get some history on transient faults, check out the following article from the classic “patterns & practices”. It describes the so-called “Transient Fault Handling Application Block”.

More recently, check out the docs on Transient Fault Handling:

And now in .NET Core, you can add resilience and transient fault handling to your .NET Core HttpClient with Polly!

You can get more information on the Polly project on the official Github page:

References


Deploying ASP .NET Core to Azure App Service

By Shahed C on January 28, 2019

This is the fourth of a new series of posts on ASP .NET Core for 2019. In this series, we’ll cover 26 topics over a span of 26 weeks from January through June 2019, titled A-Z of ASP .NET Core!

ASPNETCoreLogo-300x267 A – Z of ASP .NET Core!

In this Article:

Before you begin, make sure you sign in to Azure, or create a new trial account first to follow along.

D is for Deploying to Azure App Service

In this article, we’ll explore several options for deploying an ASP .NET Core web app to Azure App Service in the cloud. From the infamous Right-Click-Publish to fully automated CI/CD, you’ll learn about the latest Deployment Center option in the Azure Portal for App Service for web apps.

NOTE: If you’re looking for information on deploying to Docker or Kubernetes, please check out the following docs instead:


Right-Click Publish (aka Friends Don’t Let Friends Right-Click Publish)

If you’ve made it this far, you may be thinking one of the following:
a. “Hey, this is how I deploy my web apps right now!”
or
b. “Hey wait a minute, I’ve heard that you should never do this!”

Well, there is a time and place for right-click publish. There have been many debates on this, so I won’t go into the details, but here are some resources for you to see what others are saying:

Tweet from Geoffrey Huntley: https://twitter.com/GeoffreyHuntley/status/994345821276536832

So, what’s a web developer to do? To quote from the aforementioned MSDN article, “Continuing with the theme of prototyping and experimenting, right click publish is the perfect way for existing Visual Studio customers to evaluate Azure App Service (PAAS). By following the right click publish flow you get the opportunity to provision new instances in Azure and publish your application to them without leaving Visual Studio:”

In other words, you can use this approach for a quick test or demo, as shown in the screenshots below for Visual Studio.

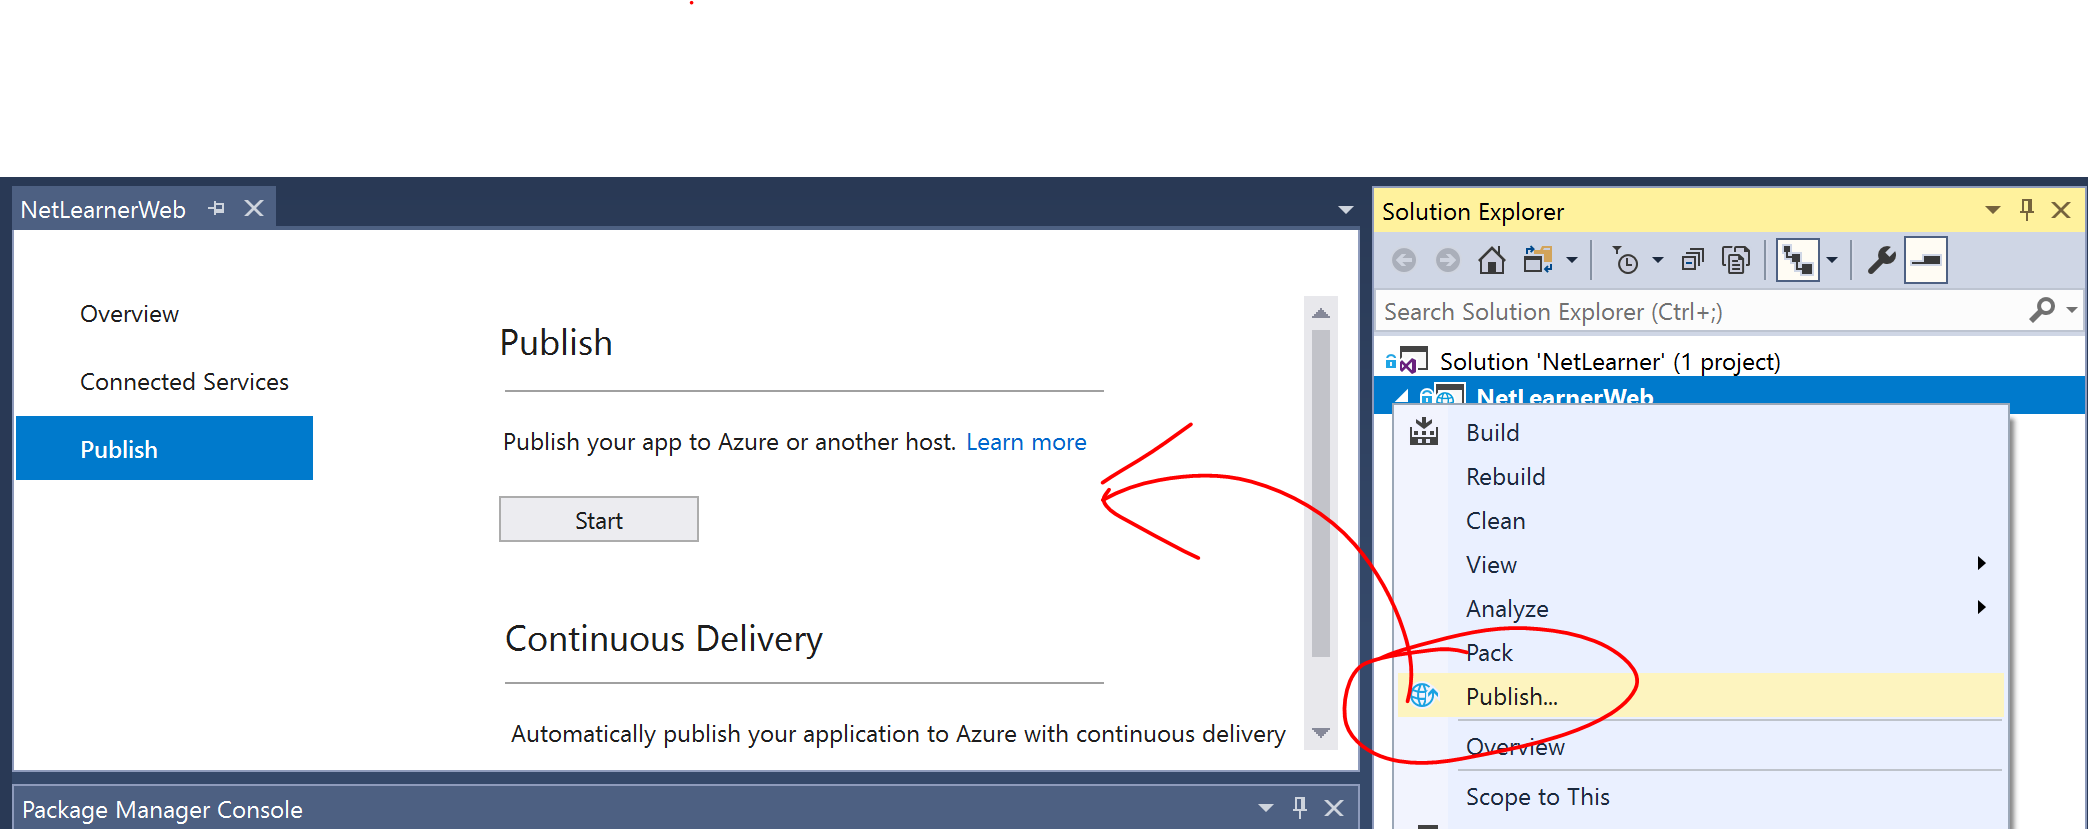
  1. Right-click your ASP .NET Core web app project in Solution Explorer and select Publish.
  2. Click the Start button on the screen that appears and follow the onscreen instructions.
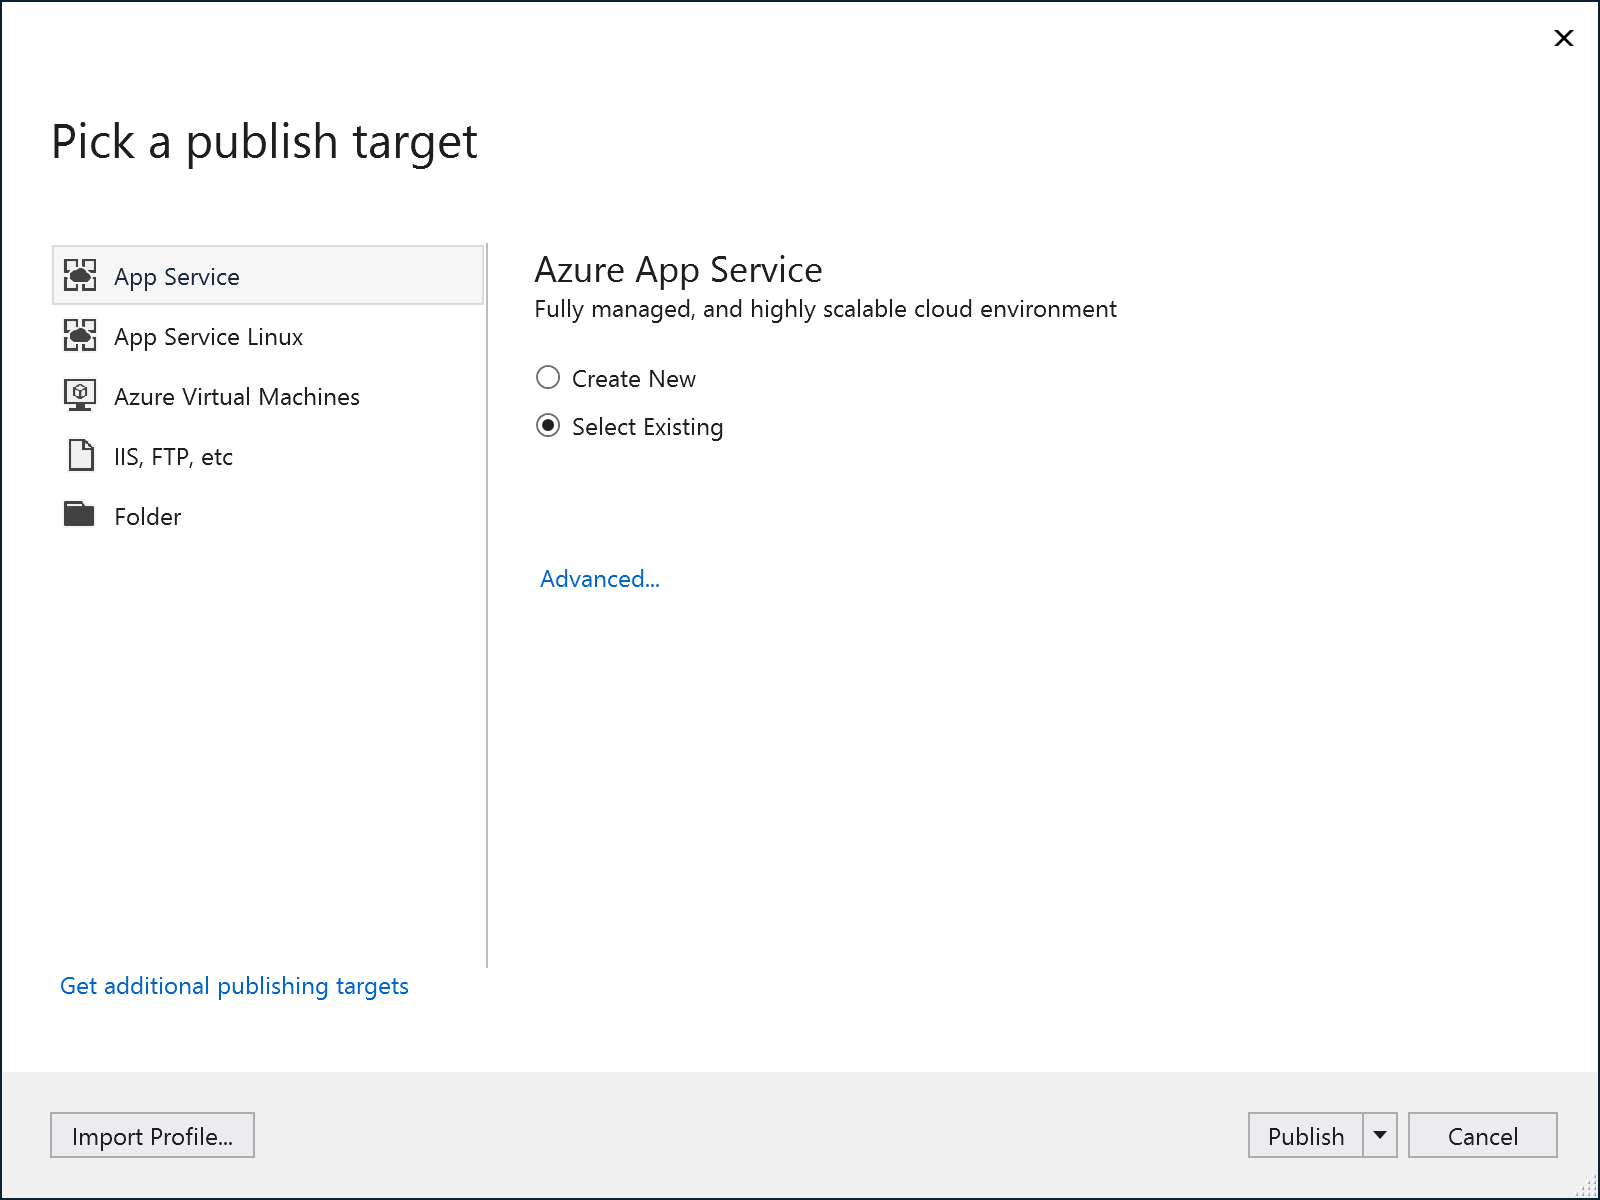
  3. Ensure that you’re logged in to the correct Azure subscription account you want to publish to.
VS2017-RightClick-Publish

Right-click Publish your project from Solution Explorer

Follow the onscreen instructions

Follow the onscreen instructions

Continue reading

Real-time ASP .NET Core Web Apps with SignalR

By Shahed C on December 23, 2018

This is the twelfth of a new series of posts on ASP .NET Core. In this post, we’ll learn about the use of SignalR to build real-time functionality in your ASP NET Core web apps. SignalR can also be used to add real-time functionality to desktop applications, mobile apps and Azure Functions.

ASPNETCoreLogo-300x267

In this Article:

What is SignalR?

SignalR has been around for 5+ years now, allowing ASP .NET developers to easily include real-time features in their web applications. Fast forward to 2018, SignalR Core is now available with ASP .NET Core (as of 2.1) as a cross-platform solution to add real-time features to web apps and more!

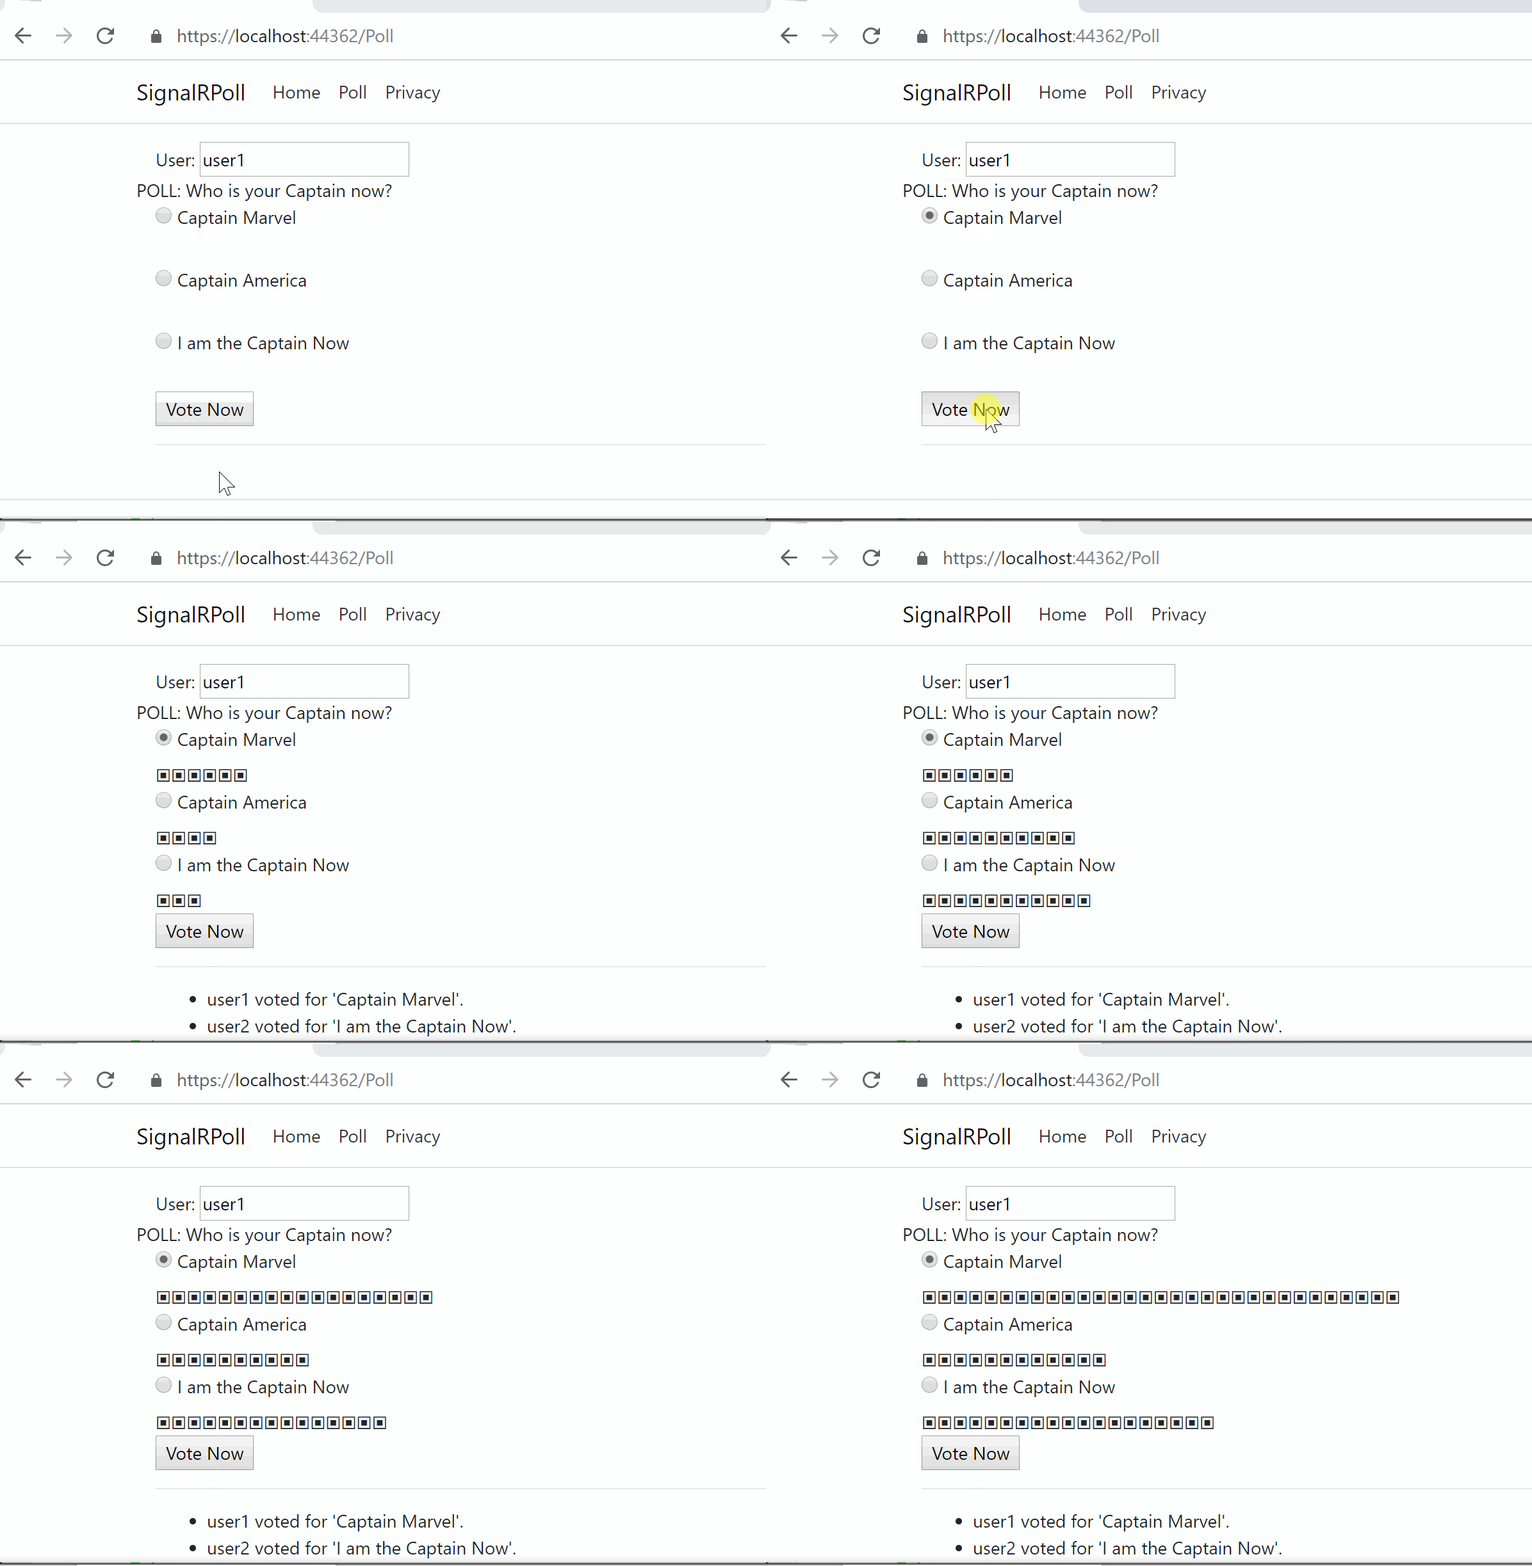
In this article, we’ll go over SignalR concepts, using a new sample I developed to allow web users to vote in a real-time online poll. Before you begin, take a look at the sample code project on GitHub:

Web SignalR Core Samples on GitHub: https://github.com/shahedc/SignalRCoreSamples

I ran a couple of polls on Facebook and Twitter to see what the dev community wanted to see. On Twitter, the #1 choice was “Polling/Voting app” followed by “Planning Poker App” and “Real-time game”. On Facebook, the #1 choice was “Real-time game” followed by “Polling/voting app”. As a result, I’ve decide to complement this article with a polling sample app, and I plan to work on other ideas in 2019.

More importantly, Brady Gaster suggested that the sample app should definitely be “Not. Chat.” 🙂

In the sample project, take a look at the SignalRPoll project to see how the polling feature has been implemented. In order to create a project from scratch, you’ll be using both server-side and client-side dependencies.

Continue reading