This is the seventh of a new series of posts on ASP .NET Core 3.1 for 2020. In this series, we’ll cover 26 topics over a span of 26 weeks from January through June 2020, titled ASP .NET Core A-Z! To differentiate from the 2019 series, the 2020 series will mostly focus on a growing single codebase (NetLearner!) instead of new unrelated code snippets week.
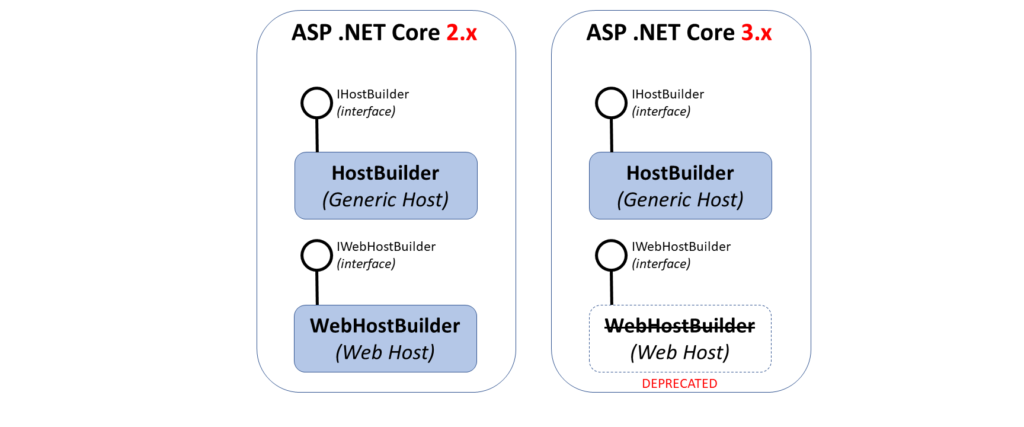
The Generic Host Builder in ASP .NET Core was introduced in v2.1, but only meant for non-HTTP workloads. However, it has now replaced the Web Host Builder as of v3.0 in 2019.
Generic Host Builder in ASP .NET Core 3.x
History Lesson: Generic Host Builder in 2.x
So, if the Generic Host Builder wasn’t used for web hosting in v2.x, what was it there for? The aforementioned non-HTTP workloads include a number of capabilities according to the 2.2 documentation, including:
app config, e.g. set base path, add hostsettings.json, env variables, etc
dependency injection, e.g. various hosted services
logging capabilities, e.g. console logging
The HostBuilder class is available from the following namespace, implementing the IHostBuilder interface:
using Microsoft.Extensions.Hosting;
At a minimum, the Main() method of your .NET Core app would look like the following:
public static async Task Main(string[] args)
{
   var host = new HostBuilder()
      .Build();

   await host.RunAsync();
}
Here, the Build() method initializes the host, so (as you may expect) it can only be called once for initialization. Additional options can be configured by calling the ConfigureServices() method before initializing the host with Build().
var host = new HostBuilder()
   .ConfigureServices((hostContext, services) =>
   {
      services.Configure<HostOptions>(option =>
      {
         // option.SomeProperty = ...
      });
   })
   .Build();
Here, the ConfigureServices() method takes in a HostBuilderContext and an injected collection of IServiceCollection services. The options set in the Configure() can be used to set additional HostOptions. Currently, HostOptions just has one property, i.e. ShutdownTimeout.
You can see more configuration capabilities in the official sample, broken down into the snippets below:
The WebHostBuilder class was made available from the following namespace (specific to ASP .NET Core), implementing the IWebHostBuilder interface:
using Microsoft.AspNetCore.Hosting;
The Web Host Builder in ASP .NET Core was used for hosting web apps in v2.x. As mentioned in the previous section, it has since been replaced by the Generic Host Builder as of v3.0. At a minimum, the Main() method of your ASP .NET Core 2.x web app would have looked like the following:
public class Program
{
   public static void Main(string[] args)
   {
      CreateWebHostBuilder(args).Build().Run();
   }

   public static IWebHostBuilder CreateWebHostBuilder(string[] args) =>
      WebHost.CreateDefaultBuilder(args)
         .UseStartup<Startup>();
}
If you’re not familiar with the shorthand syntax of the helper method CreateWebHostBuilder() shown above, here’s what it would normally look like, expanded:
public static IWebHostBuilder CreateWebHostBuilder(string[] args)
{
   return WebHost.CreateDefaultBuilder(args).UseStartup<Startup>();
}
NOTE: This type of C# syntax is known as an Expression Body Definition, introduced for methods in C# 6.0, and additional features in C# 7.0.
The CreateDefaultBuilder() method performs a lot of “magic” behind the scenes, by making use of pre-configured defaults. From the official documentation, here is a summary of the default configuration from the Default Builder:
use Kestrel as the web server
configure it using the application’s configuration providers,
(Coming soon) IIS In-Process Modules in ASP .NET Core
Generic Host Builder for Web Apps in 3.x
As of 2019, ASP .NET Core 3.x allows you to use the updated Generic Host Builder instead of the Web Host Builder in your web apps. The ASP .NET Core templates were updated to include the Generic Host Builder as of v3.0 Preview 2. You should use v3.1 since it’s a LTS (Long-Time Support) release.
At a minimum, the Main() method of your .NET Core 3.1 web app would now look like the following:
This CreateHostBuilder() method in the 3.x template looks very similar to the 2.x call to CreateWebHostBuilder() mentioned in the previous section. In fact, the main difference is that the call to WebHost.CreateDefaultBuilder() is replaced by Host.CreateDefaultBuilder(). Using the CreateDefaultBuilder() helper method makes it very easy to switch from v2.x to v3.x.
Another difference is the call to ConfigureWebHostDefaults(). Since the new host builder is a Generic Host Builder, it makes sense that we have to let it know that we intend to configure the default settings for a Web Host. The ConfigureWebHostDefaults() method does just that.
Going forward, it’s important to know the following:
WebHostBuilder has now been deprecated and could be removed in the near future
However, the IWebHostBuilder interface will remain
You won’t be able to inject just any service into the Startup class…
… instead, you have IHostingEnvironment and IConfiguration
If you’re wondering about the reason for the limitation for injecting services, this change prevents you from injecting services into the Startup class beforeConfigureServices() gets called.
This is the sixth of a new series of posts on ASP .NET Core 3.1 for 2020. In this series, we’ll cover 26 topics over a span of 26 weeks from January through June 2020, titled ASP .NET Core A-Z! To differentiate from the 2019 series, the 2020 series will mostly focus on a growing single codebase (NetLearner!) instead of new unrelated code snippets week.
Before Tag Helpers were available, you would have to use HTML Helper methods to create forms and their elements in a ASP .NET Core views. This meant that your form could look something like this:
@using (Html.BeginForm())
{
   <input />
}
With the introduction of Tag Helpers, you can now make your web pages much more cleaner. In fact, Tag Helpers work with both MVC Views and Razor Pages. The syntax is much simpler:
<form method="post">
This looks like HTML because it is HTML. You can add additional server-side attributes within the <form> tag for additional features.
In this above example, you can see how the attributes asp-controller and asp-action can be used to specify a specific controller name and action method. When these optional attributes are omitted, the current controller and default action method will be used.
Optionally, you can also use a named route, e.g.
<form asp-route="NamedRoute" method="post">
The asp-route attribute will look for a specific route with the name specified. When the form is submitted via HTTP POST, the action method will then attempt to read the form values via a passed values or bound properties.
In a Controller’s class file within an MVC app, you can set an optional Name for your action method’s Route attribute, as shown below:
[Route("/ControllerName/ActionMethod", Name = "NamedRoute")]
public IActionResult ActionMethod()
{
}
While you won’t find new Tag Helper equivalents for each and every HTML Helper you may have used in the past, you should consider using a Tag Helper wherever possible. You can even create your own custom Tag Helpers as well. For more information on custom Tag Helpers, check out the official documentation:
Below is a list of Tag Helpers with their corresponding HTML form elements:
Input Tag Helper
Let’s say you have a model with a couple of fields:
public class MyModel
{
   public string MyProperty1 { get; set; }
   public string MyProperty2 { get; set; }
}
You can use the following syntax to use an Input Tag Helper with an expression name assigned to the asp-for attribute. This allows you to refer to the properties without requiring the “Model.” prefix in your Views and Pages.
To create more specific fields for email addresses, passwords, etc, you may use data-type attributes on your models to auto-generate the necessary fields. These may include one of the following enum values:
CreditCard
Currency
Custom
Date
DateTime
Duration
EmailAddress
Html
ImageUrl
MultilineText
Password
PhoneNumber
PostalCode
Text
Time
Upload
Url
// For example:
[DataType(DataType.Date)]
public DateTime DateOfBirth { get; set; }
Note that each attribute can be applied on a field for the view/page generator to infer the data type, but is not used for data validation. For validation, you should use the appropriate validation techniques in your code. We will cover validation in a future blog post, but you can refer to the official docs for now:
Any boolean field in your model will automatically be turned into a checkbox in the HTML form. There is no extra work necessary to specify that the input type is a “checkbox”. In fact, the generated HTML includes the “checkbox” type automatically, sets the “checked” property if checked and wraps it in a label with the appropriate caption. For example, imagine a boolean field named “IsActive”:
// boolean field in a model class
public bool IsActive { get; set; }
<!-- input field in page/view wrapped in label -->
<label class="form-check-label">
   <input class="form-check-input" asp-for="IsActive" />
   @Html.DisplayNameFor(model => model.IsActive)
</label>
<!-- HTML generated for boolean field -->
<label class="form-check-label">
<input
   class="form-check-input"
   type="checkbox"
   checked="checked"
   data-val="true"
   data-val-required="The IsActive field is required."
   id="IsActive"
   name="IsActive"
   value="true"> IsActive
</label>
Hidden Fields
In case you’re wondering how you can generate a hidden <input> field, you can simply use the [HiddenInput] attribute on your hidden field’s property, as shown below. If you wish, you can explicitly set “type=hidden” in your Page/View, but I prefer to set the attribute in the model itself.
// hidden property in model class
[HiddenInput]
public string SomeHiddenField { get; set; } = "Some Value";
<!-- hidden field in page/view --><input asp-for="SomeHiddenField" />
<!-- HTML generated for hidden field -->
<input type="hidden" id="SomeHiddenField" name="SomeHiddenField" value="Some Value">
Radio Buttons
For radio buttons, you can create one <input> tag for each radio button option, with a reference to a common field, and a unique value for each radio button. Each input element can be paired with a label to include a proper (clickable) text caption . You can generate these in a loop or from a collection from dynamically generated radio buttons. To avoid reusing the same id for each radio button, you could use a string array of values to concatenate a unique suffix for each radio button id.
// string property and value array in page model class
[BindProperty]
public string ExperienceLevel { get; set; }
public string[] ExperienceLevels = new[] { "Novice", "Beginner", "Intermediate", "Advanced" };
<!-- input fields for radio buttons in page/view -->
@foreach (var experienceLevel in Model.ExperienceLevels)
{
    <input type="radio" asp-for="ExperienceLevel" value="@experienceLevel"
            id="ExperienceLevel@(experienceLevel)" />
    <label for="ExperienceLevel@(experienceLevel)">
        @experienceLevel
    </label>
    <br />
}
The multiline <textarea> field can be easily represented by a Textarea Tag Helper. This is useful for longer strings of text that need to be seen and edited across multiple lines.
public class MyModel
{
   [MinLength(5)]
   [MaxLength(1024)]
   public string MyLongTextProperty { get; set; }
}
As you would expect, you can use the following syntax to use a Textarea Tag Helper with an expression name assigned to the asp-for attribute.
This will generate the following textarea input field:
<textarea
   data-val="true"
   data-val-maxlength="The field ... maximum length of '1024'."
   data-val-maxlength-max="1024"
   data-val-minlength="The field ... minimum length of '5'."
   data-val-minlength-min="5"
   id="MyLongTextProperty"
   maxlength="1024"
   name="MyLongTextProperty"
></textarea>
Note that the property name and its attributes are used to create that textarea with the necessary id, name, maxlength and data validation settings.
Corresponding to the Textarea Tag Helper, the existing HTML Helper is shown below:
Html.TextAreaFor
Label Tag Helper
The <label> field can be represented by a Label Tag Helper. A label usually goes hand-in-hand with a specific <input> field, and is essential in creating text captions for more accessible web applications. The Display attribute from your model’s fields are used for the label’s displayed text values. (You could use the DisplayName attribute instead and omit the Name parameter, but it limits your ability to use localized resources.)
public class MyModel
{
   [Display(Name = "Long Text")]
   public string MyLongTextProperty { get; set; }
}
You can use the following syntax to use a Label Tag Helper along with an Input Tag Helper.
Note that the property name and its attributes are used to create both the label with its descriptive caption and also the input textbox with the necessary id and name.
Corresponding to the Label Tag Helper, the existing HTML Helper is shown below:
Html.LabelFor
Select Tag Helper
The <select> field (with its nested <option> fields) can be represented by a Select Tag Helper. This visually represents a dropdown or listbox, from which the user may select one or more options. In your model, you can represent this with a List<SelectListItem> of items, made possible by the namespace Microsoft.AspNetCore.Mvc.Rendering.
...
using Microsoft.AspNetCore.Mvc.Rendering;

public class MyModel
{
   public string MyItem { get; set; }

   public List<SelectListItem> MyItems { get; } = new List<SelectListItem>
   {
      new SelectListItem { Value = "Item1", Text = "Item One" },
      new SelectListItem { Value = "Item2", Text = "Item Two" },
      new SelectListItem { Value = "Item3", Text = "Item Three" },
   };
}
You can use the following syntax to use a Select Tag Helper.
Note that the asp-items attribute does require a “Model.” prefix, unlike the asp-for attribute that we have been using so far. This will generate the following HTML:
Note that the property name and its attributes are used to create both the dropdown list and also the nested options available for selection. For more customization, optgroups and multiple selections, check out the “Select Tag Helper” section in the Tag Helpers documentation at:
Corresponding to the Select Tag Helper, the existing HTML Helpers are shown below:
Html.DropDownListFor
Html.ListBoxFor
NetLearner Examples
In the NetLearner repository, you’ll find multiple web projects with various views/pages and controllers where applicable. All models are shared in the SharedLib project.
Models: In the “Models” folder of the shared library, you’ll find a LearningResource.cs class (shown below) with some fields we will use to display HTML form elements.
Views: Within the “Views” subfolder of the MVC project, the “LearningResources” subfolder contains auto-generated views for the LearningResourcesController’s methods.
Controllers: The LearningResourcesController class was auto-generated for the Human model, and then its functionality was extracted into a corresponding service class.
Services: The LearningResourceService class was written manually to provide CRUD functionality for the LearningResourcesController, and equivalent Razor/Blazor code.
Razor Pages: Within the “LearningResources” subfolder of the Razor Pages project’s Pages folder, the pairs of .cshtml and .cs files make up all the CRUD functionality for LearningResources entities.
Blazor Components: Within the “Pages” subfolder of the Blazor project, the LearningResources.razor component contains both its own HTML elements and event handlers for CRUD functionality. The ResourceDetail.razor component is reused by its parent component.
public class LearningResource
{
    public int Id { get; set; }

    [DisplayName("Resource")]
    public string Name { get; set; }


    [DisplayName("URL")]
    [DataType(DataType.Url)]
    public string Url { get; set; }

    public int ResourceListId { get; set; }
    [DisplayName("In List")]
    public ResourceList ResourceList { get; set; }

    [DisplayName("Feed Url")]
    public string ContentFeedUrl { get; set; }

    public List<LearningResourceTopicTag> LearningResourceTopicTags { get; set; }
}
Take a look at the Create and Edit views for the Human class, and you’ll recognize familiar sets of <label> and <input> fields that we discussed earlier.
[HttpPost]
public async Task<IActionResult> Create(
Bind("Id,Name,Url,ResourceListId,ContentFeedUrl")] LearningResource learningResource)

...
[HttpPost]
public async Task<IActionResult> Edit(
int id,
[Bind("Id,Name,Url,ResourceListId,ContentFeedUrl")] LearningResource learningResource)
The Razor Pages in their respective project handle the same functionality in their own way.
Razor Pages with BindProperty
Compared to MVC views, the newer Razor Pages make it a lot easier to bind your model properties to your HTML forms. The [BindProperty] attribute can be applied to MVC Controllers as well, but is much more effective within Razor Pages.
In the NetLearner repo, you’ll find a Razor web project with multiple subfolders, including Pages and their “code-behind” Page Model files.
Pages: Within the “Pages” subfolder, the “LearningResources” subfolder within it contains Razor Pages along with corresponding .cs classes that contain the necessary Get/Post methods.
Page Models: In the same LearningResources subfolder, the corresponding Page Models contain the necessary CRUD functionality. The implementation of the CRUD functionality from has been extracted into the Shared Library’s corresponding LearningResourceService service class.
This time, take a look at the Create and Edit pages for the LearningResources set of pages, and you’ll once again recognize familiar sets of <label> and <input> fields that we discussed earlier.
Since there are no controller classes in the Razor web project, let’s take a look at the corresponding C# classes for the Create and Edit pages, i.e. Create.cshtml.cs and Edit.cshtml.cs. In both of these classes, we’ll find the [BindProperty] attribute in use, right after the constructor and before the Get/Post methods.
 [BindProperty]
 public LearningResource LearningResource { get; set; }
This [BindProperty] attribute allows you to declaratively bind the LearningResource class and its properties for use by the HTML form in the corresponding Razor Page. This is an opt-in feature that allows to choose which properties to bind. If you wish, you could alternatively bind all public properties in the class by using the [BindProperties] attribute above the class, instead of above each individual member.
NOTE: By default, a Razor Page’s default methods for HTTP GET and HTTP POST are OnGet() and OnPost() respectively. If you wish to use custom page handlers in your HTML forms, you must create custom methods with the prefix OnPost followed by the name of the handler (and optionally followed by the word Async for async methods)
// action methods in .cs file associated with a Razor Page
public async Task<IActionResult> OnPostCustom1Async() { }
public async Task<IActionResult> OnPostCustom2sync() { }
The standard set of Get/Post methods are shown below, from Create.cshtml.cs:
public IActionResult OnGet()
{
   return Page();
}
public async Task<IActionResult> OnPostAsync()
{
    if (!ModelState.IsValid)
    {
        return Page();
    }

    await _learningResourceService.Add(LearningResource);

    var resourceList = await _resourceListService.Get();
    ViewData["ResourceListId"] = new SelectList(resourceList, "Id", "Name", LearningResource.ResourceListId);
    return RedirectToPage("./Index");
}
Note that the LearningResource entity is passed to the service class (which passes it to the shared DB Context) to add it to the database. If you were to remove the aforementioned [BindProperty] attribute, LearningResource would be null and the save operation would fail. The above approach only opts in to accepting HTTP POST requests. To enable use of BindProperty for HTTP GET requests as well, simply set the optional parameter SupportsGet to true, as shown below.
[BindProperty(SupportsGet = true)]
Blazor Example
The Blazor version of NetLearner also reuses the same shared library for its CRUD functionality and entity models via the shared service classes. However, its front-end web app looks noticeably different. There are no controllers or views. Rather, the .razor files contain HTML elements and the C# code necessary to handle user interaction.
An overall example of the Blazor web project is explained earlier in this series:
After the A-Z series is complete, stay tuned for new content that will explain Blazor’s use of <EditForm> and the use of Input Components to render HTML elements and handle events. For now, check out the official documentation at:
This is the fifth of a new series of posts on ASP .NET Core 3.1 for 2020. In this series, we’ll cover 26 topics over a span of 26 weeks from January through June 2020, titled ASP .NET Core A-Z! To differentiate from the 2019 series, the 2020 series will mostly focus on a growing single codebase (NetLearner!) instead of new unrelated code snippets week.
In my 2018 series, we covered EF Core Migrations to explain how to add, remove and apply Entity Framework Core Migrations in an ASP .NET Core web application project. In this article, we’ll continue to look at the newer 2020 NetLearner project, to identify entities represented by C# model classes and the relationships between them.
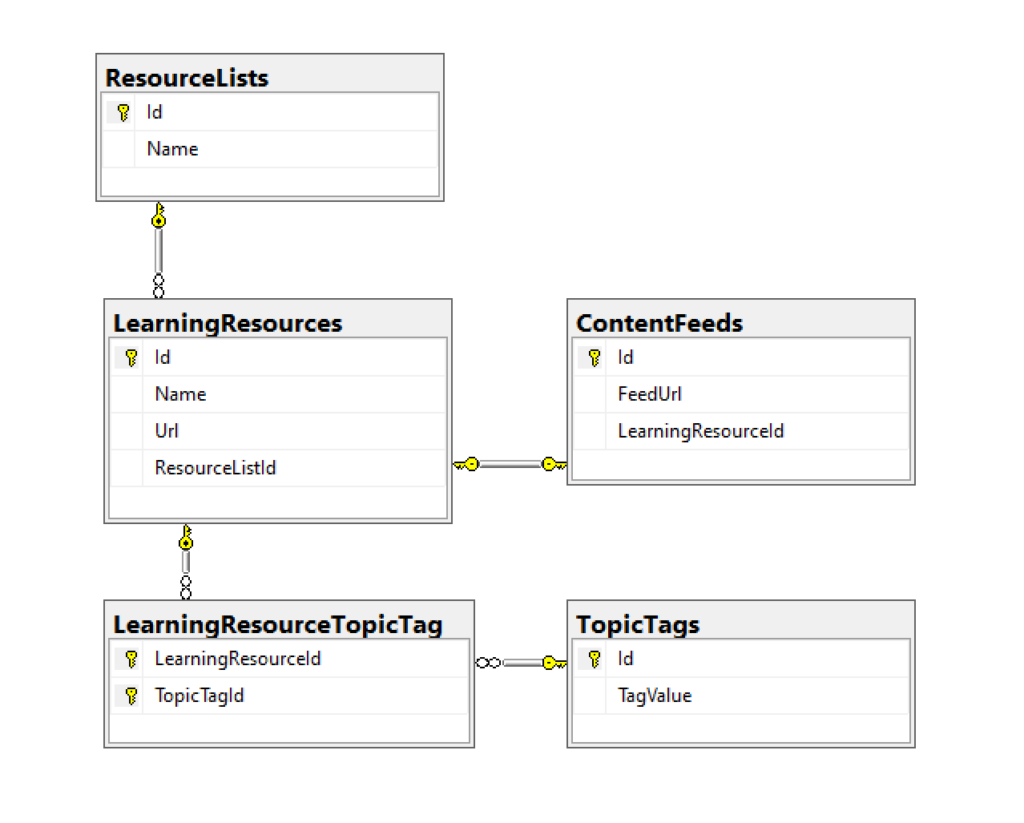
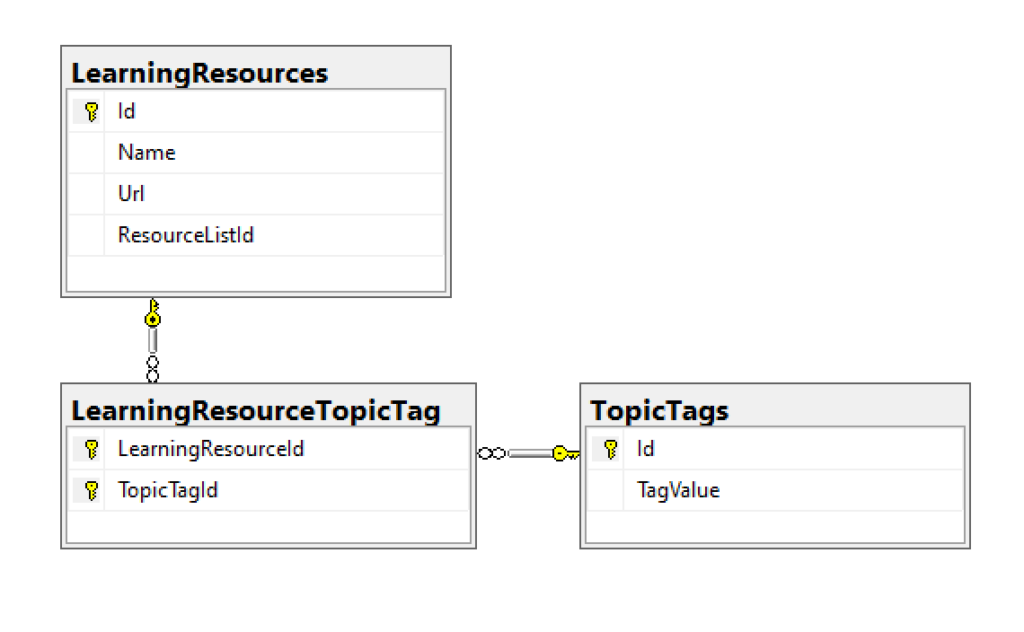
NOTE: Please note that NetLearner is a work in progress as of this writing, so its code is subject to change. The UI web apps still needs work (and will be updated at a later date) but the current version has the following models with the relationships shown below:
NetLearner database diagram
Classes and Relationships
The heart of the application is the LearningResource class. This represents any online learning resource, such as a blog post, single video, podcast episode, ebook, etc that can be accessed with a unique URL.
public class LearningResource
{
    public int Id { get; set; }

    [DisplayName("Resource")]
    public string Name { get; set; }


    [DisplayName("URL")]
    [DataType(DataType.Url)]
    public string Url { get; set; }

    public int ResourceListId { get; set; }
    [DisplayName("In List")]
    public ResourceList ResourceList { get; set; }

    public ContentFeed ContentFeed { get; set; }

    public List<LearningResourceTopicTag> LearningResourceTopicTags { get; set; }
}
The ContentFeed class represents the RSS Feed (or channel information) for an online resource, a URL that can be used to retrieve more information about the online resource, if available.
public class ContentFeed
{
    public int Id { get; set; }

    [DisplayName("Feed URL")]
    public string FeedUrl { get; set; }

    public int LearningResourceId { get; set; }
    public LearningResource LearningResource { get; set; }
}
The ResourceList class represents a logical container for learning resources in the system. It is literally a list of items, where the items are your learning resources.
public class ResourceList
{
    public int Id { get; set; }

    public string Name { get; set; }

    public List<LearningResource> LearningResources { get; set; }
}
The TopicTag class represents a single “tag” value that can be used to categorize online resources. Possibly values could be “.NET Core”, “ASP.NET Core” and so on.
public class TopicTag
{
    public int Id { get; set; }

    [DisplayName("Tag")]
    public string TagValue { get; set; }

    public List<LearningResourceTopicTag> LearningResourceTopicTags { get; set; }
}
At this point, you may have noticed both the LearningResource and TopicTag classes contain a List<T> property of LearningResourceTopicTag. If you browse the database diagram, you will notice that this table appears as a connection between the two aforementioned tables, to establish a many-to-many relationship. (more on this later)
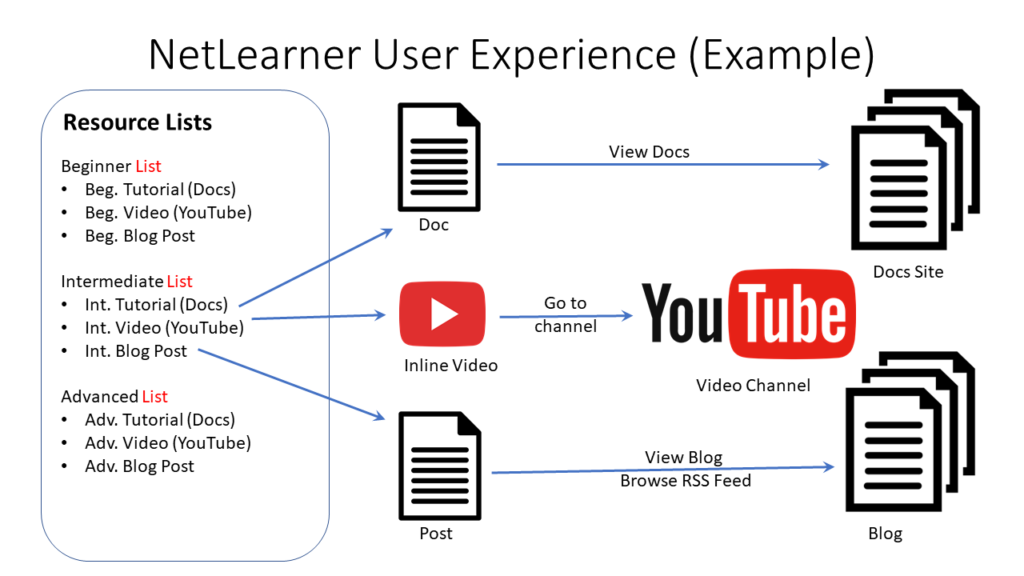
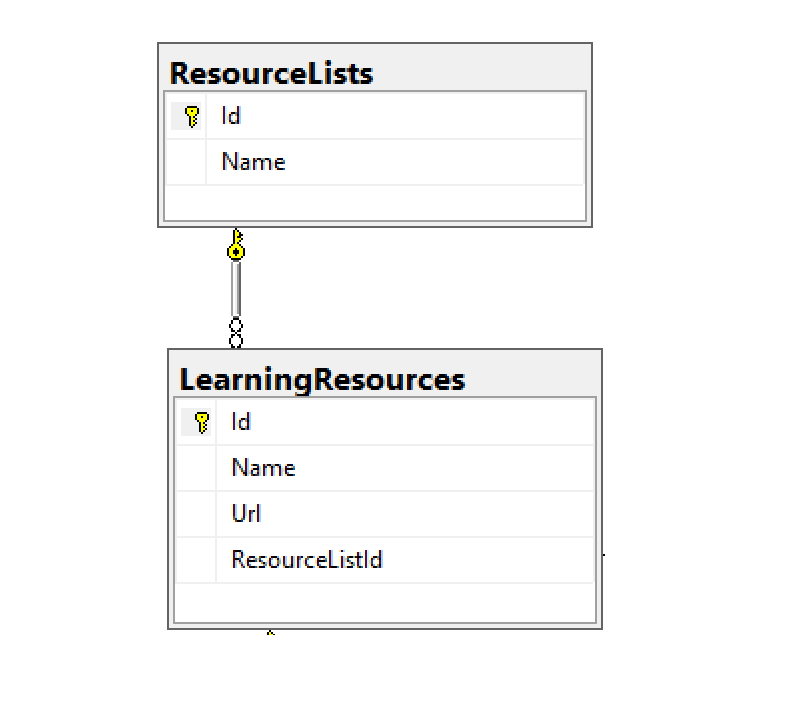
The following diagram shows an example of how the a LearningResource (e.g. link to a doc/video) is a part of a ResourceList, while each LearningResource also has a link back to its root site, channel or RSS feed (via ContentFeed).
One to One
Having looked through the above entities and relationships, we can see that each LearningResource has a ContentFeed. This is an example of a 1-to-1 relationship. For example:
Learning Resource = Wake Up and Code! blog site
Content Feed = RSS Feed for blog site
In the two classes, we see the following code:
public class LearningResource
{
    public int Id { get; set; }

    [DisplayName("Resource")]
    public string Name { get; set; }


    [DisplayName("URL")]
    [DataType(DataType.Url)]
    public string Url { get; set; }

    public int ResourceListId { get; set; }
    [DisplayName("In List")]
    public ResourceList ResourceList { get; set; }

    public ContentFeed ContentFeed { get; set; }

    public List<LearningResourceTopicTag> LearningResourceTopicTags { get; set; }
}
public class ContentFeed
{
    public int Id { get; set; }

    [DisplayName("Feed URL")]
    public string FeedUrl { get; set; }

    public int LearningResourceId { get; set; }
    public LearningResource LearningResource { get; set; }
}
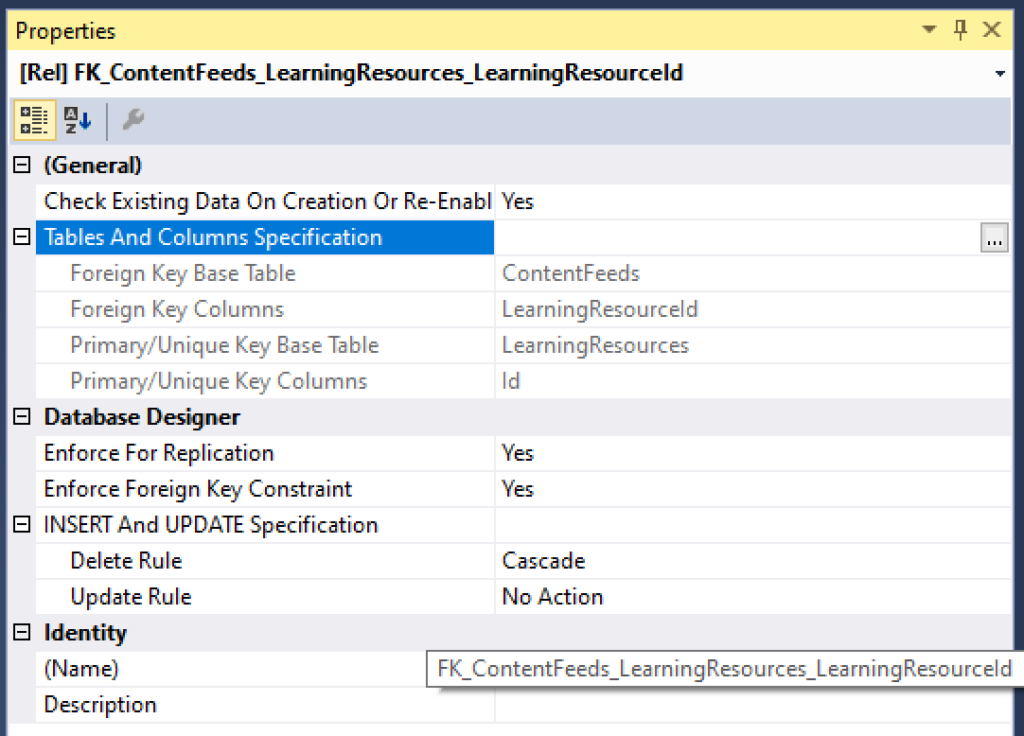
Each Learning Resource has a corresponding Content Feed, so the LearningResource class has a property for ContentFeed. That’s pretty simple. But in the ContentFeed class, you don’t necessarily need a property pointing back to the LearningResource . In fact, all you need is a LearningResourceId property. EF Core will ensure that LearningResource.Id points to ContentFeed.LearningResourceId in the database. But to help with object-property navigation in your code, it is useful to include an actual LearningResource object in the ContentFeed class to point back to LearningResource.
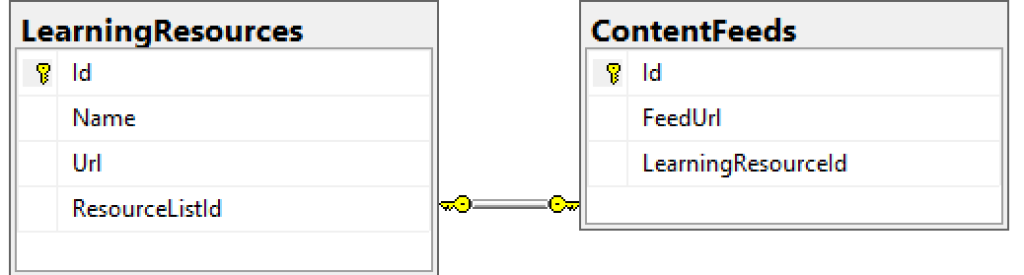
One to One Relationship
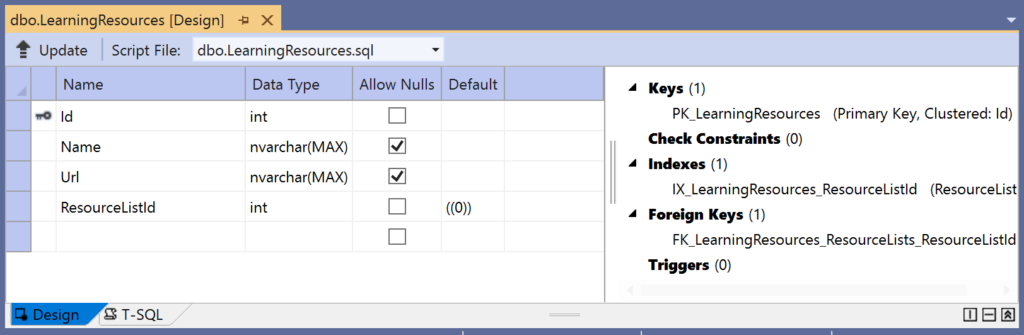
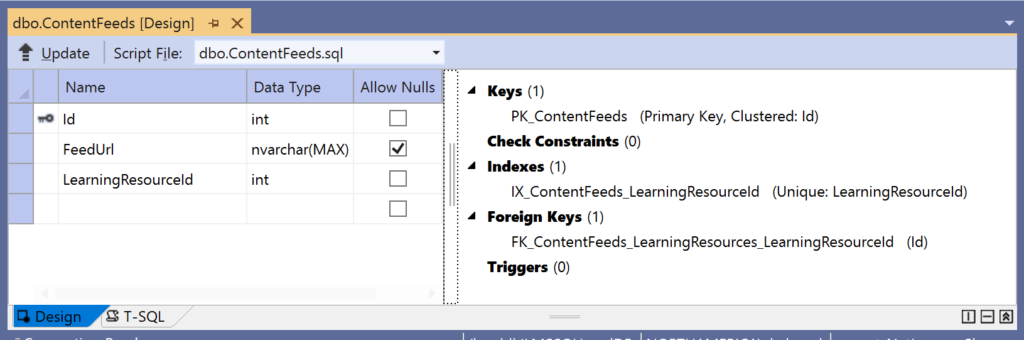
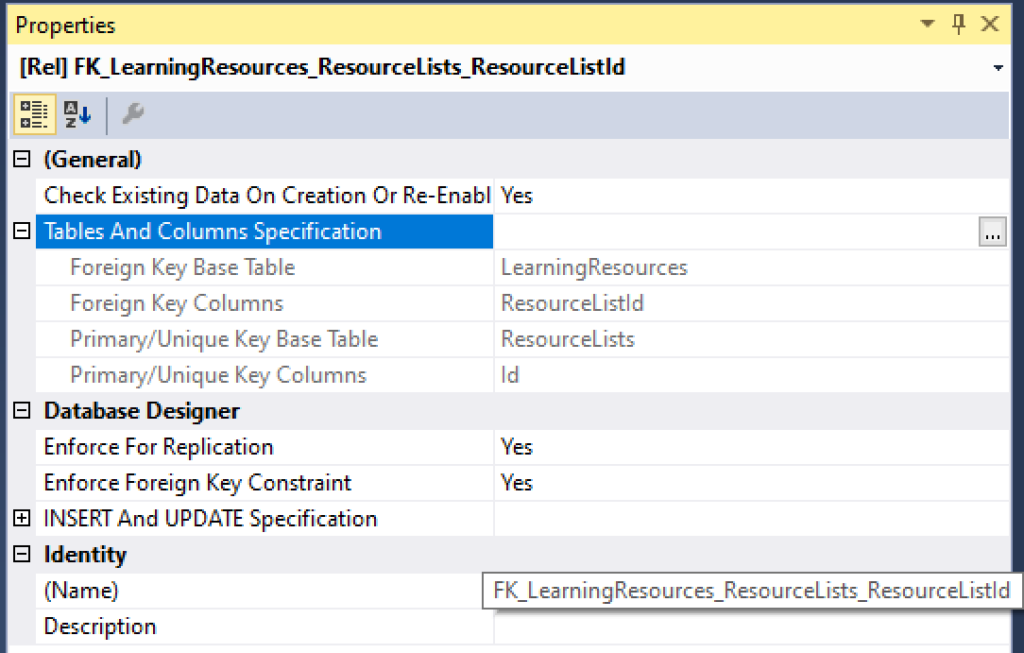
Another way of looking at the One-to-One relationship is to view the constraints of each database entity in the visuals below. Note that both tables have an Id field that is a Primary Key (inferred by EF Core) while the ContentFeeds table also has a Foreign Key for the LearningResourceId field used for the constraint in the relationship.
LearningResources tableContentFeeds tableOne to One Relationship
One to Many
Next, let’s take a look at the One-to-Many relationship for each ResourceList that has zero or more LearningResources. For example:
Resource List = ASP .NET Core Blogs (parent container)
Learning Resource = ASP .NET Core A-Z Blog Series (single URL)
In the two classes, we see the following code:
public class ResourceList
{
    public int Id { get; set; }

    public string Name { get; set; }

    public List<LearningResource> LearningResources { get; set; }
}
public class LearningResource
{
    public int Id { get; set; }

    [DisplayName("Resource")]
    public string Name { get; set; }


    [DisplayName("URL")]
    [DataType(DataType.Url)]
    public string Url { get; set; }

    public int ResourceListId { get; set; }
    [DisplayName("In List")]
    public ResourceList ResourceList { get; set; }

    public ContentFeed ContentFeed { get; set; }

    public List<LearningResourceTopicTag> LearningResourceTopicTags { get; set; }
}
Each Resource List has zero or more Learning Resources, so the ResourceList class has a List<T> property for LearningResources. This is even simpler than the previously described 1-to-1 relationship. In the LearningResource class, you don’t necessarily need a property pointing back to the ResourceList. But once again, to help with object-property navigation in your code, it is useful to include an actual ResourceList object in the LearningResource class to point back to ResourceList.
One to Many Relationship
Another way of looking at the One-to-Many relationship is to view the constraints of each database entity in the visuals below. Note that both tables have an Id field that is a Primary Key (once again, inferred by EF Core) while the ResourceLists table also has a Foreign Key for the ResourceListsId field used for the constraint in the relationship.
One to Many Constraint
Many to Many
Finally, let’s also take a look at a Many-to-Many relationship, for each TopicTag and LearningResource, either of which can have many of the other. For example:
Topic Tag = “ASP .NET Core” (tag as a text description)
Learning Resource = Specific blog post on site (single URL)
This relationship is a little more complicated than all of the above, as we will need a “join table” to connect the two tables in question. Not only that, we will have to describe the entity in the C# code with connections to both tables we would like to connect with this relationship.
In the two classes we would like to connect, we see the following code:
public class TopicTag
{
    public int Id { get; set; }

    [DisplayName("Tag")]
    public string TagValue { get; set; }

    public List<LearningResourceTopicTag> LearningResourceTopicTags { get; set; }
}
public class LearningResource
{
    public int Id { get; set; }

    [DisplayName("Resource")]
    public string Name { get; set; }


    [DisplayName("URL")]
    [DataType(DataType.Url)]
    public string Url { get; set; }

    public int ResourceListId { get; set; }
    [DisplayName("In List")]
    public ResourceList ResourceList { get; set; }

    public ContentFeed ContentFeed { get; set; }

    public List<LearningResourceTopicTag> LearningResourceTopicTags { get; set; }
}
public class LearningResourceTopicTag
{
    public int LearningResourceId { get; set; }
    public LearningResource LearningResource { get; set; }

    public int TopicTagId { get; set; }
    public TopicTag TopicTag { get; set; }

}
This special class has the following properties:
LearningResourceId: integer value, pointing back to LearningResource.Id
LearningResource: optional “navigation” property, reference back to connected LearningResource entity
TopicTagId: integer value, pointing back to TopicTag.Id
TopicTag: optional “navigation” property, reference back to connected TopicTag entity
To learn more about navigation properties, check out the official docs at:
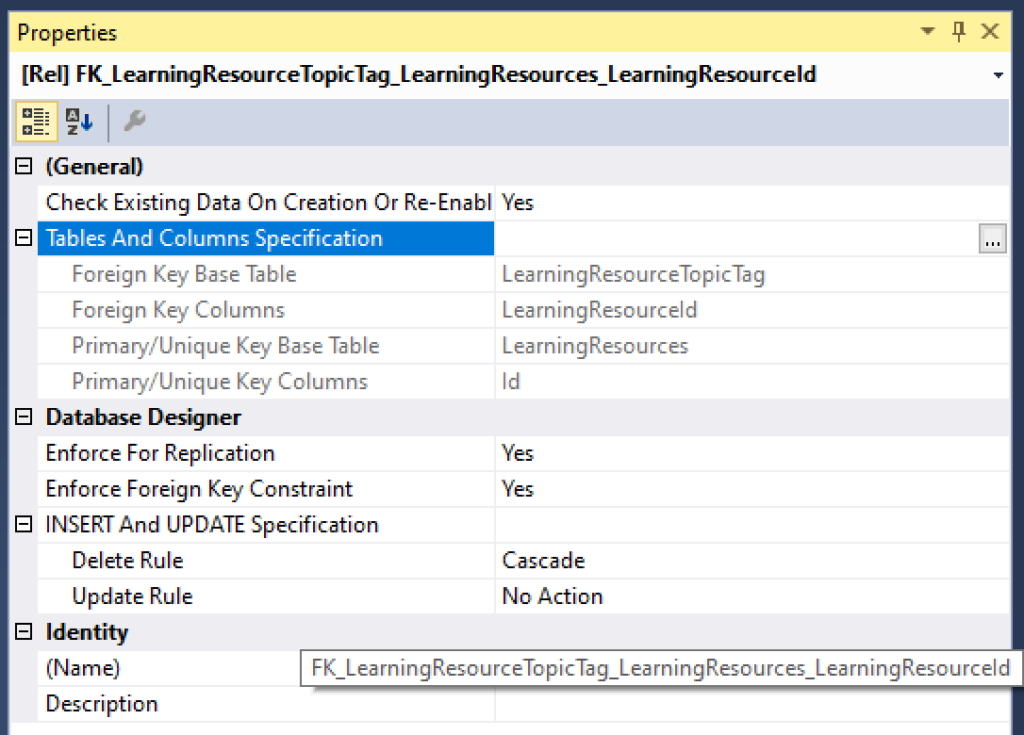
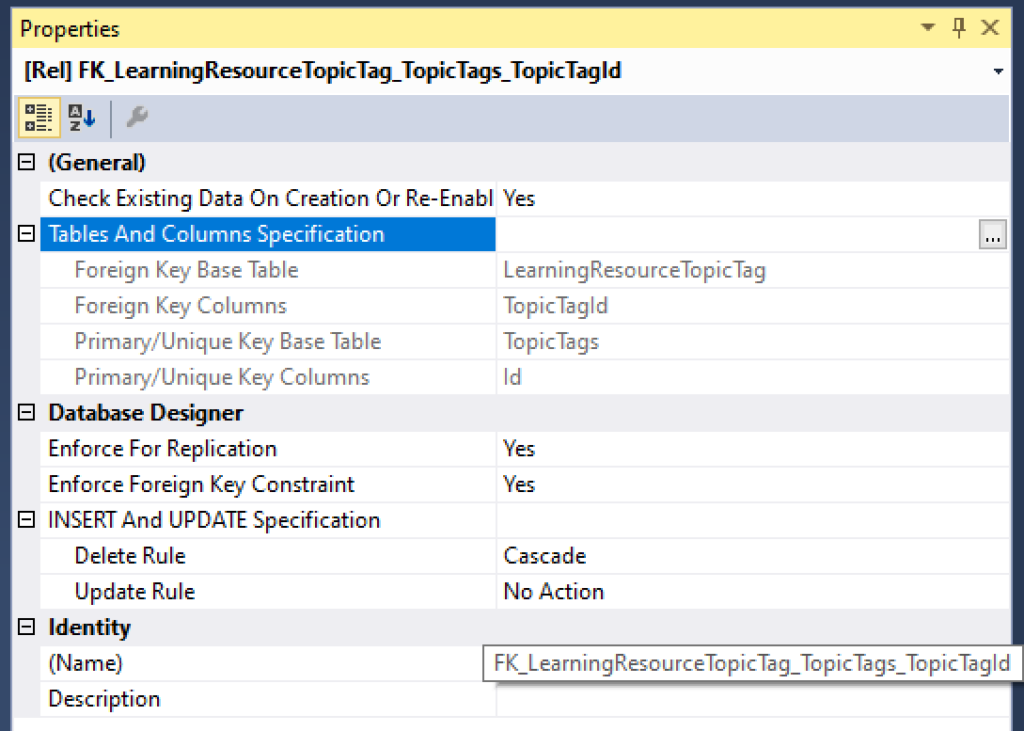
Another way of looking at the Many-to-Many relationship is to view the constraints of each database entity in the visuals below. Note that the two connected tables both have an Id field that is a Primary Key (yes, inferred by EF Core!) while the LearningResourceTopicTag table has a Composite Key for the TopicTagId and LearningResourceId fields used for the constraints in the relationship.
Constraints for LearningResources Constraints for TopicTags
The composite key is described in the LibDbContext class inside the OnModelCreating() method:
public class LibDbContext : IdentityDbContext
{
    ...
    protected override void OnModelCreating(ModelBuilder modelBuilder)
    {
       ...
       modelBuilder.Entity<LearningResourceTopicTag>()
        .HasKey(lrtt => new { lrtt.LearningResourceId, lrtt.TopicTagId });
    }
}
Here, the HasKey() method informs EF Core that the entity LearningResourceTopicTag has a composite key defined by both LearningResourceId and TopicTagId.
References
For more information, check out the list of references below.
This is the fourth of a new series of posts on ASP .NET Core 3.1 for 2020. In this series, we’ll cover 26 topics over a span of 26 weeks from January through June 2020, titled ASP .NET Core A-Z! To differentiate from the 2019 series, the 2020 series will mostly focus on a growing single codebase (NetLearner!) instead of new unrelated code snippets week.
In this article, we’ll explore several options for deploying an ASP .NET Core web app to Azure App Service in the cloud. From the infamous Right-Click-Publish to fully automated CI/CD, you’ll learn about the latest Deployment Center option in the Azure Portal for App Service for web apps.
NOTE: If you’re looking for information on deploying to Docker or Kubernetes, please check out the following docs instead:
Right-Click Publish (aka Friends Don’t Let Friends Right-Click Publish)
If you’ve made it this far, you may be thinking one of the following: a. “Hey, this is how I deploy my web apps right now!” or b. “Hey wait a minute, I’ve heard that you should never do this!”
Well, there is a time and place for right-click publish. There have been many debates on this, so I won’t go into the details, but here are some resources for you to see what others are saying:
So, what’s a web developer to do? To quote from the aforementioned MSDN article, “Continuing with the theme of prototyping and experimenting, right click publish is the perfect way for existing Visual Studio customers to evaluate Azure App Service (PAAS). By following the right click publish flow you get the opportunity to provision new instances in Azure and publish your application to them without leaving Visual Studio:”
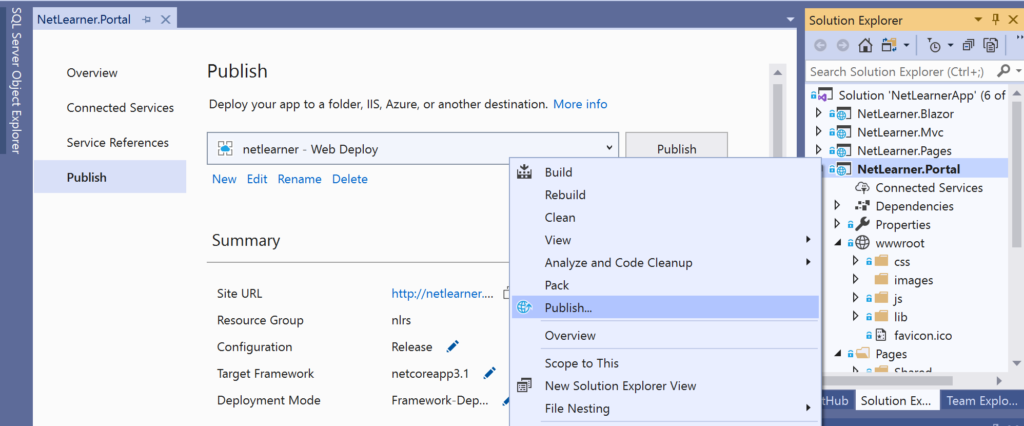
In other words, you can use this approach for a quick test or demo, as shown in the screenshots below for Visual Studio.
Right-click your ASP .NET Core web app project in Solution Explorer and select Publish.
Click the Start button on the screen that appears and follow the onscreen instructions.
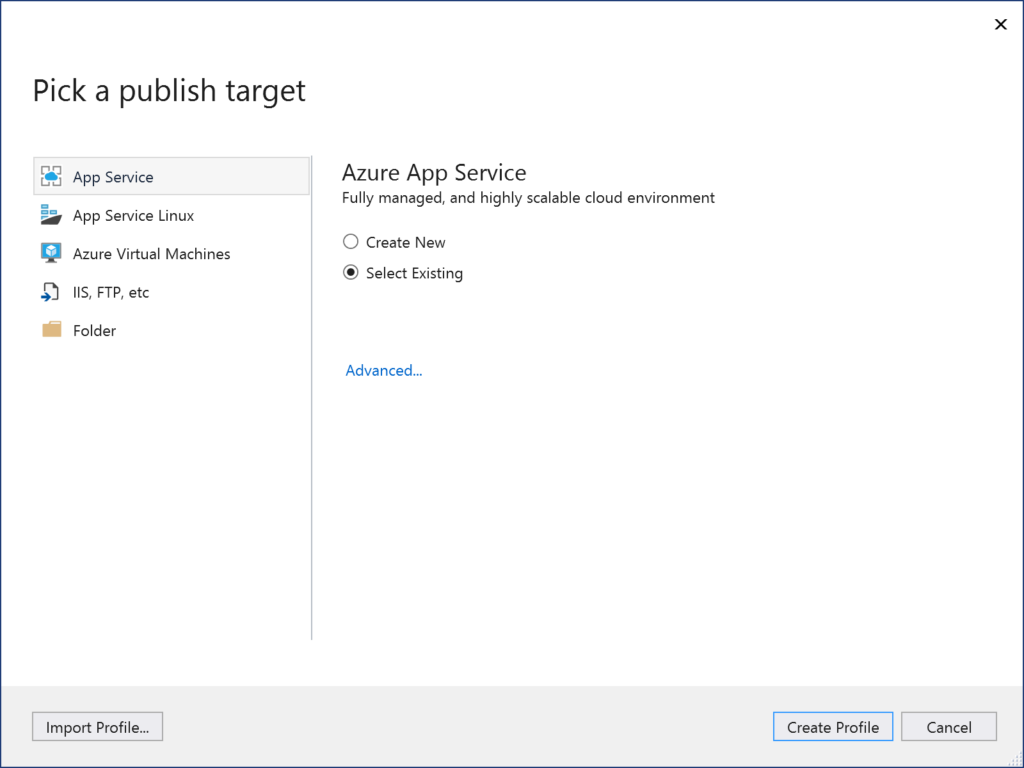
Ensure that you’re logged in to the correct Azure subscription account you want to publish to.
Right-click, Publish from Solution ExplorerPick a Publish Target
Web Apps in the Azure Portal
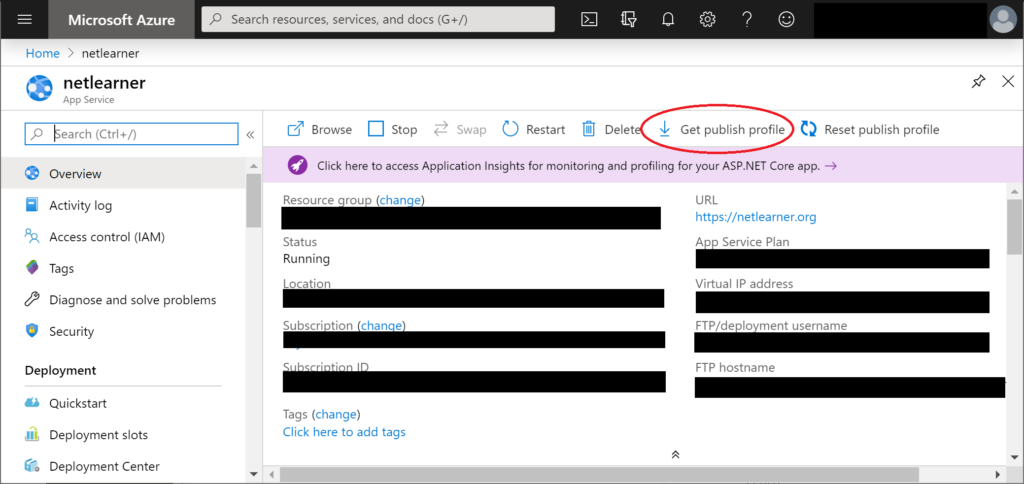
In the screenshot above, you may notice an option to “Import Profile” using the button on the lower left. This allows you to import a Web App profile file that was generated by exporting it from an existing Azure Web App. To grab this profile file, simply navigate to your existing Web App in the Azure Portal and click on “Get publish profile” in the top toolbar of your Web App, shown below:
Get Publish Profile
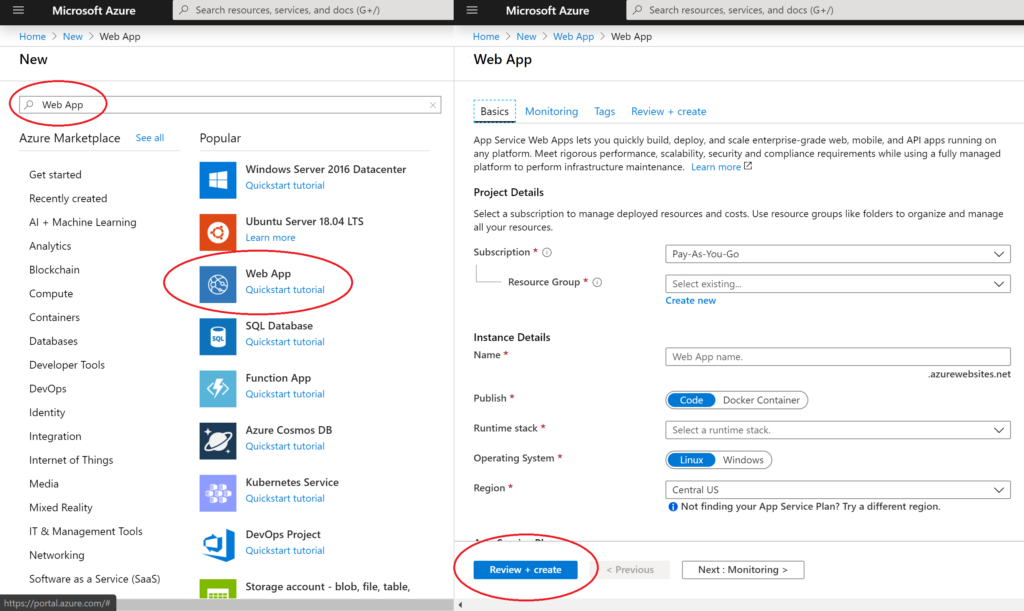
If you want to create a new Web App in Azure starting with the Azure Portal, follow the instructions below:
Select “Web App” or search for it if you don’t see it.
Enter/select the necessary values:
Subscription (select a subscription)
Resource Group (create or use existing to group resources logically)
Web App name (enter a unique name)
Publish (Code or Docker Image)
Runtime stack (.NET Core)
App Service Plan (create or use existing to set location and pricing tier)
OS (Windows or Linux)
Region (e.g. East US)
Click Next through the screens and then click the Create button to complete the creation of your new Web App.
Create New Web App
Now you can deploy to this Web App using any method you choose.
Runtime Options
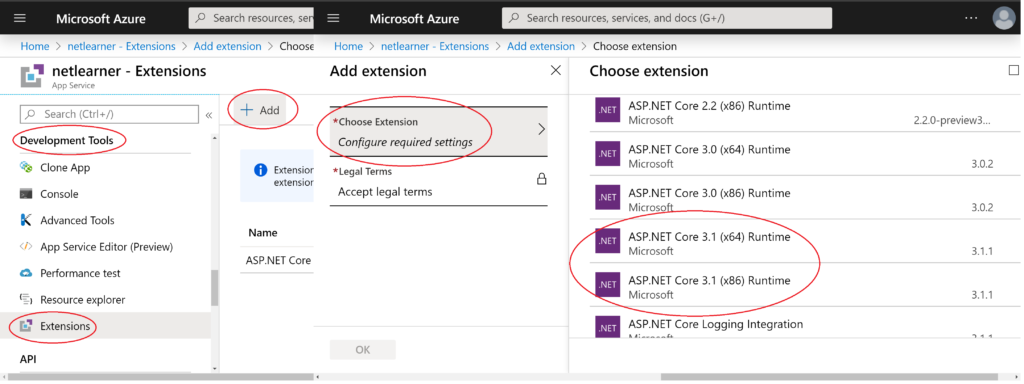
If you like to stay ahead of ASP .NET Core releases, you may be using a pre-release version of the runtime. As of this writing, the latest stable version of ASP .NET Core is version 3.1, which is already available on Azure. If you’re looking for future preview releases, Azure App Service also has an option to install an Extension for preview runtimes.
To find the proper runtime:
Navigate to your Web App in the Azure Portal.
Click on Extensions under Development Tools.
Click + Add to add a new extension.
Choose an extension to configure required settings.
Accept the legal terms and complete the installation.
Add Extension
Your options may include both 32-bit (x86) and 64-bit (x64) versions of the ASP .NET Core runtime and any preview versions of future releases. When planning ahead for multiple environments, you also have the option to deploy to Deployments Slots. This feature is available in Standard, Premium or Isolated App Service Plan tiers and will covered in a future blog post in this series.
If you’re interested in Deployment Slots right now, check out the official docs at:
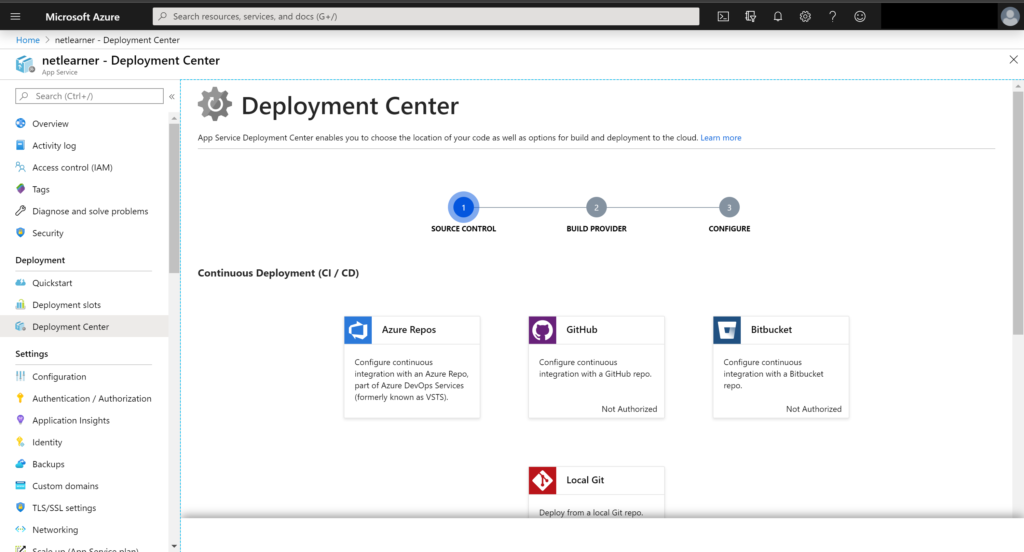
In the list of features for your Web App, you will find an option to open up the new Deployment Center. Note that this has replaced the old Deployment Options. Let’s go over each of these options:
Azure Repos
Github
Bitbucket
Local Git
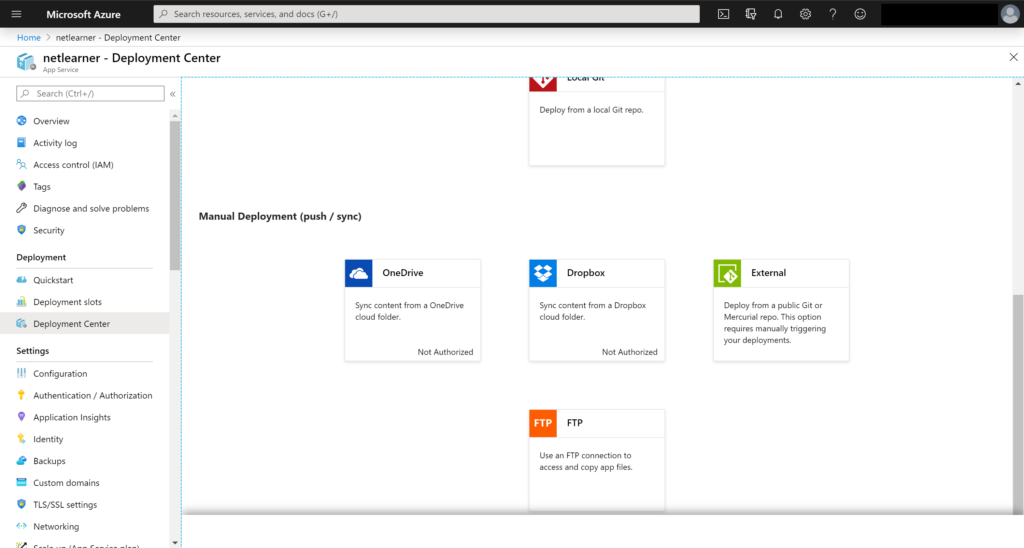
OneDrive
Dropbox
External
FTP
Deployment Options in Deployment CenterMore Deployment Options
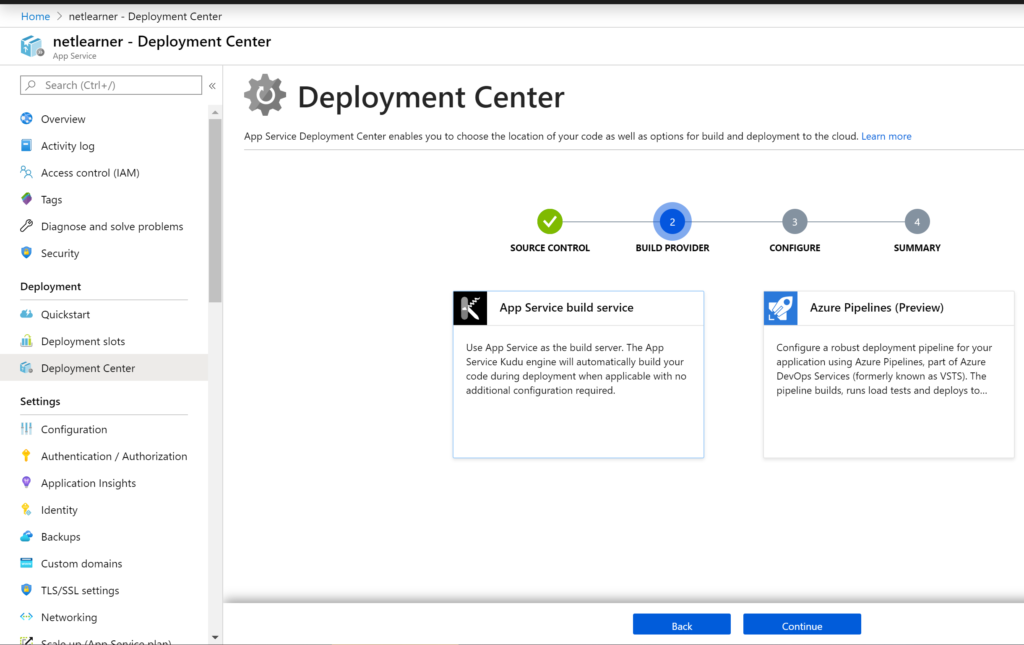
If you choose Azure Repos, you can set up your web app’s CI (Continuous Integration) system with an Azure Repo, which is part of Microsoft’s Azure DevOps services (formerly known as VSTS, aka Visual Studio Team Services). You will have options for using App Service as a Kudu build server or Azure Pipelines as your CI build system.
Azure Repos choices: Kudu or Pipelines?
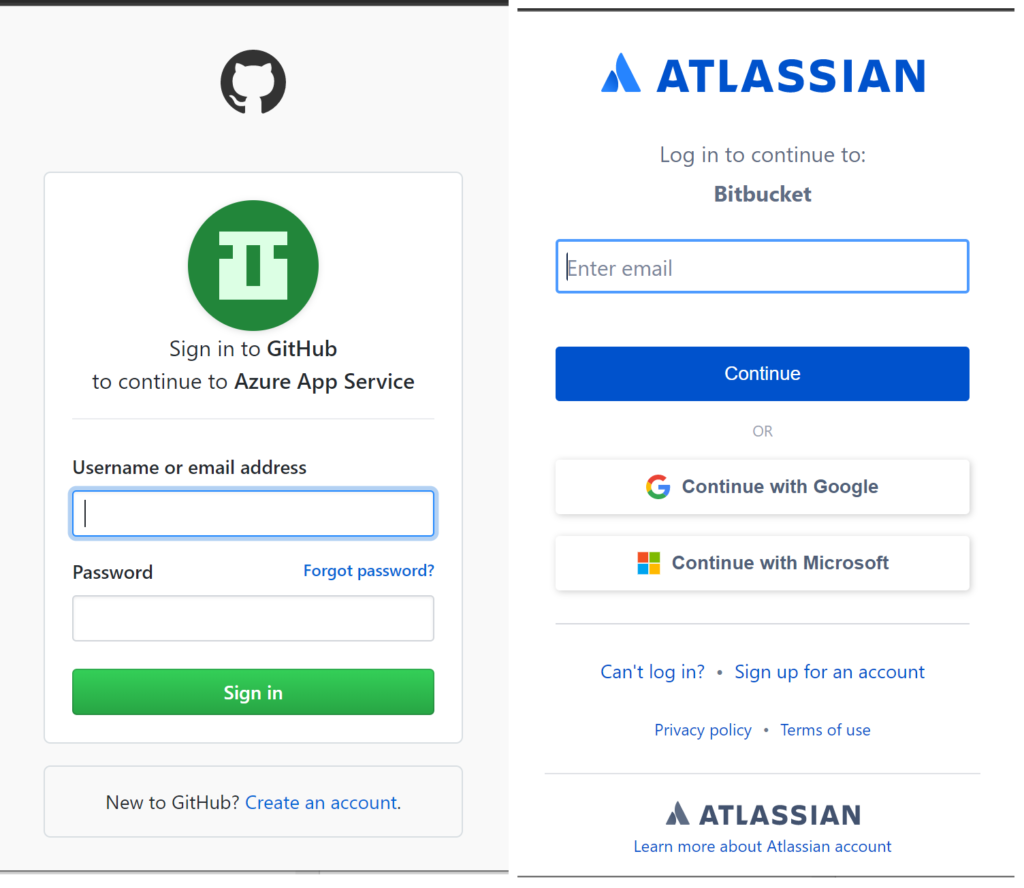
If you choose Github or BitBucket or even a local Git account, you’ll have the ability to authorize that account to publish a specific repo, every time a developer pushes their code.
Authorize Github/Bitbucket
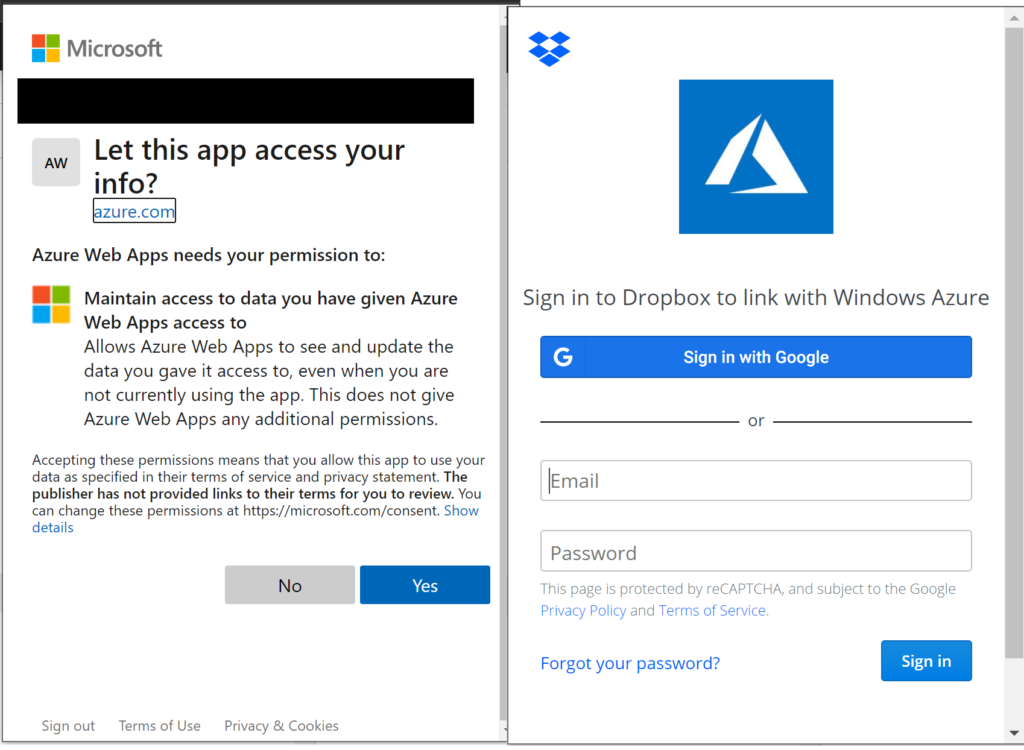
If you choose OneDrive or DropBox, you’ll have ability to authorize your App Service to pick up files deployed to a shared folder in either location.
Authorize OneDrive/DropBox
You may also select an External repo or FTP source. To learn more about Azure Repos and Azure Pipelines, check out the official docs:
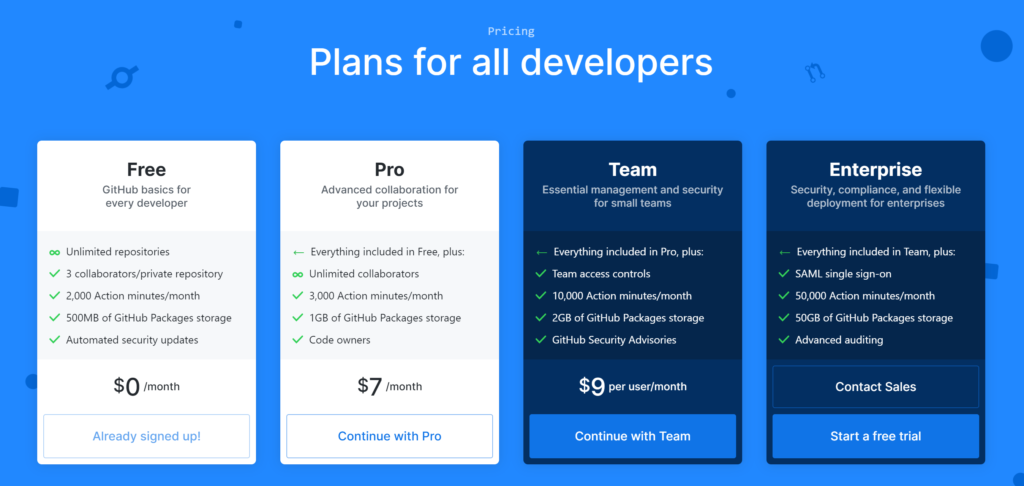
If you’ve been using GitHub for public open-source projects or private projects on paid accounts, now is a great to time to create private repositories for free! In 2019, GitHub started offering free unlimited private repos, limited to 3 collaborators. This new free option comes with issue/bug tracking and project management as well.
For more information on GitHub pricing, check out their official pricing page:
Now you can easily set up your starter projects in a private GitHub repository and take advantage of the aforementioned CI/CD setup without having to choose between paying a GitHub fee or making all your repos public.
CLI Commands
If you wish to publish to Azure App service using CLI (Command Line Interface) Commands, you may use the following commands, where you can choose a name for your Web App, Resource Group, App Sevice Plan, etc. Single-letter flags are usually preceded by a single hyphen, while flags spelled out with completed words are usually preceded by two hyphens.
First, install the Azure CLI in case you don’t have it already:
Wait, what about Azure DevOps and YAML and Pipelines?
Since this is an A-Z series, you will have to wait for “Y is for YAML” to get more detailed information on constructing your build pipeline using YAML in Azure DevOps. If you can’t wait that long, feel free to check out the following .yml sample I uploaded for use with an ASP .NET Core 3.1:
This is the third of a new series of posts on ASP .NET Core 3.1 for 2020. In this series, we’ll cover 26 topics over a span of 26 weeks from January through June 2020, titled ASP .NET Core A-Z! To differentiate from the 2019 series, the 2020 series will mostly focus on a growing single codebase (NetLearner!) instead of new unrelated code snippets week.
In this article, we’ll continue to look at the (in-progress) NetLearner application, which was generated using multiple ASP .NET Core web app project (3.1) templates. In previous releases, the template made it very easy for you to store cookies and display a cookie policy. However, the latest version doesn’t include cookie usage or a GDPR-compliant message out of the box.
Unless you’ve been living under a rock in the past couple of years, you’ve no doubt noticed all the GDPR-related emails and website popups since 2018. Whether or not you’re required by law to disclose your cookie policies, it’s good practice to reveal it to the end user so that they can choose to accept your cookies (or not).
Who Moved My Cookies?
In ASP .NET Core 2.x, the standard web app project templates provided by Microsoft included GDPR-friendly popup messages, that could be accepted by the end user to set a consent cookie. As of ASP .NET Core 3.x, this is no longer provided out of the box. However, you can still add this feature back into your project manually if needed.
Follow the instructions provided in the official docs to add this feature to your ASP .NET MVC or Razor Pages project:
As you probably know, cookies are attached to a specific browser installation and can be deleted by a user at an any time. Some new developers may not be aware of where these cookies are actually stored.
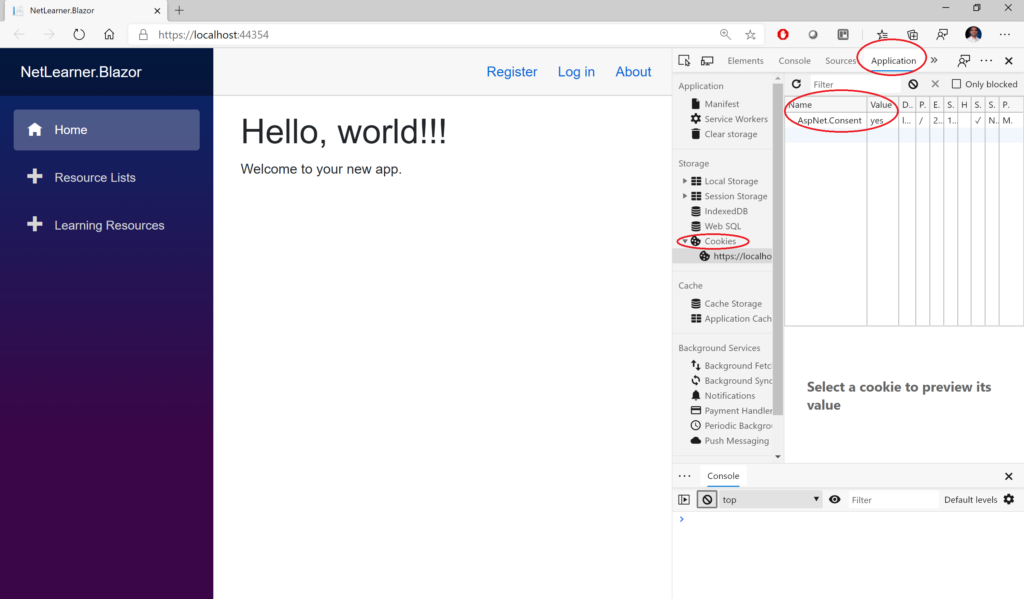
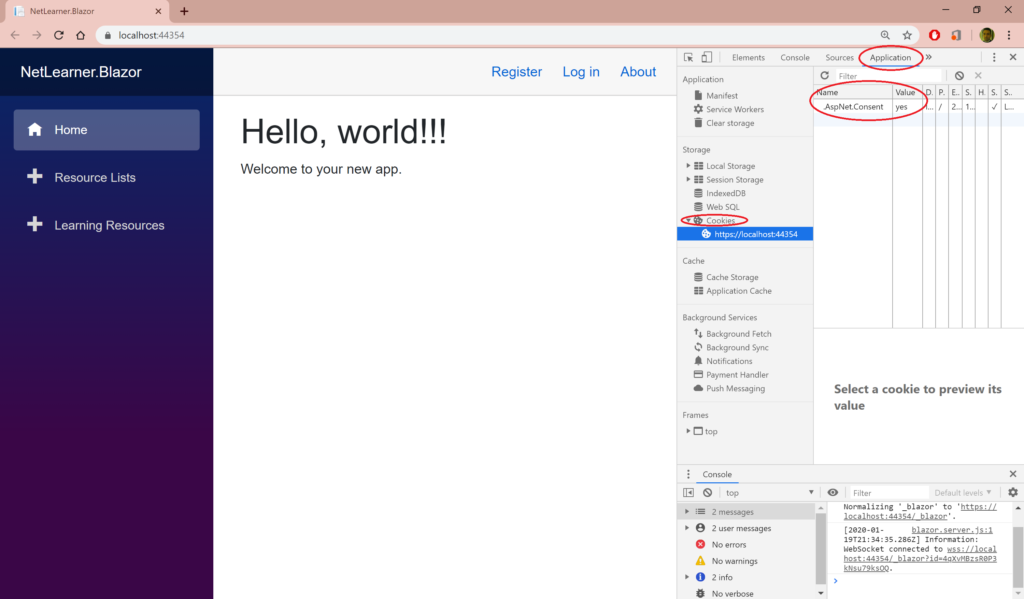
Click F12 in your browser to view the Developer Tools to see cookies grouped by website/domain.
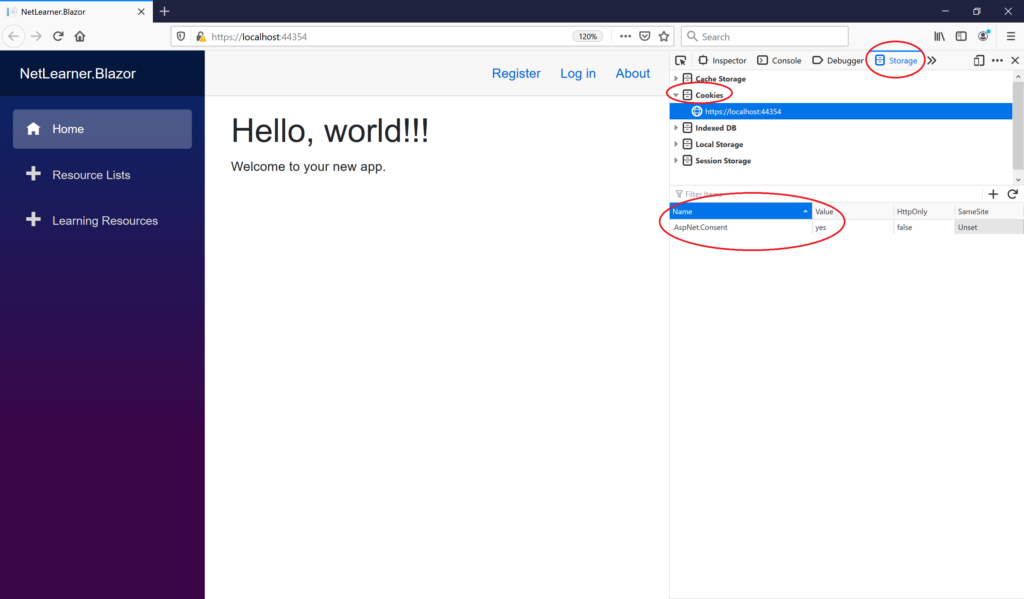
In (pre-Chromum) Edge/Firefox, expand Cookies under the Storage tab.
In (Chromium-based) Edge/Chrome, expand Storage | Cookies under the Application tab .
See screenshots below for a couple of examples how AspNet.Consent in stored, along with a boolean Yes/No value:
Cookies in Chromium-based Edge Cookies in Google Chrome Cookies in Mozilla Firefox
Partial Views for your cookie message
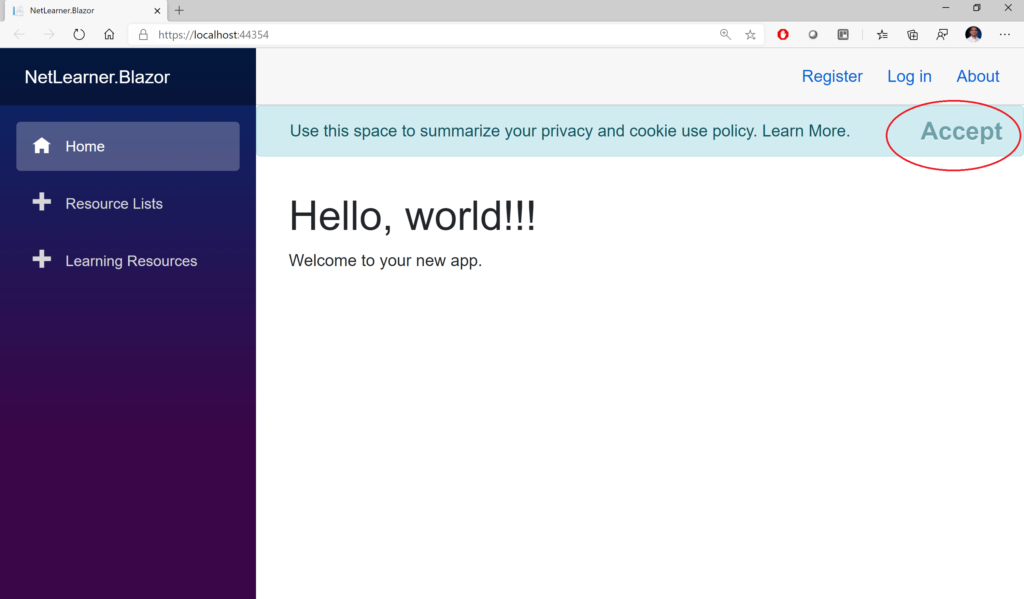
The first time you launch a new template-generated ASP .NET Core 2.x web app, you should expect to see a cookie popup that appears on every page that can be dismissed by clicking Accept. Since we added it manually in our 3.x project, let’s explore the code to dig in a little further.
GDPR-compliant cookie message
First, take a look at the _CookieConsentPartial.cshtml partial view in both the Razor Pages shared pages folder and the MVC shared views folder. The CSS class names and accessibility-friendly role attributes have been removed for brevity in the snippet below. For Razor Pages (in this example), this file should be in the /Pages/Shared/ folder by default. For MVC, this file should be in the /Views/Shared/ folder by default.
@using Microsoft.AspNetCore.Http.Features

@{
    var consentFeature = Context.Features.Get<ITrackingConsentFeature>();
    var showBanner = !consentFeature?.CanTrack ?? false;
    var cookieString = consentFeature?.CreateConsentCookie();
}

@if (showBanner)
{
    <div id="cookieConsent">
        <!-- CUSTOMIZED MESSAGE IN COOKIE POPUP -->
        <button type="button" data-dismiss="alert" data-cookie-string="@cookieString">
            <span aria-hidden="true">Accept</span>
        </button>
    </div>
    <script>
        (function () {
            var button = document.querySelector("#cookieConsent button[data-cookie-string]");
            button.addEventListener("click", function (event) {
                document.cookie = button.dataset.cookieString;
            }, false);
        })();
    </script>
}
This partial view has a combination of server-side C# code and client-side HTML/CSS/JavaScript code. First, let’s examine the C# code at the very top:
The using statement at the top mentions the Microsoft.AspNetCore.Http.Features namespace, which is necessary to use ITrackingConsentFeature.
The local variable consentFeature is used to get an instance ITrackingConsentFeature (or null if not present).
The local variable showBanner is used to store the boolean result from the property consentFeature.CanTrack to check whether the user has consented or not.
The local variable cookieString is used to store the “cookie string” value of the created cookie after a quick call to consentFeature.CreateConsentCookie().
The @if block that follows only gets executed if showBanner is set to true.
Next, let’s examine the HTML that follows:
The cookieConsent <div> is used to store and display a customized message for the end user.
This <div> also displays an Accept <button> that dismisses the popup.
The data-dismiss attribute ensures that the modal popup is closed when you click on it. This feature is available because we are using Bootstrap in our project.
The data- attribute for “data-cookie-string” is set using the server-side variable value for @cookieString.
The full value for cookieString may look something like this, beginning with the .AspNet.Consent boolean value, followed by an expiration date.
".AspNet.Consent=yes; expires=Mon, 18 Jan 2021 21:55:01 GMT; path=/; secure; samesite=none"
Finally, let’s examine the JavaScript that follows within a <script> tag:
Within the <script> tag, an anonymous function is defined and invoked immediately, by ending it with (); after it’s defined.
A button variable is defined to represent the HTML button, by using an appropriate querySelector to retrieve it from the DOM.
An eventListener is added to respond to the button’s onclick event.
If accepted, a new cookie is created using the button’s aforementioned cookieString value.
To use the partial view in your application, simply insert it into the _Layout.cshtml page defined among both the Razor Pages shared pages folder and the MVC shared views folder. The partial view can be inserted above the call to RenderBody() as shown below.
You may have noticed that there is only an Accept option in the default cookie popup generated by the template’s Partial View. This ensures that the only way to store a cookie with the user’s consent is to click Accept in the popup.
You may be wondering whether you should also display a Decline option in the cookie popup. But that would be a bad idea, because that would require you to store the user’s “No” response in the cookie itself, thus going against their wishes. If you wish to allow the user to withdraw consent at a later time, take a look at the GrantConsent() and WithdrawConsent() methods provided by ITrackingConsentFeature.
But you can still change the message in the cookie popup and your website’s privacy policy. To change the cookie’s displayed message, simply change the text that appears in the _CookieConsentPartial.cshtml partial view (or equivalent Razor component for ther Blazor project), within the <div> of the client-side HTML. In the excerpt shown in the previous section, this region is identified by the <!– CUSTOMIZED MESSAGE IN COOKIE POPUP –> placeholder comment.
Your message text is also a great place to provide a link to your website’s privacy policy. In the Razor Pages template, the <a> link is generated using a tag helper shown below. The /Privacy path points to the Privacy.cshtml Razor page in the /Pages folder.
<a asp-page="/Privacy">Learn More</a>
In a similar MVC application, you would find the Privacy.cshtml view within the /Views/Home/ folder, accessible via the Home controller’s Privacy() action method. In the MVC template, the <a> is link is generated using the following tag helper:
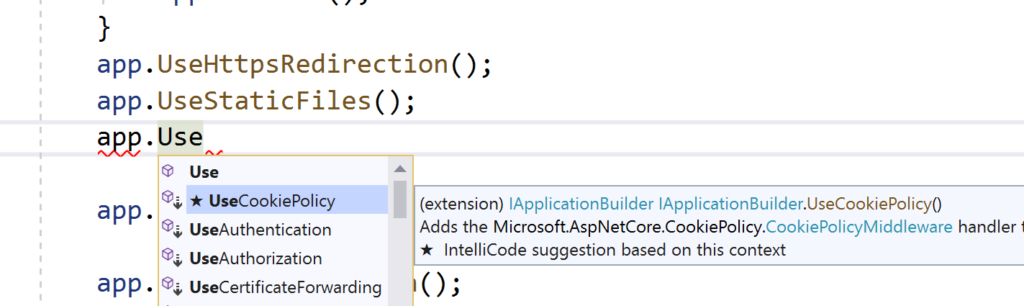
None of the above would be possible without the necessary configuration. The cookie policy can be used by simply calling the extension method app.UseCookiePolicy() in the Configure() method of your Startup.cs file, in the root location of Razor Pages, MVC and Blazor projects.
According to the official documentation, this “Adds the Microsoft.AspNetCore.CookiePolicy.CookiePolicyMiddleware handler to the specified Microsoft.AspNetCore.Builder.IApplicationBuilder, which enables cookie policy capabilities.” The cool thing about ASP .NET Core middleware is that there are many IApplicationBuilder extension methods for the necessary Middleware components you may need to use. Instead of hunting down each Middleware component, you can simply type app.Use in the Configure() method to discover what is available for you to use.
app.UseCookiePolicy() in Startup.cs
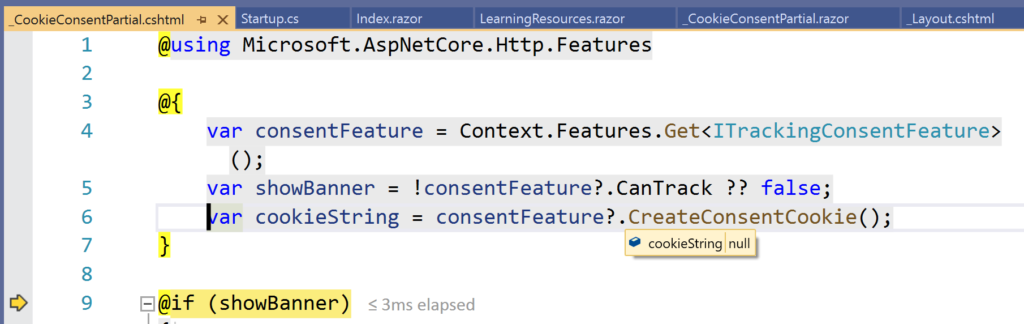
If you remove the call to app.UseCookiePolicy(), this will cause the aforementioned consentFeature value to be set to null in the C# code of your cookie popup.
var consentFeature = Context.Features.Get<ITrackingConsentFeature>();
cookieString is null if Cookie Policy disabled
There is also some minimal configuration that happens in the ConfigureServices() method which is called before the Configure() method in your Startup.cs file.
public void ConfigureServices(IServiceCollection services)
{
   services.Configure<CookiePolicyOptions>(options =>
   {
      // This lambda determines whether user consent for non-essential cookies is needed for a given request.
      options.CheckConsentNeeded = context => true;
      options.MinimumSameSitePolicy = SameSiteMode.None;
   });
   ...
}
The above code does a couple of things:
As explained by the comment, the lambda (context => true) “determines whether user consent for non-essential cookies is needed for a given request” and then the CheckConsentNeeded boolean property for the options object is set to true or false.
The property MinimumSameSitePolicy is set to SameSiteMode.None, which is an enumerator with the following possible values:
Unspecified = -1
None = 0
Lax = 1
Strict = 2
From the official documentation on cookie authentication, “ The Cookie Policy Middleware setting for MinimumSameSitePolicy can affect the setting of Cookie.SameSite in CookieAuthenticationOptions settings. For more information, check out the documentation at: