Tag Archives: Learn

IIS Hosting for ASP .NET Core 3.1 Web Apps

By Shahed C on March 2, 2020

This is the ninth of a new series of posts on ASP .NET Core 3.1 for 2020. In this series, we’ll cover 26 topics over a span of 26 weeks from January through June 2020, titled ASP .NET Core A-Z! To differentiate from the 2019 series, the 2020 series will mostly focus on a growing single codebase (NetLearner!) instead of new unrelated code snippets week.

Previous post:

NetLearner on GitHub:

In this Article:

I is for IIS Hosting

If you’ve been reading my weekly blog posts in this series (or you’ve worked with ASP .NET Core), you probably know that ASP .NET Core web apps can run on multiple platforms. Since Microsoft’s IIS (Internet Information Services) web server only runs on Windows, you may be wondering why we would need to know about IIS-specific hosting at all.

Well, we don’t need IIS to run ASP .NET Core, but there are some useful IIS features you can take advantage of. In fact, ASP .NET Core v2.2 introduced in-process hosting in IIS with the ASP .NET Core module, which continues to be available in v3.1. You can run your app either in-process or out of process.

Here’s a little background, from the 2.2 release notes of what’s new:

“In earlier versions of ASP.NET Core, IIS serves as a reverse proxy. In 2.2, the ASP.NET Core Module can boot the CoreCLR and host an app inside the IIS worker process (w3wp.exe). In-process hosting provides performance and diagnostic gains when running with IIS.” 

NOTE: The actual web.config file has been intentionally left out from the above repo, and replaced with a placeholder file (for reference), web.config.txt. When you follow the configuration steps outlined below, the actual web.config file will be generated with the proper settings.
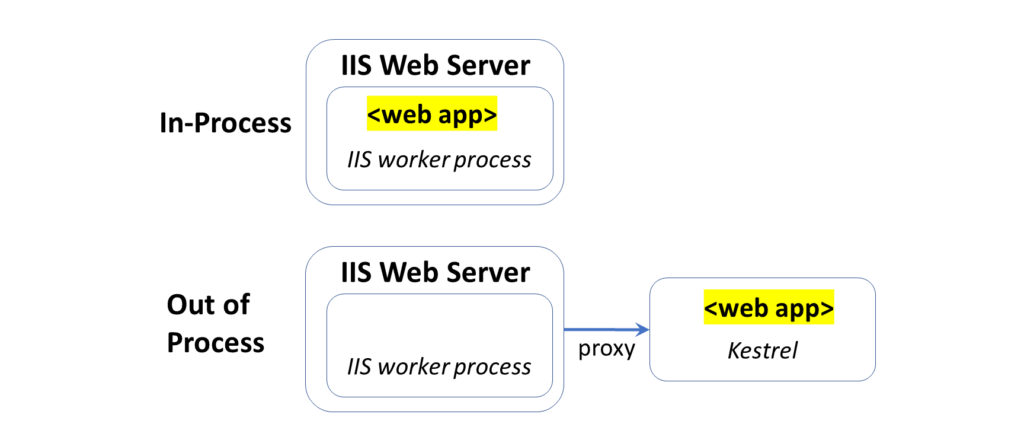
In-Process vs Out-of-Process

Developing for IIS

In order to develop for IIS on your local development machine while working with Visual Studio, you should complete the following steps:

  1. Install/Enable IIS locally: add IIS via Windows Features setup
  2. Configure IIS: add website with desired port(s)
  3. Enable IIS support in VS: include dev-time IIS support during setup
  4. Configure your web app: enable HTTPS, add launch profile for IIS

NOTE: If you need help with any of the above steps, you may follow the detailed guide in the official docs:

After Step 1 (IIS installation), the list of Windows Features should show that IIS and many of its components have been installed.
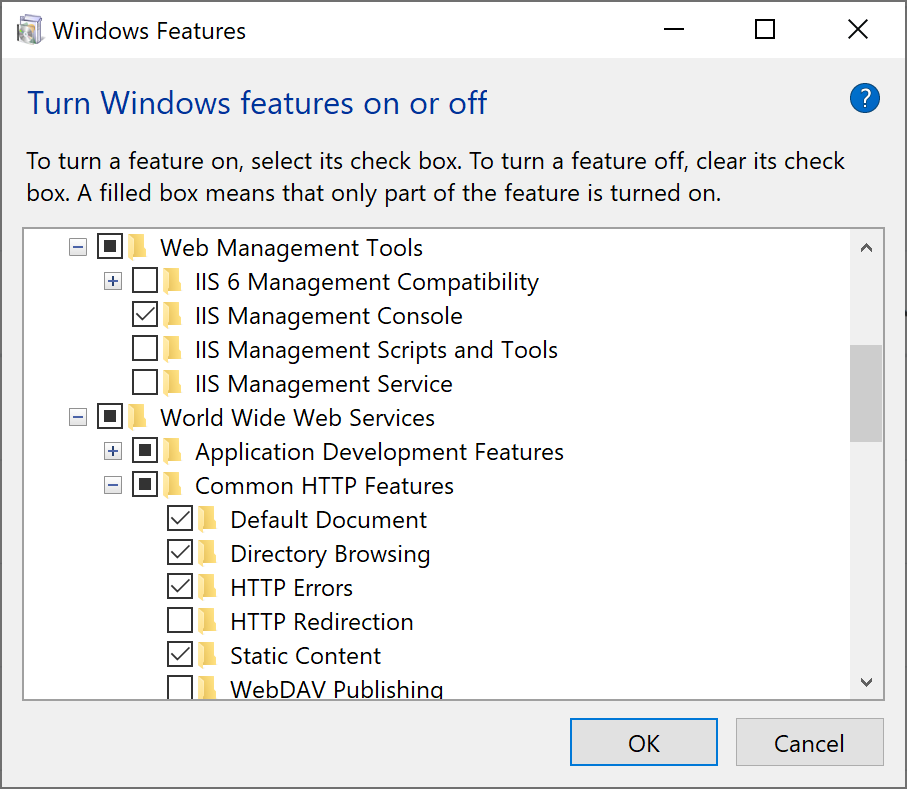
IIS components in Windows Features

During and after Step 2 (IIS configuration), my newly added website looks like the screenshots shown below:
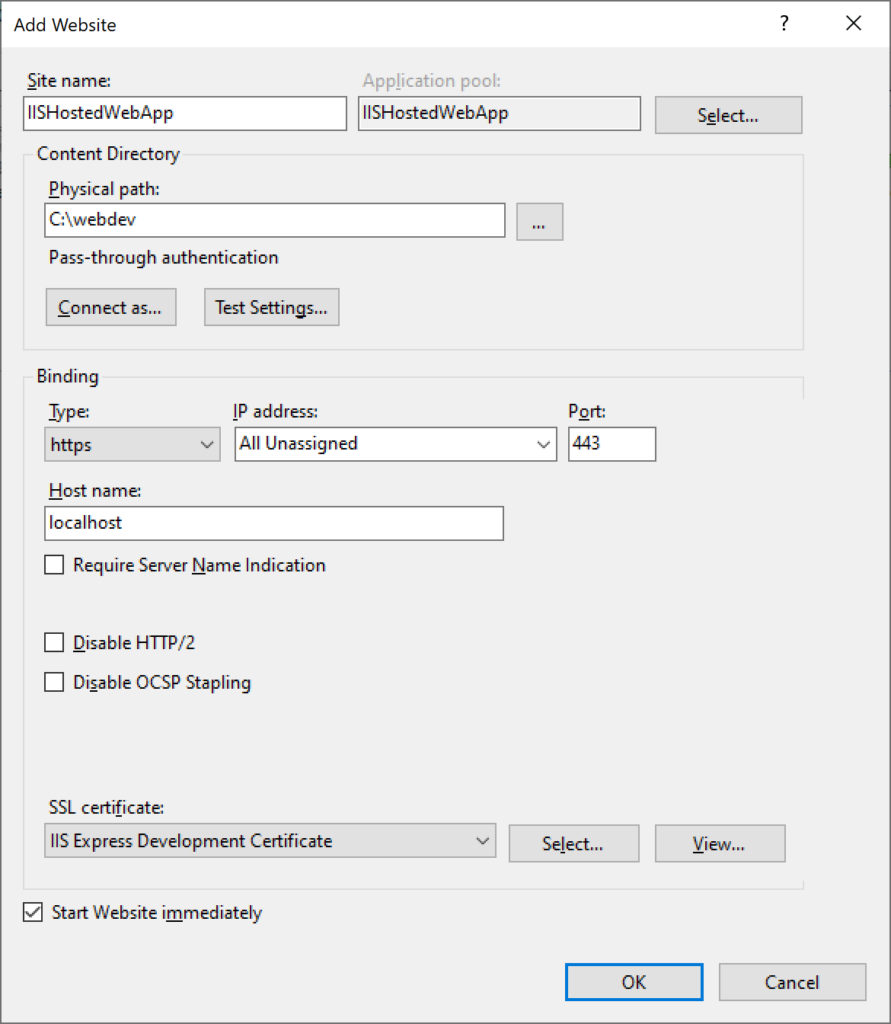
Add Website in IIS Manager
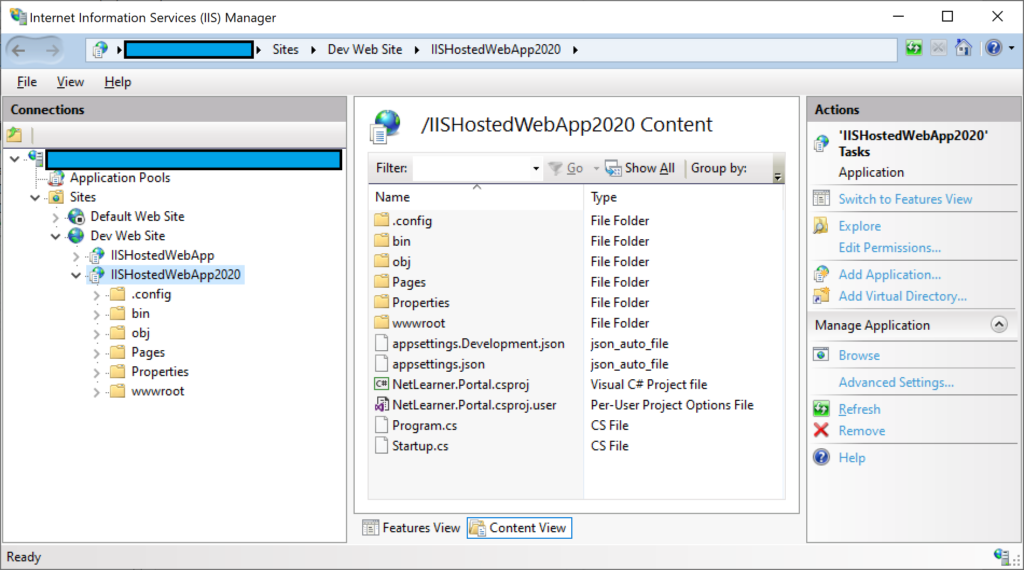
Browse Website Folder via IIS Manager

For Step 3 (IIS support in VS) mentioned above, make sure you select the “Development time IIS support” option under the “ASP .NET and web development” workload. These options are shown in the screenshot below:
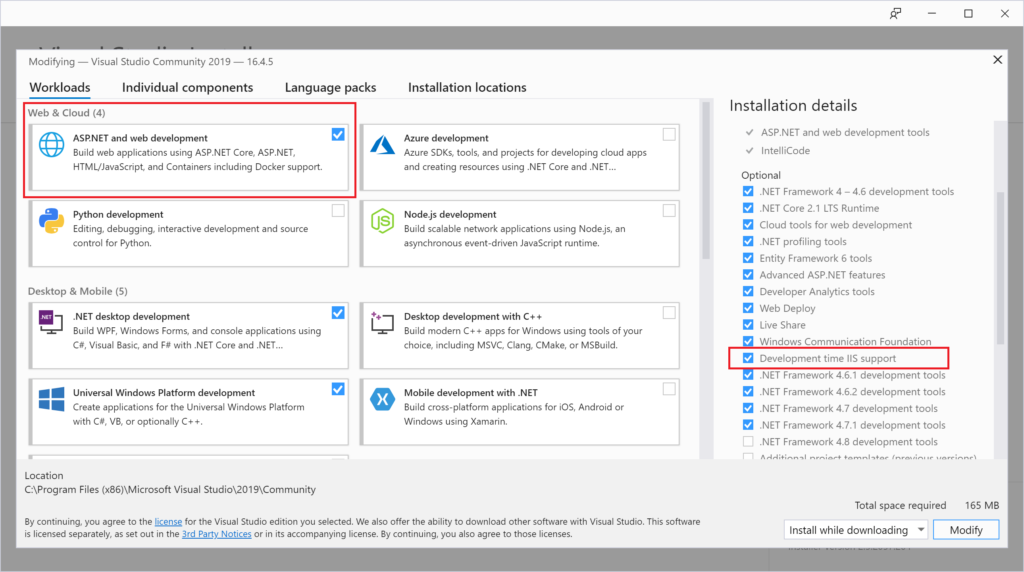
Development time IIS Support in VS2019 ASP .NET workload

After Step 4 (web app config), I can run the web application locally on IIS. Check out the next section to learn more about your web application configuration. In addition to the .csproj settings, you’ll also need a web.config file in addition to your appsettings.json file. You may also need to start VS2019 with Admin privileges before attempting to debug against IIS.

Optionally, you could set up a VM on Azure with IIS enabled and deploy to that web server. If you need some help with the setup, you can select a pre-configured Windows VM with IIS pre-installed from the Azure Portal.

If you need help with creating an Azure VM with IIS, check out the following resources:

IIS Configuration in Visual Studio

After completing Step 4 using the instructions outlined above, let’s observe the following (in the NetLearner.Portal web app project:

  • Profile: Debug tab in project properties
  • Project: .csproj settings
  • Settings: launchSettings.json
  • Config: web.config file

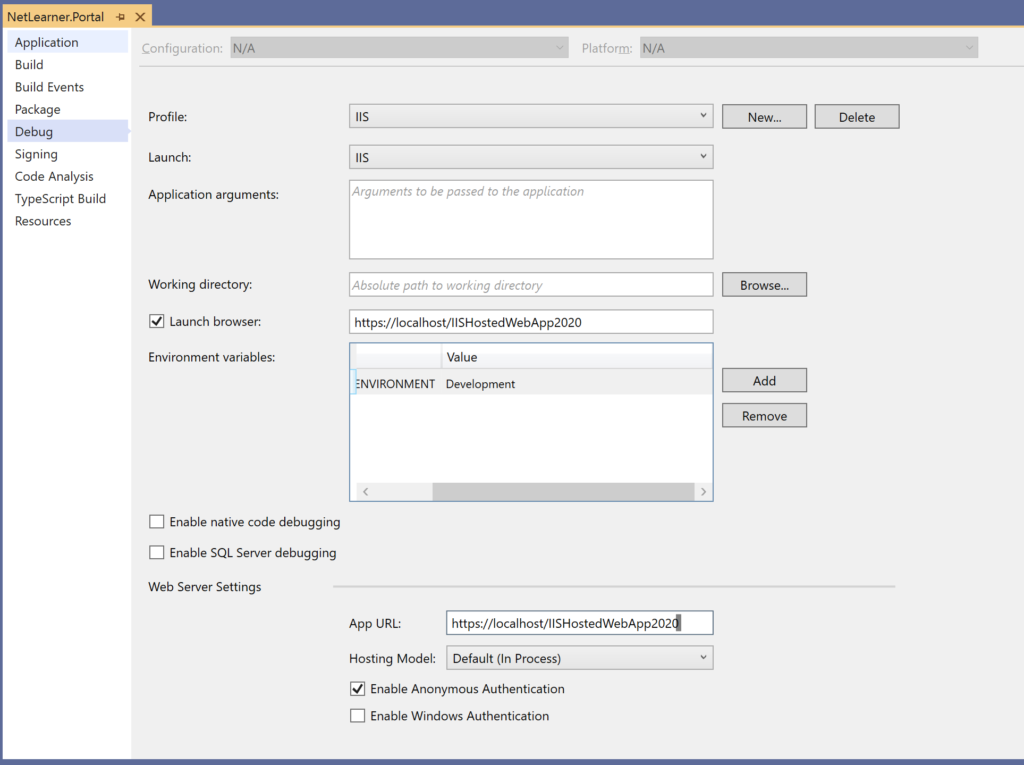
Profile: With your web project open in Visual Studio, right-click the project in Solution Explorer, and then click Properties. Click the Debug tab to see the newly-added IIS-specific profile. Recall that the Hosting Model offers 3 options during the creation of this profile: Default, In-Process and Out-of-process.
Settings: Under the Properties node in the Solution Explorer, open the launchSettings.json file. Here, you can see all the settings for your newly-created IIS-specific Profile. You can manually add/edit settings directly in this file without having to use the Visual Studio UI.
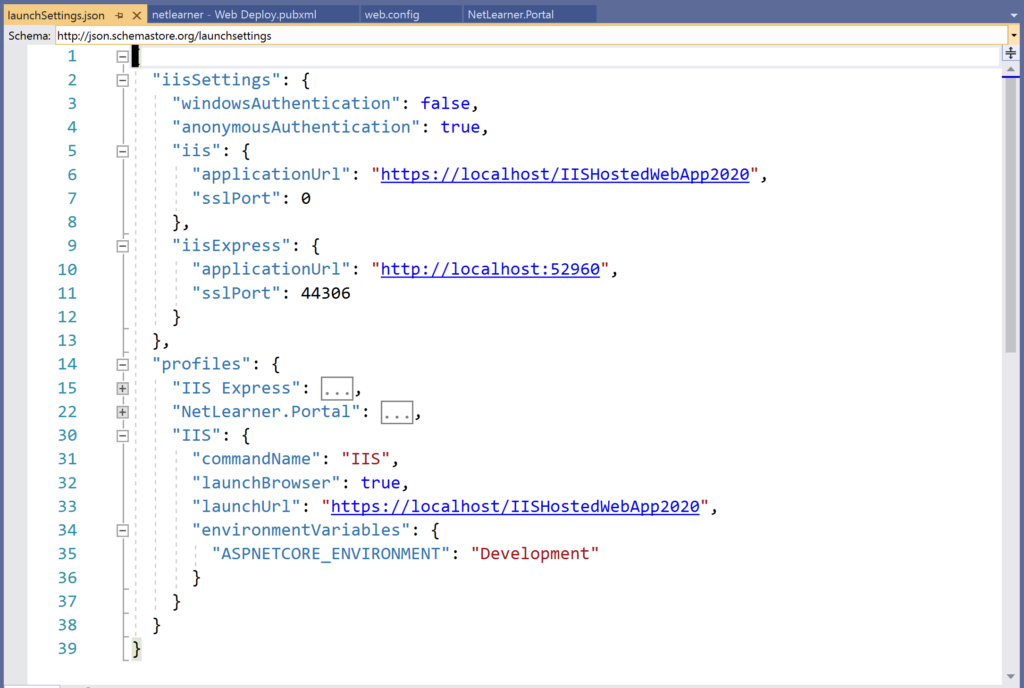
launchSettings.json file, showing IIS Profile settings

Config: You may recognize the XML-based web.config file from previous versions of ASP .NET, but the project’s settings and dependencies are now spread across multiple files, such as the .csproj file and appsettings.json config file. For ASP .NET Core projects, the web.config file is only used specifically for an IIS-hosted environment. In this file, you may configure the ASP .NET Core Module that will be used for your IIS-hosted web application.
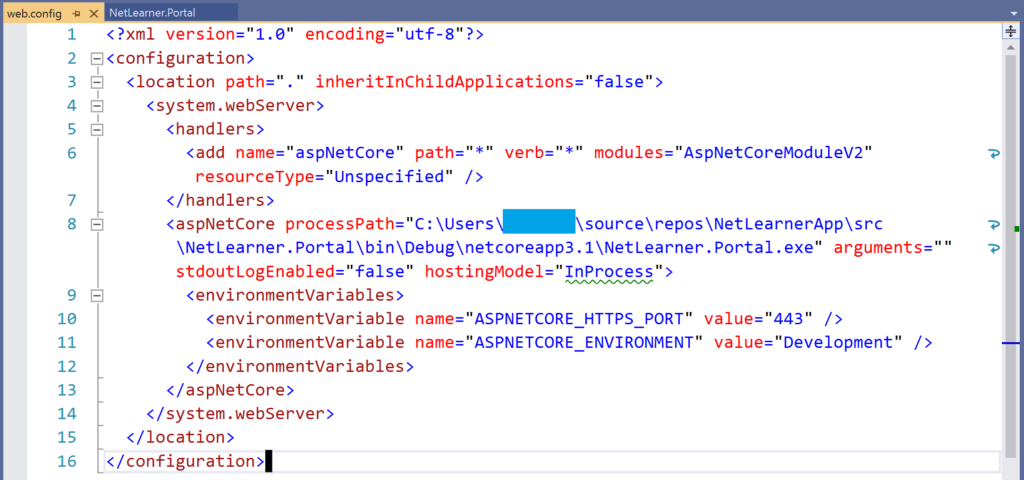
web.config file, showing hosting model, e.g. InProcess

Once your web app is configured, you can run it from Visual Studio using the profile you created previously. In order to run it using a specific profile, click the tiny dropdown next to the green Run/Debug button to select the desired profile. Then click the button itself. This should launch the application in your web browser, pointing to localhost running on IIS, e.g. https://localhost/<appname>
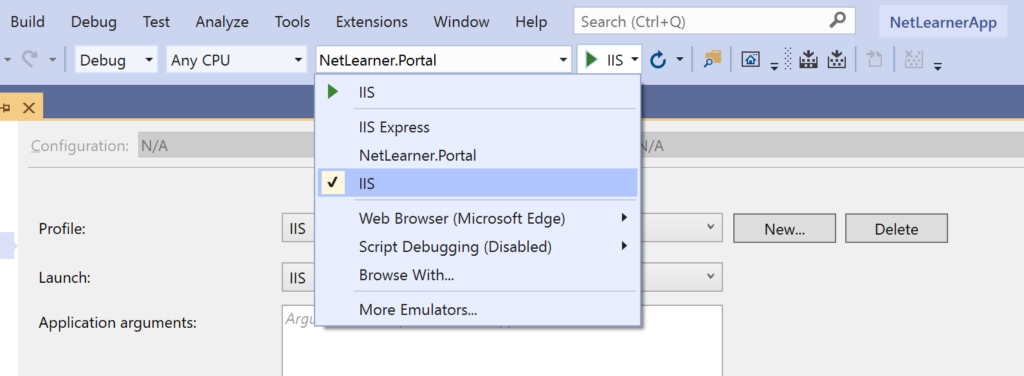
VS2019 with IIS Profile selected
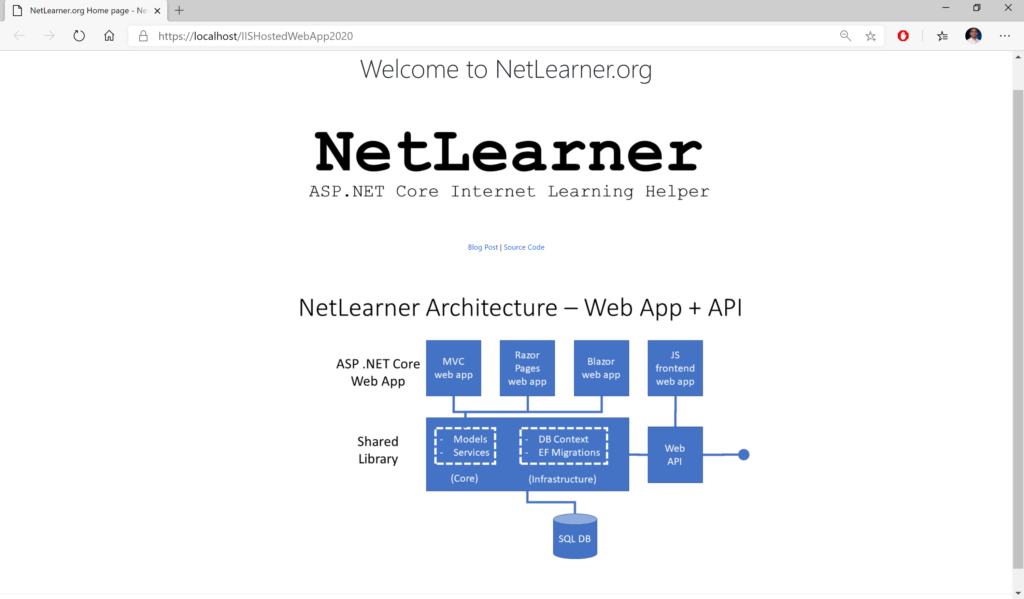
Web browser showing web app running in IIS

ASP .NET Core Module

Now that your IIS server environment has been set up (either locally or in the cloud), let’s learn about the ASP .NET Core Module. This is a native IIS module that plugs into the actual IIS pipeline (not to be confused with your web app’s request pipeline). It allows you to host your web app in one of two ways:

  • In-process: the web app is hosted inside the IIS worker process, i.e. w3wp.exe (previously known as the World Wide Web Publishing Service)
  • Out of process: IIS forwards web server requests to the web app, which uses Kestrel (the cross-platform web server included with ASP .NET Core)

As you’ve seen in an earlier section, this setting is configured in the web.config file:

<aspNetCore processPath="C:\Users\REPLACE_SOMEUSER\source\repos\NetLearnerApp\src\NetLearner.Portal\bin\Debug\netcoreapp3.1\NetLearner.Portal.exe" arguments="" stdoutLogEnabled="false" hostingModel="InProcess">

The lists below shows shows some notable differences between hosting in-process vs out of process.

In-Process vs Out-of-Process. compared

How you configure your app is up to you. For more details on the module and its configuration settings, browse through the information available at:

BONUS: Publishing to a VM with IIS

You can publish your ASP .NET Core web app to a Virtual Machine (either on your network or in Azure) or just any Windows Server you have access to. There are several different options:

Here are some prerequisites to be aware of:

  • IIS must be pre-installed on the server with relevant ports enabled
  • WebDeploy must be installed (which you would normally have on your local dev machine)
  • The VM must have a DNS name configured (Azure VMs can have fully qualified domain names, e.g. <machinename>.eastus.cloudapp.azure.com)

References

Blazor Full-Stack Web Dev in ASP .NET Core 3.1

By Shahed C on January 13, 2020
ASP .NET Core A-Z Series

This is the second of a new series of posts on ASP .NET Core 3.1 for 2020. In this series, we’ll cover 26 topics over a span of 26 weeks from January through June 2020, titled ASP .NET Core A-Z! To differentiate from the 2019 series, the 2020 series will mostly focus on a growing single codebase (NetLearner!) instead of new unrelated code snippets week.

Previous post:

NetLearner on GitHub:

In this Article:

B is for Blazor Full-Stack Web Dev

In my 2019 A-Z series, I covered Blazor for ASP .NET Core while it was still experimental. As of ASP .NET Core 3.1, server-side Blazor has now been released, while client-side Blazor (currently in preview) is expected to arrive in May 2020. This post will cover server-side Blazor, as seen in NetLearner.

To see the code in action, open the solution in Visual Studio 2019 and run the NetLearner.Blazor project. All modern web browsers should be able to run the project.

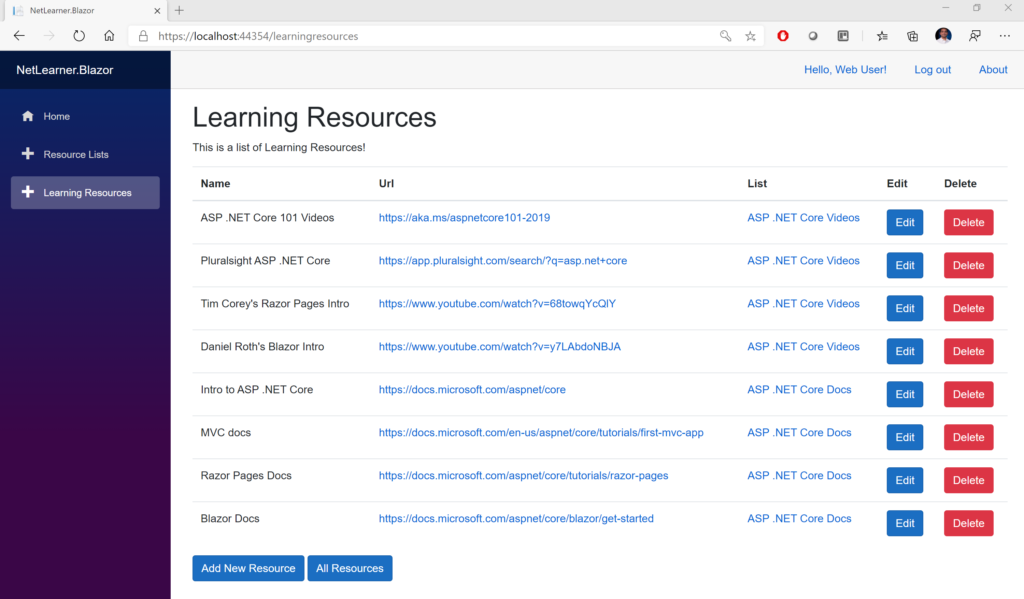
NetLearner.Blazor web app in action

Entry Point and Configuration

Let’s start with Program.cs, the entry point of the application. Just like any ASP .NET Core web application, there is a Main method that sets up the entry point. A quick call to CreateHostBuilder() in the same file ensures that two things will happen: The Generic Host will call its own CreateDefaultBuilder() method (similar to how it works in a typical ASP .NET Core web application) and it will also call UseStartup() to identify the Startup class where the application is configured.

public class Program
{
   public static void Main(string[] args)
   {
      CreateHostBuilder(args).Build().Run();
   }
 
   public static IHostBuilder CreateHostBuilder(string[] args) =>
      Host.CreateDefaultBuilder(args)
      .ConfigureWebHostDefaults(webBuilder =>
      {
         webBuilder.UseStartup<Startup>();
      });
 }

Note that the Startup class doesn’t have to be called Startup, but you do have to tell your application what it’s called. In the Startup.cs file, you will see the familiar ConfigureServices() and Configure() methods, but you won’t need any of the regular MVC-related lines of code that set up the HTTP pipeline for an MVC (or Razor Pages) application. Instead, you just need a call to AddServerSideBlazor() in ConfigureServices() and a call to MapBlazorHub() in Configure() while setting up endpoints with UseEndPoints().

public class Startup
{
   public void ConfigureServices(IServiceCollection services)
   {
      ...
      services.AddServerSideBlazor();
      ...
   } 

   public void Configure(IApplicationBuilder app, IWebHostEnvironment env) 
   {
      ...
      app.UseEndpoints(endpoints => 
      {
         endpoints.MapControllers();
         endpoints.MapBlazorHub();
         endpoints.MapFallbackToPage("/_Host");
      });
   }
}

Note that the Configure() method takes in an app object of type IApplicationBuilder, similar to the IApplicationBuilder we see in regular ASP .NET Core web apps.  A call to MapFallBackToPage() indicates the “/_Host” root page, which is defined in the _Host.cshtml page in the Pages subfolder.

Rendering the Application

This “app” (formerly defined in a static “index.html” in pre-release versions) is now defined in the aforementioned “_Host.cshtml” page. This page contains an <app> element containing the main App component.

<html>
... 
<body>
    <app>
        <component type="typeof(App)" render-mode="ServerPrerendered" />
    </app>
...
</body>
</html>

The HTML in this page has two things worth noting: an <app> element within the <body>, and a <component> element of type “App” with a render-mode attribute set to “ServerPrerendered”. This is one of 3 render modes for a Blazor component: Static, Server and ServerPrerendered. For more information on render modes, check out the official docs at:

According to the documentation, this setting “renders the component into static HTML and includes a marker for a Blazor Server app. When the user-agent starts, this marker is used to bootstrap a Blazor app.

The App component is defined in App.razor, at the root of the Blazor web app project. This App component contains nested authentication-enabled components, that make use of the MainLayout to display the single-page web application in a browser. If the user-requested routedata is found, the requested page (or root page) is displayed. If the user-requested routedata is invalid (not found), it displays a “sorry” message to the end user.

<CascadingAuthenticationState>
    <Router AppAssembly="@typeof(Program).Assembly">
        <Found Context="routeData">
            <AuthorizeRouteView RouteData="@routeData" DefaultLayout="@typeof(MainLayout)" />
        </Found>
        <NotFound>
            <LayoutView Layout="@typeof(MainLayout)">
                <p>Sorry, there's nothing at this address.</p>
            </LayoutView>
        </NotFound>
    </Router>
</CascadingAuthenticationState>

The MainLayout.razor component (under /Shared) contains the following:

  • NavMenu: displays navigation menu in sidebar
  • LoginDisplay: displays links to register and log in/out
  • _CookieConsentPartial: displays GDPR-inspired cookie message
  • @Body keyword: replaced by content of layout when rendered

The _Layout.cshtml layout file (under /Pages/Shared) acts as a template and includes a call to @RenderBody to display its content. This content is determined by route info that is requested by the user, e.g. Index.razor when the root “/” is requested, LearningResources.razor when the route “/learningresources” is requested.

    <div class="container">
        <main role="main" class="pb-3">
            @RenderBody()
        </main>
    </div>

The NavMenu.razor component contains NavLinks that point to various routes. For more information about routing in Blazor, check out the official docs at:

LifeCycle Methods

A Blazor application goes through several lifecycle methods, including both asynchronous and non-asynchronous versions where applicable. Some important ones are listed below:

  • OnInitializedAsync() and OnInitialized(): invoked after receiving initial params
  • OnParametersSetAsync() and OnParametersSet(): called after receiving params from its parent, after initialization
  • OnAfterRenderAsync() and OnAfterRender(): called after each render
  • ShouldRender(): used to suppress subsequent rendering of the component
  • StateHasChanged(): called to indicate that state has changed, can be triggered manually

These methods can be overridden and defined in the @code section (formerly @functions section) of a .razor page, e.g. LearningResources.razor.

 @code {
   ...
   protected override async Task OnInitializedAsync()
   {
      ...
   } 
   ...
}

Updating the UI

The C# code in LearningResources.razor includes methods to initialize the page, handle user interaction, and keep track of data changes. Every call to an event handler from an HTML element (e.g. OnClick event for an input button) can be bound to a C# method to handle that event. The StateHasChanged() method can be called manually to rerender the component, e.g. when an item is added/edited/deleted in the UI.

<div>
    <input type="button" class="btn btn-primary" value="All Resources" @onclick="(() => DataChanged())" />
</div>

...
private async void DataChanged()
{
    learningResources = await learningResourceService.Get();
    ResourceLists = await resourceListService.Get();
    StateHasChanged();
}

Note that the DataChanged() method includes some asynchronous calls to Get() methods from a service class. These are the service classes in the shared library that are also used by the MVC and Razor Pages web apps in NetLearner.

Parameters defined in the C# code can be used similar to HTML attributes when using the component, including RenderFragments can be used like nested HTML elements. These can be defined in sub-components such as ConfirmDialog.razor and ResourceDetail.razor that are inside the LearningResources.razor component.

<ResourceDetail LearningResourceObject="learningResourceObject"
                ResourceListValues="ResourceLists"
                DataChanged="@DataChanged">
    <CustomHeader>@customHeader</CustomHeader>
</ResourceDetail>

Inside the subcomponent, you would define the parameters as such:

@code {
    [Parameter]
    public LearningResource LearningResourceObject { get; set; }

    [Parameter]
    public List<ResourceList> ResourceListValues { get; set; }

    [Parameter]
    public Action DataChanged { get; set; }

    [Parameter]
    public RenderFragment CustomHeader { get; set; }
} 

For more information on the creation and use of Razor components in Blazor, check out the official documentation at:

Next Steps

Run the Blazor web app from the NetLearner repo and try using the UI to add, edit and delete items. Make sure you remove the restrictions mentioned in a previous post about NetLearner, which will allow you to register as a new user, log in and perform CRUD operations.

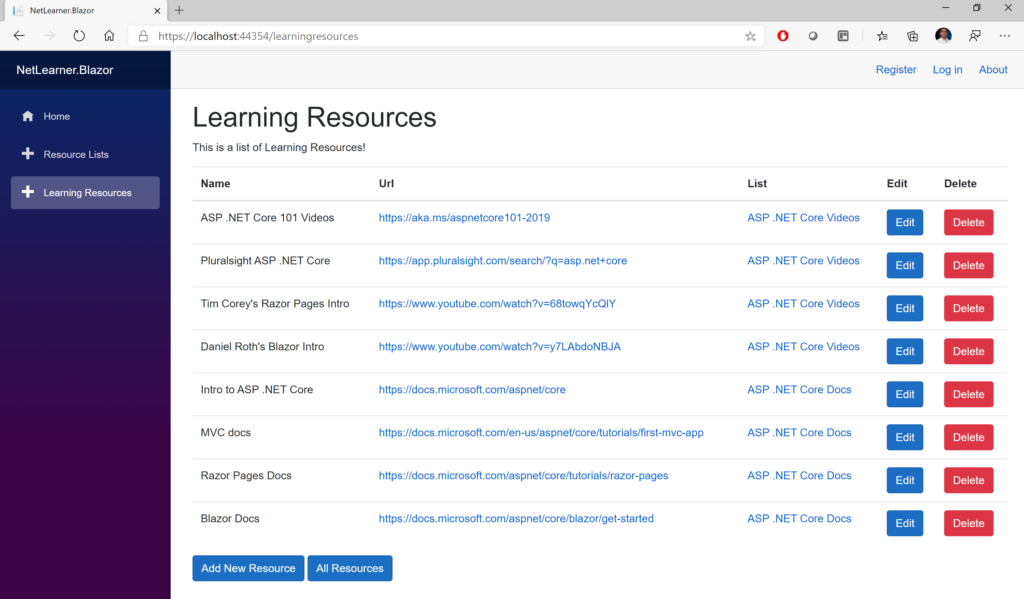
NetLearner.Blazor: Learning Resources

There is so much more to learn about this exciting new framework. Blazor’s reusable components can take various forms. In addition to server-side Blazor (released in late 2019 with .NET Core 3.1), you can also host Blazor apps on the client-side from within an ASP .NET Core web app. Client-side Blazor is currently in preview and is expected in a May 2020 release.

References

Blazor Full-Stack Web Dev in ASP .NET Core

By Shahed C on January 14, 2019

This is the second of a new series of posts on ASP .NET Core for 2019. In this series, we’ll cover 26 topics over a span of 26 weeks from January through June 2019, titled A-Z of ASP .NET Core!

ASPNETCoreLogo-300x267 A – Z of ASP .NET Core!

In this Article:

B is for Blazor

In a previous post, I covered various types of Pages that you will see when developing ASP .NET Core web applications. In this article, we will take a look at a Blazor sample and see how it works. Blazor (Browser + Razor) is an experimental .NET web framework which allows you to write full-stack C# .NET web applications that run in a web browser, using WebAssembly.

NOTE: Server-slide Blazor (aka Razor Components) allows you to run your Blazor app on the server, while using SignalR for the connection to the client, but we will focus on client-only Blazor in this article.

To get started by yourself, follow the official instructions to set up your development environment and then build your first app. In the meantime, you may download the sample code from my GitHub repo.

Web Blazor projects on GitHub: https://github.com/shahedc/BlazorDemos

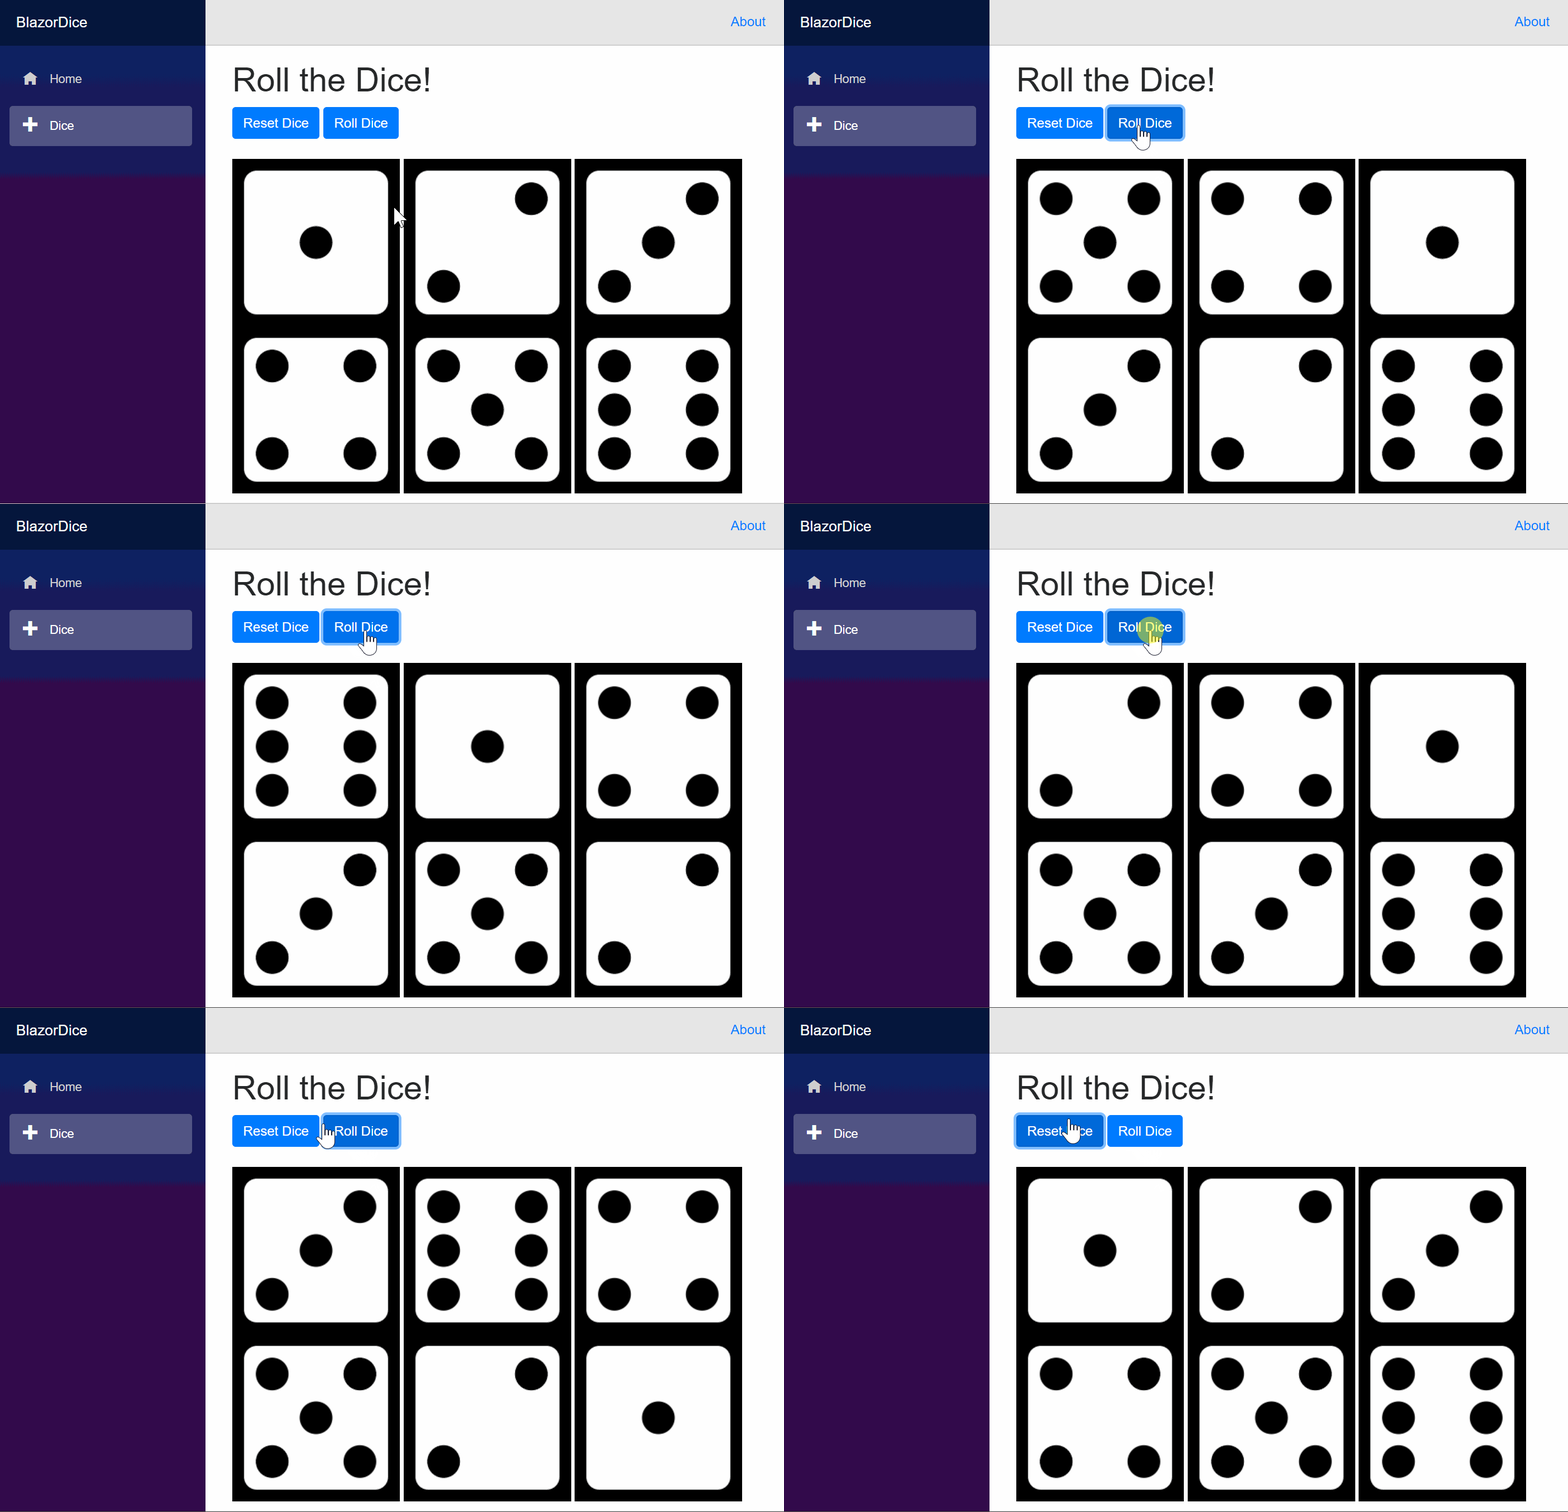
Specifically, take a look at the Blazor Dice project, which you can use to generate random numbers using dice graphics. The GIF below illustrates the web app in action!

blazor-dice

Entry Point and Configuration

Let’s start with Program.cs, the entry point of your application. Just like any ASP .NET Core web application, there is a Main method that sets up the entry point. A quick call to CreateHostBuilder() in the same file ensures that two things will happen: The Blazor Web Assembly Host will call its own CreateDefaultBuilder() method (similar to how it works in a typical ASP .NET Core web application) and it will also call UseBlazorStartup() to identify the Startup class where the application is configured.

public class Program
{
   public static void Main(string[] args)
   {
      CreateHostBuilder(args).Build().Run();
   }

   public static IWebAssemblyHostBuilder CreateHostBuilder(string[] args) =>
      BlazorWebAssemblyHost.CreateDefaultBuilder()
      .UseBlazorStartup<Startup>();
}

Note that the Startup class doesn’t have to be called Startup, but you do have to tell your application what it’s called. In the Startup.cs file, you will see the familiar ConfigureServices() and Configure() methods, but you won’t need any of the regular MVC-related lines of code that set up the HTTP pipeline for an MVC (or Razor Pages) application. Instead, you just need a minimum of 1 line of  code that adds the client side “App”. (This is different for server-hosted apps.)

public class Startup
{
   public void ConfigureServices(IServiceCollection services)
   {
   } 

   public void Configure(IBlazorApplicationBuilder app)
   {
      app.AddComponent<App>("app");
   }
}

Note that the Configure() method takes in an app object of type IBlazorApplicationBuilder, unlike the usual IApplicationBuilder we see in regular ASP .NET Core web apps.  When it adds the App component, it specifies the client-side app with the name “app” in double quotes.

UPDATE: In the above statement, I’m referring to “app” as “the client-side app”. In the comments section, I explained to a reader (Jeff) how this refers to the HTML element in index.html, one of the 3 locations where you would have to change the name if you want to rename it. Another reader (Issac) pointed out that “app” should be described as “a DOM Element Selector Identifier for the element” in that HTML file, which Angular developers should also recognize. Issac is correct, as it refers to the <app> element in the index.html file.

NAME CHANGES: Issac also pointed out that “IBlazorApplicationBuilder has already become IComponentsApplicationBuilder”. This refers to recent name changes on Jan 18, 2019. I will periodically make changes to the articles and code samples in this series. In the meantime, please refer to the following GitHub commit:

NOTE: There is an App.cshtml file in the project root that specifies the AppAssembly as a temporary measure, but the app config in this file is expected to move to Program.cs at a future date. 

Continue reading

Happy New Year 2019!

By Shahed C on December 27, 2018

If you’ve been following my ASP .NET Core blog series from October to December 2018, you may have noticed a little surprise. The first letter of each article spells out the words HAPPY NEW YEAR!

happy-new-year-2019

Congratulations! You’ve made it this far! 😀

Not just a gimmick, this blog series kicks off with a “Hello World” intro to ASP .NET Core, reveals a new open-source learning app (NetLearner) halfway through, breaks all my previous blog viewership records with December’s .NET Core 3.0 recap after Connect(); 2018 and finally wraps with up a SignalR writeup (and a new sample app that’s not chat!)

Blog viewership numbers in 2018:

  • Jan – Sep: ~2k/month with little or no updates
  • Oct: ~6k
  • Nov: ~8k
  • Dec: 36k+ (as of Dec 27, when this blog post was published)
    • 40k+ as of Dec 31 midnight

blog-stats-2018

Special thanks to the following people at Microsoft for all your guidance, motivation, inspiration, feedback and suggestions:


Also, I really appreciate the support from the Visual Studio team with their tweets:

@VisualStudio on Dec 18: https://twitter.com/VisualStudio/status/1075086548712988673

@VisualStudio on Dec 20: https://twitter.com/VisualStudio/status/1075804272279867397

During this blog series, I also participated in Matthew Groves’ 2nd annual C# Advent 2018, which ran daily from Dec 1 – Dec 25. Check out his website to see dozens of new blog posts from many talented C# developers and bloggers:

Hope you enjoyed the 2018 series and will stay tuned for what’s to come in 2019:

  • A-Z with ASP .NET Core 2019 Series
    • Jan – June 2019: 26 weeks of ASP .NET Core posts
    • Will be combined to form a living breathing ebook
    • Will be updated to align with .NET Core 3.0 release


Real-time ASP .NET Core Web Apps with SignalR

By Shahed C on December 23, 2018

This is the twelfth of a new series of posts on ASP .NET Core. In this post, we’ll learn about the use of SignalR to build real-time functionality in your ASP NET Core web apps. SignalR can also be used to add real-time functionality to desktop applications, mobile apps and Azure Functions.

ASPNETCoreLogo-300x267

In this Article:

What is SignalR?

SignalR has been around for 5+ years now, allowing ASP .NET developers to easily include real-time features in their web applications. Fast forward to 2018, SignalR Core is now available with ASP .NET Core (as of 2.1) as a cross-platform solution to add real-time features to web apps and more!

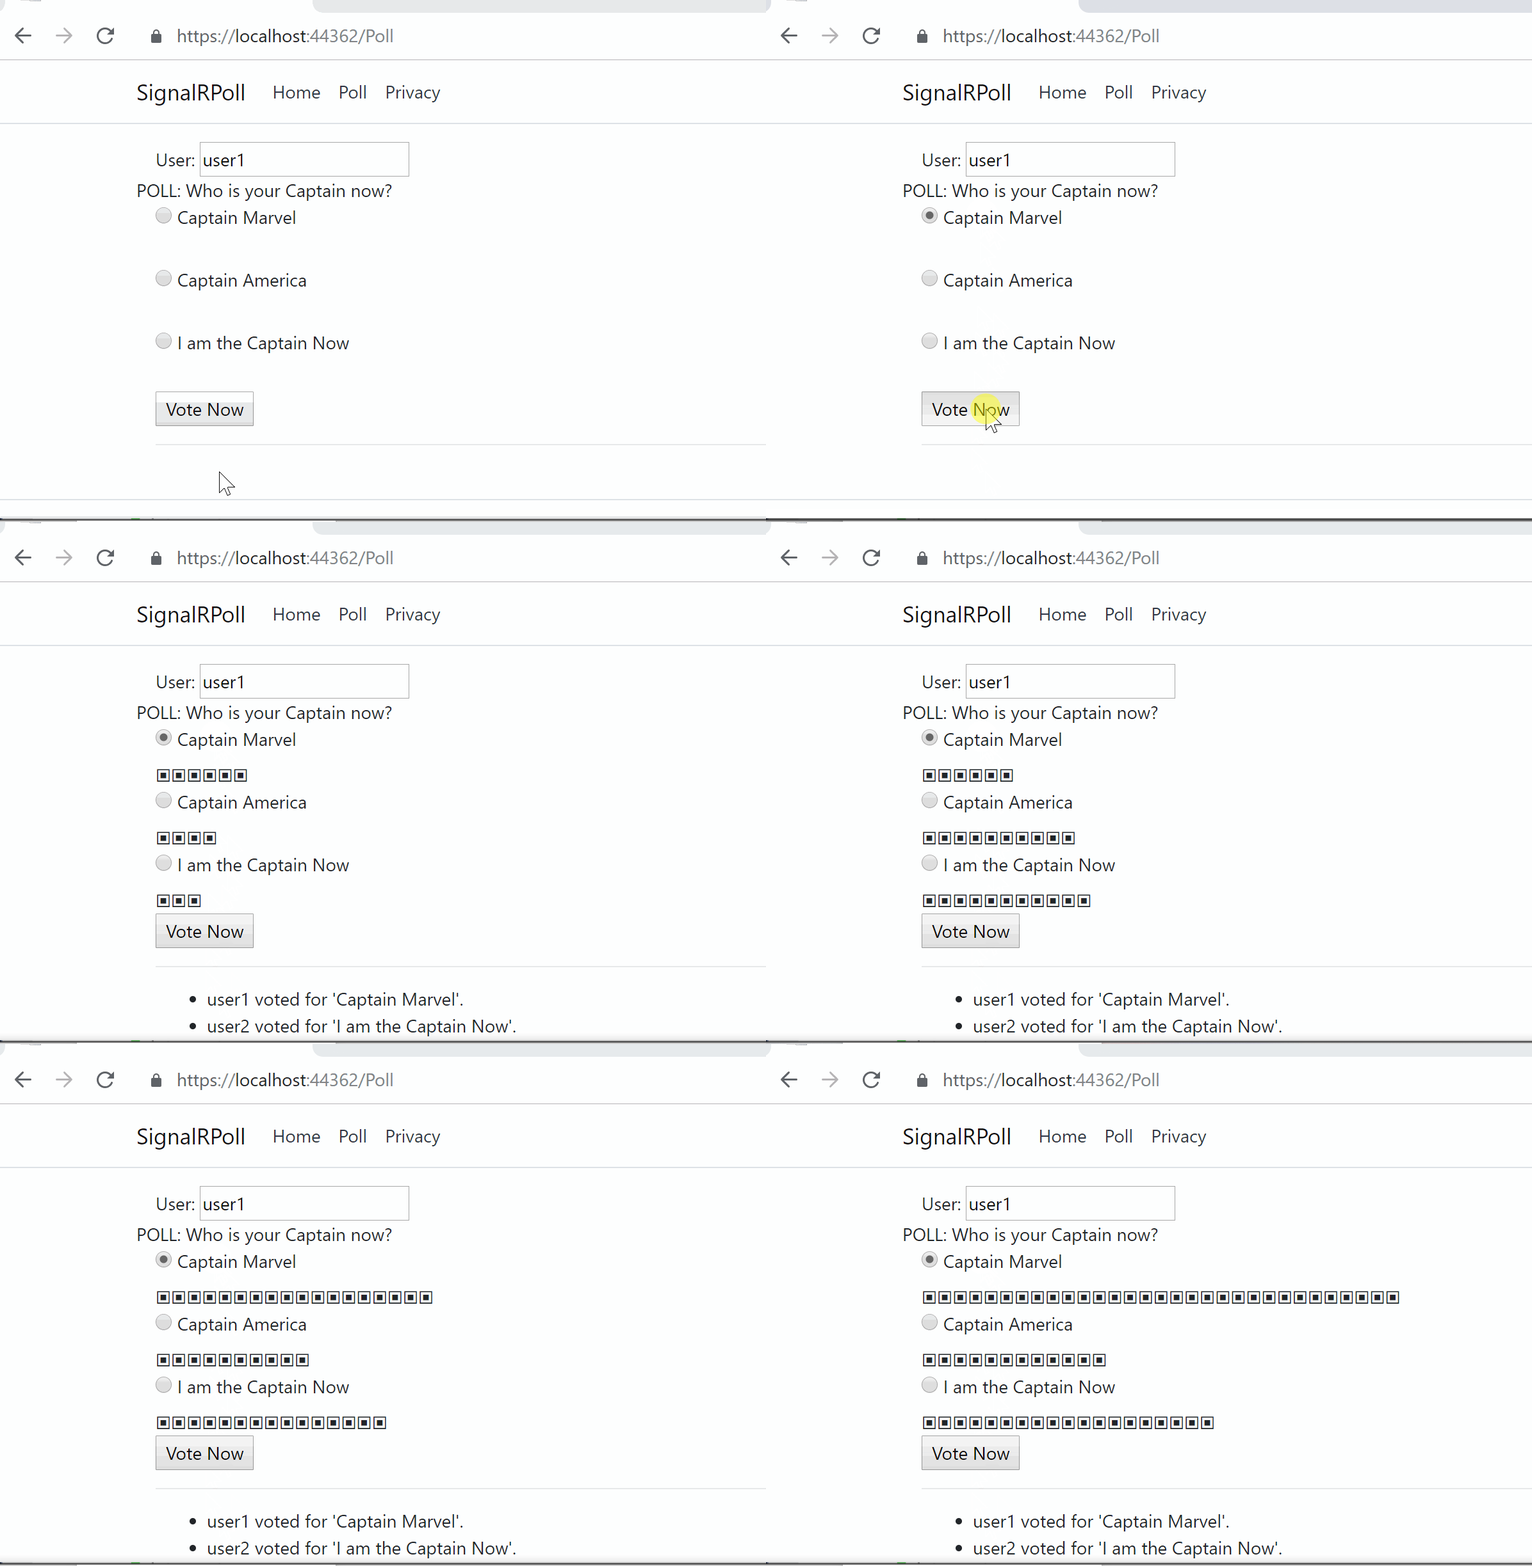
In this article, we’ll go over SignalR concepts, using a new sample I developed to allow web users to vote in a real-time online poll. Before you begin, take a look at the sample code project on GitHub:

Web SignalR Core Samples on GitHub: https://github.com/shahedc/SignalRCoreSamples

I ran a couple of polls on Facebook and Twitter to see what the dev community wanted to see. On Twitter, the #1 choice was “Polling/Voting app” followed by “Planning Poker App” and “Real-time game”. On Facebook, the #1 choice was “Real-time game” followed by “Polling/voting app”. As a result, I’ve decide to complement this article with a polling sample app, and I plan to work on other ideas in 2019.

More importantly, Brady Gaster suggested that the sample app should definitely be “Not. Chat.” 🙂

In the sample project, take a look at the SignalRPoll project to see how the polling feature has been implemented. In order to create a project from scratch, you’ll be using both server-side and client-side dependencies.

Continue reading