As promised, below is the initial release of the ASP .NET Core 3.1 A-Z ebook. This combines the 26 blog posts from the series of ASP .NET Core articles on this website.
ASP .NET Core 3.1 A-Z ebook cover
You can find the complete ebook on GitHub using one of the links below:
The cover image was generated using the Canva mobile app
The 2020 eBook is still a work in progress 🙂
I’m using my Worker Service sample to auto-generate Word documents from each blog post by converting each article’s HTML into Word format using MariGold.OpenXHTML
After some tweaking, images have been manually resized using a Macro in the Word document. Automatic resizing doesn’t seem to work between HTML to Word conversions, but feel free to submit a Pull Request if you have suggestions on how to fix it.
Animated GIF images don’t work in the ebook, so a link to each original source has been included where they appear in a few chapters.
This is the twenty-second of a new series of posts on ASP .NET Core 3.1 for 2020. In this series, we’ll cover 26 topics over a span of 26 weeks from January through June 2020, titled ASP .NET Core A-Z! To differentiate from the 2019 series, the 2020 series will mostly focus on a growing single codebase (NetLearner!) instead of new unrelated code snippets week.
To build upon a previous post on Forms and Fields in ASP .NET Core, this post covers Validation in ASP .NET Core. When a user submits form field values, proper validation can help build a more user-friendly and secure web application. Instead of coding each view/page individually, you can simply use server-side attributes in your models/viewmodels.
NOTE: As of ASP .NET Core 2.2, validation may be skipped automatically if ASP .NET Core decides that validation is not needed. According to the “What’s New” release notes, this includes primitive collections (e.g. a byte[] array or a Dictonary<string, string> key-value pair collection)
Validation in ASP .NET Core
Validation Attributes
To implement model validation with [Attributes], you will typically use Data Annotations from the System.ComponentModel.DataAnnotations namespace. The list of attribute does go beyond just validation functionality though. For example, the DataType attribute takes a datatype parameter, used for inferring the data type and used for displaying the field on a view/page (but does not provide validation for the field).
Common attributes include the following
Range: lets you specify min-max values, inclusive of min and max
RegularExpression: useful for pattern recognition, e.g. phone numbers, zip/postal codes
Required: indicates that a field is required
StringLength: sets the maximum length for the string entered
MinLength: sets the minimum length of an array or string data
public class LearningResource
{
    public int Id { get; set; }

    [DisplayName("Resource")]
    [Required]
    [StringLength(100)]
    public string Name { get; set; }


    [DisplayName("URL")]
    [Required]
    [StringLength(255)]
    [DataType(DataType.Url)]
    public string Url { get; set; }

    public int ResourceListId { get; set; }
    [DisplayName("In List")]
    public ResourceList ResourceList { get; set; }

    [DisplayName("Feed Url")]
    public string ContentFeedUrl { get; set; }

    public List<LearningResourceTopicTag> LearningResourceTopicTags { get; set; }
}
From the above code, you can see that:
The value for Name is a required string, needs to be less than 100 characters
The value for Url is a required string, needs to be less than 255 characters
The value for ContentFeedUrl can be left blank, but has to be less than 255 characters.
When the DataType is provided (e.g. DataType.Url, Currency, Date, etc), the field is displayed appropriately in the browser, with the proper formatting
For numeric values, you can also use the [Range(x,y)] attribute, where x and y sets the minimum and maximum values allowed for the number
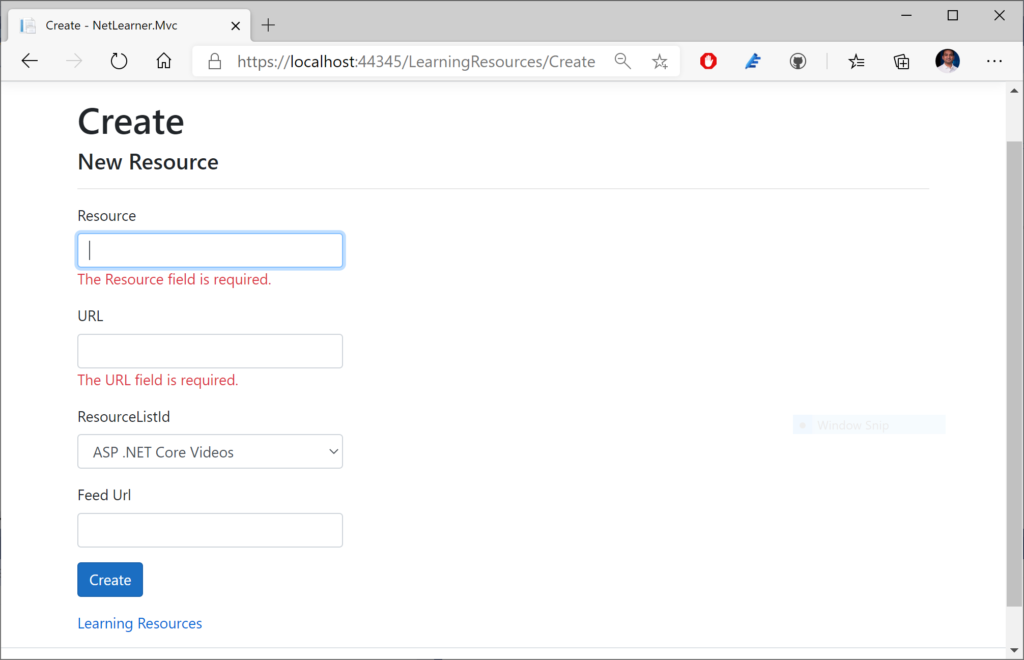
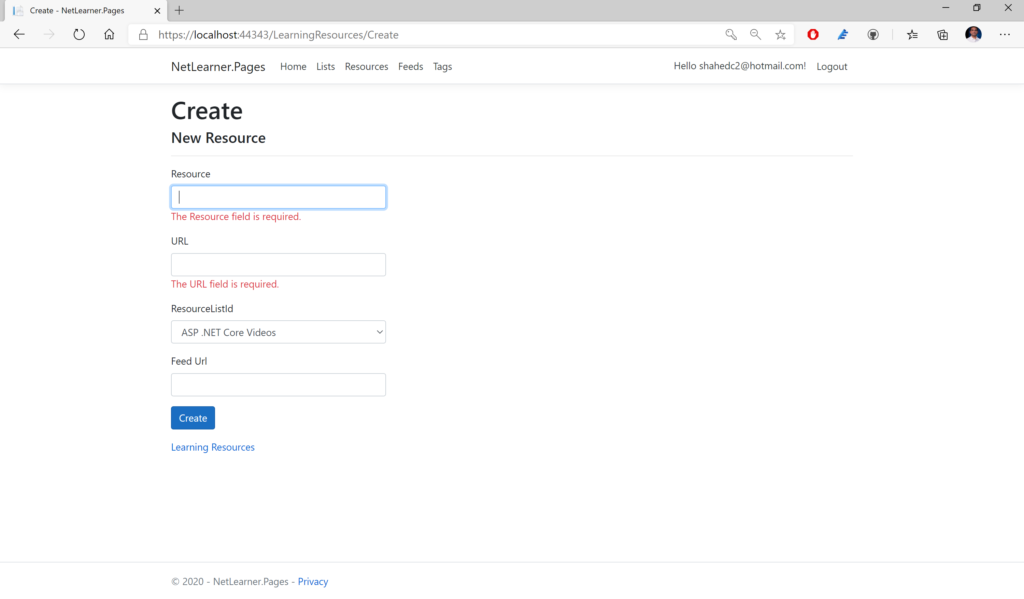
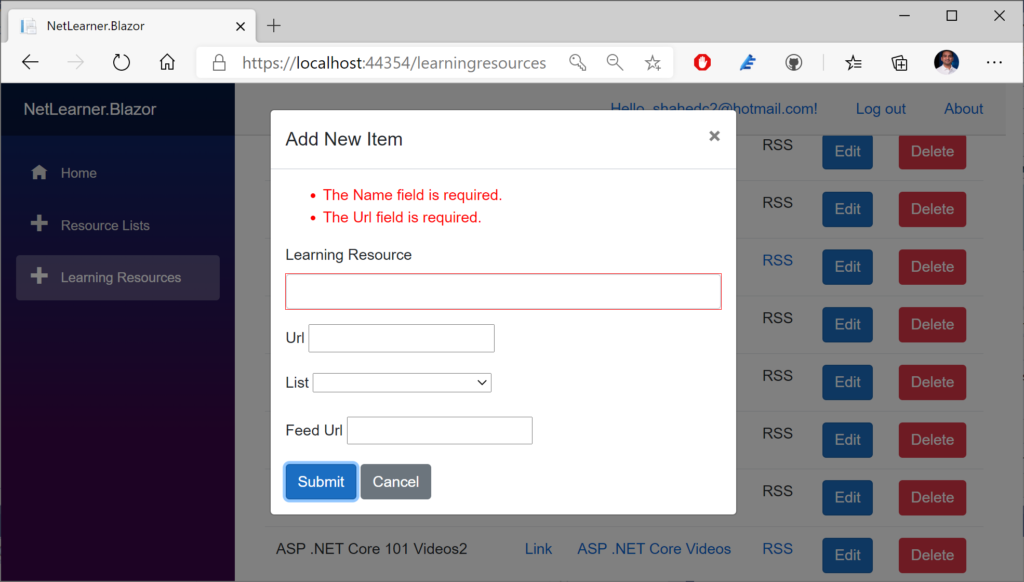
Here’s what it looks like in a browser when validation fails:
Validation errors in NetLearner.MVC Validation errors in NetLearner.Pages Validation errors in NetLearner.Blazor
The validation rules make it easier for the user to correct their entries before submitting the form.
In the above scenario, the “is required” messages are displayed directly in the browser through client-side validation.
For field-length restrictions, the client-side form will automatically prevent the entry of string values longer than the maximum threshold
If a user attempts to circumvent any validation requirements on the client-side, the server-side validation will automatically catch them.
In the MVC and Razor Pages web projects, the validation messages are displayed with the help of <div> and <span> elements, using asp-validation-summary and asp-validation-for.
In the Blazor project, the “The DataAnnotationsValidator component attaches validation support using data annotations” and “The ValidationSummary component summarizes validation messages”.
Validation occurs before an MVC controller action (or equivalent handler method for Razor Pages) takes over. As a result, you should check to see if the validation has passed before continuing next steps.
e.g. in an MVC controller
[HttpPost]
[ValidateAntiForgeryToken]
public async Task<IActionResult> Create(...)
{
   if (ModelState.IsValid)
   {
      // ...
      return RedirectToAction(nameof(Index));
   }
   return View(...);
}
e.g. in a Razor Page’s handler code:
public async Task<IActionResult> OnPostAsync()
{
   if (!ModelState.IsValid)
   {
      return Page();
   }

   //...
   return RedirectToPage(...);
}
Note that ModelState.IsValid is checked in both the Create() action method of an MVC Controller or the OnPostAsync() handler method of a Razor Page’s handler code. If IsValid is true, perform actions as desired. If false, reload the current view/page as is.
In the Blazor example, the OnValidSubmit event is triggered by <EditForm> when a form is submitted, e.g.
The method name specified refers to a C# method that handles the form submission when valid.
private async void HandleValidSubmit()
{
   ...
}
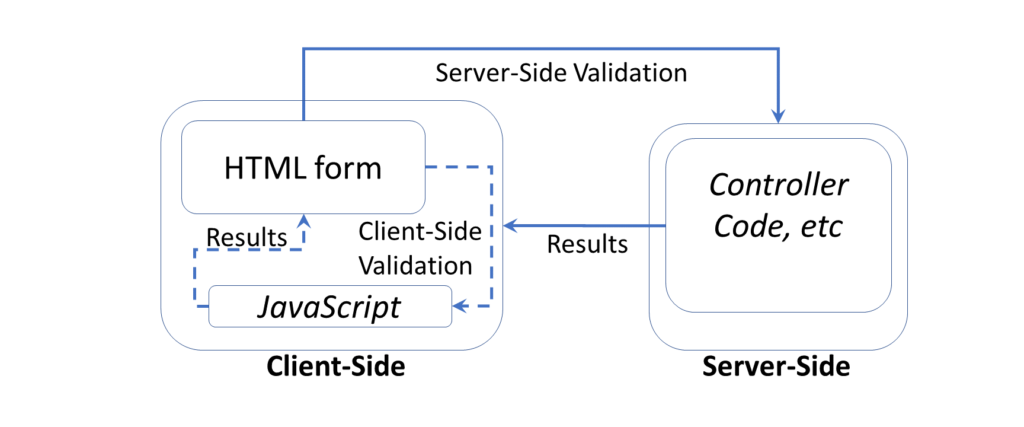
Client-Side Validation
It goes without saying that you should always have server-side validation. All the client-side validation in the world won’t prevent a malicious user from sending a GET/POST request to your form’s endpoint. Cross-site request forgery in the Form tag helper does provide a certain level of protection, but you still need server-side validation. That being said, client-side validation helps to catch the problem before your server receives the request, while providing a better user experience.
When you create a new ASP .NET Core project using one of the built-in templates for MVC or Razor Pages, you should see a shared partial view called _ValidationScriptsPartial.cshtml. This partial view should include references to jQuery unobtrusive validation, as shown below:
Note that the syntax is identical whether it’s an MVC view or a Razor page. If you ever need to disable client-side validation for some reason, that can be accomplished in different ways, whether it’s for an MVC view or a Razor page. (Blazor makes use of the aforementioned EditForm element in ASP .NET Core to include built-in validation, with the ability to track whether a submitted form is valid or invalid.)
From the official docs, the following code should be used within the ConfigureServices() method of your Startup.cs class, to set ClientValidationEnabled to false in your HTMLHelperOptions configuration.
Also mentioned in the official docs, the following code can be used for your Razor Pages, within the ConfigureServices() method of your Startup.cs class.
If you need to call a server-side method while performing client-side validation, you can use the [Remote] attribute on a model property. You would then pass it the name of a server-side action method which returns an IActionResult with a true boolean result for a valid field. This [Remote] attribute is available in the Microsoft.AspNetCore.Mvc namespace, from the Microsoft.AspNetCore.Mvc.ViewFeatures NuGet package.
The model property would look something like this:
In the controller class, (e.g. MyControllerName), you would define an action method with the name specified in the [Remote] attribute parameters, e.g. MyActionMethod.
[AcceptVerbs("Get", "Post")]
public IActionResult MyActionMethod(...)
{
   if (TestForFailureHere())
   {
      return Json("Invalid Error Message");
   }
   return Json(true);
}
You may notice that if the validation fails, the controller action method returns a JSON response with an appropriate error message in a string. Instead of a text string, you can also use a false, null, or undefined value to indicate an invalid result. If validation has passed, you would use Json(true) to indicate that the validation has passed.
So, when would you actually use something like this? Any scenario where a selection/entry needs to be validated by the server can provide a better user experience by providing a result as the user is typing, instead of waiting for a form submission. For example: imagine that a user is buying online tickets for an event, and selecting a seat number displayed on a seating chart. The selected seat could then be displayed in an input field and then sent back to the server to determine whether the seat is still available or not.
Custom Attributes
In addition to all of the above, you can simply build your own custom attributes. If you take a look at the classes for the built-in attributes, e.g. RequiredAttribute, you will notice that they also extend the same parent class:
You can do the same thing with your custom attribute’s class definition:
public class MyCustomAttribute: ValidationAttribute
{
   // ...
}
The parent class ValidationAttribute, has a virtual IsValid() method that you can override to return whether validation has been calculated successfully (or not).
public class MyCustomAttribute: ValidationAttribute
{
   // ...
   protected override ValidationResult IsValid(
      object value, ValidationContext validationContext)
   {
      if (TestForFailureHere())
      {
         return new ValidationResult("Invalid Error Message");
      }

      return ValidationResult.Success;
   }
}
You may notice that if the validation fails, the IsValid() method returns a ValidationResult() with an appropriate error message in a string. If validation has passed, you would return ValidationResult.Success to indicate that the validation has passed.
This is the nineteenth of a new series of posts on ASP .NET Core 3.1 for 2020. In this series, we’ll cover 26 topics over a span of 26 weeks from January through June 2020, titled ASP .NET Core A-Z! To differentiate from the 2019 series, the 2020 series will mostly focus on a growing single codebase (NetLearner!) instead of new unrelated code snippets week.
SignalR has been around for 7+ years now, allowing ASP .NET developers to easily include real-time features in their web applications. SignalR Core has been available in ASP .NET Core since v2.1, as a cross-platform solution to add real-time features to web apps and more!
In this article, we’ll go over SignalR concepts, using a new sample I developed to allow web users to vote in a real-time online poll. Before you begin, take a look at the sample code project on GitHub:
Back in 2018, I ran a couple of polls on Facebook and Twitter to see what the dev community wanted to see. On Twitter, the #1 choice was “Polling/Voting app” followed by “Planning Poker App” and “Real-time game”. On Facebook, the #1 choice was “Real-time game” followed by “Polling/voting app”. As a result, I decided to complement this article with a polling sample app.
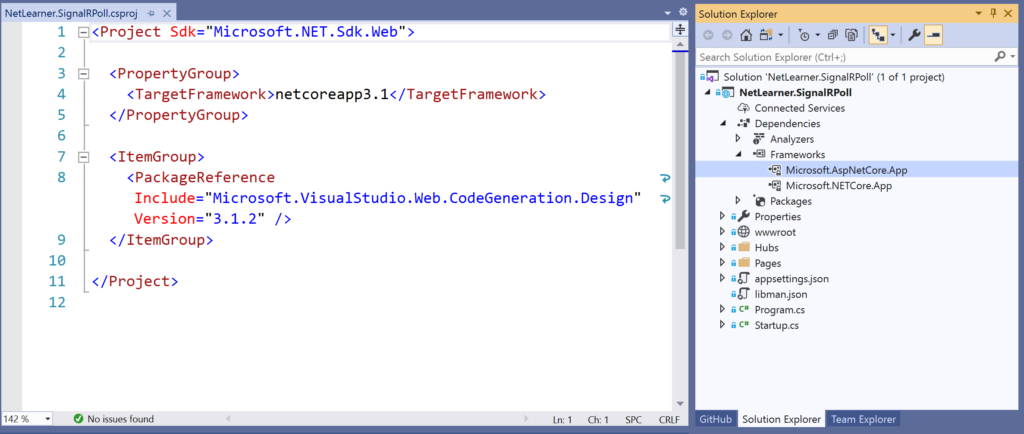
In the sample project, take a look at the SignalRPoll project to see how the polling feature has been implemented. In order to create a project from scratch, you’ll be using both server-side and client-side dependencies.
SignalR poll in action
If you need a starter tutorial, check out the official docs:
The Server-Side dependencies for SignalR Core are available via the Microsoft.AspNetCore.App package so this is a freebie when you create a new 3.1 web app project. In your server-side code, you can use the following namespace:
using Microsoft.AspNetCore.SignalR;
This will give you access to SignalR classes such as Hub and Hub<T> for your SignalR hub to derive from. In the sample project, the PollHub class inherits from the Hub class. Hub<T> can be used for strongly-typed SignalR hubs.
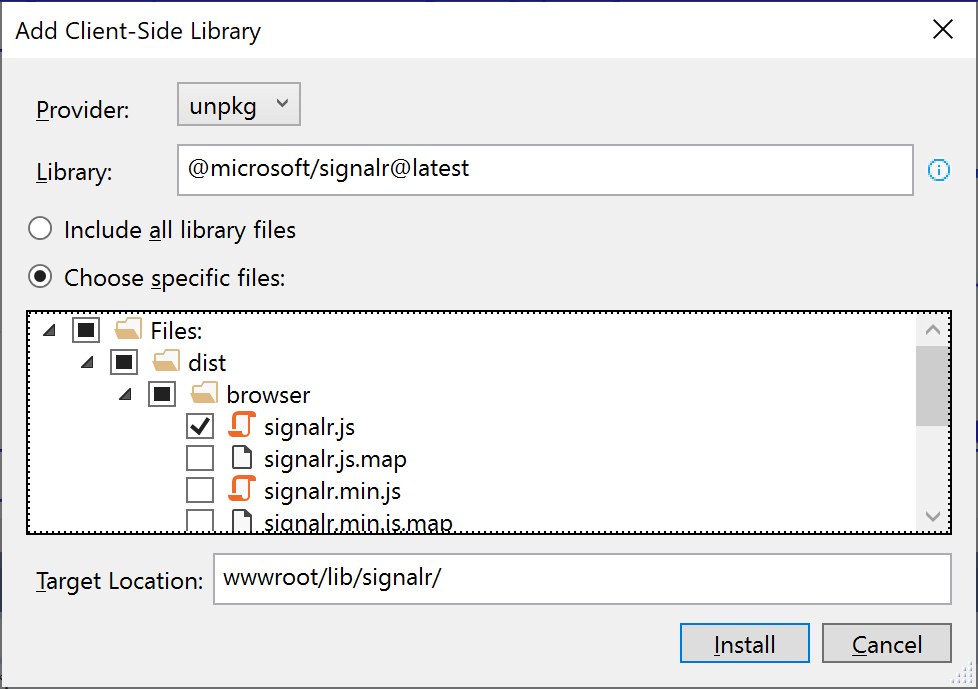
The Client Side dependencies for SignalR Core have to be added manually. Simply right-click on your web app project and select Add | Client-Side Library. In the popup that appears, select a provider (such as “unpkg”) and enter a partial search term for Library, so that you can ideally pick the latest stable version.
Steps to add client library via LibMan (aka Library Manager):
Right-click project in Solution Explorer
Select Add | Client-Side Library
In the popup that appears, select/enter the following:
Provider: choose from cdnjs, filesystem, unpkg
Library search term: @aspnet/signalr@1… pick latest stable if desired
Files: At a minimum, choose specific files signalr.js and/or its minified equivalent
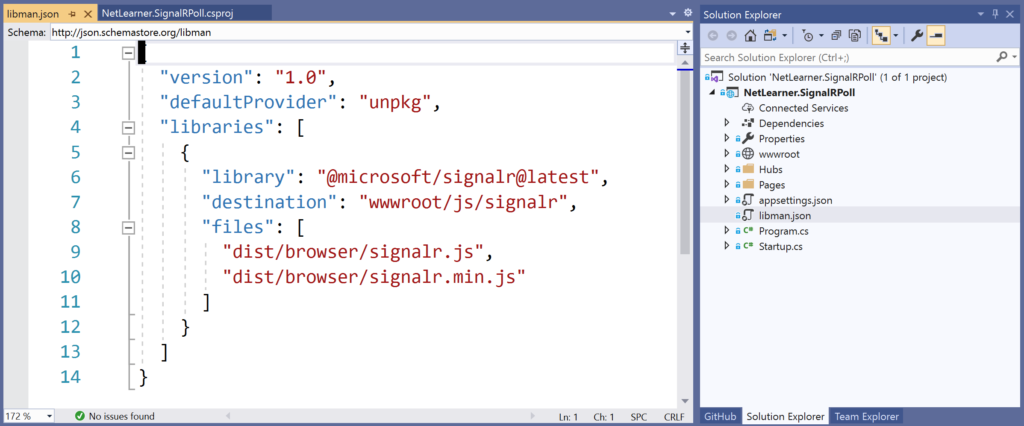
Visual Studio, showing libman.json with client-side references
If you need help with adding client-side references, check out this earlier blog post in this A-Z series:
In the sample app, the PollHub class has a simple SendMessage() method with a few parameters. Derived from the sample Chat application, it starts with the user’s desired “user” value and a custom “message” that can be passed to the SignalR Hub. For the the Captain Marvel/America poll, the method also passes an Id and Value for the selected radio button.
public class PollHub : Hub
{
   public async Task SendMessage(string user, string message, string myProjectId, string myProjectVal)
   {
      await Clients.All.SendAsync("ReceiveMessage", user, message, myProjectId, myProjectVal);
   }
}
To ensure that the SendMessage method from the server has a trigger on the client-side, the client-side code must invoke the method via the SignalR connection created with HubConnectionBuilder() on the client side. Once called, the above code will send a call to ReceiveMessage on all the clients connected to the Hub.
Client-Side
On the client-side, the JavaScript file poll.js handles the call from the browser to the server, and receives a response back from the server as well. The following code snippets highlight some important areas:
var connection = new signalR.HubConnectionBuilder().withUrl("/pollHub").build();
...
connection.on("ReceiveMessage", function (user, message, myProjectId, myProjectVal) {
   ...
   document.getElementById(myProjectId + 'Block').innerHTML += chartBlock;
});
...

document.getElementById("sendButton").addEventListener("click", function (event) {
   ...
   connection.invoke("SendMessage", user, message, myProjectId, myProjectVal)
   ...
});
The above snippets takes care of the following:
Creates a new connection objection using HubConnectionBuilder with a designated route
Uses connection.on to ensure that calls to ReceiveMessage come back from the server
Sets the innerHTML of a <span> block to simulate a growing bar chart built with small blocks
Listens for a click event from the sendButton element on the browser
When the sendButton is clicked, uses connection.invoke() to call SendMessage on the server
Configuration
The configuration for the SignalR application is set up in the Startup.cs methods ConfigureServices() and Configure(), as you may expect.
the ConfigureServices() method adds SignalR to the ASP.NET Core dependency injection system with a call to AddSignalR()
the Configure() method adds SignalR to the middleware pipeline, while setting up the necessary route(s), using a call to UseSignalR().
At the time of this writing, I have more than one route set up for multiple hubs. For the polling app, we only need the call to MapHub<PollHub>() that sets up the route “/pollHub“. You may recall this route from the client-side JavaScript code where the initial connection is set up.
For streaming fragments of data over time, you should also take a look at Streaming in SignalR Core:
To run the app, simply run the SignalRPoll app Visual Studio or from the command line. Then, click the Poll item in the top menu to go to the Poll page. This page is a simple Razor page that contains all the HTML elements necessary to display the poll. It also includes <script> references to jQuery, SignalR and poll.js client-side references.
NOTE: Even though I am using jQuery for this sample, please note that jQuery is not required to use SignalR Core. On a related note, you can also configure Webpack and TypeScript for a TypeScript client if you want.
This GIF animation below illustrates the poll in action. To record this GIF of 1 browser window, I also launched additional browser windows (not shown) pointing to the same URL, so that I could vote several times.
SignalR poll in action
In a real world scenario, there are various ways to prevent a user from voting multiple times. Some suggestions include:
Disable the voting button as soon as the user has submitted a vote.
Use a cookie to prevent the user from voting after reloading the page.
Use authentication to prevent a user from voting after clearing cookies or using a different browser.
For more information on authenticating and authorizing users, check out the official docs:
Azure SignalR Service is a fully-managed service available in Microsoft’s cloud-hosted Azure services, that allows you to add real-time functionality and easily scale your apps as needed. Using Azure SignalR Service is as easy as 1-2-3:
Add a reference to the Azure SignalR Service SDK
Configure a connection string
Call services.AddSignalR().AddAzureSignalR() and app.UseAzureSignalR in Startup.cs
For more information on Azure SignalR Service, check out the official docs and tutorials:
You may have heard that ASP .NET Core 3.0 changed the way packages are made available to developers. So how does this affect SignalR for 3.x projects? Here is a recap from the official announcement:
Microsoft “will stop producing many of the NuGet packages that we have been shipping since ASP.NET Core 1.0. The API those packages provide are still available to apps by using a <FrameworkReference> to Microsoft.AspNetCore.App. This includes commonly referenced API, such as Kestrel, Mvc, Razor, and others.”
“This will not apply to all binaries that are pulled in via Microsoft.AspNetCore.App in 2.x.”
“Notable exceptions include: The SignalR .NET client will continue to support .NET Standard and ship as NuGet package because it is intended for use on many .NET runtimes, like Xamarin and UWP.”
This is the tenth of a new series of posts on ASP .NET Core 3.1 for 2020. In this series, we’ll cover 26 topics over a span of 26 weeks from January through June 2020, titled ASP .NET Core A-Z! To differentiate from the 2019 series, the 2020 series will mostly focus on a growing single codebase (NetLearner!) instead of new unrelated code snippets week.
J is for JavaScript, CSS, HTML & Other Static Files
NOTE: this article will teach you how to include and customize the use of static files in ASP .NET Core web applications. It is not a tutorial on front-end web development.
If your ASP .NET Core web app has a front end – whether it’s a collection of MVC Views or a Single-Page Application (SPA) – you will need to include static files in your application. This includes (but is not limited to): JavaScript, CSS, HTML and various image files.
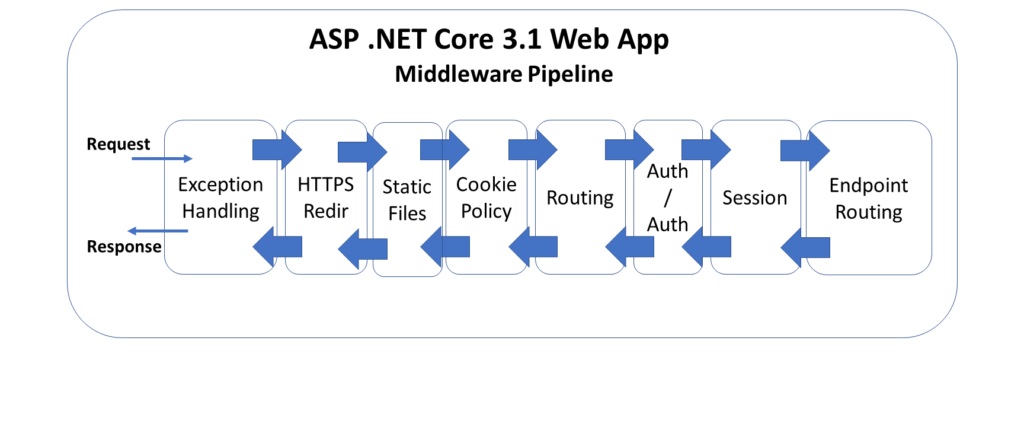
When you create a new web app using one of the built-in templates (MVC, Razor Pages or Blazor), you should see a “wwwroot” folder in the Solution Explorer. This points to a physical folder in your file system that contains the same files seen from Visual Studio. However, this location can be configured, you can have multiple locations with static files, and you can enable/disable static files in your application if desired. In fact, you have to “opt in” to static files in your middleware pipeline.
ASP .NET Core 3.1 middleware pipeline diagram
You can browse the (template-generated) sample app (with static files) on GitHub at the following location:
Let’s start by observing the Startup.cs configuration file, from any of the web projects. We’ve seen this file several times throughout this blog series. In the Configure() method, you’ll find the familiar method call to enable the use of static files.
This call to app.UseStaticFiles() ensures that static files can be served from the designated location, e.g. wwwroot. In fact, this line of code looks identical whether you look at the Startup.cs file in an MVC, Razor Pages or Blazor project.
It’s useful to note the placement of this line of code. It appears before app.UseRouting() and app.UseEndpoints(), which is very important. This ensures that static file requests can be processed and sent back to the web browser without having to touch the application routing middleware. This becomes even more important when authentication is used.
Take a look at any of the web projects to observe the authentication added to them. In the code below, you can see the familiar call to app.UseStaticFiles() once again. However, there is also a call to app.UseAuthentication(). It’s important for the authentication call to appear after the call to use static files. This ensure that the authentication process isn’t triggered when it isn’t needed.
By using the middleware pipeline in this way, you can “short-circuit” the pipeline when a request has been fulfilled by a specific middleware layer. If a static file has been successfully served using the Static Files middleware, it prevents the next layers of middleware (i.e. authentication, routing, etc) from processing the request.
NOTE: if you need to secure any static files, e.g. private images, you can consider a cloud solution such as Azure Blob Storage to store the files. The files can then be served from within the application, instead of actual static files. You could also serve secure files (from outside the wwwroot location) as a FileResult() object returned from an action method that has an [Authorize] attribute.
Customizing Locations for Static Files
It may be convenient to have the default web templates create a location for your static files and also enable the use of those static files. As you’ve already seen, enabling static files isn’t magic. Removing the call to app.useStaticFiles() will disable static files from being served. In fact, the location for static files isn’t magic either.
In a previous post, we had discussed how the Program.cs file includes a call to CreateDefaultBuilder() to set up your application:
public class Program
{
   ...
   public static IHostBuilder CreateHostBuilder(string[] args) =>
      Host.CreateDefaultBuilder(args)
         .ConfigureWebHostDefaults(webBuilder =>
         {
            webBuilder.UseStartup<Startup>();
         });
}
Behind the scenes, this method call sets the “content root” to the current directory, which contains the “wwwroot” folder, your project’s “web root”. These can both be customized.
To change the web root within your content root, you can also configure it while building the host, e.g.
webBuilder.UseWebRoot("<content-root>")
You may also use the call to app.UseStaticFiles() to customize an alternate location to serve static files. This allows you to serve additional static files from a location outside of the designated web root.
...
using Microsoft.Extensions.FileProviders;
using System.IO;
...
public void Configure(IApplicationBuilder app)
{
   ...
   app.UseStaticFiles(new StaticFileOptions
   {
      FileProvider = new PhysicalFileProvider(
         Path.Combine(env.ContentRootPath, "AltStaticRoot")),
         RequestPath = "/AltStaticFiles"
   });
}
Wait a minute… why does it look like there are two alternate locations for static files? There is a simple explanation:
In the call to Path.Combine(), the “AltStaticRoot” is an actual folder in your current directory. This Path class and its Combine() method are available in the System.IO namespace.
The “AltStaticFiles” value for RequestPath is used as a root-level “virtual folder” from which images can be served. The PhysicalFileProvider class is available in the Microsoft.Extensions.FileProviders namespace.
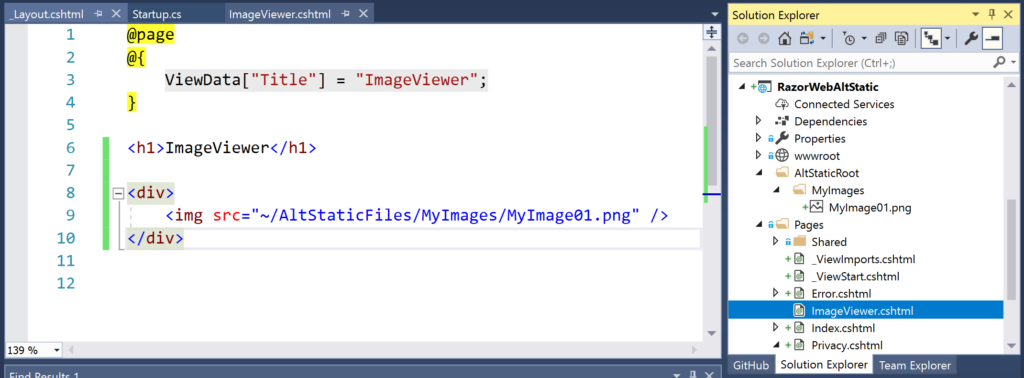
The following markup may be used in a .cshtml file to refer to an image, e.g. MyImage01.png:
The screenshot below shows an example of an image loaded from an alternate location.
Visual Studio showing image loaded from alternate location
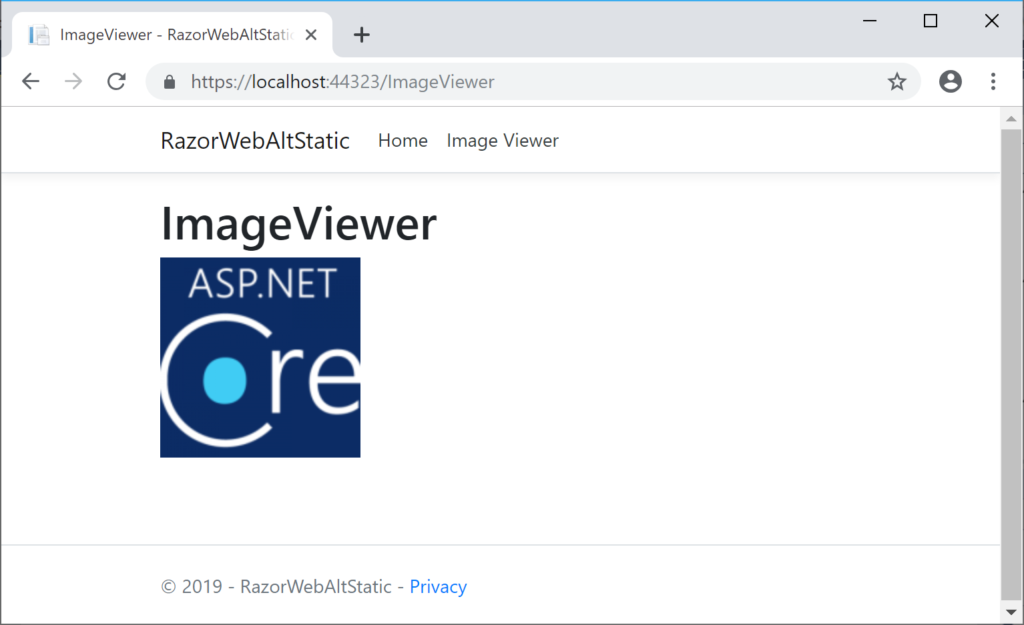
The screenshot below shows a web browser displaying such an image.
Web Browser showing image loaded from alternate location
Preserving CDN Integrity
When you use a CDN (Content Delivery Network) to serve common CSS and JS files, you need to ensure that the integrity of the source code is reliable. You can rest assured that ASP .NET Core has already solved this problem for you in its built-in templates. Let’s take a look at the shared Identity pages, e.g. _ValidationScriptsPartial.cshtml in the Razor sample code.
Right away, you’ll notice that there are two conditional <environment> blocks in the above markup. The first block is used only during development, in which the jQuery Validate file is obtained from your local copy. When not in development (e.g. staging, production, etc), the jQuery Validate file is obtained from a CDN.
You could use an automated hash-generation tool to generate the SRI (Subresource Integrity) hash values, but you would have to manually copy the value into your code. You can try out the newer LibMan (aka Library Manager) for easily adding and updating your client-side libraries.
LibMan (aka Library Manager)
The easiest way to use LibMan is to use the built-in features available in Visual Studio. Using LibMan using the IDE is as easy as launching it from Solution Explorer. Specify the provider from the library you want, and any specific files you want from that library.
In any case, using LibMan will auto-populate a “libman.json” manifest file, which you can also inspect and edit manually. The aforementioned SignalR article also includes a real-time polling web app sample. You can view its libman.json file or the newer NetLearner.Portal app’s libman.json file to observe its syntax for using a SignalR client library.
Every time you save the libman.json file, it will trigger LibMan’s restore process. This pulls down the necessary libraries from their specified source, and adds them to your local file system. If you want to trigger this restore process manually, you can always choose the “Restore Client-Side Libraries” option by right-clicking the libman.json file in Solution Explorer.
What About NPM or WebPack?
If you’ve gotten this far, you may be wondering: “hey, what about NPM or WebPack?”
It’s good to be aware that LibMan is a not a replacement for your existing package management systems. In fact, the Single-Page Application templates in Visual Studio (for Angular and React) currently use npm and WebPack. LibMan simply provides a lightweight mechanism to include client-side libraries from external locations.
For more information on WebPack in ASP .NET Core, I would recommend these 3rd-party articles:
This is the sixth of a new series of posts on ASP .NET Core 3.1 for 2020. In this series, we’ll cover 26 topics over a span of 26 weeks from January through June 2020, titled ASP .NET Core A-Z! To differentiate from the 2019 series, the 2020 series will mostly focus on a growing single codebase (NetLearner!) instead of new unrelated code snippets week.
Before Tag Helpers were available, you would have to use HTML Helper methods to create forms and their elements in a ASP .NET Core views. This meant that your form could look something like this:
@using (Html.BeginForm())
{
   <input />
}
With the introduction of Tag Helpers, you can now make your web pages much more cleaner. In fact, Tag Helpers work with both MVC Views and Razor Pages. The syntax is much simpler:
<form method="post">
This looks like HTML because it is HTML. You can add additional server-side attributes within the <form> tag for additional features.
In this above example, you can see how the attributes asp-controller and asp-action can be used to specify a specific controller name and action method. When these optional attributes are omitted, the current controller and default action method will be used.
Optionally, you can also use a named route, e.g.
<form asp-route="NamedRoute" method="post">
The asp-route attribute will look for a specific route with the name specified. When the form is submitted via HTTP POST, the action method will then attempt to read the form values via a passed values or bound properties.
In a Controller’s class file within an MVC app, you can set an optional Name for your action method’s Route attribute, as shown below:
[Route("/ControllerName/ActionMethod", Name = "NamedRoute")]
public IActionResult ActionMethod()
{
}
While you won’t find new Tag Helper equivalents for each and every HTML Helper you may have used in the past, you should consider using a Tag Helper wherever possible. You can even create your own custom Tag Helpers as well. For more information on custom Tag Helpers, check out the official documentation:
Below is a list of Tag Helpers with their corresponding HTML form elements:
Input Tag Helper
Let’s say you have a model with a couple of fields:
public class MyModel
{
   public string MyProperty1 { get; set; }
   public string MyProperty2 { get; set; }
}
You can use the following syntax to use an Input Tag Helper with an expression name assigned to the asp-for attribute. This allows you to refer to the properties without requiring the “Model.” prefix in your Views and Pages.
To create more specific fields for email addresses, passwords, etc, you may use data-type attributes on your models to auto-generate the necessary fields. These may include one of the following enum values:
CreditCard
Currency
Custom
Date
DateTime
Duration
EmailAddress
Html
ImageUrl
MultilineText
Password
PhoneNumber
PostalCode
Text
Time
Upload
Url
// For example:
[DataType(DataType.Date)]
public DateTime DateOfBirth { get; set; }
Note that each attribute can be applied on a field for the view/page generator to infer the data type, but is not used for data validation. For validation, you should use the appropriate validation techniques in your code. We will cover validation in a future blog post, but you can refer to the official docs for now:
Any boolean field in your model will automatically be turned into a checkbox in the HTML form. There is no extra work necessary to specify that the input type is a “checkbox”. In fact, the generated HTML includes the “checkbox” type automatically, sets the “checked” property if checked and wraps it in a label with the appropriate caption. For example, imagine a boolean field named “IsActive”:
// boolean field in a model class
public bool IsActive { get; set; }
<!-- input field in page/view wrapped in label -->
<label class="form-check-label">
   <input class="form-check-input" asp-for="IsActive" />
   @Html.DisplayNameFor(model => model.IsActive)
</label>
<!-- HTML generated for boolean field -->
<label class="form-check-label">
<input
   class="form-check-input"
   type="checkbox"
   checked="checked"
   data-val="true"
   data-val-required="The IsActive field is required."
   id="IsActive"
   name="IsActive"
   value="true"> IsActive
</label>
Hidden Fields
In case you’re wondering how you can generate a hidden <input> field, you can simply use the [HiddenInput] attribute on your hidden field’s property, as shown below. If you wish, you can explicitly set “type=hidden” in your Page/View, but I prefer to set the attribute in the model itself.
// hidden property in model class
[HiddenInput]
public string SomeHiddenField { get; set; } = "Some Value";
<!-- hidden field in page/view --><input asp-for="SomeHiddenField" />
<!-- HTML generated for hidden field -->
<input type="hidden" id="SomeHiddenField" name="SomeHiddenField" value="Some Value">
Radio Buttons
For radio buttons, you can create one <input> tag for each radio button option, with a reference to a common field, and a unique value for each radio button. Each input element can be paired with a label to include a proper (clickable) text caption . You can generate these in a loop or from a collection from dynamically generated radio buttons. To avoid reusing the same id for each radio button, you could use a string array of values to concatenate a unique suffix for each radio button id.
// string property and value array in page model class
[BindProperty]
public string ExperienceLevel { get; set; }
public string[] ExperienceLevels = new[] { "Novice", "Beginner", "Intermediate", "Advanced" };
<!-- input fields for radio buttons in page/view -->
@foreach (var experienceLevel in Model.ExperienceLevels)
{
    <input type="radio" asp-for="ExperienceLevel" value="@experienceLevel"
            id="ExperienceLevel@(experienceLevel)" />
    <label for="ExperienceLevel@(experienceLevel)">
        @experienceLevel
    </label>
    <br />
}
The multiline <textarea> field can be easily represented by a Textarea Tag Helper. This is useful for longer strings of text that need to be seen and edited across multiple lines.
public class MyModel
{
   [MinLength(5)]
   [MaxLength(1024)]
   public string MyLongTextProperty { get; set; }
}
As you would expect, you can use the following syntax to use a Textarea Tag Helper with an expression name assigned to the asp-for attribute.
This will generate the following textarea input field:
<textarea
   data-val="true"
   data-val-maxlength="The field ... maximum length of '1024'."
   data-val-maxlength-max="1024"
   data-val-minlength="The field ... minimum length of '5'."
   data-val-minlength-min="5"
   id="MyLongTextProperty"
   maxlength="1024"
   name="MyLongTextProperty"
></textarea>
Note that the property name and its attributes are used to create that textarea with the necessary id, name, maxlength and data validation settings.
Corresponding to the Textarea Tag Helper, the existing HTML Helper is shown below:
Html.TextAreaFor
Label Tag Helper
The <label> field can be represented by a Label Tag Helper. A label usually goes hand-in-hand with a specific <input> field, and is essential in creating text captions for more accessible web applications. The Display attribute from your model’s fields are used for the label’s displayed text values. (You could use the DisplayName attribute instead and omit the Name parameter, but it limits your ability to use localized resources.)
public class MyModel
{
   [Display(Name = "Long Text")]
   public string MyLongTextProperty { get; set; }
}
You can use the following syntax to use a Label Tag Helper along with an Input Tag Helper.
Note that the property name and its attributes are used to create both the label with its descriptive caption and also the input textbox with the necessary id and name.
Corresponding to the Label Tag Helper, the existing HTML Helper is shown below:
Html.LabelFor
Select Tag Helper
The <select> field (with its nested <option> fields) can be represented by a Select Tag Helper. This visually represents a dropdown or listbox, from which the user may select one or more options. In your model, you can represent this with a List<SelectListItem> of items, made possible by the namespace Microsoft.AspNetCore.Mvc.Rendering.
...
using Microsoft.AspNetCore.Mvc.Rendering;

public class MyModel
{
   public string MyItem { get; set; }

   public List<SelectListItem> MyItems { get; } = new List<SelectListItem>
   {
      new SelectListItem { Value = "Item1", Text = "Item One" },
      new SelectListItem { Value = "Item2", Text = "Item Two" },
      new SelectListItem { Value = "Item3", Text = "Item Three" },
   };
}
You can use the following syntax to use a Select Tag Helper.
Note that the asp-items attribute does require a “Model.” prefix, unlike the asp-for attribute that we have been using so far. This will generate the following HTML:
Note that the property name and its attributes are used to create both the dropdown list and also the nested options available for selection. For more customization, optgroups and multiple selections, check out the “Select Tag Helper” section in the Tag Helpers documentation at:
Corresponding to the Select Tag Helper, the existing HTML Helpers are shown below:
Html.DropDownListFor
Html.ListBoxFor
NetLearner Examples
In the NetLearner repository, you’ll find multiple web projects with various views/pages and controllers where applicable. All models are shared in the SharedLib project.
Models: In the “Models” folder of the shared library, you’ll find a LearningResource.cs class (shown below) with some fields we will use to display HTML form elements.
Views: Within the “Views” subfolder of the MVC project, the “LearningResources” subfolder contains auto-generated views for the LearningResourcesController’s methods.
Controllers: The LearningResourcesController class was auto-generated for the Human model, and then its functionality was extracted into a corresponding service class.
Services: The LearningResourceService class was written manually to provide CRUD functionality for the LearningResourcesController, and equivalent Razor/Blazor code.
Razor Pages: Within the “LearningResources” subfolder of the Razor Pages project’s Pages folder, the pairs of .cshtml and .cs files make up all the CRUD functionality for LearningResources entities.
Blazor Components: Within the “Pages” subfolder of the Blazor project, the LearningResources.razor component contains both its own HTML elements and event handlers for CRUD functionality. The ResourceDetail.razor component is reused by its parent component.
public class LearningResource
{
    public int Id { get; set; }

    [DisplayName("Resource")]
    public string Name { get; set; }


    [DisplayName("URL")]
    [DataType(DataType.Url)]
    public string Url { get; set; }

    public int ResourceListId { get; set; }
    [DisplayName("In List")]
    public ResourceList ResourceList { get; set; }

    [DisplayName("Feed Url")]
    public string ContentFeedUrl { get; set; }

    public List<LearningResourceTopicTag> LearningResourceTopicTags { get; set; }
}
Take a look at the Create and Edit views for the Human class, and you’ll recognize familiar sets of <label> and <input> fields that we discussed earlier.
[HttpPost]
public async Task<IActionResult> Create(
Bind("Id,Name,Url,ResourceListId,ContentFeedUrl")] LearningResource learningResource)

...
[HttpPost]
public async Task<IActionResult> Edit(
int id,
[Bind("Id,Name,Url,ResourceListId,ContentFeedUrl")] LearningResource learningResource)
The Razor Pages in their respective project handle the same functionality in their own way.
Razor Pages with BindProperty
Compared to MVC views, the newer Razor Pages make it a lot easier to bind your model properties to your HTML forms. The [BindProperty] attribute can be applied to MVC Controllers as well, but is much more effective within Razor Pages.
In the NetLearner repo, you’ll find a Razor web project with multiple subfolders, including Pages and their “code-behind” Page Model files.
Pages: Within the “Pages” subfolder, the “LearningResources” subfolder within it contains Razor Pages along with corresponding .cs classes that contain the necessary Get/Post methods.
Page Models: In the same LearningResources subfolder, the corresponding Page Models contain the necessary CRUD functionality. The implementation of the CRUD functionality from has been extracted into the Shared Library’s corresponding LearningResourceService service class.
This time, take a look at the Create and Edit pages for the LearningResources set of pages, and you’ll once again recognize familiar sets of <label> and <input> fields that we discussed earlier.
Since there are no controller classes in the Razor web project, let’s take a look at the corresponding C# classes for the Create and Edit pages, i.e. Create.cshtml.cs and Edit.cshtml.cs. In both of these classes, we’ll find the [BindProperty] attribute in use, right after the constructor and before the Get/Post methods.
 [BindProperty]
 public LearningResource LearningResource { get; set; }
This [BindProperty] attribute allows you to declaratively bind the LearningResource class and its properties for use by the HTML form in the corresponding Razor Page. This is an opt-in feature that allows to choose which properties to bind. If you wish, you could alternatively bind all public properties in the class by using the [BindProperties] attribute above the class, instead of above each individual member.
NOTE: By default, a Razor Page’s default methods for HTTP GET and HTTP POST are OnGet() and OnPost() respectively. If you wish to use custom page handlers in your HTML forms, you must create custom methods with the prefix OnPost followed by the name of the handler (and optionally followed by the word Async for async methods)
// action methods in .cs file associated with a Razor Page
public async Task<IActionResult> OnPostCustom1Async() { }
public async Task<IActionResult> OnPostCustom2sync() { }
The standard set of Get/Post methods are shown below, from Create.cshtml.cs:
public IActionResult OnGet()
{
   return Page();
}
public async Task<IActionResult> OnPostAsync()
{
    if (!ModelState.IsValid)
    {
        return Page();
    }

    await _learningResourceService.Add(LearningResource);

    var resourceList = await _resourceListService.Get();
    ViewData["ResourceListId"] = new SelectList(resourceList, "Id", "Name", LearningResource.ResourceListId);
    return RedirectToPage("./Index");
}
Note that the LearningResource entity is passed to the service class (which passes it to the shared DB Context) to add it to the database. If you were to remove the aforementioned [BindProperty] attribute, LearningResource would be null and the save operation would fail. The above approach only opts in to accepting HTTP POST requests. To enable use of BindProperty for HTTP GET requests as well, simply set the optional parameter SupportsGet to true, as shown below.
[BindProperty(SupportsGet = true)]
Blazor Example
The Blazor version of NetLearner also reuses the same shared library for its CRUD functionality and entity models via the shared service classes. However, its front-end web app looks noticeably different. There are no controllers or views. Rather, the .razor files contain HTML elements and the C# code necessary to handle user interaction.
An overall example of the Blazor web project is explained earlier in this series:
After the A-Z series is complete, stay tuned for new content that will explain Blazor’s use of <EditForm> and the use of Input Components to render HTML elements and handle events. For now, check out the official documentation at: