Tag Archives: Visual Studio

SignalR in ASP .NET Core 3.1

By Shahed C on May 11, 2020

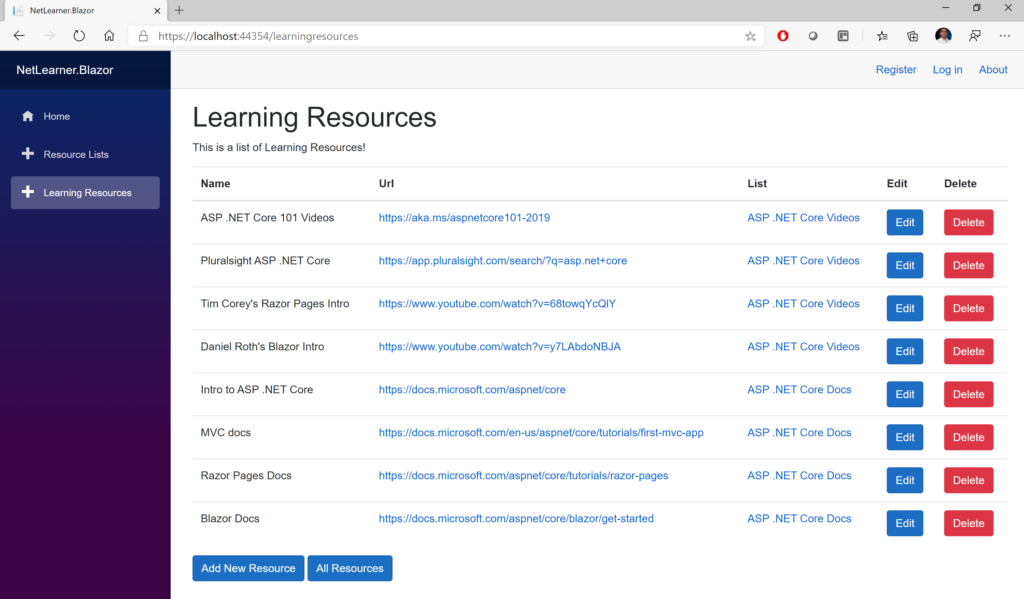
This is the nineteenth of a new series of posts on ASP .NET Core 3.1 for 2020. In this series, we’ll cover 26 topics over a span of 26 weeks from January through June 2020, titled ASP .NET Core A-Z! To differentiate from the 2019 series, the 2020 series will mostly focus on a growing single codebase (NetLearner!) instead of new unrelated code snippets week.

Previous post:

NetLearner on GitHub:

In this Article:

S is for SignalR

SignalR has been around for 7+ years now, allowing ASP .NET developers to easily include real-time features in their web applications. SignalR Core has been available in ASP .NET Core since v2.1, as a cross-platform solution to add real-time features to web apps and more!

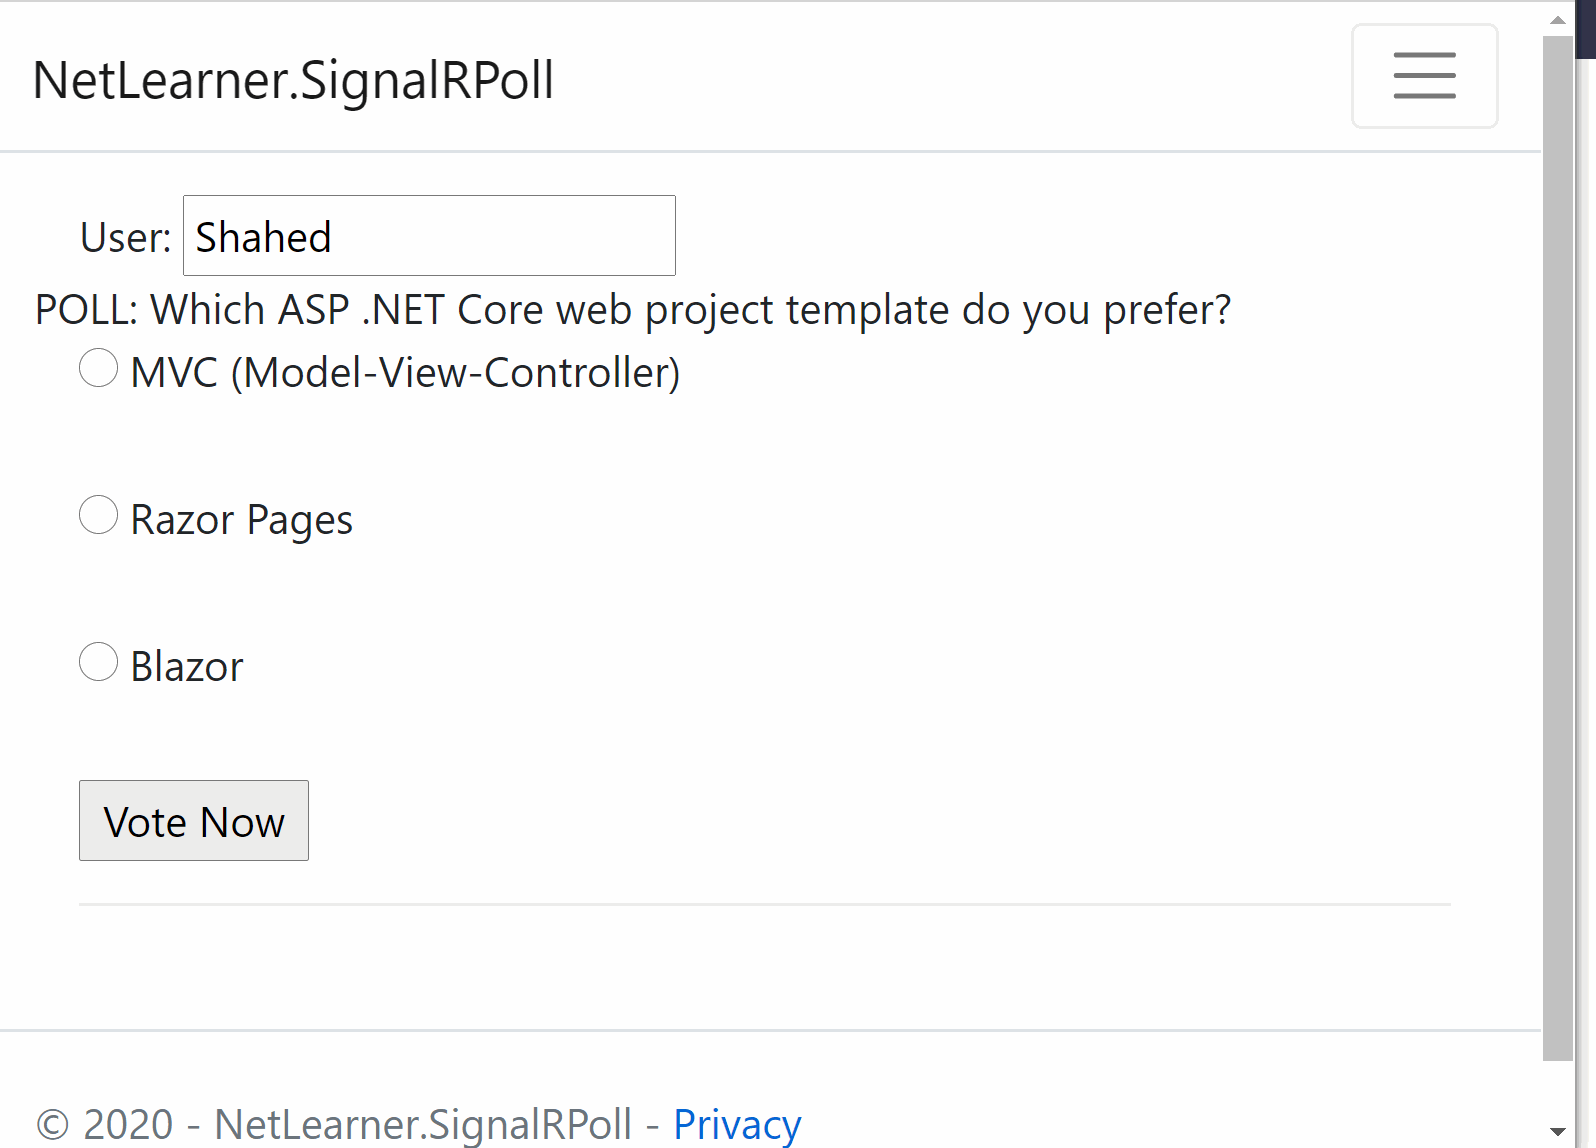
In this article, we’ll go over SignalR concepts, using a new sample I developed to allow web users to vote in a real-time online poll. Before you begin, take a look at the sample code project on GitHub:

Back in 2018, I ran a couple of polls on Facebook and Twitter to see what the dev community wanted to see. On Twitter, the #1 choice was “Polling/Voting app” followed by “Planning Poker App” and “Real-time game”. On Facebook, the #1 choice was “Real-time game” followed by “Polling/voting app”. As a result, I decided to complement this article with a polling sample app.

More importantly, Brady Gaster suggested that the sample app should definitely be “Not. Chat.” 🙂

In the sample project, take a look at the SignalRPoll project to see how the polling feature has been implemented. In order to create a project from scratch, you’ll be using both server-side and client-side dependencies.

SignalR poll in action

If you need a starter tutorial, check out the official docs:

Dependencies

Visual Studio showing csproj + dependencies

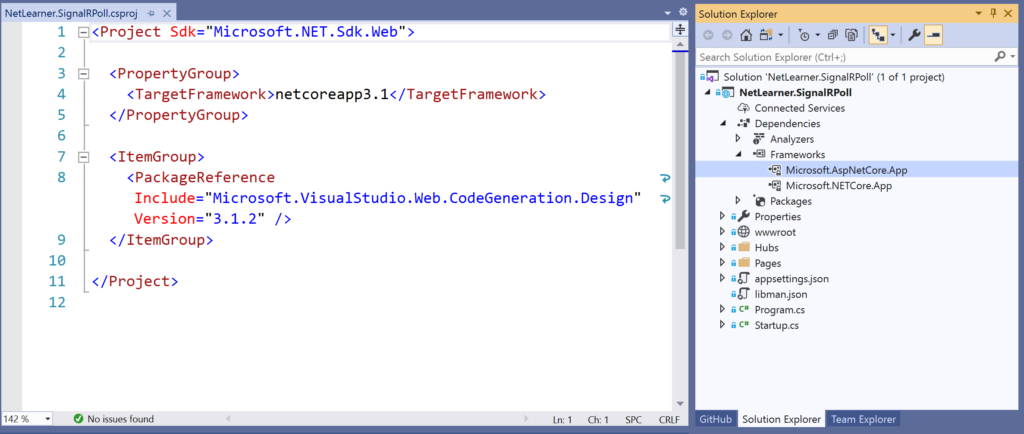
The Server-Side dependencies for SignalR Core are available via the Microsoft.AspNetCore.App package so this is a freebie when you create a new 3.1 web app project. In your server-side code, you can use the following namespace:

using Microsoft.AspNetCore.SignalR;

This will give you access to SignalR classes such as Hub and Hub<T> for your SignalR hub to derive from. In the sample project, the PollHub class inherits from the Hub class. Hub<T> can be used for strongly-typed SignalR hubs.

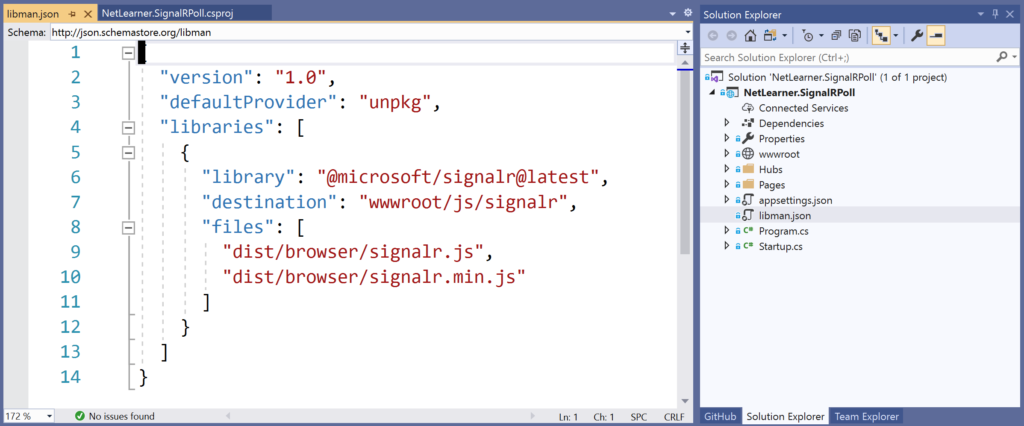
The Client Side dependencies for SignalR Core have to be added manually. Simply right-click on your web app project and select Add | Client-Side Library. In the popup that appears, select a provider (such as “unpkg”) and enter a partial search term for Library, so that you can ideally pick the latest stable version.

Steps to add client library via LibMan (aka Library Manager):

  • Right-click project in Solution Explorer
  • Select Add | Client-Side Library

In the popup that appears, select/enter the following:

  • Provider: choose from cdnjs, filesystem, unpkg
  • Library search term: @aspnet/signalr@1… pick latest stable if desired
  • Files: At a minimum, choose specific files signalr.js and/or its minified equivalent
Visual Studio, showing libman.json with client-side references

If you need help with adding client-side references, check out this earlier blog post in this A-Z series:

Server-Side Hub

In the sample app, the PollHub class has a simple SendMessage() method with a few parameters. Derived from the sample Chat application, it starts with the user’s desired “user” value and a custom “message” that can be passed to the SignalR Hub. For the the Captain Marvel/America poll, the method also passes an Id and Value for the selected radio button.

public class PollHub : Hub
{
   public async Task SendMessage(string user, string message, string myProjectId, string myProjectVal)
   {
      await Clients.All.SendAsync("ReceiveMessage", user, message, myProjectId, myProjectVal);
   }
}

To ensure that the SendMessage method from the server has a trigger on the client-side, the client-side code must invoke the method via the SignalR connection created with HubConnectionBuilder() on the client side. Once called, the above code will send a call to ReceiveMessage on all the clients connected to the Hub.

Client-Side

On the client-side, the JavaScript file poll.js handles the call from the browser to the server, and receives a response back from the server as well. The following code snippets highlight some important areas:

var connection = new signalR.HubConnectionBuilder().withUrl("/pollHub").build(); 
... 
connection.on("ReceiveMessage", function (user, message, myProjectId, myProjectVal) { 
   ... 
   document.getElementById(myProjectId + 'Block').innerHTML += chartBlock;
}); 
...

document.getElementById("sendButton").addEventListener("click", function (event) {
   ...
   connection.invoke("SendMessage", user, message, myProjectId, myProjectVal)
   ... 
});

The above snippets takes care of the following:

  1. Creates a new connection objection using HubConnectionBuilder with a designated route
  2. Uses connection.on to ensure that calls to ReceiveMessage come back from the server
  3. Sets the innerHTML of a <span> block to simulate a growing bar chart built with small blocks
  4. Listens for a click event from the sendButton element on the browser
  5. When the sendButton is clicked, uses connection.invoke() to call SendMessage on the server

Configuration

The configuration for the SignalR application is set up in the Startup.cs methods ConfigureServices() and Configure(), as you may expect.

public void ConfigureServices(IServiceCollection services) 
{
   ...
   services.AddSignalR();
}

public void Configure(IApplicationBuilder app, IHostingEnvironment env)
{
   ...
   app.UseEndpoints(endpoints =>
   {
      ... 
      endpoints.MapHub<PollHub>("/pollHub");
   });
   ...
}

The above code takes care of the following:

  1. the ConfigureServices() method adds SignalR to the ASP.NET Core dependency injection system with a call to AddSignalR()
  2. the Configure() method adds SignalR to the middleware pipeline, while setting up the necessary route(s), using a call to UseSignalR().

At the time of this writing, I have more than one route set up for multiple hubs. For the polling app, we only need the call to MapHub<PollHub>() that sets up the route “/pollHub“. You may recall this route from the client-side JavaScript code where the initial connection is set up.

For streaming fragments of data over time, you should also take a look at Streaming in SignalR Core:

Running the App

To run the app, simply run the SignalRPoll app Visual Studio or from the command line. Then, click the Poll item in the top menu to go to the Poll page. This page is a simple Razor page that contains all the HTML elements necessary to display the poll. It also includes <script> references to jQuery, SignalR and poll.js client-side references.

NOTE: Even though I am using jQuery for this sample, please note that jQuery is not required to use SignalR Core. On a related note, you can also configure Webpack and TypeScript for a TypeScript client if you want.

This GIF animation below illustrates the poll in action. To record this GIF of 1 browser window, I also launched additional browser windows (not shown) pointing to the same URL, so that I could vote several times.

SignalR poll in action

In a real world scenario, there are various ways to prevent a user from voting multiple times. Some suggestions include:

  • Disable the voting button as soon as the user has submitted a vote.
  • Use a cookie to prevent the user from voting after reloading the page.
  • Use authentication to prevent a user from voting after clearing cookies or using a different browser.

For more information on authenticating and authorizing users, check out the official docs:

Azure SignalR Service

Azure SignalR Service is a fully-managed service available in Microsoft’s cloud-hosted Azure services, that allows you to add real-time functionality and easily scale your apps as needed. Using Azure SignalR Service is as easy as 1-2-3:

  1. Add a reference to the Azure SignalR Service SDK
  2. Configure a connection string
  3. Call services.AddSignalR().AddAzureSignalR() and app.UseAzureSignalR in Startup.cs

For more information on Azure SignalR Service, check out the official docs and tutorials:

Packaging Changes in 3.x

You may have heard that ASP .NET Core 3.0 changed the way packages are made available to developers. So how does this affect SignalR for 3.x projects? Here is a recap from the official announcement:

  • Microsoft “will stop producing many of the NuGet packages that we have been shipping since ASP.NET Core 1.0. The API those packages provide are still available to apps by using a <FrameworkReference> to Microsoft.AspNetCore.App. This includes commonly referenced API, such as Kestrel, Mvc, Razor, and others.”
  • “This will not apply to all binaries that are pulled in via Microsoft.AspNetCore.App in 2.x.”
  • Notable exceptions include: The SignalR .NET client will continue to support .NET Standard and ship as NuGet package because it is intended for use on many .NET runtimes, like Xamarin and UWP.”

Sourcehttps://github.com/aspnet/Announcements/issues/325

References:

Logging in ASP .NET Core 3.1

By Shahed C on March 24, 2020

This is the twelfth of a new series of posts on ASP .NET Core 3.1 for 2020. In this series, we’ll cover 26 topics over a span of 26 weeks from January through June 2020, titled ASP .NET Core A-Z! To differentiate from the 2019 series, the 2020 series will mostly focus on a growing single codebase (NetLearner!) instead of new unrelated code snippets week.

Previous post:

NetLearner on GitHub:

In this Article:

L is for Logging in ASP .NET Core

You could write a fully functional ASP .NET Core web application without any logging. But in the real world, you should use some form of logging. This blog post provides an overview of how you can use the built-in logging functionality in ASP .NET Core web apps. While we won’t go deep into 3rd-party logging solutions such as Serilog in this article, you should definitely consider a robust semantic/structured logging solution for your projects.

Logging providers in ASP .NET Core 3.1

Log Messages

The simplest log message includes a call to the extension method ILogger.Log()  by passing on a LogLevel and a text string. Instead of passing in a LogLevel, you could also call a specific Log method such as LogInformation() for a specific LogLevel. Both examples are shown below:

// Log() method with LogLevel passed in 
_logger.Log(LogLevel.Information, "some text");

// Specific LogXX() method, e.g. LogInformation()
_logger.LogInformation("some text");

LogLevel values include Trace, Debug, Information, Warning, Error, Critical and None. These are all available from the namespace Microsoft.Extensions.Logging. For a more structured logging experience, you should also pass in meaningful variables/objects following the templated message string, as all the Log methods take in a set of parameters defined as “params object[] args”.

public static void Log (
   this ILogger logger, LogLevel logLevel, string message, params object[] args);

This allows you to pass those values to specific logging providers, along with the message itself. It’s up to each logging provider on how those values are captured/stored, which you can also configure further. You can then query your log store for specific entries by searching for those arguments. In your code, this could look something like this:

_logger.LogInformation("some text for id: {someUsefulId}", someUsefulId);

Even better, you can add your own EventId for each log entry. You can facilitate this by defining your own set of integers, and then passing an int value to represent an EventId. The EventId type is a struct that includes an implicit operator, so it essentially calls its own constructor with whatever int value you provide.

_logger.LogInformation(someEventId, "some text for id: {someUsefulId}", someUsefulId);

In the NetLearner.Portal project, we can see the use of a specific integer value for each EventId, as shown below:

// Step X: kick off something here
_logger.LogInformation(LoggingEvents.Step1KickedOff, "Step {stepId} Kicked Off.", stepId);

// Step X: continue processing here
_logger.LogInformation(LoggingEvents.Step1InProcess, "Step {stepId} in process...", stepId);

// Step X: wrap it up
_logger.LogInformation(LoggingEvents.Step1Completed, "Step {stepId} completed!", stepId);

The integer values can be whatever you want them to be. An example is shown below:

public class LoggingEvents
{
   public const int ProcessStarted = 1000; 

   public const int Step1KickedOff = 1001;
   public const int Step1InProcess = 1002;
   public const int Step1Completed = 1003; 
   ...
}

Logging Providers

The default template-generated web apps include a call to CreateDefaultBuilder() in Program.cs, which automatically adds the Console and Debug providers. As of ASP.NET Core 2.2, the EventSource provider is also automatically added by the default builder. When on Windows, the EventLog provider is also included.

 public static IHostBuilder CreateHostBuilder(string[] args) =>
    Host.CreateDefaultBuilder(args)
      .ConfigureWebHostDefaults(webBuilder =>
      {
         webBuilder.UseStartup<Startup>();
      });

NOTE: As mentioned in an earlier post in this blog series, the now-deprecated Web Host Builder has been replaced by the Generic Host Builder with the release of .NET Core 3.0.

If you wish to add your own set of logging providers, you can expand the call to CreateDefaultBuilder(), clear the default providers, and then add your own. The built-in providers now include ConsoleDebug, EventLog, TraceSource and EventSource.

public static IHostBuilder CreateHostBuilder(
   string[] args) => Host.CreateDefaultBuilder(args)  
      .ConfigureWebHostDefaults(webBuilder =>
      {
         webBuilder.UseStartup<Startup>();
      })
      .ConfigureLogging(logging =>  
      {  
         // clear default logging providers
         logging.ClearProviders();  

         // add built-in providers manually, as needed 
         logging.AddConsole();   
         logging.AddDebug();  
         logging.AddEventLog();
         logging.AddEventSourceLogger();
         logging.AddTraceSource(sourceSwitchName); 
      });

The screenshots below show the log results viewable in Visual Studio’s Debug Window and in the Windows 10 Event Viewer. Note that the EventId’s integer values (that we had defined) are stored in the EventId field as numeric value in the Windows Event Viewer log entries.

 VS2019 Output panel showing debug messages
VS2019 Output panel showing debug messages
Windows Event Viewer showing log data

For the Event Log provider, you’ll also have to add the following NuGet package and corresponding using statement:

Microsoft.Extensions.Logging.EventLog

For the Trace Source provider, a “source switch” can be used to determine if a trace should be propagated or ignored. For more information on the Trace Source provider and the Source Switch it uses check out the official docs at:

For more information on adding logging providers and further customization, check out the official docs at:

JSON Configuration

One way to configure each Logging Provider is to use your appsettings.json file. Depending on your environment, you could start with appsettings.Development.json or App Secrets in development, and then use environment variables, Azure Key Vault in other environments. You may refer to earlier blog posts from 2018 and 2019 for more information on the following:

In your local JSON config file, your configuration uses the following syntax:

{
   "Logging": {
      "LogLevel": {
         "Default": "Debug",
         "Category1": "Information",
         "Category2": "Warning"
      },
      "SpecificProvider":
      {
         "ProviderProperty": true
      }
   }
}

The configuration for LogLevel sets one or more categories, including the Default category when no category is specified. Additional categories (e.g. System, Microsoft or any custom category) may be set to one of the aforementioned LogLevel values.

The LogLevel block can be followed by one or more provider-specific blocks (e.g. Console) to set its properties, e.g. IncludeScopes. Such an example is shown below.

{
   "Logging": {
      "LogLevel": {
         "Default": "Debug",
         "System": "Information",
         "Microsoft": "Information"
      },
      "Console":
      {
         "IncludeScopes": true
      }
   }
}

To set logging filters in code, you can use the AddFilter () method for specific providers or all providers in your Program.cs file. The following syntax can be used to add filters for your logs.

  .ConfigureLogging(logging =>
      logging.AddFilter("Category1", LogLevel.Level1)
         .AddFilter<SomeProvider>("Category2", LogLevel.Level2));

In the above sample, the following placeholders can be replaced with:

  • CategoryX: System, Microsoft, custom categories
  • LogLevel.LevelX: Trace, Debug, Information, Warning, Error, Critical, None
  • SomeProvider: Debug, Console, other providers

To set the EventLog level explicitly, add a section for “EventLog” with the default minimum “LogLevel” of your choice. This is useful for Windows Event Logs, because the Windows Event Logs are logged for Warning level or higher, by default.

{
   "Logging": {
     "LogLevel": {
       "Default": "Debug"
     },
     "EventLog": {
       "LogLevel": {
         "Default": "Information"
       }
     }
   }
 }

Log Categories

To set a category when logging an entry, you may set the string value when creating a logger. If you don’t set a value explicitly, the fully-qualified namespace + class name is used. In the WorkhorseModel class seen in The NetLearner.Portal project, the log results seen in the Debug window started with:

NetLearner.Portal.Pages.WorkhorseModel

This is the category name created using the class name passed to the constructor in WorkhorseModel as shown below:

private readonly ILogger _logger; 

public WorkhorseModel(ILogger<WorkhorseModel> logger)
{
   _logger = logger;
}

If you wanted to set this value yourself, you could change the code to the following:

private readonly ILogger _logger; 

public WorkhorseModel(WorkhorseModel logger)
{
   _logger = logger.CreateLogger("NetLearner.Portal.Pages.WorkhorseModel");
}

The end results will be the same. However, you may notice that there are a couple of differences here:

  1. Instead of ILogger<classname> we are now passing in an ILoggerFactory type as the logger.
  2. Instead of just assigning the injected logger to the private _logger variable, we are now calling the factory method CreateLogger() with the desired string value to set the category name.

Exceptions in Logs

In addition to EventId values and Category Names, you may also capture Exception information in your application logs. The various Log extensions provide an easy way to pass an exception by passing the Exception object itself.

try 
{
   // try something here
   throw new Exception();
} catch (Exception someException)
{
   _logger.LogError(eventId, someException, "Trying step {stepId}", stepId);
   // continue handling exception
}

Checking the Event Viewer, we may see a message as shown below. The LogLevel is shown as “Error” because we used the LogError() extension method in the above code, which is forcing an Exception to be thrown. The details of the Exception is displayed in the log as well.

Windows Event Viewer showing error log entry

Structured Logging with Serilog

At the very beginning, I mentioned the possibilities of structured logging with 3rd-party providers. There are many solutions that work with ASP .NET Core, including (but not limited to) elmahNLog and Serilog. Here, we will take a brief look at Serilog.

Similar to the built-in logging provider described throughout this article, you should include variables to assign template properties in all log messages, e.g.

Log.Information("This is a message for {someVariable}", someVariable);

To make use of Serilog, you’ll have to perform the following steps:

  1. grab the appropriate NuGet packages: SerilogHosting, various Sinks, e,g, Console
  2. use the Serilog namespace, e.g. using Serilog
  3. create a new LoggerConfiguration() in your Main() method
  4. call UseSerilog() when creating your Host Builder
  5. write log entries using methods from the Log static class.

For more information on Serilog, check out the following resources:

References

IIS Hosting for ASP .NET Core 3.1 Web Apps

By Shahed C on March 2, 2020

This is the ninth of a new series of posts on ASP .NET Core 3.1 for 2020. In this series, we’ll cover 26 topics over a span of 26 weeks from January through June 2020, titled ASP .NET Core A-Z! To differentiate from the 2019 series, the 2020 series will mostly focus on a growing single codebase (NetLearner!) instead of new unrelated code snippets week.

Previous post:

NetLearner on GitHub:

In this Article:

I is for IIS Hosting

If you’ve been reading my weekly blog posts in this series (or you’ve worked with ASP .NET Core), you probably know that ASP .NET Core web apps can run on multiple platforms. Since Microsoft’s IIS (Internet Information Services) web server only runs on Windows, you may be wondering why we would need to know about IIS-specific hosting at all.

Well, we don’t need IIS to run ASP .NET Core, but there are some useful IIS features you can take advantage of. In fact, ASP .NET Core v2.2 introduced in-process hosting in IIS with the ASP .NET Core module, which continues to be available in v3.1. You can run your app either in-process or out of process.

Here’s a little background, from the 2.2 release notes of what’s new:

“In earlier versions of ASP.NET Core, IIS serves as a reverse proxy. In 2.2, the ASP.NET Core Module can boot the CoreCLR and host an app inside the IIS worker process (w3wp.exe). In-process hosting provides performance and diagnostic gains when running with IIS.” 

NOTE: The actual web.config file has been intentionally left out from the above repo, and replaced with a placeholder file (for reference), web.config.txt. When you follow the configuration steps outlined below, the actual web.config file will be generated with the proper settings.

In-Process vs Out-of-Process

Developing for IIS

In order to develop for IIS on your local development machine while working with Visual Studio, you should complete the following steps:

  1. Install/Enable IIS locally: add IIS via Windows Features setup
  2. Configure IIS: add website with desired port(s)
  3. Enable IIS support in VS: include dev-time IIS support during setup
  4. Configure your web app: enable HTTPS, add launch profile for IIS

NOTE: If you need help with any of the above steps, you may follow the detailed guide in the official docs:

After Step 1 (IIS installation), the list of Windows Features should show that IIS and many of its components have been installed.

IIS components in Windows Features

During and after Step 2 (IIS configuration), my newly added website looks like the screenshots shown below:

Add Website in IIS Manager
Browse Website Folder via IIS Manager

For Step 3 (IIS support in VS) mentioned above, make sure you select the “Development time IIS support” option under the “ASP .NET and web development” workload. These options are shown in the screenshot below:

Development time IIS Support in VS2019 ASP .NET workload

After Step 4 (web app config), I can run the web application locally on IIS. Check out the next section to learn more about your web application configuration. In addition to the .csproj settings, you’ll also need a web.config file in addition to your appsettings.json file. You may also need to start VS2019 with Admin privileges before attempting to debug against IIS.

Optionally, you could set up a VM on Azure with IIS enabled and deploy to that web server. If you need some help with the setup, you can select a pre-configured Windows VM with IIS pre-installed from the Azure Portal.

If you need help with creating an Azure VM with IIS, check out the following resources:

IIS Configuration in Visual Studio

After completing Step 4 using the instructions outlined above, let’s observe the following (in the NetLearner.Portal web app project:

  • Profile: Debug tab in project properties
  • Project: .csproj settings
  • Settings: launchSettings.json
  • Config: web.config file

Profile: With your web project open in Visual Studio, right-click the project in Solution Explorer, and then click Properties. Click the Debug tab to see the newly-added IIS-specific profile. Recall that the Hosting Model offers 3 options during the creation of this profile: Default, In-Process and Out-of-process.

Settings: Under the Properties node in the Solution Explorer, open the launchSettings.json file. Here, you can see all the settings for your newly-created IIS-specific Profile. You can manually add/edit settings directly in this file without having to use the Visual Studio UI.

launchSettings.json file, showing IIS Profile settings

Config: You may recognize the XML-based web.config file from previous versions of ASP .NET, but the project’s settings and dependencies are now spread across multiple files, such as the .csproj file and appsettings.json config file. For ASP .NET Core projects, the web.config file is only used specifically for an IIS-hosted environment. In this file, you may configure the ASP .NET Core Module that will be used for your IIS-hosted web application.

web.config file, showing hosting model, e.g. InProcess

Once your web app is configured, you can run it from Visual Studio using the profile you created previously. In order to run it using a specific profile, click the tiny dropdown next to the green Run/Debug button to select the desired profile. Then click the button itself. This should launch the application in your web browser, pointing to localhost running on IIS, e.g. https://localhost/<appname>

VS2019 with IIS Profile selected
Web browser showing web app running in IIS

ASP .NET Core Module

Now that your IIS server environment has been set up (either locally or in the cloud), let’s learn about the ASP .NET Core Module. This is a native IIS module that plugs into the actual IIS pipeline (not to be confused with your web app’s request pipeline). It allows you to host your web app in one of two ways:

  • In-process: the web app is hosted inside the IIS worker process, i.e. w3wp.exe (previously known as the World Wide Web Publishing Service)
  • Out of process: IIS forwards web server requests to the web app, which uses Kestrel (the cross-platform web server included with ASP .NET Core)

As you’ve seen in an earlier section, this setting is configured in the web.config file:

<aspNetCore processPath="C:\Users\REPLACE_SOMEUSER\source\repos\NetLearnerApp\src\NetLearner.Portal\bin\Debug\netcoreapp3.1\NetLearner.Portal.exe" arguments="" stdoutLogEnabled="false" hostingModel="InProcess">

The lists below shows shows some notable differences between hosting in-process vs out of process.

In-Process vs Out-of-Process. compared

How you configure your app is up to you. For more details on the module and its configuration settings, browse through the information available at:

BONUS: Publishing to a VM with IIS

You can publish your ASP .NET Core web app to a Virtual Machine (either on your network or in Azure) or just any Windows Server you have access to. There are several different options:

Here are some prerequisites to be aware of:

  • IIS must be pre-installed on the server with relevant ports enabled
  • WebDeploy must be installed (which you would normally have on your local dev machine)
  • The VM must have a DNS name configured (Azure VMs can have fully qualified domain names, e.g. <machinename>.eastus.cloudapp.azure.com)

References

Cookies and Consent in ASP .NET Core 3.1

By Shahed C on January 20, 2020

This is the third of a new series of posts on ASP .NET Core 3.1 for 2020. In this series, we’ll cover 26 topics over a span of 26 weeks from January through June 2020, titled ASP .NET Core A-Z! To differentiate from the 2019 series, the 2020 series will mostly focus on a growing single codebase (NetLearner!) instead of new unrelated code snippets week.

Previous post:

NetLearner on GitHub:

In this Article:

C is for Cookies and Consent

In this article, we’ll continue to look at the (in-progress) NetLearner application, which was generated using multiple ASP .NET Core web app project (3.1) templates. In previous releases, the template made it very easy for you to store cookies and display a cookie policy. However, the latest version doesn’t include cookie usage or a GDPR-compliant message out of the box.

Unless you’ve been living under a rock in the past couple of years, you’ve no doubt noticed all the GDPR-related emails and website popups since 2018. Whether or not you’re required by law to disclose your cookie policies, it’s good practice to reveal it to the end user so that they can choose to accept your cookies (or not).

Who Moved My Cookies?

In ASP .NET Core 2.x, the standard web app project templates provided by Microsoft included GDPR-friendly popup messages, that could be accepted by the end user to set a consent cookie. As of ASP .NET Core 3.x, this is no longer provided out of the box. However, you can still add this feature back into your project manually if needed.

Follow the instructions provided in the official docs to add this feature to your ASP .NET MVC or Razor Pages project:

But wait… how about Blazor web app projects? After asking a few other developers on Twitter, I decided to implement this feature myself, in my NetLearner repository. I even had the opportunity to answer a related question on Stack Overflow. Take a look at the following Blazor web project:

Browser Storage

As you probably know, cookies are attached to a specific browser installation and can be deleted by a user at an any time. Some  new developers may not be aware of where these cookies are actually stored.

Click F12 in your browser to view the Developer Tools to see cookies grouped by website/domain.

  • In (pre-Chromum) Edge/Firefox, expand Cookies under the Storage tab.
  • In (Chromium-based) Edge/Chrome, expand Storage | Cookies under the Application tab .

See screenshots below for a couple of examples how AspNet.Consent in stored, along with a boolean Yes/No value:

Cookies in Chromium-based Edge
Cookies in Google Chrome
 Cookies in Mozilla Firefox
Cookies in Mozilla Firefox

Partial Views for your cookie message

The first time you launch a new template-generated ASP .NET Core 2.x web app, you should expect to see a cookie popup that appears on every page that can be dismissed by clicking Accept. Since we added it manually in our 3.x project, let’s explore the code to dig in a little further.

GDPR-compliant cookie message

First, take a look at the _CookieConsentPartial.cshtml partial view in both the Razor Pages shared pages folder and the MVC shared views folder. The CSS class names and accessibility-friendly role attributes have been removed for brevity in the snippet below. For Razor Pages (in this example), this file should be in the /Pages/Shared/ folder by default. For MVC, this file should be in the /Views/Shared/ folder by default.

@using Microsoft.AspNetCore.Http.Features

@{
    var consentFeature = Context.Features.Get<ITrackingConsentFeature>();
    var showBanner = !consentFeature?.CanTrack ?? false;
    var cookieString = consentFeature?.CreateConsentCookie();
}

@if (showBanner)
{
    <div id="cookieConsent">
        <!-- CUSTOMIZED MESSAGE IN COOKIE POPUP --> 
        <button type="button" data-dismiss="alert" data-cookie-string="@cookieString">
            <span aria-hidden="true">Accept</span>
        </button>
    </div>
    <script>
        (function () {
            var button = document.querySelector("#cookieConsent button[data-cookie-string]");
            button.addEventListener("click", function (event) {
                document.cookie = button.dataset.cookieString;
            }, false);
        })();
    </script>
} 

This partial view has a combination of server-side C# code and client-side HTML/CSS/JavaScript code. First, let’s examine the C# code at the very top:

  1. The using statement at the top mentions the Microsoft.AspNetCore.Http.Features namespace, which is necessary to use ITrackingConsentFeature.
  2. The local variable consentFeature is used to get an instance ITrackingConsentFeature (or null if not present).
  3. The local variable showBanner is used to store the boolean result from the property consentFeature.CanTrack to check whether the user has consented or not.
  4. The local variable cookieString is used to store the “cookie string” value of the created cookie after a quick call to consentFeature.CreateConsentCookie().
  5. The @if block that follows only gets executed if showBanner is set to true.

Next, let’s examine the HTML that follows:

  1. The cookieConsent <div> is used to store and display a customized message for the end user.
  2. This <div> also displays an Accept <button> that dismisses the popup.
  3. The  data-dismiss attribute ensures that the modal popup is closed when you click on it. This feature is available because we are using Bootstrap in our project.
  4. The data- attribute for “data-cookie-string” is set using the server-side variable value for @cookieString.

The full value for cookieString may look something like this, beginning with the .AspNet.Consent boolean value, followed by an expiration date.

".AspNet.Consent=yes; expires=Mon, 18 Jan 2021 21:55:01 GMT; path=/; secure; samesite=none"

Finally, let’s examine the JavaScript that follows within a <script> tag:

  1. Within the <script> tag, an anonymous function is defined and invoked immediately, by ending it with (); after it’s defined.
  2. button variable is defined to represent the HTML button, by using an appropriate querySelector to retrieve it from the DOM.
  3. An eventListener is added to respond to the button’s onclick event.
  4. If accepted, a new cookie is created using the button’s aforementioned cookieString value.

To use the partial view in your application, simply insert it into the _Layout.cshtml page defined among both the Razor Pages shared pages folder and the MVC shared views folder. The partial view can be inserted above the call to RenderBody() as shown below.

<div class="container">
   <partial name="_CookieConsentPartial" />
   <main role="main" class="pb-3">
      @RenderBody()
   </main>
</div>

In an MVC application, the partial view can be inserted the same way, using the <partial> tag helper.

Blazor Implementation

Here are the steps I used in the Blazor project, tracked in the BlazorCookieExperiment branch:

  1. Update ConfigureServices() in Startup.cs to set up cookie usage
  2. Use JSInterop to set document.cookie in netLearnerJSInterop.js
  3. Update _Host.cshtml to include the .js file
  4. Observe code in _CookieConsentPartial.cshtml as reference
  5. Add _CookieConsentPartial.razor component in Shared folder
  6. Update MainLayout.razor to include above component
<div class="main">
    <div class="top-row px-4 auth">
        <LoginDisplay />
        <a href="https://docs.microsoft.com/aspnet/" target="_blank">About</a>
    </div>

    <_CookieConsentPartial />
    <div class="content px-4">
        @Body
    </div>
</div> 

Customizing your message

You may have noticed that there is only an Accept option in the default cookie popup generated by the template’s Partial View. This ensures that the only way to store a cookie with the user’s consent is to click Accept in the popup.

You may be wondering whether you should also display a Decline option in the cookie popup. But that would be a bad idea, because that would require you to store the user’s “No” response in the cookie itself, thus going against their wishes. If you wish to allow the user to withdraw consent at a later time, take a look at the GrantConsent() and WithdrawConsent() methods provided by ITrackingConsentFeature.

But you can still change the message in the cookie popup and your website’s privacy policy. To change the cookie’s displayed message, simply change the text that appears in the _CookieConsentPartial.cshtml partial view (or equivalent Razor component for ther Blazor project), within the <div> of the client-side HTML. In the excerpt shown in the previous section, this region is identified by the <!– CUSTOMIZED MESSAGE IN COOKIE POPUP –> placeholder comment.

   <div id="cookieConsent">
      <!-- CUSTOMIZED MESSAGE IN COOKIE POPUP -->
      <button type="button" data-dismiss="alert" data-cookie-string="@cookieString">
         <span aria-hidden="true">Accept</span>
      </button>
   </div>

Your message text is also a great place to provide a link to your website’s privacy policy. In the Razor Pages template, the <a> link is generated using a tag helper shown below. The /Privacy path points to the Privacy.cshtml Razor page in the /Pages folder.

<a asp-page="/Privacy">Learn More</a>

In a similar MVC application, you would find the Privacy.cshtml view within the /Views/Home/ folder, accessible via the Home controller’s Privacy() action method. In the MVC template, the <a> is link is generated using the following tag helper:

<a asp-area="" asp-controller="Home" asp-action="Privacy">Learn More</a>

Startup Configuration

None of the above would be possible without the necessary configuration. The cookie policy can be used by simply calling the extension method app.UseCookiePolicy() in the Configure() method of your Startup.cs file, in the root location of Razor Pages, MVC and Blazor projects.

public void Configure(IApplicationBuilder app, IHostingEnvironment env)
 {
    ...
    app.UseCookiePolicy();
    ...
 }

According to the official documentation, this “Adds the Microsoft.AspNetCore.CookiePolicy.CookiePolicyMiddleware handler to the specified Microsoft.AspNetCore.Builder.IApplicationBuilder, which enables cookie policy capabilities.
The cool thing about ASP .NET Core middleware is that there are many IApplicationBuilder extension methods for the necessary Middleware components you may need to use. Instead of hunting down each Middleware component, you can simply type app.Use in the Configure() method to discover what is available for you to use.

app.UseCookiePolicy() in Startup.cs

If you remove the call to app.UseCookiePolicy(), this will cause the aforementioned consentFeature value to be set to null in the C# code of your cookie popup.

var consentFeature = Context.Features.Get<ITrackingConsentFeature>(); 
cookieString is null if Cookie Policy disabled

There is also some minimal configuration that happens in the ConfigureServices() method which is called before the Configure() method in your Startup.cs file.

public void ConfigureServices(IServiceCollection services)
{
   services.Configure<CookiePolicyOptions>(options =>
   {
      // This lambda determines whether user consent for non-essential cookies is needed for a given request.
      options.CheckConsentNeeded = context => true;
      options.MinimumSameSitePolicy = SameSiteMode.None; 
   }); 
   ...
} 

The above code does a couple of things:

  1. As explained by the comment, the lambda (context => true) “determines whether user consent for non-essential cookies is needed for a given request” and then the CheckConsentNeeded boolean property for the options object is set to true or false.
  2. The property MinimumSameSitePolicy is set to SameSiteMode.None, which is an enumerator with the following possible values:
    • Unspecified = -1
    • None = 0
    • Lax = 1
    • Strict = 2

From the official documentation on cookie authentication,  The Cookie Policy Middleware setting for MinimumSameSitePolicy can affect the setting of Cookie.SameSite in CookieAuthenticationOptions settings. For more information, check out the documentation at:

References

Blazor Full-Stack Web Dev in ASP .NET Core 3.1

By Shahed C on January 13, 2020
ASP .NET Core A-Z Series

This is the second of a new series of posts on ASP .NET Core 3.1 for 2020. In this series, we’ll cover 26 topics over a span of 26 weeks from January through June 2020, titled ASP .NET Core A-Z! To differentiate from the 2019 series, the 2020 series will mostly focus on a growing single codebase (NetLearner!) instead of new unrelated code snippets week.

Previous post:

NetLearner on GitHub:

In this Article:

B is for Blazor Full-Stack Web Dev

In my 2019 A-Z series, I covered Blazor for ASP .NET Core while it was still experimental. As of ASP .NET Core 3.1, server-side Blazor has now been released, while client-side Blazor (currently in preview) is expected to arrive in May 2020. This post will cover server-side Blazor, as seen in NetLearner.

To see the code in action, open the solution in Visual Studio 2019 and run the NetLearner.Blazor project. All modern web browsers should be able to run the project.

NetLearner.Blazor web app in action

Entry Point and Configuration

Let’s start with Program.cs, the entry point of the application. Just like any ASP .NET Core web application, there is a Main method that sets up the entry point. A quick call to CreateHostBuilder() in the same file ensures that two things will happen: The Generic Host will call its own CreateDefaultBuilder() method (similar to how it works in a typical ASP .NET Core web application) and it will also call UseStartup() to identify the Startup class where the application is configured.

public class Program
{
   public static void Main(string[] args)
   {
      CreateHostBuilder(args).Build().Run();
   }
 
   public static IHostBuilder CreateHostBuilder(string[] args) =>
      Host.CreateDefaultBuilder(args)
      .ConfigureWebHostDefaults(webBuilder =>
      {
         webBuilder.UseStartup<Startup>();
      });
 }

Note that the Startup class doesn’t have to be called Startup, but you do have to tell your application what it’s called. In the Startup.cs file, you will see the familiar ConfigureServices() and Configure() methods, but you won’t need any of the regular MVC-related lines of code that set up the HTTP pipeline for an MVC (or Razor Pages) application. Instead, you just need a call to AddServerSideBlazor() in ConfigureServices() and a call to MapBlazorHub() in Configure() while setting up endpoints with UseEndPoints().

public class Startup
{
   public void ConfigureServices(IServiceCollection services)
   {
      ...
      services.AddServerSideBlazor();
      ...
   } 

   public void Configure(IApplicationBuilder app, IWebHostEnvironment env) 
   {
      ...
      app.UseEndpoints(endpoints => 
      {
         endpoints.MapControllers();
         endpoints.MapBlazorHub();
         endpoints.MapFallbackToPage("/_Host");
      });
   }
}

Note that the Configure() method takes in an app object of type IApplicationBuilder, similar to the IApplicationBuilder we see in regular ASP .NET Core web apps.  A call to MapFallBackToPage() indicates the “/_Host” root page, which is defined in the _Host.cshtml page in the Pages subfolder.

Rendering the Application

This “app” (formerly defined in a static “index.html” in pre-release versions) is now defined in the aforementioned “_Host.cshtml” page. This page contains an <app> element containing the main App component.

<html>
... 
<body>
    <app>
        <component type="typeof(App)" render-mode="ServerPrerendered" />
    </app>
...
</body>
</html>

The HTML in this page has two things worth noting: an <app> element within the <body>, and a <component> element of type “App” with a render-mode attribute set to “ServerPrerendered”. This is one of 3 render modes for a Blazor component: Static, Server and ServerPrerendered. For more information on render modes, check out the official docs at:

According to the documentation, this setting “renders the component into static HTML and includes a marker for a Blazor Server app. When the user-agent starts, this marker is used to bootstrap a Blazor app.

The App component is defined in App.razor, at the root of the Blazor web app project. This App component contains nested authentication-enabled components, that make use of the MainLayout to display the single-page web application in a browser. If the user-requested routedata is found, the requested page (or root page) is displayed. If the user-requested routedata is invalid (not found), it displays a “sorry” message to the end user.

<CascadingAuthenticationState>
    <Router AppAssembly="@typeof(Program).Assembly">
        <Found Context="routeData">
            <AuthorizeRouteView RouteData="@routeData" DefaultLayout="@typeof(MainLayout)" />
        </Found>
        <NotFound>
            <LayoutView Layout="@typeof(MainLayout)">
                <p>Sorry, there's nothing at this address.</p>
            </LayoutView>
        </NotFound>
    </Router>
</CascadingAuthenticationState>

The MainLayout.razor component (under /Shared) contains the following:

  • NavMenu: displays navigation menu in sidebar
  • LoginDisplay: displays links to register and log in/out
  • _CookieConsentPartial: displays GDPR-inspired cookie message
  • @Body keyword: replaced by content of layout when rendered

The _Layout.cshtml layout file (under /Pages/Shared) acts as a template and includes a call to @RenderBody to display its content. This content is determined by route info that is requested by the user, e.g. Index.razor when the root “/” is requested, LearningResources.razor when the route “/learningresources” is requested.

    <div class="container">
        <main role="main" class="pb-3">
            @RenderBody()
        </main>
    </div>

The NavMenu.razor component contains NavLinks that point to various routes. For more information about routing in Blazor, check out the official docs at:

LifeCycle Methods

A Blazor application goes through several lifecycle methods, including both asynchronous and non-asynchronous versions where applicable. Some important ones are listed below:

  • OnInitializedAsync() and OnInitialized(): invoked after receiving initial params
  • OnParametersSetAsync() and OnParametersSet(): called after receiving params from its parent, after initialization
  • OnAfterRenderAsync() and OnAfterRender(): called after each render
  • ShouldRender(): used to suppress subsequent rendering of the component
  • StateHasChanged(): called to indicate that state has changed, can be triggered manually

These methods can be overridden and defined in the @code section (formerly @functions section) of a .razor page, e.g. LearningResources.razor.

 @code {
   ...
   protected override async Task OnInitializedAsync()
   {
      ...
   } 
   ...
}

Updating the UI

The C# code in LearningResources.razor includes methods to initialize the page, handle user interaction, and keep track of data changes. Every call to an event handler from an HTML element (e.g. OnClick event for an input button) can be bound to a C# method to handle that event. The StateHasChanged() method can be called manually to rerender the component, e.g. when an item is added/edited/deleted in the UI.

<div>
    <input type="button" class="btn btn-primary" value="All Resources" @onclick="(() => DataChanged())" />
</div>

...
private async void DataChanged()
{
    learningResources = await learningResourceService.Get();
    ResourceLists = await resourceListService.Get();
    StateHasChanged();
}

Note that the DataChanged() method includes some asynchronous calls to Get() methods from a service class. These are the service classes in the shared library that are also used by the MVC and Razor Pages web apps in NetLearner.

Parameters defined in the C# code can be used similar to HTML attributes when using the component, including RenderFragments can be used like nested HTML elements. These can be defined in sub-components such as ConfirmDialog.razor and ResourceDetail.razor that are inside the LearningResources.razor component.

<ResourceDetail LearningResourceObject="learningResourceObject"
                ResourceListValues="ResourceLists"
                DataChanged="@DataChanged">
    <CustomHeader>@customHeader</CustomHeader>
</ResourceDetail>

Inside the subcomponent, you would define the parameters as such:

@code {
    [Parameter]
    public LearningResource LearningResourceObject { get; set; }

    [Parameter]
    public List<ResourceList> ResourceListValues { get; set; }

    [Parameter]
    public Action DataChanged { get; set; }

    [Parameter]
    public RenderFragment CustomHeader { get; set; }
} 

For more information on the creation and use of Razor components in Blazor, check out the official documentation at:

Next Steps

Run the Blazor web app from the NetLearner repo and try using the UI to add, edit and delete items. Make sure you remove the restrictions mentioned in a previous post about NetLearner, which will allow you to register as a new user, log in and perform CRUD operations.

NetLearner.Blazor: Learning Resources

There is so much more to learn about this exciting new framework. Blazor’s reusable components can take various forms. In addition to server-side Blazor (released in late 2019 with .NET Core 3.1), you can also host Blazor apps on the client-side from within an ASP .NET Core web app. Client-side Blazor is currently in preview and is expected in a May 2020 release.

References