This is the eleventh of a new series of posts on ASP .NET Core. In this post, we’ll learn about API Controllers in ASP .NET Core and some new features that will improve your API development experience.

In this Article:
- Why Web API?
- What’s new with Web API in ASP .NET Core?
- The APIController Attribute
- Open API (Swagger) Integration
- Setting up Swagger in your Web API
- Model Validation Errors and Other HTTP 400 Responses
- Testing Your Web API
- Enabling CORS
- References
Why Web API?
If you’re building a Web App with ASP .NET Core, you may already have a complete web application with models, views and controllers using ASP .NET Core MVC. You may also opt for the new Razor Pages to simplify your development environment or try out the all-new experimental Blazor to run C# in a web browser using WebAssembly.
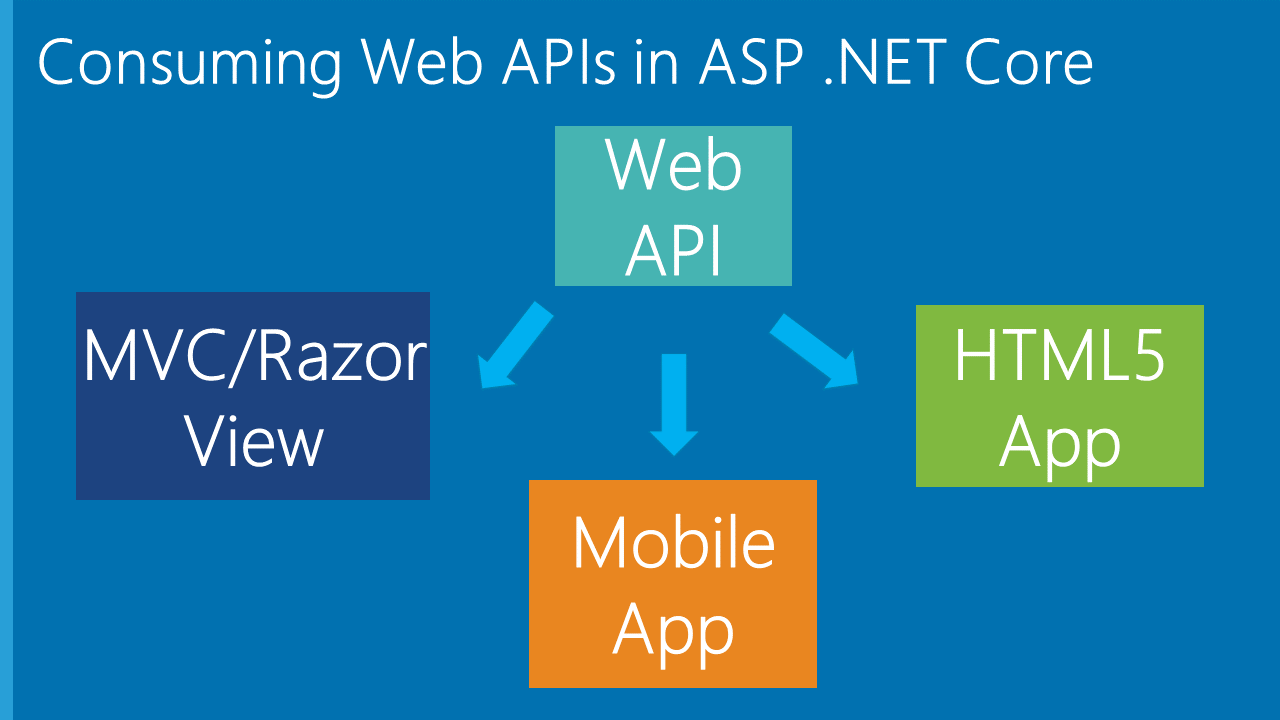
So… what would you need a Web API for?
In addition to all of the above, you may also need to retrieve data or allow input through endpoints you expose via a REST API. Such endpoints can be accessible via simple JavaScript AJAX calls on any web page, whether it’s a static HTML page or a View within an ASP .NET Core web app. You may also use your Web API as a backend for a mobile application running natively on a smartphone or tablet.
What’s new with Web API in ASP .NET Core?
From last week’s blog post of new .NET Core announcements and features, we’ve seen many new features from ASP .NET Core 2.2 and the upcoming 3.0. These include improved Open API (Swagger) integration. As mentioned earlier, you can use community-driven projects such as NSwag and Swashbuckle.AspNetCore to visualize Open API documents for your API.
Earlier in ASP .NET Core 2.1, the new [APIController] attribute was added so that the aforementioned tools can easily be used to generate an Open API specification. This includes (but is not limited to) return types, parameter sources, and possible error responses without the need for additional attributes.
In this blog post, you’ll get some guidance on how to create such Web API controllers using ASP .NET Core. If you need a tutorial on how to get started, check out the official docs at:
- Create a web API with ASP.NET Core MVC: https://docs.microsoft.com/en-us/aspnet/core/tutorials/first-web-api
To see this in action, check out the sample Web API project on Github:
![]() Web API Sample on GitHub: https://github.com/shahedc/WebApiSample
Web API Sample on GitHub: https://github.com/shahedc/WebApiSample
The APIController Attribute
When ASP .NET Core was first announced (as ASP .NET 5 before the Core 1.0 release), one of the benefits was the anticipated unification of Web + API controllers. Instead of having separate base classes, you could now have a single ControllerBase parent class to inherit from, whether you’re building an MVC Web Controller or Web API Controller.
As of Core 2.0, your MVC and API controllers both derive from the Controller class, which derives from ControllerBase:
public class MyMvc20Controller : Controller {}

[Route("api/[controller]")]
public class MyApi20Controller : Controller {}
As of Core 2.1 (and 2.2), the template-generated classes look a little different, where a Web controller is a child of the Controller class and an API controller is a child of ControllerBase.
public class MyMvc21Controller : Controller {}

[Route("api/[controller]")]
public class MyApi21Controller : ControllerBase {}
This can be expressed in the table below:
| Namespace | Microsoft.AspNetCore.Mvc
|
| Common parent | ControllerBase (Abstract Class) |
| MVC Controller parent | Controller: ControllerBase |
| MVC Controller | MyMvcController: Controller |
| Web API Controller | MyApiController: ControllerBase |
So, what’s the purpose of the APIController attribute? According to the attribute’s documentation, the [APIController] attribute “Indicates that a type and all derived types are used to serve HTTP API responses. The presence of this attribute can be used to target conventions, filters and other behaviors based on the purpose of the controller.”
This relatively new attribute isn’t required to build a Web API Controller, but will make your life easier. In fact, you may create a custom base controller for your API controllers, simply by using the [ApiController] attribute with a new base controller class.
Open API (Swagger) Integration
As mentioned in the previous blog post, Open API (Swagger) integration was already included in ASP .NET Core 2.1 and continues to improve with the all-new 2.2. To see this in action, let’s explore the following sample code:
[Produces("application/json")]
[Route("api/[controller]")]
[ApiController]
public class ItemsController : Controller
{
}
In order to use the API Controller attribute, it’s important to SetCompatibilityVersion to 2.1 or higher in your ConfigureServices() method of your Startup class. Since we’re using 2.2 here, the constant that’s passed in is Version_2_2.
public void ConfigureServices(IServiceCollection services)
{
   services.AddMvc().SetCompatibilityVersion(CompatibilityVersion.Version_2_2);
}
To learn more about setting the compatibility version, check out the official docs at:
- Compatibility version for ASP.NET Core MVC: https://docs.microsoft.com/en-us/aspnet/core/mvc/compatibility-version?view=aspnetcore-2.2
As of ASP .NET Core 2.2, you may also apply the APIController attribute at the Assembly level. This would be set in the Startup.cs class file, as shown below:
[assembly: ApiController]
namespace MyAspNet22WebApiProject
{
   public class Startup
   {
   }
}
Setting up Swagger in your Web API
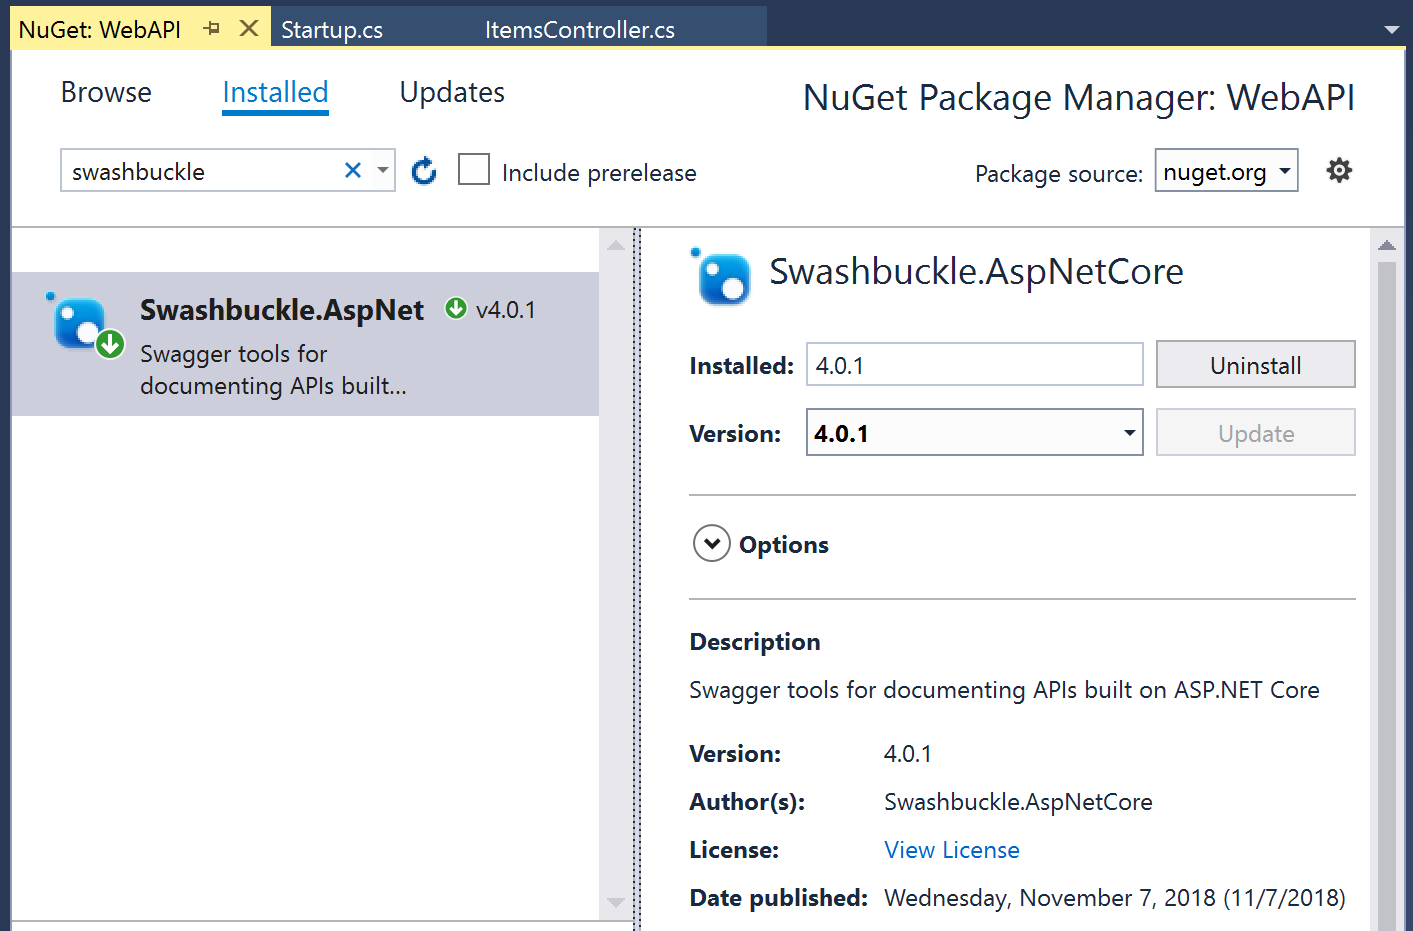
There are a few steps required to set up Swagger for your Web API project. I will use Swashbuckle for this example.
Step 1: Install the Swashbuckle.AspNetCore from NuGet.
You may install this package using the Package Manager Console in Visual Studio, from the Manage NuGet Packages dialog, or with the “dotnet add” command.
PowerShell Command in Package Manager Console:
Install-Package Swashbuckle.AspNetCore
CLI Command:
dotnet add TodoApi.csproj package Swashbuckle.AspNetCore
NuGet Packages dialog in Visual Studio:
Step 2: Update your ConfigureServices() method in the Startup class to register the Swagger generator with at least 1 or more Swagger documents.
using Swashbuckle.AspNetCore.Swagger;
...
public void ConfigureServices(IServiceCollection services)
{
   services.AddMvc().SetCompatibilityVersion(CompatibilityVersion.Version_2_2);

   // register the swagger generator
   services.AddSwaggerGen(c =>
   {
      c.SwaggerDoc("v1", new Info { Title = "My API", Version = "v1" });
   });
}
In order to use the above code, you must add the using statement specified, to grab the appropriate Swashbuckle namespace for Swagger.
Step 3: Update your Configure() method in the Startup class to enable the Swagger middleware you just registered.
public void Configure(IApplicationBuilder app, IHostingEnvironment env)
{
   // Enable Swagger middleware
   app.UseSwagger();

   // specify the Swagger JSON endpoint.
   app.UseSwaggerUI(c =>
   {
      c.SwaggerEndpoint("/swagger/v1/swagger.json", "My API V1");
   });

   ...
   app.UseMvc();
}
Note that the endpoint path begins with /swagger which you can now access with your browser.
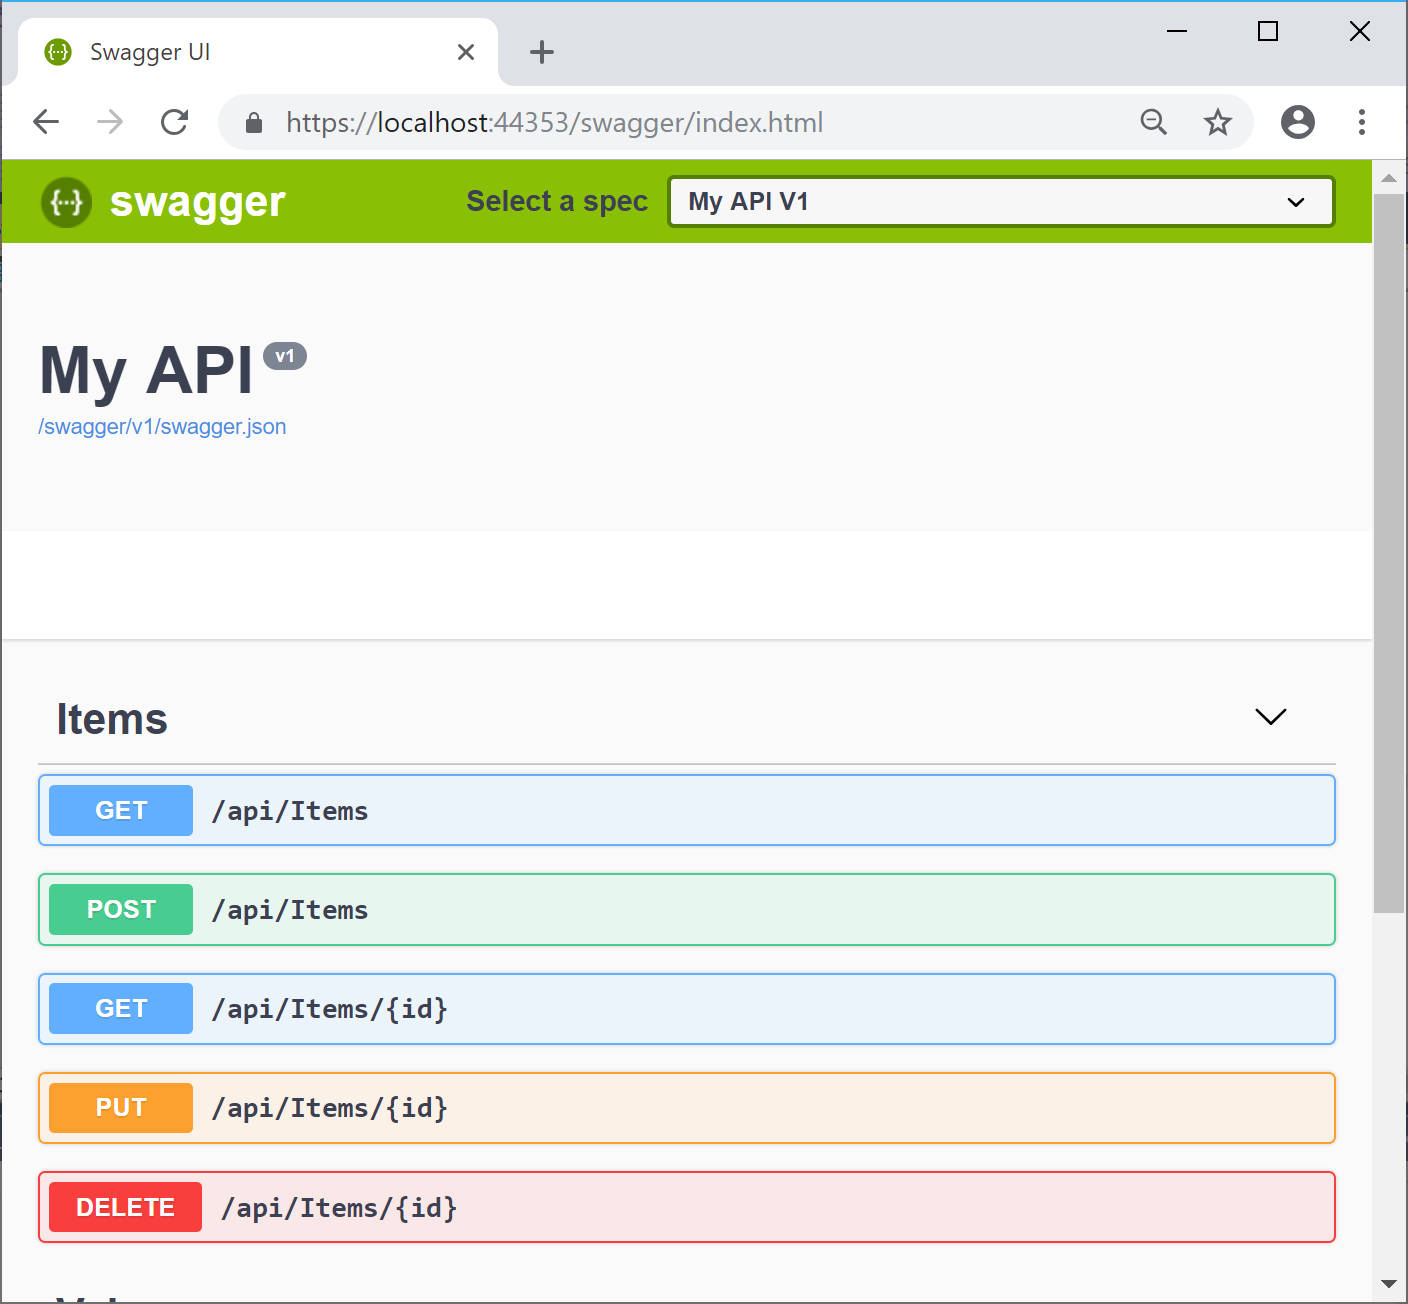
Step 4: Try it out!
The following screenshot shows what the Swagger UI looks like in a web browser.
Model Validation Errors and Other HTTP 400 Responses
We should all be familiar with Error 404 for “File Not Found” when a URI is requested but the source is not found. When there is a bad request, the error type is HTTP 400 Bad Request, which implies that the server won’t process the request due to a client error. This could include a model validation failure.
Before automatic model validation errors with the ApiController attribute, you would have to detect and return a BadRequest, e.g.
if (!ModelState.IsValid)
{
   return BadRequest(ModelState);
}
This is no longer necessary with the new ApiController attribute and the response can be further customized with InvalidModelStateResponseFactory if you wish to do so.
For more information about Web API Controllers in ASP .NET Core, check out the official documentation at:
- Build web APIs with ASP.NET Core: https://docs.microsoft.com/en-us/aspnet/core/web-api/?view=aspnetcore-2.2
Testing Your Web API
There are several ways to test your Web API.
Web Browser:
The easiest way would be to use your favorite web browser. You may feel a little lost if you run your web project from Visual Studio but are unable to access your web app in a browser. Just remember that a Web API project without a website won’t be accessible at the root URL of the website, e.g. https://localhost:44353.
Instead, you’ll have to use the specific path for each API Controller, e.g. https://localhost:44353/api/<controllername>
Postman:
Postman is a popular 3rd-party utility that makes API Development very easy. Simply download the app from their website and enter the API path you wish to test.
- Download Postman: https://www.getpostman.com/
Postman allows you to save collections of URLs, customize your parameters, and more!
Swagger:
The aforementioned Swagger utility can be used with the steps outline earlier in this article. For more information, check out the official documentation at:
- ASP.NET Core Web API help pages with Swagger / OpenAPI: https://docs.microsoft.com/en-us/aspnet/core/tutorials/web-api-help-pages-using-swagger
HTTP-REPL
There’s a really cool command-line REPL (Read Evaluate Print Loop) tool being built by the ASP .NET Core team, for use with RESTful HTTP services. As of December 2018, the tool has been delayed a little longer.
More coming soon: “When we announced planning for ASP.NET Core 2.2, we mentioned a number of features that aren’t detailed above, including API Authorization with IdentityServer4, Open API (Swagger) driven client code generation, and the HTTP REPL command line tool. These features are still being worked on and aren’t quite ready for release, however we expect to make them available as add-ons in the coming months. Thanks for your patience while we complete these experiences and get them ready for you all to try out.”
For now, feel free to check out this September 2018 post from Scott Hanselman, where he outlines the new tool and how to use the pre-release version.
- A command-line REPL for RESTful HTTP Services: https://www.hanselman.com/blog/ACommandlineREPLForRESTfulHTTPServices.aspx
Enabling CORS
After following all the tutorials, you may realize that your Web API does not work when deploying to a web server and is not accessible from a remote client. This may be caused by the following error:
No 'Access-Control-Allow-Origin' header is present on the requested resource
In order to fix this, you may have to enable CORS (Cross-Origin Resource Sharing) on your web server, e.g. within the App Service settings in Azure.
Using the Azure CLI, you can enable CORS with the following command:
az resource update --name web --resource-group myResourceGroup --namespace Microsoft.Web --resource-type config --parent sites/<app_name> --set properties.cors.allowedOrigins="['http://localhost:5000']" --api-version 2015-06-01
Replace the <app_name> placeholder text with your actual app name. Also, note that the allowedOrigins list only includes an arbitrary localhost URL with a specified port. You may adjust this to enable specific remote clients or optionally enable all client URLs with “[‘*’]”.
If you wish to enable CORS using the Azure portal, browse through your App Service settings and update the Allowed Origins field using the guidance provided.
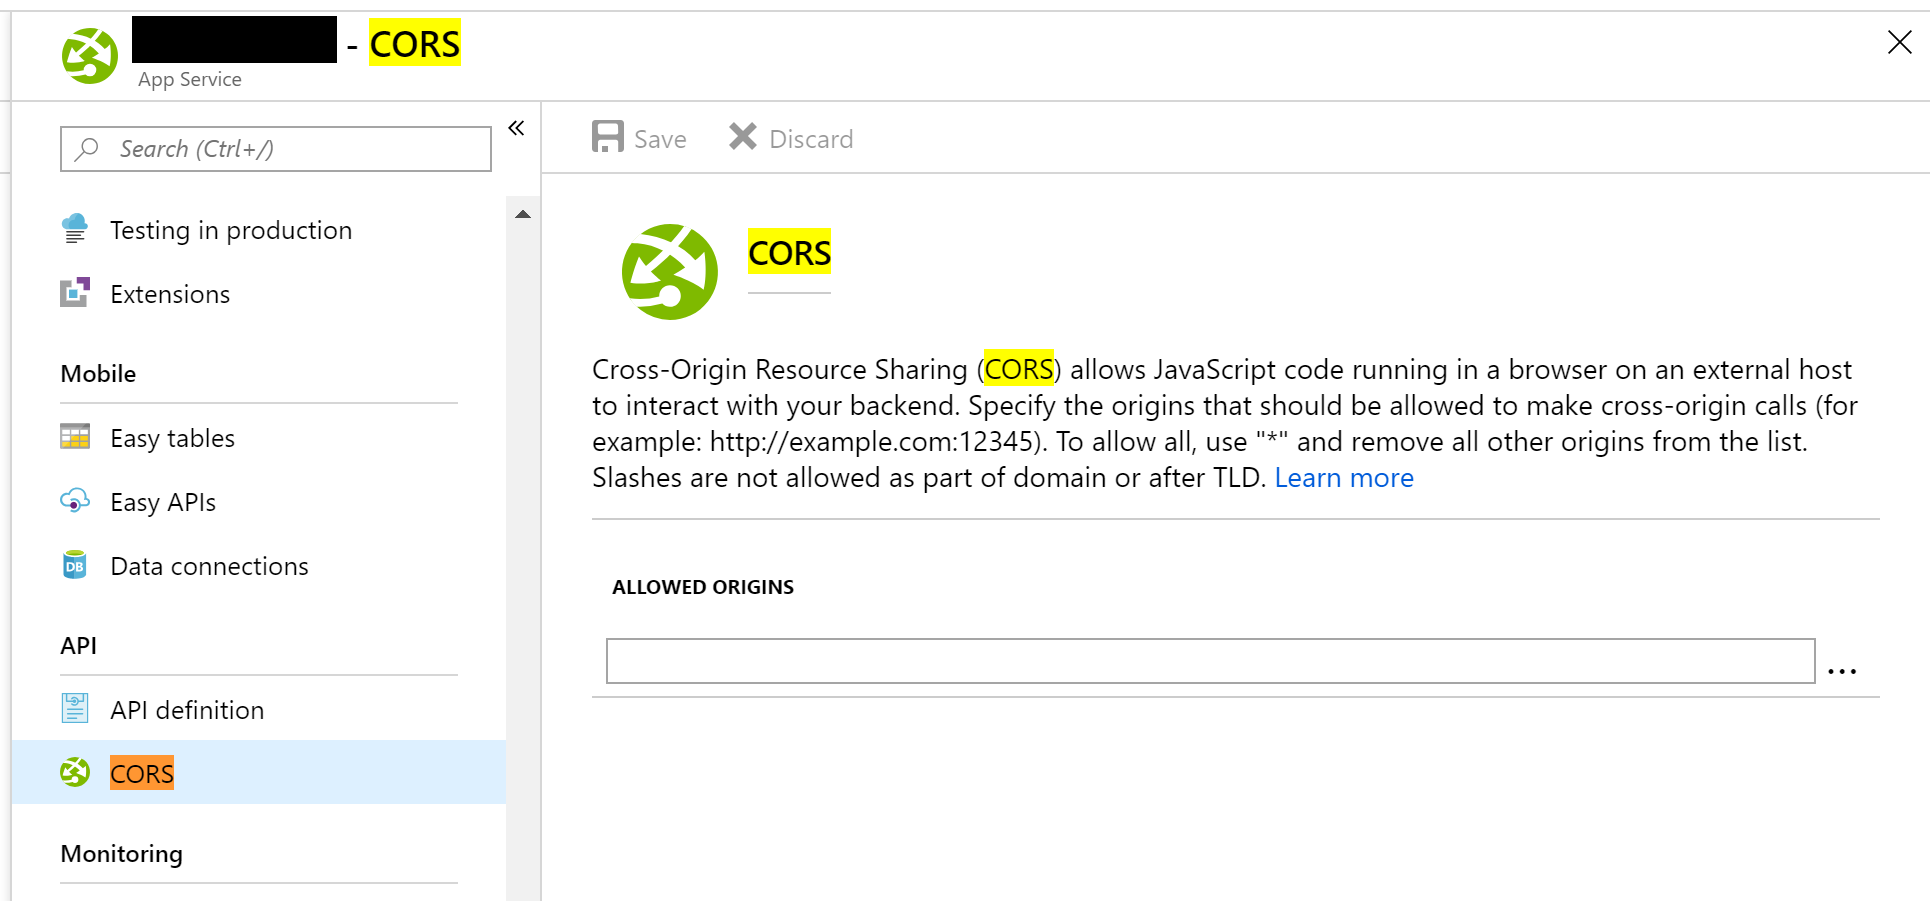
“Cross-Origin Resource Sharing (CORS) allows JavaScript code running in a browser on an external host to interact with your backend. Specify the origins that should be allowed to make cross-origin calls (for example: http://example.com:12345). To allow all, use “*” and remove all other origins from the list. Slashes are not allowed as part of domain or after TLD.”
- Learn More: https://go.microsoft.com/fwlink/?linkid=870118
If you wish to enable CORS within your ASP .NET Core code, you can also do so using the CORS middleware package. For information on this approach, check out the official documentation at:
- Enable Cross-Origin Requests (CORS) in ASP.NET Core: https://docs.microsoft.com/en-us/aspnet/core/security/cors
References
- Build web APIs with ASP.NET Core: https://docs.microsoft.com/en-us/aspnet/core/web-api
- ASP.NET Core 2.1.0-preview1: Improvements for building Web APIs: https://blogs.msdn.microsoft.com/webdev/2018/02/27/asp-net-core-2-1-web-apis/
- What’s new in ASP.NET Core 2.1: https://docs.microsoft.com/en-us/aspnet/core/release-notes/aspnetcore-2.1
- ASP.NET Core Web API help pages with Swagger / OpenAPI: https://docs.microsoft.com/en-us/aspnet/core/tutorials/web-api-help-pages-using-swagger
- Get started with Swashbuckle and ASP.NET Core: https://docs.microsoft.com/en-us/aspnet/core/tutorials/getting-started-with-swashbuckle
- Get started with NSwag and ASP.NET Core: https://docs.microsoft.com/en-us/aspnet/core/tutorials/getting-started-with-nswag
- NSwag on GitHub: https://github.com/RSuter/NSwag
- Swashbuckle.AspNetCore on GitHub: https://github.com/domaindrivendev/Swashbuckle.AspNetCore
- Microsoft.AspNetCore.Mvc.Api.Analyzers on NuGet: https://www.nuget.org/packages/Microsoft.AspNetCore.Mvc.Api.Analyzers
- ASP.NET Core 2.2.0-preview1: Open API Analyzers & Conventions: https://blogs.msdn.microsoft.com/webdev/2018/08/23/asp-net-core-2-20-preview1-open-api-analyzers-conventions/
- What’s new in ASP.NET Core 2.2: https://docs.microsoft.com/en-us/aspnet/core/release-notes/aspnetcore-2.2
Pingback: API Controllers in ASP .NET Core - How to Code .NET
Pingback: Dew Drop - December 17, 2018 (#2861) - Morning Dew
Pingback: Preventing data leakage - Today in Tech - Thursday, Dec 27, 2018