Category Archives: ASP.NET

Unit Testing in ASP .NET Core

By Shahed C on May 28, 2019

This is the twenty-first of a series of posts on ASP .NET Core in 2019. In this series, we’ll cover 26 topics over a span of 26 weeks from January through June 2019, titled A-Z of ASP .NET Core!

ASPNETCoreLogo-300x267 A – Z of ASP .NET Core!

In this Article:

U is for Unit testing

Whether you’re practicing TDD (Test-Driven Development) or writing your tests after your application code, there’s no doubt that unit testing is essential for web application development. When it’s time to pick a testing framework, there are multiple alternatives such as xUnit.net, NUnit and MSTest. This article will focus on xUnit.net because of its popularity (and similarity to its alternatives) when compared to the other testing frameworks.

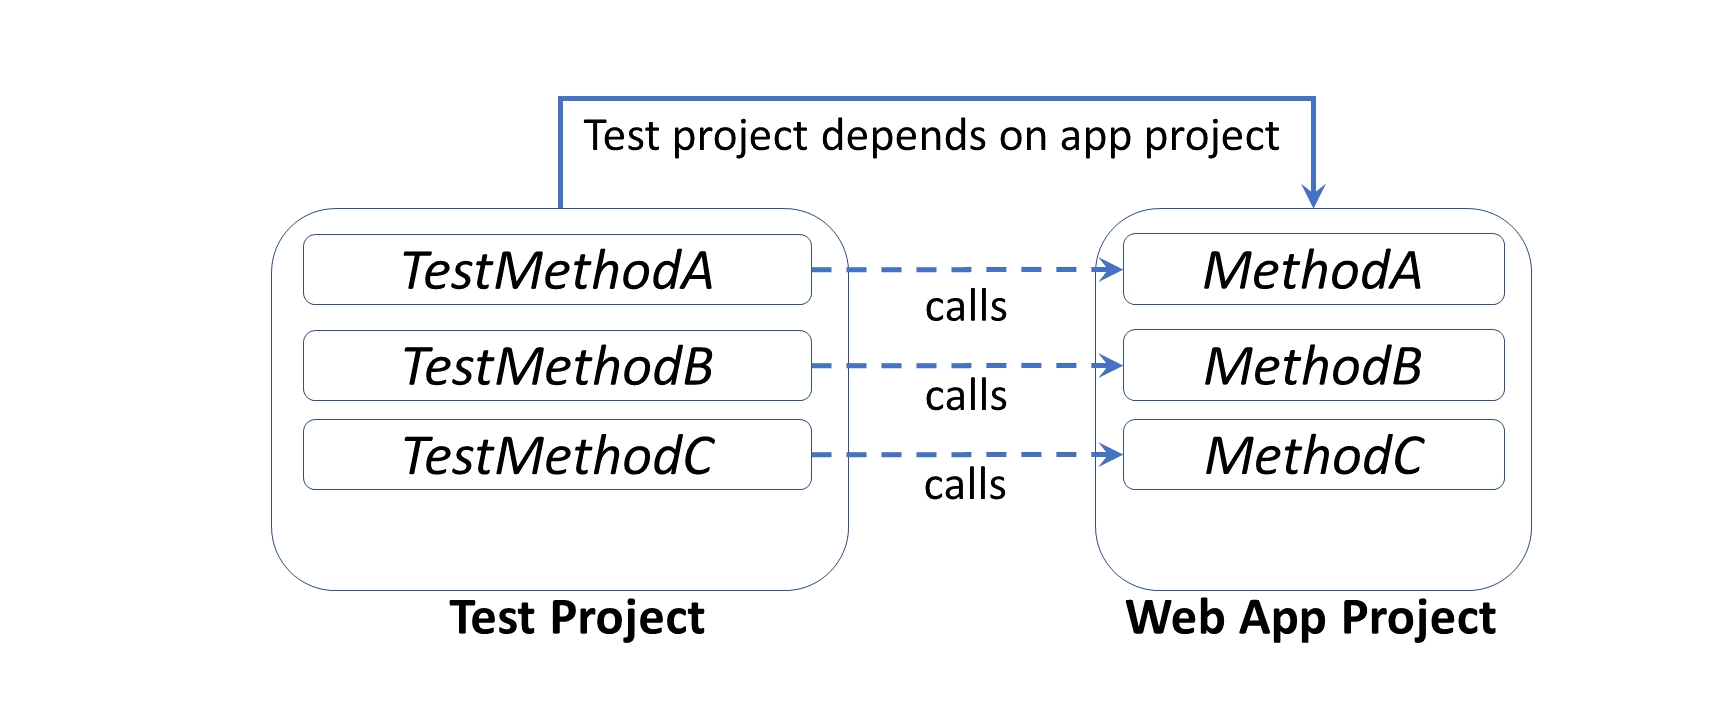
In a nutshell: a unit test is code you can write to test your application code. Your web application will not have any knowledge of your test project, but your test project will need to have a dependency of the app project that it’s testing.

UnitTesting-Projects

Here are some poll results, from asking 500+ developers about which testing framework they prefer, showing xUnit.net in the lead.

A similar poll on Facebook also showed xUnit.net leading ahead of other testing frameworks. If you need to see the equivalent attributes and assertions, check out the comparison table provided by xUnit.net:

To follow along, take a look at the sample project on Github:

Web Unit Testing Sample: https://github.com/shahedc/CalcApp30WithTests

Setting up Unit Testing

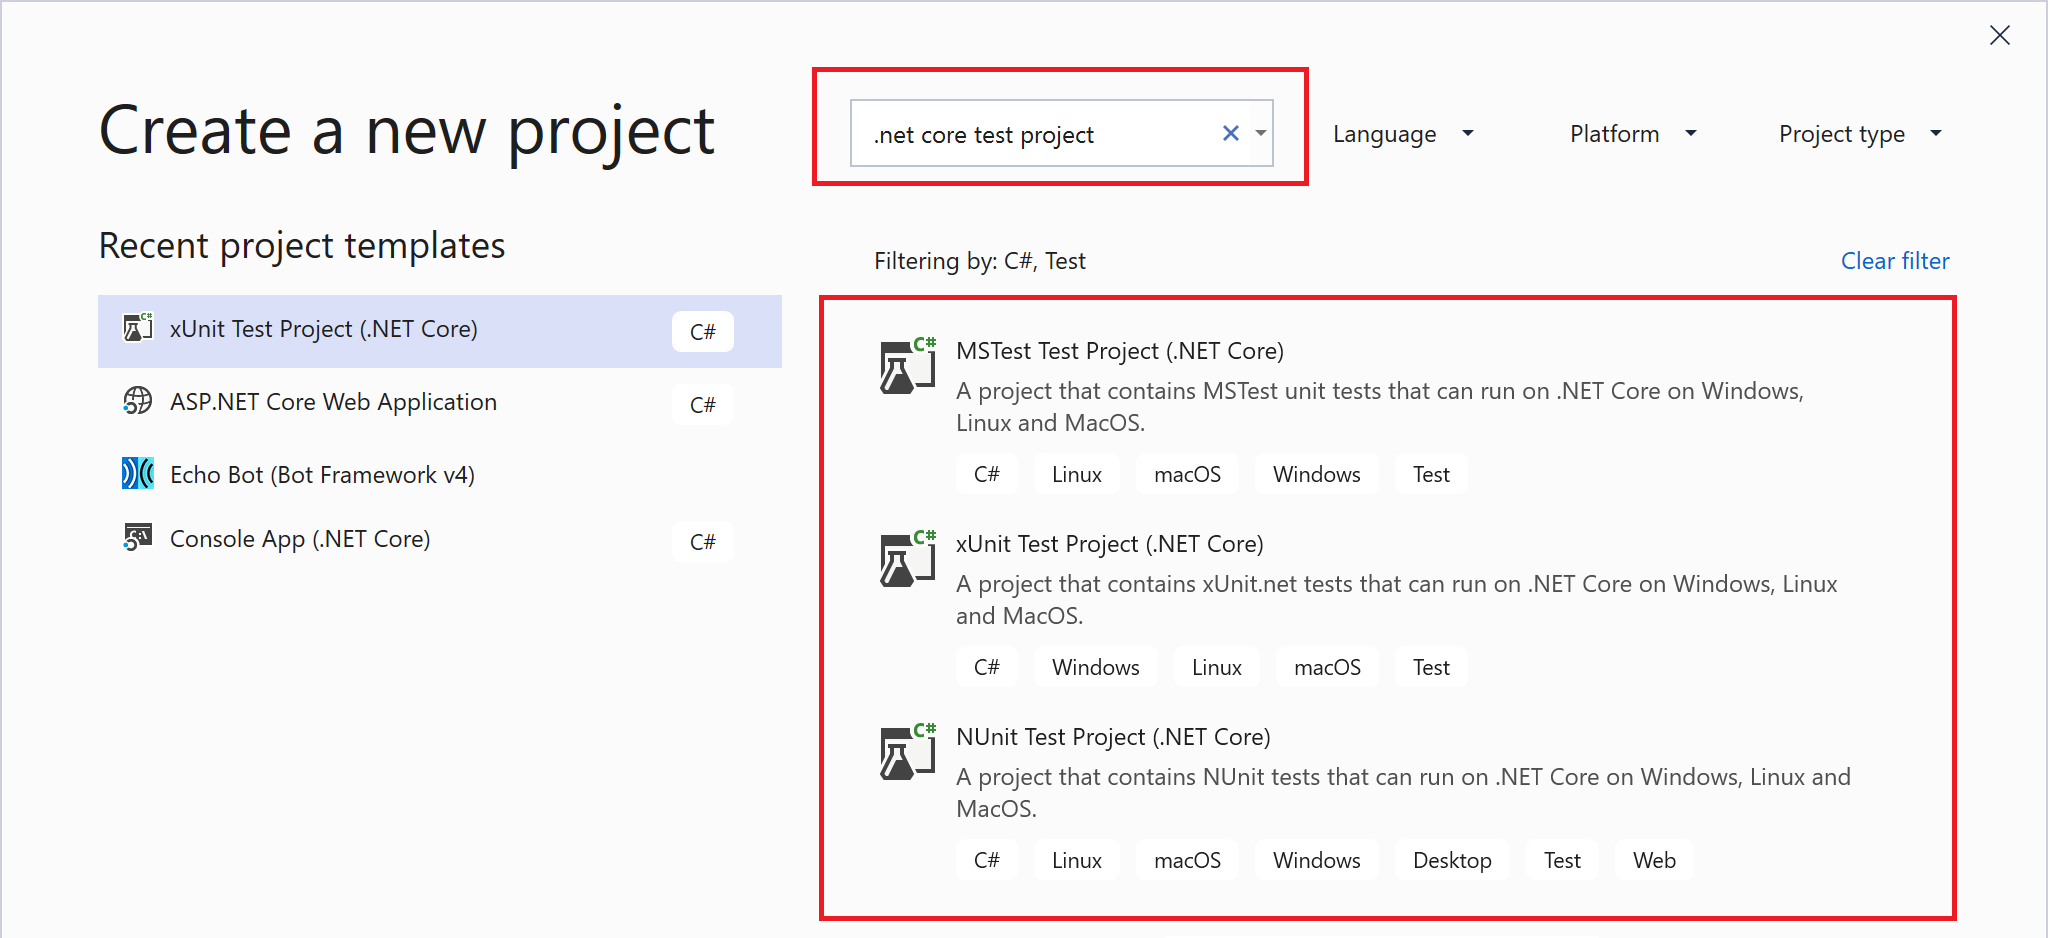
The quickest way to set up unit testing for an ASP .NET Core web app project is to create a new test project using a template. This creates a cross-platform .NET Core project that includes one blank test. In Visual Studio 2019, search for “.net core test project” when creating a new project to identify test projects for MSTest, XUnit and NUnit. Select the XUnit project to follow along with the sample provided.

UnitTesting-NewProject

The placeholder unit test class includes a blank test. Typically, you could create a test class for each application class being tested. The simplest unit test usually includes three distinct steps: Arrange, Act and Assert.

  1. Arrange: Set up the any variables and objects necessary.
  2. Act: Call the method being tested, passing any parameters needed
  3. Assert: Verify expected results

The unit test project should have a dependency for the app project that it’s testing. In the test project file CalcMvcWeb.Tests.csproj, you’ll find a reference to CalcMvcWeb.csproj.

... 
<ItemGroup>
   <ProjectReference Include="..\..\CalcMvcWeb\CalcMvcWeb.csproj" />
</ItemGroup>
...

In the Solution Explorer panel, you should see a project dependency of the reference project.

UnitTesting-Dependency

If you need help adding reference projects using CLI commands, check out the official docs at:

Facts, Theories and Inline Data

When you add a new xUnit test project, you should get a simple test class (UnitTest1) with an empty test method (Test1). This test class should be a public class and the test method should be decorated with a [Fact] attribute. The attribute indicates that this is a test method without any parameters, e.g. Test1().

public class UnitTest1
{
   [Fact]
   public void Test1()
   {
      
   }
}

In the sample project, you’ll see a test class (CalcServiceTests.cs) with a series of methods that take 1 or more parameters. Instead of a [Fact] attribute, each method has a [Theory] attribute. In addition to this primary attribute, each [Theory] attribute is followed by one of more [InlineData] attributes that have sample argument values for each method parameter.

[Theory(DisplayName = "Add Numbers")]
[InlineData(4, 5, 9)]
[InlineData(2, 3, 5)]
public void TestAddNumbers(int x, int y, int expectedResult)
{
   ...
}

In the code sample, each occurrence of [InlineData] is followed by 3 numeric values:

  • [InlineData(4, 5, 9)] –> this implies that x = 4, y = 5, expectedResult = 9
  • [InlineData(2, 3, 5)] –> this implies that x = 2, y = 3, expectedResult = 5

NOTE: If you want to skip a method during your test runs, simply add a Skip parameter to your Fact or Theory with a text string for the “Reason”.

e.g.

  • [Fact(Skip=”this is broken”)]
  • [Theory(Skip=”we should skip this too”)]

Asserts and Exceptions

Back to the 3-step process, let’s explore the TestAddNumbers() method and its method body.

public void TestAddNumbers(int x, int y, int expectedResult)
{
   // 1. Arrange
   var cs = new CalcService();

   // 2. Act 
   var result = cs.AddNumbers(x, y);

   // 3. Assert 
   Assert.Equal(expectedResult, result);
}
  1. During the Arrange step, we create a new instance of an object called CalcService which will be tested.
  2. During the Act step, we call the object’s AddNumbers() method and pass 2 values that were passed in via InlineData.
  3. During the Assert step, we compare the expectedResult (passed by InlineData) with the returned result (obtained from a call to the method being tested).

The Assert.Equal() method is a quick way to check whether an expected result is equal to a returned result. If they are equal, the test  method will pass. Otherwise, the test will fail. There is also an Assert.True() method that can take in a boolean value, and will pass the test if the boolean value is true.

For a complete list of Assertions in xUnit.net, refer to the Assertions section of the aforementioned comparison table:

If an exception is expected, you can assert a thrown exception. In this case, the test passes if the exception occurs. Keep in mind that unit tests are for testing expected scenarios. You can only test for an exception if you know that it will occur.

[Theory]
[InlineData(1, 0)]
public void TestDivideByZero(int x, int y)
{
   var cs = new CalcService();

   Exception ex = Assert
    .Throws<DivideByZeroException>(() => cs.UnsafeDivide(x, y));

}

The above code tests a method named UnsafeDivide() that divides 2 numbers, x and y. There is no guard against dividing by zero, so a DivideByZeroException() occurs whenever y is 0. Since InlineData passes a 1 and a 0, this guarantees that the exception will occur. In this case, the Act and Assert steps occur in the same statement.

To get a glimpse of the UnsafeDivide() method from the CalcService class, here is a snippet:

public int UnsafeDivide(int x, int y)
{
   return (x / y);
}

As you can see in the code snippet above, the UnsafeDivide() method simply divides two numbers, without checking to see if the denominator is 0 or not. This generates the expected exception when y is set to 0.

Running Tests

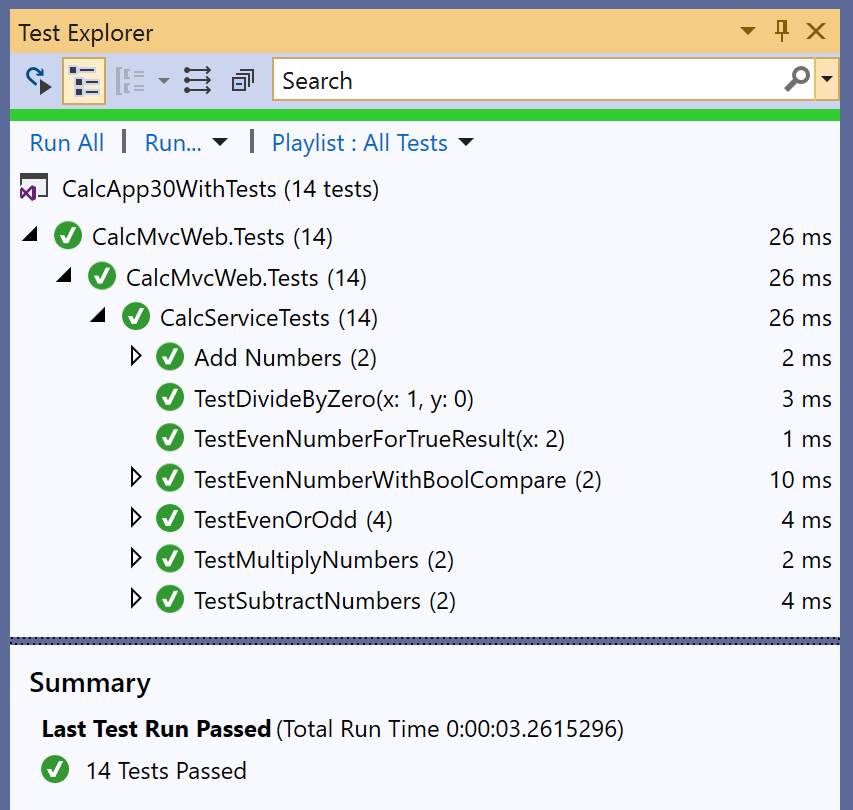
To run your unit tests in Visual Studio, use the Test Explorer panel.

  1. From the top menu, click Test | Windows | Test Explorer
  2. In the Test Explorer panel, click Run All
  3. Review the test status and summary
  4. OPTIONAL: if any tests fail, inspect the code and fix as needed.

UnitTesting-TestExplorer

To run your unit tests with a CLI Command, run the following command in the test project folder:

> dotnet test

The results may look something like this:

Test run for C:\path\to\test\assembly\CalcMvcWeb.Tests.dll(.NETCoreApp,Version=v3.0)
Microsoft (R) Test Execution Command Line Tool Version 16.0.1
Copyright (c) Microsoft Corporation. All rights reserved.

Starting test execution, please wait...

Total tests: 14. Passed: 14. Failed: 0. Skipped: 0.
Test Run Successful.
Test execution time: 2.4306 Seconds

As of xUnit version 2, tests can automatically run in parallel to save time. Test methods within a class are considered to be in the same implicit collection, and so will not be run in parallel. You can also define explicit collections using a [Collection] attribute to decorate each test class. Multiple test classes within the same collection will not be run in parallel.

For more information on collections, check out the official docs at:

NOTE: Visual Studio includes a Live Unit Testing feature that allows you to see the status of passing/failing tests as you’re typing your code. This feature is only available in the Enterprise Edition of Visual Studio.

Custom Names and Categories

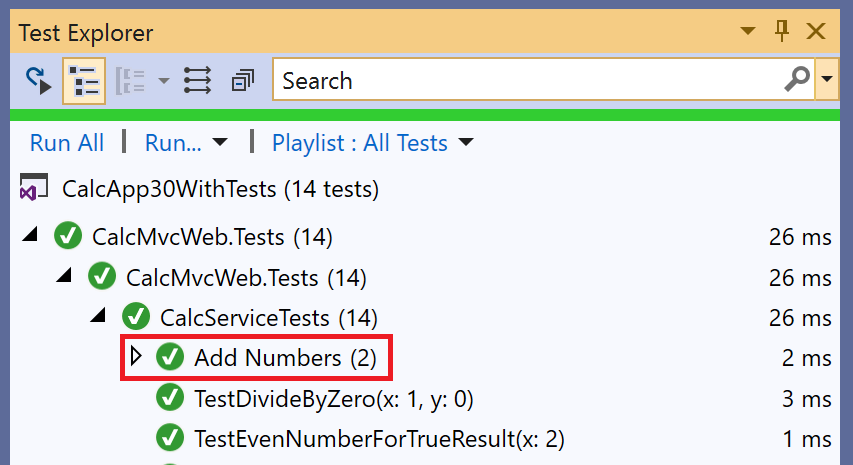
You may have noticed a DisplayName parameter when defining the [Theory] attribute in the code samples. This parameter allows you to defined a friendly name for any test method (Fact or Theory)  that can be displayed in the Test Explorer. For example:

[Theory(DisplayName = "Add Numbers")]

Using the above attribute above the TestAddNumbers() method will show the friendly name “Add Numbers” in the Test Explorer panel during test runs.

UnitTesting-TestExplorer-cropped

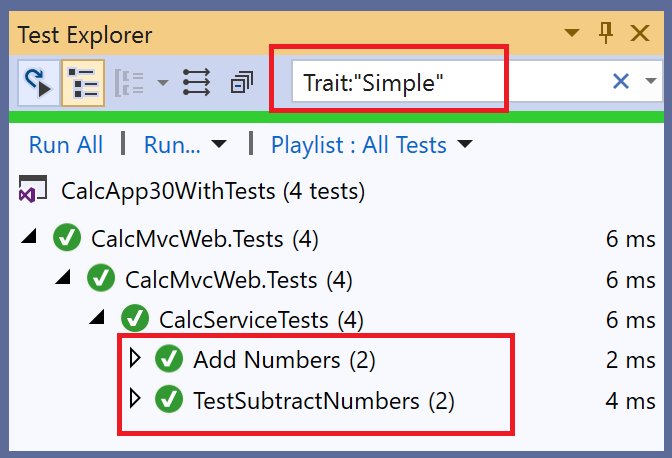
Finally, consider the [Trait] attribute. This attribute can be use to categorize related test methods by assigning an arbitrary name/value pair for each defined “Trait”. For example:

[Trait("Math Ops", "Simple")]
public void TestAddNumbers() { ... }

[Trait("Math Ops", "Simple")]
public void TestSubtractNumbers { ... }

Using the above attribute for two methods TestAddNumbers() and TestSubtractNumbers() will categorize the methods into a “category” called Math Ops: Simple. This makes it possible to filter just the Addition and Subtraction test methods, e.g. Trait: “Simple”

UnitTesting-TestExplorer-traits

Next Steps: Mocking, Integration Tests and More!

There is so much more to learn with unit testing. You could read several chapters or even an entire book on unit testing and related topics. To continue your learning in this area, consider the following:

  • MemberData: use the MemberData attribute to go beyond isolated test methods. This allows you to reuse test values for multiples methods in the test class.
  • ClassData: use the ClassData attribute to use your test data in multiple test classes. This allows you to specify a class that will pass a set of collections to your test method.

For more information on the above, check out this Nov 2017 post from Andrew Lock:

To go beyond Unit Tests, consider the following:

  • Mocking: use a mocking framework (e.g. Moq) to mock external dependencies that you shouldn’t need to test from your own code.
  • Integration Tests: use integration tests to go beyond isolated unit tests, to ensure that multiple components of your application are working correctly. This includes databases and file systems.
  • UI Tests: test your UI components using a tool such as Selenium WebDriver or IDE in the language of your choice, e.g. C#. For browser support, you may use Chrome or Firefox extensions, so this includes the new Chromium-based Edge browser.

While this article only covers MVC, take a look at the official docs for Unit Testing with Razor Pages:

References


Tag Helper Authoring in ASP .NET Core

By Shahed C on May 21, 2019

This is the twentieth of a series of posts on ASP .NET Core in 2019. In this series, we’ll cover 26 topics over a span of 26 weeks from January through June 2019, titled A-Z of ASP .NET Core!

ASPNETCoreLogo-300x267 A – Z of ASP .NET Core!

In this Article:

T is for Tag Helper Authoring

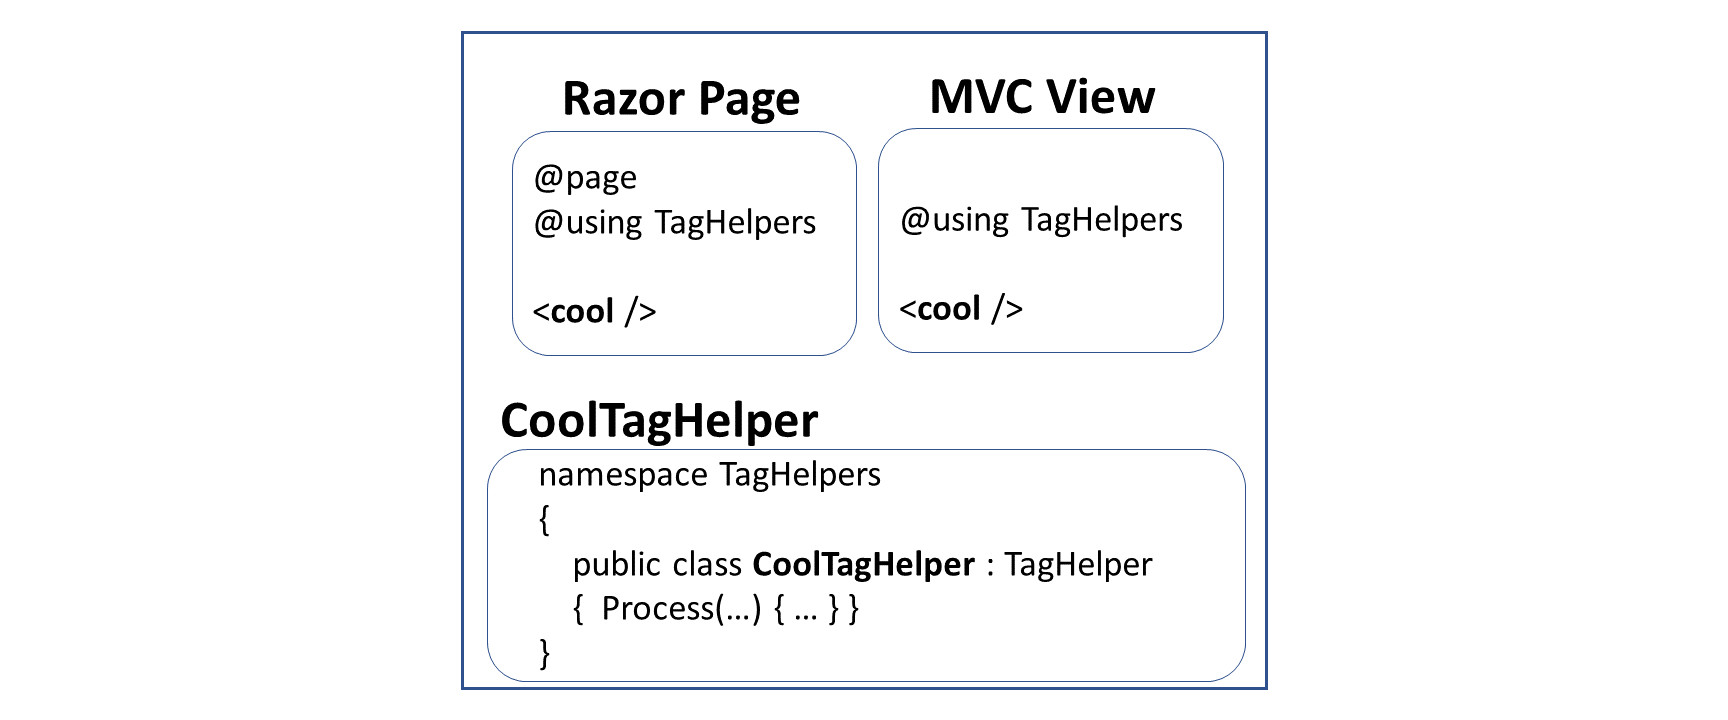
Tag Helpers are very useful for ASP .NET Core developers in creating HTML elements with server-side attributes. They work equally well in both Razor Pages and MVC views. Better yet, the syntax allows a front-end developer to easily customize the UI, with HTML/CSS knowledge.

If you need a refresher on built-in tag helpers in ASP .NET Core, you may revisit an earlier post in this series:

TagHelpers-Razor-MVC

Authoring your own tag helpers is as easy as implementing the ITagHelper interface. To make things easier, the TagHelper class (which already implements the aforementioned interface) can be extended to build your custom tag helpers.

To follow along, take a look at the sample project on Github:

Web Tag Helper Authoring Sample: https://github.com/shahedc/TagHelperAuthoring30

CAUTION: the sample code contains spoilers for Avengers: Endgame (2019).

Custom Tag Helpers

As with most concepts introduced in ASP .NET Core, it helps to use named folders and conventions to ease the development process. In the case of Tag Helpers, you should start with a “TagHelpers” folder at the root-level of your project for your convenience. You can save your custom tag helper classes in this folder.

This blog post and its corresponding code sample builds upon the official tutorial for authoring tag helpers. While the official tutorial covers instructions for MVC views, this blog post takes a look at a Razor Page example. The creation of Tag Helpers involves the same process in either case. Let’s start with the synchronous and asynchronous versions of a Tag Helper that formats email addresses.

The class EmailTagHelper.cs defines a tag helper that is a subclass of the TagHelper class, saved in the “TagHelpers” folder. It contains a Process() method that changes the output of the HTML tag it is generating.

public class EmailTagHelper : TagHelper
{
   ...
   // synchronous method, CANNOT call output.GetChildContentAsync();
   public override void Process(TagHelperContext context, TagHelperOutput output)
   {
      // ...
   } 
}

The class AsyncEmailTagHelper.cs defines a tag helper that is also a subclass of the TagHelper class, saved in the aforementioned “TagHelpers” folder. It contains a ProcessAsync() method, which has a different signature (returns Task object instead of void) and grabs the child content from the output using output.GetChildContentAsync();

public class AsyncEmailTagHelper : TagHelper
{
   ...
   // ASYNC method, REQUIRED to call output.GetChildContentAsync();
   public override async Task ProcessAsync(TagHelperContext context, TagHelperOutput output)
   {
      // ... 
   }
}

In order to use the tag helper in a Razor Page, simply add a using statement for the Tag Helper’s namespace, and then include a custom HTML tag that has the same name as the Tag Helper’s class name (without the TagHelper suffix). For the Email and AsyncEmail Tag Helpers, the corresponding tags in your Razor Page would be <email> and <async-email> respectively.

In the EmailTester.cshtml page:

<email mail-to="Black.Widow"></email>

In the AsyncEmailTester.cshtml page:

<async-email>Black.Widow</async-email>

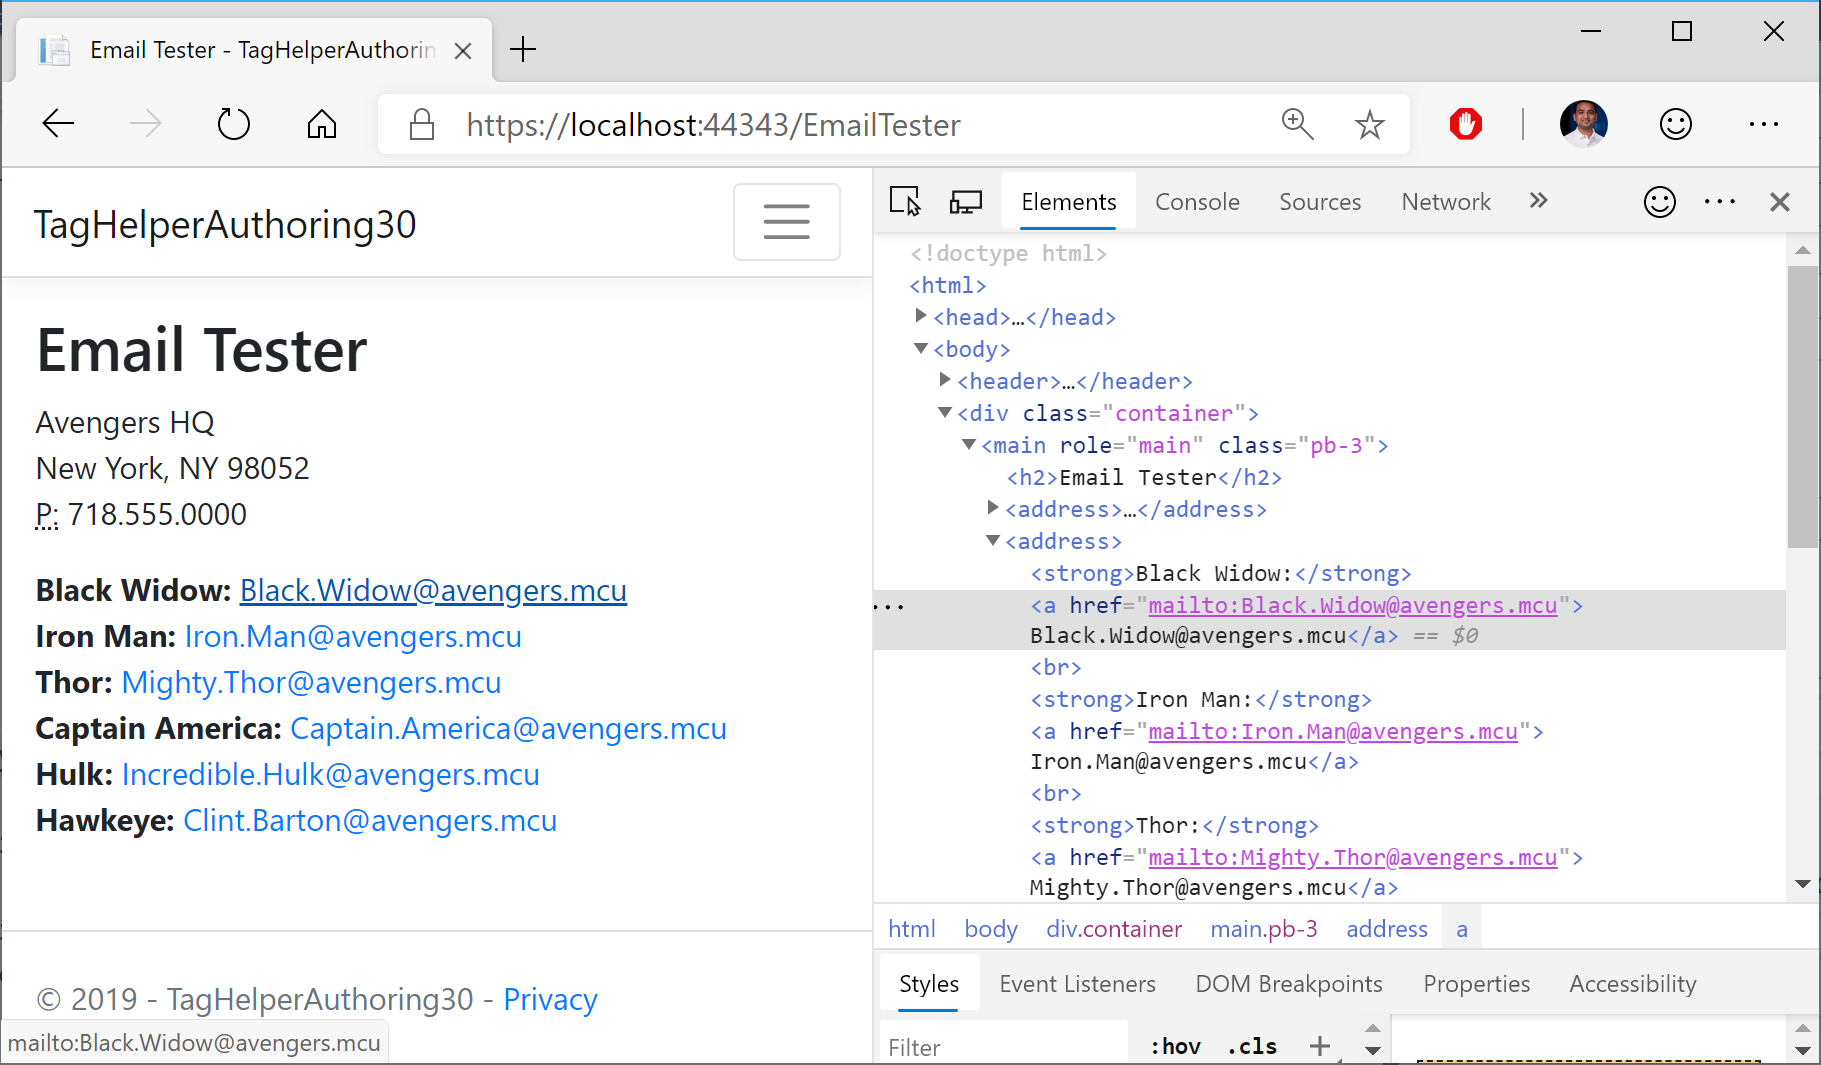
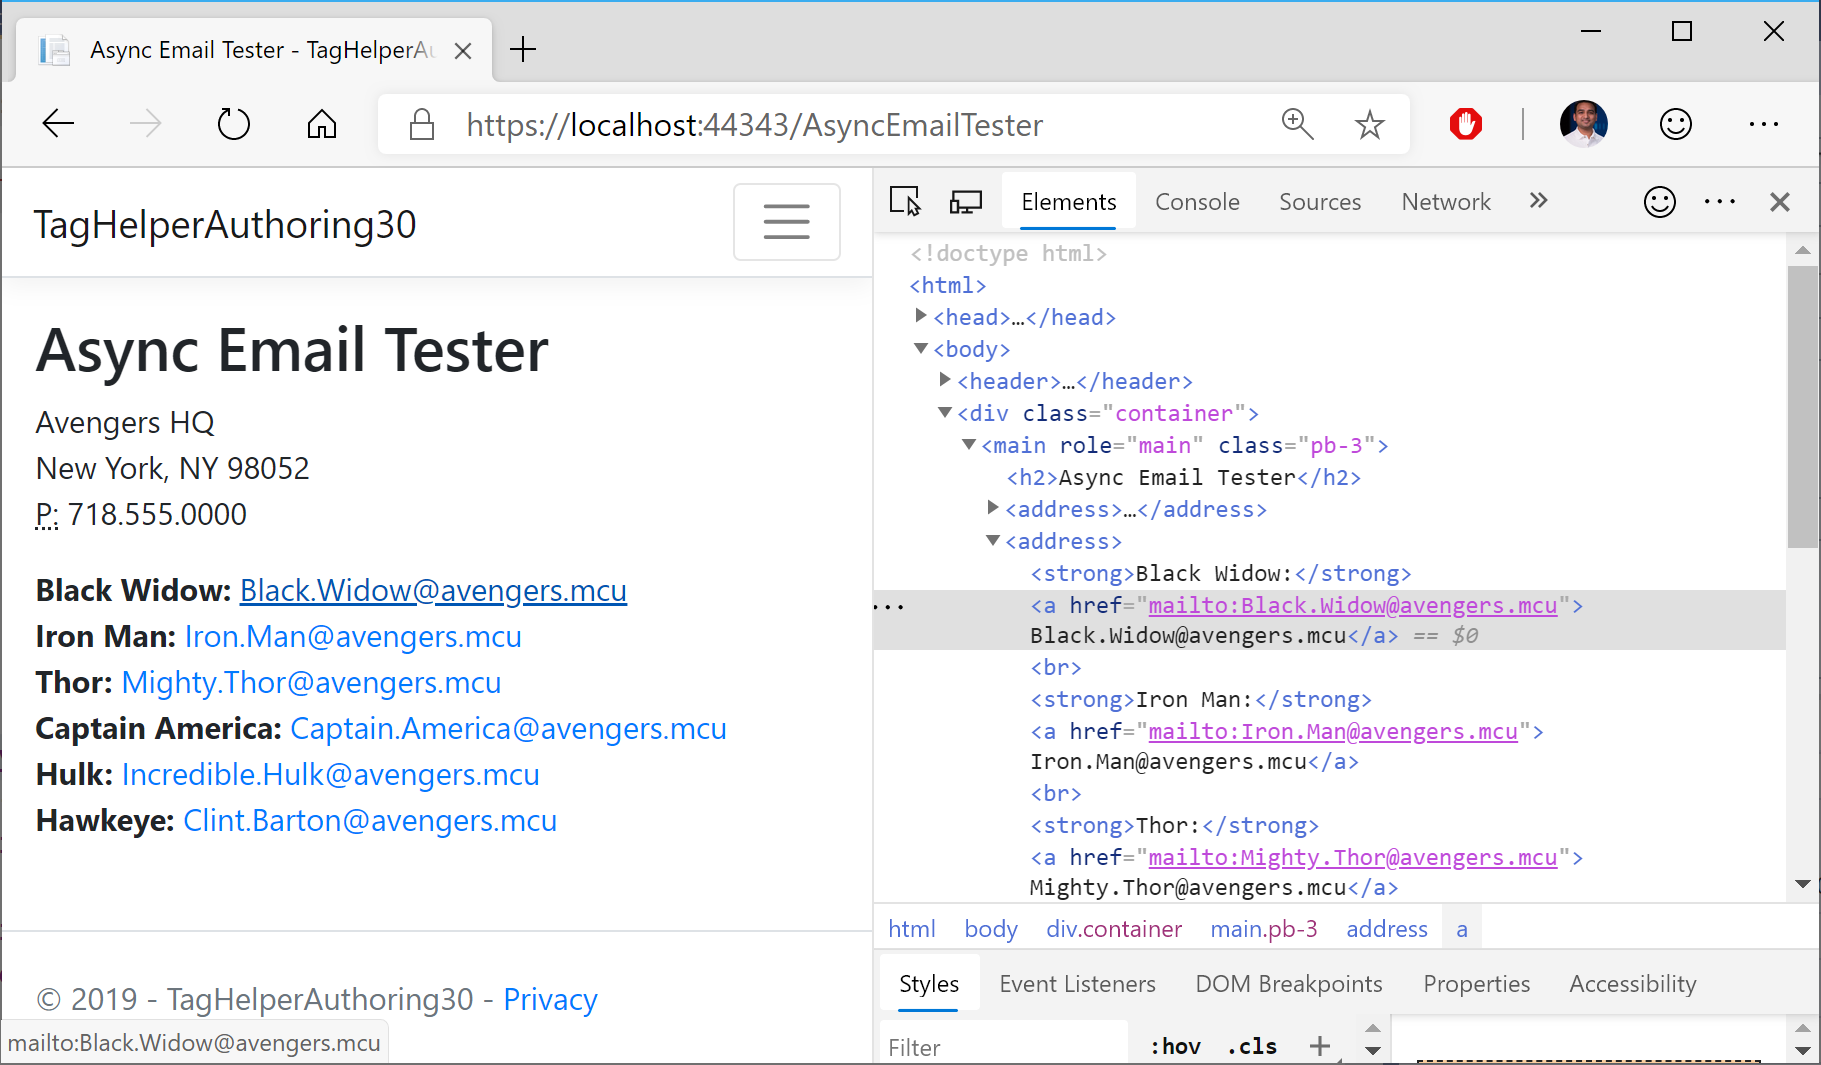
Note that the PascalCase capitalization in the class name corresponds to a lowercase tag in kebab-case. In a browser, the end result includes a clickable email link from the Razor Pages. Both the non-async and async version of the methods produce similar end results.

Email Tester in a Razor Page

Email Tester in a Razor Page

Async Email Tester in a Razor Page

Async Email Tester in a Razor Page

Setting Attributes and Content

So how does the Process() method convert your custom tags into valid HTML tags? It does that in a series of steps.

  1. Set the HTML element as the tag name to replace it with, e.g. <a>
  2. Set each attribute within that HTML element, e.g. href
  3. Set HTML Content within the tags.

The process involved is slightly different between the synchronous and asynchronous versions of the Process method. In the synchronous EmailTagHelper.cs class, the Process() method does the following:

// 1. Set the HTML element
output.TagName = "a"; 

// 2. Set the href attribute
output.Attributes.SetAttribute("href", "mailto:" + address);

// 3. Set HTML Content
output.Content.SetContent(address);

In the asynchronous AsyncEmailTagHelper.cs class, the ProcessAsync() method does the following:

// 1. Set the HTML element
output.TagName = "a"; 

var content = await output.GetChildContentAsync();
var target = content.GetContent() + "@" + EmailDomain;

// 2. Set the href attribute within that HTML element, e.g. href
output.Attributes.SetAttribute("href", "mailto:" + target);

// 3. Set HTML Content
output.Content.SetContent(target);

The difference between the two is that the async method gets the output content asynchronously with some additional steps. Before setting the attribute in Step 2, it grabs the output content from GetChildContentAsync() and then uses content.GetContent() to extract the content before setting the attribute with output.Attributes.SetAttribute(). 

Updating Pre/Post Content

This section recaps the BoldTagHelper explained in the docs tutorial, by consolidating all the lessons learned. In the BoldTagHelper.cs class from the sample, you can see the following code:

[HtmlTargetElement("bold")]
[HtmlTargetElement(Attributes = "bold")]
public class BoldTagHelper : TagHelper
{
   public override void Process(TagHelperContext context, TagHelperOutput output)
   {
      output.Attributes.RemoveAll("bold");
      output.PreContent.SetHtmlContent("<strong>");
      output.PostContent.SetHtmlContent("</strong>");
   }
}

Let’s go over what the code does, line by line:

  • The [HtmlTargetElement] attribute forces a Tag Helper to target a specific element, e.g. [HtmlTargetElement(“bold”)], which will target a <bold> tag in a Razor Page or MVC View.
  • When one or more attributes are specified, e.g. [HtmlTargetElement(Attributes = “bold”)], the Tag Helper targets a bold attribute within an element, e.g. <p bold>
  • Combining the above one after the other gives you an OR condition, in which either scenario can be matched.
  • Combining them in a single [HtmlTargetElement] creates an AND condition, which would match a bold tag with a bold attribute, which is not very useful, e.g. [HtmlTargetElement(“bold”, Attributes = “bold”)]

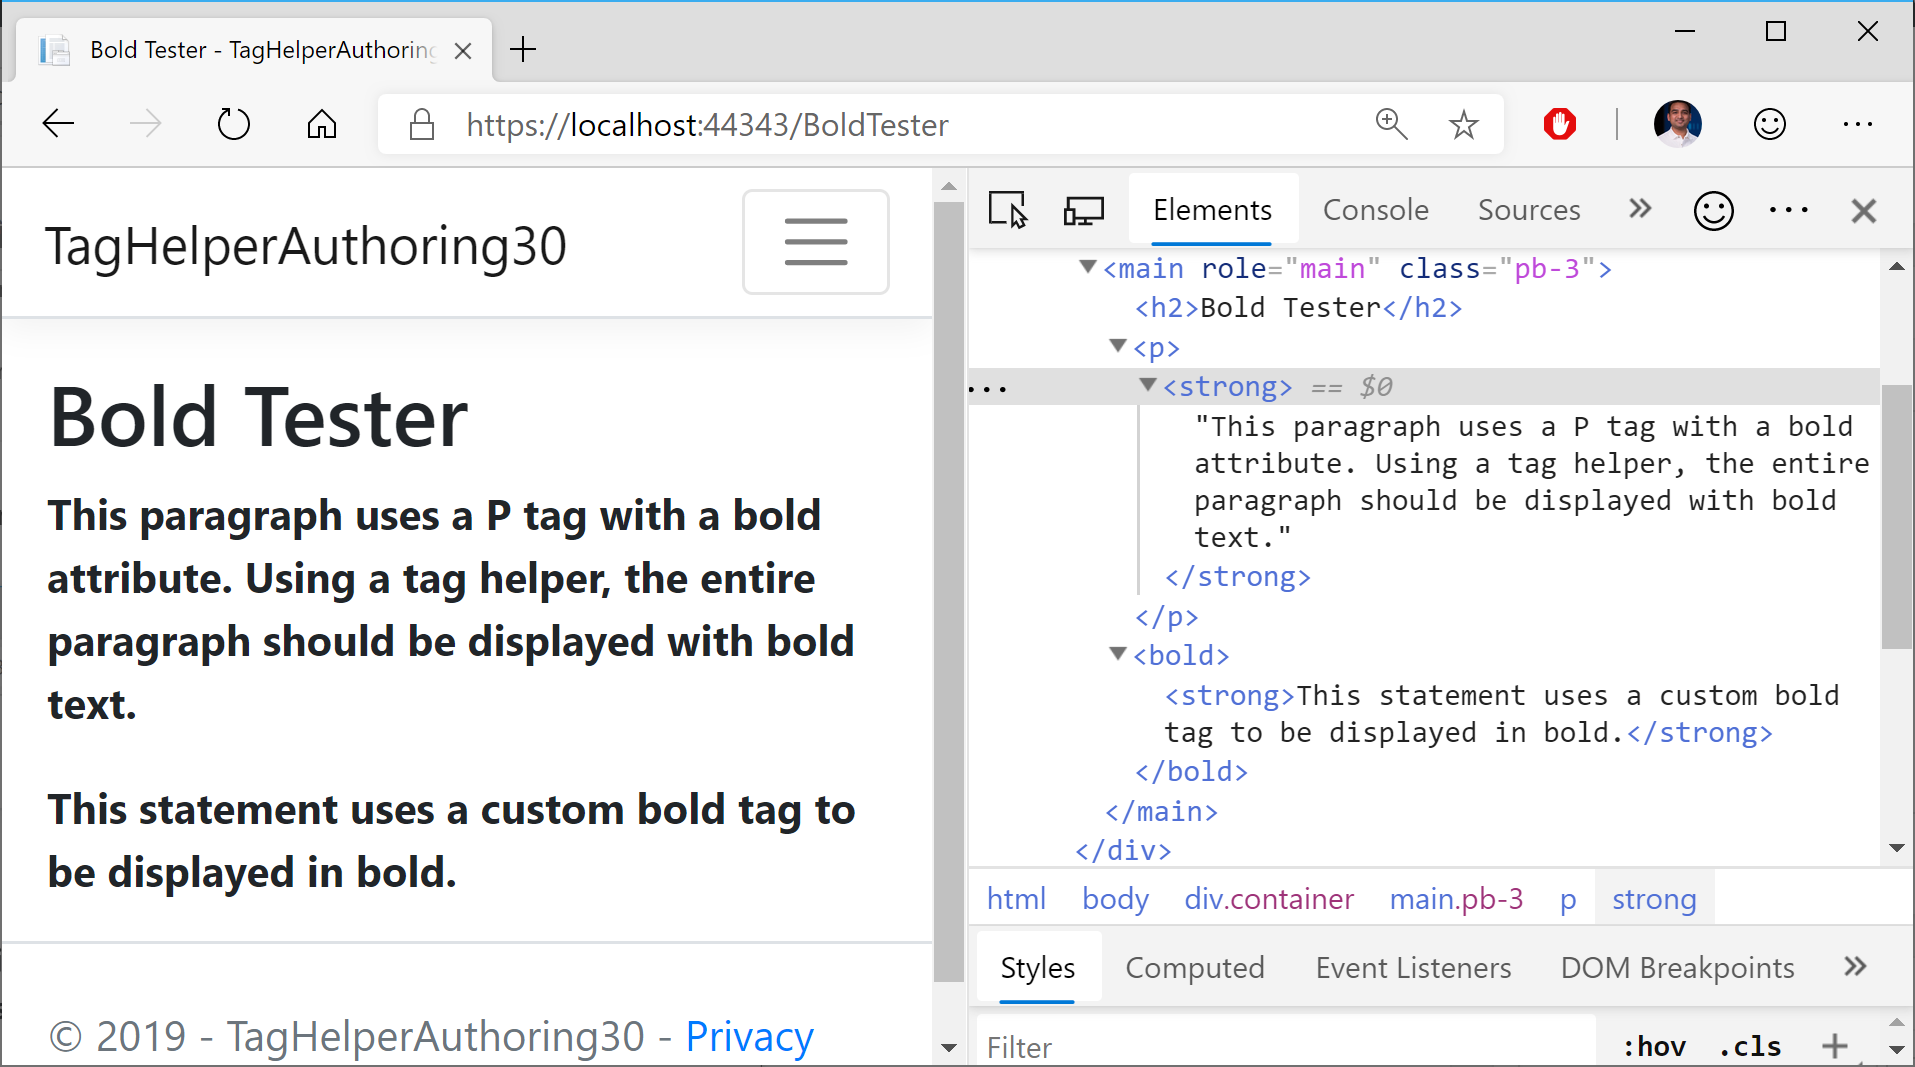
Here is a snippet the corresponding Razor Page for testing the above scenario, BoldTester.cshtml:

<p bold>This paragraph uses a P tag with a bold attribute. 
Using a tag helper, the entire paragraph should be displayed with bold text.</p>

<bold>This statement uses a custom bold tag to be displayed in bold.</bold>

The tag helper affects both fragments, as seen in the screenshot below:

TagHelpers-BoldTester

The statements in the Process() method accomplish the following:

  • The RemoveAll() method from output.Attributes removes the “bold” attribute within the tag, as it is essentially acting as a placeholder.
  • The SetHtmlContent() from output.PreContent adds an opening <strong> tag  inside the enclosing element, i.e. just after <p> or <bold>
  • The SetHtmlContent() from output.Postontent adds a closing </strong> tag  inside the enclosing element, i.e. just before </p> or </bold>

Passing Complex Objects

What if you want to pass a more complex object, with properties and objects within it? This can be done by defining a C# model class, e.g. SuperheroModel.cs, that can be initialized inside in the Page Model class (SuperheroInfoTesterModel.cs) and then used in a Razor Page (SuperheroInfoTester.cshtml). The tag helper (SuperheroTagHelper.cs) then brings it all together by replacing <superhero> tags with whatever SuperHeroModel info is passed in.

Let’s take a look at all its parts, and how it all comes together.

Object ModelSuperheroModel.cs

public class SuperheroModel
{
   public string LastName { get; set; }
   public string FirstName { get; set; }
   public string SuperName { get; set; }
   public bool HasSurvived { get; set; }

   public bool ShowInfoWithSpoilers { get; set; }
}

Razor PageSuperheroInfoTester.cshtml

@page
@model SuperheroInfoTesterModel

... 

<h3>Black Widow Info:</h3>
<div condition="@Model.blackWidowInfo.ShowInfoWithSpoilers">
 <superhero hero-info="Model.blackWidowInfo" />
</div>
...

Page Model for Razor Page: SuperheroInfoTester.cshtml.cs

public class SuperheroInfoTesterModel : PageModel
{
   public SuperheroModel blackWidowInfo { get; set; }
   // ...

   public void OnGet()
   {
      blackWidowInfo = new SuperheroModel
      {
         // ...
      }
      // ...
   }
}

Superhero Tag HelperSuperheroTagHelper.cs

public class SuperheroTagHelper : TagHelper
{
   public SuperheroModel HeroInfo { get; set; }

   public override void Process(TagHelperContext context, TagHelperOutput output)
   {
     // ...
   }
}

Going through the above code:

  1. The tag helper is named SuperheroTagHelper, implying that it can be used for <superhero> tags in a Razor Page, e.g. SuperHeroInfoTester.cshtml
  2. The tag helper also contains a SuperheroModel object called HeroInfo, which allows a hero-info attribute, i.e. <superhero hero-info=”Model.property”>
  3. The SuperheroModel class contains various public properties that provide information about a specific superhero.
  4. The SuperHeroInfoTesterModel page model class includes an OnGet() method that initializes multiple SuperheroModel objects, to be displayed in the Razor Page.

Inside the tag helper, the Process() method takes care of replacing the <superhero> tag with a <section> tag:

public override void Process(TagHelperContext context, TagHelperOutput output)
{
   string htmlContent = $@"<ul><li><strong>First Name:</strong> {HeroInfo.FirstName}</li>
<li><strong>Last Name:</strong> {HeroInfo.LastName}</li>
<li><strong>Superhero Name:</strong> {HeroInfo.SuperName}</li>
<li><strong>Survived Endgame? </strong> {HeroInfo.HasSurvived}</li></ul>";
 
   output.TagName = "section";
   output.Content.SetHtmlContent(htmlContent);
   output.TagMode = TagMode.StartTagAndEndTag; 
}

After initializing some HTML content to display a <ul> list, the above code in the Process() method accomplishes the following:

  1. Set the HTML element as the tag name to replace it with, e.g. <section>
  2. Set HTML Content within the tags.
  3. Set Tag Mode to include both start and end tags, e.g. <section> … </section>

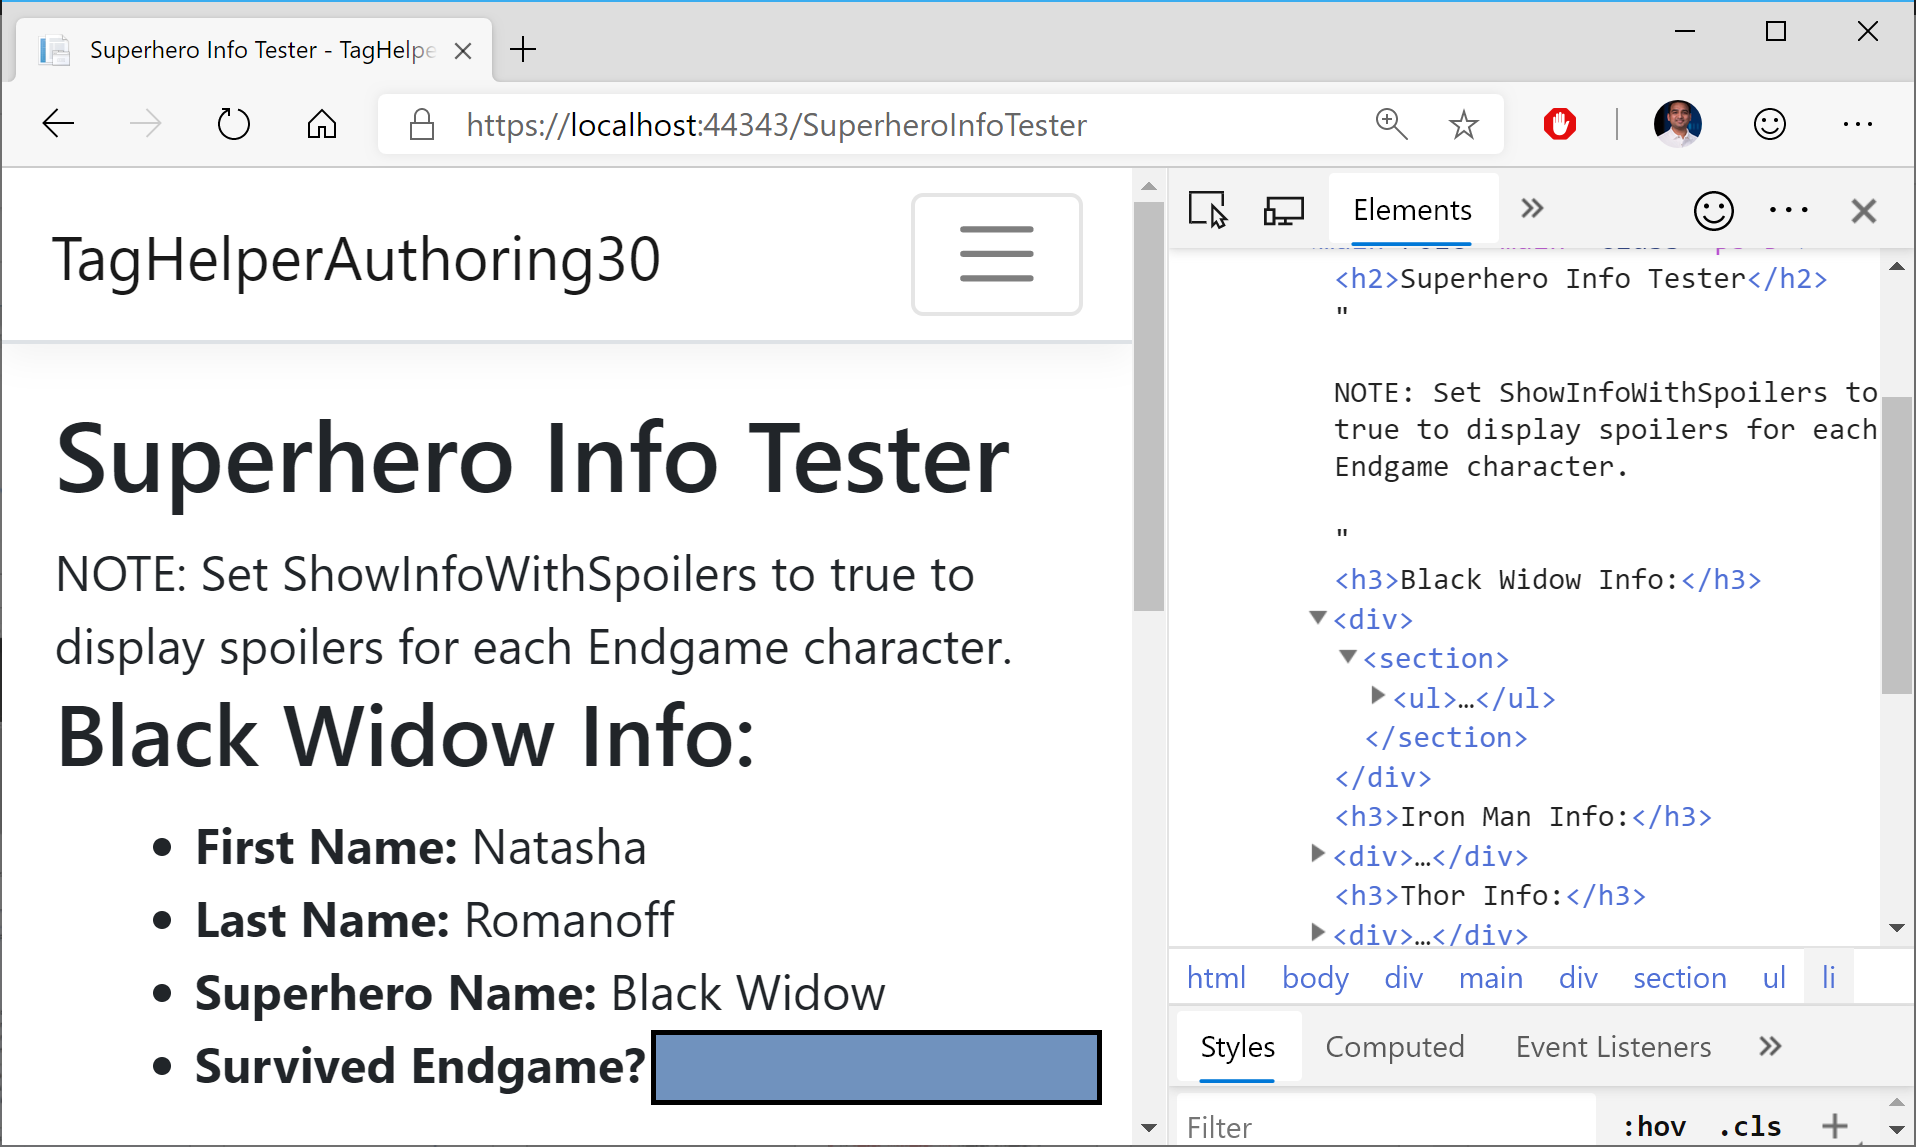
End Result in Browser:

TagHelpers-Model

In a web browser, you can see that that the <superhero> tag has been converted into a <section> tag with <ul> content.

Handling Conditions

When you want to handle a UI element in different ways based on certain conditions, you may use a ConditionTagHelper. In this case, a condition is used to determine whether spoilers for the popular movie Avengers: Endgame should be displayed or not. If the spoiler flag is set to false, the character’s info is not displayed at all.

@page
@model SuperheroInfoTesterModel
...
<div condition="@Model.blackWidowInfo.ShowInfoWithSpoilers">
 <superhero hero-info="Model.blackWidowInfo" />
</div>
...

In the above code from the SuperheroInfoTester.cshtml page:

  • the <div> includes a condition that evaluates a boolean value, e.g. Model.blackWidowInfo.ShowInfoWithSpoilers
  • the Model object comes from the @model defined at the top of the page
  • the boolean value of ShowInfoWithSpoilers determines whether the <div> is displayed or not.

References


Summarizing Build 2019 + SignalR Service for ASP .NET (Core) Developers

By Shahed C on May 14, 2019

This is the nineteenth of a series of posts on ASP .NET Core in 2019. In this series, we’ll cover 26 topics over a span of 26 weeks from January through June 2019, titled A-Z of ASP .NET Core!

ASPNETCoreLogo-300x267 A – Z of ASP .NET Core!

In this Article:

S is for Summarizing Build 2019 (and SignalR Service!)

For the letter S, I was originally thinking of an article dedicated to SignalR Service. However, Microsoft’s annual Build Conference just happened at the time of this writing. So this week’s post will focus on Summarizing Build 2019 for ASP .NET (Core) Developers, followed by a sneak peek of SignalR Service at the end.

The biggest news for .NET Developers is that .NET Core is the future of .NET, going forward. Furthermore, .NET Core vNext will be named .NET 5, a unified platform for all .NET developers (.NET Framework, Xamarin/Mono and .NET Core).

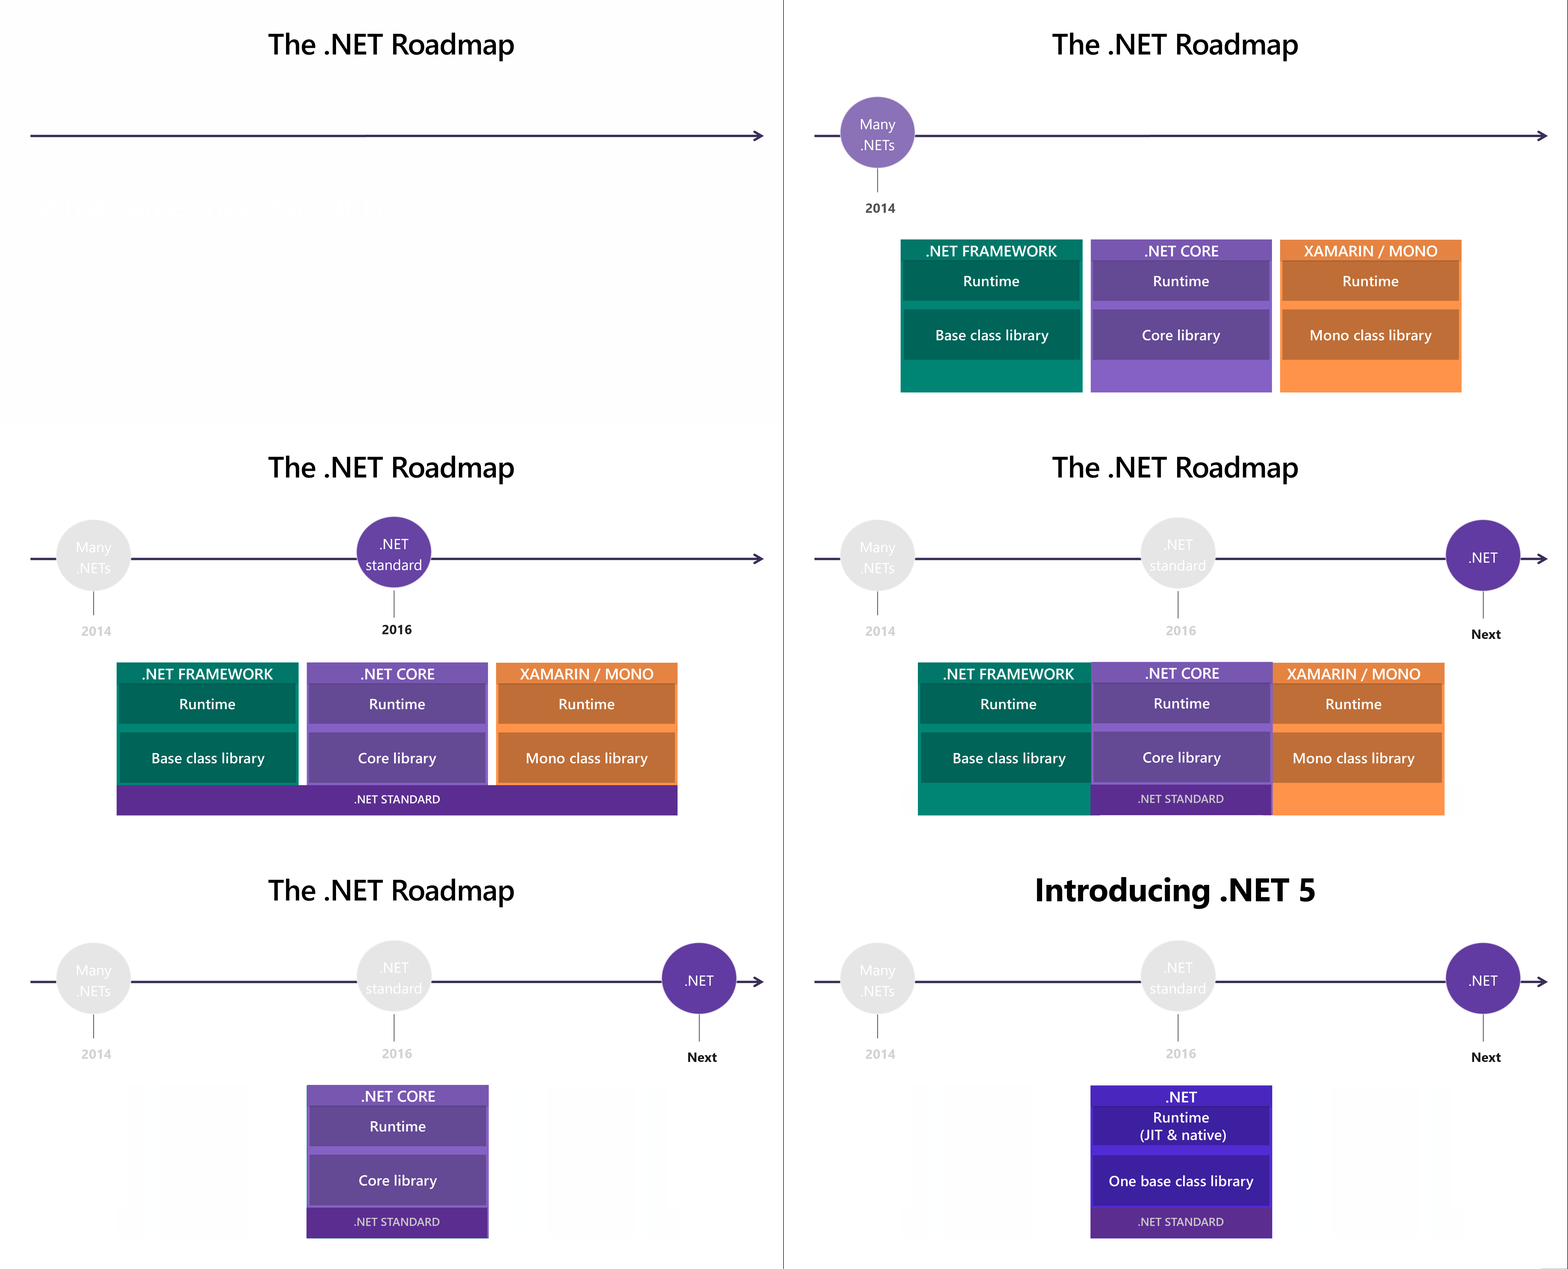
The GIF below was generated from the .NET Overview session at Build 2019 to illustrate this future:

.NET Roadmap, 2019 and Beyond

.NET Roadmap, from 2014 through 2016, then 2019 and Beyond

Build 2019 for .NET Developers

The quickest to way to catch up on Build 2019 content is to watch all the relevant videos. But how do you know which ones to watch? Well, if you’re a .NET developer, I’ve put together a handy video playlist specifically for .NET Developers (including ASP .NET Core Developers).


Your key takeaways from new announcements should include:

  • .NET Core is the future of .NET: If you’ve already started working with .NET Core, that’s great! If you’re starting a new project, you should consider .NET Core.
  • .NET Framework will continue to be supported: If you have any existing applications on .NET Framework (Windows-only), you can keep those on .NET Framework.
  • .NET Releases will become more predictable: Starting with .NET 5.0, there will be 1 major release every year,  after which each even-numbered release (6.0, 8.0, etc) will come with LTS (Long-Term Support).

In 2019, the expected schedule for .NET Core 3.x is as follows:

  • July 2019: .NET Core 3.0 RC (Release Candidate)
  • September 2019: .NET Core 3.0 (includes ASP .NET Core 3.0)
  • November 2019: .NET Core 3.1 (LTS)

In 2020 and beyond, the expected schedule for .NET Core 5+ is shown below:

  • Early to mid 2020: .NET 5.0 Preview 1
  • November 2020: .NET 5.0
  • November 2021: .NET 6.0 (LTS)
  • November 2022: .NET 7.0
  • November 2023: .NET 8.0 (LTS)

Minor releases (e.g. 5.1, etc) will be considered only if necessary. According to the official announcement, the first preview of .NET 5.0 should be available within the first half of 2020.

NOTE: The upcoming .NET 5.0 should not be confused with the so-called “ASP .NET 5” which was the pre-release name for ASP .NET Core 1.0 before the product was first released in 2016. Going forward, the name of the unified framework is simply .NET 5, without the need for a trailing “Core” in the name.

What’s New in .NET Core 3.0 (Preview 5)

As of May 2019, .NET Core 3.0 is in Preview 5, is expected to be in RC in July 2019, to be followed by a full release in September 2019. This includes ASP .NET Core 3.0 for web development (and more!). For my first look at .NET Core 3.0, you may browse through this earlier post in this series:

The primary themes of .NET Core 3.0 are:

  1. Windows desktop apps: while this is usually not a concern for ASP .NET Core web application developers, it’s good to know that Windows developers can start using .NET Core right away.
  2. Full-stack web dev: Blazor is no longer experimental and its latest preview allows developers to use C# for full-stack web development. More info at: https://blazor.net
  3. AI & ML: Not just buzzwords, Artificial Intelligence and Machine Learning are everywhere. ML.NET 1.0 is now available for C# developers to join this exciting new area of software development. More info at: dot.net/ml
  4. Big Data: .NET for Apache Spark is now in Preview, available on Azure Databricks and Azure HDInsight. More info at: dot.net/spark

For more information on Blazor, you may browse through  this earlier post in this series:

A lot has changed with Blazor in recent months, so the above post will be updated after Core 3.0 is released. In the meantime, check out the official Blazor session from Build 2019.


What’s New in ASP.NET Core 3.0 (Preview 5)

What about ASP .NET Core 3.0 in Preview 5? In the Preview 5 announcement, you can see a handful of updates for this specific release. This includes the following:

  • Easy Upgrade: to upgrade from an earlier preview, update the package reference in your .csproj project file to the latest version (3.0.0-preview5-19227-01)
  • JSON Seralization: now includes support for reading/writing JSON using System.Text.Json. This is part of the built-in JSON support mentioned in the official writeup for .NET Core 3.0 Preview 5.
  • Integration with SignalR: Starting with this release, SignalR clients and servers will now use the aforementioned System.Text.Json as the default Hub protocol. You can read more about this in the SignalR section of the Migration guide for 2.x to 3.0.
  • Continued NewtonsoftJson support: In case you need to switch back to NewtonSoft.Json (previously the default option for the SignalR Hub), the instructions are provided in the aforementioned Migration guide and the announcement. Note that NewtonSoft.Json needs to be installed as a NuGet package.

There has been a lot of development in ASP .NET Core 3.0 in previous Preview releases, so you can refer to my earlier posts in the series for more info:

Here are links to all preview notes if you need a refresher on what was new in each Preview:

NOTE: Changes from each preview to the next is usually cumulative. However, please note that Blazor went from experimental to preview in April 2019, and is now called Blazor on both the client and server. Previously, server-side Blazor was temporarily renamed to Razor Components, but then it was changed back to server-side Blazor.

What’s Next for .NET Core (.NET Core vNext = .NET 5!)

So, what’s next for .NET Core? First of all, the next major version won’t be called .NET Core, as we now know. With the upcoming release of .NET 5, you can now rest assured that all your investment into .NET Core will carry over into the future unified release.

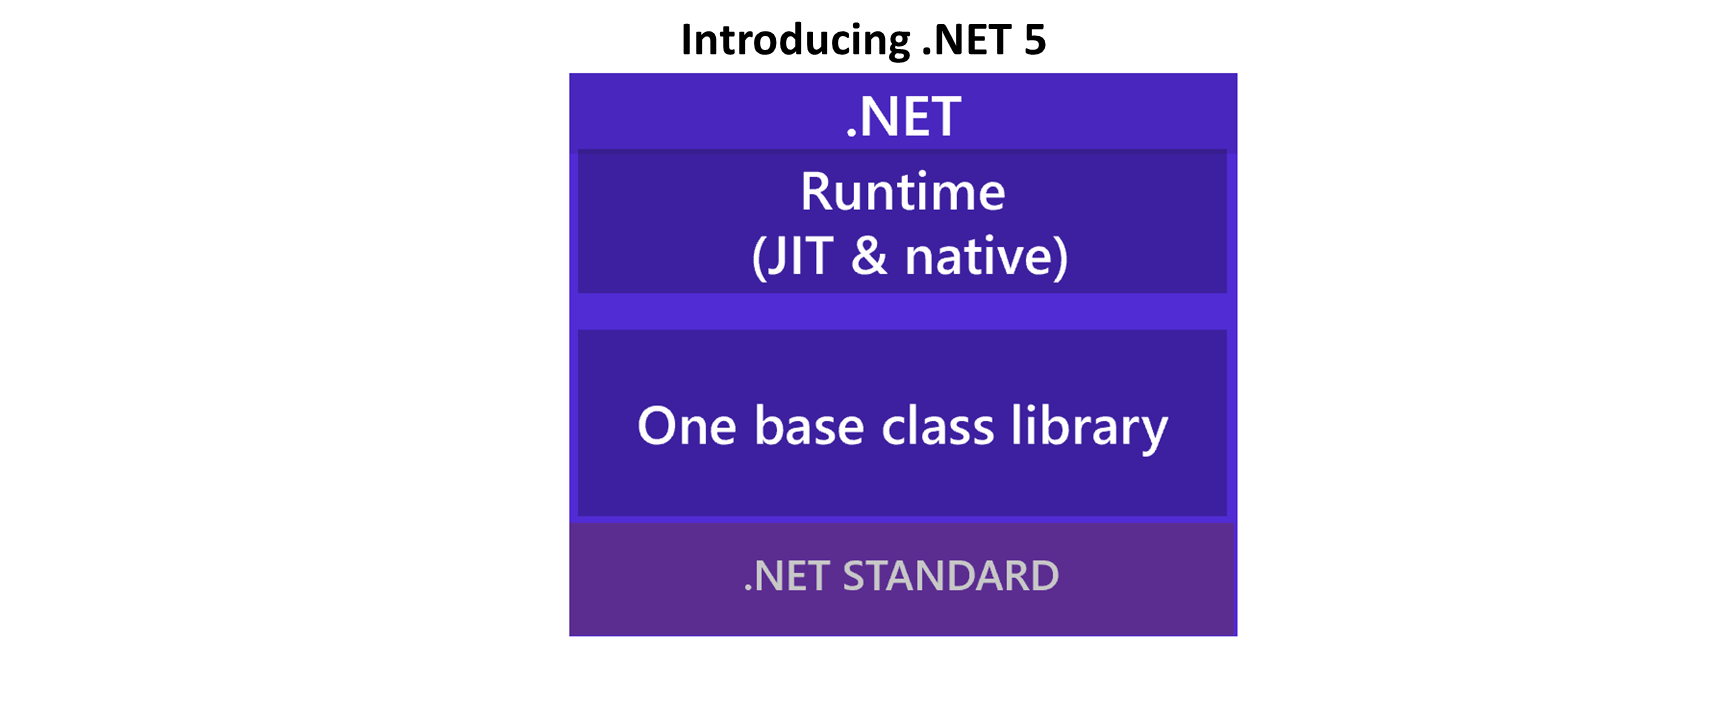
Imagine taking the cross-platform .NET Core and bringing in the best of Mono for a single BCL (Base Class Library implementation). You may recall that .NET Standard was introduced when there were multiple versions of .NET (Framework, Mono/Xamarin and Core). Going forward, .NET Standard will continue to exist and .NET 5 will adhere to .NET Standard.

DotNet5-Layers-Heading

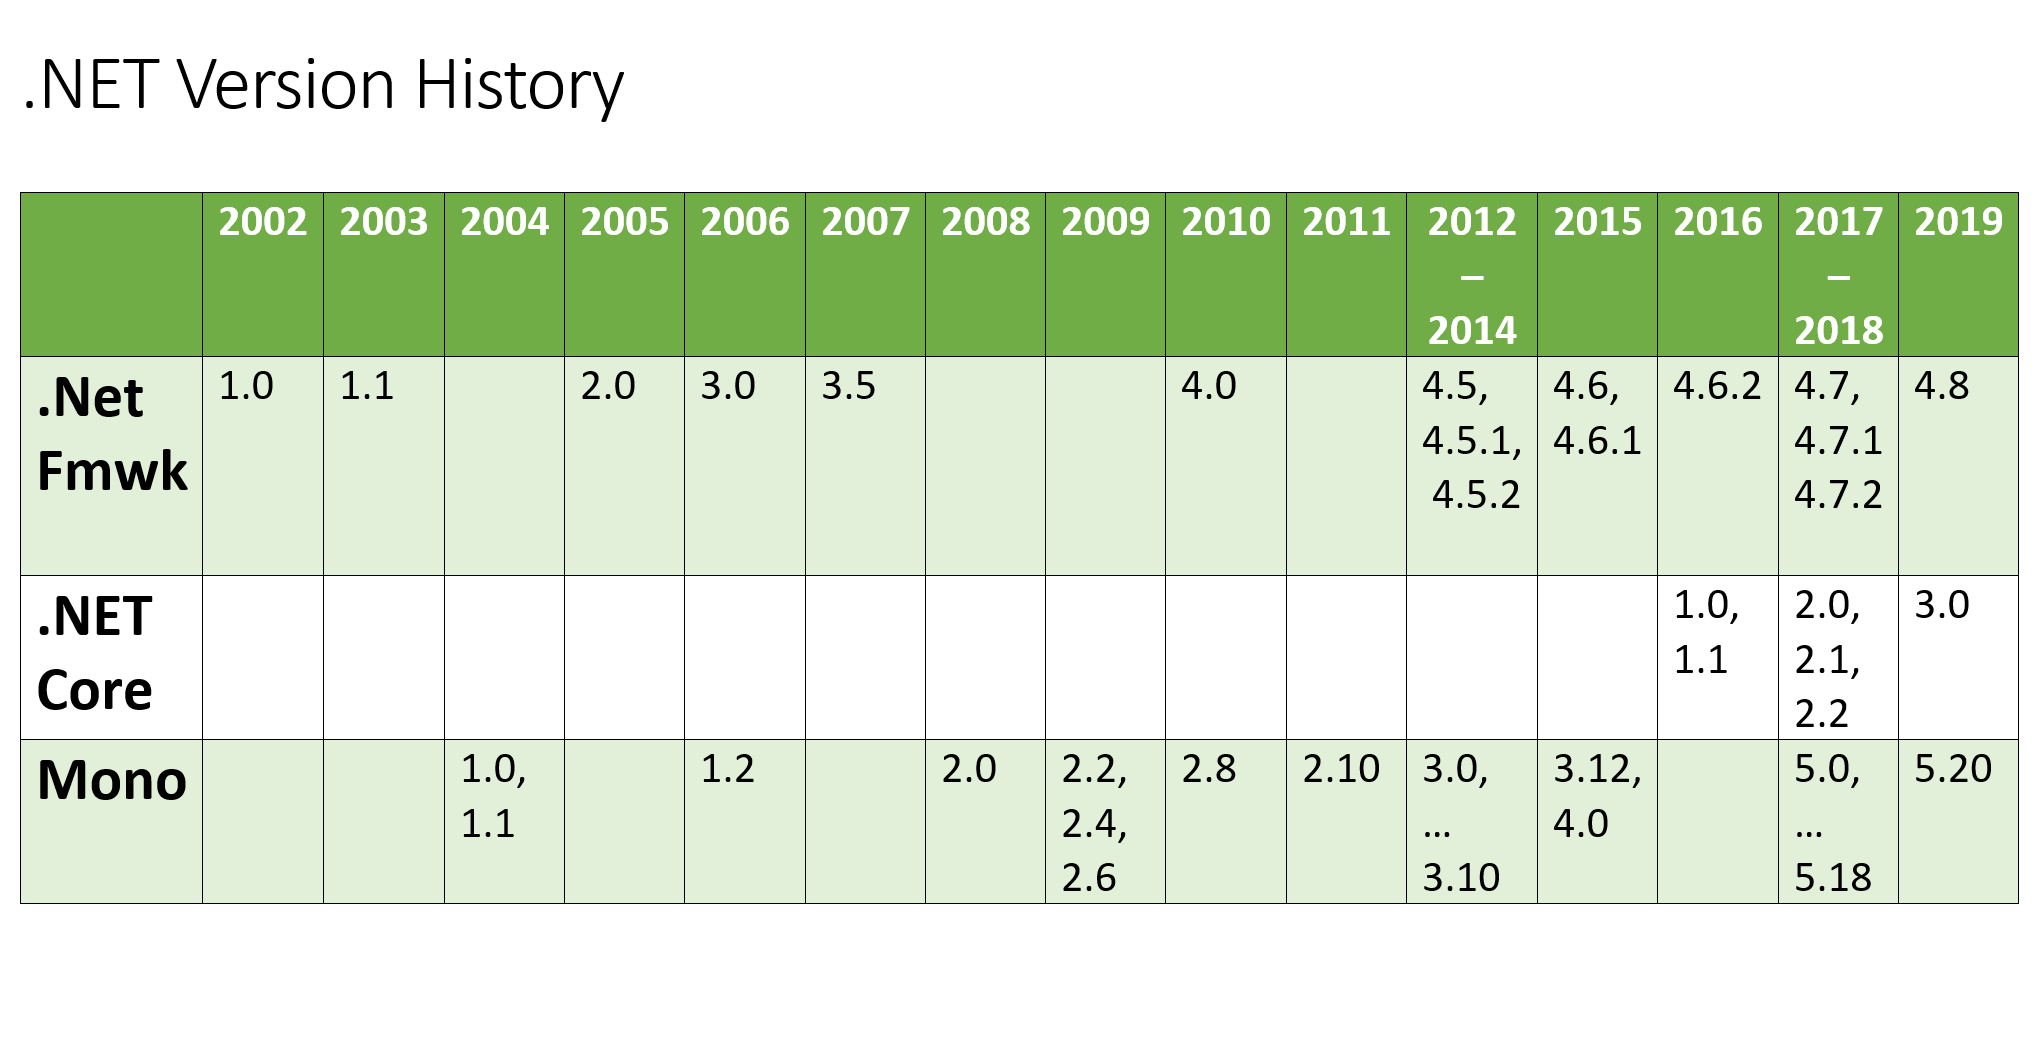
Compare the unified diagram with the various versions of .NET Framework, .NET Core and Mono over the years:

DotNet-VersionHistory

Note that not everything in the world of .NET today will make it into .NET 5. Not to worry though, as there are various recommended alternatives for all .NET developers. Take the following technologies, for example:

  • Web Forms: As you may have noticed, ASP .NET Web Forms have not been ported to ASP .NET Core. Instead of Web Forms, developers may consider Blazor as their choice of web application development.
  • WCF: Although Web API has been included in ASP .NET Core, there is no option for WCF. Going forward, you may use gRPC as an alternative.

Migration Guides for the above scenarios will be provided at a later date.

EF 6.3 for .NET Core, SqlClient & Diagnostics

In addition to ASP .NET Core itself, there are other tools and technologies that may be useful for ASP .NET Core developers. That may include (but is not limited to) the following):

  • Entity Framework 6.3: In addition to the EF Core running on .NET Core, EF 6.x was known to run on the Windows-only .NET Framework 4.x but not on .NET Core. Going forward, EF 6.3 will run on .NET Core 3.0 across platforms.
  • SqlClient: Instead of replacing the existing System.Data.SqlClient package directly, the new Microsoft.Data.SqlClient (available on NuGet) will support both .NET Core and .NET Framework.
  • .NET Core Diagnostic Tools: Making use of .NET Core Global Tools, a new suite of tools will help developers with diagnostics and troubleshooting ofperf issues.

From the tools‘ GitHub page, the following tools are currently available, with the following descriptions:

  • dotnet-dump: “Dump collection and analysis utility.”
  • dotnet-trace: “Enable the collection of events for a running .NET Core Application to a local trace file.”
  • dotnet-counters: “Monitor performance counters of a .NET Core application in real time.”

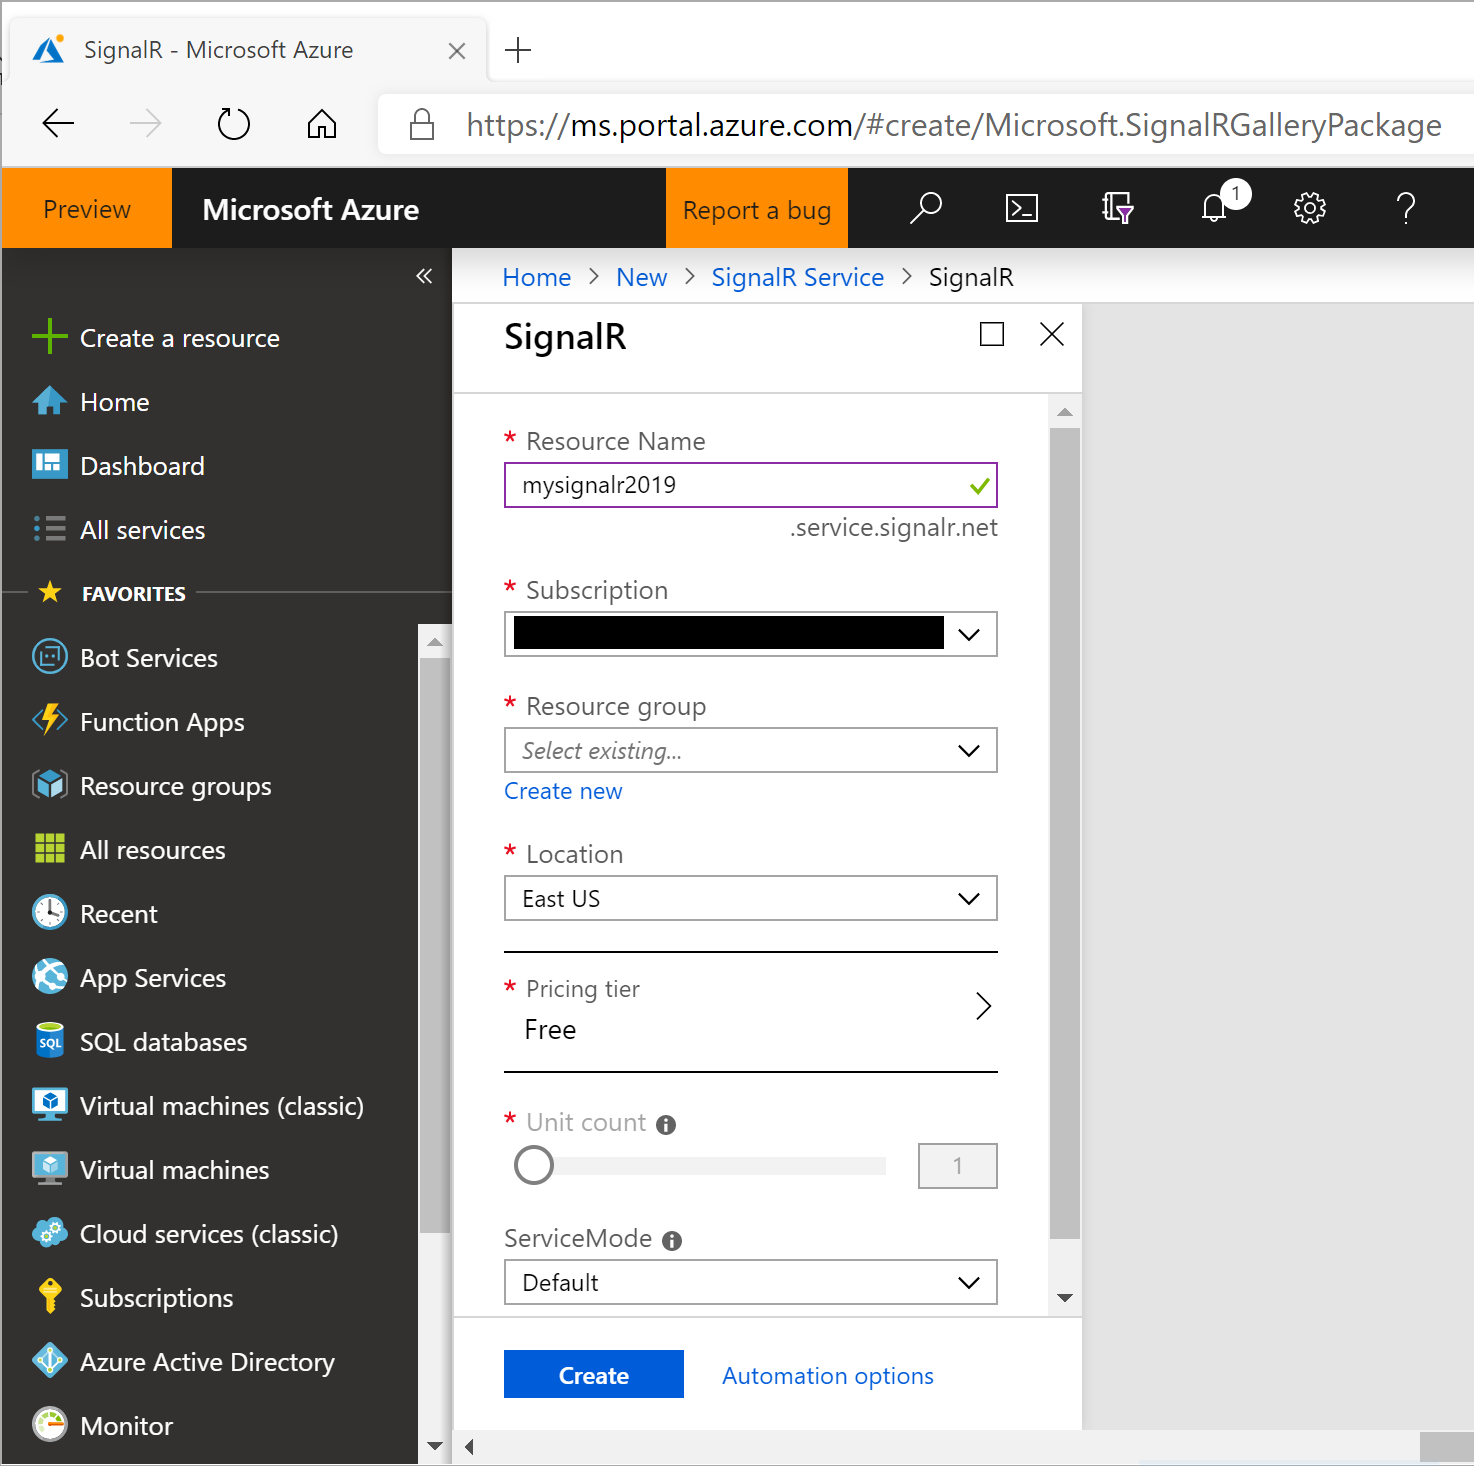
SignalR Service (Sneak Peek)

Finally, let’s take a quick peek at the all-new SignalR Service.

SignalR-Service-Portal

  • Who can use this: Web developers who want to build real-time features can get started with a variety of official Quickstart guides: ASP .NET Core, JavaScript, C#, Java and REST API

If you’re already familiar with using SignalR, switching to using Azure SignalR Service is as easy as 1-2-3.

  1. Append a call to .AddAzureSignalR() to AddSignalR() in the ConfigureServices() method of your Startup class.
  2. Replace the call to UseSignalR() with a call to UseAzureSignalR() in your Configure() method
  3. Ensure that your environment’s connection string is set correctly for the key “Azure:SignalR:ConnectionString“.

In the ConfigureServices() method, this is what your code should look like:

public void ConfigureServices(IServiceCollection services)
{
   // ...
   services.AddMvc();
   services.AddSignalR().AddAzureSignalR();
} 

In the Configure() method, this is what your code should look like:

app.UseAzureSignalR(routes =>
{
 routes.MapHub<HubClassName>("/HubRouteName");
});

Your connection string (in your environment or User Secrets) may look like the following:

"Azure:SignalR:ConnectionString": "Endpoint=<yourendpoint>;AccessKey=<yourkey>;"

For a detailed tutorial for ASP .NET Core developers, try this official guide:

After the A-Z weekly series is complete, stay tuned for monthly blog posts about cool things .NET developers can do in Azure. This will include a more in-depth look at SignalR Service in a future writeup, including guidance for both web and mobile developers.

References for Build 2019 Announcements

References for SignalR Service


Razor Pages in ASP .NET Core

By Shahed C on May 8, 2019

This is the eighteenth of a series of posts on ASP .NET Core in 2019. In this series, we’ll cover 26 topics over a span of 26 weeks from January through June 2019, titled A-Z of ASP .NET Core!

ASPNETCoreLogo-300x267 A – Z of ASP .NET Core!

In this Article:

R is for Razor Pages

Razor Pages were introduced in ASP .NET Core v2.0, and briefly covered in my 2018 series. The post covered Pages in ASP .NET Core: Razor, Blazor and MVC Views. This post in the 2019 A-Z series will go deeper into Razor Pages and some of its features. You may also refer to a previous post to learn more about Forms and Fields (specifically the Razor Pages section).

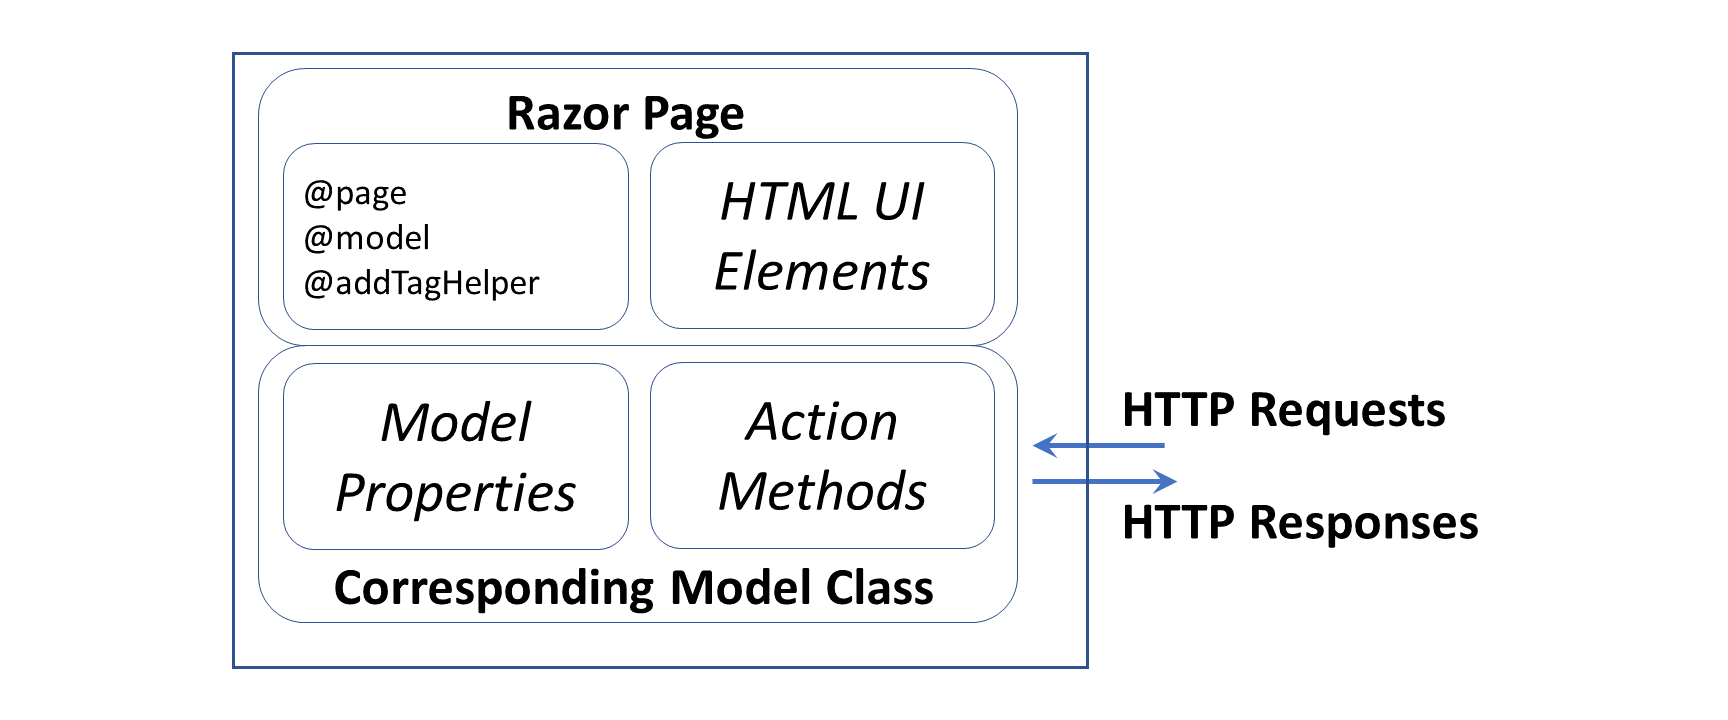
Built on top of MVC in ASP .NET Core, Razor Pages allows you to simplify the way you organize and code your web apps. Your Razor Pages may coexist along with a backend Web API and/or traditional MVC views backed by controllers. Razor Pages are typically backed by a corresponding .cs class file, which represents a Model for the Page with Model Properties and Action Methods that represent HTTP Verbs. You can even use your Razor knowledge to work on Blazor fullstack web development.

Razor-Pages-Diagram

Core 3.0 Packages

To follow along, take a look at the sample project on Github:

Web Razor Pages (Core 3.0) Sample: https://github.com/shahedc/RazorPagesCore30

Let’s start by taking a look at a 3.0 project (currently in preview) compared to a 2.x project (seen in 2018’s post on Pages). The snippet below shows a .csproj for the sample app. This was created by starting with the Core 3.0 (Preview) Razor Pages Template in VS2019 and then following the official tutorial on Docs.

<Project Sdk="Microsoft.NET.Sdk.Web">

  <PropertyGroup>
    <TargetFramework>netcoreapp3.0</TargetFramework>
  </PropertyGroup>


  <ItemGroup>
    <PackageReference Include="Microsoft.AspNetCore.Mvc.NewtonsoftJson" Version="3.0.0-preview3-19153-02" />
    <PackageReference Include="Microsoft.EntityFrameworkCore.SqlServer" Version="3.0.0-preview3.19153.1" />
    <PackageReference Include="Microsoft.EntityFrameworkCore.Tools" Version="3.0.0-preview3.19153.1">
    ...
  </ItemGroup>

</Project>

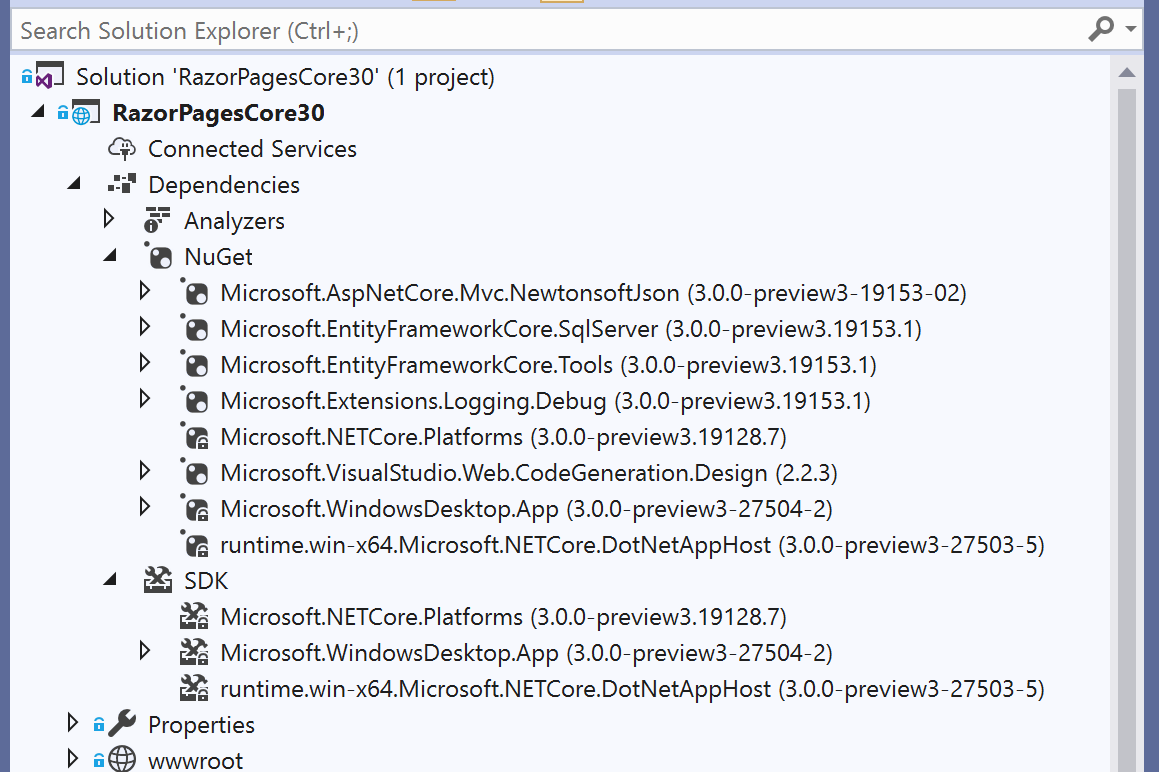
For ASP .NET Core 3.0, both NewtonsoftJson and EF Core have been removed from the ASP .NET Core shared framework. Instead, they are available as NuGet packages that can be included via <PackageReference> tags in the .csproj project file.

This is reflected in the Solution Explorer, where the Dependencies tree shows the NewtonsoftJson and EF Core packages nested under the NuGet node.

Razor-Pages-SolutionExplorer

If you need a refresher on the new changes for ASP .NET Core 3.0, refer to the following:

Page Syntax

To develop Razor Pages, you can reuse syntax from MVC Razor Views, including Tag Helpers, etc. For more information on Tag Helpers, stay tuned for an upcoming post in this series. The code snippet below shows a typical Razor page, e.g. Index.cshtml:

@page
@model IndexModel
@{
 ViewData["Title"] = "Home page";
}

<!-- HTML content, with Tag Helpers, model attributes -->

Here is a quick recap of what a Razor Page is made of:

  1. Each Razor Page starts with an @page directive to indicate that it’s a Razor Page. This is different from Razor Views in MVC, which should not start with @page.
  2. The @page directive may be followed by an @model directive. This identifies the corresponding C# model class, typically located in the same folder as the .cshtml page itself.
  3. (Optional) You can include server-side code within an @{} block.
  4. The rest of the page should include any HTML content you would like to display. This includes any server-side Tag Helpers and Model attributes.

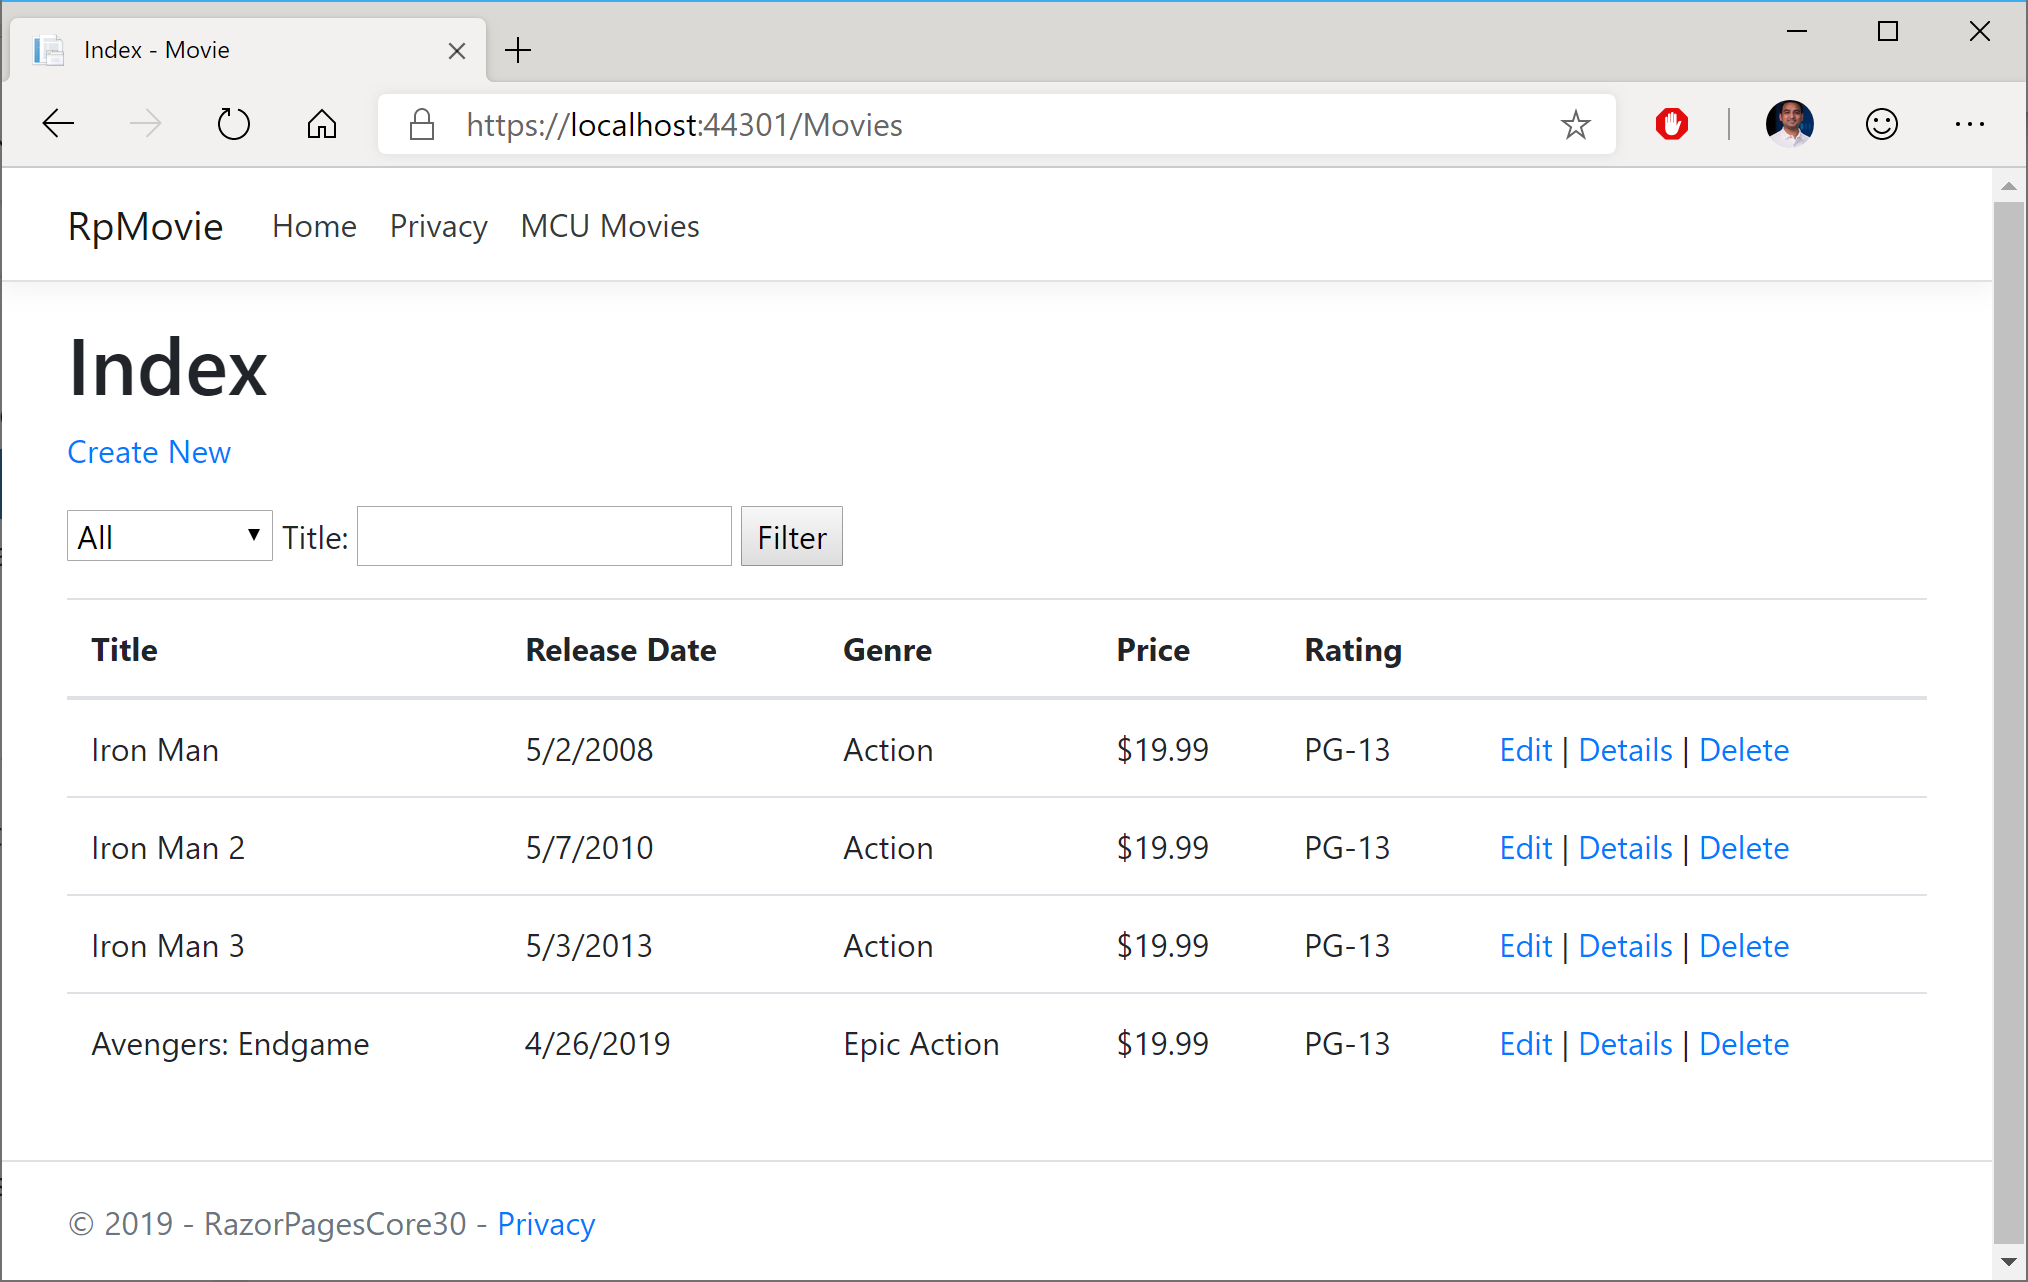
Running the sample app shows the Movies Index page in action:

e.g. https://localhost:44301/Movies

Razor-Pages-Movies-Index

Model Binding

The .cs model class associated  with the page includes both the model’s attributes, as well as action methods for HTTP Verbs. In a way, it consolidates the functionality of an MVC Controller and C# viewmodel class, within a single class file.

The simplest way to use model binding in a Razor Page use to use the [BindProperty] attribute on properties defined in the model class. This may include both simple and complex objects. In the sample, the Movie property in the CreateModel class is decorated with this attribute as shown below:

[BindProperty]
public Movie Movie { get; set; }

Note that [BindProperty] allows you to bind properties for HTTP POST requests by default. However, you will have to explicitly opt-in for HTTP GET requests. This can be accomplished by including an optional boolean parameter (SupportsGet) and setting it to True.

[BindProperty(SupportsGet = true)]
public string SearchString { get; set; }

This may come in handy when passing in QueryString parameters to be consumed by your Razor Page. Parameters are optional and are part of the route used to access your Razor Pages.

To use the Model’s properties, you can use the syntax Model.Property to refer to each property by name. Instead of using the name of the model, you have to use the actual word “Model” in your Razor Page code.

e.g. a page’s model could have a complex object…

public Movie Movie { get; set; }

Within the complex object, e.g. the Movie class has a public ID property:

public int ID { get; set; }

In the Razor Page that refers to the above model, you can refer to Model.Movie.ID by name:

@page
@model RazorPagesCore30.Pages.Movies.DetailsModel
...
<a asp-page="./Edit" asp-route-id="@Model.Movie.ID">Edit</a>

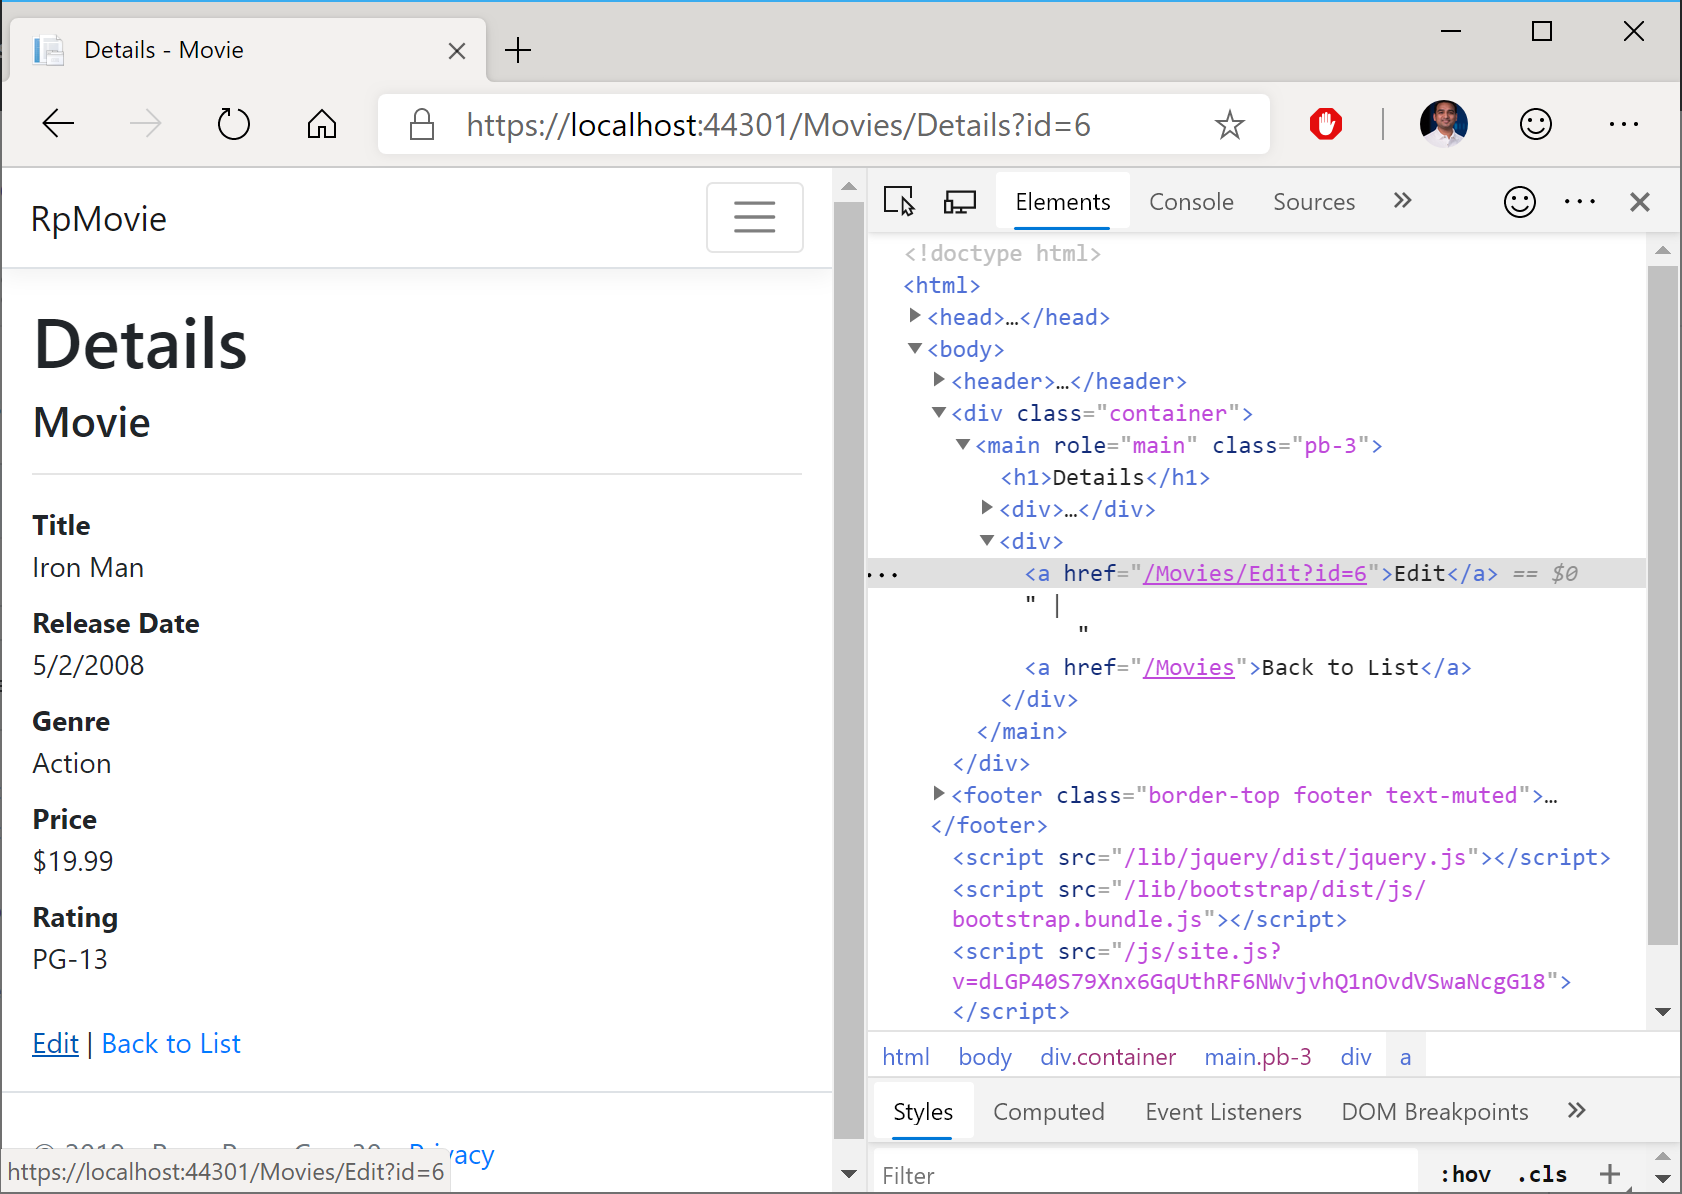
In this particular example, the <a> anchor tag is generated with a link to the Edit page with a route that uses a specific Movie ID value. The link points to the Edit page in the current subfolder (i.e. “Movies”), indicated by the period and slash in the path. The generated HTML looks like the following:

<a href="/Movies/Edit?id=6">Edit</a>

Razor-Pages-Movies-Details

Page Parameters

Page parameters can be included with the @page directive at the top of the page. To indicate that a parameter is optional, you may include a trailing ? question mark character after the parameter name. You may also couple the parameter names with a data type, e.g. int for integers.

@page "{id}"

@page "{id?}"

@page "{id:int?}"

The above snippet shows 3 different options for an id parameter, an optional id parameter and an integer-enforced id parameter. In the C# model code, a property named id can be automatically bound to the page parameter by using the aforementioned [BindProperty] attribute.

In the sample, the  SearchString property in the IndexModel class for Movies shows this in action.

[BindProperty(SupportsGet = true)]
public string SearchString { get; set; }

The corresponding page can then define an optional searchString parameter with the @page directive. In the HTML content that follows, Input Tag Helpers can be used to bind an HTML field (e.g. an input text field) to the field.

@page "{searchString?}"
...
Title: <input type="text" asp-for="SearchString" />

Page Routing

As you may have guessed, a page parameter is setting up route data, allowing you to access the page using a route that includes the page name and parameter:

e.g. https://servername/PageName/?ParameterName=ParameterValue

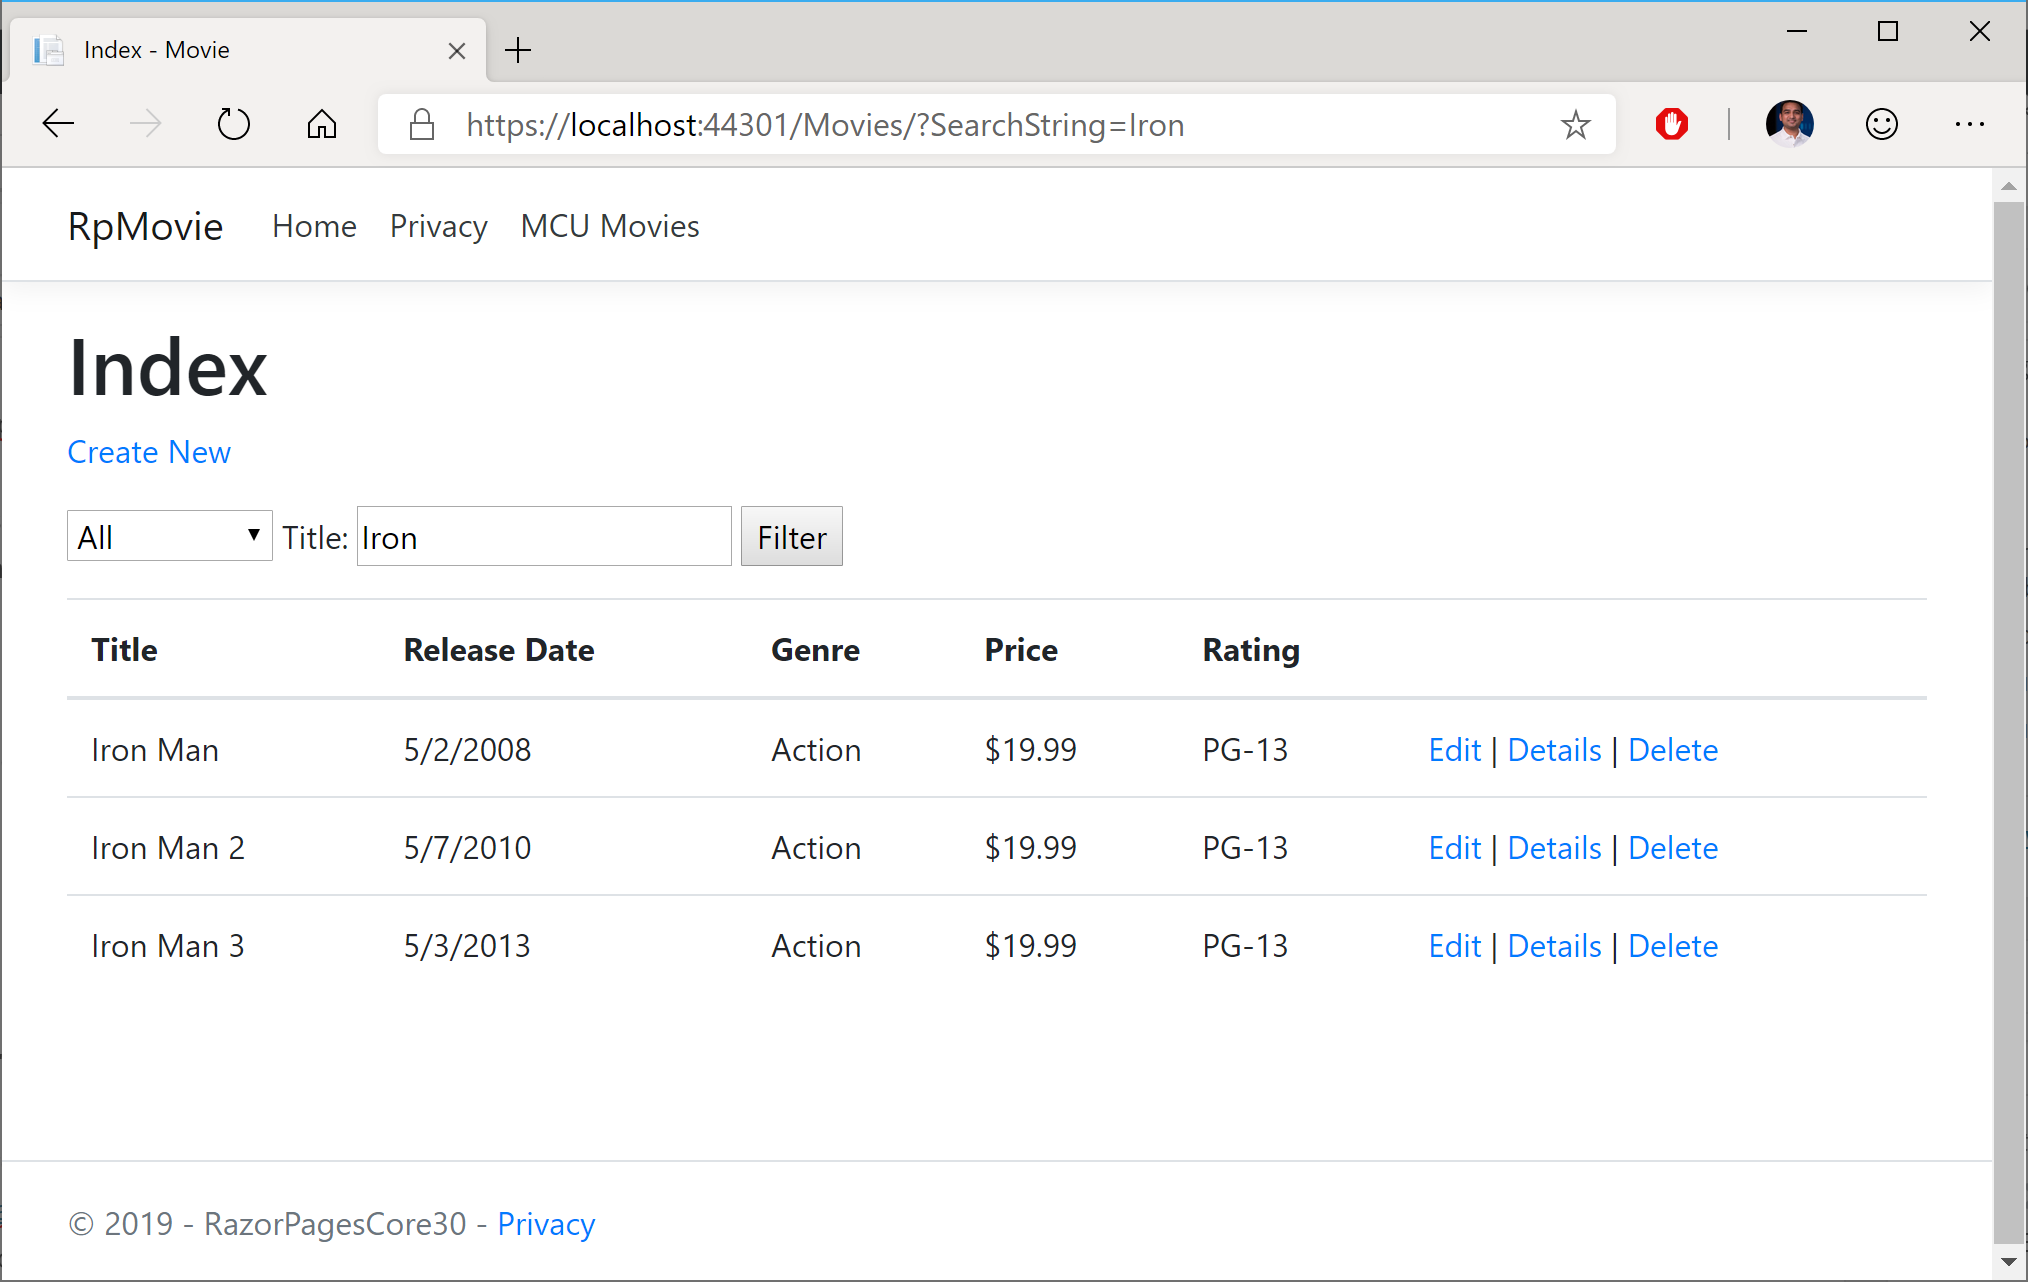
In the sample project, browsing to the Movies page with the search string “Iron” shows a series of “Iron Man” movies, as shown in the following screenshot.

e.g. https://localhost:44301/Movies/?SearchString=Iron

Razor-Pages-Movies-Search

Here, the value for SearchString is used by the OnGetAsync() method in the Index.cshtml.cs class for the Movies page. In the code snippet below, you can see that a LINQ Query filters the movies by a subset of movies where the Title contains the SearchString value. Finally, the list of movies is assigned to the Movie list object.

...
public IList<Movie> Movie { get;set; }
...
public async Task OnGetAsync()
{
   ...
   if (!string.IsNullOrEmpty(SearchString))
   {
      movies = movies.Where(s => s.Title.Contains(SearchString));
   }
   ...
   Movie = await movies.ToListAsync();
}

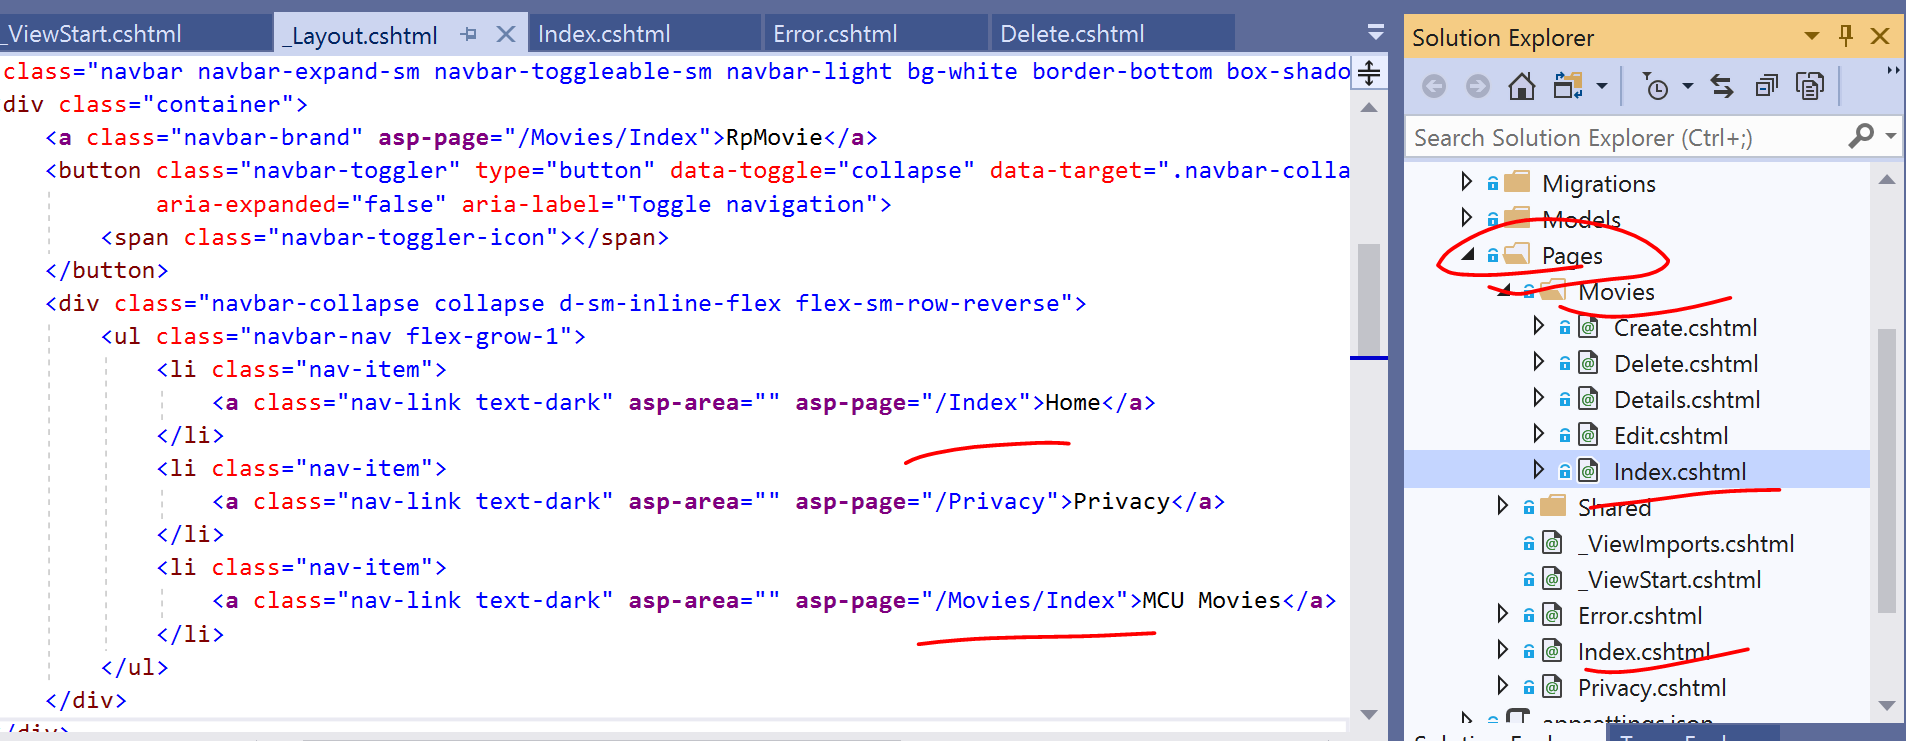
By convention, all Razor Pages should be in a root-level “Pages” folder. Think of this “Pages” folder as a virtual root of your web application. To create a link to a Razor Page, you may link to the name of a Razor Page at the root level (e.g. “/Index”) or a Razor Page within a subfolder (e.g. “/Movies/Index”).

<a class="nav-link text-dark" asp-area="" asp-page="/Index">Home</a>

<a class="nav-link text-dark" asp-area="" asp-page="/Movies/Index">MCU Movies</a>

Razor-Pages-Movies-Routes

Handler Methods

The OnGetAsync() method seen in the previous method is triggered when the Razor Page is triggered by an HTTP GET request that matches its route data. In addition to OnGetAsync(), you can find a complete list of Handler Methods that correspond to all HTTP verbs. The most common ones are for GET and POST:

  • OnGet() or OnGetAsync for HTTP GET
  • OnPost() or OnPostAsync for HTTP POST

When using the Async alternatives for each handler methods, you should return a Task object (or void for the non-async version). To include a return value, you should return a Task<IActionResult> (or IActionResult for the non-async version).

public void OnGet() {}
public IActionResult OnGet() {}
public async Task OnGetAsync() {}

public void OnPost() {}
public IActionResult OnPost() {}
public async Task<IActionResult> OnPostAsync() {}

To implement custom handler methods, you can handle more than one action in the same HTML form. To accomplish this, use the asp-page-handler attribute on an HTML <button> to handle different scenarios.

<form method="post">
 <button asp-page-handler="Handler1">Button 1</button>
 <button asp-page-handler="Handler2">Button 2</button>
</form>

To respond to this custom handlers, the exact handler names (e.g. Handler1 and Handler2) need to be included after OnPost in the handler methods. The snippet below shows the corresponding examples for handling the two buttons.

public async Task<IActionResult> OnPostHandler1Async()
{
   //...
}
public async Task<IActionResult> OnPostHandler2Info()
{
   // ...
}

NOTE: if you need to create a public method that you don’t have to be recognized as a handler method, you should decorate such a method with the [NonHandler] attribute.

References


Query Tags in EF Core for ASP .NET Core Web Apps

By Shahed C on April 29, 2019

This is the seventeenth of a series of posts on ASP .NET Core in 2019. In this series, we’ll cover 26 topics over a span of 26 weeks from January through June 2019, titled A-Z of ASP .NET Core!

ASPNETCoreLogo-300x267 A – Z of ASP .NET Core!

In this Article:

Q is for Query Tags in EF Core

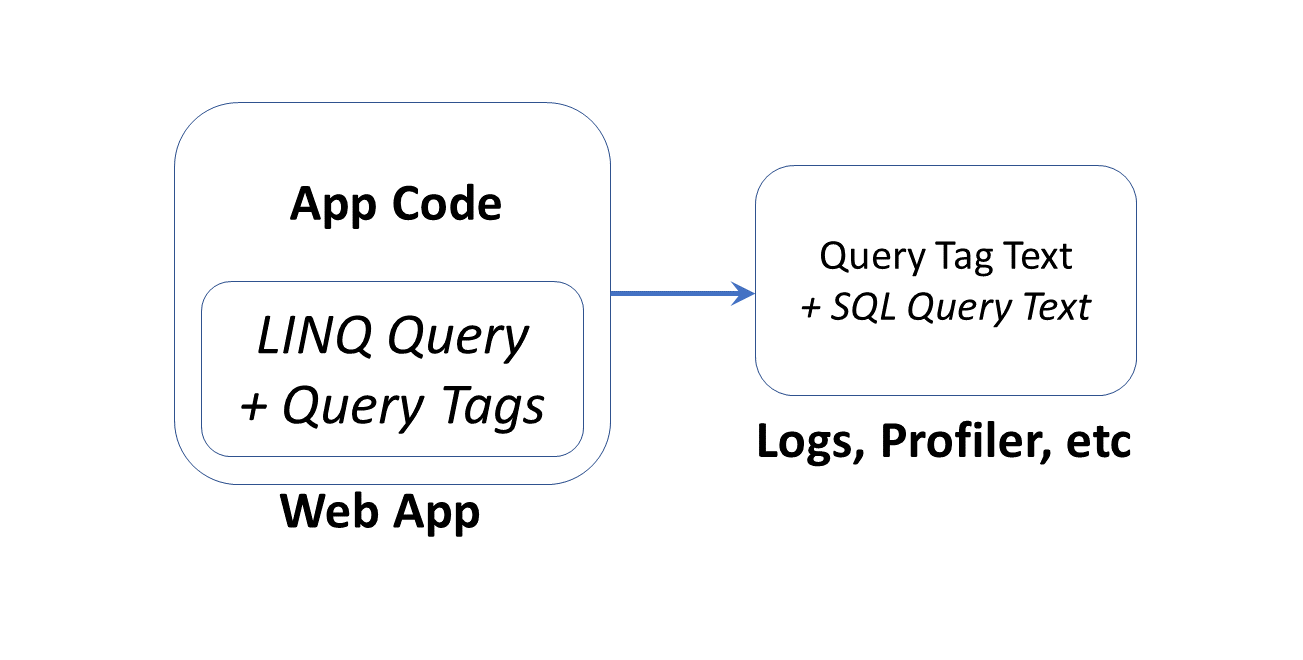
Query Tags were introduced in Entity Framework (EF) Core 2.2, as a way to associate your LINQ Queries with SQL Queries. This can be useful when browsing log files during debugging and troubleshooting. This article explains how Query Tags work, how to find the output and how to format the text strings before displaying them.

Blog-Diagram-QueryTags

NOTE: You may have read that Query Types have been renamed to entities without keys, but please note that Query Types (introduced in EF Core 2.1) are not the same thing as Query Tags.

As of ASP .NET Core 3.0 Preview 1, EF Core must be installed separately via NuGet (e.g. v3.0.0-preview4.19216.3), as it is no longer included with the ASP .NET Core shared framework. Also, the dotnet ef tool has to be installed as a global/local tool, as it is no longer part of the .NET Core SDK. For more information, see the official announcement for Preview 4, where it was first mentioned:

Implementing Query Tags

To follow along, take a look at the sample project on Github:

Web Query Tag Sample: https://github.com/shahedc/WebAppWithQueries

The sample includes a simple model called MyItem, with a few basic fields:

public class MyItem
{
   public int Id { get; set; }
   public string MyItemName { get; set; }
   public string MyItemDescription { get; set; }
}

A collection of MyItem objects are defined as a DbSet in the ApplicationDbContext:

public DbSet<WebAppWithQueries.Models.MyItem> MyItems { get; set; }

The QueriedData() action method in the MyItemController defines a Query Tag with the TagWith() method, as shown below:

public async Task<IActionResult> QueriedData()
{
   var topX = 2;
   var myItems =
   (from m in _context.MyItems.TagWith($"This retrieves top {topX} Items!")
   orderby m.Id ascending
   select m).Take(topX);

   return View(await myItems.ToListAsync());
}

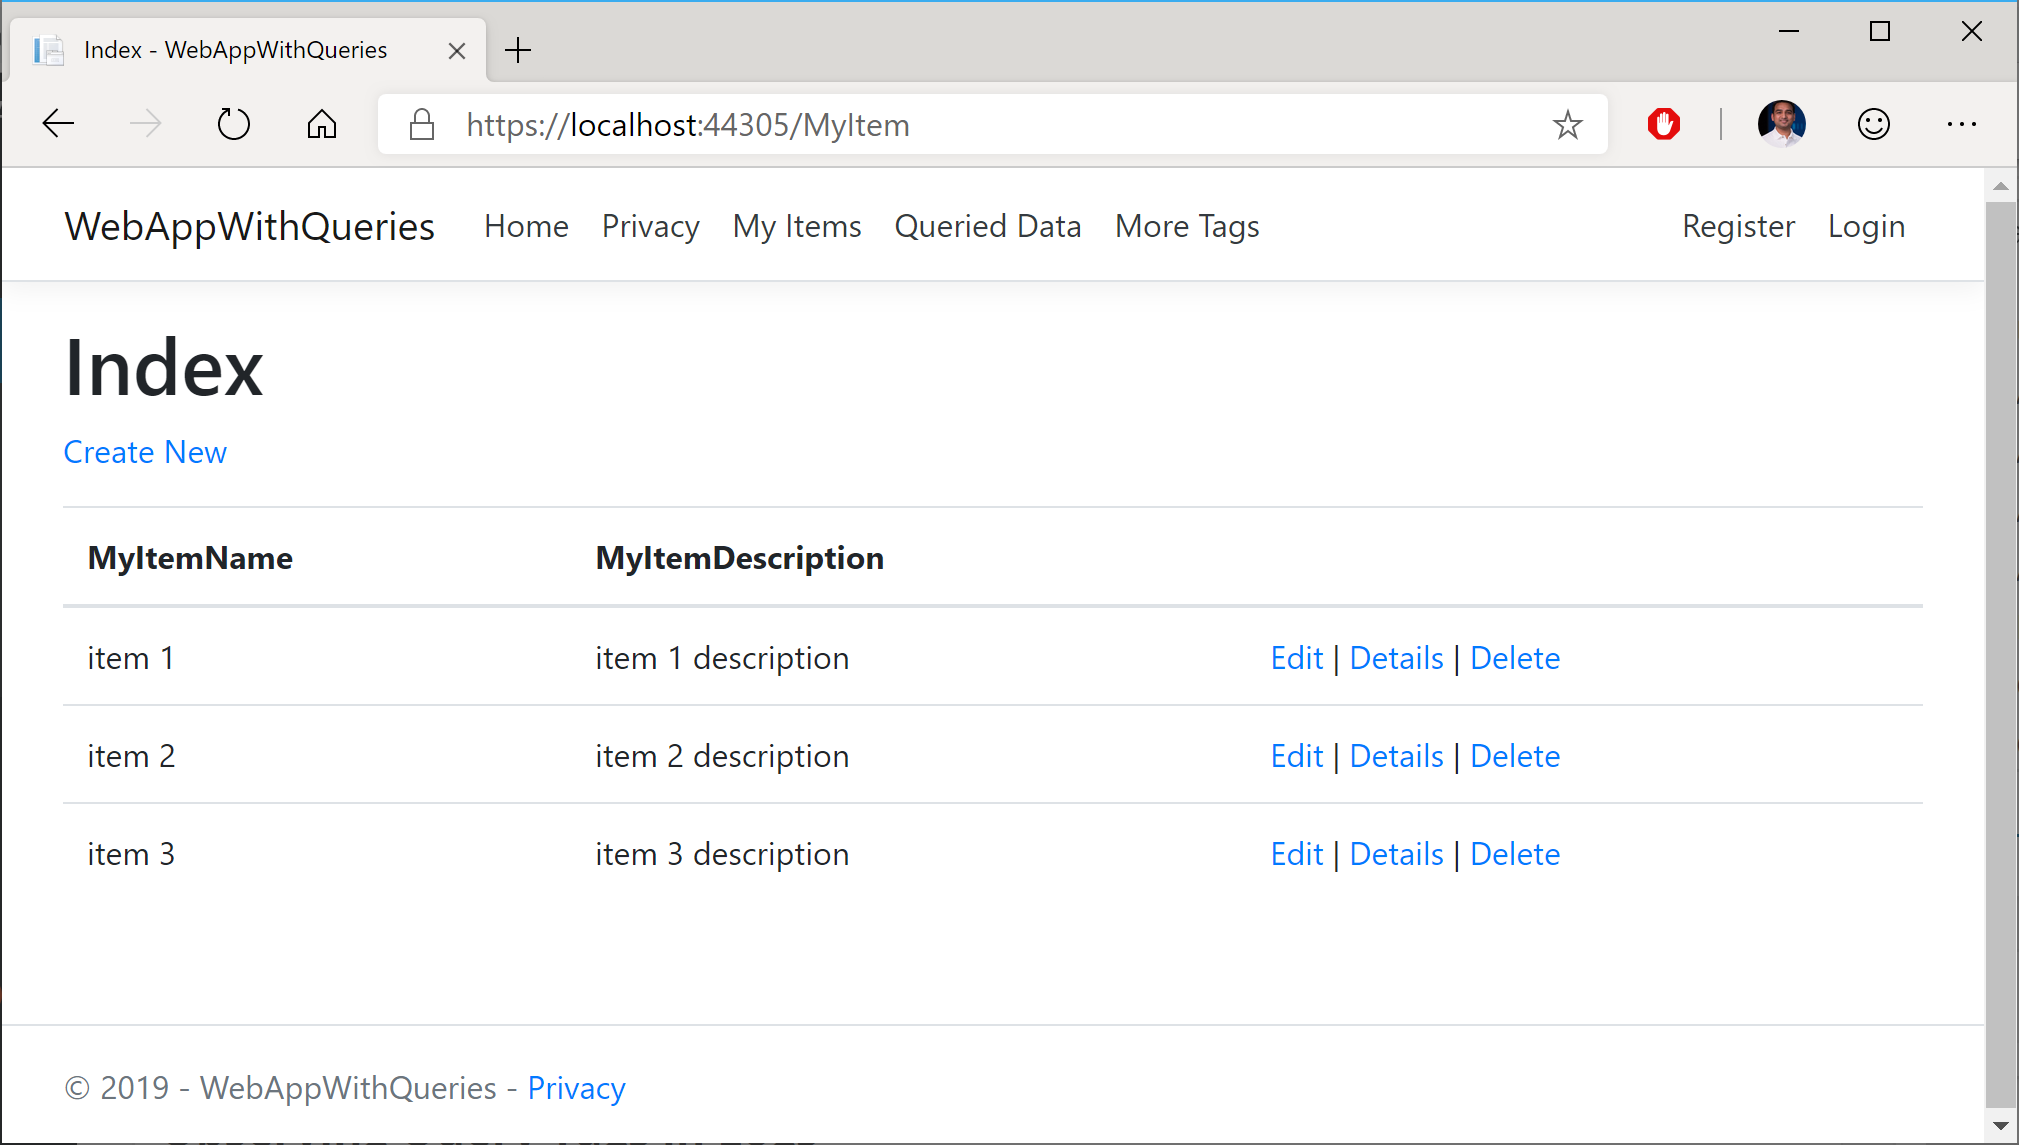
In the above query, the TagWith() method takes a single string value that can they be stored along with wherever the resultant SQL Queries are logged. This may include your persistent SQL Server database logs or Profiler logs that can be observed in real-time. It doesn’t affect what gets displayed in your browser.

AspNetCore-QueryTags-Browser

Observing Query Tags in Logs

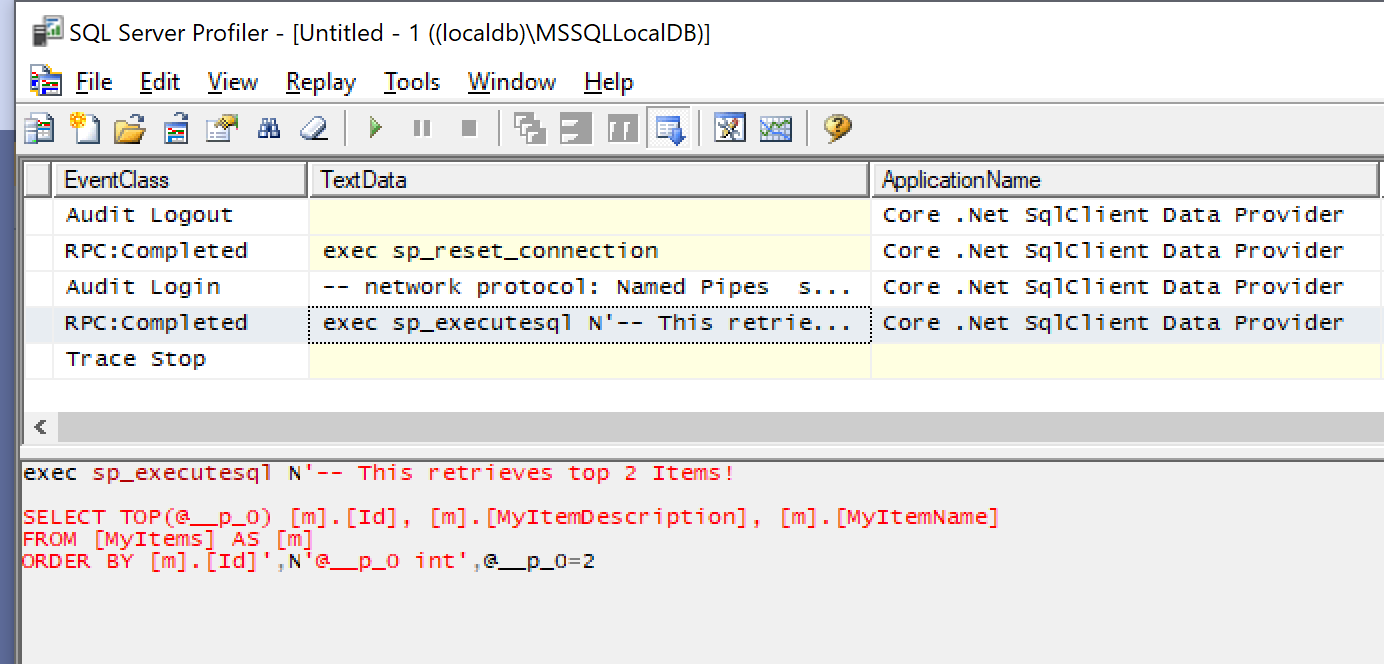
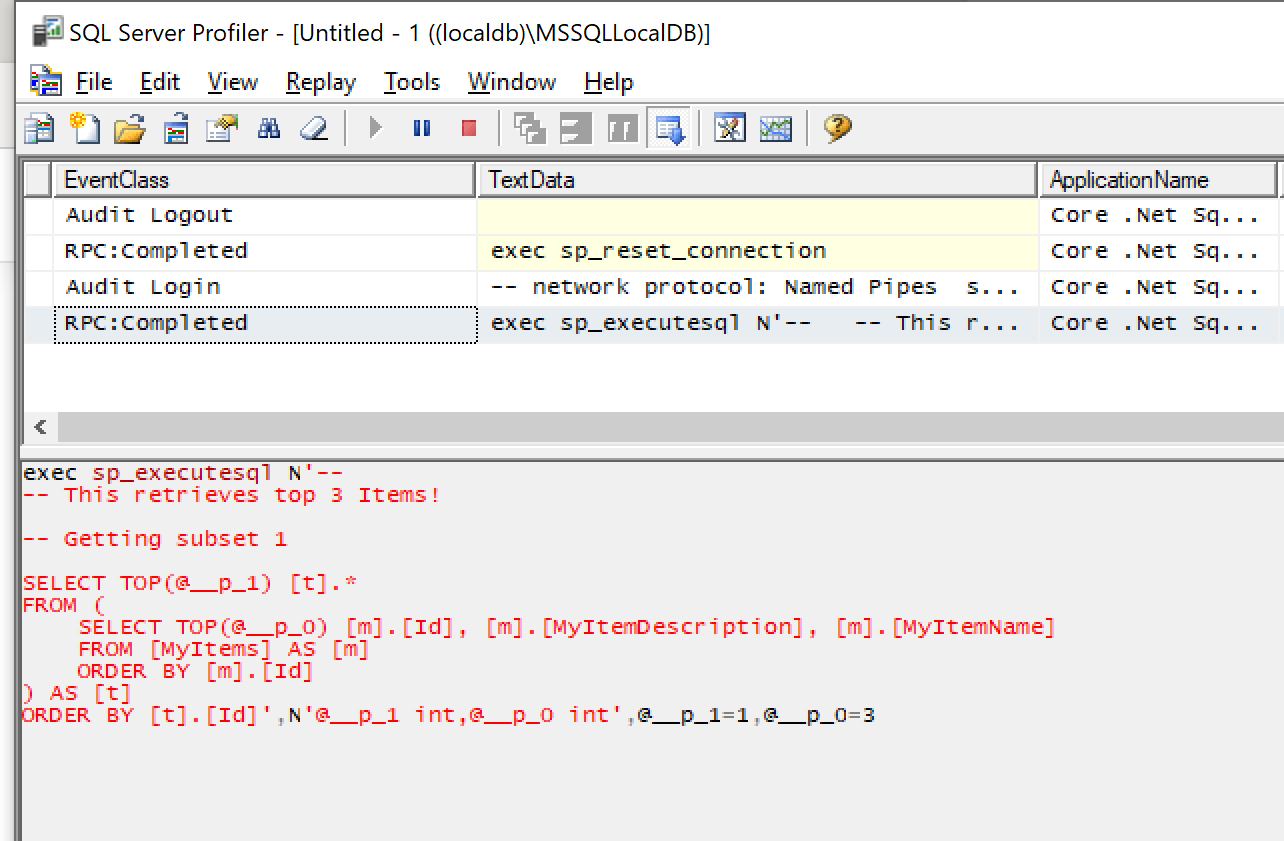
Using the SQL Server Profiler tool, the screenshot below shows how the Query Tag string defined in the code is outputted along with the SQL Query. Since topX is set to 2, the final string includes the value of topX inline within the logged text (more on formatting later).

AspNetCore-QueryTags-Profiler

From the code documentation, the TagWith() method “adds a tag to the collection of tags associated with an EF LINQ query. Tags are query annotations that can provide contextual tracing information at different points in the query pipeline.

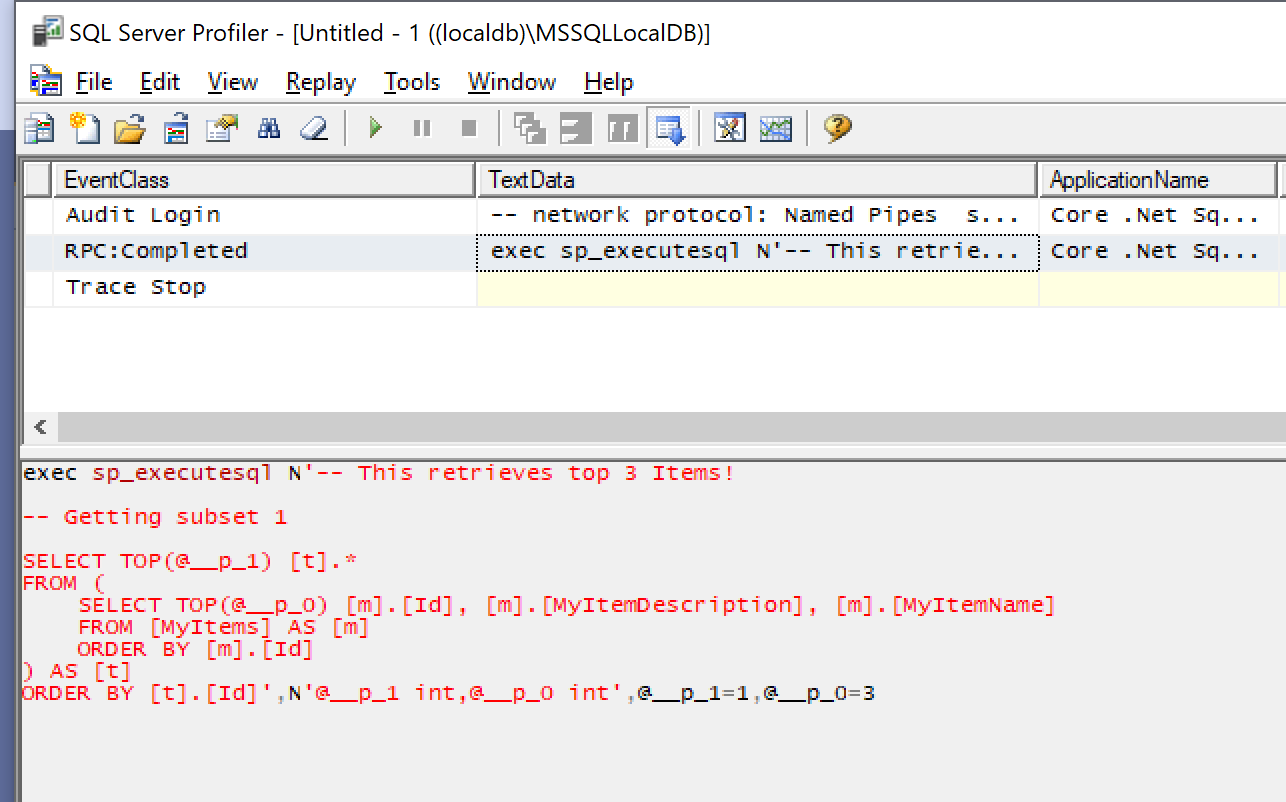
Wait a minute… does it say “collection of tags”…? Yes, you can add a collection of tags! You can call the method multiple times within the same query. In the QueriedDataWithTags() action of method the MyItemController class, you can call a string of methods to trigger cumulative calls to TagWith(), which results in multiple tags being stored in the logs.

AspNetCore-QueryTags-Profiler-More

Formatting Query Tag Strings

You may have noticed that I used the $ (dollar sign) symbol in my Query Tag samples to include variables inline within the string. In case you’re not familiar with this language feature, the string interpolation feature was introduced in C# 6.

$"This retrieves top {topX} Items!"

You may also have  noticed that the profiler is showing the first comment in the same line as the leading text “exec sp_executesql” in the Profiler screenshot. If you want to add some better formatting (e.g. newline characters), you can use the so-called verbatim identifier, which is essentially the @ symbol ahead of the string.

@"This string has more
than 1 line!"

While this is commonly used in C# to allow newlines and unescaped characters (e.g. backslashes in file paths), some people may not be aware that you can use it in Query Tags for formatting. This operator allows you to add multiple newlines in the Query Tag’s string value. You can combine both operators together as well.

@$"This string has more than 1 line 
and includes the {topX} variable!"

In an actual example, a newline produces the following results:

AspNetCore-QueryTags-Profiler-Newlines

The above screenshot now shows the text from multiple Query Tags each on their own new line. As before, both of them were evaluated during the execution of a single SQL statement.

References