This is the twenty-first of a series of posts on ASP .NET Core in 2019. In this series, we’ll cover 26 topics over a span of 26 weeks from January through June 2019, titled A-Z of ASP .NET Core!
 A – Z of ASP .NET Core!
In this Article:
- U is for Unit Testing
- Setting up Unit Testing
- Facts, Theories and Inline Data
- Asserts and Exceptions
- Running Tests
- Custom Names and Categories
- Next Steps
- References
U is for Unit testing
Whether you’re practicing TDD (Test-Driven Development) or writing your tests after your application code, there’s no doubt that unit testing is essential for web application development. When it’s time to pick a testing framework, there are multiple alternatives such as xUnit.net, NUnit and MSTest. This article will focus on xUnit.net because of its popularity (and similarity to its alternatives) when compared to the other testing frameworks.
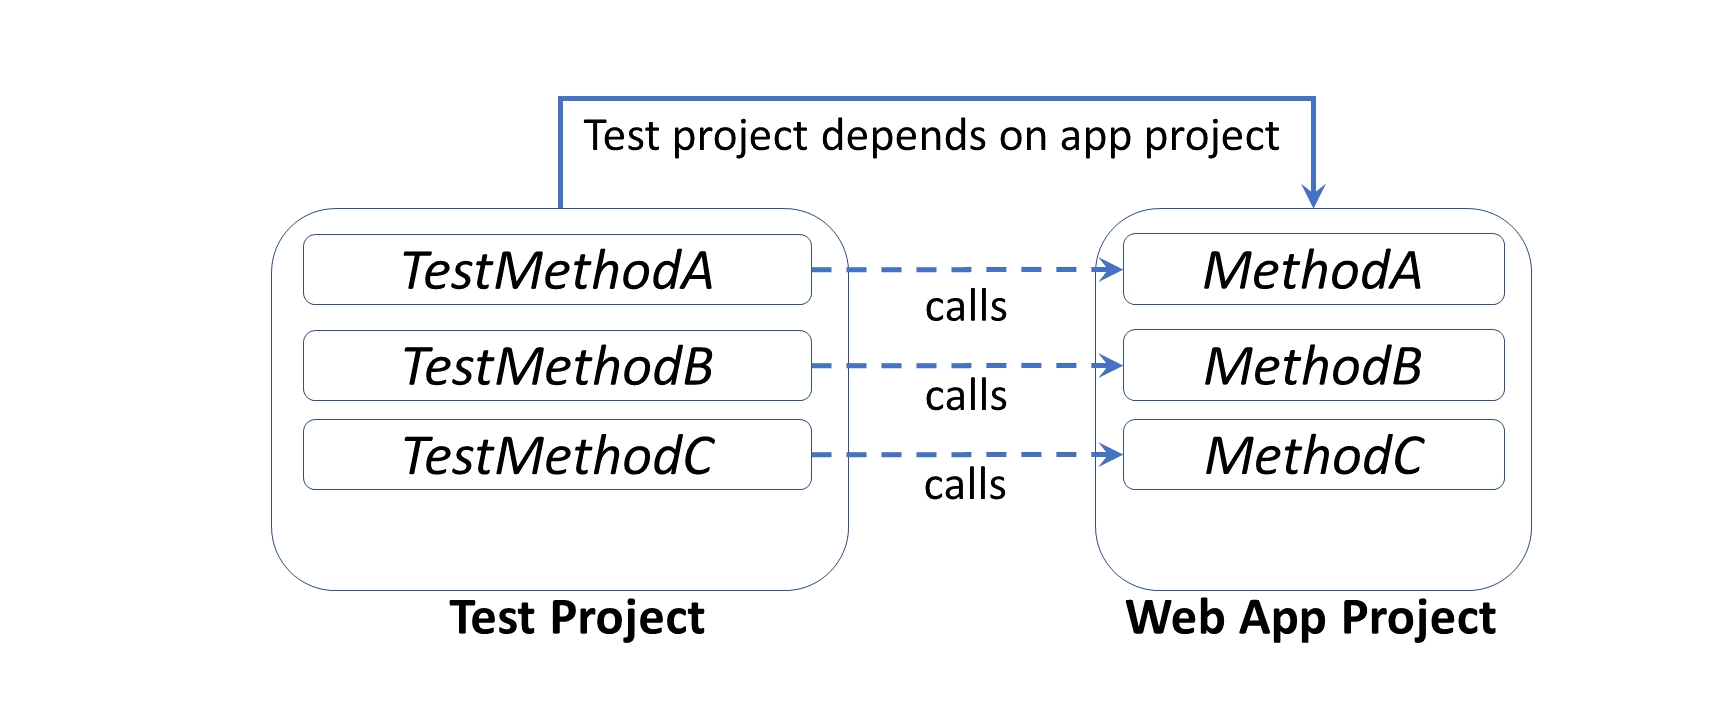
In a nutshell: a unit test is code you can write to test your application code. Your web application will not have any knowledge of your test project, but your test project will need to have a dependency of the app project that it’s testing.
Here are some poll results, from asking 500+ developers about which testing framework they prefer, showing xUnit.net in the lead.
POLL: Hey #AspNetCore #webdev community on twitter! What do you use for unit testing #ASPNET web apps?
Please RT for reach. Thanks!
— Shahed Chowdhuri (@shahedC) May 22, 2019
A similar poll on Facebook also showed xUnit.net leading ahead of other testing frameworks. If you need to see the equivalent attributes and assertions, check out the comparison table provided by xUnit.net:
- Comparing xUnit.net to other frameworks: https://xunit.net/docs/comparisons
To follow along, take a look at the sample project on Github:
![]() Unit Testing Sample: https://github.com/shahedc/CalcApp30WithTests
Unit Testing Sample: https://github.com/shahedc/CalcApp30WithTests
Setting up Unit Testing
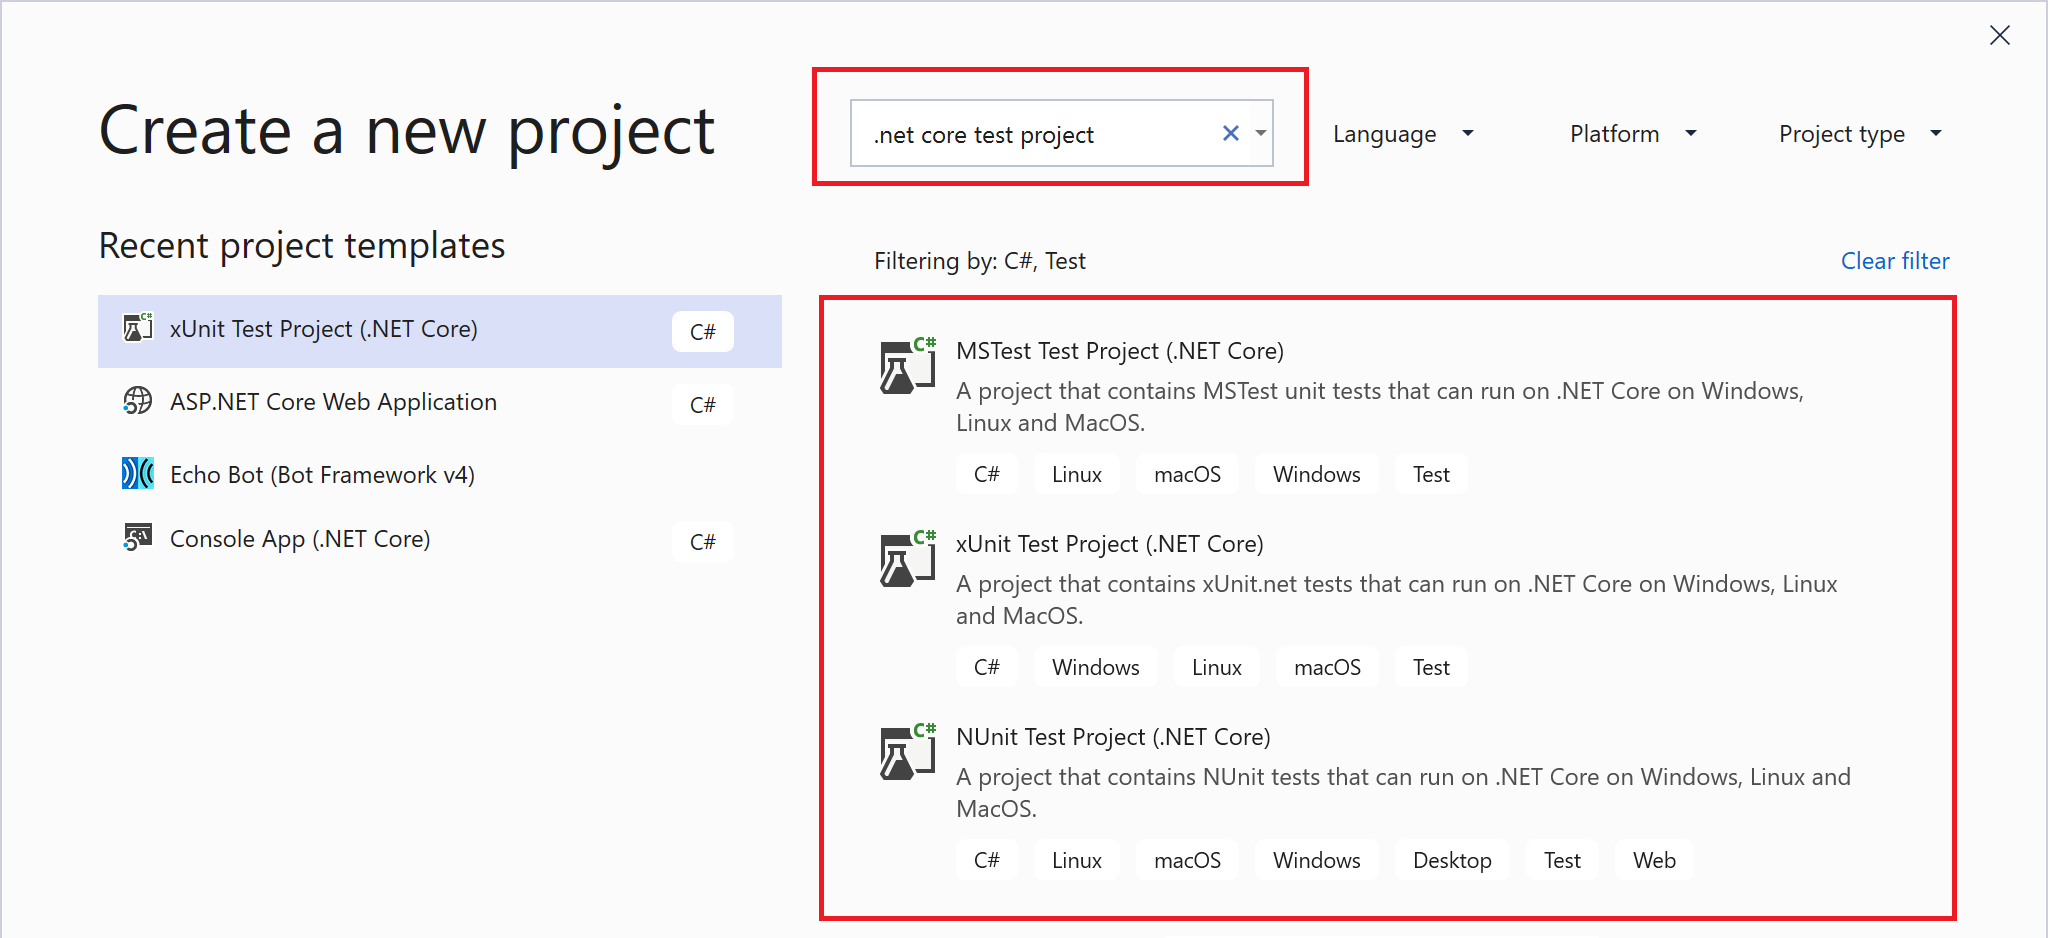
The quickest way to set up unit testing for an ASP .NET Core web app project is to create a new test project using a template. This creates a cross-platform .NET Core project that includes one blank test. In Visual Studio 2019, search for “.net core test project” when creating a new project to identify test projects for MSTest, XUnit and NUnit. Select the XUnit project to follow along with the sample provided.
The placeholder unit test class includes a blank test. Typically, you could create a test class for each application class being tested. The simplest unit test usually includes three distinct steps: Arrange, Act and Assert.
- Arrange: Set up the any variables and objects necessary.
- Act: Call the method being tested, passing any parameters needed
- Assert: Verify expected results
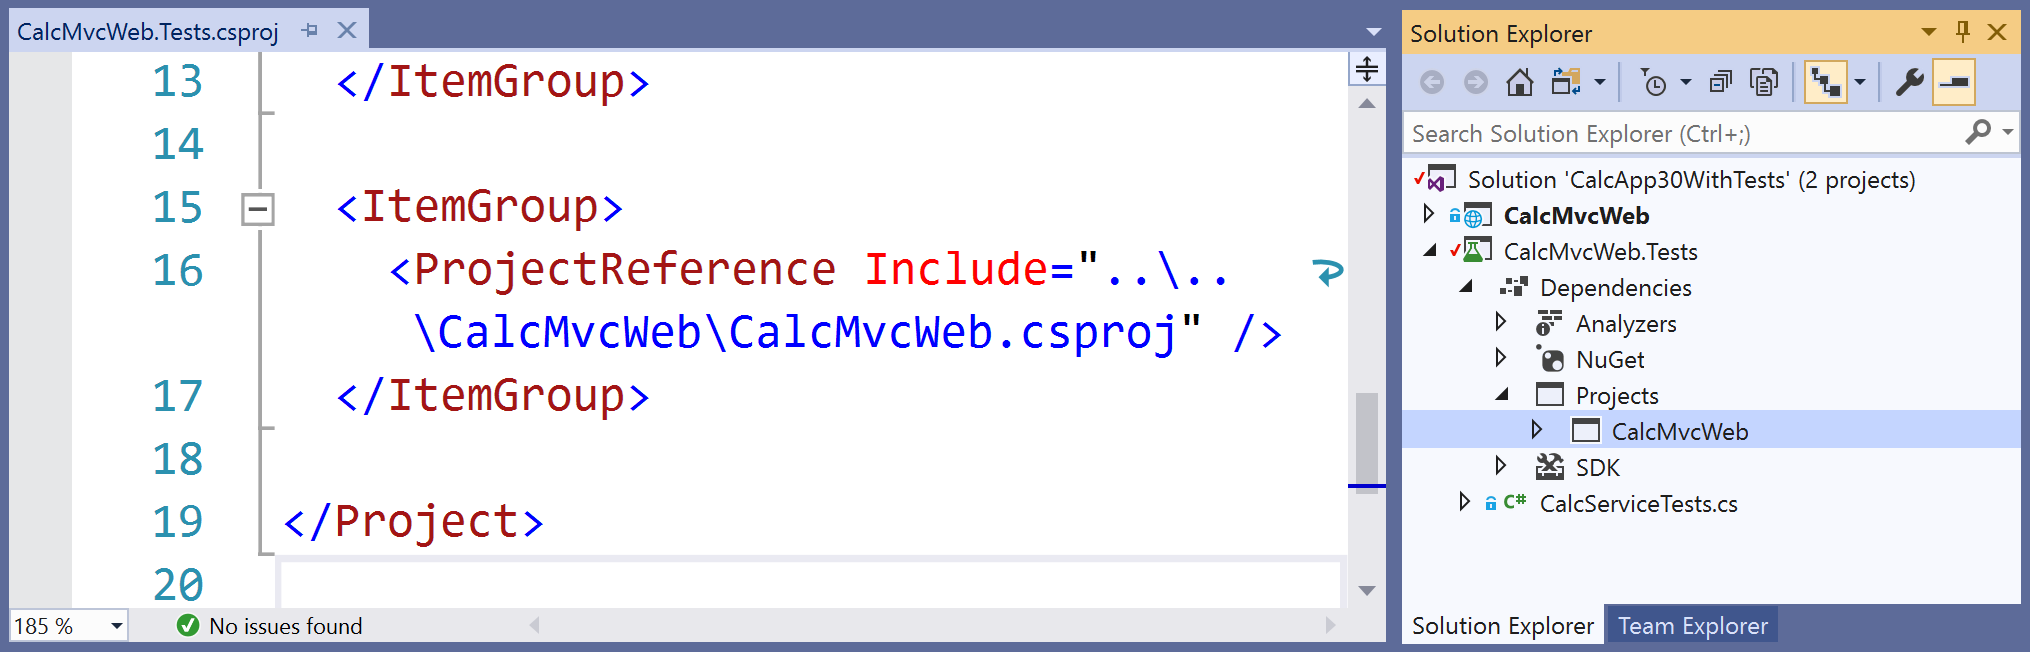
The unit test project should have a dependency for the app project that it’s testing. In the test project file CalcMvcWeb.Tests.csproj, you’ll find a reference to CalcMvcWeb.csproj.
...
<ItemGroup>
   <ProjectReference Include="..\..\CalcMvcWeb\CalcMvcWeb.csproj" />
</ItemGroup>
...
In the Solution Explorer panel, you should see a project dependency of the reference project.
If you need help adding reference projects using CLI commands, check out the official docs at:
- Unit testing C# code in .NET Core using dotnet test and xUnit: https://docs.microsoft.com/en-us/dotnet/core/testing/unit-testing-with-dotnet-test#creating-the-test-project
Facts, Theories and Inline Data
When you add a new xUnit test project, you should get a simple test class (UnitTest1) with an empty test method (Test1). This test class should be a public class and the test method should be decorated with a [Fact] attribute. The attribute indicates that this is a test method without any parameters, e.g. Test1().
public class UnitTest1
{
   [Fact]
   public void Test1()
   {

   }
}
In the sample project, you’ll see a test class (CalcServiceTests.cs) with a series of methods that take 1 or more parameters. Instead of a [Fact] attribute, each method has a [Theory] attribute. In addition to this primary attribute, each [Theory] attribute is followed by one of more [InlineData] attributes that have sample argument values for each method parameter.
[Theory(DisplayName = "Add Numbers")]
[InlineData(4, 5, 9)]
[InlineData(2, 3, 5)]
public void TestAddNumbers(int x, int y, int expectedResult)
{
   ...
}
In the code sample, each occurrence of [InlineData] is followed by 3 numeric values:
- [InlineData(4, 5, 9)] –> this implies that x = 4, y = 5, expectedResult = 9
- [InlineData(2, 3, 5)] –> this implies that x = 2, y = 3, expectedResult = 5
NOTE: If you want to skip a method during your test runs, simply add a Skip parameter to your Fact or Theory with a text string for the “Reason”.
e.g.
- [Fact(Skip=”this is broken”)]
- [Theory(Skip=”we should skip this too”)]
Asserts and Exceptions
Back to the 3-step process, let’s explore the TestAddNumbers() method and its method body.
public void TestAddNumbers(int x, int y, int expectedResult)
{
   // 1. Arrange
   var cs = new CalcService();

   // 2. Act
   var result = cs.AddNumbers(x, y);

   // 3. Assert
   Assert.Equal(expectedResult, result);
}
- During the Arrange step, we create a new instance of an object called CalcService which will be tested.
- During the Act step, we call the object’s AddNumbers() method and pass 2 values that were passed in via InlineData.
- During the Assert step, we compare the expectedResult (passed by InlineData) with the returned result (obtained from a call to the method being tested).
The Assert.Equal() method is a quick way to check whether an expected result is equal to a returned result. If they are equal, the test method will pass. Otherwise, the test will fail. There is also an Assert.True() method that can take in a boolean value, and will pass the test if the boolean value is true.
For a complete list of Assertions in xUnit.net, refer to the Assertions section of the aforementioned comparison table:
- Assertions in unit testing frameworks: https://xunit.net/docs/comparisons#assertions
If an exception is expected, you can assert a thrown exception. In this case, the test passes if the exception occurs. Keep in mind that unit tests are for testing expected scenarios. You can only test for an exception if you know that it will occur.
[Theory]
[InlineData(1, 0)]
public void TestDivideByZero(int x, int y)
{
   var cs = new CalcService();

   Exception ex = Assert
    .Throws<DivideByZeroException>(() => cs.UnsafeDivide(x, y));

}
The above code tests a method named UnsafeDivide() that divides 2 numbers, x and y. There is no guard against dividing by zero, so a DivideByZeroException() occurs whenever y is 0. Since InlineData passes a 1 and a 0, this guarantees that the exception will occur. In this case, the Act and Assert steps occur in the same statement.
To get a glimpse of the UnsafeDivide() method from the CalcService class, here is a snippet:
public int UnsafeDivide(int x, int y)
{
   return (x / y);
}
As you can see in the code snippet above, the UnsafeDivide() method simply divides two numbers, without checking to see if the denominator is 0 or not. This generates the expected exception when y is set to 0.
Running Tests
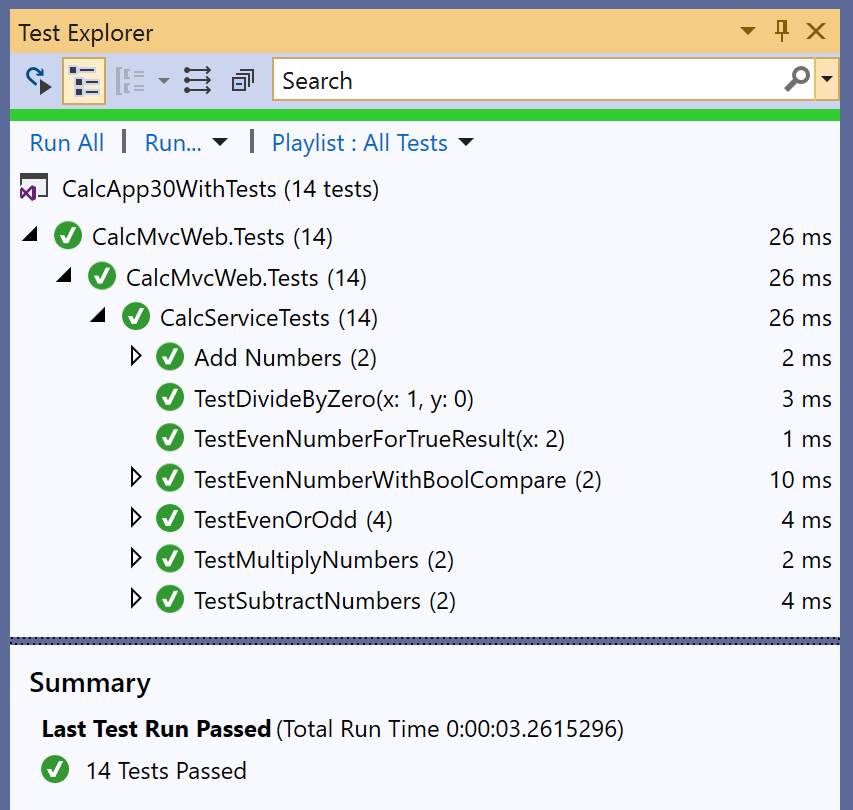
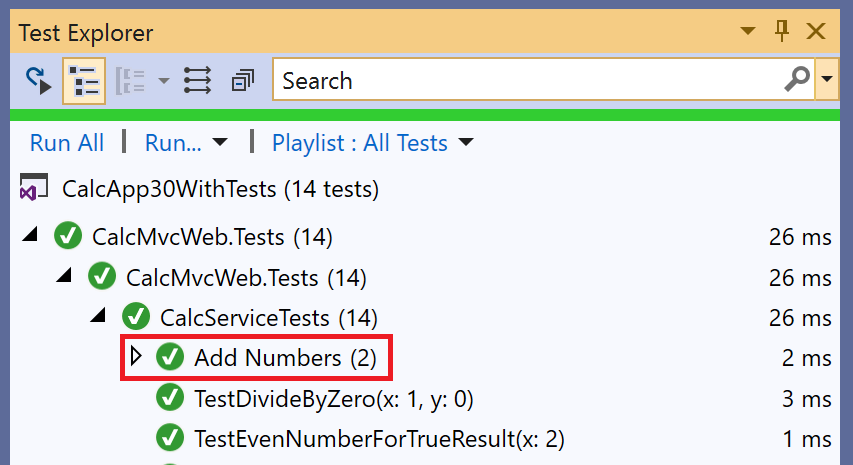
To run your unit tests in Visual Studio, use the Test Explorer panel.
- From the top menu, click Test | Windows | Test Explorer
- In the Test Explorer panel, click Run All
- Review the test status and summary
- OPTIONAL: if any tests fail, inspect the code and fix as needed.
To run your unit tests with a CLI Command, run the following command in the test project folder:
> dotnet test
The results may look something like this:
Test run for C:\path\to\test\assembly\CalcMvcWeb.Tests.dll(.NETCoreApp,Version=v3.0)
Microsoft (R) Test Execution Command Line Tool Version 16.0.1
Copyright (c) Microsoft Corporation. All rights reserved.

Starting test execution, please wait...

Total tests: 14. Passed: 14. Failed: 0. Skipped: 0.
Test Run Successful.
Test execution time: 2.4306 Seconds
As of xUnit version 2, tests can automatically run in parallel to save time. Test methods within a class are considered to be in the same implicit collection, and so will not be run in parallel. You can also define explicit collections using a [Collection] attribute to decorate each test class. Multiple test classes within the same collection will not be run in parallel.
For more information on collections, check out the official docs at:
- Running Tests in Parallel: https://xunit.net/docs/running-tests-in-parallel
NOTE: Visual Studio includes a Live Unit Testing feature that allows you to see the status of passing/failing tests as you’re typing your code. This feature is only available in the Enterprise Edition of Visual Studio.
Custom Names and Categories
You may have noticed a DisplayName parameter when defining the [Theory] attribute in the code samples. This parameter allows you to defined a friendly name for any test method (Fact or Theory) that can be displayed in the Test Explorer. For example:
[Theory(DisplayName = "Add Numbers")]
Using the above attribute above the TestAddNumbers() method will show the friendly name “Add Numbers” in the Test Explorer panel during test runs.
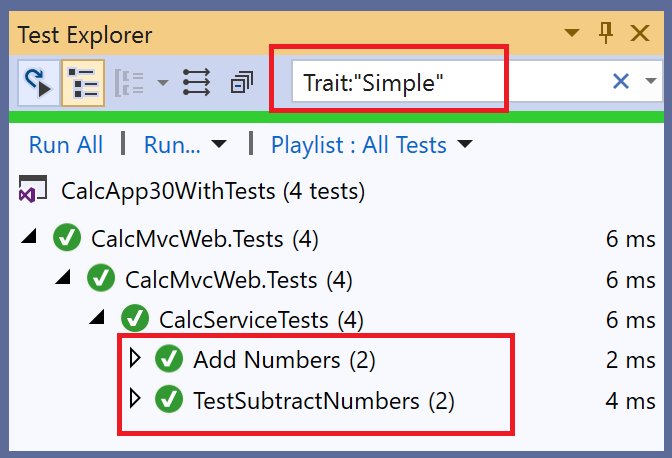
Finally, consider the [Trait] attribute. This attribute can be use to categorize related test methods by assigning an arbitrary name/value pair for each defined “Trait”. For example:
[Trait("Math Ops", "Simple")]
public void TestAddNumbers() { ... }

[Trait("Math Ops", "Simple")]
public void TestSubtractNumbers { ... }
Using the above attribute for two methods TestAddNumbers() and TestSubtractNumbers() will categorize the methods into a “category” called Math Ops: Simple. This makes it possible to filter just the Addition and Subtraction test methods, e.g. Trait: “Simple”
Next Steps: Mocking, Integration Tests and More!
There is so much more to learn with unit testing. You could read several chapters or even an entire book on unit testing and related topics. To continue your learning in this area, consider the following:
- MemberData: use the MemberData attribute to go beyond isolated test methods. This allows you to reuse test values for multiples methods in the test class.
- ClassData: use the ClassData attribute to use your test data in multiple test classes. This allows you to specify a class that will pass a set of collections to your test method.
For more information on the above, check out this Nov 2017 post from Andrew Lock:
- Creating parameterised tests in xUnit with [InlineData], [ClassData], and [MemberData]: https://andrewlock.net/creating-parameterised-tests-in-xunit-with-inlinedata-classdata-and-memberdata/
To go beyond Unit Tests, consider the following:
- Mocking: use a mocking framework (e.g. Moq) to mock external dependencies that you shouldn’t need to test from your own code.
- Integration Tests: use integration tests to go beyond isolated unit tests, to ensure that multiple components of your application are working correctly. This includes databases and file systems.
- UI Tests: test your UI components using a tool such as Selenium WebDriver or IDE in the language of your choice, e.g. C#. For browser support, you may use Chrome or Firefox extensions, so this includes the new Chromium-based Edge browser.
While this article only covers MVC, take a look at the official docs for Unit Testing with Razor Pages:
- Razor Pages unit tests in ASP.NET Core: https://docs.microsoft.com/en-us/aspnet/core/test/razor-pages-tests
References
- Getting started: .NET Core with command line > xUnit.net: https://xunit.net/docs/getting-started/netcore/cmdline
- Running Tests in Parallel > xUnit.net: https://xunit.net/docs/running-tests-in-parallel
- Unit testing C# code in .NET Core using dotnet test and xUnit: https://docs.microsoft.com/en-us/dotnet/core/testing/unit-testing-with-dotnet-test
- Test controller logic in ASP.NET Core: https://docs.microsoft.com/en-us/aspnet/core/mvc/controllers/testing
- Integration tests in ASP.NET Core: https://docs.microsoft.com/en-us/aspnet/core/test/integration-tests
- Razor Pages unit tests in ASP.NET Core: https://docs.microsoft.com/en-us/aspnet/core/test/razor-pages-tests
- Unit testing in .NET Core and .NET Standard – .NET Core: https://docs.microsoft.com/en-us/dotnet/core/testing/
- Introducing the .NET Core Unit Testing Framework (or: Why xUnit?): https://visualstudiomagazine.com/articles/2018/11/01/net-core-testing.aspx?m=1
- Writing xUnit Tests in .NET Core: https://visualstudiomagazine.com/articles/2018/11/01/xunit-tests-in-net-core.aspx
- Live Unit Testing – Visual Studio: https://docs.microsoft.com/en-us/visualstudio/test/live-unit-testing
- Mocks Aren’t Stubs: https://martinfowler.com/articles/mocksArentStubs.html
- Mocking in .NET Core Tests with Moq: http://dontcodetired.com/blog/post/Mocking-in-NET-Core-Tests-with-Moq
- Moq – Unit Test In .NET Core App Using Mock Object: https://www.c-sharpcorner.com/article/moq-unit-test-net-core-app-using-mock-object/
I would add one amazing thing testing ASP.NET Core apps with xUnit – you can use xUnit fixture with default IClassFixture<WebApplicationFactory> – it gives you access to all configured DI easily: https://docs.microsoft.com/en-us/aspnet/core/test/integration-tests#basic-tests-with-the-default-webapplicationfactory
Thanks for sharing! There’s some great material in docs right there. Only thing I would change soon is the use of WebHostBuilder in that article. With Core v3.0, we’ll be moving to Generic Host Builder, as you know.
Don’t forget about using fake data for tests too.
We all have that friend that is using production data for testing. =) Friends don’t let friends use production data for testing.
https://github.com/bchavez/Bogus
Thanks for sharing, very useful! 🙂
I use this library regularly for fake data. Very useful, love it!
Pingback: Dew Drop – May 29, 2019 (#2968) | Morning Dew
Pingback: The Morning Brew - Chris Alcock » The Morning Brew #2755
I created some useful library which combines AutoFixture, xUnit and Moq and covers common issues with testing like:
– The testing scope is limited to a single class only.
– There is no “new” keyword in tests, everything is auto mocked
– Changes to a constructor of a class is not require editing all tests for that class.
– Boilerplate code within the test class is kept to a minimum
https://github.com/Ermesx/testing-context
Very cool, thanks for sharing! 🙂
Pingback: YAML-defined CI/CD for ASP .NET Core | Wake Up And Code!