This is the fifteenth of a series of posts on ASP .NET Core in 2019. In this series, we’ll cover 26 topics over a span of 26 weeks from January through June 2019, titled A-Z of ASP .NET Core!
 A – Z of ASP .NET Core!
In this Article:
- O is for Organizational Accounts
- Adding Authentication
- Configuring App Registration
- Using Authentication in your Code
- Endpoint Routing in MVC
- App Settings and Identity
- References
O is for Organizational Accounts
If you’ve created new ASP .NET Core projects, you’ve probably seen an option to add authentication upon creation. In Visual Studio, the IDE provides radio buttons to select a specific type of Authentication. Using CLI commands (e.g. in the VS Code terminal) you can use the ‐‐auth flag to choose the type of authentication you’d like to add.
The possible values are:
- None – No authentication (Default).
- Individual – Individual authentication.
- IndividualB2C – Individual authentication with Azure AD B2C.
- SingleOrg – Organizational authentication for a single tenant.
- MultiOrg – Organizational authentication for multiple tenants.
- Windows – Windows authentication..
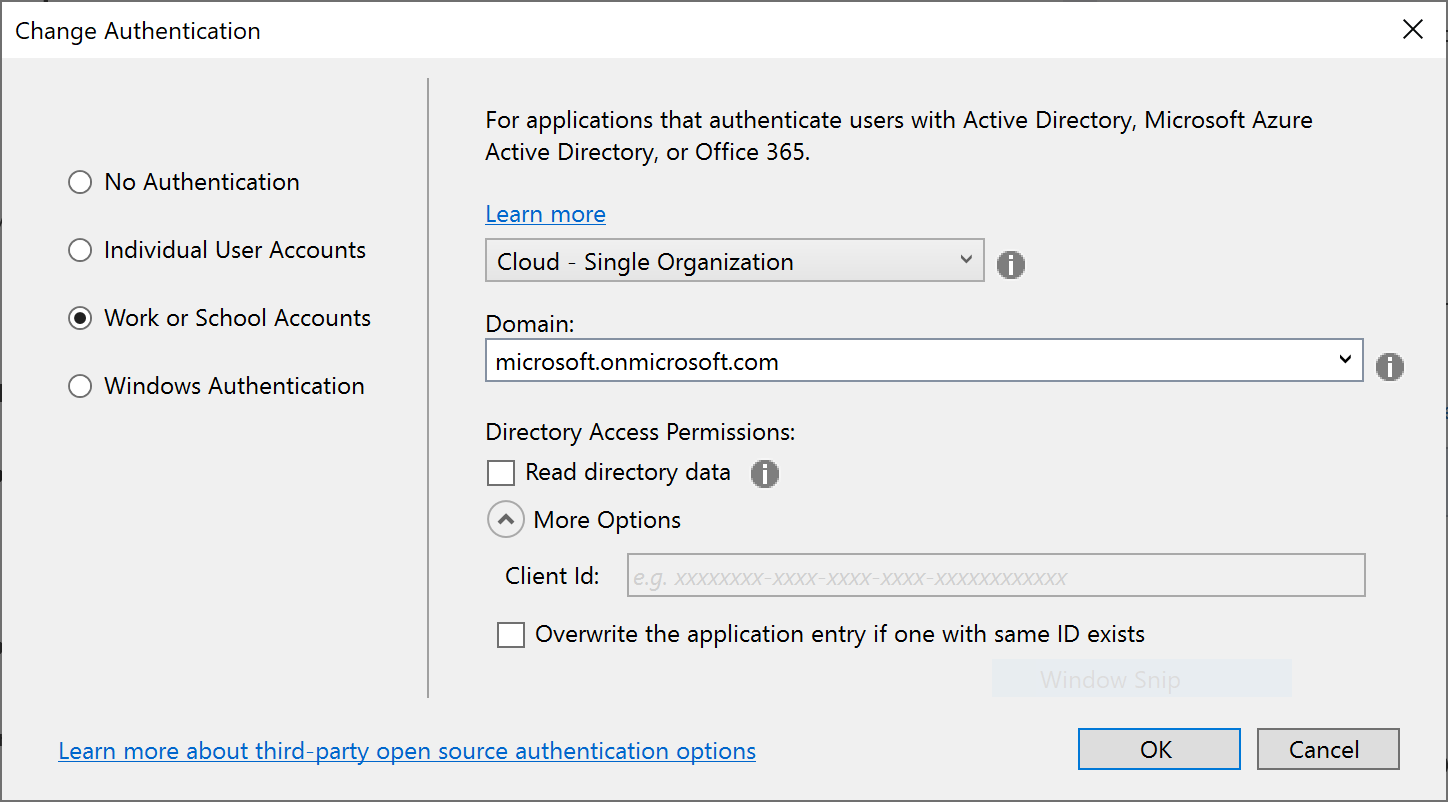
In this article, we will focus on the option for Work or School Accounts. This option can be used to authenticate users with AD (Active Directory, Azure AD or Office 365. In VS2019, a screenshot of the dialog is shown below:
To follow along, take a look at the sample project on Github:
![]() Org Authentication Sample: https://github.com/shahedc/AspNetCore2019Org
Org Authentication Sample: https://github.com/shahedc/AspNetCore2019Org
Adding Authentication
To add authentication to a new project quickly, here are the instructions for Visual Studio 2019.
If you choose to use the new splash screen:
- Click “Create a new project”
- Select “ASP .NET Core Web Application”
- Click Next
- Enter Project Name, Location, Solution Name
- Optional: check the checkbox to place in the same directory
- Click Create
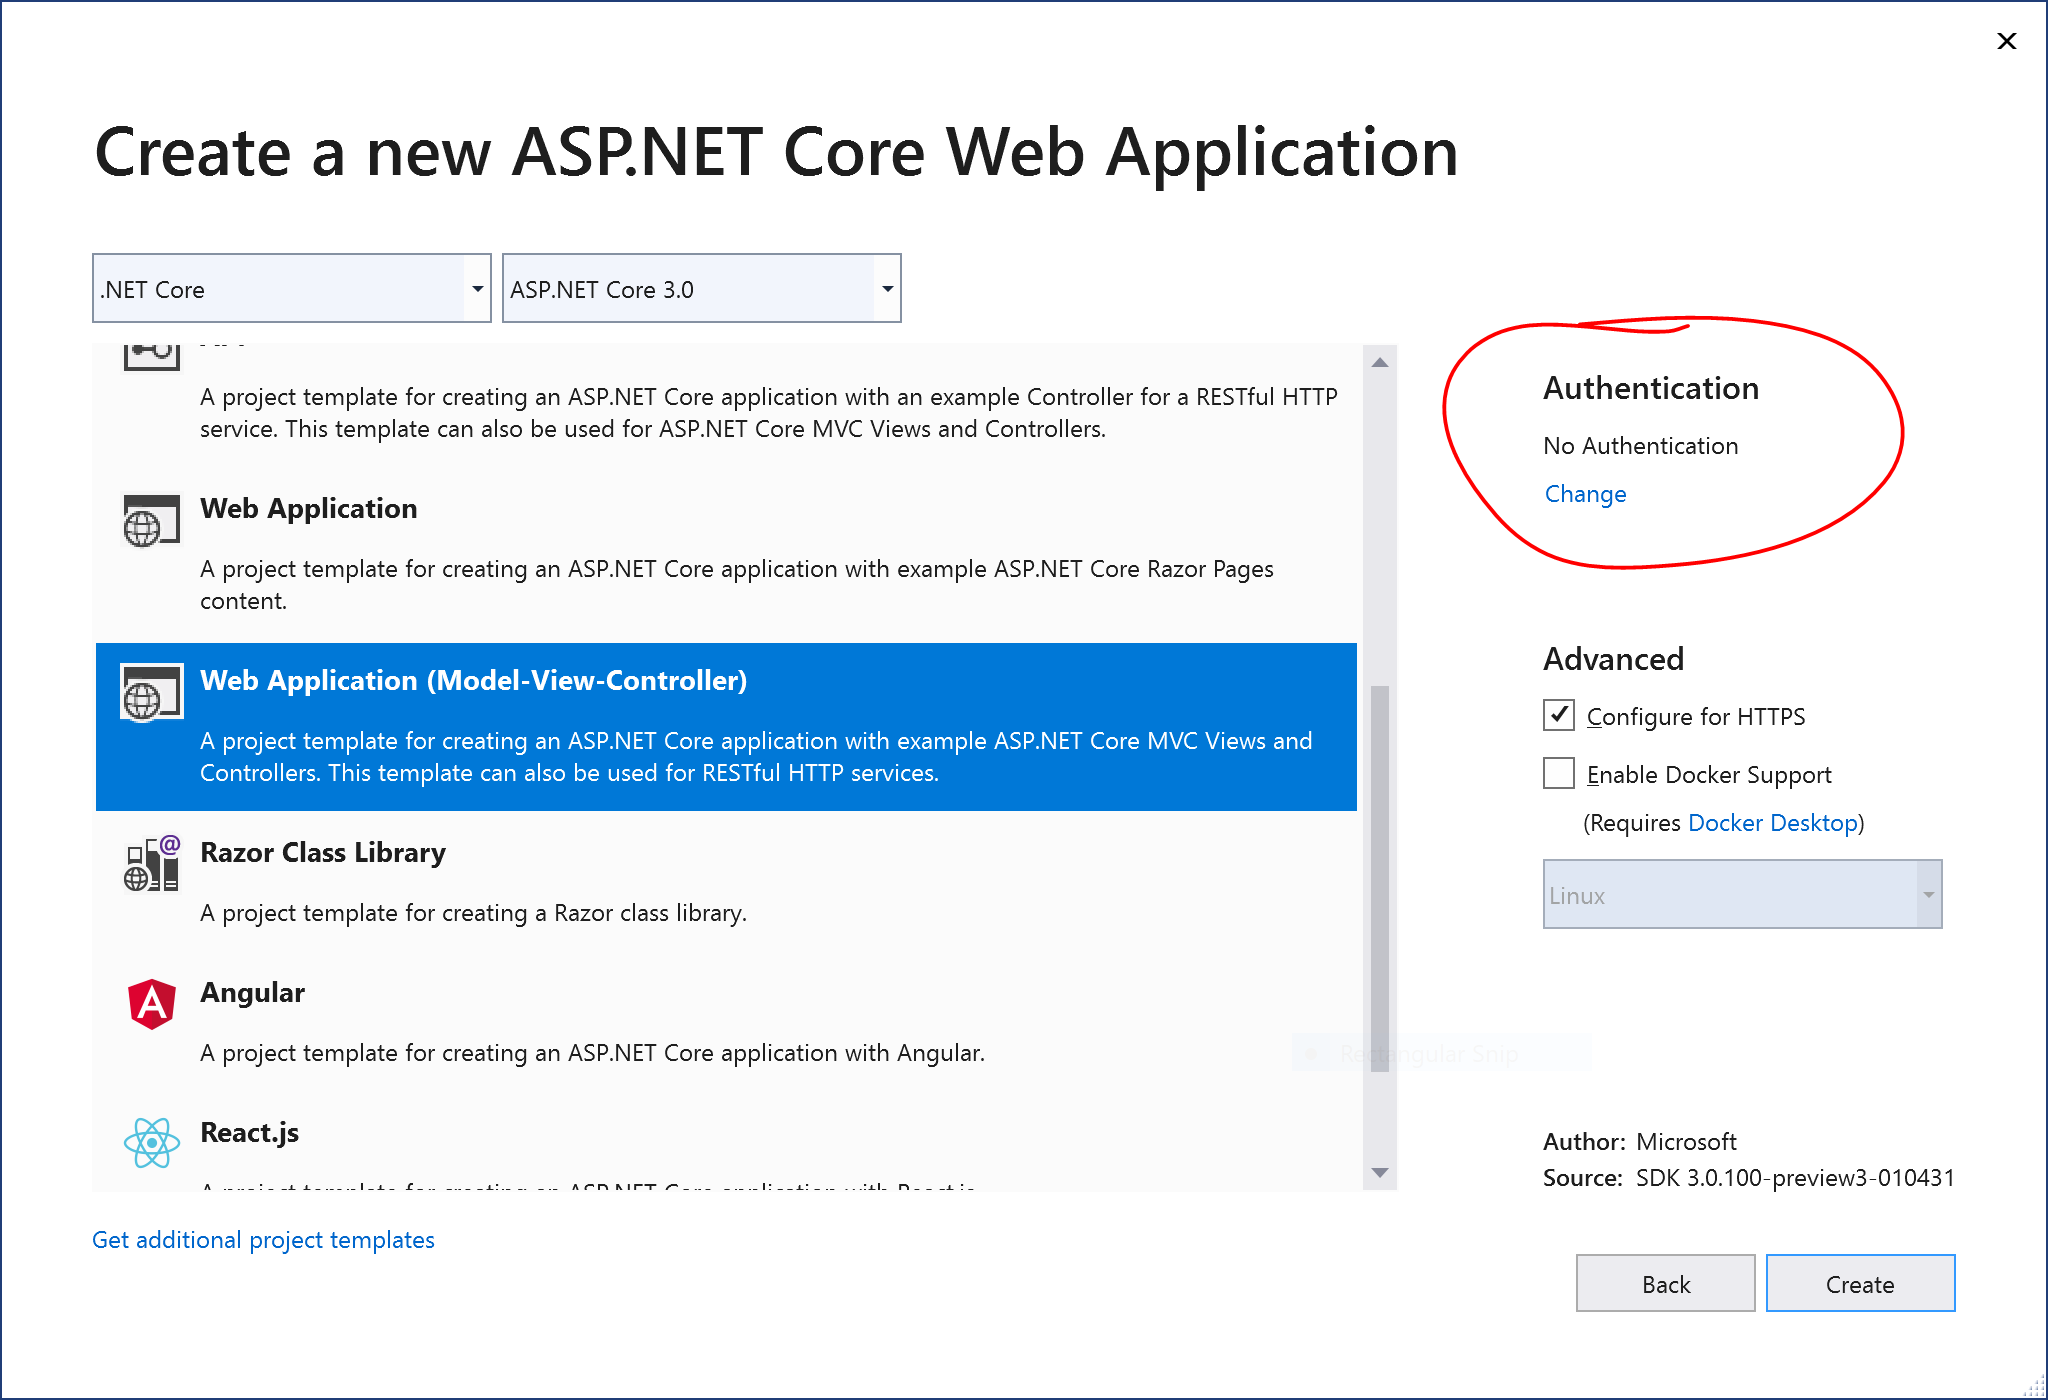
- Select .NET Core 3.0 and then ASP .NET Core 3.0 from dropdowns
- Select a project type, e.g. Empty, Web Application (Razor Pages or MVC), etc
- Click the “Change” action link in the Authentication section
This should allow you to change the authentication type to “Work or School Accounts” so that you may your organizational domain info. As always, you may select the little info buttons (lowercase i) to learn more about each field. Talk to your system administrator if you need more help on what domains to use.
NOTE: If you’re having trouble locating .NET Core 3.0 project types in Visual Studio, take a look at the previous blog post in this series on .NET Core 3.0 to get some help on how to enable it.
If you wish to skip the Splash Screen instead upon launching VS2019:
- Click “Continue without code” in the lower right area of the splash screen.
- In the top menu, click File | New | Project (or Ctrl-Shift-N)
- Follow the remaining steps outlined earlier in this section
To use CLI Commands in a Terminal window, use the dotnet new command followed by the ‐‐auth flag. The authentication type can be any of the aforementioned authentication types, e.g. Individual.
dotnet new mvc --auth Individual -o myproj
Configuring App Registration
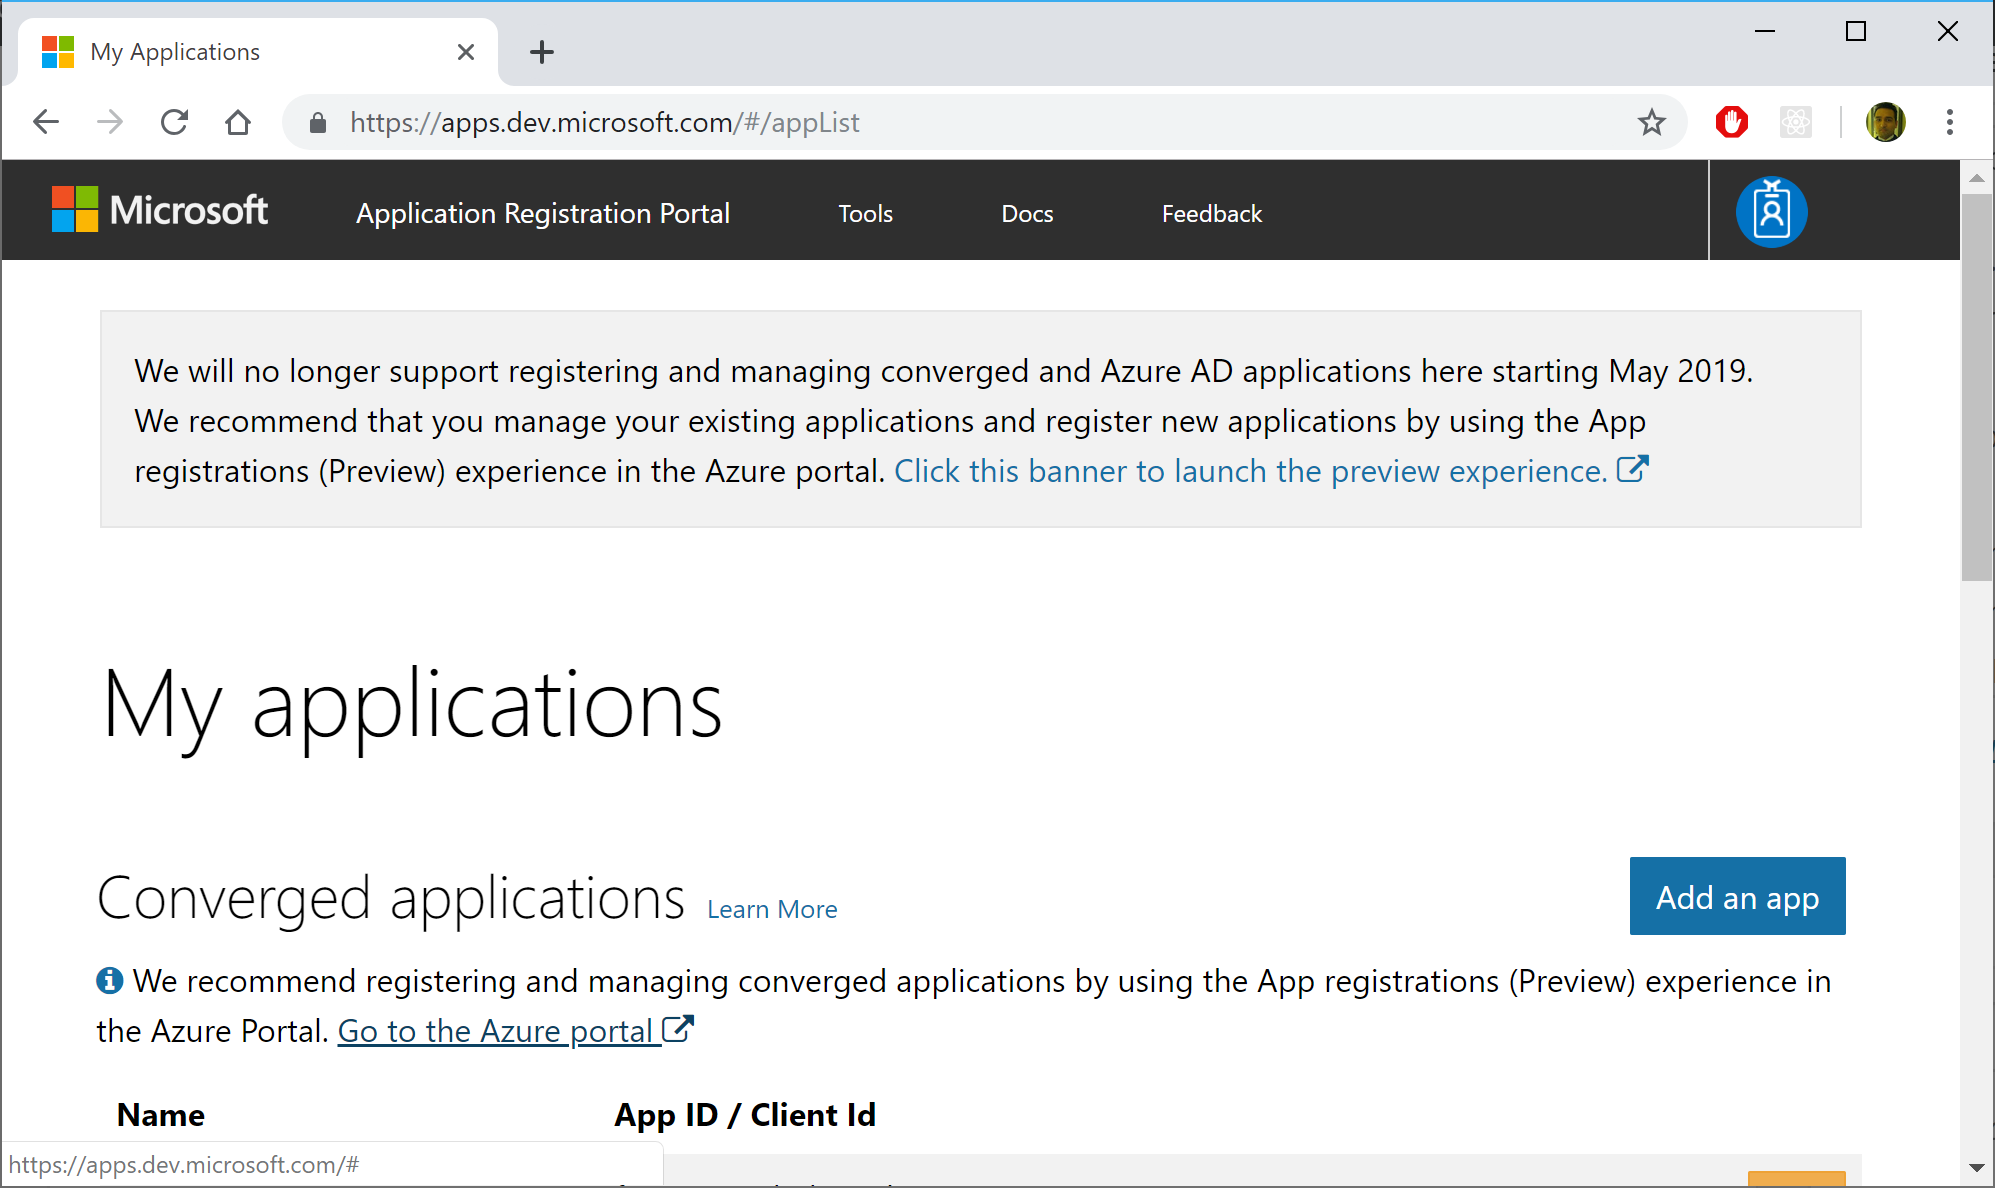
If you’ve used “Individual User Accounts” before, you’ve probably used a database to store user data, either on-premises or in the cloud. If you’ve used “Work or School Accounts” (i.e. organizational accounts), you may have the old App portal at the following URL:
- (OLD) Application Registration Portal: https://apps.dev.microsoft.com
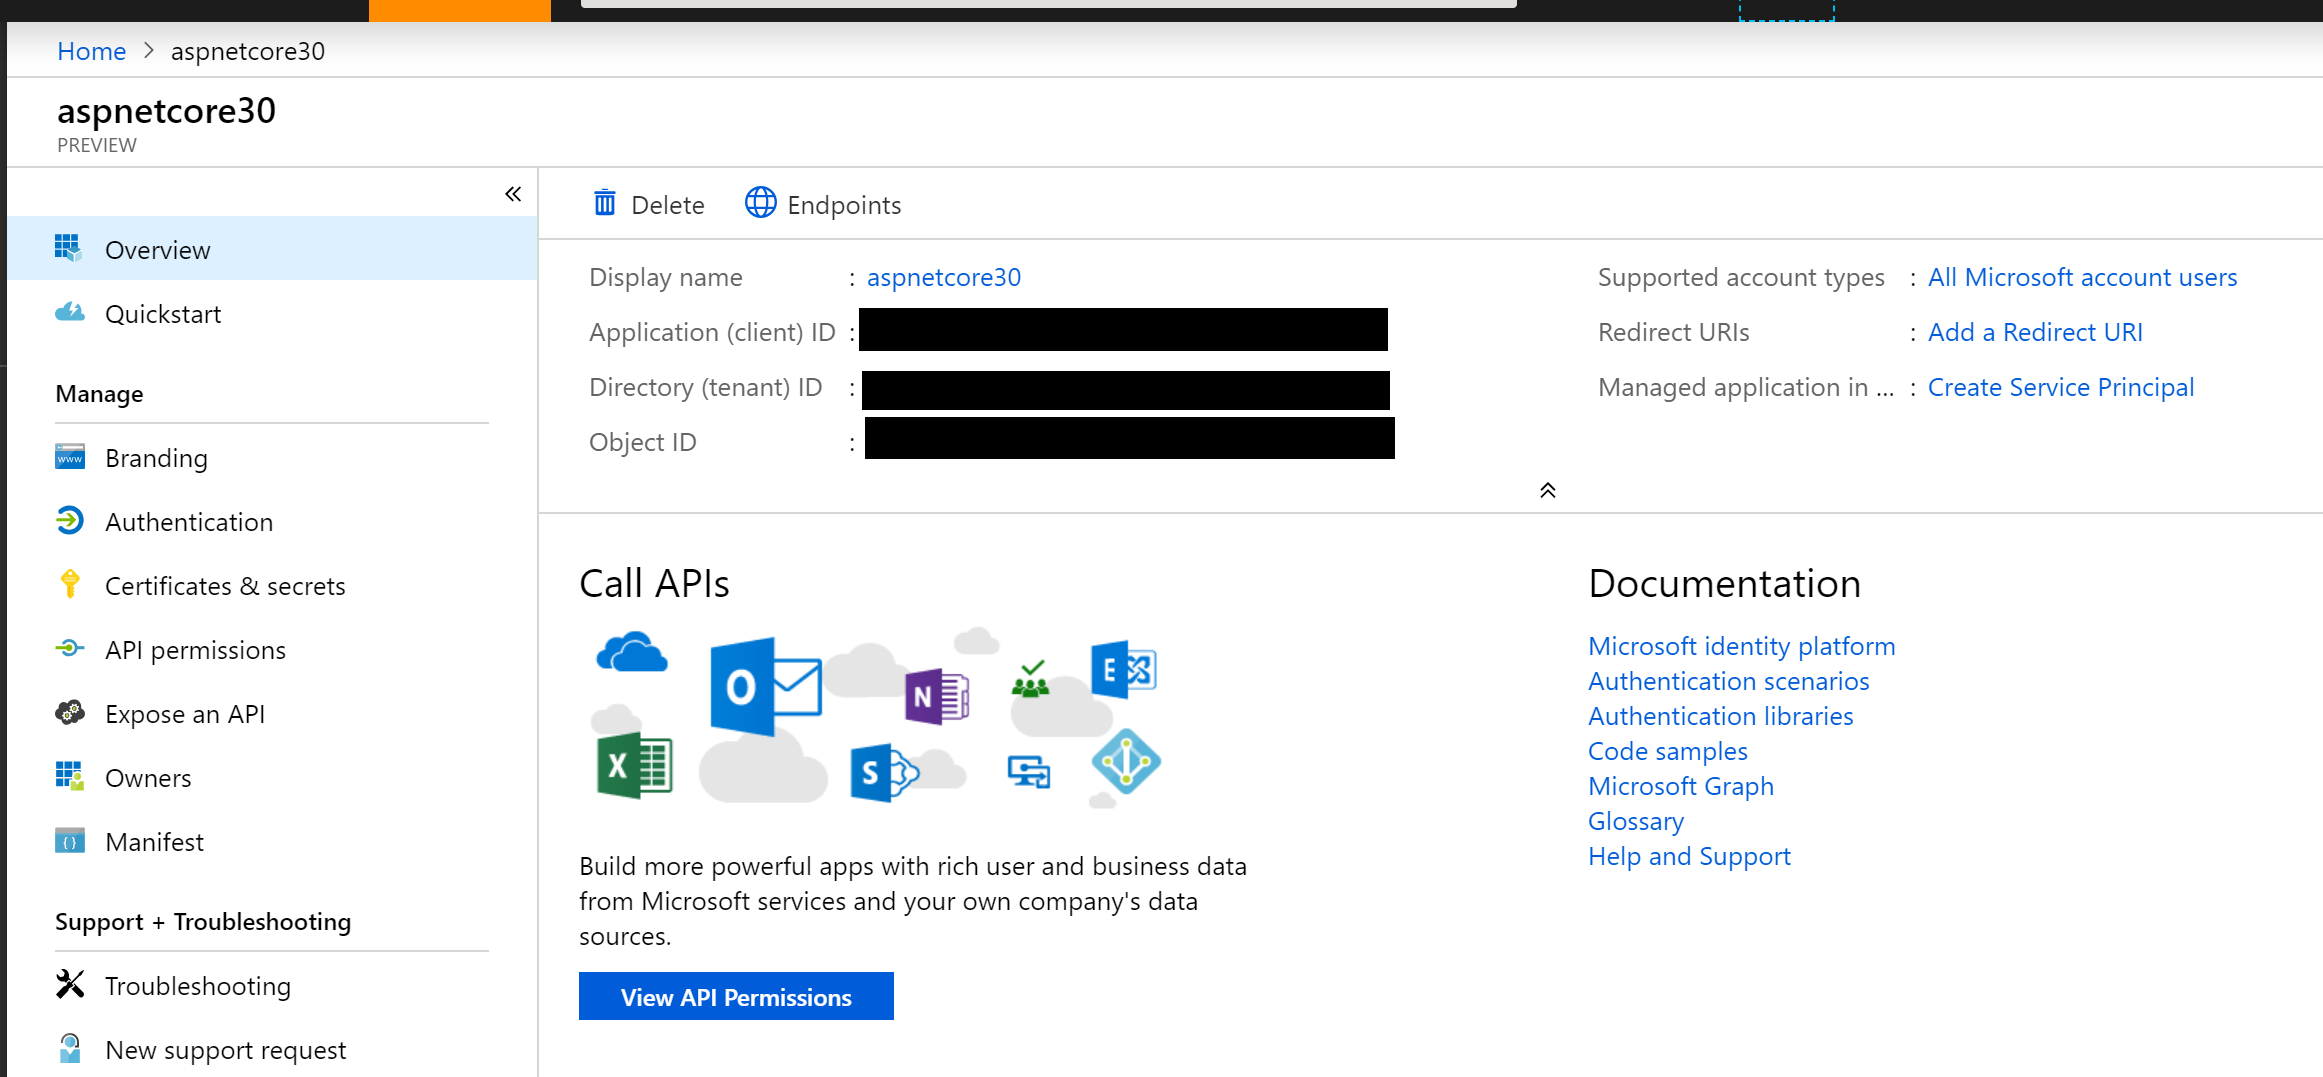
You may see a message suggesting that you should go to the Azure Portal to use the new App Registrations feature. Although this feature is currently in preview, you can start using it right now. If you click the link, it should take you directly to the App Registrations page, and may prompt you to log in first.
If you’re not clear about how you got to this screen or how to come back to it later, here’s a set of steps that may help.
- Log in to the Azure Portal
- Search for App Registrations
- Arrive at the App Registrations page
- If necessary, click the banner that takes you to the preview experience.
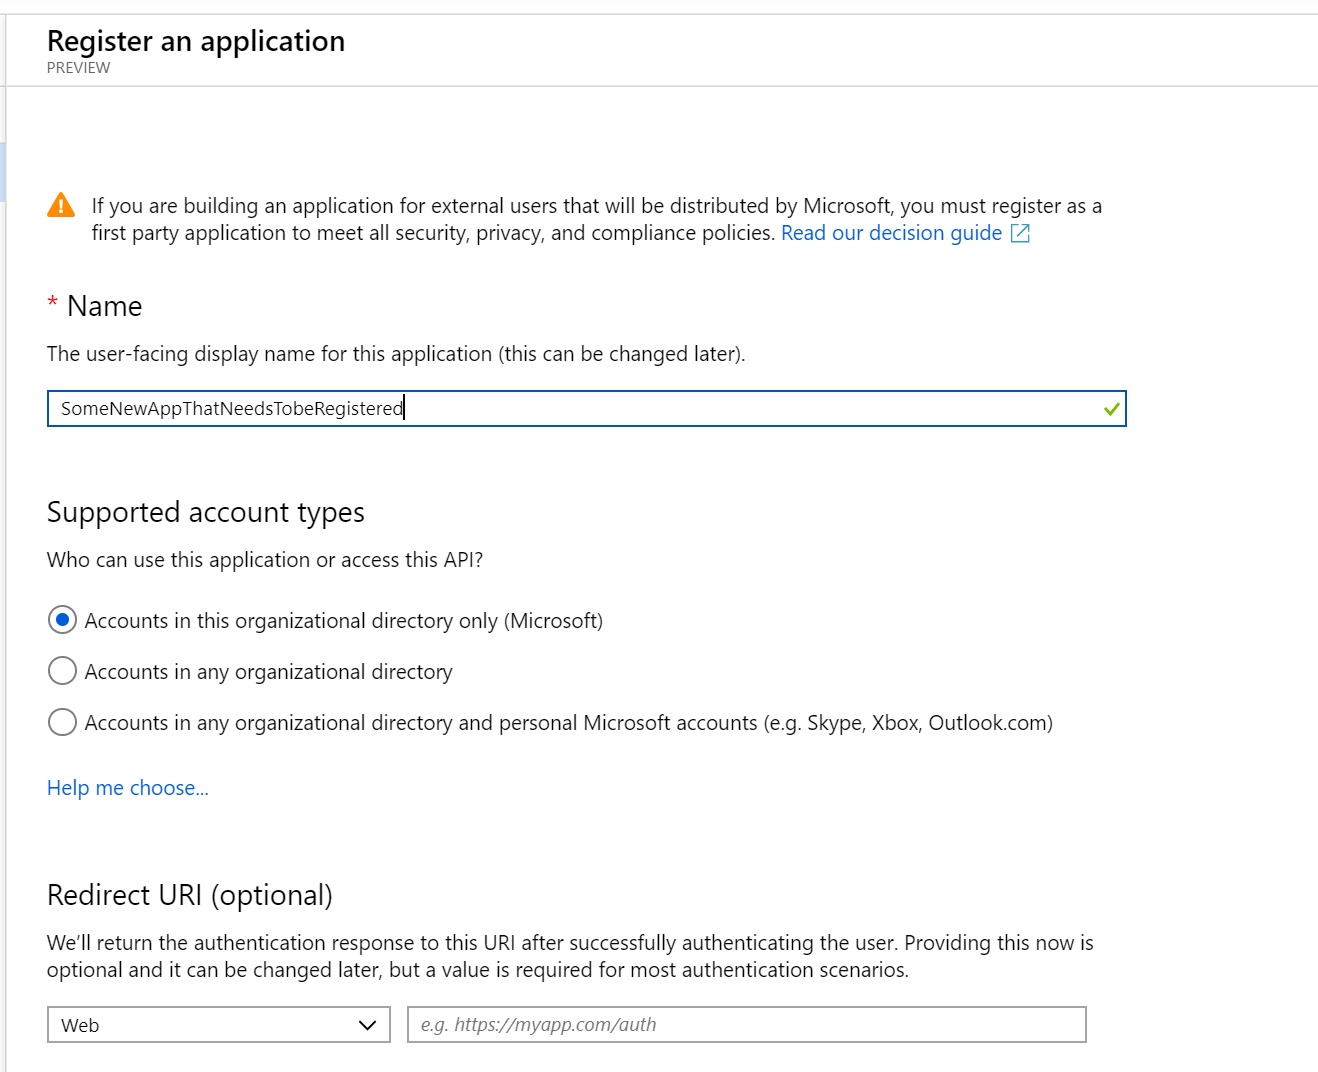
The preview experience includes both your old and new app registrations. Click “New registration” to add a new app for authentication.
In the form that follows, fill out the values for:
- Name (which you can change later)
- Account Type (your org, any org, any org + personal MSA)
- Redirect URI (where users will return after authentication)
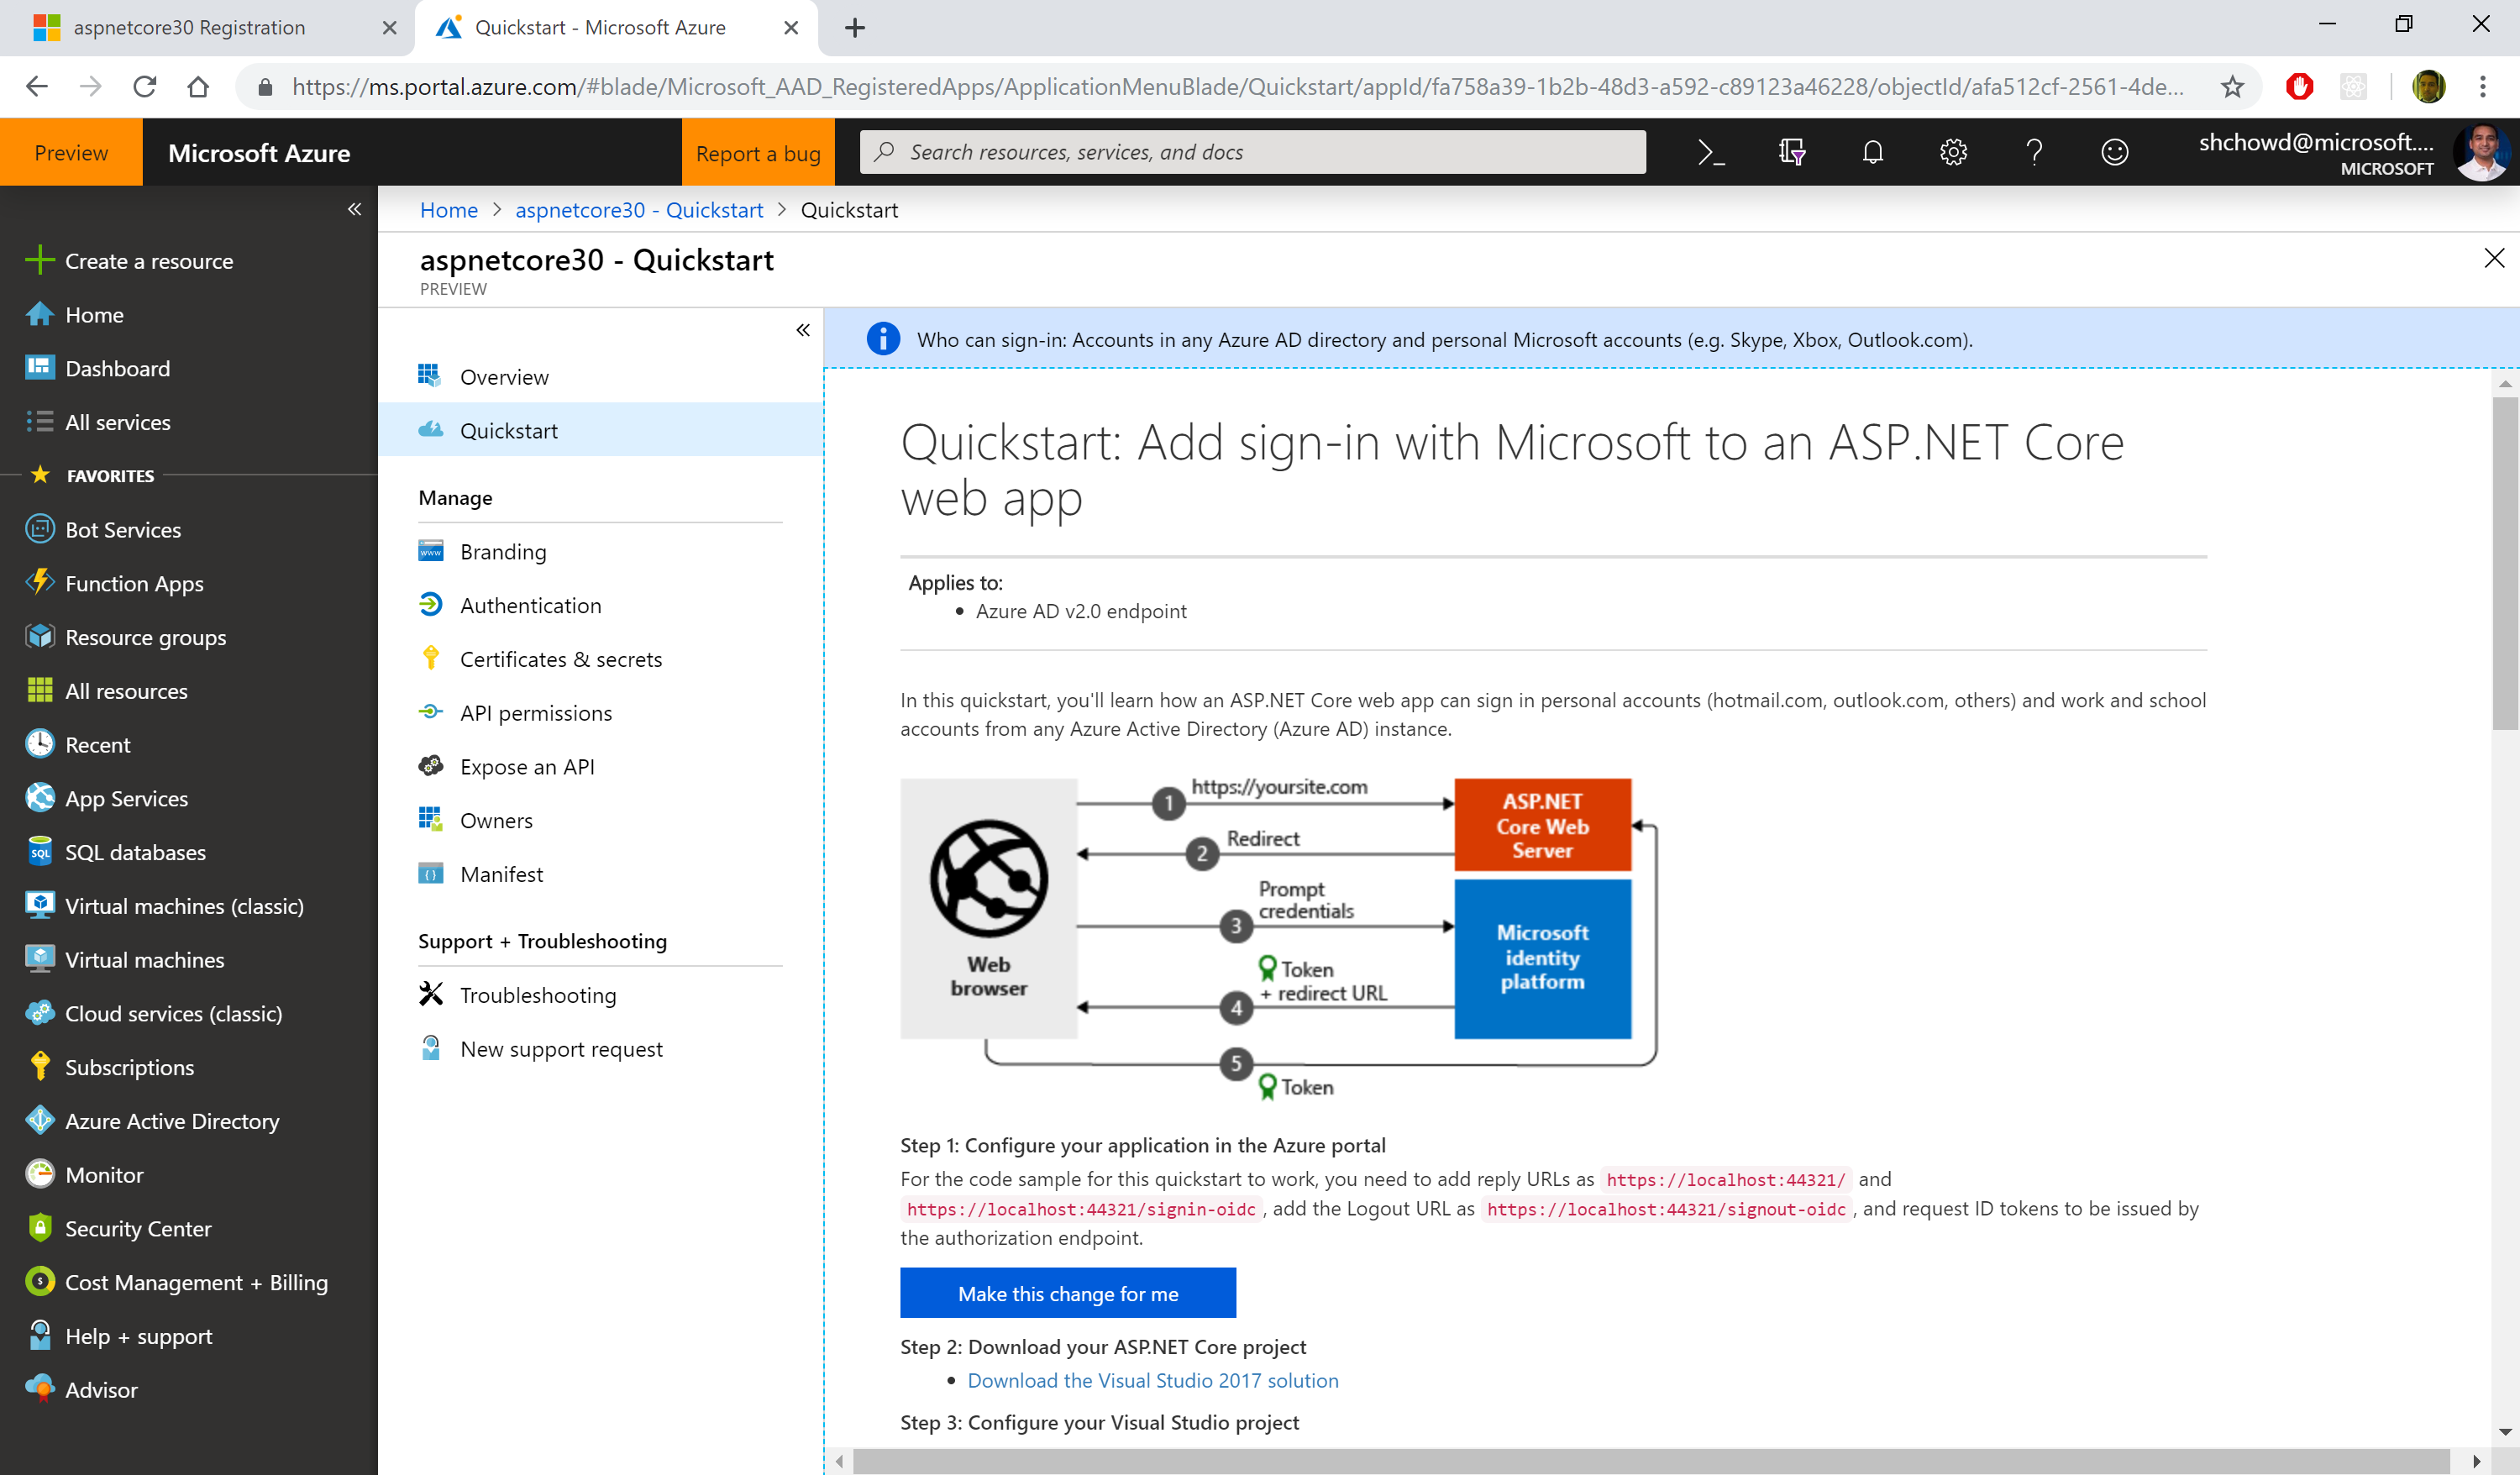
Now you should have options to configure your app and also download a pre-written application to get started. In the QuickStart section for your newly registered application (after selecting the guide for “ASP .NET Core”, you should see a button to make the changes for you and also download a configured Visual Studio application.
In the steps that follow:
- Click the “Make the changes for me” button to make the necessary configuration changes.
- Click the “Download” link to download the pre-configured Visual Studio solution.
At the time of this writing, the project type is a VS2017 application. You can download it to inspect it, but I would recommend creating a new project manually in VS2019. There are some subtle diferences between projects created by VS2019 with authentication turned on, versus what you get with the downloaded project.
For further customization using the Manifest file available to you, check out the official documentation on the Azure AD app manifest:
- Understanding the Azure Active Directory app manifest: https://docs.microsoft.com/en-us/azure/active-directory/develop/reference-app-manifest
Using Authentication in Your Code
When creating a new project in VS2019, you get the following lines of code in your ConfigureServices() method, including calls to .AddAuthentication() and .addMvc().
// contents of ConfigureServices() when created in VS2019

services.AddAuthentication(AzureADDefaults.AuthenticationScheme)
.AddAzureAD(options => Configuration.Bind("AzureAd", options));

services.AddMvc(options =>
{
   var policy = new AuthorizationPolicyBuilder()
      .RequireAuthenticatedUser()
      .Build();
      options.Filters.Add(new AuthorizeFilter(policy));
})
.AddNewtonsoftJson();
If you download the pre-configured project from the Azure portal, you may notice an additional block of code in between .AddAuthentication() and .addMVC().
// contents of ConfigureServices() when downloaded from Portal

services.AddAuthentication(AzureADDefaults.AuthenticationScheme)
.AddAzureAD(options => Configuration.Bind("AzureAd", options));

services.Configure<OpenIdConnectOptions>(AzureADDefaults.OpenIdScheme, options =>
{
   options.Authority = options.Authority + "/v2.0/";
   options.TokenValidationParameters.ValidateIssuer = false;
});

services.AddMvc(options =>
{
   var policy = new AuthorizationPolicyBuilder()
      .RequireAuthenticatedUser()
      .Build();
   options.Filters.Add(new AuthorizeFilter(policy));
})
.SetCompatibilityVersion(CompatibilityVersion.Version_2_1);
This additional block calls services.Configure<OpenIdConnectOptions>() method to set up authentication for an Azure AD v2.0 endpoint. According to the documentation displayed in the Portal itself: “All users with a work or school, or personal Microsoft account can use your application or API. This includes Office 365 subscribers. To change the supported accounts for an existing registration, use the manifest editor. Take care, as certain properties may cause errors for personal accounts.”
You can copy the this block of code manually into your VS2019 project, and refer to the sample project’s Startup.cs file.
services.Configure<OpenIdConnectOptions>(AzureADDefaults.OpenIdScheme, options =>
{
   options.Authority = options.Authority + "/v2.0/";
   options.TokenValidationParameters.ValidateIssuer = false;
});
There is also a difference in the Compatibility Version setting in the code. The downloaded project for VS2017 currently sets compatibility for v2.1 but you can manually set this to 3.0 when you create a project manually in VS2019, as seen in this snippet from the sample Startup.cs file.
services.AddMvc(options =>
{
   var policy = new AuthorizationPolicyBuilder()
      .RequireAuthenticatedUser()
      .Build();
   options.Filters.Add(new AuthorizeFilter(policy));
})
.SetCompatibilityVersion(CompatibilityVersion.Version_3_0);
Endpoint Routing in MVC
In the Configure() method of Startup.cs, the downloaded project contains familiar method calls to various Middleware components.
app.UseHttpsRedirection();
app.UseStaticFiles();
app.UseCookiePolicy();

app.UseAuthentication();

app.UseMvc(routes =>
{
   routes.MapRoute(
   name: "default",
   template: "{controller=Home}/{action=Index}/{id?}");
});
When you create an ASP .NET Core 3.0 project in VS2019, you may see the new Endpoint Routing feature, which makes it look like this:
app.UseHttpsRedirection();
app.UseStaticFiles();

app.UseRouting(routes =>
{
   routes.MapControllerRoute(
   name: "default",
   template: "{controller=Home}/{action=Index}/{id?}");
});

app.UseCookiePolicy();

app.UseAuthentication();
app.UseAuthorization();
You may notice the addition of app.UseRouting() appearing in between app.UseStaticFiles() and app.UseCookiePolicy, and there is no explicit call to app.UseMvc(). This doesn’t mean that the application is calling MVC ahead of time. Rather, the release notes explains it well:
“So think of UseRouting(…) as making a deferred routing decision – where middleware that appear after it run in the middle. Any middleware that run after routing can see the results and read or modify the route data and chosen endpoint. When processing reaches the end of the pipeline, then the endpoint is invoked.”
You can read more about this in the writeup for v3.0 Preview 2:
- ASP.NET Core updates in .NET Core 3.0 Preview 2: https://devblogs.microsoft.com/aspnet/aspnet-core-3-preview-2/
App Settings and Identity
In your appsettings.json file, you can set values for your App Settings. This includes the following AzureAd settings:
- Instance
- Domain
- ClientId
- TenantId
- CallbackPath
{
  "AzureAd": {
    "Instance": "https://login.microsoftonline.com/",
    "Domain": "<YOUR_SUB_DOMAIN>.onmicrosoft.com",
    "ClientId": "<YOUR_CLIENT_ID>",
    "TenantId": "<YOUR_TENANT_ID>",
    "CallbackPath": "/signin-oidc"
  },
  "Logging": {
    "LogLevel": {
      "Default": "Warning",
      "Microsoft.Hosting.Lifetime": "Information"
    }
  },
  "AllowedHosts": "*"
}
You can see more information on appsettings.json values in the official docs. You can also open the apssettings.json from the portal-downloaded project to get your own app’s Id values. The following documentation is specifically written for v2, but offers explains for important fields such as ClientId and TenantId.
- Microsoft identity platform ASP.NET Core web app quickstart: https://docs.microsoft.com/en-us/azure/active-directory/develop/quickstart-v2-aspnet-core-webapp
To ensure that your authentication is working correctly, you can test it out by applying the [Authorize] attribute on a controller, e.g. the HomeController.cs class.
[Authorize]
public class HomeController : Controller
{
   //
}
To get a refresher on how to use the [Authorize] attribute, check out the post on Authorization from earlier in this blog series. For more on assigning users to specific roles, check out the official documentation at the following URL:
- Role-based authorization in ASP.NET Core: https://docs.microsoft.com/en-us/aspnet/core/security/authorization/roles
Finally, take a look at the Login.partial.cshtml partial view to observe the way a user’s identity is detected and shown. Here is a snippet from the sample:
@if (User.Identity.IsAuthenticated)
{
 <li class="nav-item">
 <span class="nav-text text-dark">Hello @User.Identity.Name!</span>
 </li>
}
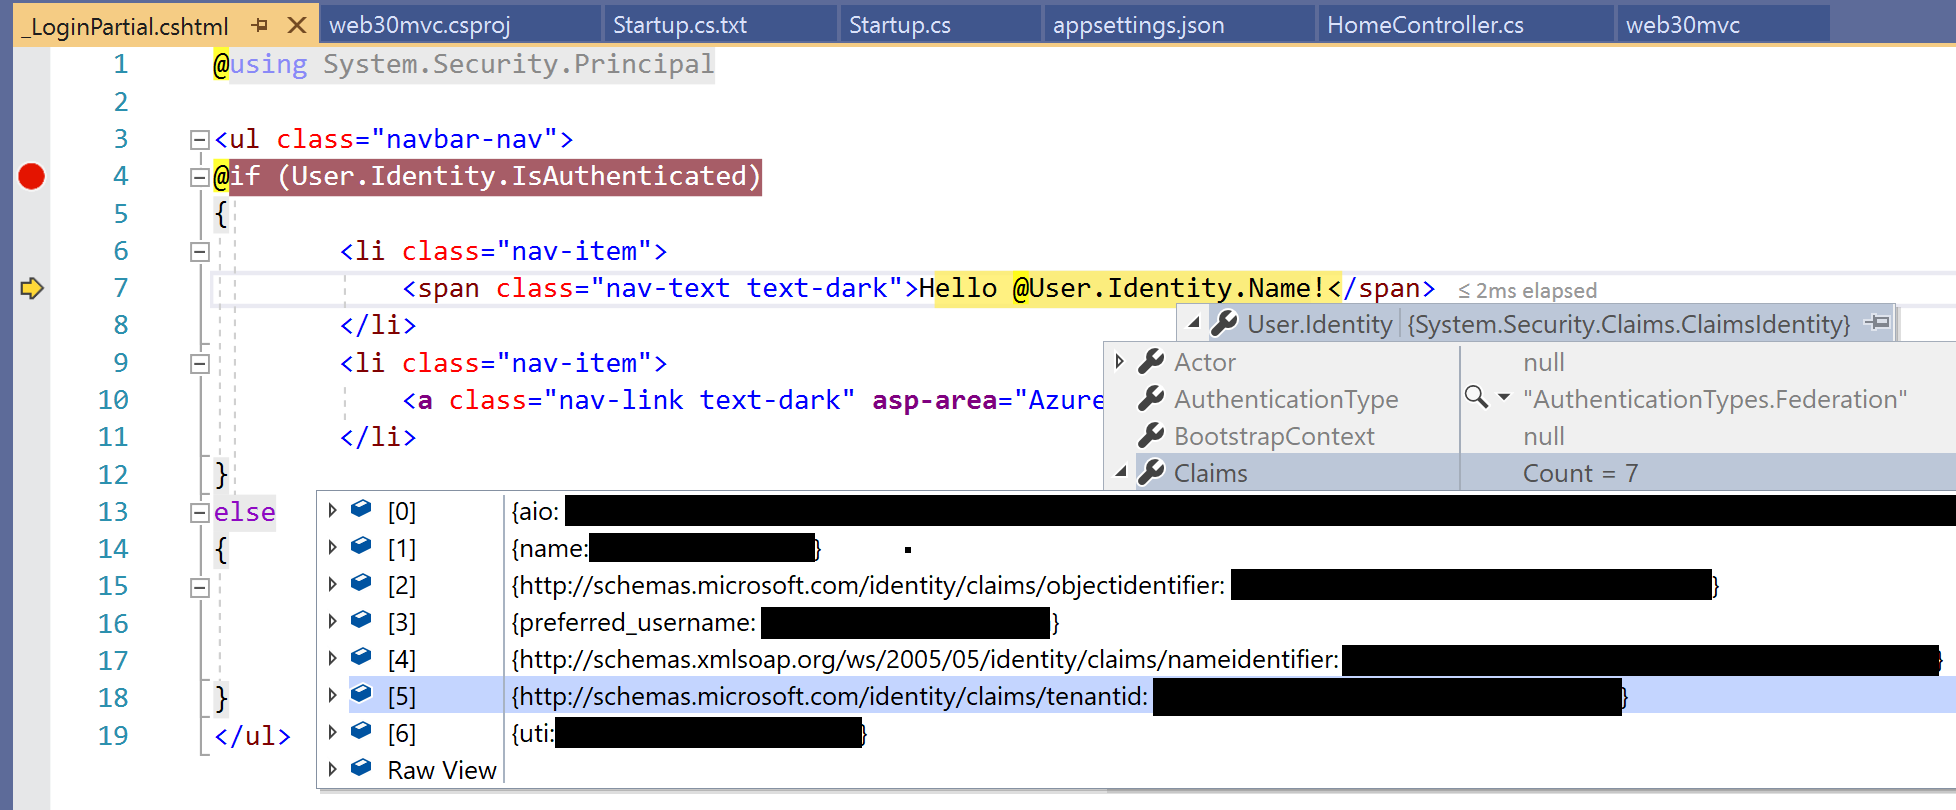
Depending on what you have access to, the User.Identity object may not contain everything you expect it to. Here are some things to take note of:
- User.Identity should be null when not logged in
- User.Identity should be non-null when logged in…
- … however, User.Identity.Name may be null even when logged in
- If User.Identity.Name is null, also check User.Identity.Claims
- User.Identity.Claims should have more than 0 values when logged in
The following screenshot shows an example of the user information in my debugging environment when logged in:
References:
- ASP.NET Blog | ASP.NET Core updates in .NET Core 3.0 Preview 2: https://devblogs.microsoft.com/aspnet/aspnet-core-3-preview-2/
- Role-based authorization in ASP.NET Core | Microsoft Docs: https://docs.microsoft.com/en-us/aspnet/core/security/authorization/roles
- Configure an application to access web APIs (Preview) | Microsoft Docs: https://docs.microsoft.com/en-us/azure/active-directory/develop/quickstart-configure-app-access-web-apis
- Understanding the Azure Active Directory app manifest | Microsoft Docs: https://docs.microsoft.com/en-us/azure/active-directory/develop/reference-app-manifest



Pingback: Dew Drop – April 17, 2019 (#2939) | Morning Dew
Pingback: The Morning Brew - Chris Alcock » The Morning Brew #2729
I’d love to see a complete article how to use and integrate Azure B2C with the new up coming Blazor, both hosting models (Client or Server side).
Thanks!
..Ben
Thanks for the suggestion. After my A-Z series is complete, I’ll be focusing on a new series with all new ASP .NET Core topics with some Azure tie-in for each new article. I’ll add this to my todo list for then. 🙂
Awesome, looking forward to it. Just be sure on Blazor you cover both models as the client code runs on different ends.
Thanks for the tips. I’ll leave the comments open as always, so that devs like you can respond with your feedback. 🙂
How do we do this with ADFS instead of Azure? We used to have an option for OnPremise when choosing Work or School account.
To enable ADFS authentication for ASP .NET Core web apps, please check out the official docs at the following URL for guidance:
https://docs.microsoft.com/en-us/aspnet/core/security/authentication/ws-federation