This is the sixteenth of a new series of posts on ASP .NET Core 3.1 for 2020. In this series, we’ll cover 26 topics over a span of 26 weeks from January through June 2020, titled ASP .NET Core A-Z! To differentiate from the 2019 series, the 2020 series will mostly focus on a growing single codebase (NetLearner!) instead of new unrelated code snippets week.
Previous post:
NetLearner on GitHub:
- Repository: https://github.com/shahedc/NetLearnerApp
- v0.16-alpha release: https://github.com/shahedc/NetLearnerApp/releases/tag/v0.16-alpha
In this Article:
- P is for Production Tips
- Deployment Slots
- Environment Configuration
- EF Core Migrations
- Scalability
- CI/CD
- Troubleshooting
- References
P is for Production Tips
After getting through more than halfway in this A-Z series, this blog post takes a step back from application code to focus on productions tips. Once you’re ready to deploy (and maintain) your web app in production, there are many tips and tricks you should be aware of. In fact, feel free to discuss with your team members and the dev community to learn about other ways developers are deploying in production.
While this article focuses on deployments to Azure App Service, you can use some of the lessons learned for your own environments. That being said, I would highly recommend taking a look at Azure for all your staging and production deployment needs.
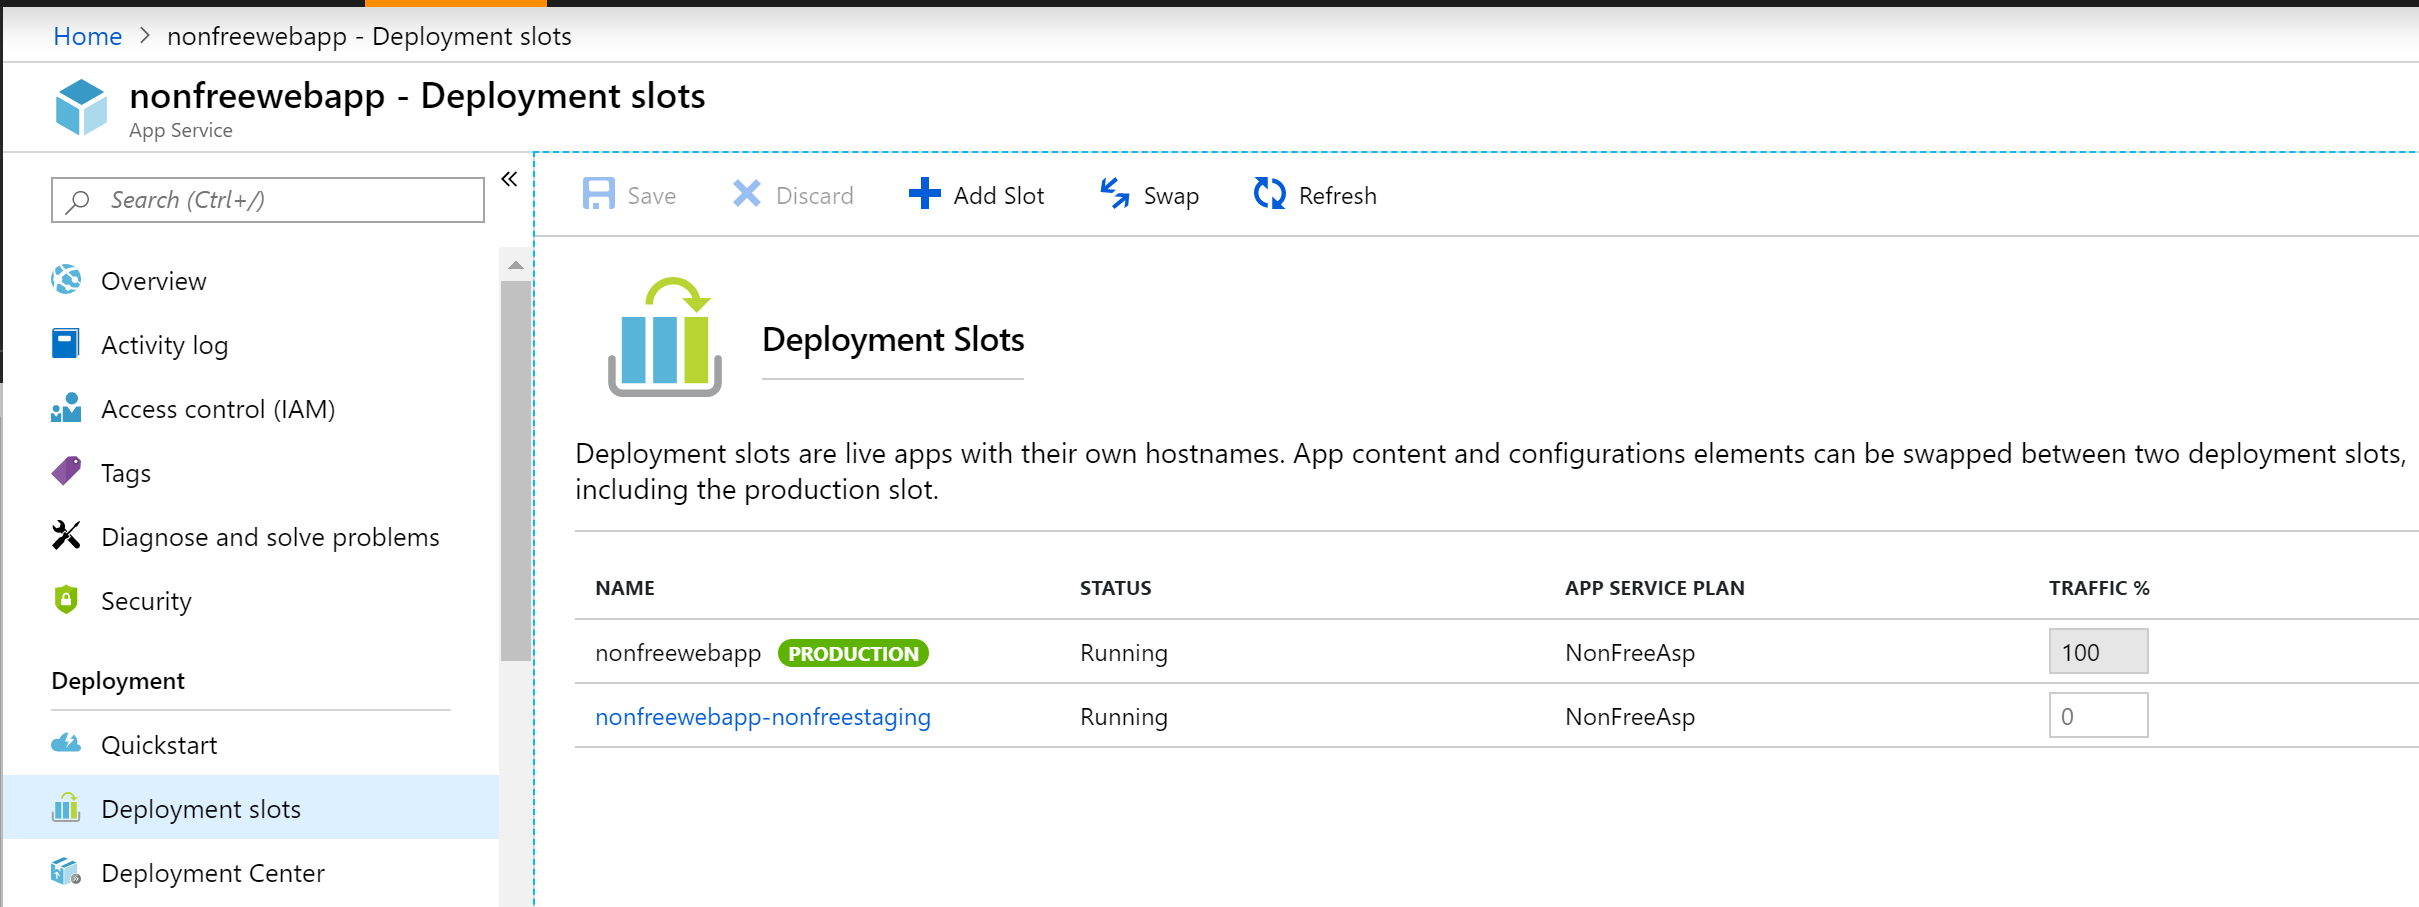
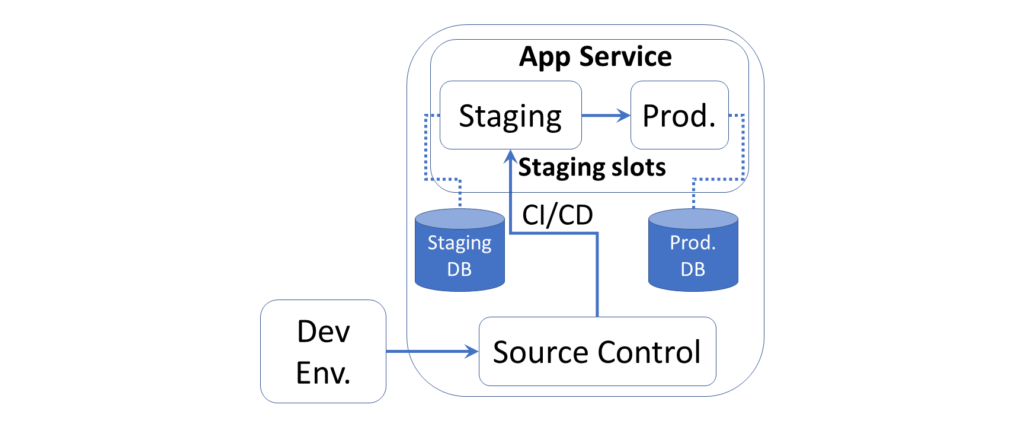
Deployment Slots
Azure makes it very easy to deploy your ASP .NET Core web application with the use of Deployment Slots. Instead of publish a web app directly to production or worrying about downtime, you can publish to a Staging Slot and the perform a “swap” operation to essentially promote your Staging environment into Production.
NOTE: To enable multiple deployment slots in Azure, you must be using an App Service in a Standard, Premium, or Isolated tier.
If you need help creating a Web App in App Service, you may refer to my blog post on the topic:
- Deploying ASP .NET Core 3.1 to Azure App Service: https://wakeupandcode.com/deploying-asp-net-core-3-1-to-azure-app-service/
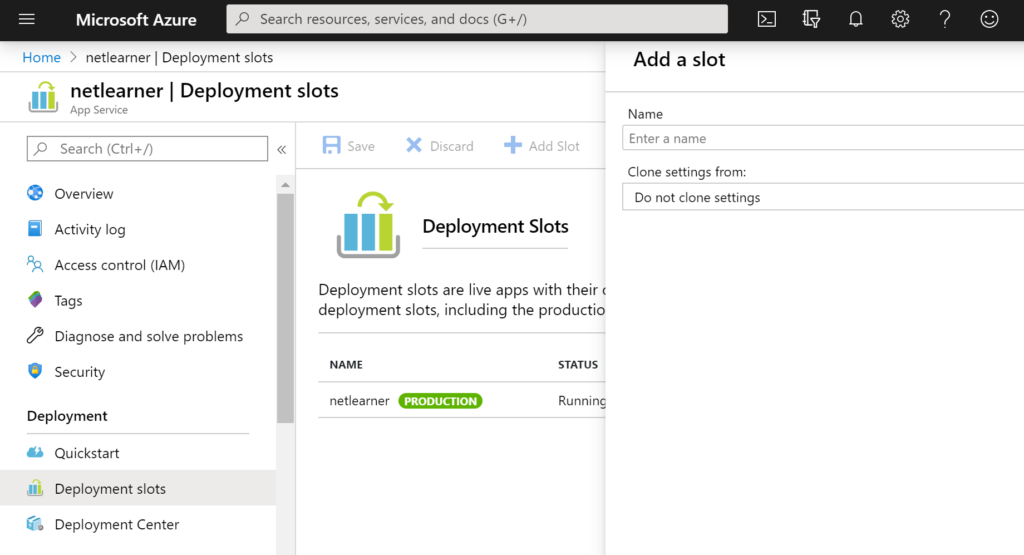
To make use of deployment slots for your Web App:
- Log in to the Azure Portal.
- Create a new Web App if you haven’t done so already.
- Locate the App Service blade for your Web App
- Enter the Deployment Slots item under Deployment
- Click + Add Slot to add a new slot
- Enter a Name, chose a source to clone settings (or not)
- Click the Add button to create a new slot
Once you set up multiple slots for staging and production, you may use the Swap feature to swap your deployed application when the staged deployment is ready to be deployed into production. Note that all slots are immediately live at the specified endpoints, e.g. hostname.azurewebsite.net.
You may also adjust website traffic by setting the Traffic % manually. From the above screenshot, you can see that the Traffic % is initially set to 0 for the newly-created slot. This forces all customer traffic to go to the Production slot by default.
When deploying your application through various means (Visual Studio Publish, Azure CLI, CI/CD from your Source Control System, etc), you may choose the exact slot when there is more than one. You may also set up “Auto-Swap” to swap a slot (e.g. staging) automatically into production, upon pushing code into that slot.
To learn more about all of the above, check out the official docs at:
- Set up staging environments for web apps in Azure App Service: https://docs.microsoft.com/en-us/azure/app-service/deploy-staging-slots
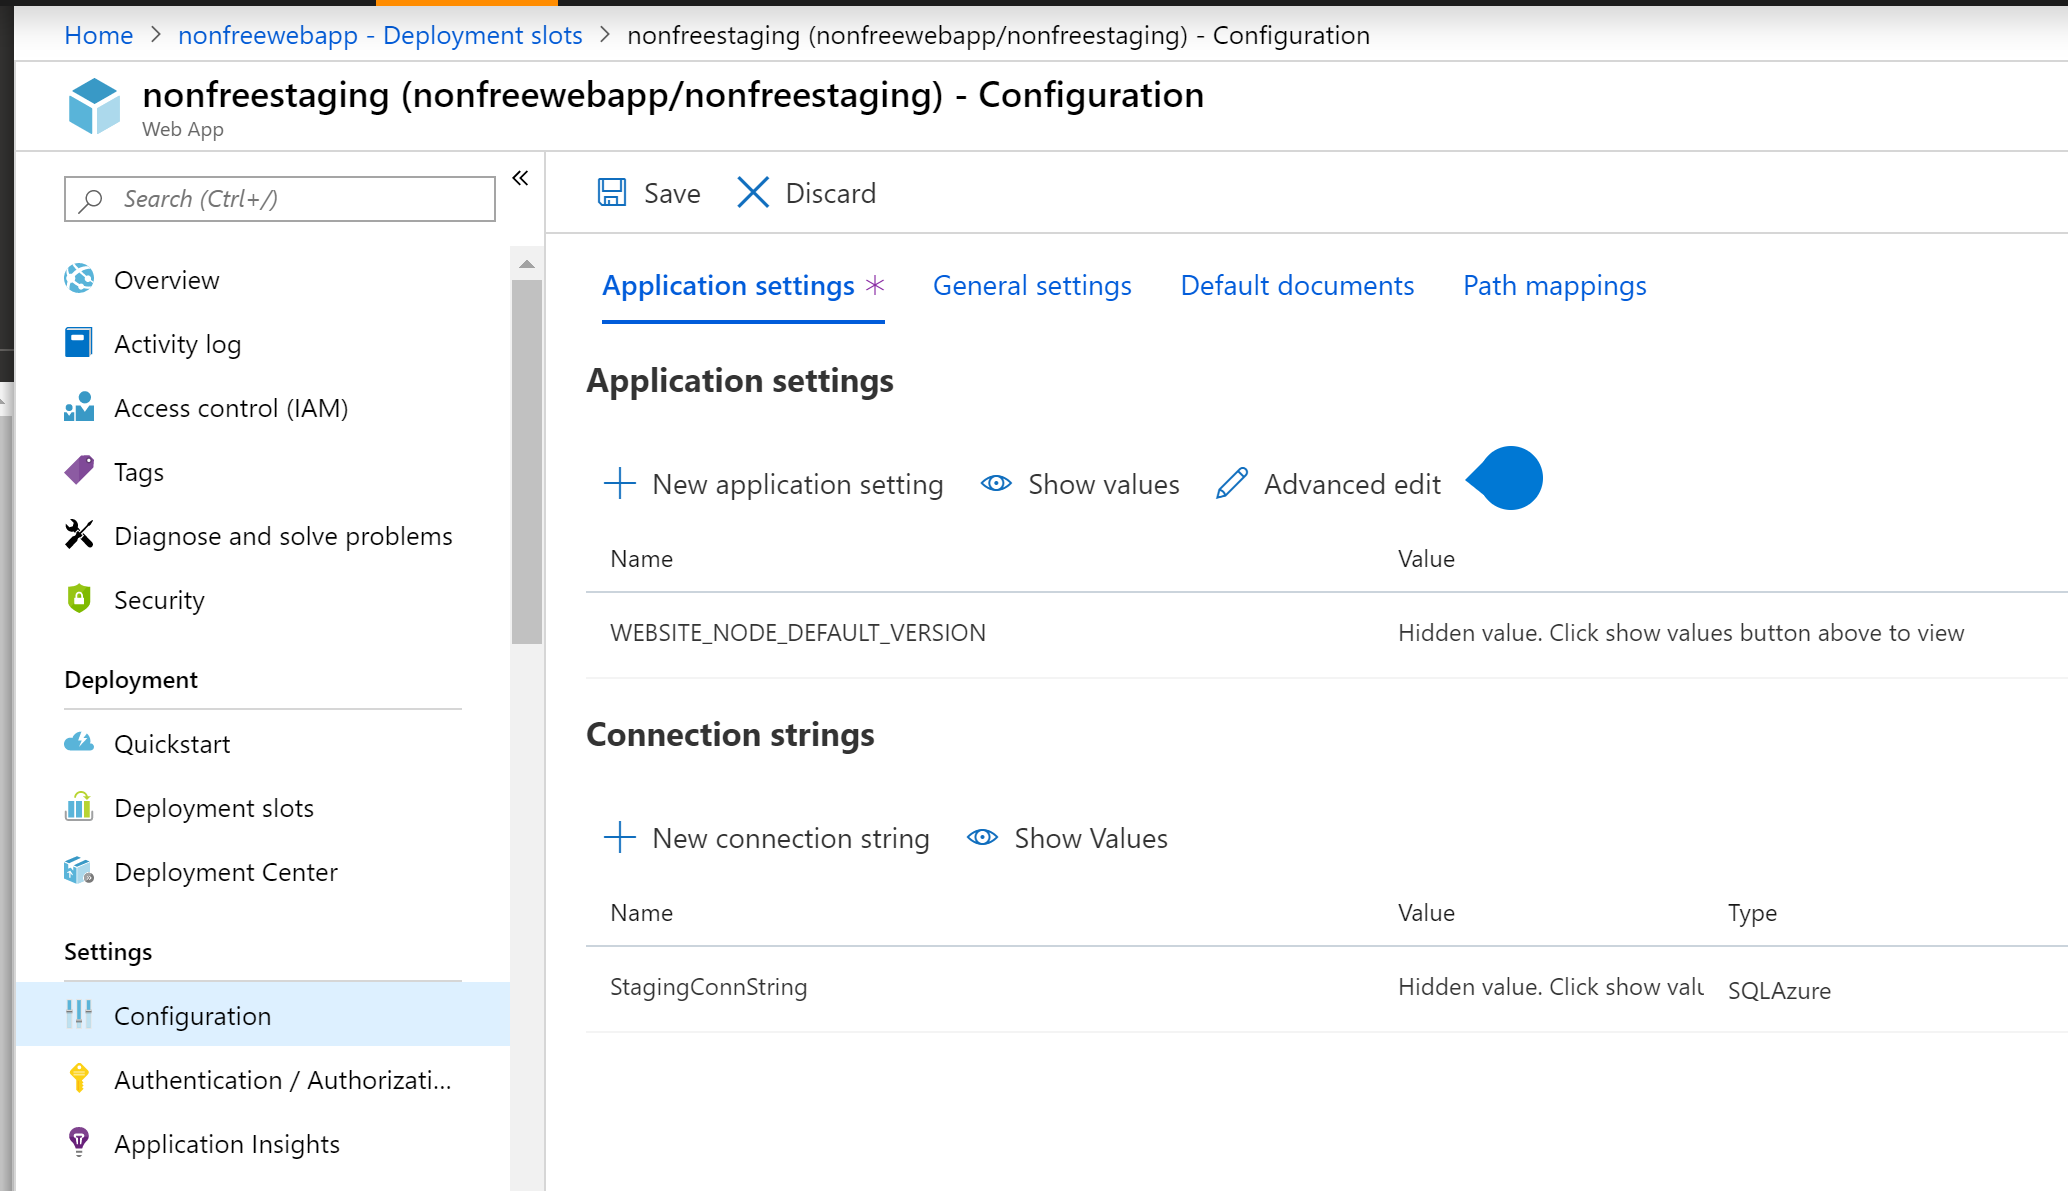
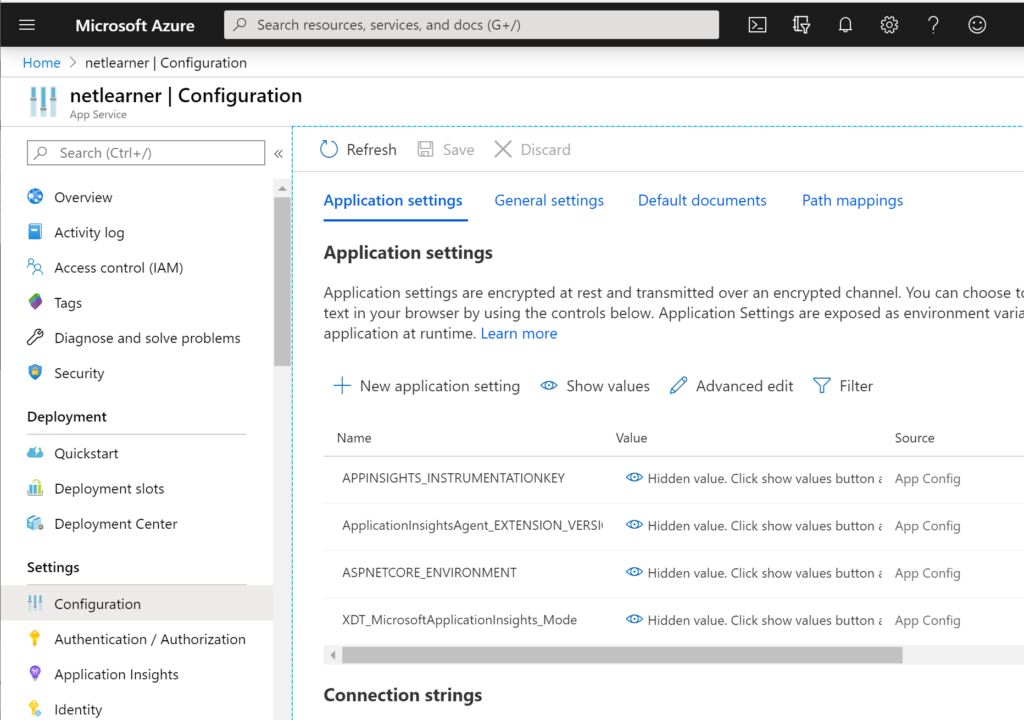
Environment Configuration
To maintain unique configuration settings for each environment (e.g. staging database vs production database connection strings), you should have unique configuration settings for each environment. This is easily accomplished using the Configuration section in the Settings category of each slot’s unique blade.
NOTE: If you need help with User Secrets for your development environment or Key Vault secrets for your server environment, consider the following posts from my 2018 series and earlier in this 2020 series:
- Your Web App Secrets in ASP .NET Core: https://wakeupandcode.com/your-web-app-secrets-in-asp-net-core/
- Key Vault for ASP .NET Core Web Apps: https://wakeupandcode.com/key-vault-for-asp-net-core-3-1-web-apps/
EF Core Migrations
You may be wondering how you can deploy structural changes from your database into production. Perhaps, you write manual SQL scripts to run in production, maybe you use a tool to generate such SQL scripts or a combination of both. Many developers aren’t aware but you can actually make use of Entity Framework Core (EF Core) Migrations to update your database structure.
To get a quick refresher on EF Core Migrations and Relationships, check out the following post:
- EF Core Migrations in ASP .NET Core: https://wakeupandcode.com/ef-core-migrations-in-asp-net-core/
- EF Core Relationships in ASP .NET Core: https://wakeupandcode.com/ef-core-relationships-in-asp-net-core-3-1/
You wouldn’t typically run your “Update Database” command in production. Instead, you could generate a SQL Script from your EF Core Migrations. This will allow you to inspect the SQL Scripts (revise them if necessary), hand them over to a DBA if appropriate and finally run the SQL Scripts in production when required.
The following PowerShell command can be run in Visual Studio’s Package Manager Console panel:
Script-Migration
The following CLI Command can be run on a Command Prompt, PowerShell prompt or VS Code Terminal window:
dotnet ef migrations script
You may set specific migrations to start from and/or end on:
Script-Migration -To <starting-migration>
Script-Migration -From <ending-migration>
You may also dump out the SQL scripts into a file for further inspection:
Script-Migration -Output "myMigrations.sql"
Scalability
If you’re deploying your web apps to Azure App Service, it’s a no-brainer to take advantage of scalability features. You could ask Azure to scale your app in various ways:
- Scale Up: Upgrade to a more powerful (and higher priced) tier to add more CPU, memory and disk space. As you’ve seen with the appearance of staging slots, upgrading to a higher tier also provides additional features. Other features include custom domains (as opposed to just subdomains under azurewebsites.net) and custom certificates.
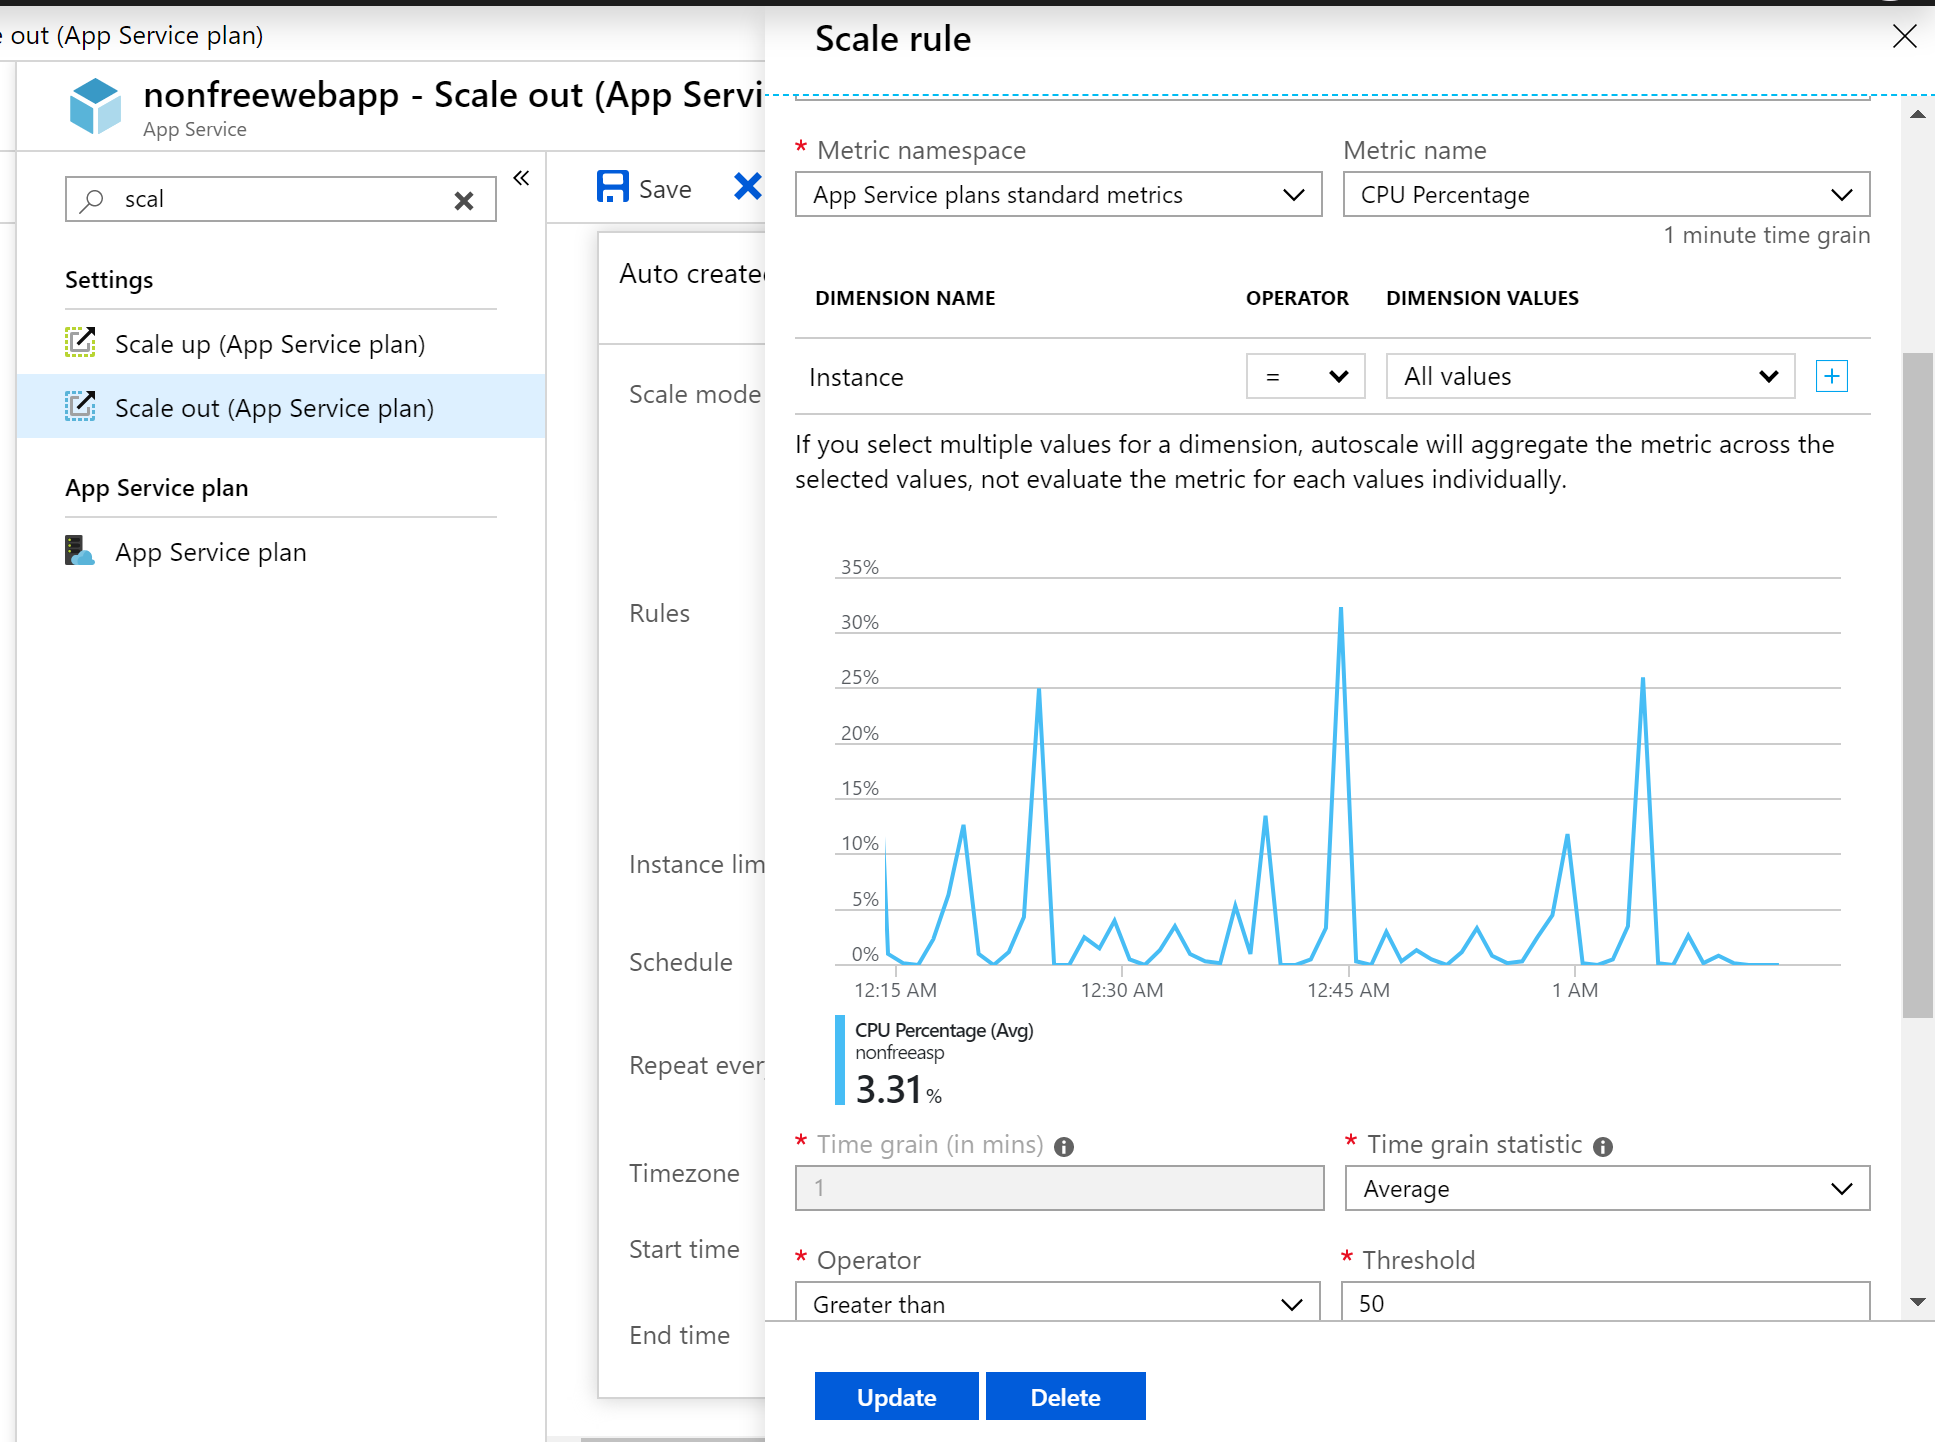
- Scale Out: Upgrade the number of VM instances that power your web app. Depending on your pricing tier, you can “scale out” your web app to dozens of instances.
- Autoscaling: When scaling out, you can choose when to scale out automatically:
- Based on a Metric: CPU %, Memory %, Disk Queue Length, Http Queue Length, Data In and Data Out.
- Up to a specific Instance Count: set a numeric value for the number of instances, set minmium and maximum.
An example of autoscaling on a metric could be: “When the CPU% is >50%, increase instance count by 1“. When you had new scaling conditions, you may also set a schedule to start/end on specific dates and also repeated on specific days of the week.
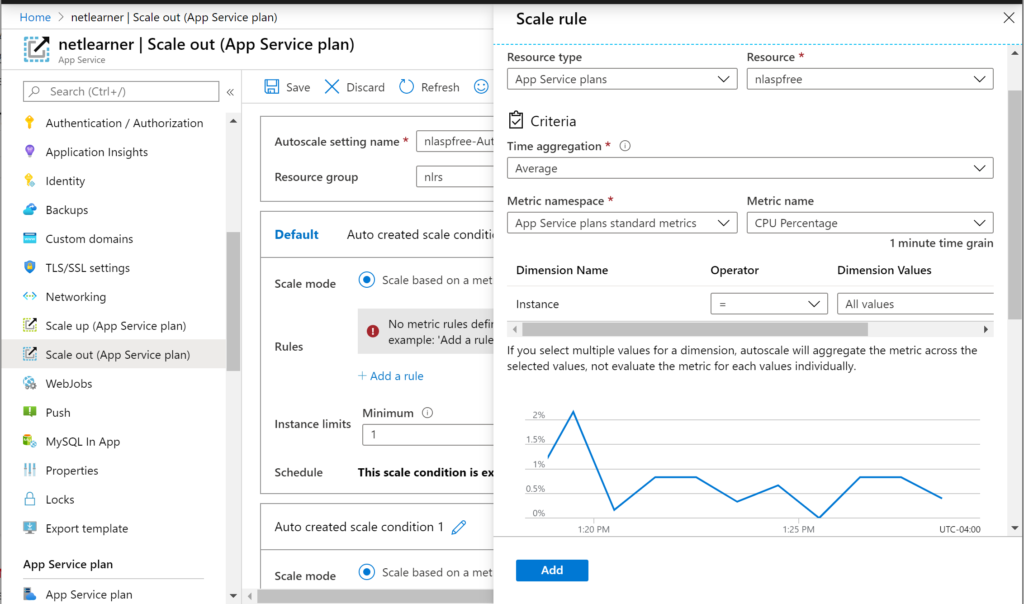
NOTE: In order to make use of Auto-Scaling, you’ll have to upgrade to the appropriate tier to do so. You can still use Manual Scaling at a lower tier. Scalability features are not available on the F1 Free Tier.
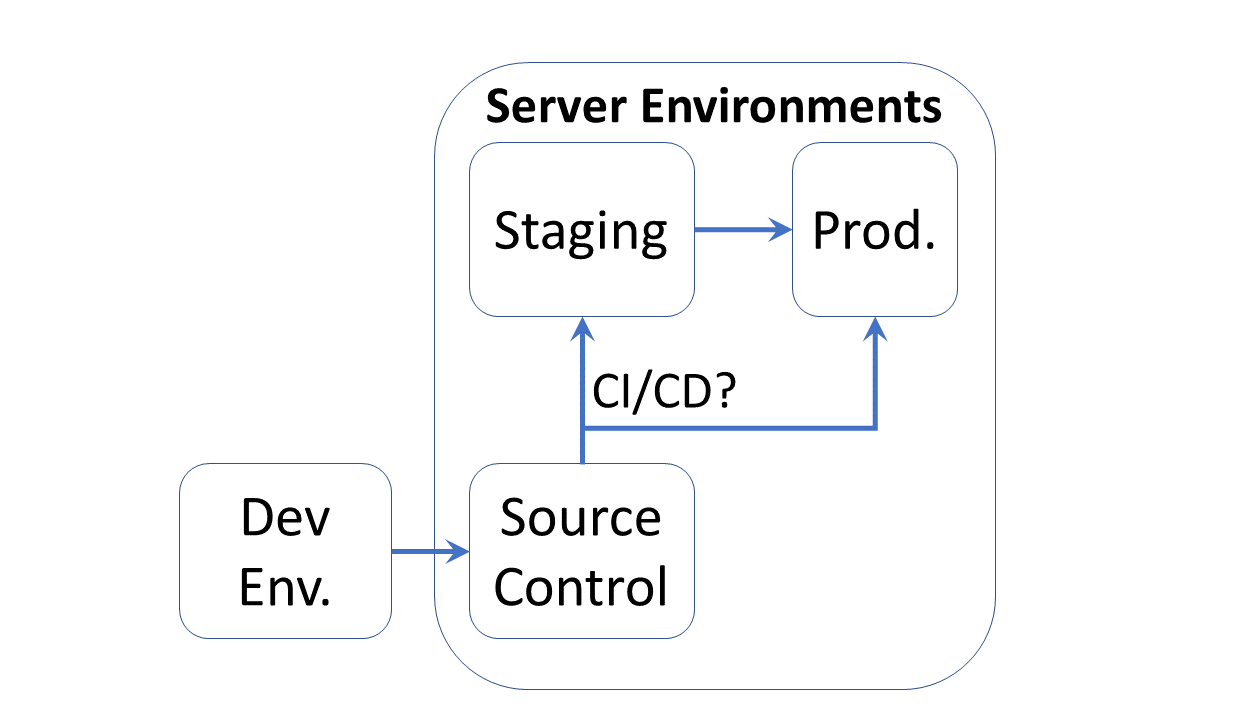
CI/CD
There are countless possibilities to make use of CI/CD (Continuous Integration and Continuous Deployment) to make sure that your code has been merged properly, with unit tests passing and deployed into the appropriate server environments. Some of your options may include one of the following: Azure Pipelines, GitHub Actions, or some other 3rd party solution.
- Azure Pipelines: an offering of Azure DevOps services, you can quickly set up CI/CD for your web app, both public and private.
- GitHub Actions: available via GitHub, the relatively-new Actions feature allows you to automate your workflow
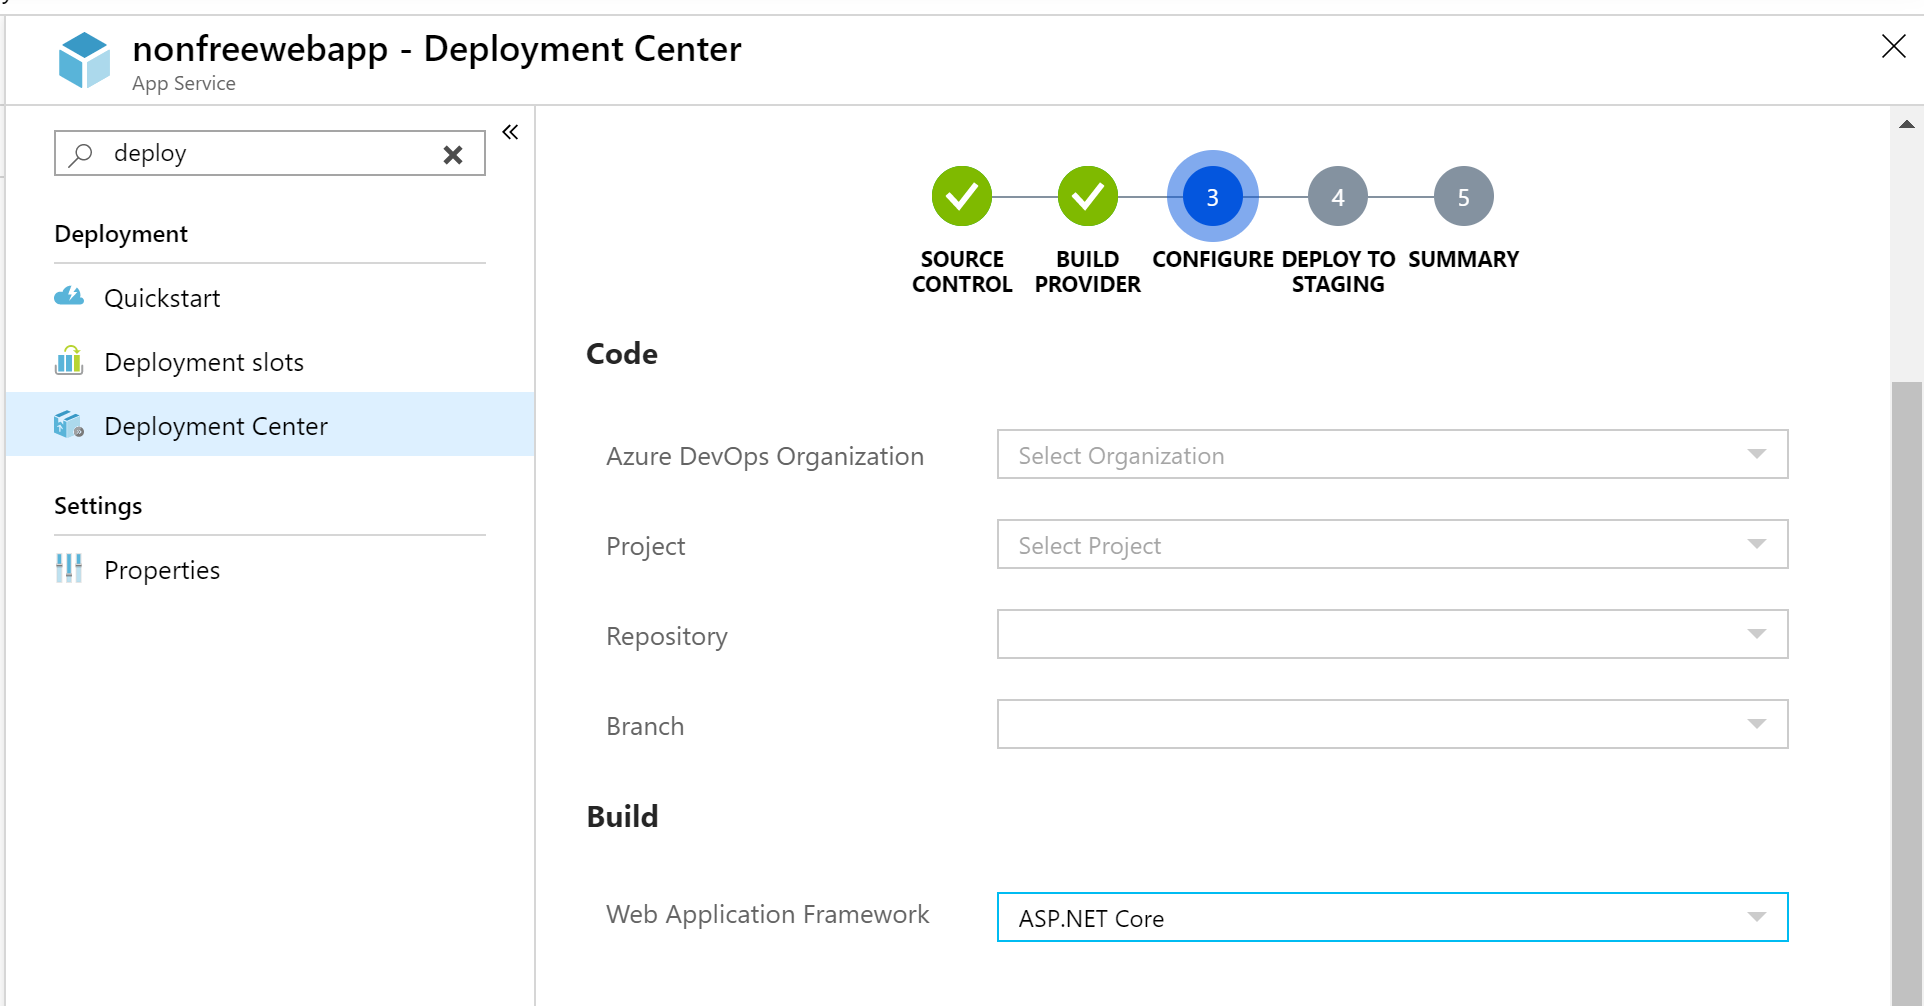
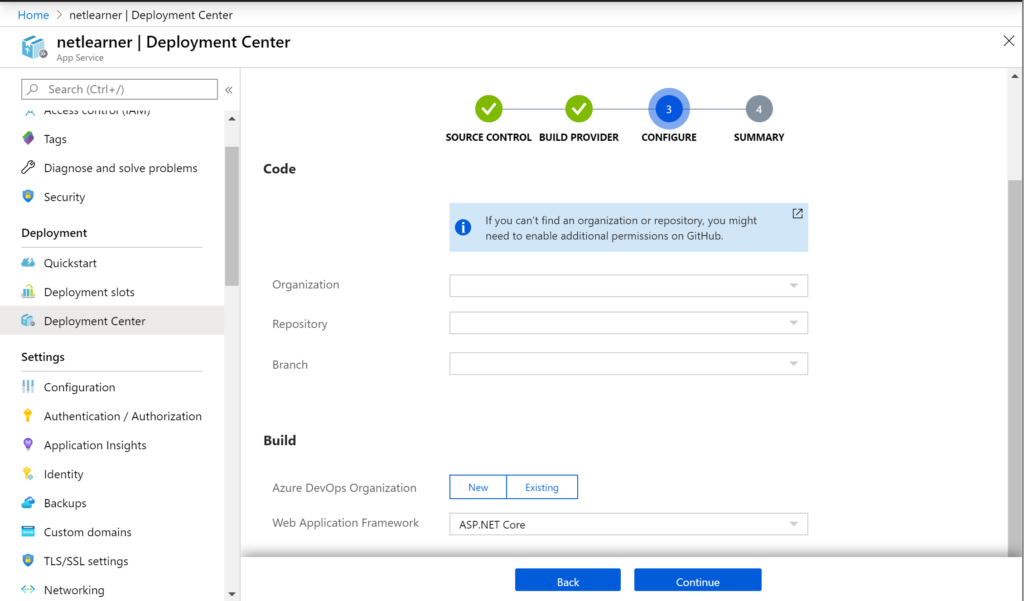
The Deployment Center feature in Azure’s App Service makes it very easy to select Azure Pipelines (under Azure Repos) for your web app. This is all part of Azure DevOps Services, formerly known as VSTS (Visual Studio Team Services)
To get started with the above options, check out the official docs at:
- Azure Pipelines: https://docs.microsoft.com/en-us/azure/devops/pipelines/?view=azure-devops
- GitHub Actions: https://github.com/features/actions
TeamCity and Octopus Deploy are also popular products in various developer communities. Whatever you end up using, make sure you and your team select the option that works best for you, to ensure that you have your CI/CD pipeline set up as early as possible.
Troubleshooting
Once your application has been deployed, you may need to troubleshoot issues that occur in Production. You can use a combination of techniques, including (but not limited to) Logging, Error Handling and Application Insights.
- Logging: From ASP .NET Core’s built-in logging provider to customizable structured logging solutions (such as Serilog), logging helps you track down bugs in any environment.
- Error Handling: Anticipating errors before they occur, and then logging errors in production help you
- Application Insights: Enabled by default in Azure’s App Service, Application Insights literally give you insight into your web application running in a cloud environment.
For more information on Logging and Error Handling, check out the earlier posts in this series:
- Logging in ASP .NET Core: https://wakeupandcode.com/logging-in-asp-net-core-3-1/
- Handling Errors in ASP .NET Core: https://wakeupandcode.com/handling-errors-in-asp-net-core-3-1/
For more information on Application Insights, check out the official documentation at:
- App Insights Overview: https://docs.microsoft.com/en-us/azure/azure-monitor/app/app-insights-overview
References
- Set up staging environments for web apps in Azure App Service: https://docs.microsoft.com/en-us/azure/app-service/deploy-staging-slots
- Use multiple environments in ASP.NET Core: https://docs.microsoft.com/en-us/aspnet/core/fundamentals/environments
- Configuration in ASP.NET Core: https://docs.microsoft.com/en-us/aspnet/core/fundamentals/configuration
- Migrations – EF Core: https://docs.microsoft.com/en-us/ef/core/managing-schemas/migrations/
- Scale up features and capacities: https://docs.microsoft.com/en-us/azure/app-service/web-sites-scale
- Azure Pipelines Documentation: https://docs.microsoft.com/en-us/azure/devops/pipelines/?view=azure-devops

 A – Z of ASP .NET Core!