Tag Archives: ASP.NET Core

RELEASE: ASP .NET Core A-Z eBook

By Shahed C on July 29, 2019

As promised, below is the initial release of the ASP .NET Core A-Z ebook. This combines the 26 blog posts from the series of ASP .NET Core articles on this website.

ASPNETCoreLogo-300x267 A – Z of ASP .NET Core!

eBook cover

eBook cover

You can find the complete ebook on GitHub using one of the links below:

Don’t miss my guest appearance on the .NET Community Standup:

    • With Jon Galloway, Damian Edwards and Scott Hanselman.
    • 5:07 -> video starts
    • 18:58 to 36:20 -> my segment
    • 36:20 to end -> just chatting

Things to note (updated):

  • The cover image was generated using the Canva mobile app
  • The eBook is still a work in progress 🙂
  • I’m using my Worker Service sample to auto-generate Word documents from each blog post by converting each article’s HTML into Word format using MariGold.OpenXHTML
  • After some tweaking, images have been manually resized per chapter. Automatic resizing doesn’t seem to work between HTML to Word conversions, but feel free to submit a Pull Request if you have suggestions on how to fix it.
  • Animated GIF images don’t work in the ebook, so a link to each original source has been included where they appear in a few chapters.
  • The content currently covers a combination of ASP .NET Core 2.2 and 3.0 (Preview). In the weeks/months ahead, the content will be updated to include Core 3.0 across the entire series.

SNEAK PEEK: ASP .NET Core A-Z eBook

By Shahed C on July 15, 2019

Over the past 26 weeks, this blog has hosted a series of ASP .NET Core articles to cover 26 different topics from A-Z. Below is a sneak peek of an upcoming eBook that will combine all 26 blog posts as 26 chapters of the book.

ASPNETCoreLogo-300x267 A – Z of ASP .NET Core!

Things to note:

  • The eBook is still a work in progress 🙂
  • I’m using my Worker Service sample to auto-generate Word documents from each blog post by converting each article’s HTML into Word format using MariGold.OpenXHTML
  • The code segments are wrapped in <pre> tags on the site, but these don’t convert easily into Word, so I’m setting each code block’s CSS style to use Courier-New fonts before the conversion
  • I also fixed a bug around converting newline characters into <br> breaks within the <pre> tags
  • Images are still broken as of this writing, as each image tends to appear in their original size, going off the page throughout each Word document. This should be fixed soon.
  • The content currently covers a combination of ASP .NET Core 2.2 and 3.0 (Preview). In the weeks/months ahead, the content will be updated to include Core 3.0 across the entire series.
  • The complete eBook will be available as a free PDF.
eBook cover

eBook cover

You can find the Worker Service sample code on GitHub:

Web Worker Service Sample: https://github.com/shahedc/WorkerServiceSample

The (unpolished) auto-generated Word documents are also available in the GitHub repo, within a “chapters” subfolder:

Stay tuned for updates!

Zero-Downtime* Web Apps for ASP .NET Core

By Shahed C on July 1, 2019

This is the twenty-sixth of a series of posts on ASP .NET Core in 2019. In this series, we’ve cover 26 topics over a span of 26 weeks from January through June 2019, titled A-Z of ASP .NET Core!

ASPNETCoreLogo-300x267 A – Z of ASP .NET Core!

In this Article:

Z is for Zero-Downtime* Web Apps for ASP .NET Core

If you’ve made it this far in this ASP .NET Core A-Z series, hopefully you’ve learned about many important topics related to ASP .NET Core web application development. As we wrap up this series with a look at tips and tricks to attempt zero-downtime, this last post itself has its own lettered A-F mini-series: Availability, Backup & Restore, CI/CD, Deployment Slots, EF Core Migrations and Feature Flags.

Zero-Downtime-Deployment

* While it may not be possible to get 100% availability 24/7/365, you can ensure a user-friendly experience free from (or at least with minimal) interruptions, by following a combination of the tips and tricks outlined below. This write-up is not meant to be a comprehensive guide. Rather, it is more of an outline with references that you can follow up on, for next steps.

Availability

To improve the availability of your ASP .NET Core web app running on Azure, consider running your app in multiple regions for HA (High Availability). To control traffic to/from your website, you may use Traffic Manager to direct web traffic to a standby/secondary region, in case the primary region is unavailable.

Consider the following 3 options, in which the primary region is always active and the secondary region may be passive (as a hot or cold standby) or active. When both are active, web requests are load-balanced between the two regions.

 Options Primary Region Secondary Region
A Active Passive, Hot Standby
B Active Passive, Cold Standby
C Active Active

If you’re running your web app in a Virtual Machine (VM) instead of Azure App Service, you may also consider Availability Sets. This helps build redundancy in your Web App’s architecture, when you have 2 or more VMs in an Availability Set. For added resiliency, use Azure Load Balancer with your VMs to load-balance incoming traffic. As an alternative to Availability Sets, you may also use Availability Zones to counter any failures within a datacenter.

Backup & Restore

Azure’s App Service lets you back up and restore your web application, using the Azure Portal or with Azure CLI commands. Note that this requires your App Service to be in at least the Standard or Premium tier, as it is not available in the Free/Shared tiers. You can create backups on demand when you wish, or schedule your backups as needed. If your site goes down, you can quickly restore your last good backup to minimize downtime.

Zero-Downtime-Backups

In addition to the app itself, the backup process also backs up the Web App’s configuration, file contents and the database connected to your app. Database types include SQL DB (aka SQL Server PaaS), MySQL and PostgreSQL. Note that these backups include a complete backup, and not incremental/delta backups.

Continuous Integration & Continuous Deployment

In the previous post, we covered CI/CD with YAML pipelines. Whether you have to fix an urgent bug quickly or just deploy a planned release, it’s important to have a proper CI/CD pipeline. This allows you to deploy new features and fixes quickly with minimal downtime.

YAML-New-Pipeline

Deployment Slots

Whether you’re deploying your Web App to App Service for the first time or the 100th time, it helps to test out your app before releasing to the public. Deployment slots make it easy to set up a Staging Slot, warm it up and swap it immediately with a Production Slot. Swapping a slot that has already been warmed up ahead of time will allow you to deploy the latest version of your Web App almost immediately.

Zero-Downtime-Slots

Note that this feature is only available in Standard, Premium or Isolated App Service tiers, as it is not available in the Free/Shared tiers. You can combine Deployment Slots with your CI/CD pipelines to ensure that your automated deployments end up in the intended slots.

EF Core Migrations in Production

We covered EF Core Migrations in a previous post, which is one way of upgrading your database in various environments (including production). But wait, is it safe to run EF Core Migrations in a production environment? Even though you can use auto-generated EF Core migrations (written in C# or outputted as SQL Scripts), you may also modify your migrations for your needs.

I would highly recommend reading Jon P Smith‘s two-part series on “Handling Entity Framework Core database migrations in production”:

What you decide to do is up to you (and your team). I would suggest exploring the different options available to you, to ensure that you minimize any downtime for your users. For any non-breaking DB changes, you should be able to migrate your DB easily. However, your site may be down for maintenance for any breaking DB changes.

Feature Flags

Introduced by the Azure team, the Microsoft.FeatureManagement package allows you to add Feature Flags to your .NET application. This enables your web app to include new features that can easily be toggled for various audiences. This means that you could potentially test out new features by deploying them during off-peak times, but toggling them to become available via app configuration.

To install the package, you may use the following dotnet command:

>dotnet add package Microsoft.FeatureManagement --version 1.0.0-preview-XYZ

… where XYZ represents the a specific version number suffix for the latest preview. If you prefer the Package Manager Console in Visual Studio, you may also use the following PowerShell command:

>Install-Package Microsoft.FeatureManagement -Version 1.0.0-preview-XYZ

By combining many/all of the above features, tips and tricks for your Web App deployments, you can release new features while minimizing/eliminating downtime. If you have any new suggestions, feel free to leave your comments.

References

YAML-defined CI/CD for ASP .NET Core

By Shahed C on June 24, 2019

This is the twenty-fifth of a series of posts on ASP .NET Core in 2019. In this series, we’ll cover 26 topics over a span of 26 weeks from January through June 2019, titled A-Z of ASP .NET Core!

ASPNETCoreLogo-300x267 A – Z of ASP .NET Core!

In this Article:

Y is for YAML-defined CI/CD for ASP .NET Core

If you haven’t heard of it yet, YAML is yet another markup language. No really, it is. YAML literally stands for Yet Another Markup Language. If you need a reference for YAML syntax and how it applies to Azure DevOps Pipelines, check out the official docs:

In the context of Azure DevOps, you can use Azure Pipelines with YAML to make it easier for you set up a CI/CD pipeline for Continuous Integration and Continuous Deployment. This includes steps to build and deploy your app. Pipelines consist of stages, which consist of jobs, which consists of steps. Each step could be a script or task. In addition to these options, a step can also be a reference to an external template to make it easier to create your pipelines.

YAML-Syntax

This article will refer to the following sample code on GitHub, which contains a Core 2.2 web project and a sample YAML file:

Web Web Project with YAML Pipeline : https://github.com/shahedc/AspNetCoreWithPipeline

Getting Started With Pipelines

To get started with Azure Pipelines in Azure DevOps:

  1. Log in at: https://dev.azure.com
  2. Create a Project for your Organization
  3. Add a new Build Pipeline under Pipelines | Builds
  4. Connect to your code location, e.g. GitHub repo
  5. Select your repo, e.g. a specific GitHub repository
  6. Configure your YAML
  7. Review your YAML and Run it

From here on forward, you may come back to your YAML here, edit it, save it, and run as necessary. You’ll even have the option to commit your YAML file “azure-pipelines.yml” into your repo, either in the master branch or in a separate branch (to be submitted as a Pull Request that can be merged).

YAML-New-Pipeline

If you need more help getting started, check out the official docs and Build 2019 content at:


To add pre-written snippets to your YAML, you may use the Task Assistant side panel to insert a snippet directly into your YAML file. This includes tasks for .NET Core builds, Azure App Service deployment and more.

YAML-Task-Assistant

OS/Environment and Runtime

From the sample repo, take a look at the sample YAML file “azure-pipelines.yml“. Near the top, there is a definition for a “pool” with a “vmImage” set to ‘windows-2019’.

pool:
 vmImage: 'windows-2019'

If I had started off with the default YAML pipeline configuration for a .NET Core project, I would probably get a vmImage value set to ‘ubuntu-latest’. This is just one of many possible values. From the official docs on Microsoft-hosted agents, we can see that Microsoft’s agent pool provides at least the following VM images across multiple platforms, e.g.

  • Visual Studio 2019 Preview on Windows Server 2019 (windows-2019)
  • Visual Studio 2017 on Windows Server 2016 (vs2017-win2016)
  • Visual Studio 2015 on Windows Server 2012R2 (vs2015-win2012r2)
  • Windows Server 1803 (win1803) – for running Windows containers
  • macOS X Mojave 10.14 (macOS-10.14)
  • macOS X High Sierra 10.13 (macOS-10.13)
  • Ubuntu 16.04 (ubuntu-16.04)

In addition to the OS/Environment, you can also set the .NET Core runtime version. This may come in handy if you need to explicitly set the runtime for your project.

steps:
- task: DotNetCoreInstaller@0
 inputs:
 version: '2.2.0'

Restore and Build

Once you’ve set up your OS/environment and runtime, you can restore and build your project. To build a specific configuration by name, you can set up a variable first to define the build configuration, and then pass in the variable name to the build step.

variables:
 buildConfiguration: 'Release'

steps:
- script: dotnet restore

- script: dotnet build --configuration $(buildConfiguration)
 displayName: 'dotnet build $(buildConfiguration)'

In the above snippet, the buildConfiguration is set to ‘Release’ so that the project is built for its ‘Release’ configuration. The displayName is a friendly name in a text string (for any step) that may include variable names as well. This is useful for observing logs and messages during troubleshooting and inspection.

Note the use of script steps to make use of dotnet commands with parameters you may already be familiar with, if you’ve been using .NET Core CLI Commands. This makes it easier to run steps without having to spell everything out. From the official docs, here are some more detailed steps for restore and build, if you wish to customize your steps and tasks further:

steps:
- task: DotNetCoreCLI@2
 inputs:
 command: restore
 projects: '**/*.csproj'
 feedsToUse: config
 nugetConfigPath: NuGet.config 
 externalFeedCredentials: <Name of the NuGet service connection>

Note that you can set your own values for an external NuGet feed to restore dependencies for your project. Once restored, you may also customize your build steps/tasks.

steps:
- task: DotNetCoreCLI@2
 displayName: Build
 inputs:
 command: build
 projects: '**/*.csproj'
 arguments: '--configuration Release'

Unit Testing and Code Coverage

Although unit testing is not required for a project to be compiled and deployed, it is absolutely essential for any real-world application. In addition to running unit tests, you may also want to measure your code coverage for those unit tests. All these are possible via YAML configuration.

From the official docs, here is a snippet to run your unit tests, that is equivalent to a “dotnet test” command for your project:

steps:
- task: DotNetCoreCLI@2
 inputs:
 command: test
 projects: '**/*Tests/*.csproj'
 arguments: '--configuration $(buildConfiguration)'

Also, here is another snippet to collect code coverage:

steps:
- task: DotNetCoreCLI@2
 inputs:
 command: test
 projects: '**/*Tests/*.csproj'
 arguments: '--configuration $(buildConfiguration) --collect "Code coverage"'

Once again, the above snippet uses the “dotnet test” command, but also adds the –collect option to enable the data collector for your test run. The text string value that follows is a friendly name that you can set for the data collector. For more information on “dotnet test” and its options, check out the docs at:

Package and Deploy

Finally, it’s time to package and deploy your application. In this example, I am deploying my web app to Azure App Service.

- task: DotNetCoreCLI@2
 inputs:
 command: publish
 publishWebProjects: True
 arguments: '--configuration $(BuildConfiguration) --output $(Build.ArtifactStagingDirectory)'
 zipAfterPublish: True 

- task: PublishBuildArtifacts@1
 displayName: 'publish artifacts'

The above snippet runs a “dotnet publlish” command with the proper configuration setting, followed by an output location, e.g. Build.ArtifactStagingDirectory. The value for the output location is one of many predefined build/system variables, e.g. System.DefaultWorkingDirectory, Build.StagingDirectory, Build.ArtifactStagingDirectory, etc. You can find out more about these variables from the official docs:

The PublishBuildArtifacts task uploads the package to a file container, ready for deployment. After your artifacts are ready, it’s time to deploy your web app to Azure, e.g. Azure App Service.

- task: AzureRmWebAppDeployment@4
 inputs:
 ConnectionType: 'AzureRM'
 azureSubscription: '<REPLACE_AZURE_SUBSCRIPTION_NAME_(ID)>'
 appType: 'webApp'
 WebAppName: 'WebProjectForPipelines'
 packageForLinux: '$(System.ArtifactsDirectory)/**/*.zip'
 enableCustomDeployment: true
 DeploymentType: 'webDeploy'

The above snippet runs msdeploy.exe using the previously-created zipped package. Note that there is a placeholder text for the Azure Subscription ID. If you use the Task Assistant panel to add a “Azure App Service Deploy” snippet, you will be prompted to select your Azure Subscription, and a Web App location to deploy to, including deployment slots if necessary. Note that the DeploymentType actually defaults to ‘webDeploy’ so setting the value may not be necessary. However, if UseWebDeploy (optional) is set to true, the DeploymentType is required.

You may use the Azure DevOps portal to inspect the progress of each step and troubleshoot any failed steps. You can also drill down into each step to see the commands that are running in the background, followed by any console messages.

YAML-Pipeline-Success

NOTE: to set up a release pipeline with multiple stages and optional approval conditions, check out the official docs at:

Triggers, Tips & Tricks

Now that you’ve set up your pipeline, how does this all get triggered? If you’ve taken a look at the sample YAML file, you will notice that the first command includes a trigger, followed by the word “master”. This ensures that the pipeline will be triggered every time code is pushed to the corresponding code repository’s master branch. When using a template upon creating the YAML file, this trigger should be automatically included for you.

trigger:
- master

To include more triggers, you may specify triggers for specific branches to include or exclude.

trigger:
 branches:
 include:
 - master
 - releases/*
 exclude:
 - releases/old*

Finally here are some tips and tricks when using YAML to set up CI/CD using Azure Pipelines:

  • Snippets: when you use the Task Assistant panel to add snippets into your YAML, be careful where you are adding each snippet. It will insert it wherever your cursor is positioned, so make sure you’ve clicked into the correction location before inserting anything.
  • Order of tasks and steps: Verify that you’ve inserted (or typed) your tasks and steps in the correct order. For example: if you try to deploy an app before publishing it, you will get an error.
  • Indentation: Whether you’re typing your YAML or using the snippets (or some other tool),  use proper indentation. You will get syntax errors of the steps and tasks aren’t indented correctly.
  • Proper Runtime/OS: Assign the proper values for the desired runtime, environment and operating system.
  • Publish Artifacts: Don’t forget to publish your artifacts before attempting to deploy the build.
  • Artifacts location: Specify the proper location(s) for artifacts when needed.
  • Authorize Permissions: When connecting your Azure Pipeline to your code repository (e.g. GitHub repo) and deployment location (e.g. Azure App Service), you will be prompted to authorize the appropriate permissions. Be aware of what permissions you’re granting.
  • Private vs Public: Both your Project and your Repo can be private or public. If you try to mix and match a public Project with a private Repo, you will get the following warning message: “You selected a private repository, but this is a public project. Go to project settings to change the visibility of the project.” 

References


XML + JSON Serialization in ASP .NET Core

By Shahed C on June 17, 2019

This is the twenty-fourth of a series of posts on ASP .NET Core in 2019. In this series, we’ll cover 26 topics over a span of 26 weeks from January through June 2019, titled A-Z of ASP .NET Core!

ASPNETCoreLogo-300x267 A – Z of ASP .NET Core!

In this Article:

X is for XML + JSON Serialization

XML (eXtensible Markup Language) is a popular document format that has been used for a variety of applications over the years, including Microsoft Office documents, SOAP Web Services, application configuration and more. JSON (JavaScript Object Notation) was derived from JavaScript, but has also been used for storing data in both structured and unstructured formats, regardless of language used. In fact, ASP .NET Core applications switched from XML-based .config files to JSON-based .json settings files for application configuration.

XmlJsonSerialization

This article will refer to the following sample code on GitHub, derived from the guidance provided in the official documentation + sample:

Web XML + JSON Serialization : https://github.com/shahedc/XmlJsonSerialization

Returning JsonResult and IActionResult

Before we get into XML serialization, let’s start off with JSON Serialization first, and then we’ll get to XML. If you run the Web API sample project for this blog post, you’ll notice a CIController.cs file that represents a “Cinematic Item Controller” that expose API endpoints. These endpoints can serve up both JSON and XML results of Cinematic Items, i.e. movies, shows and shorts in a Cinematic Universe.

Run the application and navigate to the following endpoint in an API testing tool, e.g. Postman:

  • https://localhost:44372/api/ci/

Serialization-Get

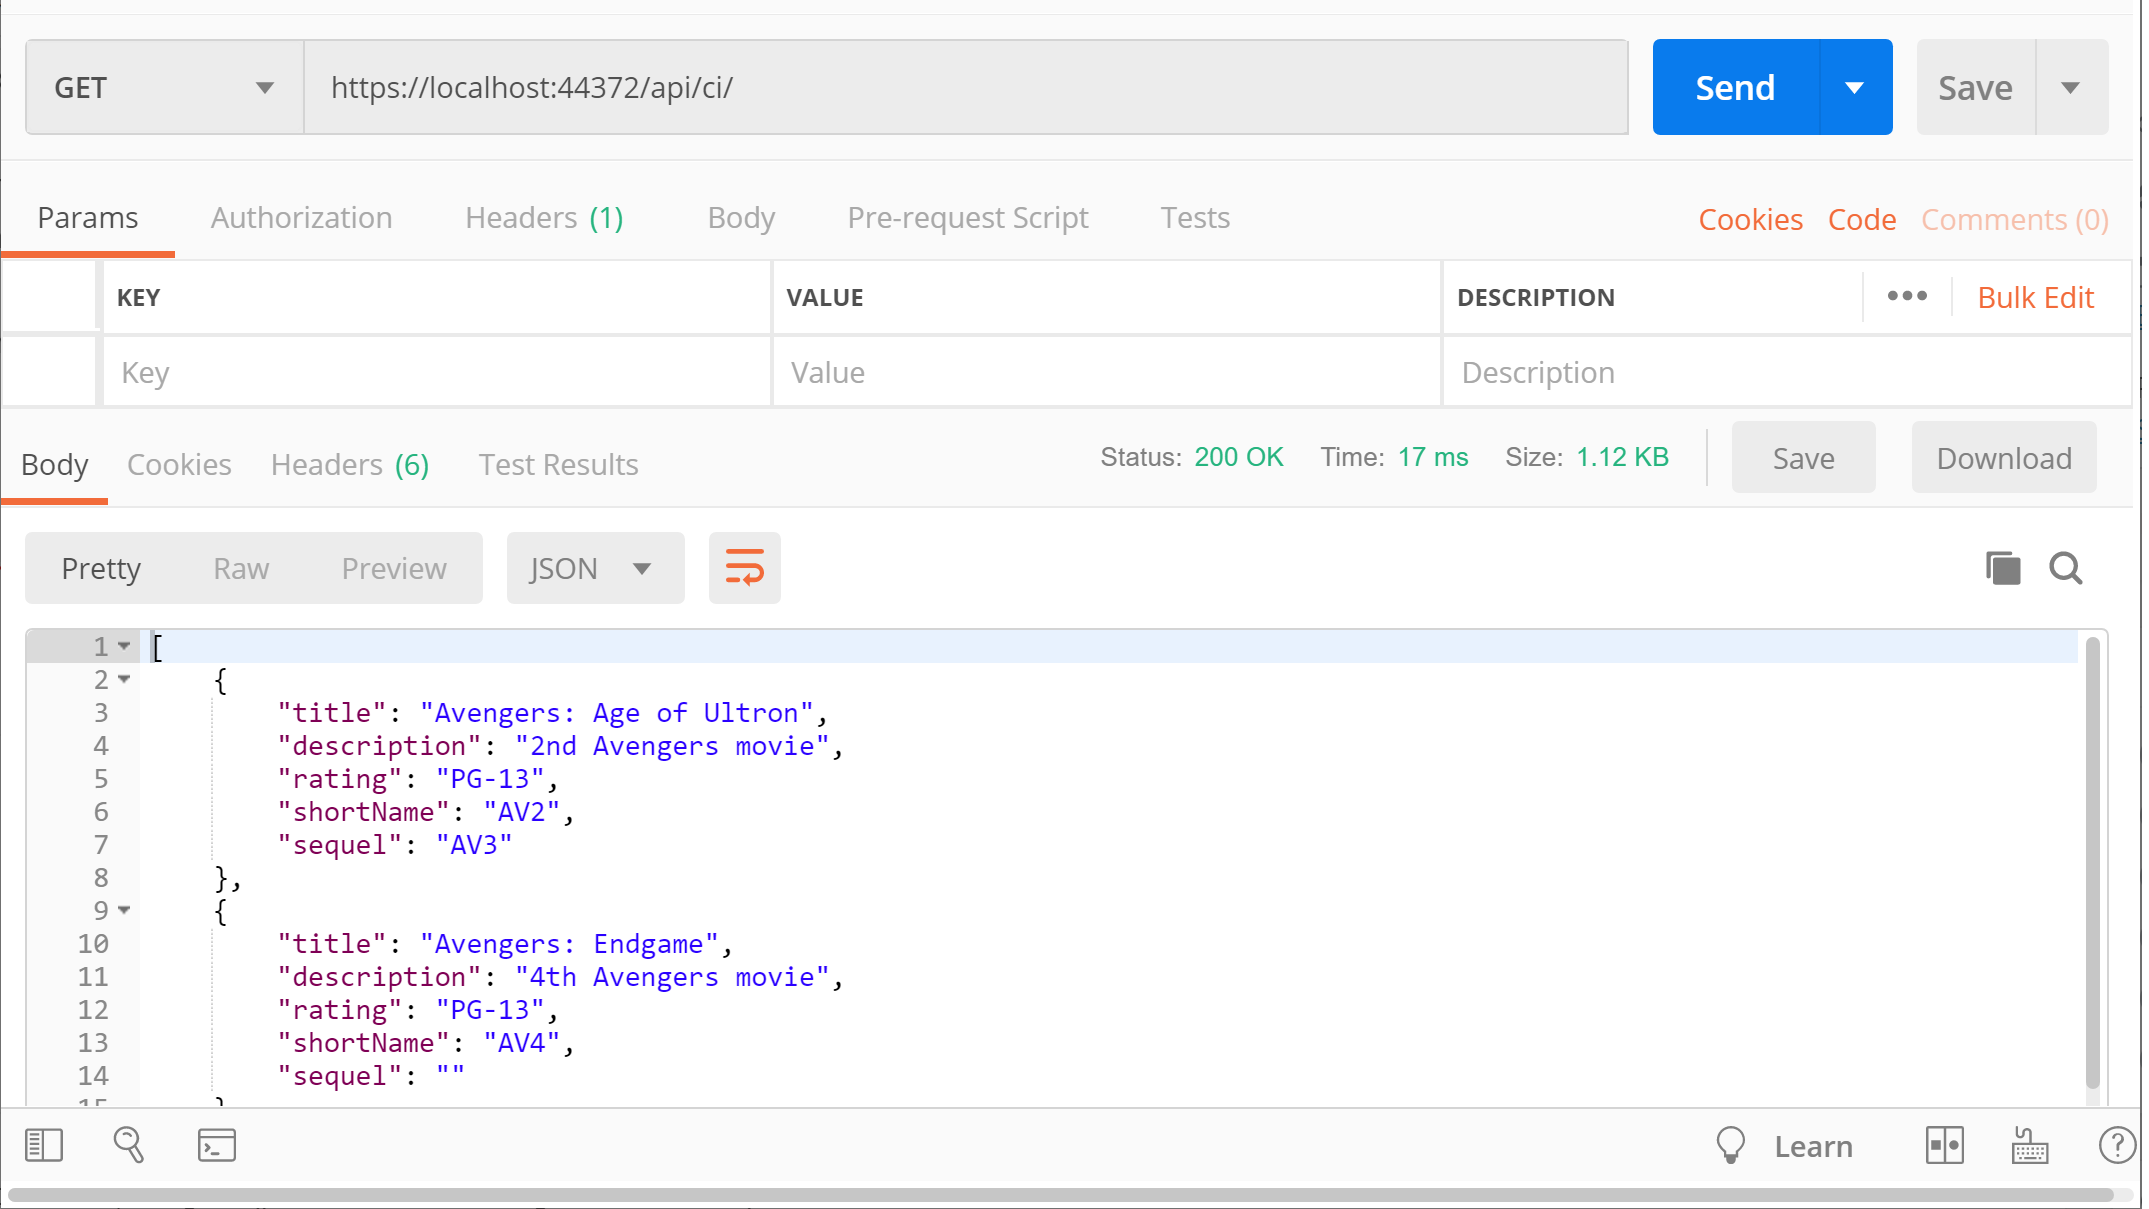
This triggers a GET request by calling the CIController‘s Get() method:

  // GET: api/ci
 [HttpGet]
 public JsonResult Get()
 {
    return Json(_cinematicItemRepository.CinematicItems());
 }

In this case, the Json() method returns a JsonResult object that serializes a list of Cinematic Items. For simplicity, the _cinematicRepository object’s CinematicItems() method (in CinematicItemRepository.cs) returns a hard-coded list of CinematicItem objects. Its implementation here isn’t important, because you would typically retrieve such values from a persistent data store, preferably through some sort of service class.

public List<CinematicItem> CinematicItems()
{
   return new List<CinematicItem>
   {
      new CinematicItem
      {
         Title = "Iron Man 1",
         Description = "First movie to kick off the MCU.",
         Rating = "PG-13",
         ShortName = "IM1",
         Sequel = "IM2"
      },
      ... 
   }
}

The JSON result looks like the following, where a list of movies are returned:

[
 {
 "title": "Avengers: Age of Ultron",
 "description": "2nd Avengers movie",
 "rating": "PG-13",
 "shortName": "AV2",
 "sequel": "AV3"
 },
 {
 "title": "Avengers: Endgame",
 "description": "4th Avengers movie",
 "rating": "PG-13",
 "shortName": "AV4",
 "sequel": ""
 },
 {
 "title": "Avengers: Infinity War",
 "description": "3rd Avengers movie",
 "rating": "PG-13",
 "shortName": "AV3",
 "sequel": "AV4"
 },
 {
 "title": "Iron Man 1",
 "description": "First movie to kick off the MCU.",
 "rating": "PG-13",
 "shortName": "IM1",
 "sequel": "IM2"
 },
 {
 "title": "Iron Man 2",
 "description": "Sequel to the first Iron Man movie.",
 "rating": "PG-13",
 "shortName": "IM2",
 "sequel": "IM3"
 },
 {
 "title": "Iron Man 3",
 "description": "Wraps up the Iron Man trilogy.",
 "rating": "PG-13",
 "shortName": "IM3",
 "sequel": ""
 },
 {
 "title": "The Avengers",
 "description": "End of MCU Phase 1",
 "rating": "PG-13",
 "shortName": "AV1",
 "sequel": "AV2"
 }
]

Instead of specifically returning a JsonResult, you could also return a more generic IActionResult, which can still be interpreted as JSON. Run the application and navigate to the following endpoint, to include the action method “search” folllowed by a QueryString parameter “fragment” for a partial match.

  • https://localhost:44372/api/ci/search?fragment=ir

Serialization-Get-Search

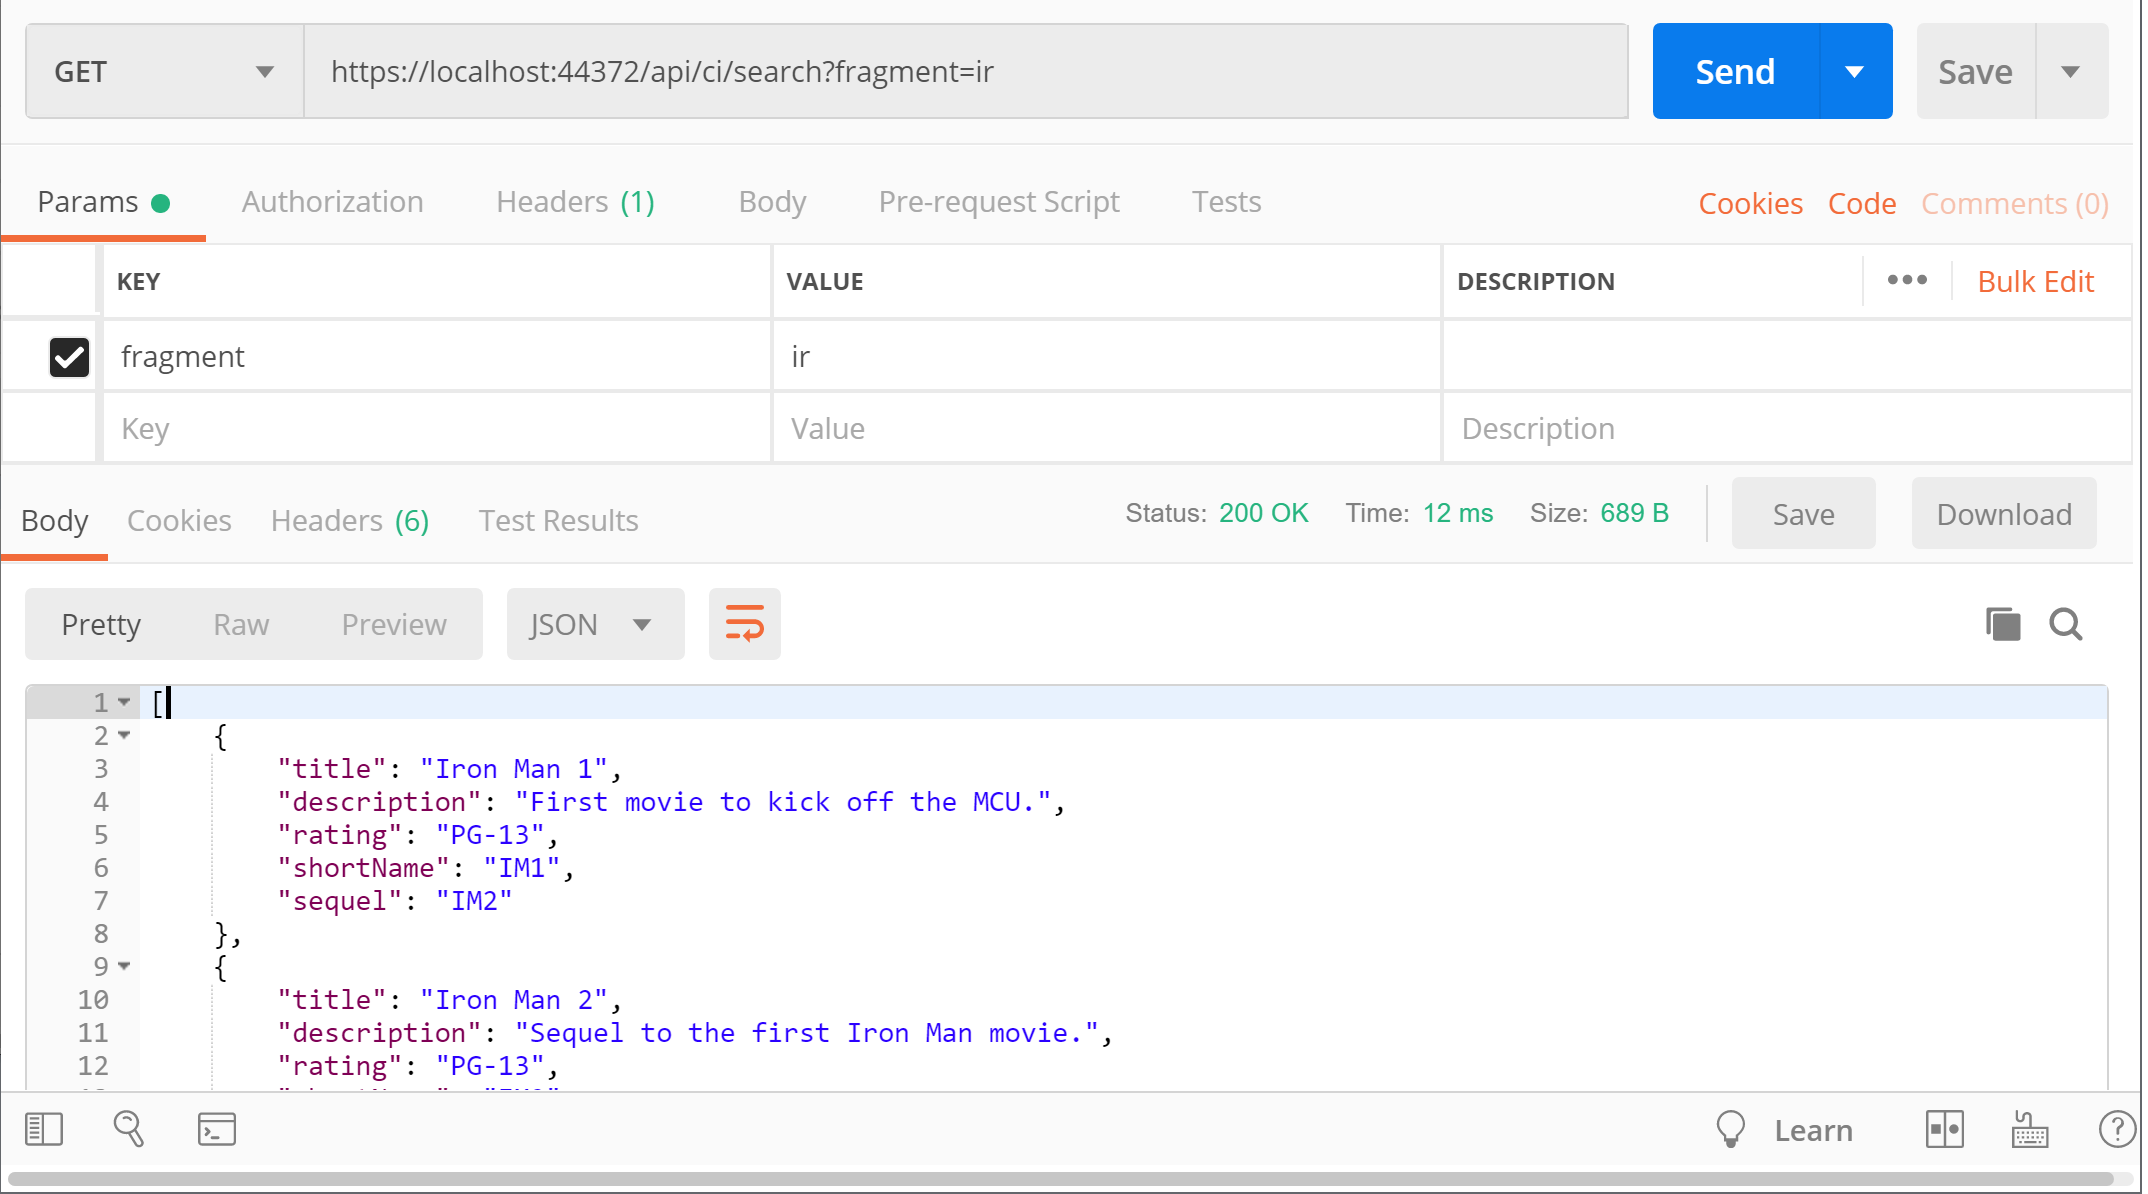
This triggers a GET request by calling the CIController‘s Search() method, with its fragment parameter set to “ir” for a partial text search:

// GET: api/ci/search?fragment=ir
[HttpGet("Search")]
public IActionResult Search(string fragment)
{
   var result = _cinematicItemRepository.GetByPartialName(fragment);
   if (!result.Any())
   {
      return NotFound(fragment);
   }
   return Ok(result);
}

In this case, the GetByPartialName() method returns a List of CinematicItem objects that are returned as JSON by default, with a HTTP 200 OK status. In case no results are found, the action method will return a 404 with the NotFound() method.

public List<CinematicItem> GetByPartialName(string titleFragment)
{
   return CinematicItems()
      .Where(ci => ci.Title
         .IndexOf(titleFragment, 0, StringComparison.CurrentCultureIgnoreCase) != -1)
      .ToList();
}

The JSON result looks like the following, where any movie title partially matches the string fragment provided:

[
 {
 "title": "Iron Man 1",
 "description": "First movie to kick off the MCU.",
 "rating": "PG-13",
 "shortName": "IM1",
 "sequel": "IM2"
 },
 {
 "title": "Iron Man 2",
 "description": "Sequel to the first Iron Man movie.",
 "rating": "PG-13",
 "shortName": "IM2",
 "sequel": "IM3"
 },
 {
 "title": "Iron Man 3",
 "description": "Wraps up the Iron Man trilogy.",
 "rating": "PG-13",
 "shortName": "IM3",
 "sequel": ""
 }
]

Returning Complex Objects

An overloaded version of the Get() method takes in a “shortName” string parameter to filter results by an alternate short name for each movie in the repository for the cinematic universe. Instead of returning a JsonResult or IActionResult, this one returns a complex object (CinematicItem) that contains properties that we’re interested in.

// GET api/ci/IM1
[HttpGet("{shortName}")]
public CinematicItem Get(string shortName)
{
   return _cinematicItemRepository.GetByShortName(shortName);
}

The GetByShortName() method in the CinematicItemRepository.cs class simply checks for a movie by the shortName parameter and returns the first match. Again, the implementation is not particularly important, but it illustrates how you can pass in parameters to get back JSON results.

public CinematicItem GetByShortName(string shortName)
{
   return CinematicItems().FirstOrDefault(ci => ci.ShortName == shortName);
}

While the application is running, navigate to the following endpoint:

  • https://localhost:44372/api/ci/IM1

Serialization-Get-ShortName

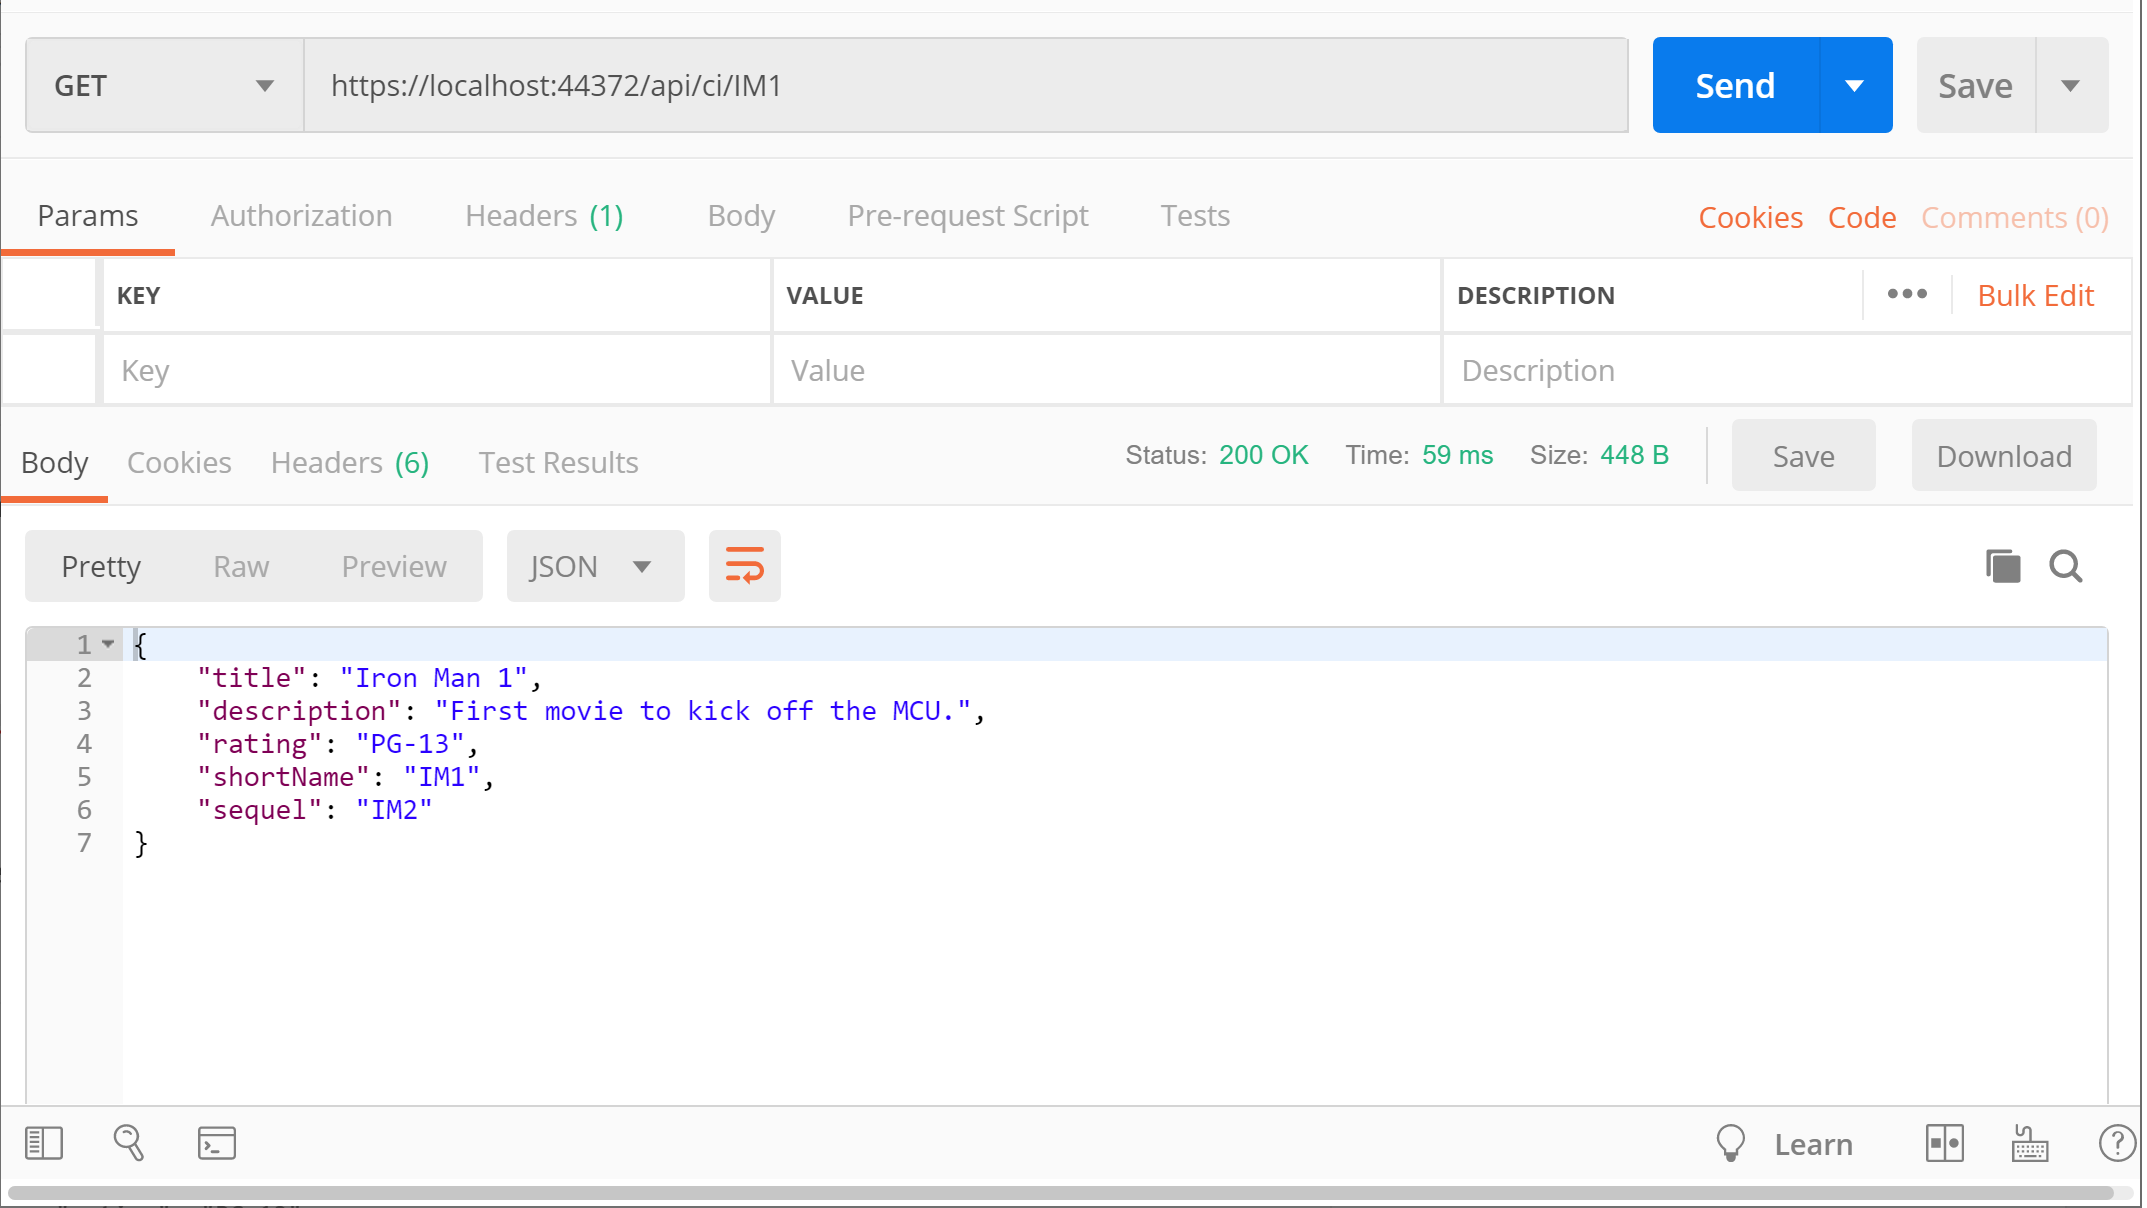
This triggers another GET request by calling the CIController‘s overloaded Get() method, with the shortName parameter. When passing the short name “IM1”, this returns one item  “Iron Man 1”, as shown below:

{
   "title": "Iron Man 1",
   "description": "First movie to kick off the MCU.",
   "rating": "PG-13",
   "shortName": "IM1",
   "sequel": "IM2"
}

Another example with a complex result takes in a parameter via QueryString and checks for an exact match with a specific property. In this case the Related() action method calls the repository’s GetBySequel() method to find a specific movie by its sequel’s short name.

// GET: api/ci/related?sequel=IM2
[HttpGet("Related")]
public CinematicItem Related(string sequel)
{
 return _cinematicItemRepository.GetBySequel(sequel);
}

The GetBySequel() method in the CinematicItemRepository.cs class  checks for a movie’s sequel by the shortName parameter and returns the first match.

public CinematicItem GetBySequel(string sequelShortName)
{
   return CinematicItems().FirstOrDefault(ci => ci.Sequel == sequelShortName);
}

While the application is running, navigate to the following endpoint:

  • https://localhost:44372/api/ci/related?sequel=IM3

Serialization-Get-Sequel

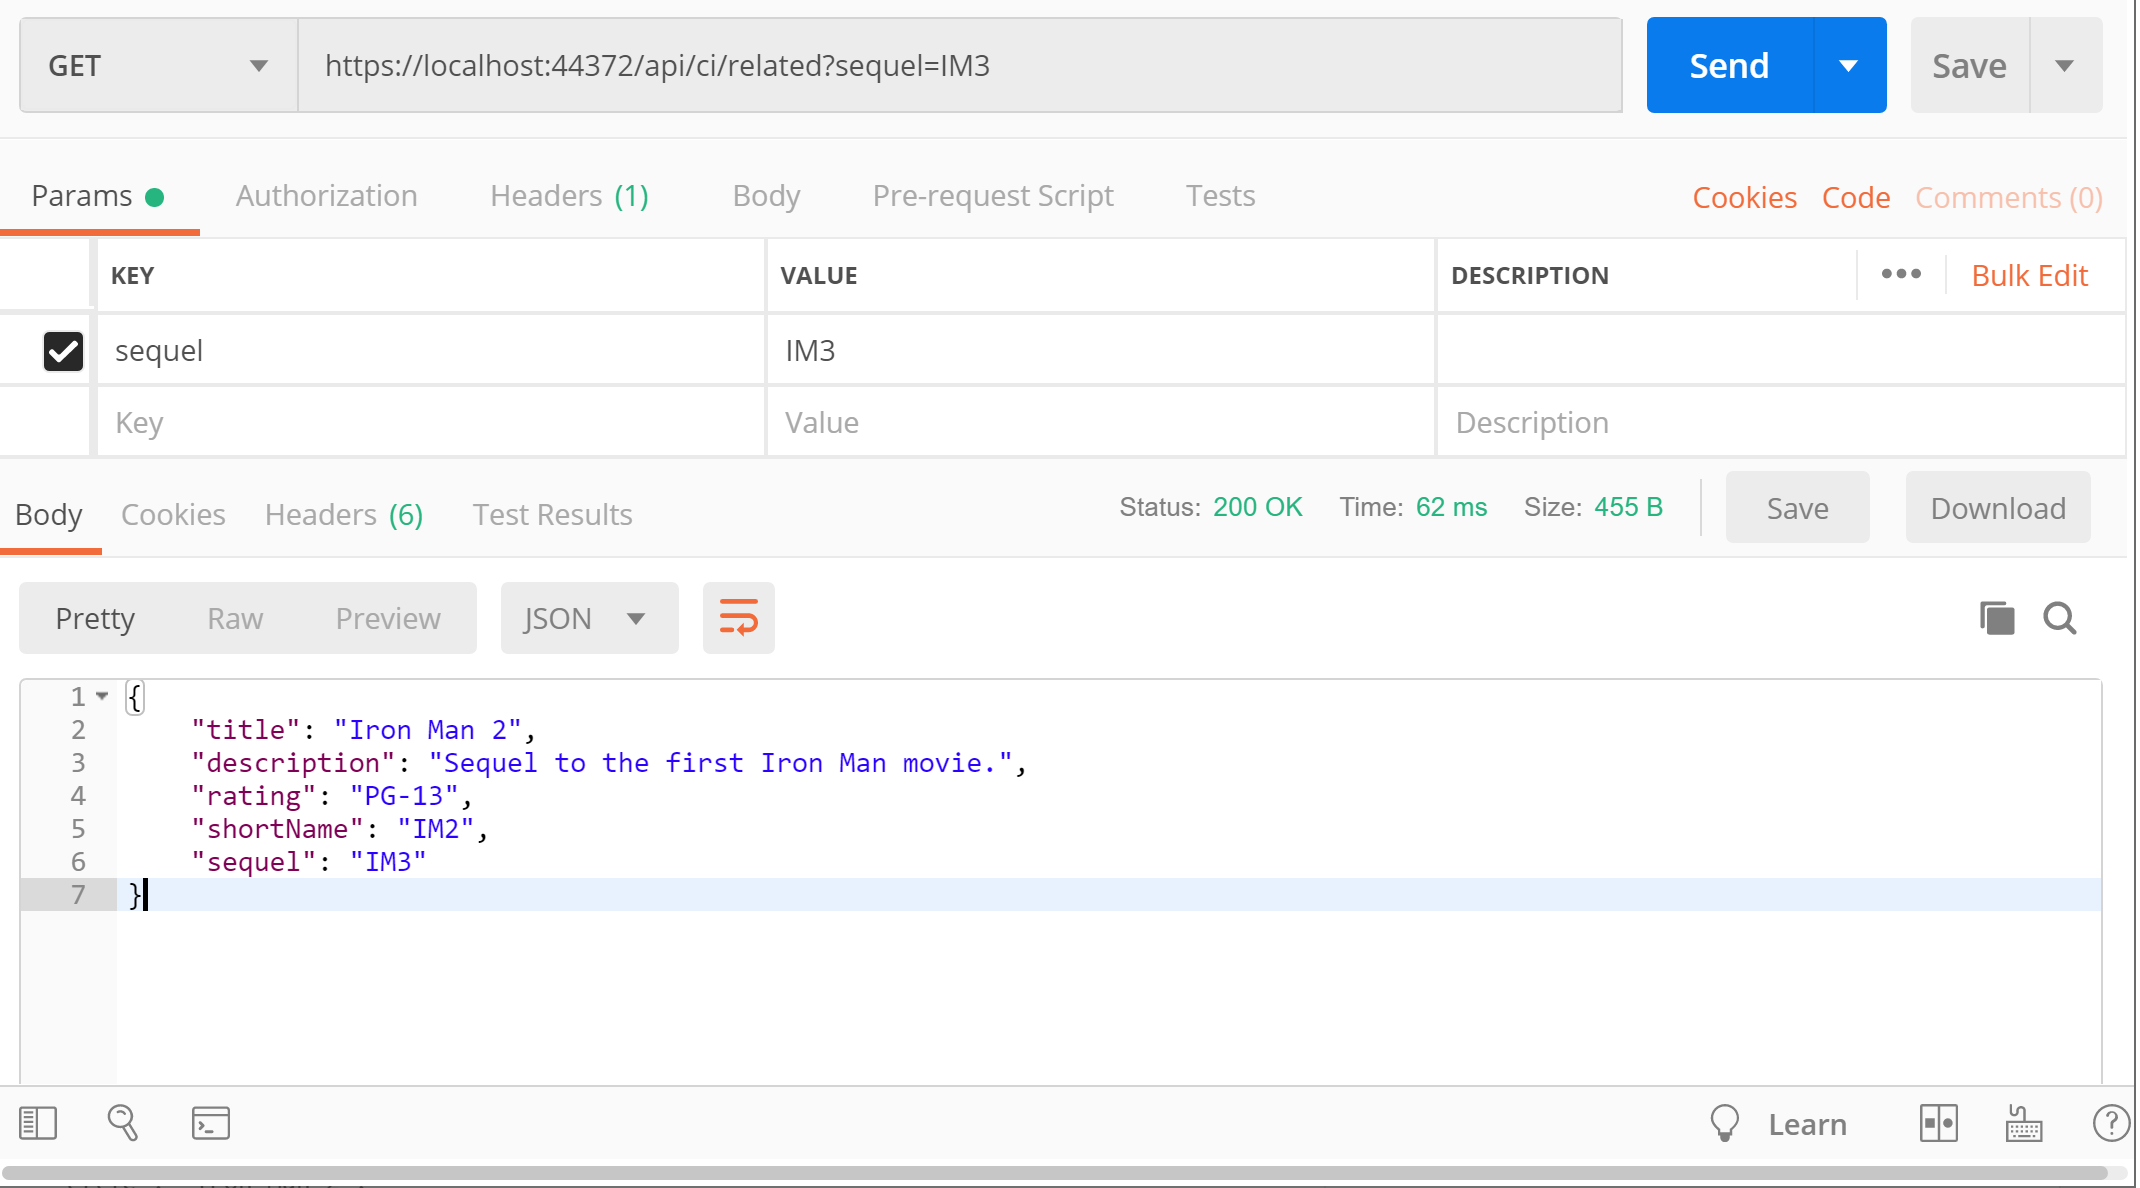
This triggers a GET request by calling the CIController‘s Related() method, with the sequel parameter. When passing the sequel’s short name “IM3”, this returns one item “Iron Man 2”, as shown below:

{
   "title": "Iron Man 2",
   "description": "Sequel to the first Iron Man movie.",
   "rating": "PG-13",
   "shortName": "IM2",
   "sequel": "IM3"
}

As you can see, the result is in JSON format for the returned object.

XML Serialization

Wait a minute… with all these JSON results, when will we get to XML serialization? Not to worry, there are multiple ways to get XML results while reusing the above code. First, add the NuGet package “Microsoft.AspNetCore.Mvc.Formatters.Xml” to your project and then update your Startup.cs file’s ConfigureServices() to include a call to services.AddMvc.AddXmlSeralizerFormatters():

public void ConfigureServices(IServiceCollection services)
{
   ...
   services.AddMvc()
    .AddXmlSerializerFormatters();
   ...
}

Set the request’s Accept header value to “application/xml” before requesting the endpoint, then run the application and navigate to the following endpoint once again:

  • https://localhost:44372/api/ci/IM1

Serialization-Get-XML

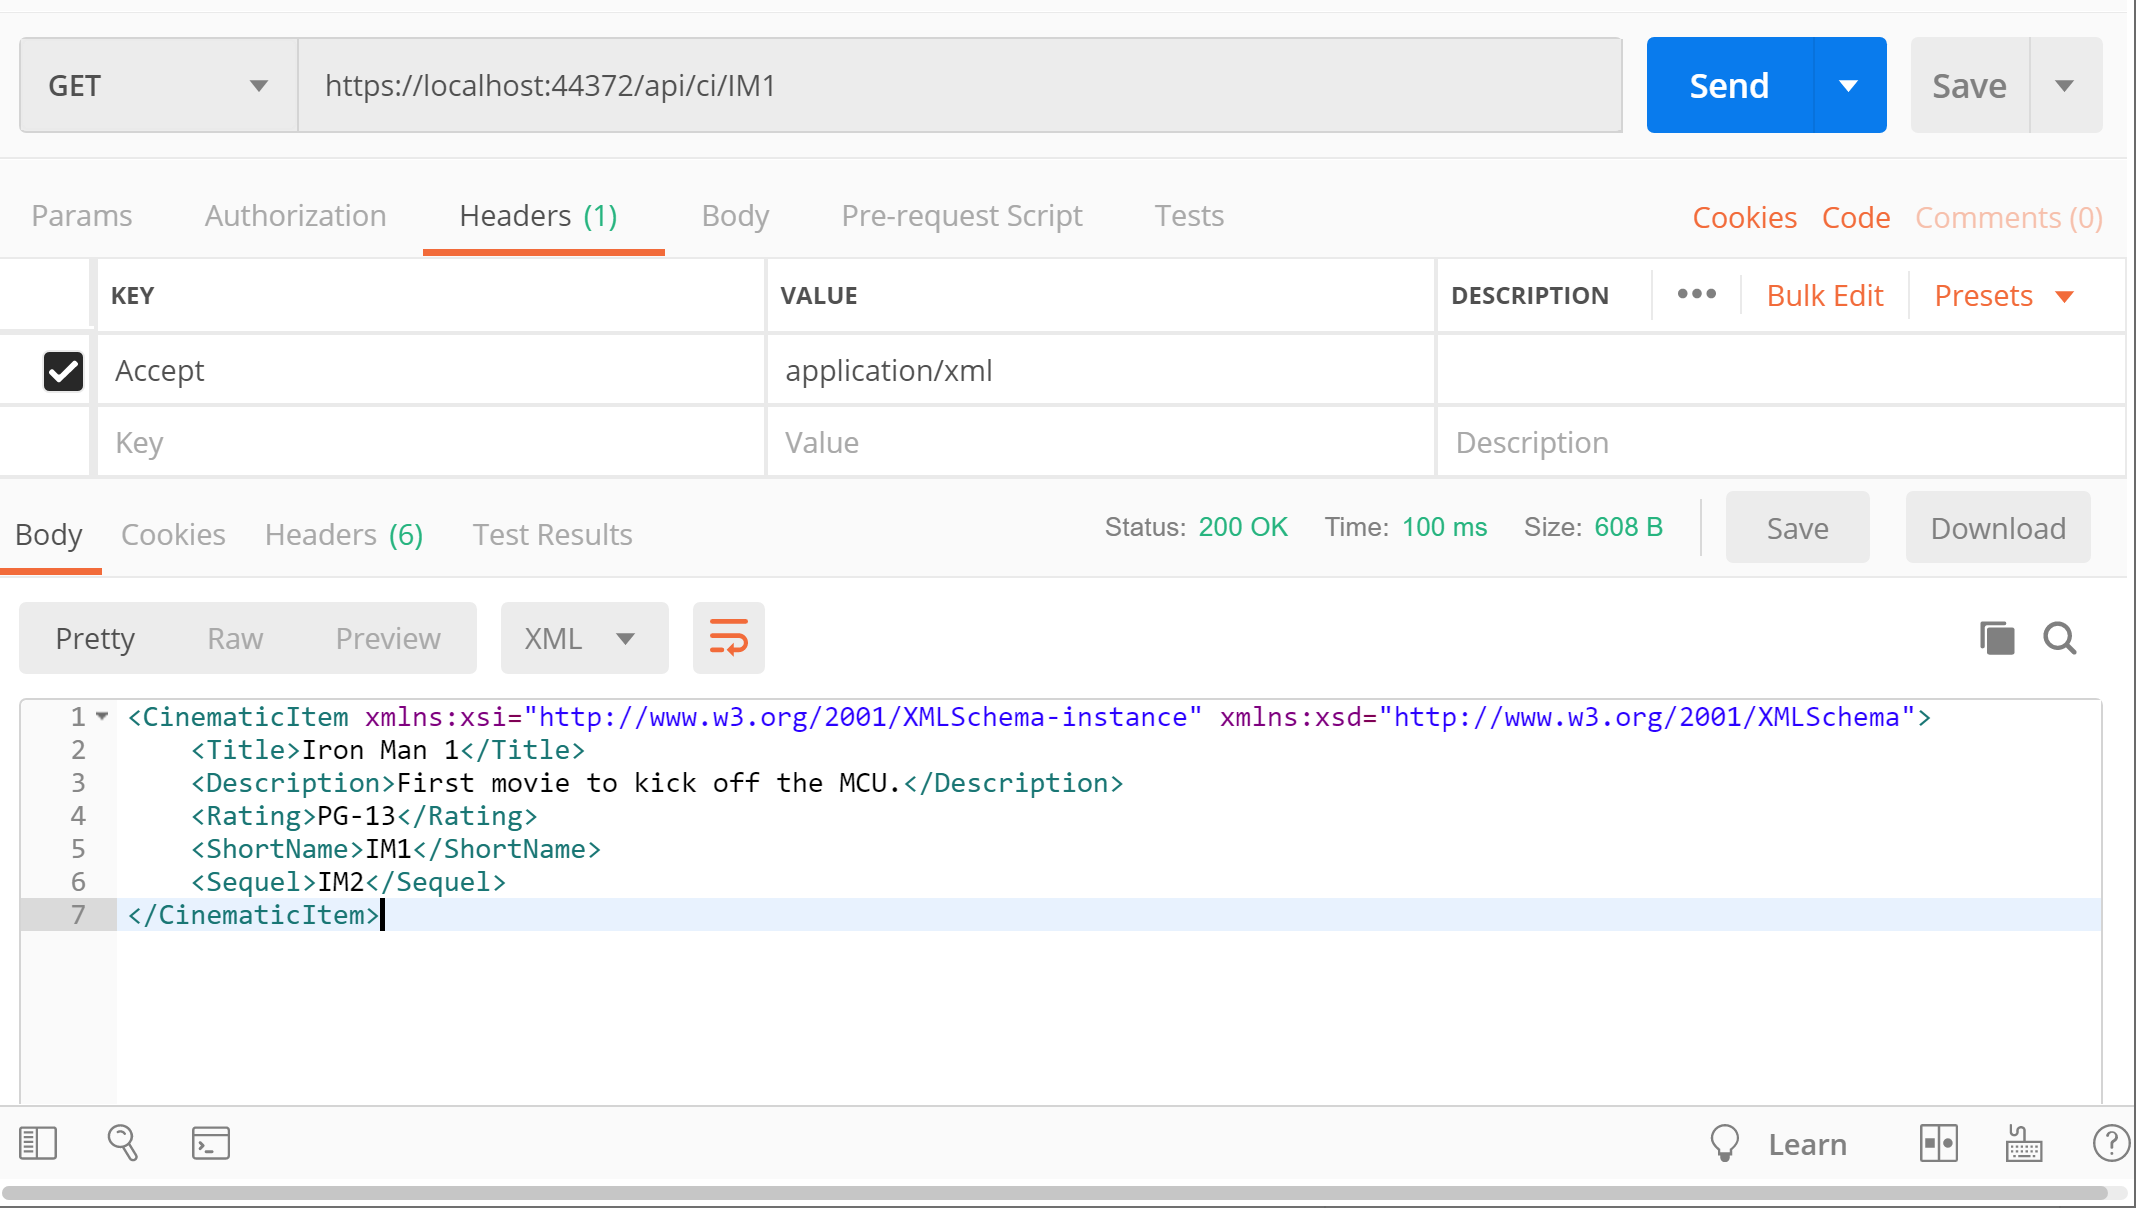
This should provide the following XML results:

<CinematicItem xmlns:xsi="http://www.w3.org/2001/XMLSchema-instance" xmlns:xsd="http://www.w3.org/2001/XMLSchema">
 <Title>Iron Man 1</Title>
 <Description>First movie to kick off the MCU.</Description>
 <Rating>PG-13</Rating>
 <ShortName>IM1</ShortName>
 <Sequel>IM2</Sequel>
</CinematicItem>

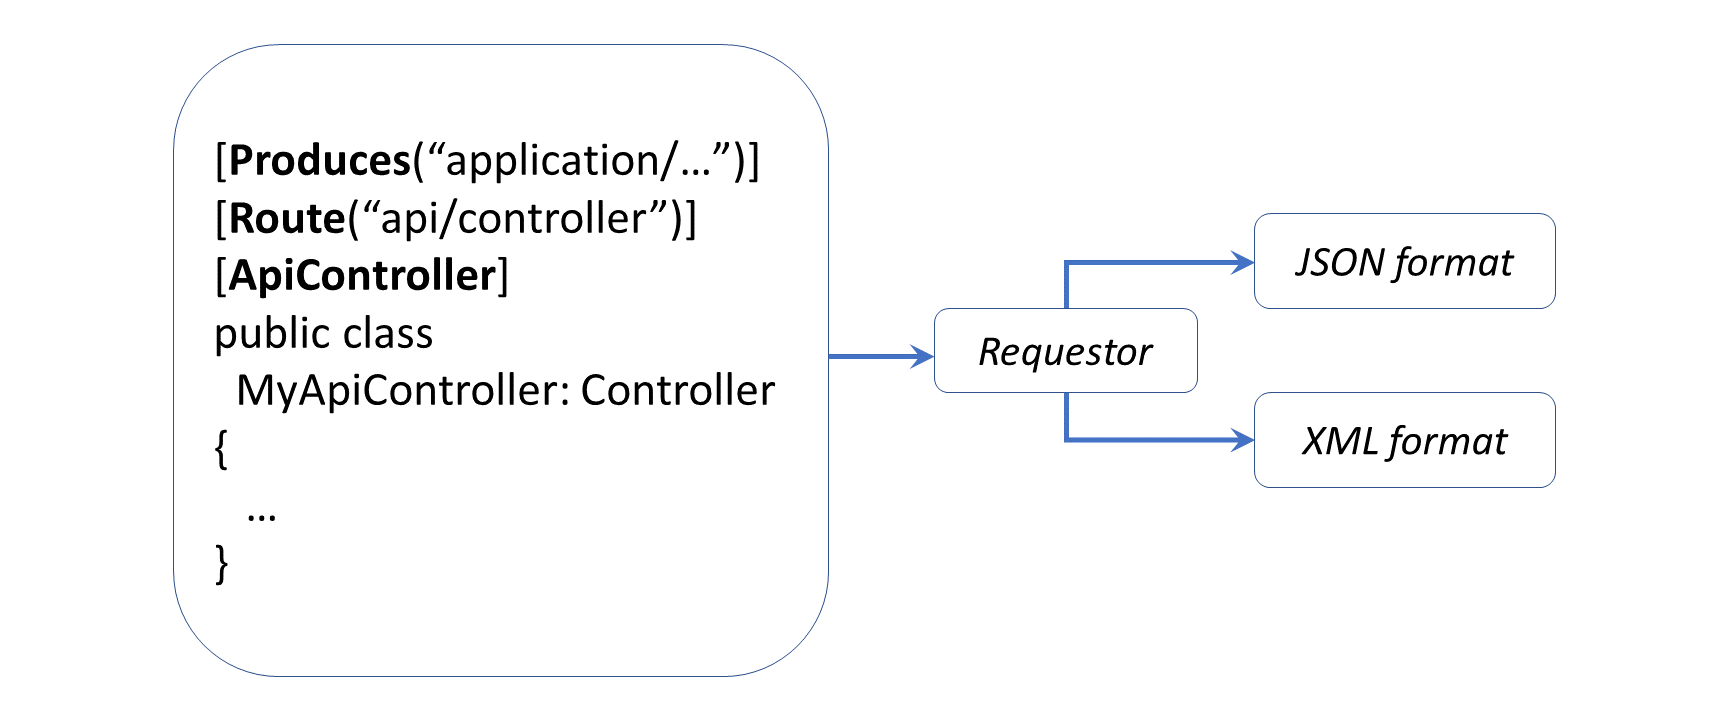
Since the action method returns a complex object, the result can easily be switched to XML simply by changing the Accept header value. In order to return XML using an IActionResult method, you should also use the [Produces] attribute, which can be set to “application/xml” at the Controller level

[Produces("application/xml")]
[Route("api/[controller]")]
[ApiController]
public class CIController : Controller
{
   ...
}

Then revisit the following endpoint, calling the search action method with the fragment parameter set to “ir”:

  • https://localhost:44372/api/ci/search?fragment=ir

At this point, it is no longer necessary to set the Accept header to “application/xml” during the request, since the [Produces] attribute is given priority over it.

Serialization-Get-Search-XML

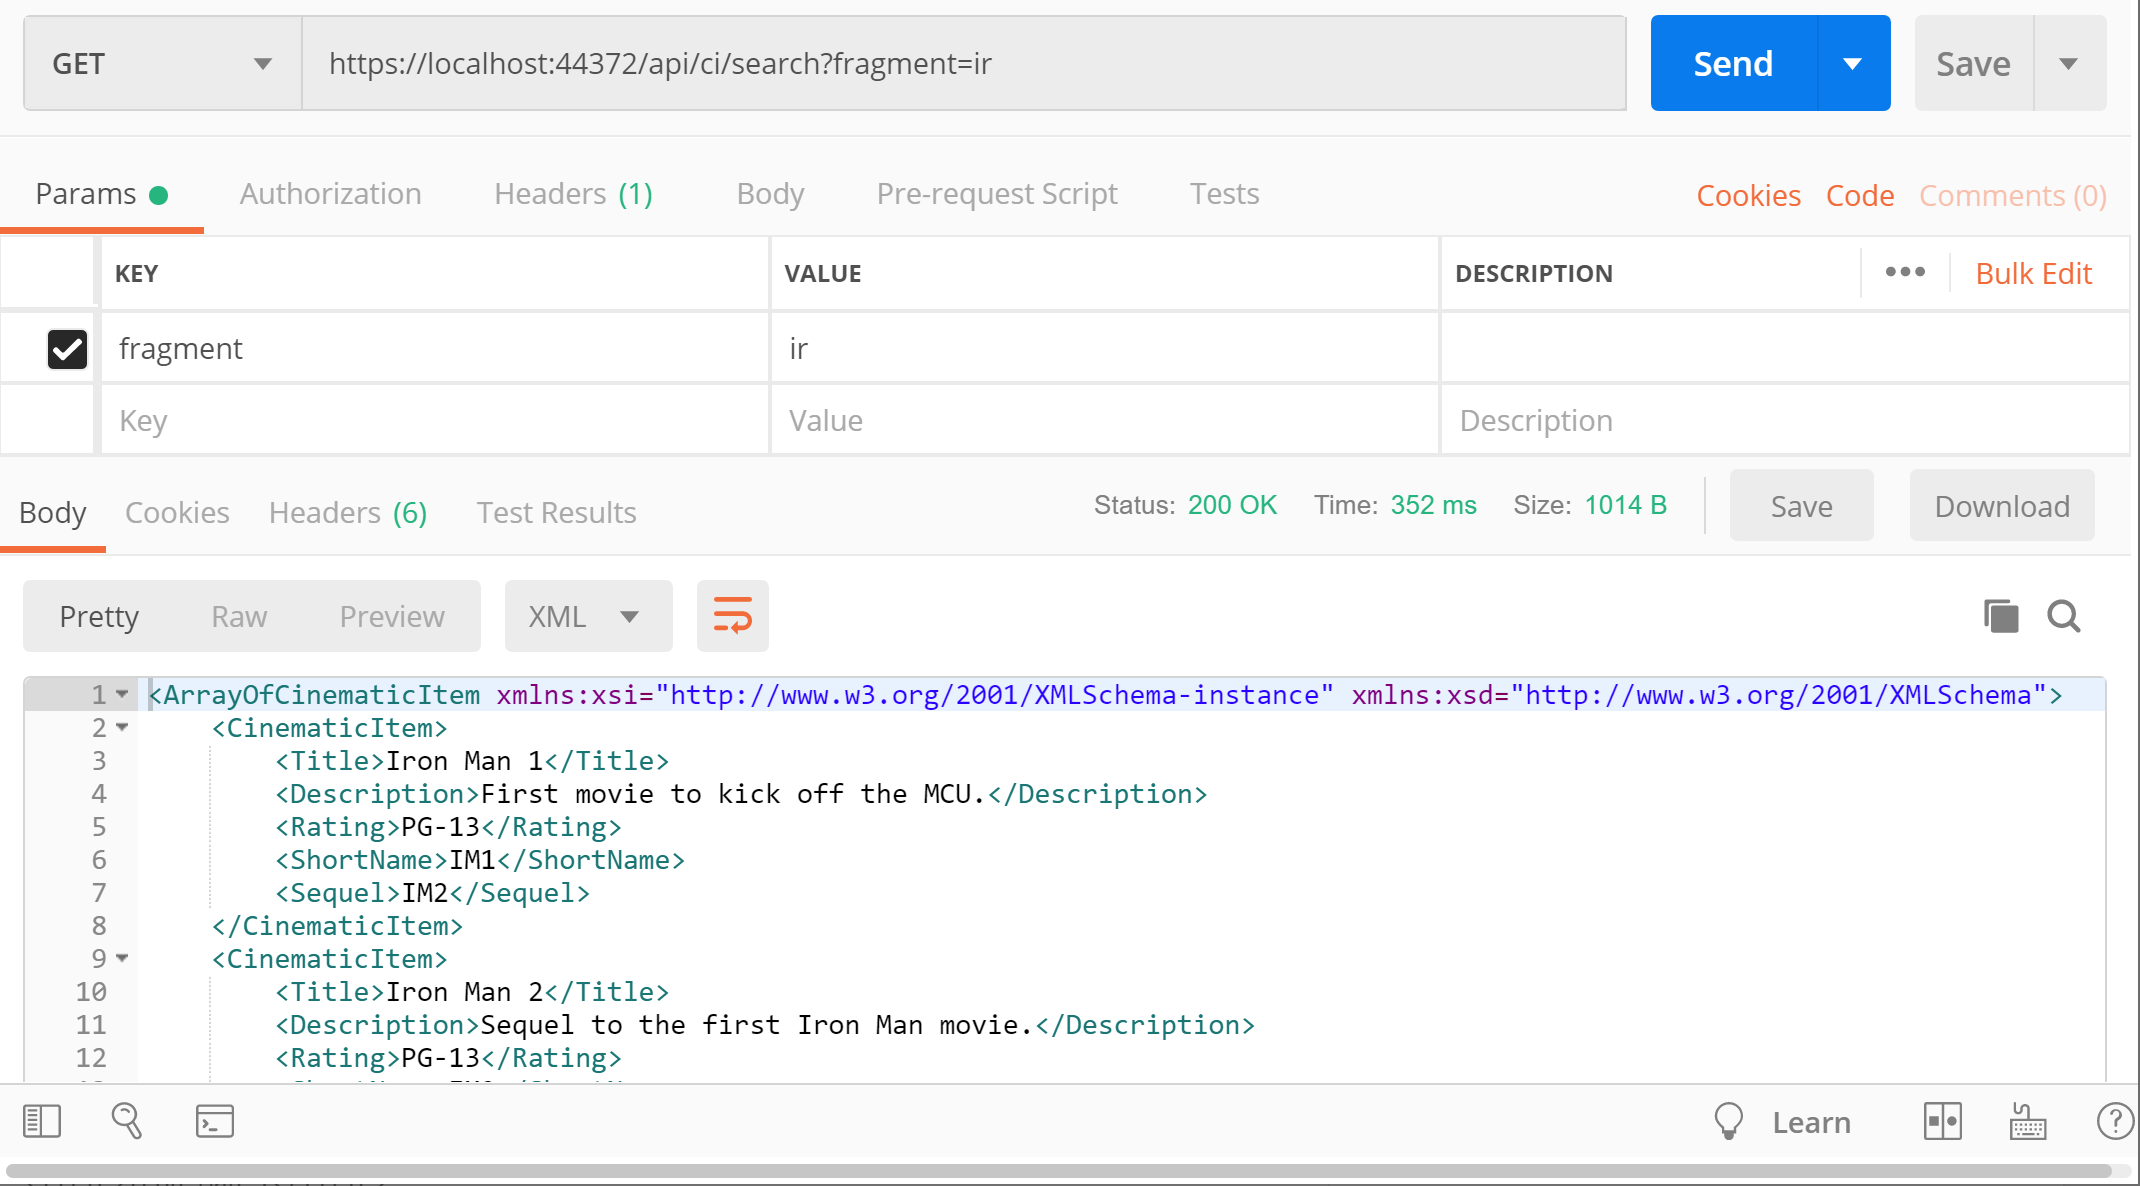
This should produces the following result , with an array of CinematicItem objects in XML:

<ArrayOfCinematicItem xmlns:xsi="http://www.w3.org/2001/XMLSchema-instance" xmlns:xsd="http://www.w3.org/2001/XMLSchema">
 <CinematicItem>
 <Title>Iron Man 1</Title>
 <Description>First movie to kick off the MCU.</Description>
 <Rating>PG-13</Rating>
 <ShortName>IM1</ShortName>
 <Sequel>IM2</Sequel>
 </CinematicItem>
 <CinematicItem>
 <Title>Iron Man 2</Title>
 <Description>Sequel to the first Iron Man movie.</Description>
 <Rating>PG-13</Rating>
 <ShortName>IM2</ShortName>
 <Sequel>IM3</Sequel>
 </CinematicItem>
 <CinematicItem>
 <Title>Iron Man 3</Title>
 <Description>Wraps up the Iron Man trilogy.</Description>
 <Rating>PG-13</Rating>
 <ShortName>IM3</ShortName>
 <Sequel />
 </CinematicItem>
</ArrayOfCinematicItem>

As for the first Get() method returning JsonResult, you can’t override it with the [Produces] attribute or the Accept header value to change the result to XML format.

To recap, the order of precedence is as follows:

  1. public JsonResult Get()
  2. [Produces(“application/…”)]
  3. Accept: “application/…”

References