Category Archives: Database

NetLearner on ASP .NET Core 3.1

By Shahed C on December 30, 2019

In This Article:

NetLearner: What is it?

NetLearner is an ASP .NET Core web app to allow any user to consolidate multiple learning resources all under one umbrella. The codebase itself is a way for new/existing .NET developers to learn ASP .NET Core, while a deployed instance of NetLearner can be used as a curated link-sharing web application.

NetLearner on GitHub: https://github.com/shahedc/NetLearnerApp

Restrictions

Registration for each web app has been disabled by default. To enable registration, please do the following:

  1. Locate scaffolded Identity pages under /Areas/Identity/Pages/Account/
  2. In Register.cshtml, update the page to include environments in addition to Development, if desired.
  3. In Register.cshtml.cs, replace [Authorize] with [AllowAnonymous] to allow access to registration

Architecture

The current version of NetLearner on Github includes a shared .NET Standard Class Library, used by multiple web app projects. The web apps include:

  • MVC: familiar to most ASP .NET developers
  • Razor Pages: relatively new in ASP .NET
  • Blazor: the latest offering from ASP .NET
NetLearner Archicture: Web App + API

Future updates will also include:

  • Web API, exposed for use by other consumers
  • JavaScript front-end web app(s)

Note that an ASP .NET Core web app can contain various combinations of all of the above. However, the purpose of the NetLearner application code is to demonstrate how to achieve similar results using all of the above. So, each of the web app projects will be developed in parallel, using a shared library.

Shared Library

The shared library is a .NET Standard 2.1 library. This version was selected because .NET Core 3.x supports .NET Standard 2.1, as seen in the official documentation.

.NET Standard: https://docs.microsoft.com/en-us/dotnet/standard/net-standard

The shared library contains the following:

  • Database Context: for use by Entity Framework Core
  • Migrations: for EF Core to manage the (SQL Server) db
  • Models: db entities, used by web apps
  • Services: service classes to handle CRUD operations

Using terms from Clean Architecture references, you may think of the DB Context and Migrations as part of the Infrastructure code, while the Models and Services are part of the Core code. For simplicity, these are all kept in a single library. In your own application, you may split them up into separate assemblies named Core and Infrastructure.

Running the Application

In order to run the web app samples, clone the following repository:

NetLearnerhttps://github.com/shahedc/NetLearnerApp

Here, you will find at least 4 projects:

  1. NetLearner.SharedLib: shared library project
  2. NetLearner.Blazor: Blazor server-side web project
  3. NetLearner.Mvc: MVC web project
  4. NetLearner.Pages: Razor Pages web project

To create a local copy of the database:

  1. Open the solution file in Visual Studio 2019
  2. In the Package Manager Console panel, change the Default Project to “NetLearner.SharedLib” to ensure that EF Core commands are run against the correct project
  3. In the Package Manager console, run the Update-Database command
  4. Verify that there are no errors upon database creation

To run the samples from Visual Studio 2019:

  1. Run each web project one after another
  2. Navigate to the links in the navigation menu, e.g. Lists and Resources
  3. Add/Edit/Delete items in any of the web apps
  4. Create one or more lists
  5. Create one more resources, assign each to a list
  6. Verify that your data changes are reflected no matter which web app you use
NetLearner MVC: Resource Lists
NetLearner MVC: Learning Resources

NetLearner Razor Pages: Resource Lists
  NetLearner Razor Pages: Learning Resources
NetLearner Razor Pages: Learning Resources
   NetLearner Blazor: Resource Lists
NetLearner Blazor: Resource Lists
    NetLearner Blazor: Learning Resources
NetLearner Blazor: Learning Resources

What’s Next?

In 2020, you can expect a new A-Z weekly blog series to cover 26 different topics from January through June 2020. To get a sneak peek of what’s to come, take a peek at the 2019 A-Z series.

RELEASE: ASP .NET Core A-Z eBook

By Shahed C on July 29, 2019

As promised, below is the initial release of the ASP .NET Core A-Z ebook. This combines the 26 blog posts from the series of ASP .NET Core articles on this website.

ASPNETCoreLogo-300x267 A – Z of ASP .NET Core!

eBook cover

eBook cover

You can find the complete ebook on GitHub using one of the links below:

Don’t miss my guest appearance on the .NET Community Standup:

    • With Jon Galloway, Damian Edwards and Scott Hanselman.
    • 5:07 -> video starts
    • 18:58 to 36:20 -> my segment
    • 36:20 to end -> just chatting

Things to note (updated):

  • The cover image was generated using the Canva mobile app
  • The eBook is still a work in progress 🙂
  • I’m using my Worker Service sample to auto-generate Word documents from each blog post by converting each article’s HTML into Word format using MariGold.OpenXHTML
  • After some tweaking, images have been manually resized per chapter. Automatic resizing doesn’t seem to work between HTML to Word conversions, but feel free to submit a Pull Request if you have suggestions on how to fix it.
  • Animated GIF images don’t work in the ebook, so a link to each original source has been included where they appear in a few chapters.
  • The content currently covers a combination of ASP .NET Core 2.2 and 3.0 (Preview). In the weeks/months ahead, the content will be updated to include Core 3.0 across the entire series.

Query Tags in EF Core for ASP .NET Core Web Apps

By Shahed C on April 29, 2019

This is the seventeenth of a series of posts on ASP .NET Core in 2019. In this series, we’ll cover 26 topics over a span of 26 weeks from January through June 2019, titled A-Z of ASP .NET Core!

ASPNETCoreLogo-300x267 A – Z of ASP .NET Core!

In this Article:

Q is for Query Tags in EF Core

Query Tags were introduced in Entity Framework (EF) Core 2.2, as a way to associate your LINQ Queries with SQL Queries. This can be useful when browsing log files during debugging and troubleshooting. This article explains how Query Tags work, how to find the output and how to format the text strings before displaying them.

Blog-Diagram-QueryTags

NOTE: You may have read that Query Types have been renamed to entities without keys, but please note that Query Types (introduced in EF Core 2.1) are not the same thing as Query Tags.

As of ASP .NET Core 3.0 Preview 1, EF Core must be installed separately via NuGet (e.g. v3.0.0-preview4.19216.3), as it is no longer included with the ASP .NET Core shared framework. Also, the dotnet ef tool has to be installed as a global/local tool, as it is no longer part of the .NET Core SDK. For more information, see the official announcement for Preview 4, where it was first mentioned:

Implementing Query Tags

To follow along, take a look at the sample project on Github:

Web Query Tag Sample: https://github.com/shahedc/WebAppWithQueries

The sample includes a simple model called MyItem, with a few basic fields:

public class MyItem
{
   public int Id { get; set; }
   public string MyItemName { get; set; }
   public string MyItemDescription { get; set; }
}

A collection of MyItem objects are defined as a DbSet in the ApplicationDbContext:

public DbSet<WebAppWithQueries.Models.MyItem> MyItems { get; set; }

The QueriedData() action method in the MyItemController defines a Query Tag with the TagWith() method, as shown below:

public async Task<IActionResult> QueriedData()
{
   var topX = 2;
   var myItems =
   (from m in _context.MyItems.TagWith($"This retrieves top {topX} Items!")
   orderby m.Id ascending
   select m).Take(topX);

   return View(await myItems.ToListAsync());
}

In the above query, the TagWith() method takes a single string value that can they be stored along with wherever the resultant SQL Queries are logged. This may include your persistent SQL Server database logs or Profiler logs that can be observed in real-time. It doesn’t affect what gets displayed in your browser.

AspNetCore-QueryTags-Browser

Observing Query Tags in Logs

Using the SQL Server Profiler tool, the screenshot below shows how the Query Tag string defined in the code is outputted along with the SQL Query. Since topX is set to 2, the final string includes the value of topX inline within the logged text (more on formatting later).

AspNetCore-QueryTags-Profiler

From the code documentation, the TagWith() method “adds a tag to the collection of tags associated with an EF LINQ query. Tags are query annotations that can provide contextual tracing information at different points in the query pipeline.

Wait a minute… does it say “collection of tags”…? Yes, you can add a collection of tags! You can call the method multiple times within the same query. In the QueriedDataWithTags() action of method the MyItemController class, you can call a string of methods to trigger cumulative calls to TagWith(), which results in multiple tags being stored in the logs.

AspNetCore-QueryTags-Profiler-More

Formatting Query Tag Strings

You may have noticed that I used the $ (dollar sign) symbol in my Query Tag samples to include variables inline within the string. In case you’re not familiar with this language feature, the string interpolation feature was introduced in C# 6.

$"This retrieves top {topX} Items!"

You may also have  noticed that the profiler is showing the first comment in the same line as the leading text “exec sp_executesql” in the Profiler screenshot. If you want to add some better formatting (e.g. newline characters), you can use the so-called verbatim identifier, which is essentially the @ symbol ahead of the string.

@"This string has more
than 1 line!"

While this is commonly used in C# to allow newlines and unescaped characters (e.g. backslashes in file paths), some people may not be aware that you can use it in Query Tags for formatting. This operator allows you to add multiple newlines in the Query Tag’s string value. You can combine both operators together as well.

@$"This string has more than 1 line 
and includes the {topX} variable!"

In an actual example, a newline produces the following results:

AspNetCore-QueryTags-Profiler-Newlines

The above screenshot now shows the text from multiple Query Tags each on their own new line. As before, both of them were evaluated during the execution of a single SQL statement.

References


Handling Errors in ASP .NET Core

By Shahed C on February 25, 2019

This is the eighth of a series of posts on ASP .NET Core in 2019. In this series, we’ll cover 26 topics over a span of 26 weeks from January through June 2019, titled A-Z of ASP .NET Core!

ASPNETCoreLogo-300x267 A – Z of ASP .NET Core!

In this Article:

This article will refer to the following sample code on GitHub:

Web Error Handling Samples: https://github.com/shahedc/ErrorHandlingWeb

H is for Handling Errors

Unless you’re perfect 100% of the time (who is?), you’ll most likely have errors in your code. If your code doesn’t build due to compilation errors, you can probably correct that by fixing the offending code. But if your application encounters runtime errors while it’s being used, you may not be able to anticipate every possible scenario.

Runtime errors may cause Exceptions, which can be caught and handled in many programming languages. Unit tests will help you write better code, minimize errors and create new features with confidence. In the meantime, there’s the good ol’ try-catch-finally block, which should be familiar to most developers.

NOTE: You may skip to the next section below if you don’t need this refresher.

Blog-Diagram-errors

Exceptions with Try-Catch-Finally

The simplest form of a try-catch block looks something like this:

try
{
   // try something here

} catch (Exception ex)
{
  // catch an exception here
}

You can chain multiple catch blocks, starting with more specific exceptions. This allows you to catch more generic exceptions toward the end of your try-catch code.  In a string of catch() blocks, only the caught exception (if any) will cause that block of code to run.

try
{
   // try something here

} catch (IOException ioex)
{
  // catch specific exception, e.g. IOException

} catch (Exception ex)
{
  // catch generic exception here

}

Finally, you can add the optional finally block. Whether or not an exception has occurred, the finally block will always be executed.

try
{
   // try something here

} catch (IOException ioex)
{
  // catch specific exception, e.g. IOException

} catch (Exception ex)
{
  // catch generic exception here

} finally
{
   // always run this code

}

Try-Catch-Finally in Sample App

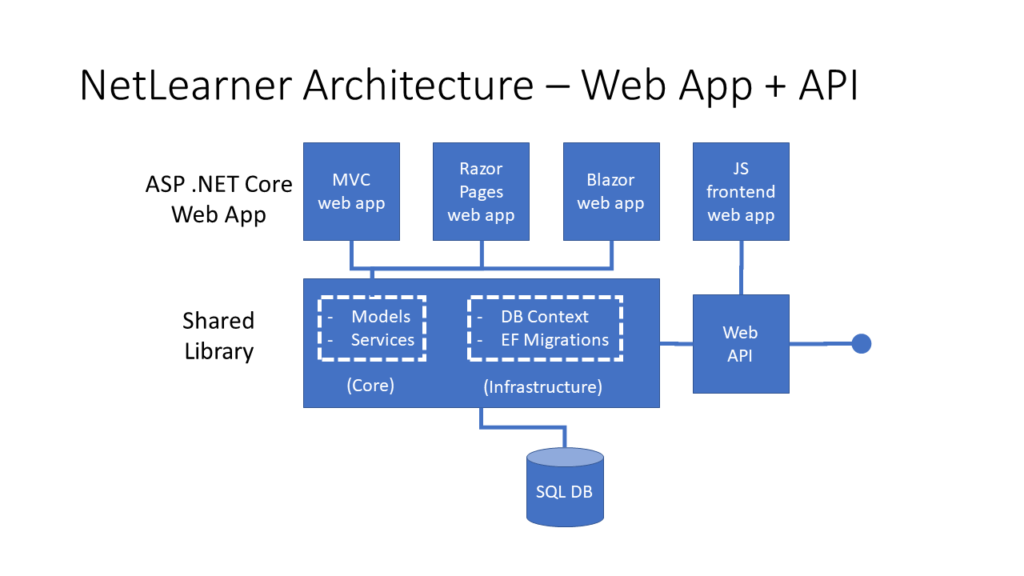
In the MVC sample app, the Reader Controller uses a Data Service from a shared .NET Standard Library to read from a data file that may exist in the Web App’s static files. It displays a view with some hard-coded data and tries to replace some data with additional information obtained from the data file.

// hard-code some data
var data1 = new DataItem
{
 Id = 1,
 SomeData = "data 1 initialized"
}; 
var data2 = new DataItem
{
 Id = 2,
 SomeData = "data 2 initialized"
}; 
var data3 = new DataItem
{
 Id = 3,
 SomeData = "data 3 initialized"
};

Then, try to read some data from a data file, to replace information in the data model.

// get data from file if possible
try
{ // Open the text file using a stream reader.
 var webRoot = _env.WebRootPath;
 var file = System.IO.Path.Combine(webRoot, @"data\datafile.txt");

 using (StreamReader sr = new StreamReader(file))
 {
 // Read the stream to a string, overwrite some data
 data2.SomeData = sr.ReadToEnd();
 }
}
catch (IOException ioException)
{
 data2.SomeData = $"IO Error: {ioException.Message}";
}
catch (Exception exception)
{
 data2.SomeData = $"Generic Error: {exception.Message}";
}
finally
{
 data3.SomeData = "All done!";
}

In the above code, you can see a series of try-catch blocks, ending with a finally block:

  1. try to read the file and overwrite some data in the 2nd data object.
  2. catch an IOException, capture the error message
  3. catch a generic Exception if a different exception has occurred, capture the generic error message
  4. finally, overwrite some data in the 3rd data object whether or not any errors have occurred.

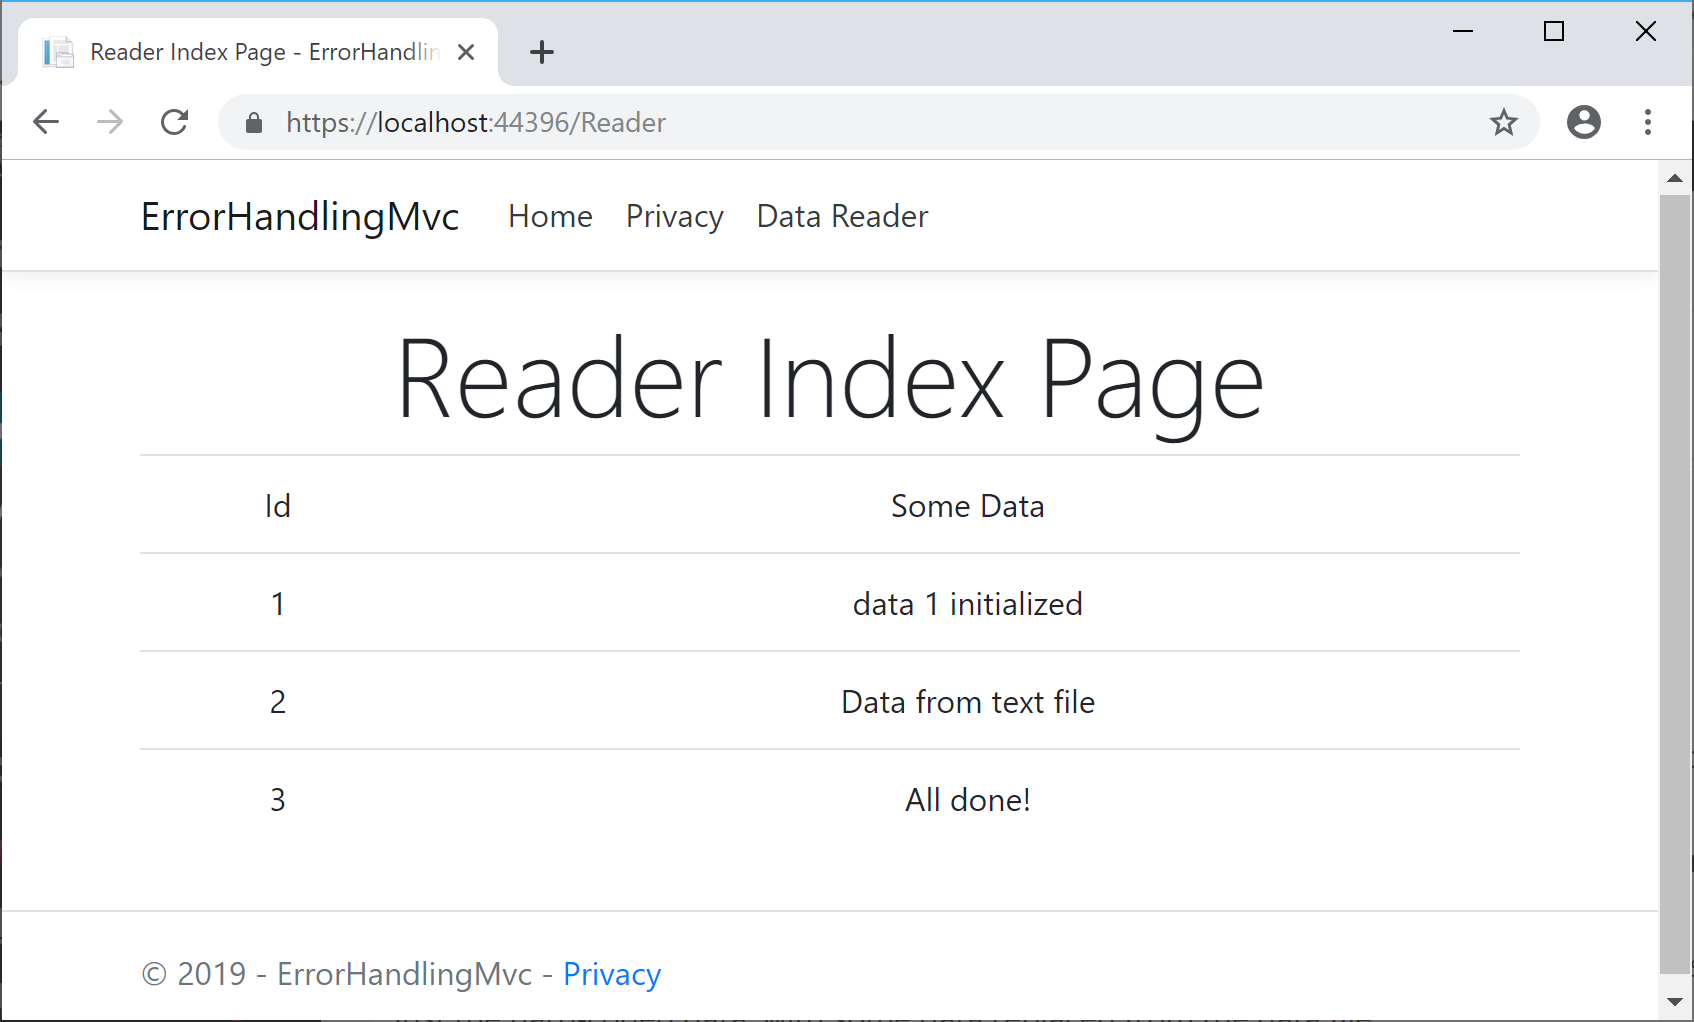
Run the MVC app and navigate to the Reader Controller. If there are no errors, you should see just the hard-coded data, with some data replaced from the data file.

ErrorApp-Success

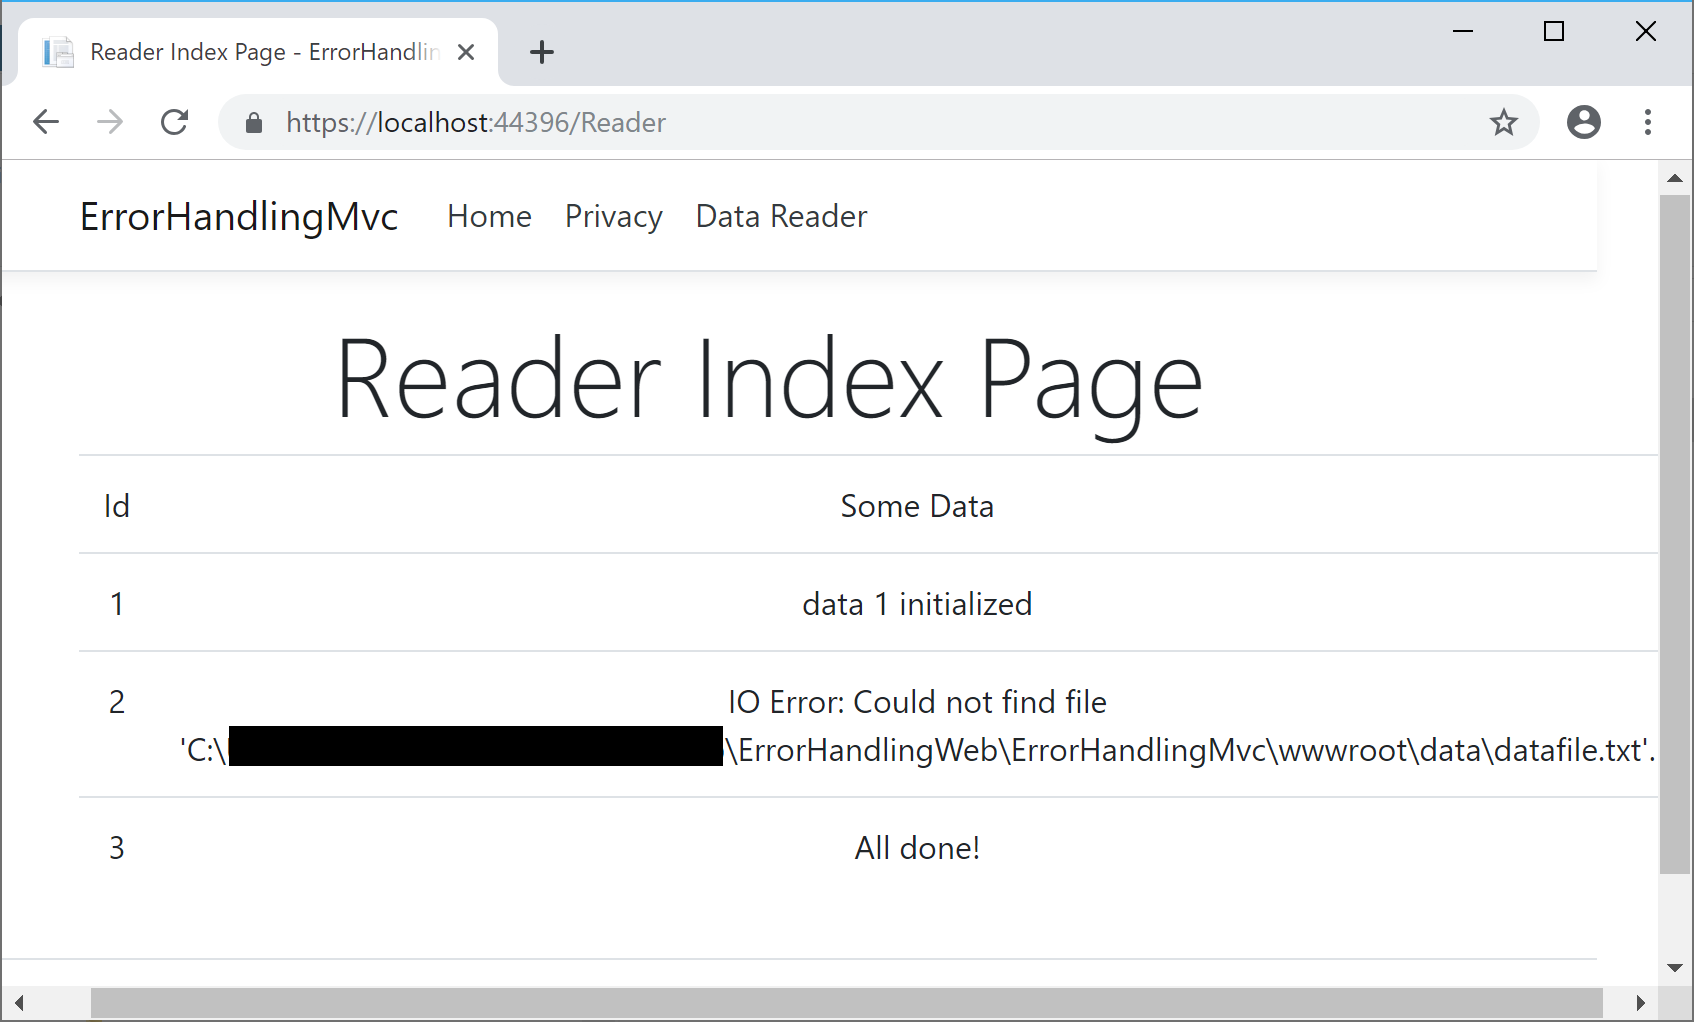
If you rename/delete the data file, then run the program again, you should see an error message as well. This reflects the IOException that occurred while attempting to read a missing file.

ErrorApp-IOError

Error Handling for MVC

In ASP .NET Core MVC web apps, unhandled exceptions are typically handled in different ways, depending on whatever environment the app is running in. The default template uses the DeveloperExceptionPage middleware in a development environment but redirects to a shared Error view in non-development scenarios. This logic is implemented in the Configure() method of the Startup.cs class.

if (env.IsDevelopment())
{
   app.UseDeveloperExceptionPage();
}
else
{
   app.UseExceptionHandler("/Home/Error");
   ...
}

The DeveloperExceptionPage middleware can be further customized with DeveloperExceptionPageOptions properties, such as FileProvider and SourceCodeLineCount.

var options = new DeveloperExceptionPageOptions
{
   SourceCodeLineCount = 2
};  
app.UseDeveloperExceptionPage(options);

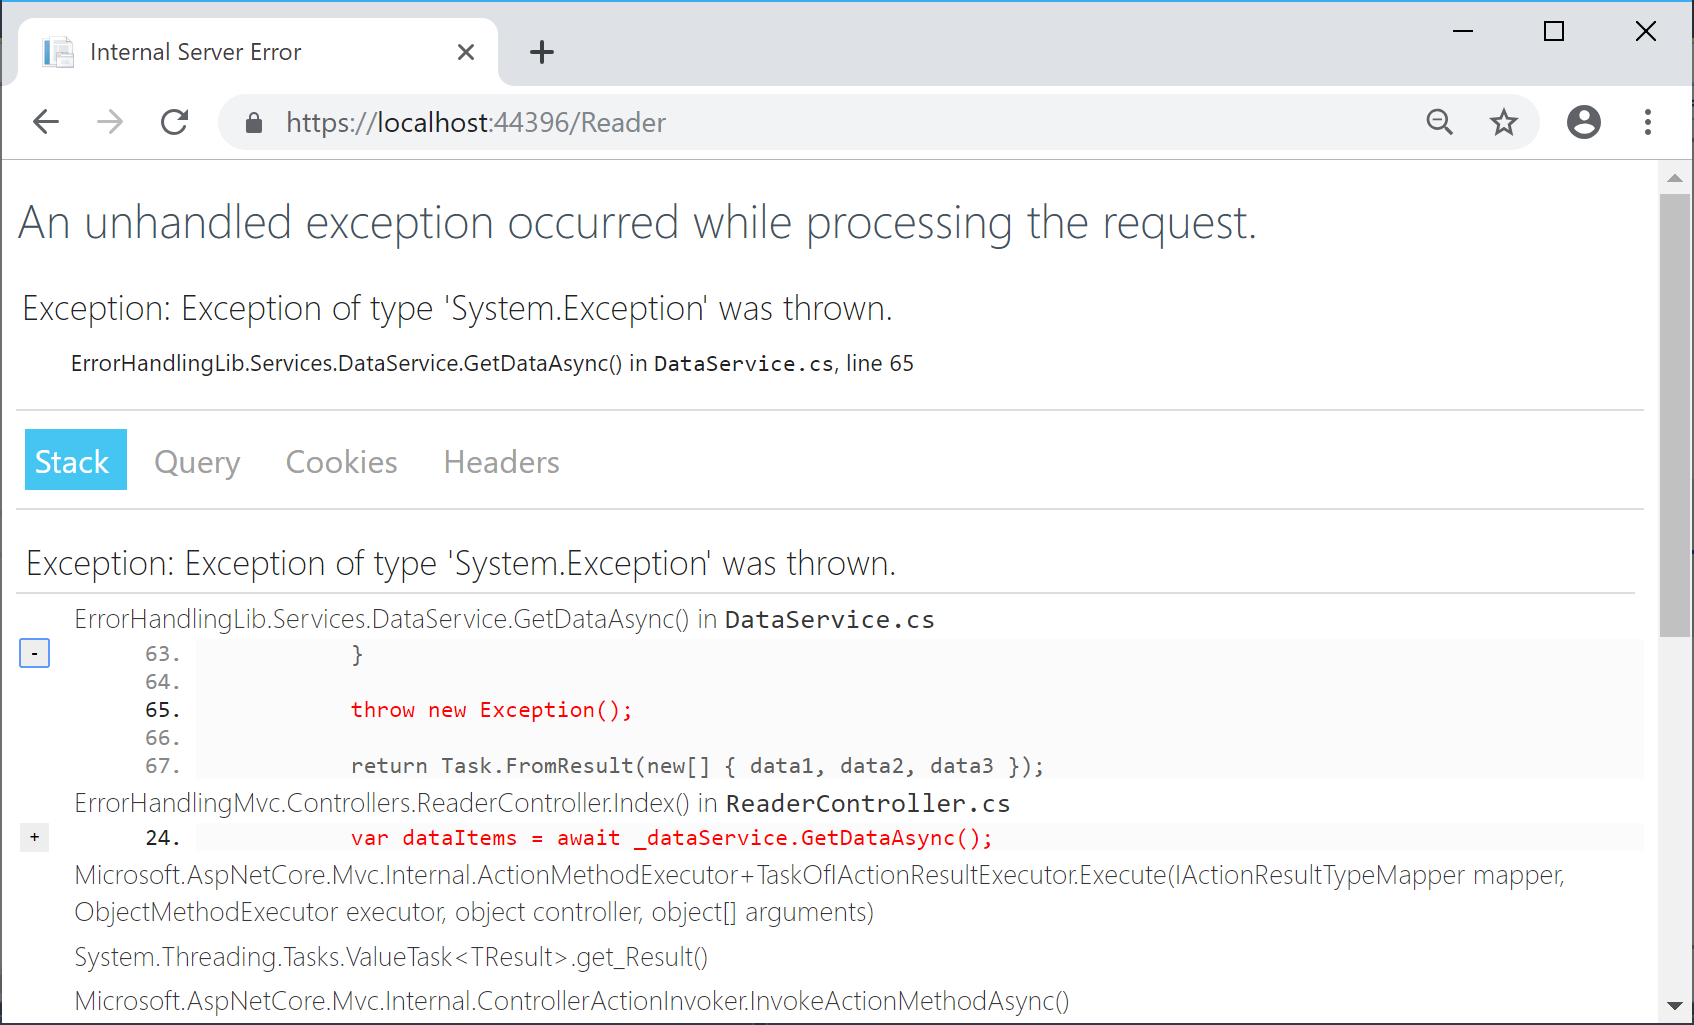
Using the snippet shown above, the error page will show the offending line in red, with a variable number of lines of code above it. The number of lines is determined by the value of SourceCodeLineCount, which is set to 2 in this case. In this contrived example, I’m forcing the exception by throwing a new Exception in my code.

ErrorApp-MvcError-Dev-SourceLine

For non-dev scenarios, the shared Error view can be further customized by updating the Error.cshtml view in the Shared subfolder. The ErrorViewModel has a ShowRequestId boolean value that can be set to true to see the RequestId value.

@model ErrorViewModel
@{
   ViewData["Title"] = "Error";
}

<h1 class="text-danger">Error.</h1>
<h2 class="text-danger">An error occurred while processing your request.</h2>

@if (Model.ShowRequestId)
{
<p>
<strong>Request ID:</strong> <code>@Model.RequestId</code>
</p>
}

<h3>header content</h3>
<p>text content</p> 

In the MVC template’s Home Controller, the Error() action method sets the RequestId to the current Activity.Current.Id if available or else it uses HttpContext.TraceIdentifier. These values can be useful during debugging.

[ResponseCache(Duration = 0, Location = ResponseCacheLocation.None, NoStore = true)]
public IActionResult Error()
{
   return View(new ErrorViewModel { 
      RequestId = Activity.Current?.Id ?? HttpContext.TraceIdentifier 
   });
}

UPDATE:

Wait… what about Web API in ASP .NET Core? After posting this article in a popular ASP .NET Core group on Facebook, I got some valuable feedback from the admin:

Dmitry Pavlov: “For APIs there is a nice option to handle errors globally with the custom middleware https://code-maze.com/global-error-handling-aspnetcore – helps to get rid of try/catch-es in your code. Could be used together with FluentValidation and MediatR – you can configure mapping specific exception types to appropriate status codes (400 bad response, 404 not found, and so on to make it more user friendly and avoid using 500 for everything). “

For more information on the aforementioned items, check out the following resources:

Later on in this series, we’ll cover ASP .NET Core Web API in more detail, when we get to “W is for Web API”. Stay tuned!

Error Handling for Razor Pages

Since Razor Pages still use the MVC middleware pipeline, the exception handling is similar to the scenarios described above. For starters, here’s what the Configure() method looks like in the Startup.cs file for the Razor Pages web app sample.

if (env.IsDevelopment())
{
   app.UseDeveloperExceptionPage();
}
else
{
   app.UseExceptionHandler("/Error");
   ...
}

In the above code, you can see the that development environment uses the same DeveloperExceptionPage middleware. This can be customized using the same techniques outlined in the previous section for MVC pages, so we won’t go over this again.

As for the non-dev scenario, the exception handler is slightly different for Razor Pages. Instead of pointing to the Home controller’s Error() action method (as the MVC version does), it points to the to the /Error page route. This Error.cshtml Razor Page found in the root level of the Pages folder.

@page
@model ErrorModel
@{
   ViewData["Title"] = "Error";
}

<h1 class="text-danger">Error.</h1>
<h2 class="text-danger">An error occurred while processing your request.</h2>

@if (Model.ShowRequestId)
{
    <p>
        <strong>Request ID:</strong> <code>@Model.RequestId</code>
    </p>
}

<h3>custom header text</h3>
<p>custom body text</p>

The above Error page for looks almost identical to the Error view we saw in the previous section, with some notable differences:

  • @page directive (required for Razor Pages, no equivalent for MVC view)
  • uses ErrorModel (associated with Error page) instead of ErrorViewModel (served by Home controller’s action method)

Logging Errors

To log errors in ASP .NET Core, you can use the built-in logging features or 3rd-party logging providers. In ASP .NET Core 2.x, the use of CreateDefaultBuilder() in Program.cs takes of care default Logging setup and configuration (behind the scenes).

public static IWebHostBuilder CreateWebHostBuilder(string[] args) =>
   WebHost.CreateDefaultBuilder(args)
      .UseStartup<Startup>();

NOTE: The Web Host Builder is being replaced by the Generic Host Builder in ASP .NET Core 3.0, but you can expect similar initial behavior. For more information on Generic Host Builder, take a look at the previous blog post in this series: Generic Host Builder in ASP .NET Core.

The host sets up the logging configuration for you, e.g.:

.ConfigureLogging((hostingContext, logging) =>
{
   logging.AddConfiguration(hostingContext.Configuration.GetSection("Logging"));
   logging.AddConsole();
   logging.AddDebug();
   logging.AddEventSourceLogger();
})

Since ASP .NET Core is open-source, you can find the above snippet (or something similar) on Github. Here is a link to the 2.2 release of WebHost:

To make use of error logging (in addition to other types of logging) in your MVC web app, you may call the necessary methods in your controller’s action methods. Here, you can log various levels of information, warnings and errors at various severity levels.

As seen in the snippet below, you have to do the following in your MVC Controller that you want to add Logging to:

  1. Add using statement for Logging namespace
  2. Add a private readonly variable for an ILogger object
  3. Inject an ILogger<model> object into the constructor
  4. Assign the private variable to the injected variable
  5. Call various log logger methods as needed.
...
using Microsoft.Extensions.Logging;

public class MyController: Controller
{
   ...
   private readonly ILogger _logger; 

   public MyController(..., ILogger<MyController> logger)
   {
      ...
      _logger = logger;
   }
   
   public IActionResult MyAction(...)
   {
      _logger.LogTrace("log trace");
      _logger.LogDebug("log debug");
      _logger.LogInformation("log info");
      _logger.LogWarning("log warning");
      _logger.LogError("log error");
      _logger.LogCritical("log critical");
   }
}

In Razor Pages, the logging code will go into the Page’s corresponding Model class. As seen in the snippet below, you have to do the following to the Model class that corresponds to a Razor Page:

  1. Add using statement for Logging namespace
  2. Add a private readonly variable for an ILogger object
  3. Inject an ILogger<model> object into the constructor
  4. Assign the private variable to the injected variable
  5. Call various log logger methods as needed.
...
using Microsoft.Extensions.Logging;

public class MyPageModel: PageModel
{
   ...
   private readonly ILogger _logger;

   public MyPageModel(..., ILogger<MyPageModel> logger)
   {
      ...
      _logger = logger; 
   }
   ...
   public void MyPageMethod() 
   {
      ... 
      _logger.LogInformation("log info"); 
      _logger.LogError("log error");
      ...
   }
} 

You may have noticed that Steps 1 through 5 are pretty much identical for MVC and Razor Pages. This makes it very easy to quickly add all sorts of logging into your application, including error logging.

Transient fault handling

Although it’s beyond the scope of this article, it’s worth mentioning that you can avoid transient faults (e.g. temporary database connection losses) by using some proven patterns, practices and existing libraries. To get some history on transient faults, check out the following article from the classic “patterns & practices”. It describes the so-called “Transient Fault Handling Application Block”.

More recently, check out the docs on Transient Fault Handling:

And now in .NET Core, you can add resilience and transient fault handling to your .NET Core HttpClient with Polly!

You can get more information on the Polly project on the official Github page:

References


EF Core Relationships in ASP .NET Core

By Shahed C on February 4, 2019

This is the fifth of a new series of posts on ASP .NET Core for 2019. In this series, we’ll cover 26 topics over a span of 26 weeks from January through June 2019, titled A-Z of ASP .NET Core!

ASPNETCoreLogo-300x267 A – Z of ASP .NET Core!

In this Article:

E is for EF Core Relationships

In my 2018 series, we covered EF Core Migrations to explain how to add, remove and apply Entity Framework Core Migrations in an ASP .NET Core web application project. In this article, we’ll continue to look at the NetLearner project, to identify entities represented by C# model classes and the relationships between them.

NOTE: Please note that NetLearner is a work in progress as of this writing, so its code is subject to change. The UI still needs work (and will be updated at a later date) but the current version has the following models with the relationships shown below:

NetLearner database diagram

NetLearner database diagram

Classes and Relationships

The heart of the application is the LearningResource class. This represents any online learning resource, such as a blog post, single video, podcast episode, ebook, etc that can be accessed with a unique URL.

public class LearningResource : InternetResource
{
    public List<LearningResourceItemList> LearningResourceItemLists
    {
        get; set;
    }
}

The abstract class InternetResource defines the common properties (e.g. Id, Name and Url) found in any Internet resource, and is also used by other classes ResourceRoot and RssFeed.

public abstract class InternetResource
{
    public int Id { get; set; }
    public string Name { get; set; }
    public string Url { get; set; }
}

The ResourceRoot class represents a root-level resource (e.g. a blog home or a podcast website) while the RssFeed class represents the RSS Feed for an online resource.

public class ResourceRoot: InternetResource
{
    public RssFeed RssFeed { get; set; }
    public List<LearningResource> LearningResources { get; set; }
}
public class RssFeed: InternetResource
{
    public int ResourceRootId { get; set; }
}

The ItemList class represents a logical container for learning resources in the system. It is literally a list of items, where the items are your learning resources.

public class ItemList
{
    public int Id { get; set; }
    public string Name { get; set; }
    public List<LearningResourceItemList> LearningResourceItemLists
    {
        get; set;
    }
}

At this point, you may have noticed both the LearningResource and ItemList classes contain a List<T> property of LearningResourceItemList. If you browse the database diagram, you will notice that this table appears as a connection between the two aforementioned tables, to establish a many-to-many relationship. (more on this later)

The following diagram shows an example of how the a LearningResource is a part of a list (which is a part of a ResourceCatalog), while each LearningResource also has a ResourceRoot.

NetLearner example

NetLearner example

One to One

Having looked through the above entities and relationships, we can see that each ResourceRoot has an RssFeed. This is an example of a 1-to-1 relationship. For example:

  • Resource Root = Wake Up and Code! blog site
  • Rss Feed = RSS Feed for blog site

In the two classes, we see the following code:

public class ResourceRoot: InternetResource
{
    public RssFeed RssFeed { get; set; }
    public List<LearningResource> LearningResources { get; set; }
}
public class RssFeed: InternetResource
{
    public int ResourceRootId { get; set; }
}

Each Resource Root has a corresponding Rss Feed, so the ResourceRoot class has a property for RssFeed. That’s pretty simple. But in the RssFeed class, you don’t need a property pointing back to the ResourceRoot. In fact, all you need is a ResourceRootId property. EF Core will ensure that ResourceRoot.Id points to RssFeed.ResourceRootId in the database.

One to One Relationships

One to One Relationships

If you’re wondering how these two classes got their Id, Name and Url fields, you may recall that they are both derived from a common abstract parent class (InternetResource) that define all this fields for reuse. But wait a second… why doesn’t this parent class appear in the database? That’s because we don’t need it in the database and have intentionally ommitted it from the list of DBSet<> definitions in the DB Context for the application, found in ApplicationDbContext.cs:

public class ApplicationDbContext : IdentityDbContext
{
...
    public DbSet<ItemList> ItemList { get; set; }
    public DbSet<LearningResource> LearningResource { get; set; }
    public DbSet<ResourceCatalog> ResourceCatalog { get; set; }
    public DbSet<ResourceRoot> ResourceRoot { get; set; }
    public DbSet<RssFeed> RssFeed { get; set; }
...
}

Another way of looking at the One-to-One relationship is to view the constraints of each database entity in the visuals below. Note that both tables have an Id field that is a Primary Key (inferred by EF Core) while the RssFeed table also has a Foreign Key for the ResourceRootId field used for the constraint in the relationship.

RssFeed table

RssFeed table

ResourceRoot Table

ResourceRoot Table

NetLearner-Db-ResourceRoot-RssFeed

1-to-1 Relationship: ResourceRoot.Id points to RssFeed.ResourceRootId

One to Many (Example 1)

Next, let’s take a look at the One-to-Many relationship for each ResourceCatalog that has zero or more ItemLists. For example:

  • Resource Catalog = ASP .NET Core Blogs
  • Item List = ASP .NET Core A-Z Blog Series

In the two classes, we see the following code:

public class ResourceCatalog
{
    public int Id { get; set; }
    public string Name { get; set; }
    public List<ItemList> ItemLists { get; set; }
}
public class ItemList
{
    public int Id { get; set; }
    public string Name { get; set; }
    public List<LearningResourceItemList> LearningResourceItemLists
    {
        get; set;
    }
}

Each Resource Catalog has zero or more Item Lists, so the ResourceCatalog class has a List<T> property for ItemLists. This is even simpler than the previously described 1-to-1 relationship. In the ItemList class, you don’t need a property pointing back to the ResourceCatalog.

One-to-Many Relationship

One-to-Many Relationship

Another way of looking at the One-to-Many relationship is to view the constraints of each database entity in the visuals below. Note that both tables have an Id field that is a Primary Key (once again, inferred by EF Core) while the ItemList table also has a Foreign Key for the ResourceCatalogId field used for the constraint in the relationship.

NetLearner-Db-ResourceCatalog-ItemList-Constraint

1-to-Many Relationship: ResourceCatalog.Id points to ItemList.ResourceCatalogId

One to Many (Example 2)

Let’s also take a look at another One-to-Many relationship, for each ResourceRoot that has zero or more LearningResources. For example:

  • Resource Root = Wake Up and Code! blog site
  • Learning Resource = Specific blog post on site

In the two classes, we see the following code:

public class ResourceRoot: InternetResource
{
    public RssFeed RssFeed { get; set; }
    public List<LearningResource> LearningResources { get; set; }
}
public class LearningResource : InternetResource
{
    public List<LearningResourceItemList> LearningResourceItemLists
    {
        get; set;
    }
}

Each Resource Root has zero or more Learning Resources, so the ResourceRoot class has a List<T> property for LearningResources. This is just as simple as the aforementioned 1-to-many relationship. In the LearningResource class, you don’t need a property pointing back to the ResourceRoot.

Relationship between ResourceRoot and LearningResource

ResourceRoot and LearningResource

Another way of looking at the One-to-Many relationship is to view the constraints of each database entity in the visuals below. Note that both tables have an Id field that is a Primary Key (inferred by EF Core, as you should know by now) while the LearningResource table also has a Foreign Key for the ResourceRootId field used for the constraint in the relationship.

1-to-Many Constraint

1-to-Many Constraint for ResourceRoot and LearningResource

Many to Many

Finally, let’s also take a look at a Many-to-Many relationship, for each ItemList and LearningResource, either of which can have many of the other. For example:

  • Item List = ASP .NET Core A-Z Blog Series
  • Learning Resource = Specific blog post on site

This relationship is a little more complicated than all of the above, as we will need a “join table” to connect the two tables in question. Not only that, we will have to describe the entity in the C# code with connections to both tables we would like to connect with this relationship.

If you’re wondering when EF Core will support this type of relationship without a join table, check out the following GitHub issue discussions:

Specifically, take a look at this comment: “Current plan for 3.0 is to implement skip-level navigation properties as a stretch goal. If property bags (#9914) also make it into 3.0, enabling a seamless experience for many-to-many could become easier.

In the two classes we would like to connect, we see the following code:

public class ItemList
{
    public int Id { get; set; }
    public string Name { get; set; }
    public List<LearningResourceItemList> LearningResourceItemLists
    {
        get; set;
    }
}
public class LearningResource : InternetResource
{
    public List<LearningResourceItemList> LearningResourceItemLists
    {
        get; set;
    }
}

Next, we have the LearningResourceItemList class as a “join entity” to connect the above:

public class LearningResourceItemList
{
    public int LearningResourceId { get; set; }
    public LearningResource LearningResource { get; set; }
    public int ItemListId { get; set; }
    public ItemList ItemList { get; set; }
}

This special class has the following properties:

  • LearningResourceId: integer value, pointing back to LearningResource.Id
  • LearningResource: optional “navigation” property, reference back to connected LearningResource entity
  • ItemListId: integer value, pointing back to ItemList.Id
  • ItemList:  optional “navigation” property, reference back to connected ItemList entity

To learn more about navigation properties, check out the official docs at:

Many-to-Many Relationship

Many-to-Many Relationship

Another way of looking at the Many-to-Many relationship is to view the constraints of each database entity in the visuals below. Note that the two connected tables both have an Id field that is a Primary Key (yes, inferred by EF Core!) while the LearningResourceItemList table has a Composite Key for the ItemListId and LearningResourceId fields used for the constraints in the relationship.

The composite key is described in the ApplicationDbContext class inside the OnModelCreating() method:

public class ApplicationDbContext : IdentityDbContext
{
    ...
    protected override void OnModelCreating(ModelBuilder modelBuilder)
    {
        modelBuilder.Entity<LearningResourceItemList>()
            .HasKey(r => new { r.LearningResourceId, r.ItemListId });
        base.OnModelCreating(modelBuilder);
    }
}

Here, the HasKey() method informs EF Core that the entity LearningResourceItemList has a composite key defined by both LearningResourceId and ItemListId.

References

For more information, check out the list of references below.

For detailed tutorials that include both Razor Pages and MVC, check out the official tutorials below: