Category Archives: Visual Studio

Authentication & Authorization in ASP .NET Core

By Shahed C on January 7, 2019

This is the first of a new series of posts on ASP .NET Core for 2019. In this series, we’ll cover 26 topics over a span of 26 weeks from January through June 2019, titled A-Z of ASP .NET Core!

ASPNETCoreLogo-300x267 A – Z of ASP .NET Core!

In this Article:

A is for Authentication & Authorization

Authentication and Authorization are two different things, but they also go hand in hand. Think of Authentication as letting someone into your home and Authorization as allowing your guests to do specific things once they’re inside (e.g. wear their shoes indoors, eat your food, etc). In other words, Authentication lets your web app’s users identify themselves to get access to your app and Authorization allows them to get access to specific features and functionality.

In this article, we will take a look at the NetLearner app, on how specific pages can be restricted to users who are logged in to the application. Throughout the series, I will try to focus on new code added to NetLearner or build a smaller sample app if necessary.

Authentication in ASP .NET Core

The quickest way to add authentication to your ASP .NET Core app is to use of the pre-built templates with one of the Authentication options. The examples below demonstrate both the CLI commands and Visual Studio UI.

CLI Commands:

> dotnet new webapp --auth Individual

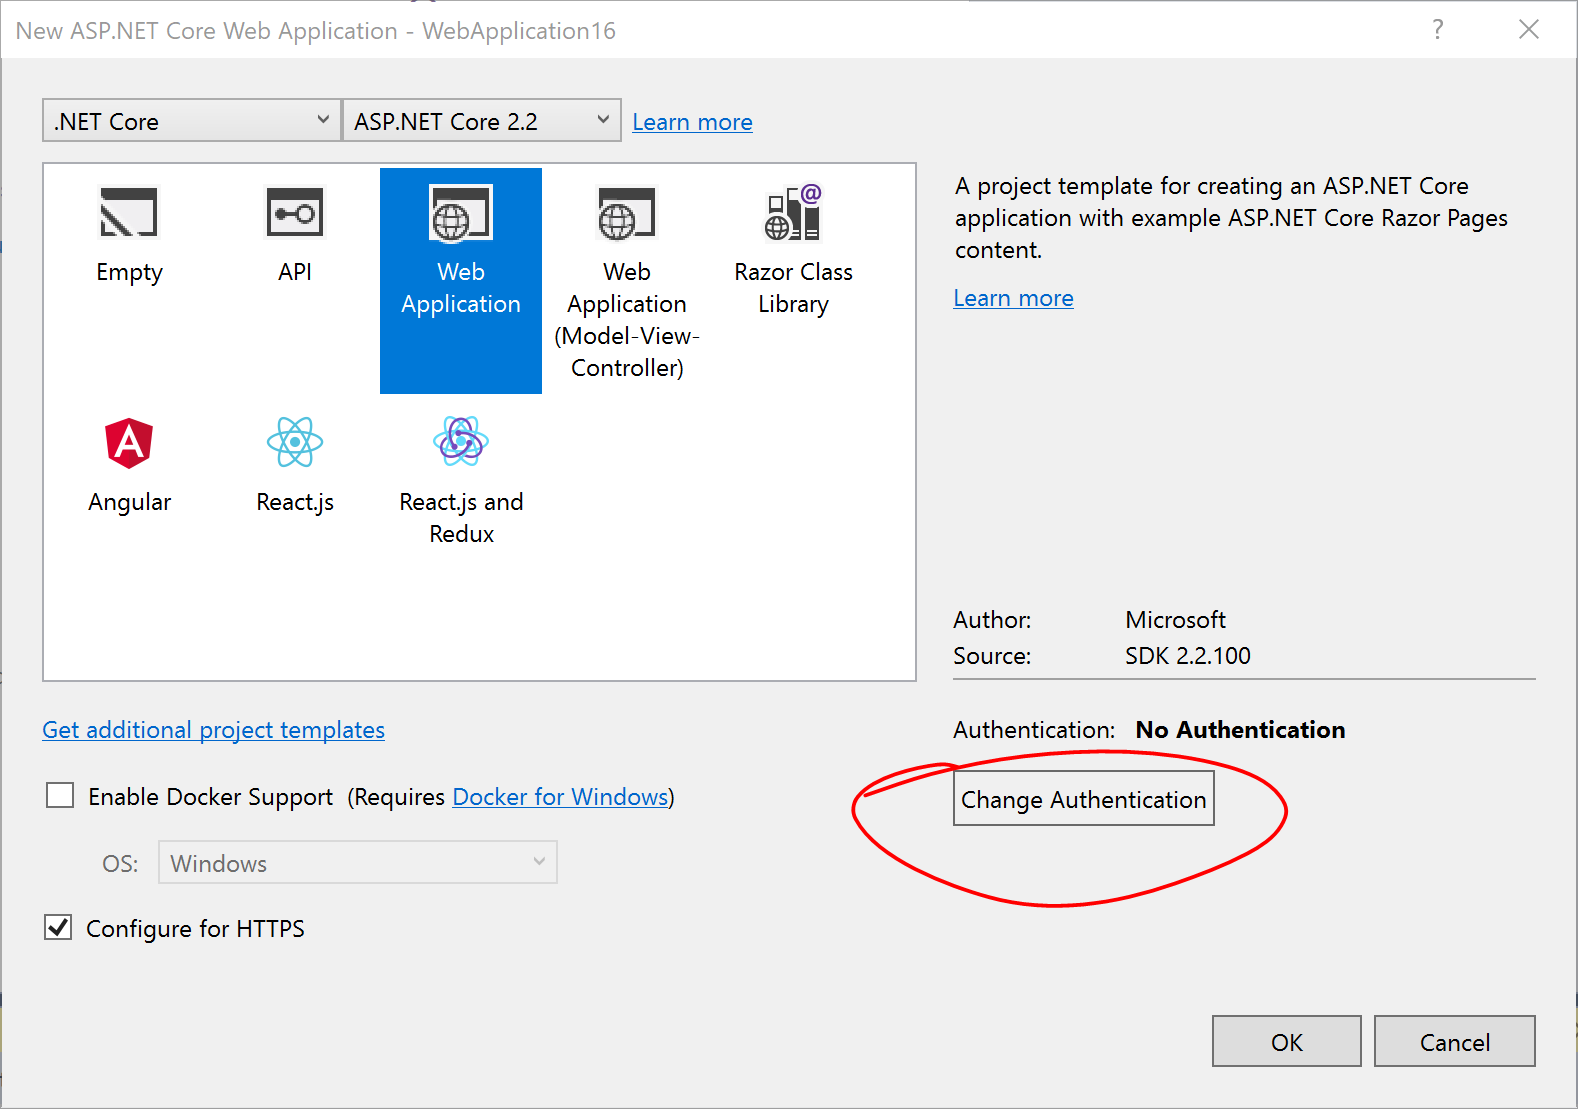
Visual Studio 2017 new project with Authentication:

Change Authentication upon creating a new project

Change Authentication upon creating a new project

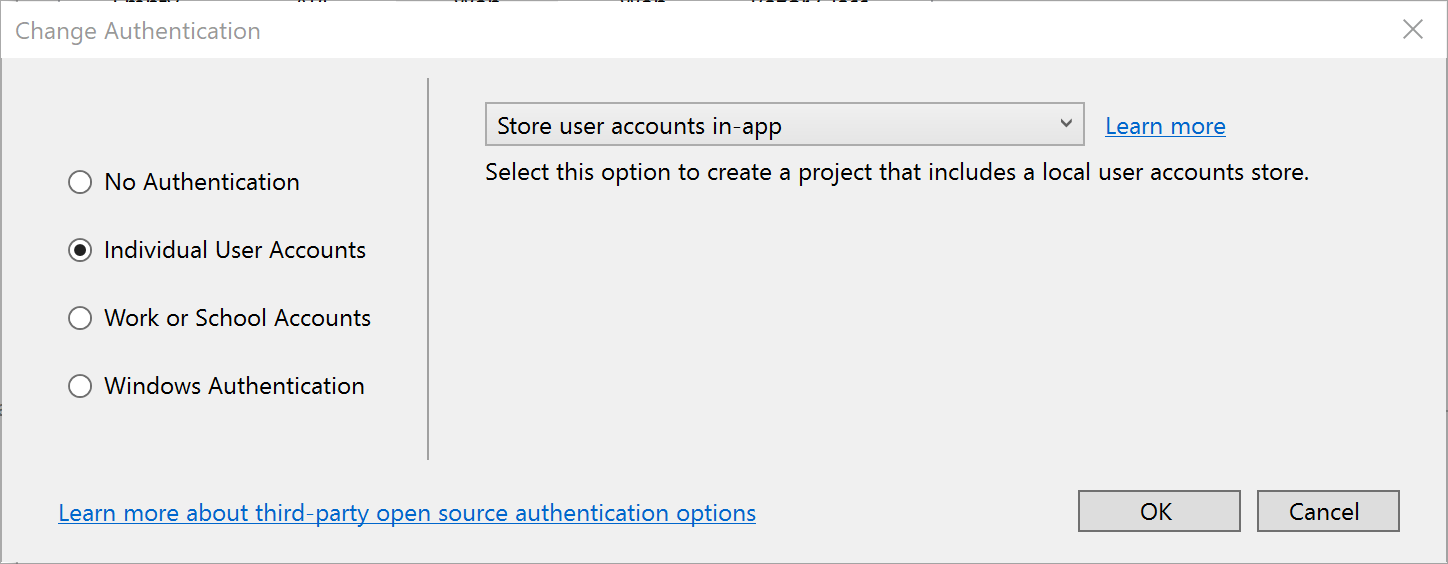
Select Authentication Type

Select Authentication Type

The above example uses “Individual” authentication, which offers a couple of options:

  • Store user accounts in-app: includes a local user accounts store
  • Connect to an existing user store in the cloud: connect to an existing Azure AD B2C application

Even if I choose to start with a local database, I can update the connection string to point to a SQL Server instance on my network or in the cloud, depending on which configuration is being loaded. If you’re wondering where your Identity code lives, check out my previous post on Razor UI Libraries, and jump to the last section where Identity is mentioned.

From the documentation, the types of authentication are listed below.

  • None: No authentication
  • Individual: Individual authentication
  • IndividualB2C: Individual authentication with Azure AD B2C
  • SingleOrg: Organizational authentication for a single tenant
  • MultiOrg: Organizational authentication for multiple tenants
  • Windows: Windows authentication

To get help information about Authentication types, simply type ––help after the ––auth flag, e.g.

> dotnet new webapp --auth --help

Authentication in NetLearner

Within my NetLearner app, the following snippets of code are added to the Startup.cs configuration:

public void ConfigureServices(IServiceCollection services)
{
...
   services.AddDbContext<ApplicationDbContext>(options =>
      options.UseSqlServer(
      Configuration.GetConnectionString("DefaultConnection")));

   services.AddDefaultIdentity<IdentityUser>()
      .AddDefaultUI(UIFramework.Bootstrap4)
      .AddEntityFrameworkStores<ApplicationDbContext>();
...
}
public void Configure(IApplicationBuilder app, IHostingEnvironment env)
{
...
 app.UseStaticFiles();
...
 app.UseAuthentication();
...
 app.UseMvc();
}

In the above, note that:

  • The ConfigureServices() method has calls to services.AddDbContext and server.AddDefaultIdentity. The call to add a DB Context will vary depending on which data store you choose for authentication. The call to AddDefaultIdentity ensures that your app calls AddIdentity, AddDefaultUI and AddDefaultTokenProviders to add common identity features and user Register/Login functionality.
  • The Configure() method has a call to app.UseAuthentication to ensure that authentication is used by your web app. Note that this appears after app.UseStaticFiles but before app.UseMvc to ensure that static files (html, css, js, etc) can be served without any authentication but MVC application-controlled routes and views/pages will follow authentication rules.

Continue reading

Happy New Year 2019!

By Shahed C on December 27, 2018

If you’ve been following my ASP .NET Core blog series from October to December 2018, you may have noticed a little surprise. The first letter of each article spells out the words HAPPY NEW YEAR!

happy-new-year-2019

Congratulations! You’ve made it this far! 😀

Not just a gimmick, this blog series kicks off with a “Hello World” intro to ASP .NET Core, reveals a new open-source learning app (NetLearner) halfway through, breaks all my previous blog viewership records with December’s .NET Core 3.0 recap after Connect(); 2018 and finally wraps with up a SignalR writeup (and a new sample app that’s not chat!)

Blog viewership numbers in 2018:

  • Jan – Sep: ~2k/month with little or no updates
  • Oct: ~6k
  • Nov: ~8k
  • Dec: 36k+ (as of Dec 27, when this blog post was published)
    • 40k+ as of Dec 31 midnight

blog-stats-2018

Special thanks to the following people at Microsoft for all your guidance, motivation, inspiration, feedback and suggestions:


Also, I really appreciate the support from the Visual Studio team with their tweets:

@VisualStudio on Dec 18: https://twitter.com/VisualStudio/status/1075086548712988673

@VisualStudio on Dec 20: https://twitter.com/VisualStudio/status/1075804272279867397

During this blog series, I also participated in Matthew Groves’ 2nd annual C# Advent 2018, which ran daily from Dec 1 – Dec 25. Check out his website to see dozens of new blog posts from many talented C# developers and bloggers:

Hope you enjoyed the 2018 series and will stay tuned for what’s to come in 2019:

  • A-Z with ASP .NET Core 2019 Series
    • Jan – June 2019: 26 weeks of ASP .NET Core posts
    • Will be combined to form a living breathing ebook
    • Will be updated to align with .NET Core 3.0 release


Real-time ASP .NET Core Web Apps with SignalR

By Shahed C on December 23, 2018

This is the twelfth of a new series of posts on ASP .NET Core. In this post, we’ll learn about the use of SignalR to build real-time functionality in your ASP NET Core web apps. SignalR can also be used to add real-time functionality to desktop applications, mobile apps and Azure Functions.

ASPNETCoreLogo-300x267

In this Article:

What is SignalR?

SignalR has been around for 5+ years now, allowing ASP .NET developers to easily include real-time features in their web applications. Fast forward to 2018, SignalR Core is now available with ASP .NET Core (as of 2.1) as a cross-platform solution to add real-time features to web apps and more!

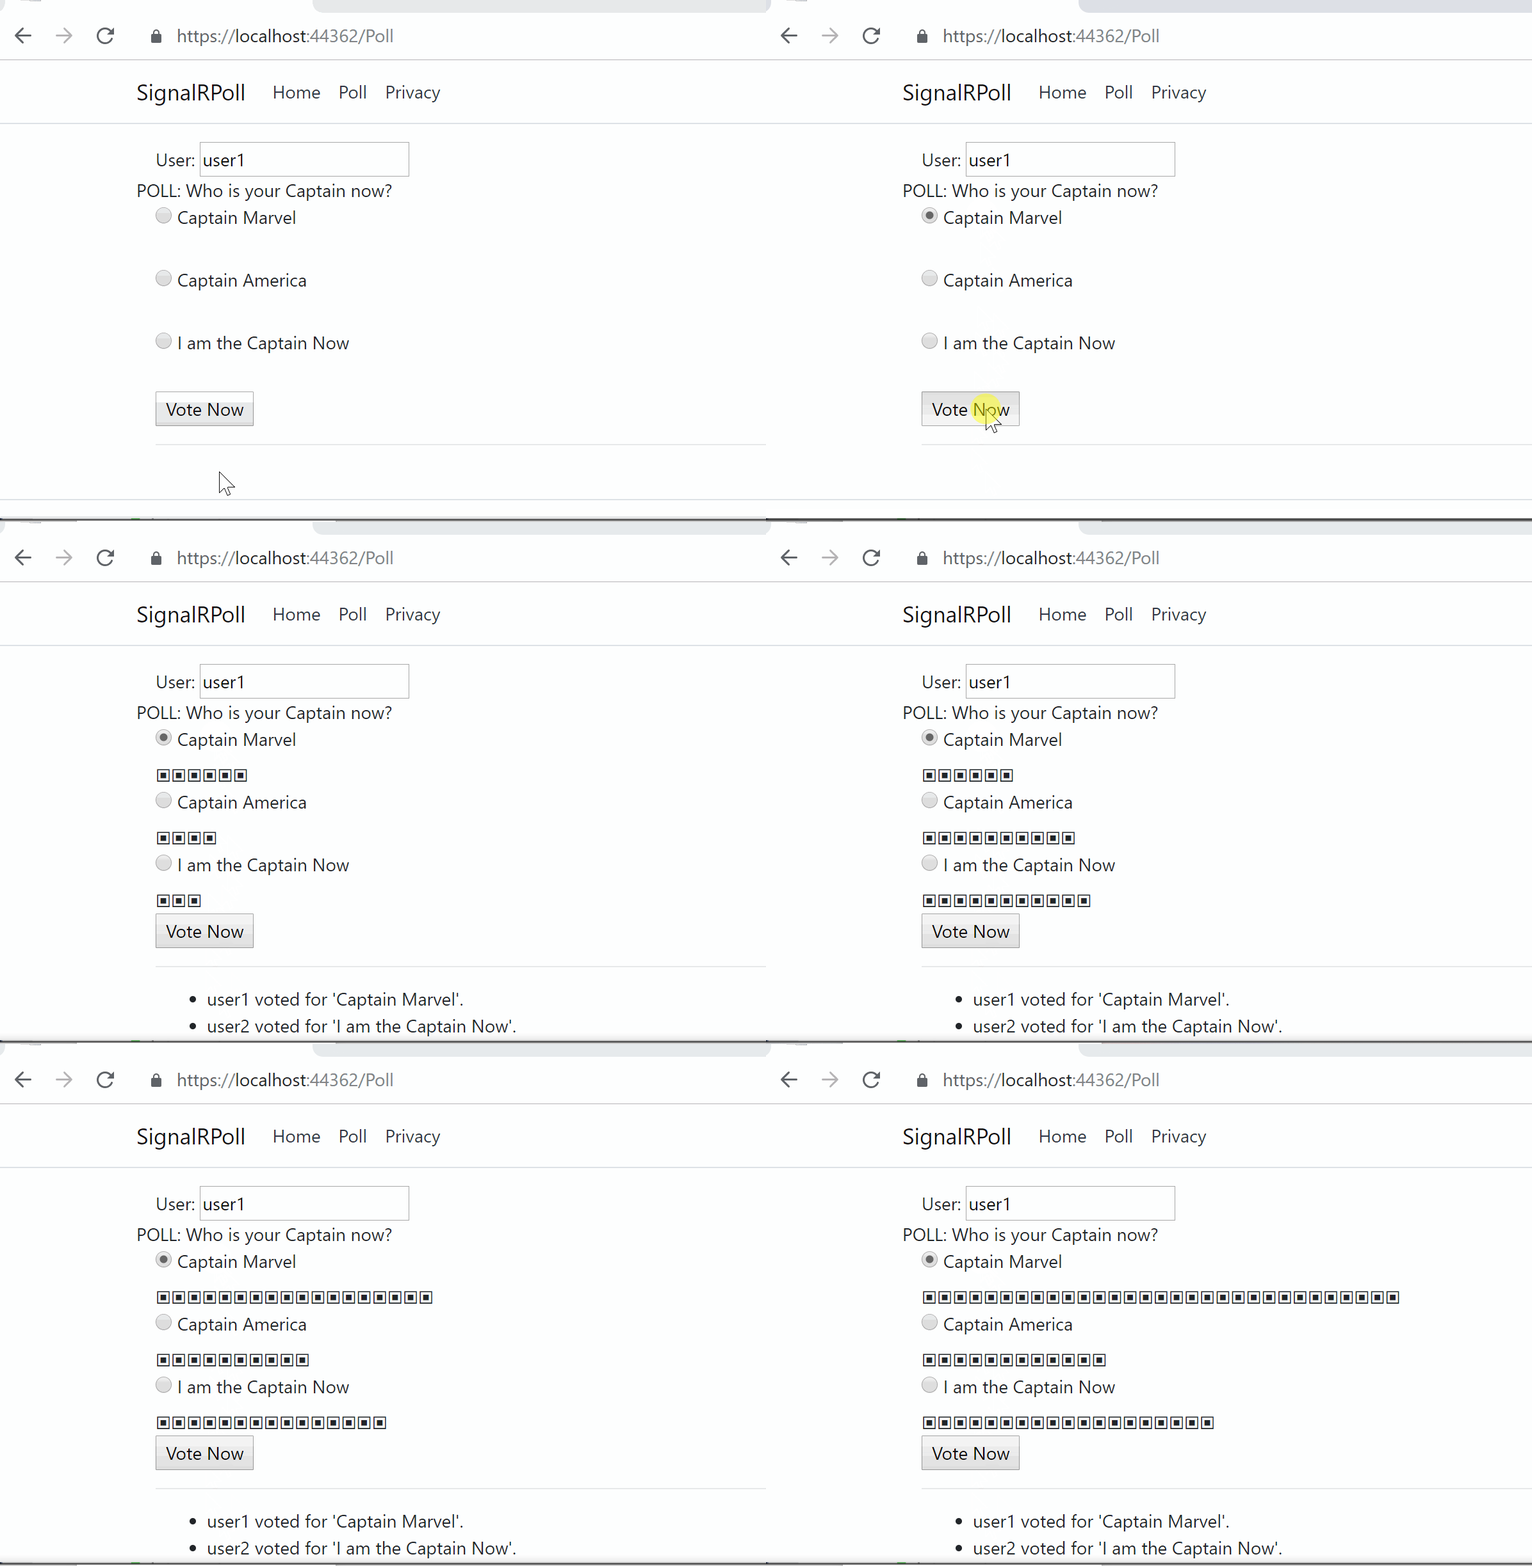
In this article, we’ll go over SignalR concepts, using a new sample I developed to allow web users to vote in a real-time online poll. Before you begin, take a look at the sample code project on GitHub:

Web SignalR Core Samples on GitHub: https://github.com/shahedc/SignalRCoreSamples

I ran a couple of polls on Facebook and Twitter to see what the dev community wanted to see. On Twitter, the #1 choice was “Polling/Voting app” followed by “Planning Poker App” and “Real-time game”. On Facebook, the #1 choice was “Real-time game” followed by “Polling/voting app”. As a result, I’ve decide to complement this article with a polling sample app, and I plan to work on other ideas in 2019.

More importantly, Brady Gaster suggested that the sample app should definitely be “Not. Chat.” 🙂

In the sample project, take a look at the SignalRPoll project to see how the polling feature has been implemented. In order to create a project from scratch, you’ll be using both server-side and client-side dependencies.

Continue reading

API Controllers in ASP .NET Core

By Shahed C on December 16, 2018

This is the eleventh of a new series of posts on ASP .NET Core. In this post, we’ll learn about API Controllers in ASP .NET Core and some new features that will improve your API development experience.

ASPNETCoreLogo-300x267

In this Article:

Why Web API?

If you’re building a Web App with ASP .NET Core, you may already have a complete web application with models, views and controllers using ASP .NET Core MVC. You may also opt for the new Razor Pages to simplify your development environment or try out the all-new experimental Blazor to run C# in a web browser using WebAssembly.

So… what would you need a Web API for? 

In addition to all of the above, you may also need to retrieve data or allow input through endpoints you expose via a REST API. Such endpoints can be accessible via simple JavaScript AJAX calls on any web page, whether it’s a static HTML page or a View within an ASP .NET Core web app. You may also use your Web API as a backend for a mobile application running natively on a smartphone or tablet.
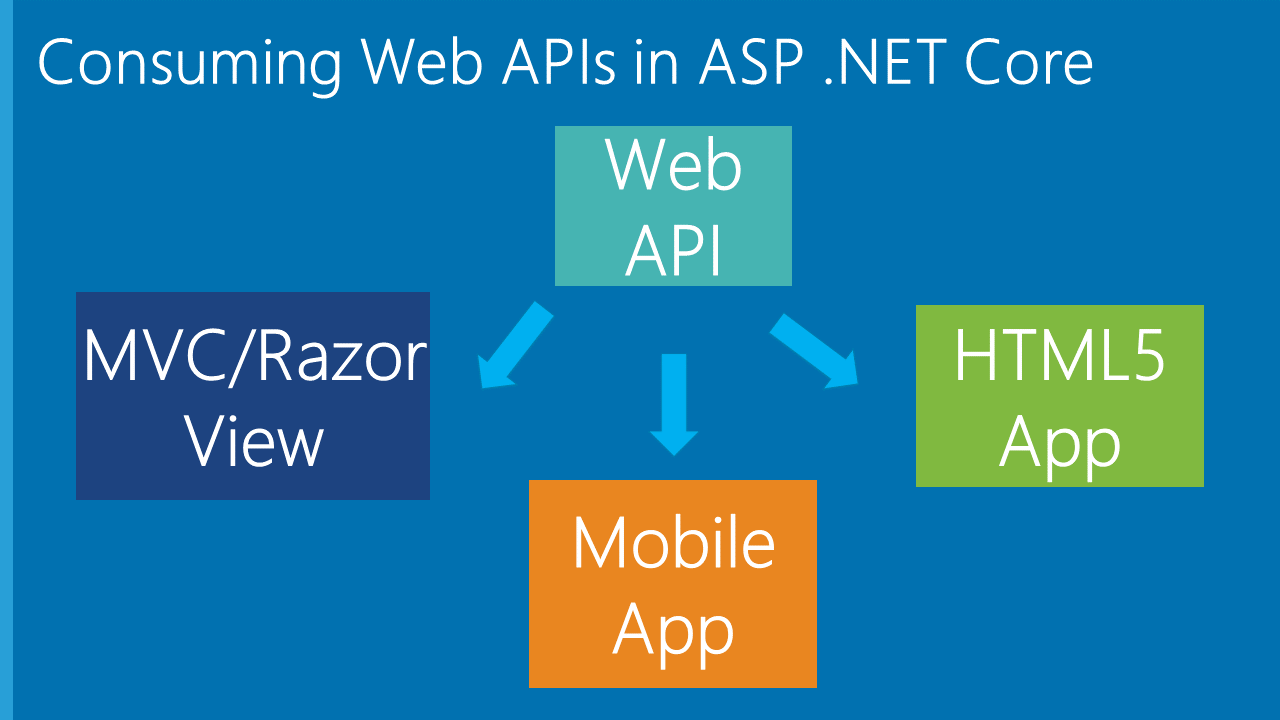
webapi-consume

What’s new with Web API in ASP .NET Core?

From last week’s blog post of new .NET Core announcements and features, we’ve seen many new features from ASP .NET Core 2.2 and the upcoming 3.0. These include improved Open API (Swagger) integration. As mentioned earlier, you can use community-driven projects such as NSwag and Swashbuckle.AspNetCore to visualize Open API documents for your API.

Earlier in ASP .NET Core 2.1, the new [APIController] attribute was added so that the aforementioned tools can easily be used to generate an Open API specification. This includes (but is not limited to) return types, parameter sources, and possible error responses without the need for additional attributes.

In this blog post, you’ll get some guidance on how to create such Web API controllers using ASP .NET Core. If you need a tutorial on how to get started, check out the official docs at:

To see this in action, check out the sample Web API project on Github:

Web Web API Sample on GitHub: https://github.com/shahedc/WebApiSample

The APIController Attribute

When ASP .NET Core was first announced (as ASP .NET 5 before the Core 1.0 release), one of the benefits was the anticipated unification of Web + API controllers. Instead of having separate base classes, you could now have a single ControllerBase parent class to inherit from, whether you’re building an MVC Web Controller or Web API Controller.

As of Core 2.0, your MVC and API controllers both derive from the Controller class, which derives from ControllerBase:

public class MyMvc20Controller : Controller {} 

[Route("api/[controller]")]
public class MyApi20Controller : Controller {}

As of Core 2.1 (and 2.2), the template-generated classes look a little different, where a Web controller is a child of the Controller class and an API controller is a child of ControllerBase.

public class MyMvc21Controller : Controller {}

[Route("api/[controller]")]
public class MyApi21Controller : ControllerBase {} 

This can be expressed in the table below:

Namespace Microsoft.AspNetCore.Mvc


Common parent ControllerBase (Abstract Class)
MVC Controller parent Controller: ControllerBase
MVC Controller MyMvcController: Controller
Web API Controller MyApiController: ControllerBase

So, what’s the purpose of the APIController attribute? According to the attribute’s documentation, the [APIController] attribute “Indicates that a type and all derived types are used to serve HTTP API responses. The presence of this attribute can be used to target conventions, filters and other behaviors based on the purpose of the controller.

This relatively new attribute isn’t required to build a Web API Controller, but will make your life easier. In fact, you may create a custom base controller for your API controllers, simply by using the [ApiController] attribute with a new base controller class.

Open API (Swagger) Integration

As mentioned in the previous blog post, Open API (Swagger) integration was already included in ASP .NET Core 2.1 and continues to improve with the all-new 2.2. To see this in action, let’s explore the following sample code:

[Produces("application/json")]
[Route("api/[controller]")]
[ApiController]
public class ItemsController : Controller
{ 
}

In order to use the API Controller attribute, it’s important to SetCompatibilityVersion to 2.1 or higher in your ConfigureServices() method of your Startup class. Since we’re using 2.2 here, the constant that’s passed in is Version_2_2.

public void ConfigureServices(IServiceCollection services)
{
   services.AddMvc().SetCompatibilityVersion(CompatibilityVersion.Version_2_2);
}

To learn more about setting the compatibility version, check out the official docs at:

As of ASP .NET Core 2.2, you may also apply the APIController attribute at the Assembly level. This would be set in the Startup.cs class file, as shown below:

[assembly: ApiController]
namespace MyAspNet22WebApiProject
{
   public class Startup
   { 
   } 
}

Setting up Swagger in your Web API

There are a few steps required to set up Swagger for your Web API project. I will use Swashbuckle for this example.

Step 1: Install the Swashbuckle.AspNetCore from NuGet.

You may install this package using the Package Manager Console in Visual Studio, from the Manage NuGet Packages dialog, or with the “dotnet add” command.

PowerShell Command in Package Manager Console:

Install-Package Swashbuckle.AspNetCore

CLI Command:

dotnet add TodoApi.csproj package Swashbuckle.AspNetCore

NuGet Packages dialog in Visual Studio:
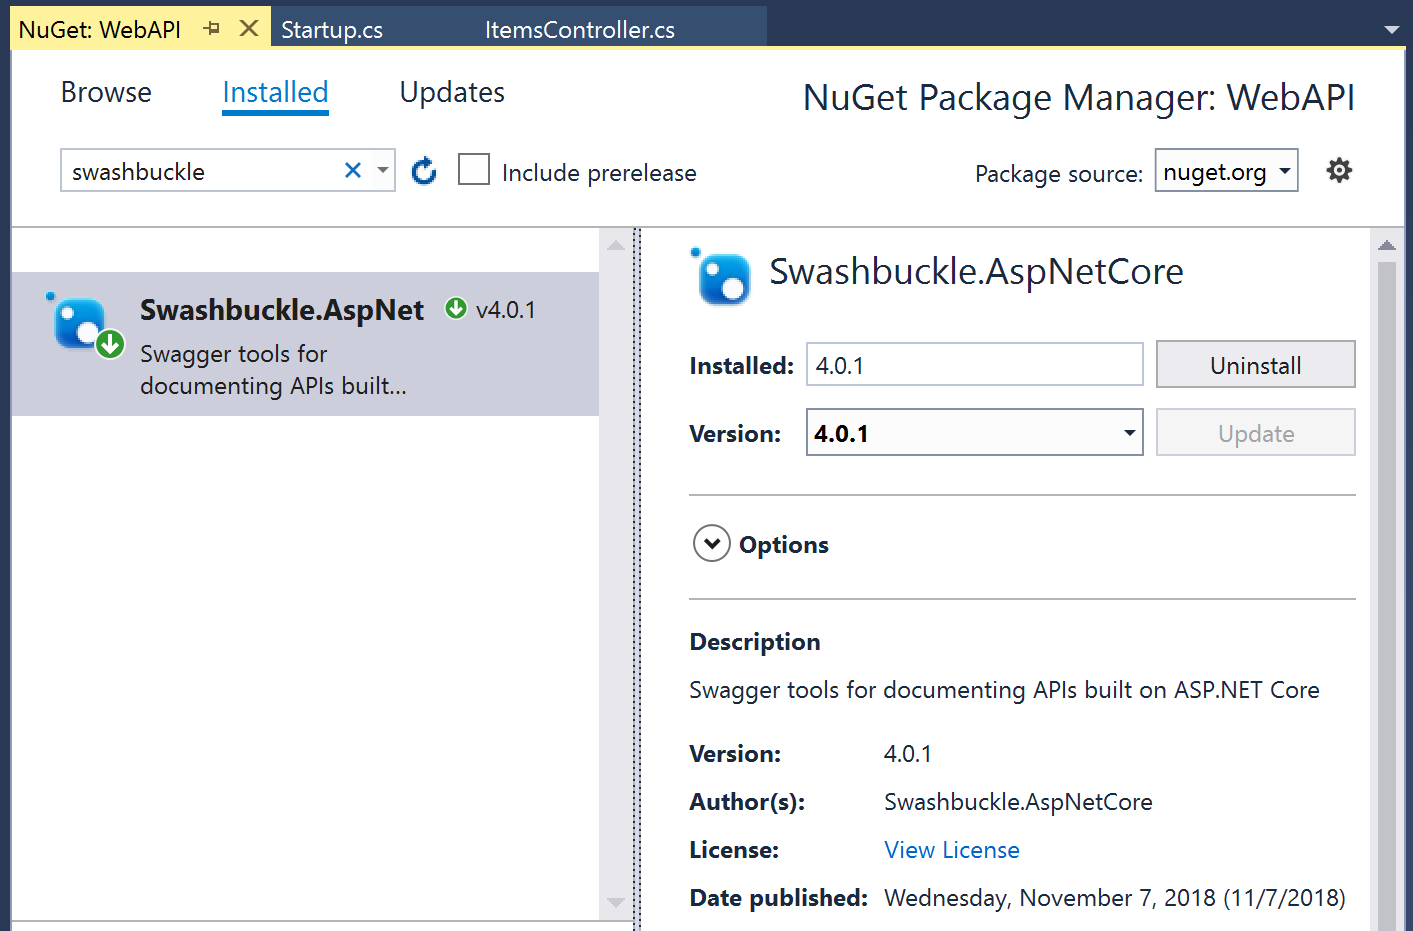
VS2017-NuGet-Swashbuckle

Step 2: Update your ConfigureServices() method in the Startup class to register the Swagger generator with at least 1 or more Swagger documents. 

using Swashbuckle.AspNetCore.Swagger; 
...
public void ConfigureServices(IServiceCollection services)
{
   services.AddMvc().SetCompatibilityVersion(CompatibilityVersion.Version_2_2); 

   // register the swagger generator
   services.AddSwaggerGen(c =>
   {
      c.SwaggerDoc("v1", new Info { Title = "My API", Version = "v1" });
   });
}

In order to use the above code, you must add the using statement specified, to grab the appropriate Swashbuckle namespace for Swagger.

Step 3: Update your Configure() method in the Startup class to enable the Swagger middleware you just registered. 

public void Configure(IApplicationBuilder app, IHostingEnvironment env)
{
   // Enable Swagger middleware 
   app.UseSwagger(); 

   // specify the Swagger JSON endpoint.
   app.UseSwaggerUI(c =>
   {
      c.SwaggerEndpoint("/swagger/v1/swagger.json", "My API V1");
   }); 

   ... 
   app.UseMvc();
}

Note that the endpoint path begins with /swagger which you can now access with your browser.

Step 4: Try it out!

The following screenshot shows what the Swagger UI looks like in a web browser.
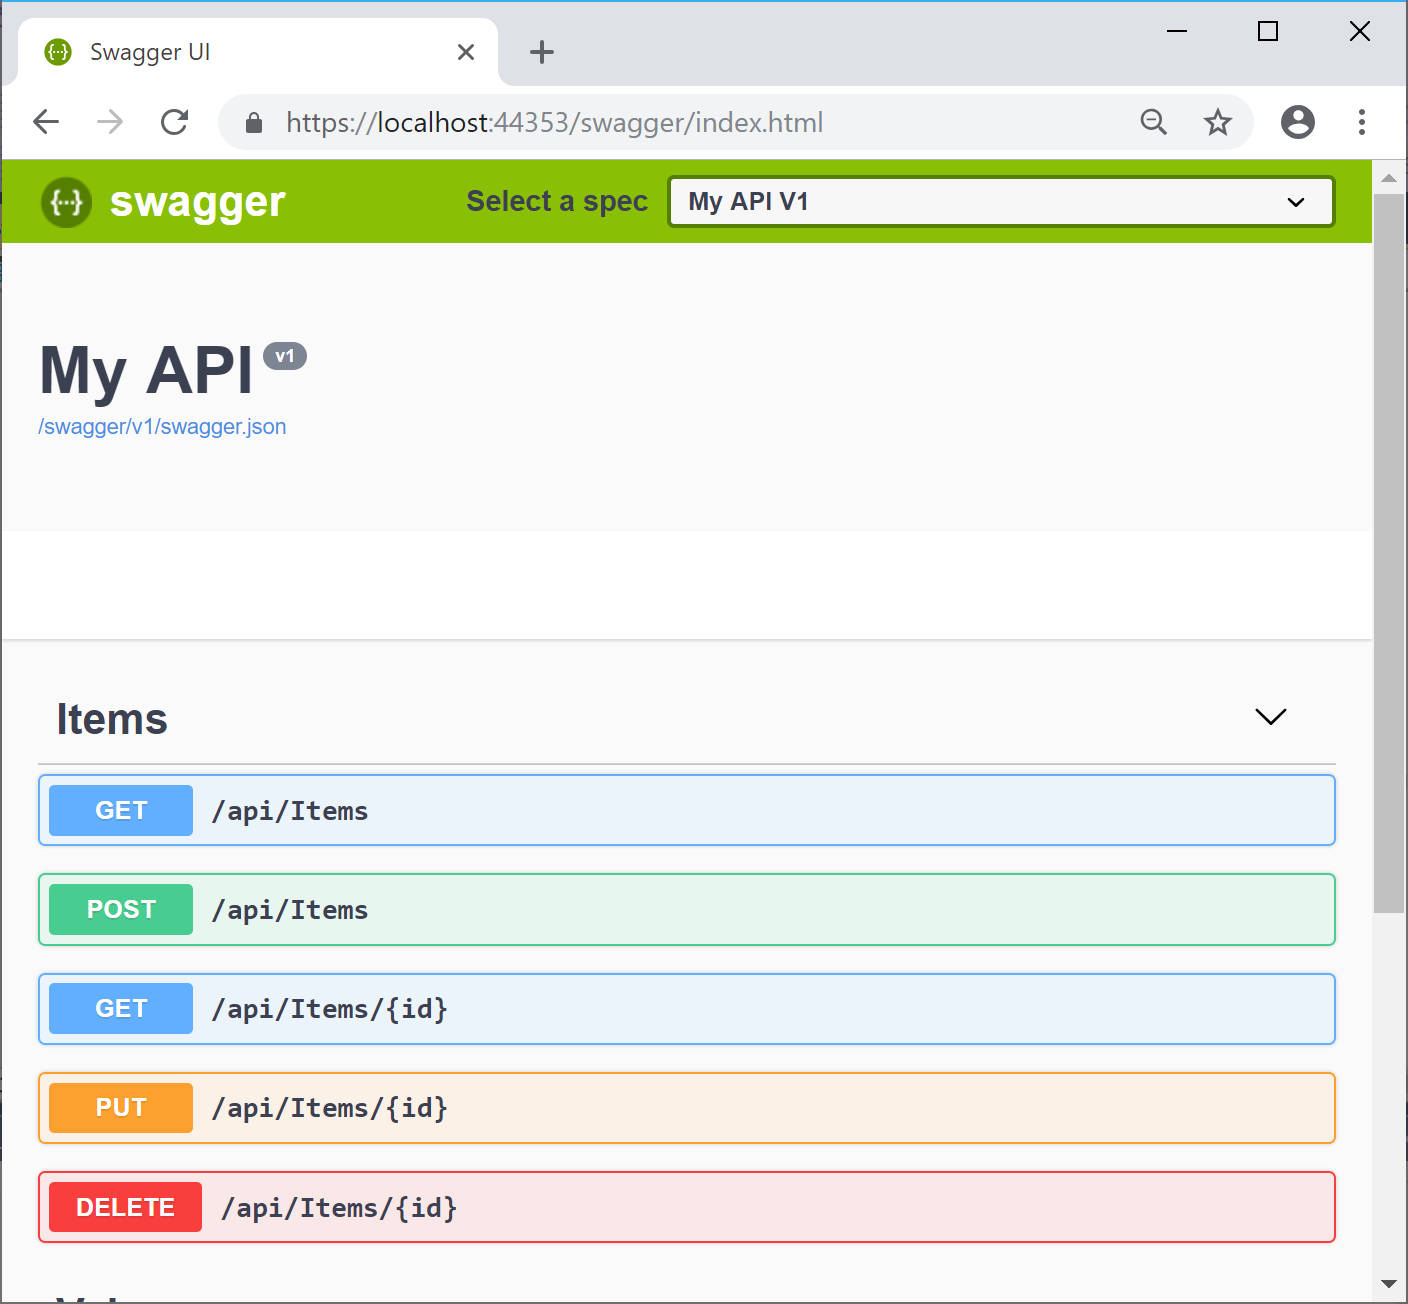
AspNetCore-WebAPI-Swagger

Model Validation Errors and Other HTTP 400 Responses

We should all be familiar with Error 404 for “File Not Found” when a URI is requested but the source is not found. When there is a bad request, the error type is HTTP 400 Bad Request, which implies that the server won’t process the request due to a client error. This could include a model validation failure.

Before automatic model validation errors with the ApiController attribute, you would have to detect and return a BadRequest, e.g.

if (!ModelState.IsValid)
{
   return BadRequest(ModelState);
}

This is no longer necessary with the new ApiController attribute and the response can be further customized with InvalidModelStateResponseFactory if you wish to do so.

For more information about Web API Controllers in ASP .NET Core, check out the official documentation at:

Testing Your Web API

There are several ways to test your Web API.

Web Browser:

The easiest way would be to use your favorite web browser. You may feel a little lost if you run your web project from Visual Studio but are unable to access your web app in a browser. Just remember that a Web API project without a website won’t be accessible at the root URL of the website, e.g. https://localhost:44353.

Instead, you’ll have to use the specific path for each API Controller, e.g. https://localhost:44353/api/<controllername>

Postman:

Postman is a popular 3rd-party utility that makes API Development very easy. Simply download the app from their website and enter the API path you wish to test.

Postman allows you to save collections of URLs, customize your parameters, and more!

Swagger:

The aforementioned Swagger utility can be used with the steps outline earlier in this article. For more information, check out the official documentation at:

HTTP-REPL

There’s a really cool command-line REPL (Read Evaluate Print Loop) tool being built by the ASP .NET Core team, for use with RESTful HTTP services. As of December 2018, the tool has been delayed a little longer.

More coming soon: “When we announced planning for ASP.NET Core 2.2, we mentioned a number of features that aren’t detailed above, including API Authorization with IdentityServer4, Open API (Swagger) driven client code generation, and the HTTP REPL command line tool. These features are still being worked on and aren’t quite ready for release, however we expect to make them available as add-ons in the coming months. Thanks for your patience while we complete these experiences and get them ready for you all to try out.”

For now, feel free to check out this September 2018 post from Scott Hanselman, where he outlines the new tool and how to use the pre-release version.

Enabling CORS

After following all the tutorials, you may realize that your Web API does not work when deploying to a web server and is not accessible from a remote client. This may be caused by the following error:

No 'Access-Control-Allow-Origin' header is present on the requested resource

In order to fix this, you may have to enable CORS (Cross-Origin Resource Sharing) on your web server, e.g. within the App Service settings in Azure.

Using the Azure CLI, you can enable CORS with the following command:

az resource update --name web --resource-group myResourceGroup --namespace Microsoft.Web --resource-type config --parent sites/<app_name> --set properties.cors.allowedOrigins="['http://localhost:5000']" --api-version 2015-06-01

Replace the <app_name> placeholder text with your actual app name. Also, note that the allowedOrigins list only includes an arbitrary localhost URL with a specified port. You may adjust this to enable specific remote clients or optionally enable all client URLs with “[‘*’]”.

If you wish to enable CORS using the Azure portal, browse through your App Service settings and update the Allowed Origins field using the guidance provided.
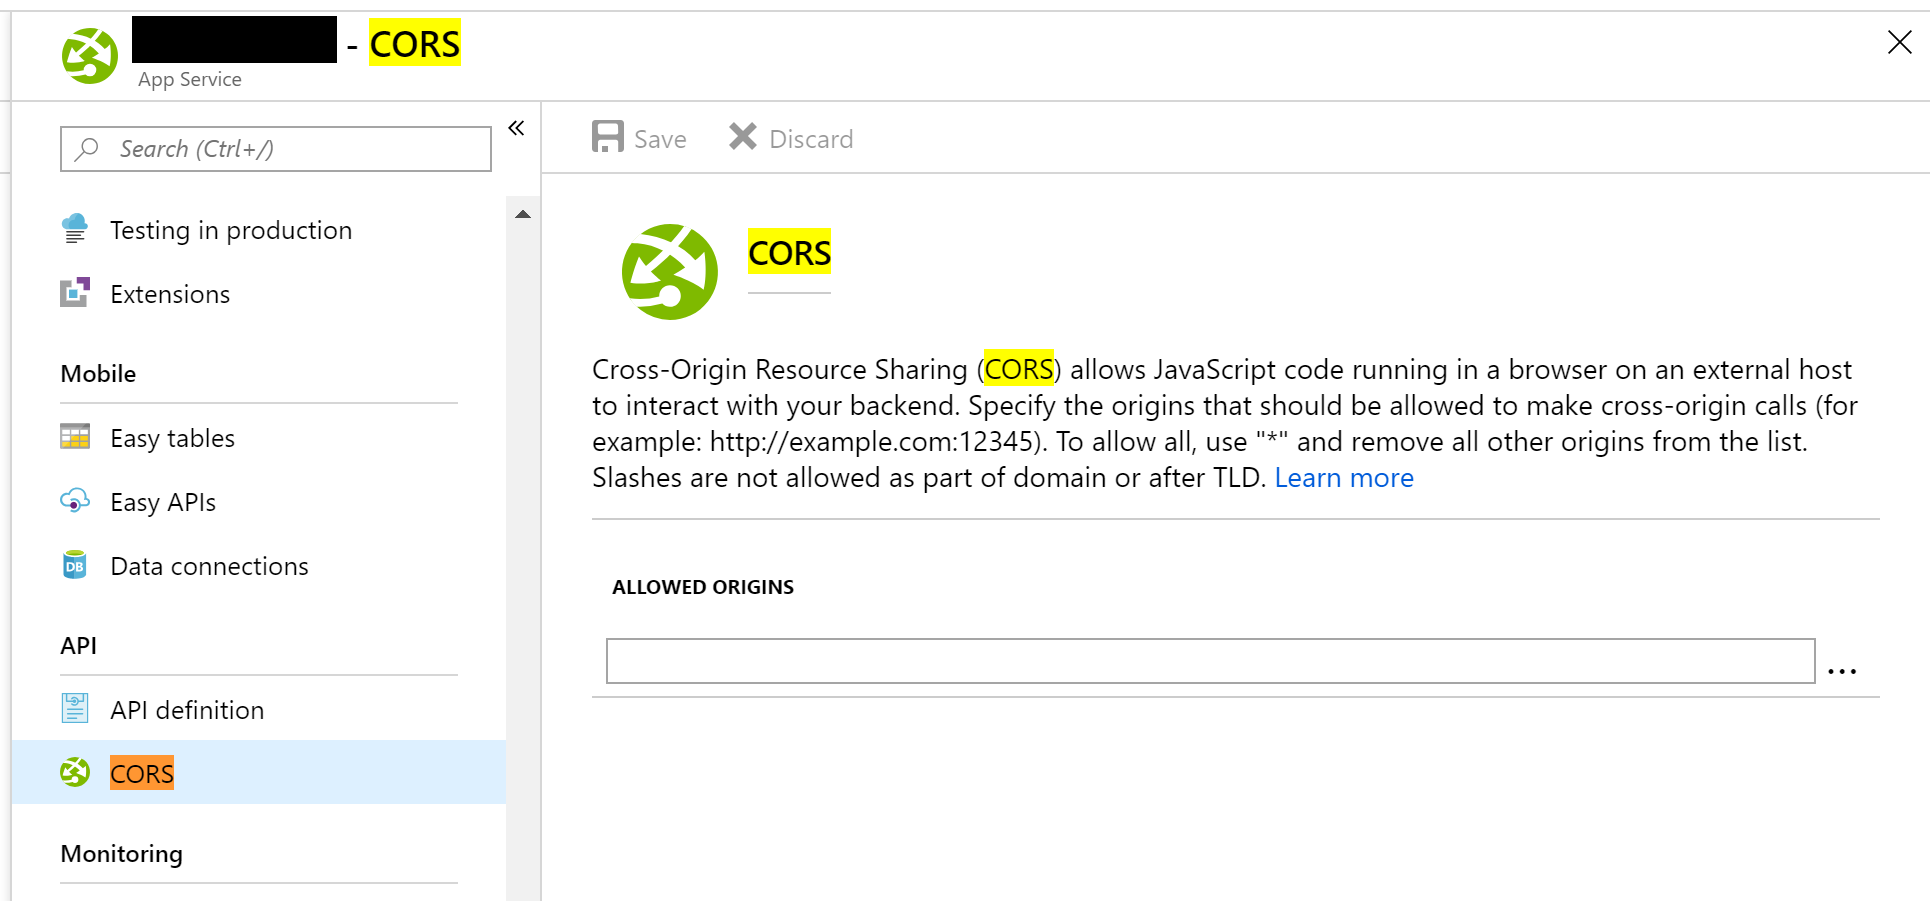
Azure-WebApp-CORS

“Cross-Origin Resource Sharing (CORS) allows JavaScript code running in a browser on an external host to interact with your backend. Specify the origins that should be allowed to make cross-origin calls (for example: http://example.com:12345). To allow all, use “*” and remove all other origins from the list. Slashes are not allowed as part of domain or after TLD.”

If you wish to enable CORS within your ASP .NET Core code, you can also do so using the CORS middleware package. For information on this approach, check out the official documentation at:

References


Exploring .NET Core 3.0 and the Future of C# with ASP .NET Core

By Shahed C on December 8, 2018

This is the tenth of a new series of posts on ASP .NET Core. In this post, we’ll explore what’s to come in .NET Core 3.0 and C# 8.0, and what’s new with ASP .NET Core. This post is also included in Matthew Groves‘ 2018 C# Advent Calendar, in the Dec 8 slot.

ASPNETCoreLogo-300x267

WARNING: Be prepared for a lot of information and tons of links to get even more information. 🙂 

In This Article:

Microsoft Connect(); 2018

msft-connect-2018

This past week has given us many exciting announcements and releases from Microsoft Connect(); 2018. This includes the releases of .NET Core 2.2 (with ASP .NET Core 2.2), .NET Core 3.0 Preview 1 and Visual Studio 2019 Preview 1.

You can catch up on what you missed at the following URLs:

What to Expect in .NET Core 3.0

.NET Core 3.0 brings us a slew of new features, notably support for Windows desktop apps (WinForms, WPF) on .NET Core. This will allow “side by side” versions of .NET Core for your desktop apps as opposed to “in-place” framework installations.

Well, how about ASP .NET Core 3.0? Well, during Connect(); 2018, Scott Hunter pointed out that ASP .NET Core 2.2 was also released at the same time as .NET Core 3.0 preview 1. He added that ASP .NET Core 3.0 (preview) within  .NET Core 3.0 (preview) currently has “the exact same ASP .NET Core 2.2 bits” and “so, there’s no benefit to move to 3 yet… won’t be till…. sometime next year [2019]”.

Skip to 8:43 in the following video:


What to Expect in ASP .NET Core 3.0

Here are a few things you can expect in ASP .NET Core 3.0, whenever it comes out next year:

  • Newtonsoft’s Json.NET will be removed from the shared framework
  • EF Core will be shipped separately as pure NuGet packages
  • ASP .NET Core 3.0 will only run on the cross-platform .NET Core 3.0
  • ASP .NET Core 3.0 will NOT run on the Windows-only .NET Framework
  • Note that some new C# 8.0 features will only be coming to .NET Core 3.0

You can get more information on ASP .NET Core 3.0 from an Oct 2018 announcement:

Some additional things you should know about Blazor, the cool kid on the block:

From Daniel Roth (Oct 2018): “We are now working towards shipping Razor Components and the editing in .NET Core 3.0,”… “This includes integrating Razor Components into ASP.NET Core so that it can be used from MVC. We expect to have a preview of this support early next year after the ASP.NET Core 2.2 release has wrapped up.

What’s New in ASP .NET Core 2.2 Right Now

So what’s new in ASP .NET Core 2.2 right now? First of all, you can work with ASP .NET Core 2.2 in the latest version of Visual Studio 2017 or VS Code with the .NET Core 2.2 SDK. There are many cool new features, notably:

  • New Health Checks API
  • Improved Open API (Swagger) Integration
  • Client-side template updates (Bootstrap 4, Angular 6)
  • SignalR Java Client
  • HTTP/2 Server Support (Preview)
  • Improved perf: IIS throughput, MVC model validation + routing, HTTP Client

You can read the full announcement here:

You can get also a recap of the API improvements and Health Checks API in this video from Connect:


Health Checks

From the aforementioned Github repo, here is a code snippet for the new Health Checks feature:

public void ConfigureServices(IServiceCollection services)
{
   ...
   services.AddHealthChecks()
      .AddDbContextCheck<PlacesContext>();
   ...
}
public void Configure(IApplicationBuilder app, IHostingEnvironment env)
{
   ... 
   app.UseHealthChecks("/ready");
   ...
}

In the above snippet, the call to AddHealthChecks() followed by AddDbContextCheck() ensures that the data connection is healthy before determining that the application is healthy. The route /ready can be accessed in a browser or externally to determine the health of the application.

Open API (Swagger)

Features for using Open API (Swagger) with ASP .NET Core was already included in ASP .NET Core 2.1 and has further improved with ASP .NET Core 2.2. As before, you can use community-driven projects such as NSwag and Swashbuckle.AspNetCore to visualize Open API documents for your API.

Benefits include:

  • interactive documentation
  • client SDK generation
  • API discoverability

So what’s new in 2.2? We now have Microsoft.AspNetCore.Mvc.Api.Analyzers, which work with [APIController]-decorated controllers introduced in 2.1, and also builds on API conventions. With this package added to a new Web API project, my .csproj project file looks like this:

<Project Sdk="Microsoft.NET.Sdk.Web"> 
<PropertyGroup>
 <TargetFramework>netcoreapp2.2</TargetFramework>
 <AspNetCoreHostingModel>InProcess</AspNetCoreHostingModel>
 </PropertyGroup> 
<ItemGroup>
 <PackageReference Include="Microsoft.AspNetCore.App" />
 <PackageReference Include="Microsoft.AspNetCore.Mvc.Api.Analyzers" Version="2.2.0" />
 <PackageReference Include="Microsoft.AspNetCore.Razor.Design" Version="2.2.0" PrivateAssets="All" />
 </ItemGroup> 
</Project>

So what do these new analyzers do? One example can be explained by starting with the code snippet below:

 // GET api/values/5
 [HttpGet("{id}")]
 [ProducesResponseType(200)]
 public ActionResult<string> Get(int? id)
 {
    if (id == null)
    {
       return NotFound();
    }
    return "value";
 }

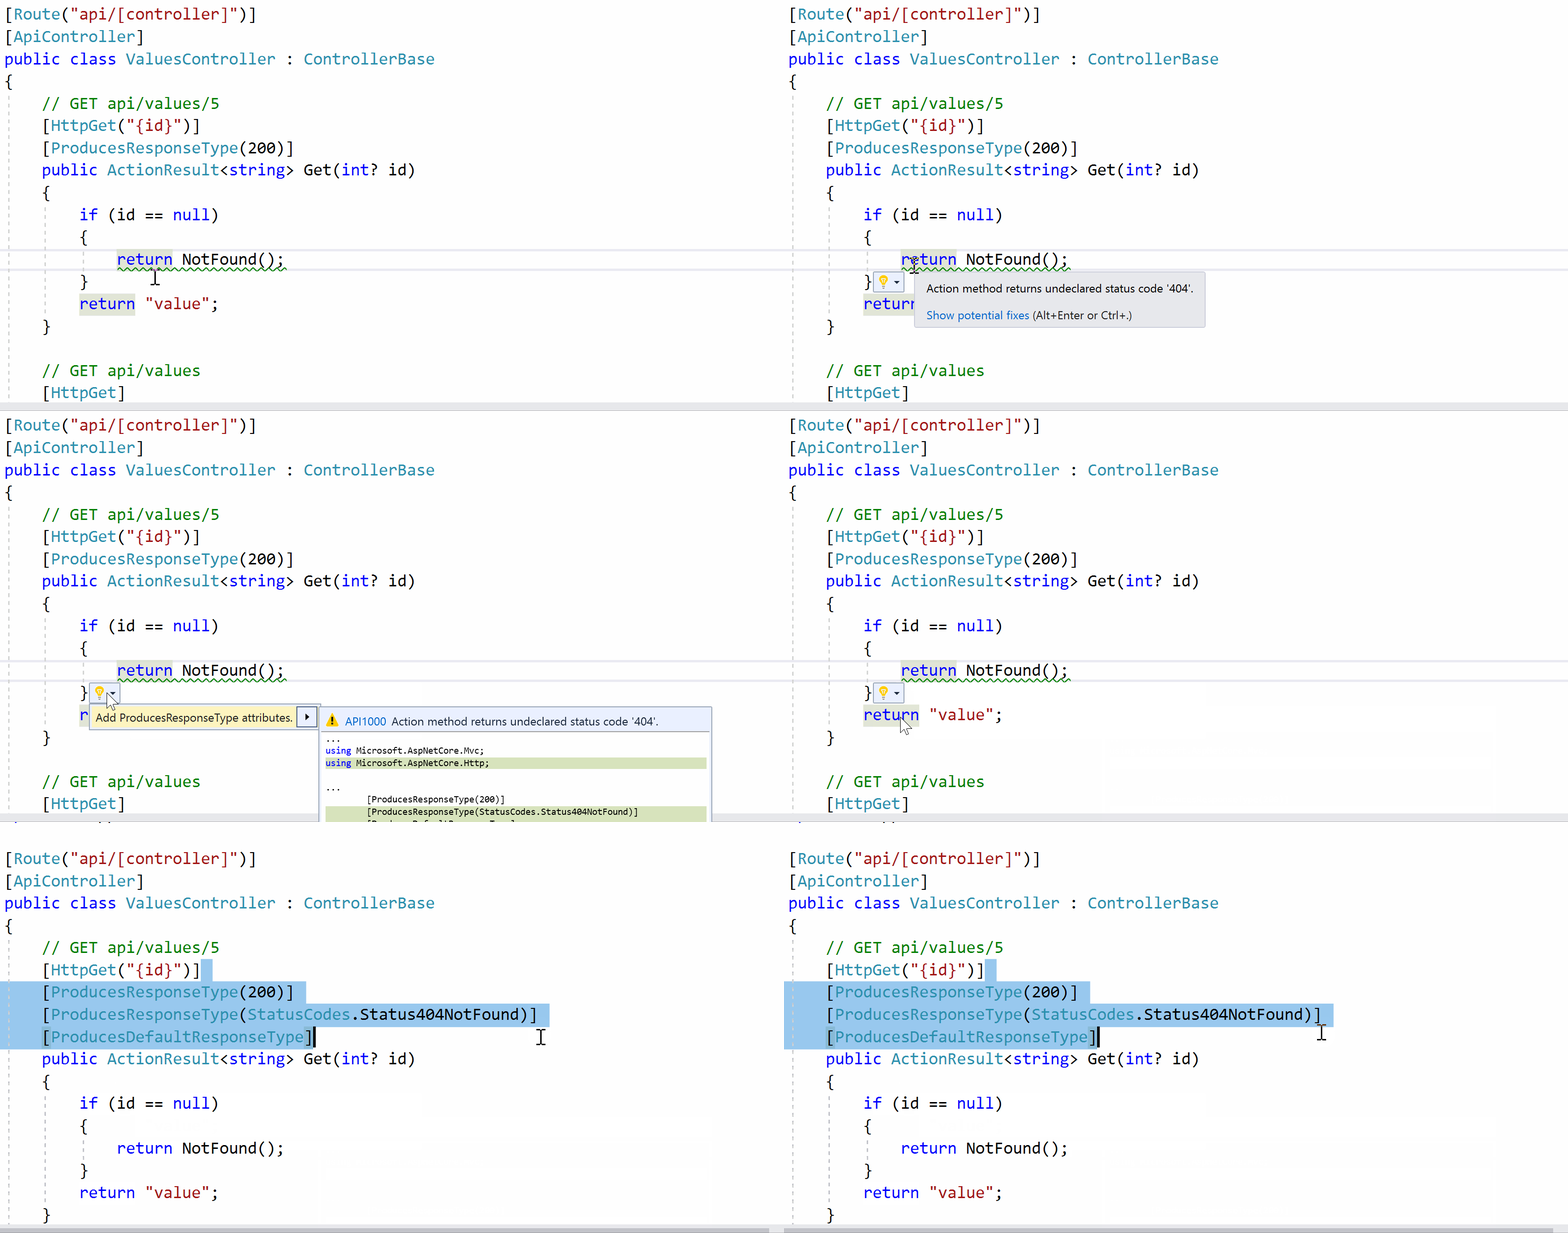
In this simple Get method in my API Controller, it returns an HTTP 200 (Success!) Status Code when everything is going well, which is indicated by [ProducesResponsesType(200)]. But if the id value is null, it returns NotFound(). In this case, the analyzer can automatically guide you to add the proper attribute for a HTTP 400 (Not Found) Status Code as well.

See this illustrated in the GIF below:

API Analyzer Example

API Analyzer Example

Here is the end result:

 // GET api/values/5
 [HttpGet("{id}")]
 [ProducesResponseType(200)]
 [ProducesResponseType(StatusCodes.Status404NotFound)]
 [ProducesDefaultResponseType]
 public ActionResult<string> Get(int? id)
 {
    if (id == null)
    {
       return NotFound();
    }
    return "value";
 }

If you use common API Conventions, you can make your life even easier by using Conventions. Conventions can be applied via attributes in 3 different ways: at the assembly level, at the controller level and at the method level, each deeper level superseding the attribute at the higher level. These can then be superseded by ProducesResponseType applied at an action level.

Three examples are shown below:

At the assembly level:

[assembly: ApiConventionType(typeof(DefaultApiConventions))]

At the controller level, e.g. ItemsController

[ApiConventionType(typeof(DefaultApiConventions))]
[ApiController]
[Route("/api/[controller]")]
public class ItemsController : ControllerBase
{
   ...
}

At the method level, e.g. PutItem()

// PUT: api/items/5
[ApiConventionMethod(typeof(DefaultApiConventions), nameof(DefaultApiConventions.Put))]
[HttpPut("{id}")]
public async Task<ActionResult<Item>> PutItem(long id, Item item)
{
   ...
}

For more information, check out the official announcement from August 2018:

What’s New in EF Core 2.2 & 3.0

EF Core 2.2 includes some new features and a ton of bug fixes. New features include:

  • Spatial data support: used to represent the physical location and shape of objects
  • Collections of owned entities: extends the ability to model ownership to 1-to-many associations, going beyond 1-to-1 associations (previously added in 2.0)
  • Query tags: allows you to annotate a LINQ query with a string of text that appears as comments in generated SQL output (which may be captured in logs)

EF Core 3.0 will bring several new features:

  • LINQ improvements
  • Cosmos DB support
  • C# 8.0 support
  • Reverse engineering database views into query types
  • Property bag entities
  • EF 6.3 on .NET Core

These are all explained in detail in the official announcement:

What to Expect in C# 8.0

From one of the C# 8.0 announcements“The current plan is that C# 8.0 will ship at the same time as .NET Core 3.0. However, the features will start to come alive with the previews of Visual Studio 2019”.

Here are some new features you can expect in C #8.0:

  • Nullable Reference Types: get a friendly warning if you try to assign non-nullable reference types to null. This setting can be toggled, to assist in future projects and also provide warnings in existing projects. In other words, C# 8.0 allows you to express “nullable intent”.
string myString = null; // Friendly Warning!
string? myString = null; // This is ok
  • IAsyncEnumerable<T> for consumption of async streams: It is essentially an asynchronous version of IEnumerable<T>, allowing you to await foreach over the items in an async stream.
async IAsyncEnumerable<int> GetBigResultsAsync()
{
   await foreach (var result in GetResultsAsync())
   {
      if (result > SomeValue) yield return result; 
   }
}
  • Ranges and Indices: A new Index type and a .. (two dots) range feature bring in the ability to easily slice through subsets of ranges of values. You may have missed such a feature in C# if you’ve worked with Python to manipulate your data.
// for an array of ints
int[] myArray = { 0, 1, 2, 3, 4, 5, 6, 7, 8, 9 };
Index index1 = 3; // 0-index, number 3, counted from beginning
Index index2 = ^4; // 4th item from end, counting backwards 

Console.WriteLine($"{myArray[index1]}, {myArray[index2]}"); // "3, 6" 

var mySlice = myArray[index1..index2]; // { 3, 4, 5 } not including end 

When I used the above code in Visual Studio 2019 Preview 1, I had to update my .csproj to use C# 8.0. Take a look at the example below:

<Project Sdk="Microsoft.NET.Sdk"> 
<PropertyGroup>
 <OutputType>Exe</OutputType>
 <TargetFramework>netcoreapp3.0</TargetFramework>
 <LangVersion>8.0</LangVersion>
 </PropertyGroup> 
</Project>
  • Default implementations of interface members: this gives you the ability to add a real implementation of an interface member that will be used by any class that implements the interface but doesn’t explicitly define the member in its class. Existing classes will automatically get this implementation.
interface ILogger
{
   // method 1 defined in interface 
   void Log(LogLevel level, string message);
   
   /// method 2 can be added to interface, even after class was created
   void Log(Exception ex) => Log(LogLevel.Error, ex.ToString()); 
} 

class ConsoleLogger : ILogger
{
   // method 1, explicitly implemented in class   
   public void Log(LogLevel level, string message) { ... }
  
   // method 2, Log(Exception) gets default implementation
}

You can get more information on C# 8.0 features at:

References, Docs & Tutorials

New/Updated Downloads:

.NET Core 3 and ASP .NET Core 3.0 References:

ASP .NET Core 2.2 Tutorials, Samples and Docs:

Open API (Swagger) References 

ASP .NET Core 3.0

C# 8.0 Tutorials, Samples and Docs:

References for Microsoft Connect(); (Dec 4, 2018)