Tag Archives: authorization

Organizational Accounts for ASP .NET Core 3.1

By Shahed C on April 13, 2020

This is the fifteenth of a new series of posts on ASP .NET Core 3.1 for 2020. In this series, we’ll cover 26 topics over a span of 26 weeks from January through June 2020, titled ASP .NET Core A-Z! To differentiate from the 2019 series, the 2020 series will mostly focus on a growing single codebase (NetLearner!) instead of new unrelated code snippets week.

Previous post:

NetLearner on GitHub:

NOTE: The NetLearner suite of apps won’t be updated to use organizational authentication in the main branch, so you can check out the new sample code in the experimental subfolder, merged from a branch:

In this Article:

O is for Organizational Accounts

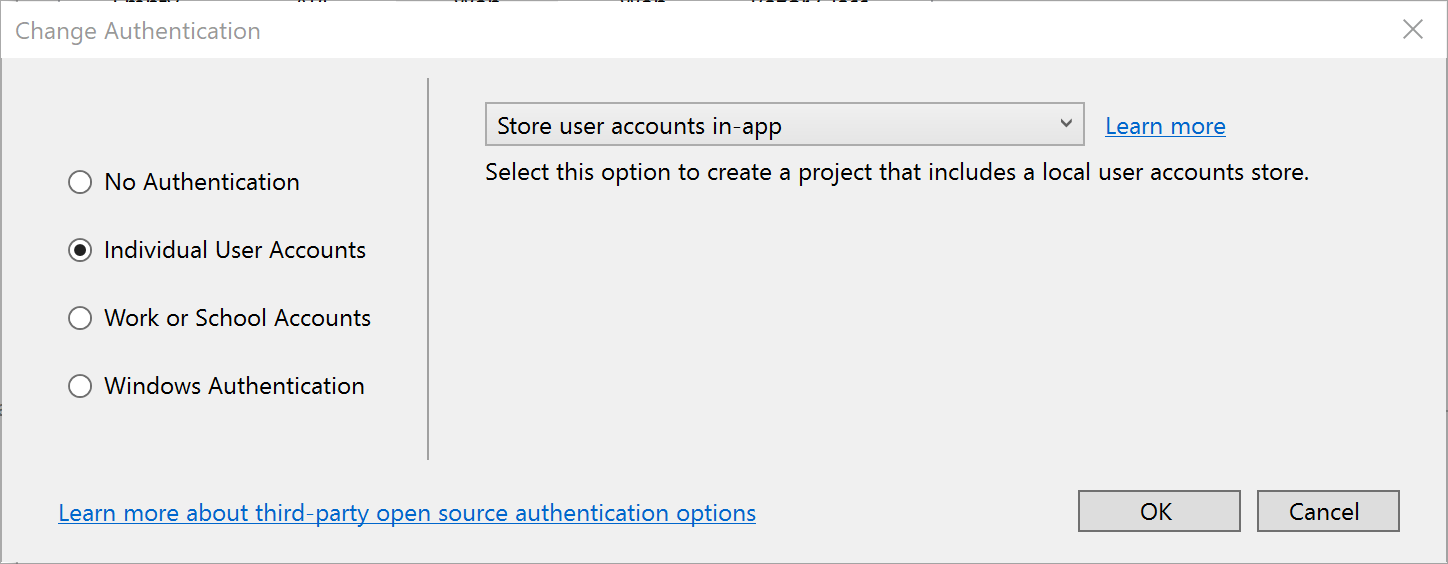
If you’ve created new ASP .NET Core projects, you’ve probably seen an option to add authentication upon creation. In Visual Studio, the IDE provides radio buttons to select a specific type of Authentication. Using CLI commands (e.g. in the VS Code terminal) you can use the ‐‐auth flag to choose the type of authentication you’d like to add.

The possible values are:

  • None – No authentication (Default).
  • Individual – Individual authentication (accounts stored in-app).
  • IndividualB2C – Individual authentication with Azure AD B2C.
  • SingleOrg – Organizational authentication for a single tenant.
  • MultiOrg – Organizational authentication for multiple tenants.
  • Windows – Windows authentication..

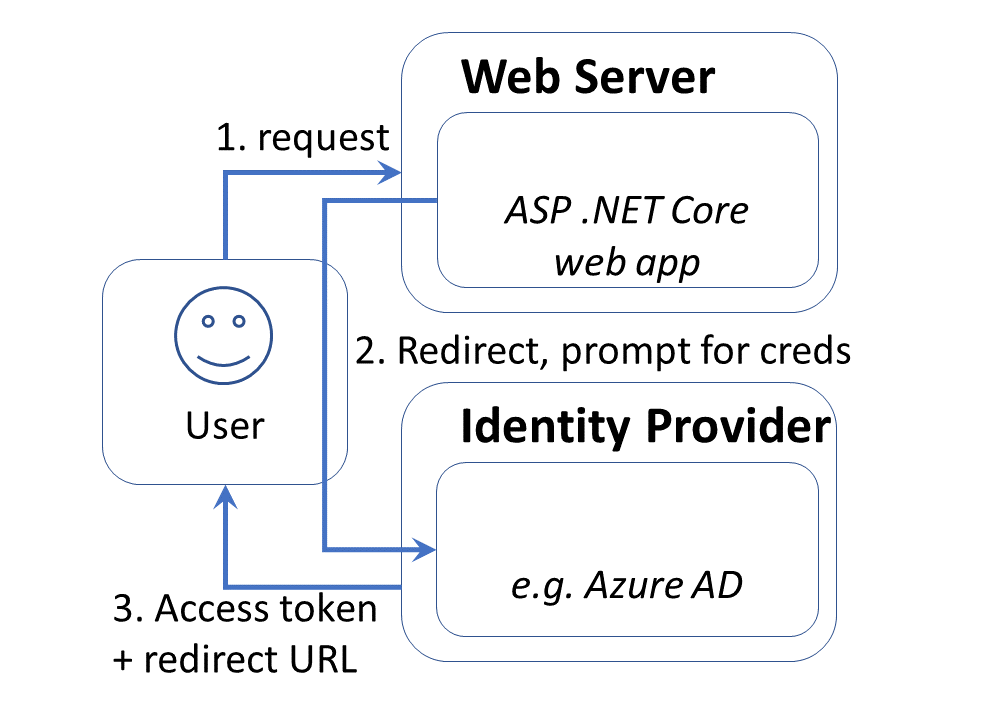
In this article, we will focus on the option for Work or School Accounts. This option can be used to authenticate users with AD (Active Directory, Azure AD or Office 365. This authentication process is illustrated in the diagram shown below:
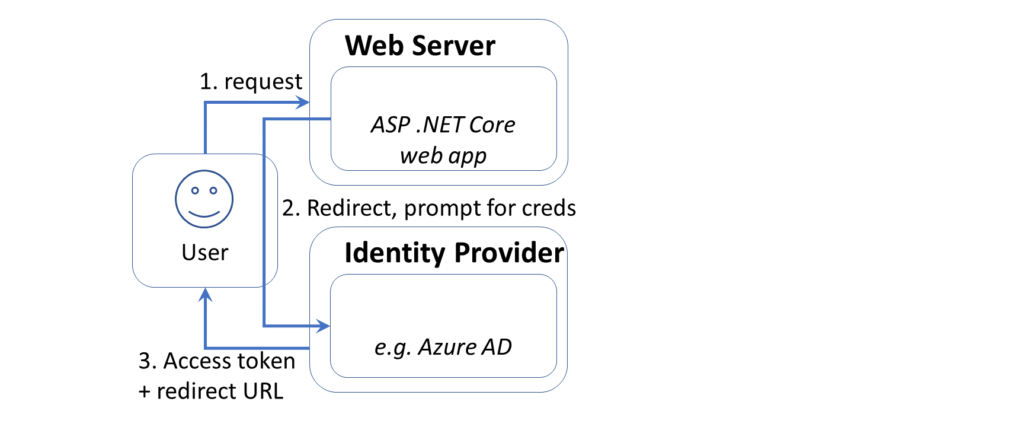
ASP .NET Core web authentication via AzureAD

Adding Authentication

To add authentication to a new project quickly, here are the instructions for Visual Studio 2019.

If you choose to use the new splash screen:

  1. Click “Create a new project”
  2. Select “ASP .NET Core Web Application” or “Blazor” (server-side)
  3. Click Next
  4. Enter Project Name, Location, Solution Name
  5. Optional: check the checkbox to place in the same directory
  6. Click Create
  7. Select .NET Core and then ASP .NET Core 3.1 from dropdowns
  8. Select a project type, e.g. Empty, Web Application (Razor Pages or MVC), Blazor App.
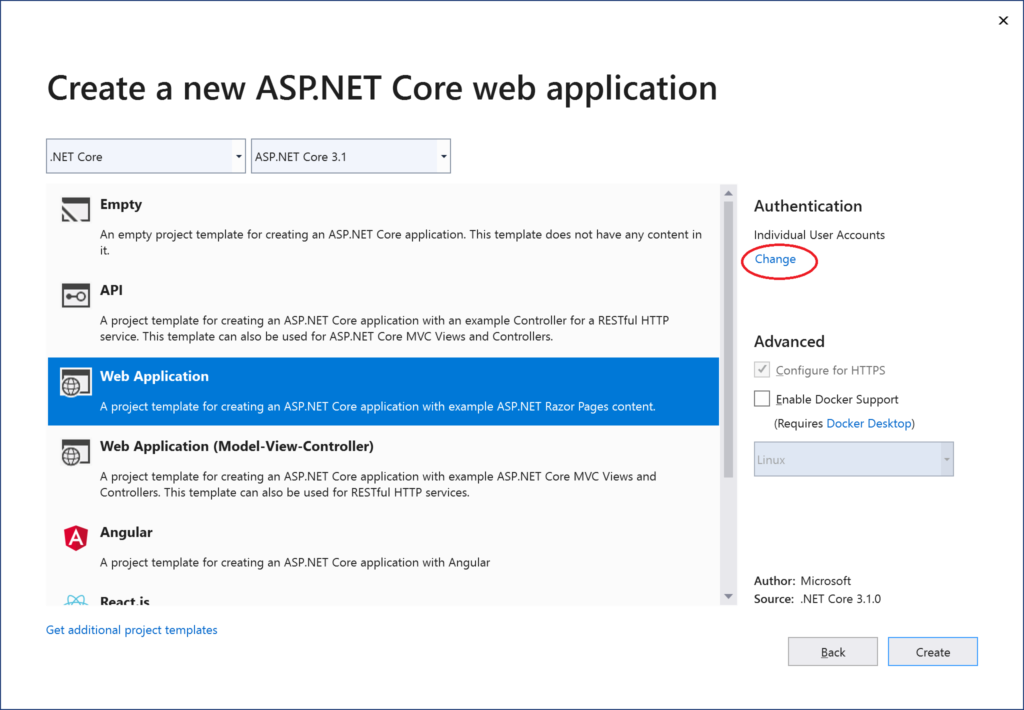
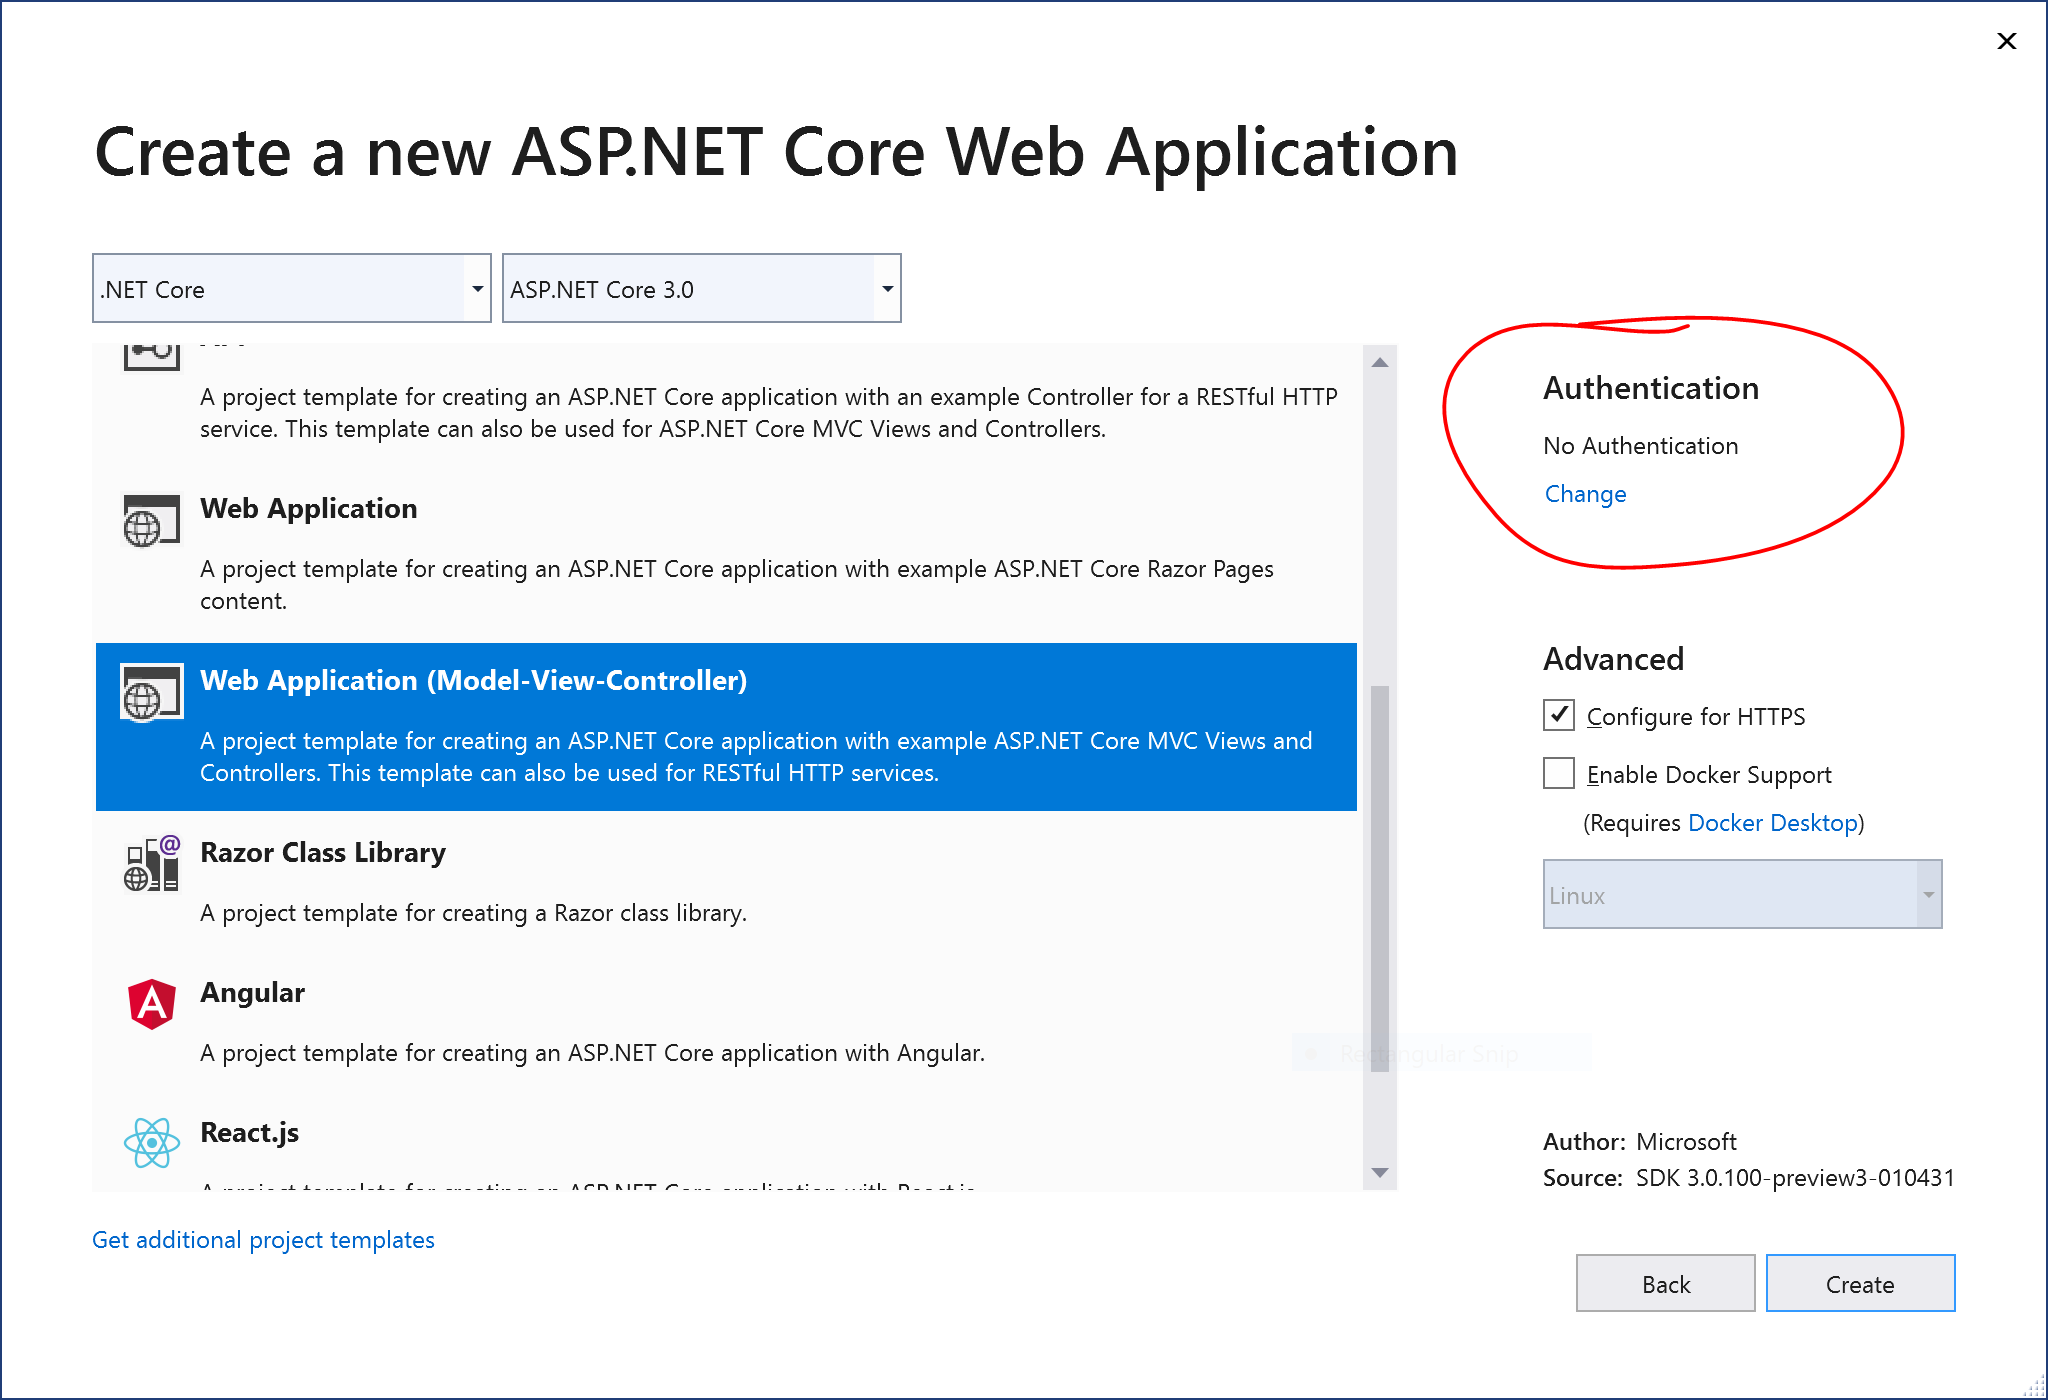
  9. Click the “Change” action link in the Authentication section
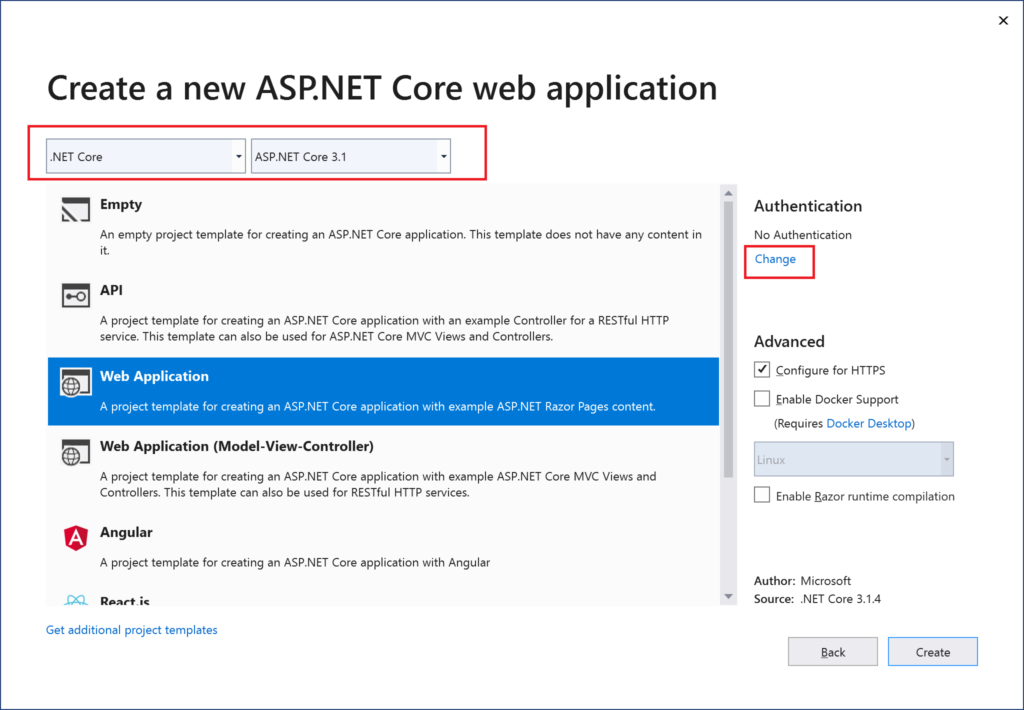
Creating a new web app project with authentication

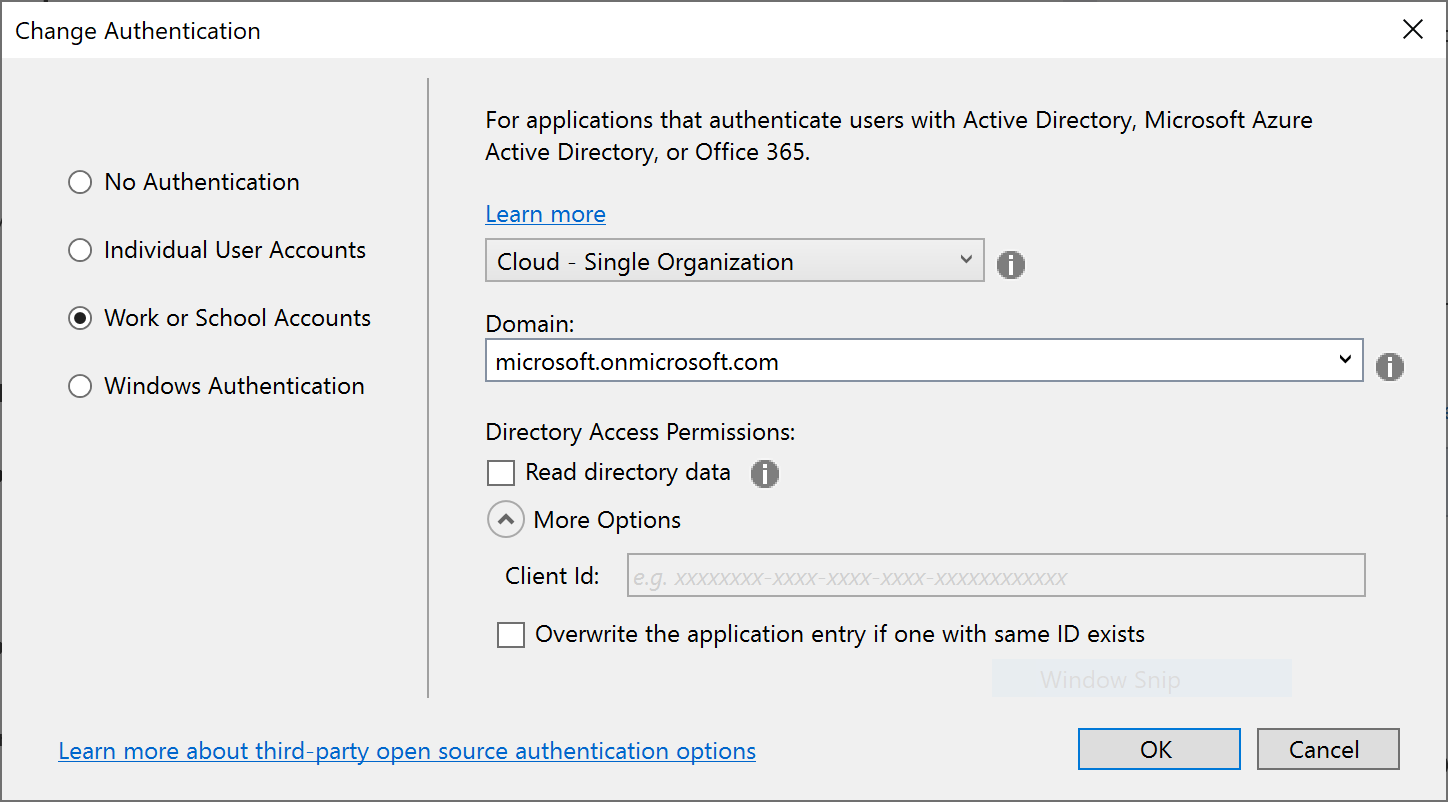
This should allow you to change the authentication type to “Work or School Accounts” so that you may your organizational domain info. As always, you may select the little info buttons (lowercase i) to learn more about each field. Talk to your system administrator if you need more help on what domains to use.
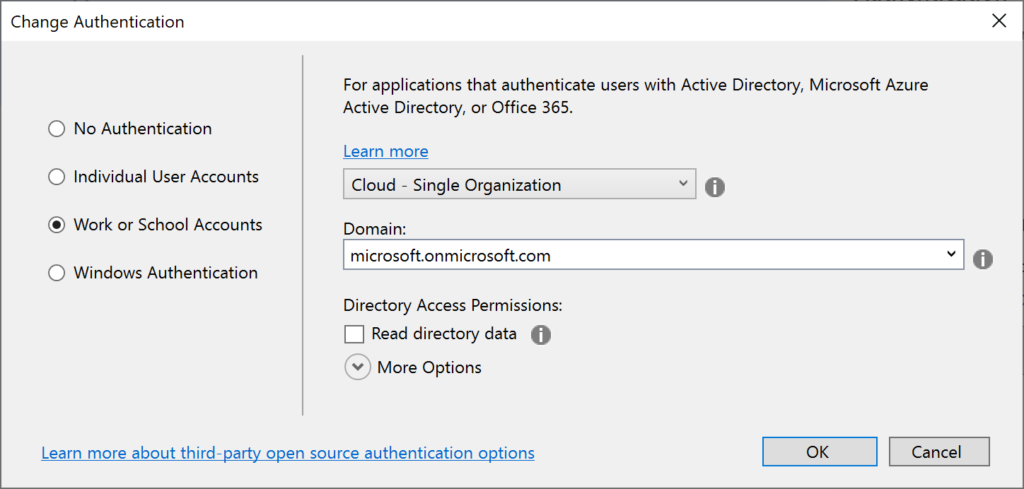
Work/School account selected for authentication method

NOTE: If you need help creating new .NET Core 3.1 project types in Visual Studio, take a look at this previous blog post in this series on .NET Core 3.0 to get some help on how to enable it.

If you wish to skip the Splash Screen instead upon launching VS2019:

  1. Click “Continue without code” in the lower right area of the splash screen.
  2. In the top menu, click File | New | Project (or Ctrl-Shift-N)
  3. Follow the remaining steps outlined earlier in this section

To use CLI Commands in a Terminal window, use the dotnet new command followed by the ‐‐auth flag. The authentication type can be any of the aforementioned authentication types, e.g. Individual.

dotnet new mvc --auth Individual -o myproj

Configuring App Registration

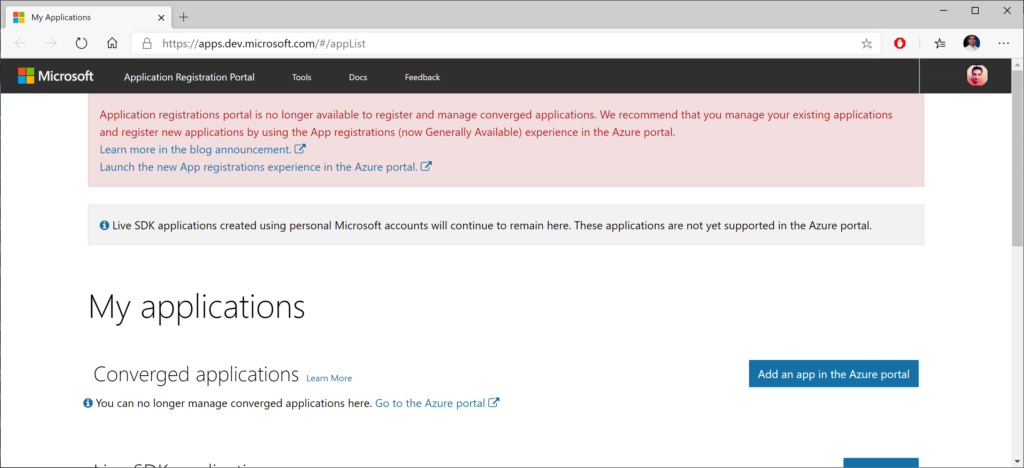
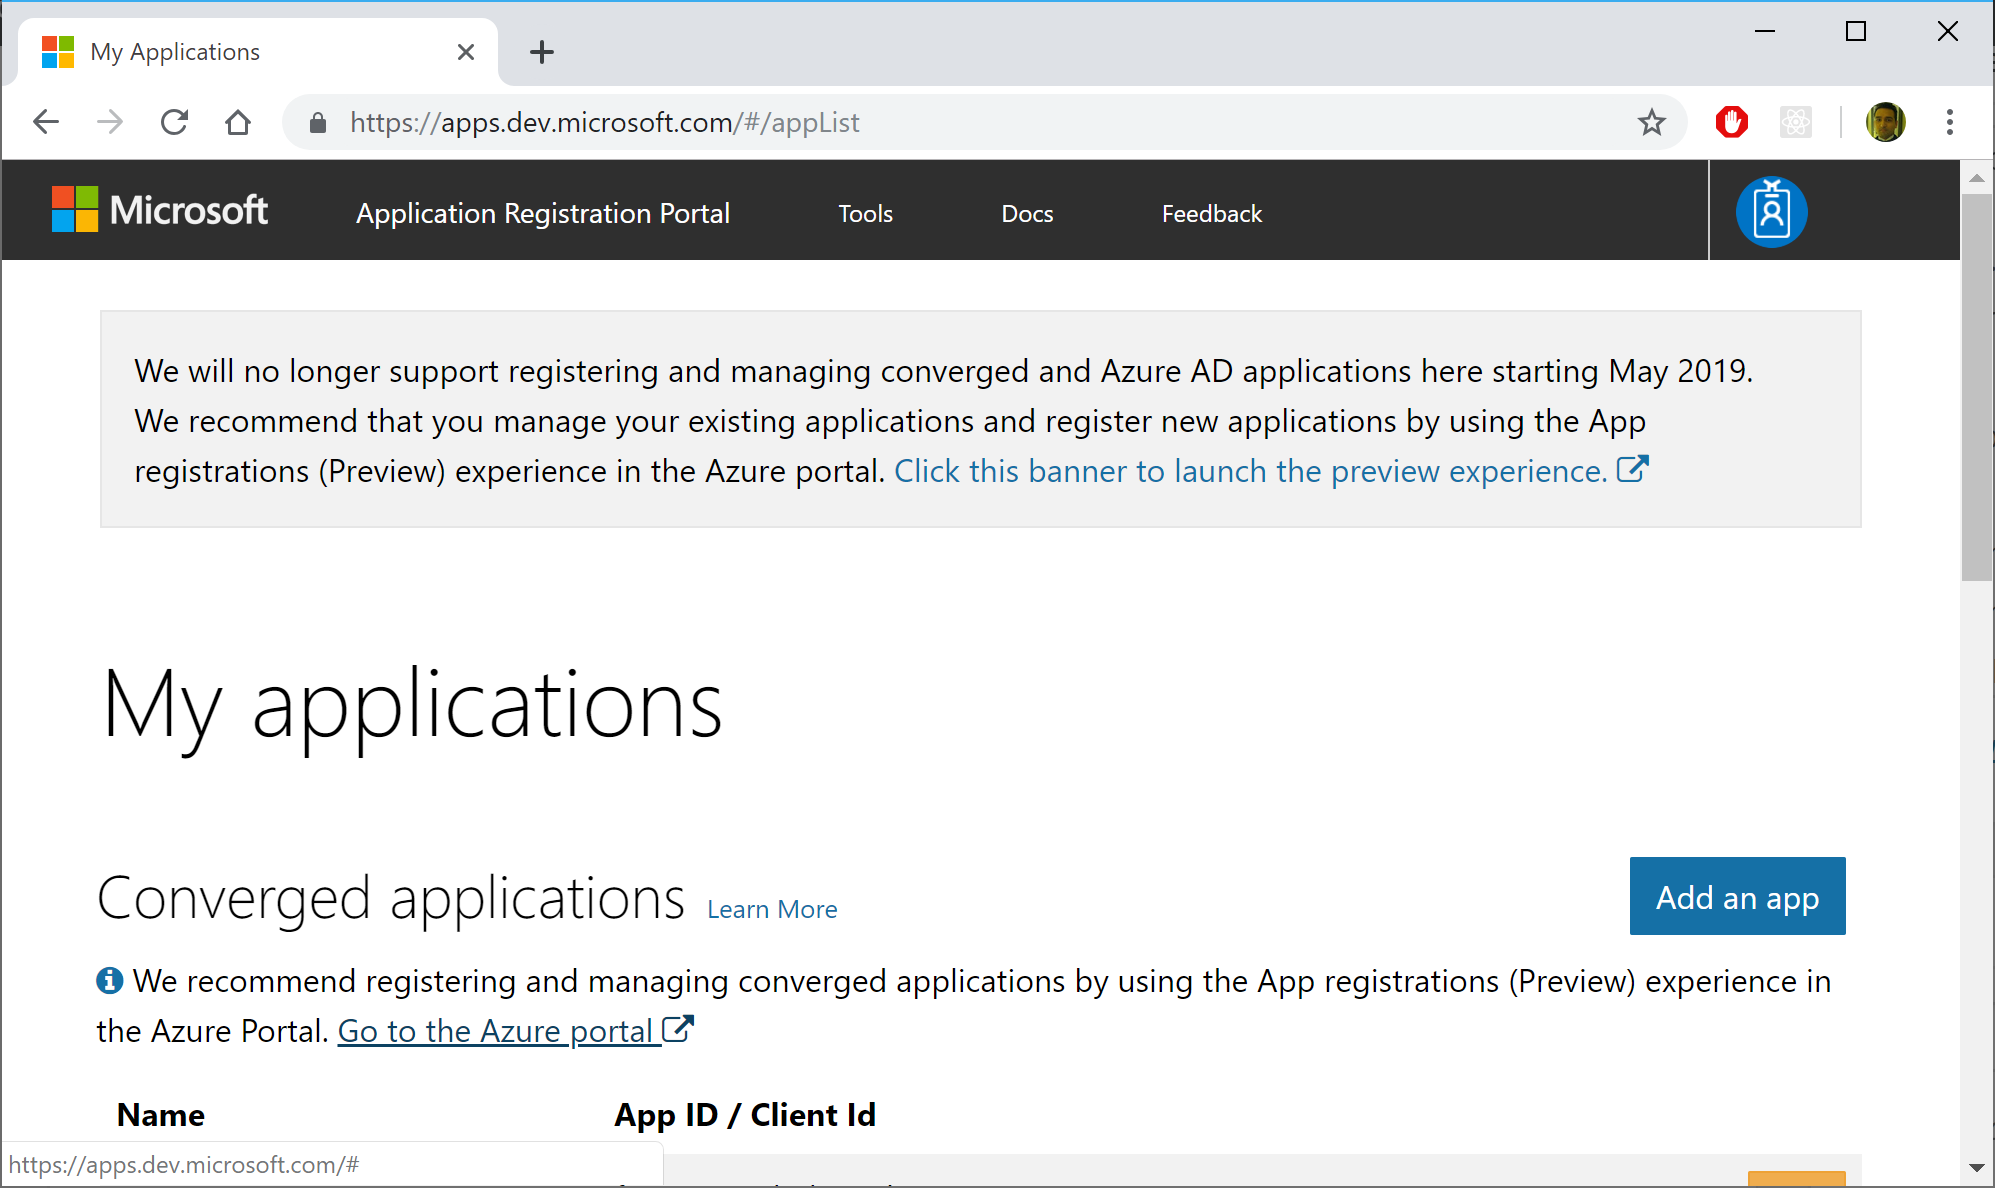
If you’ve used “Individual User Accounts” before, you’ve probably used a database to store user data, either on-premises or in the cloud. If you’ve used “Work or School Accounts” (i.e. organizational accounts), you may have the old App portal at the following URL:

Old App Registration Portal

On the old site, you may see a message suggesting that you should go to the Azure Portal to use the newer (current) App Registrations feature. This feature was previously in preview, and you can currently use it directly in the Azure Portal. If you click the link from the old site, it should take you directly to the App Registrations page, and may prompt you to log in first.
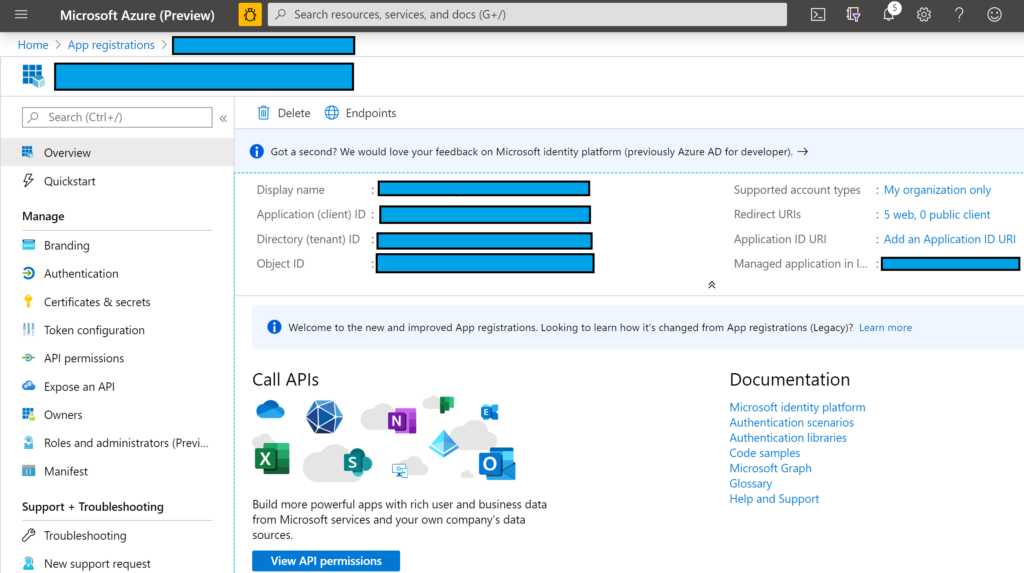
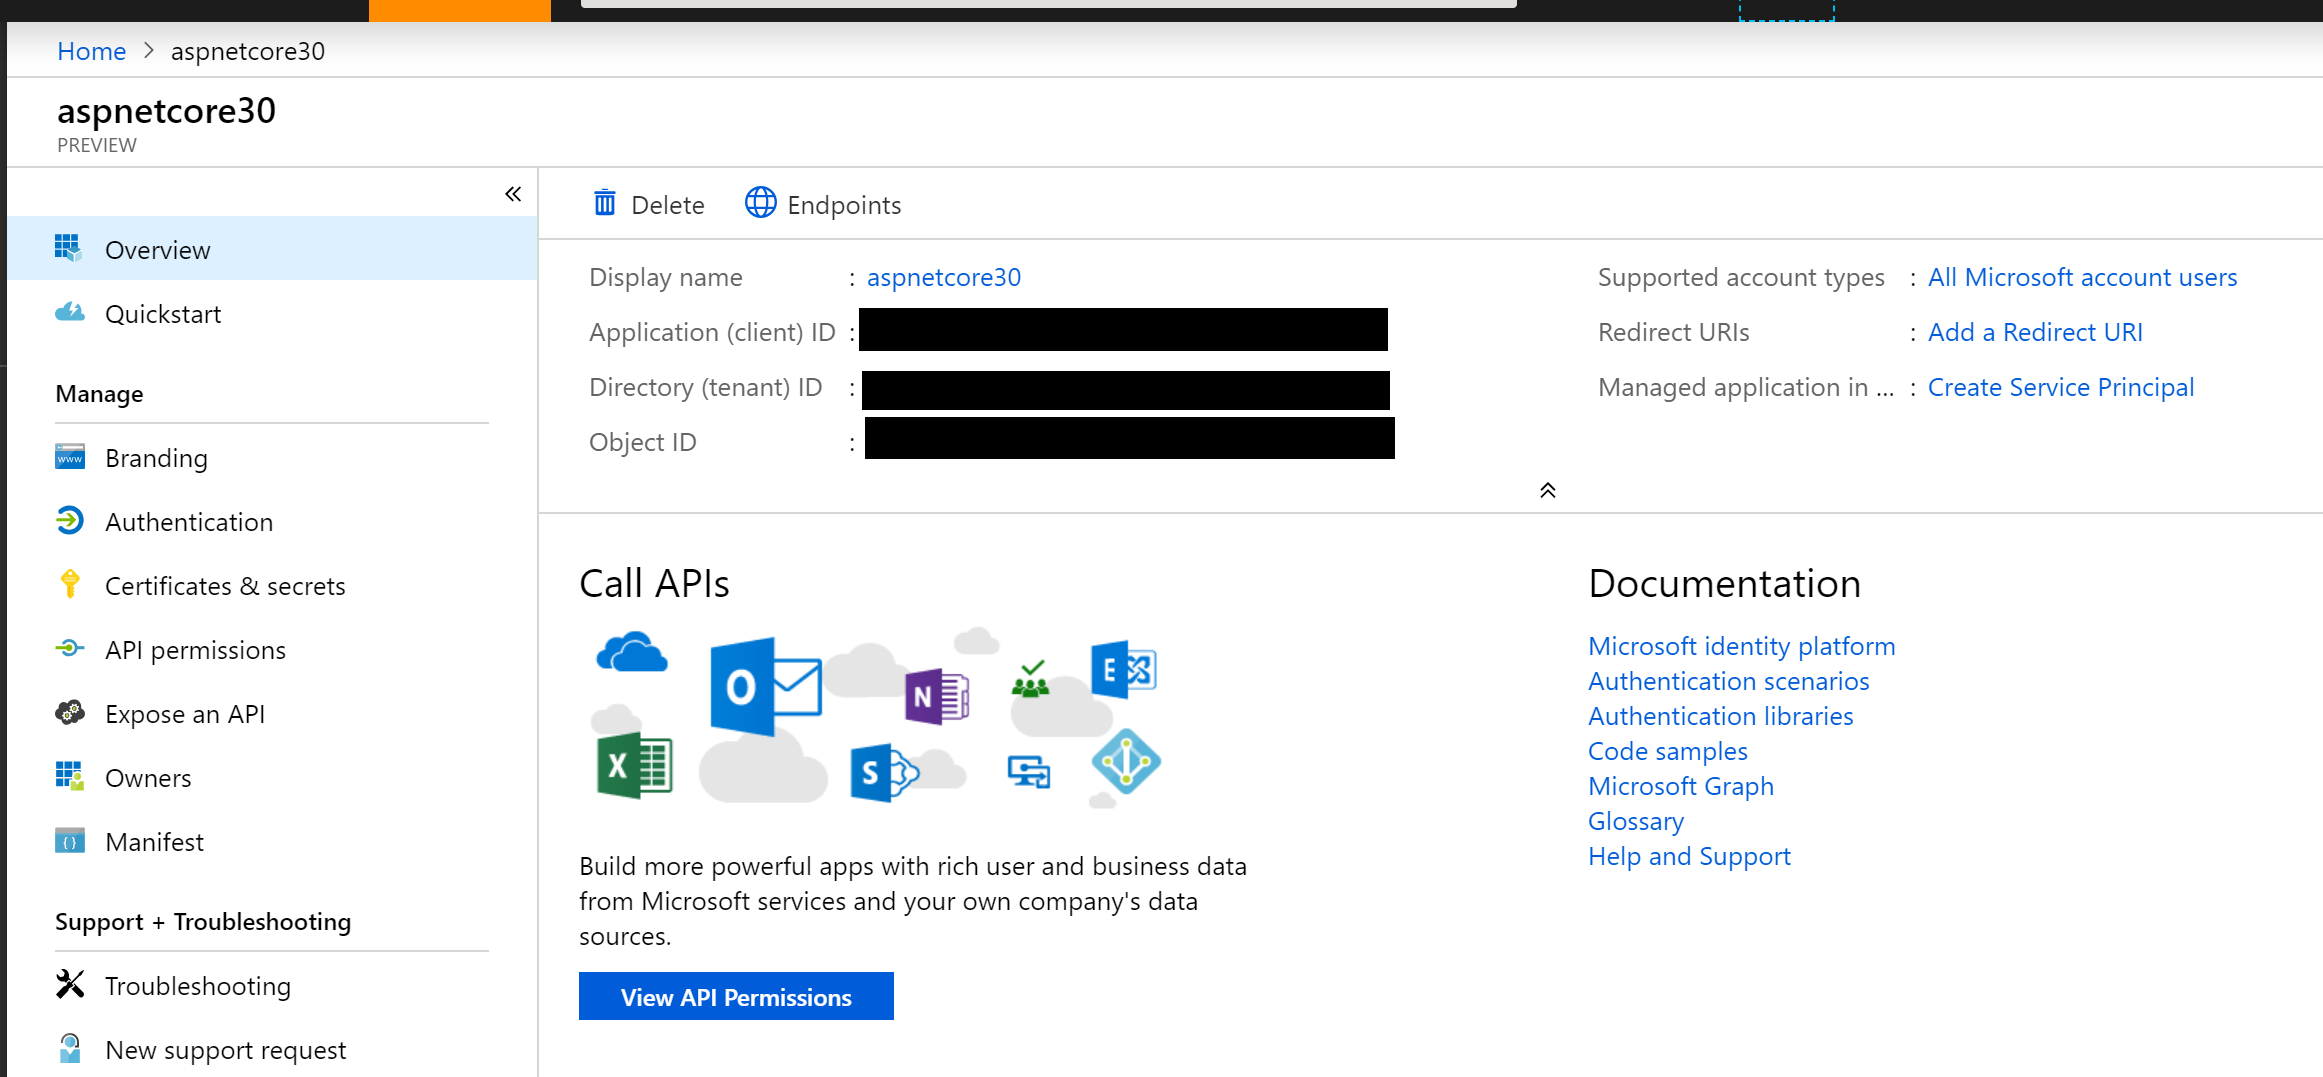
TODO: screenshot of new (preview?) portal, overview section
App Registration screen showing overview

If you’re not clear about how you got to this screen or how to come back to it later, here’s a set of steps that may help.

  1. Log in to the Azure Portal
  2. Search for App Registrations
  3. Arrive at the App Registrations page
  4. When a newer preview version becomes available, you may have to click the banner that takes you to a preview experience.
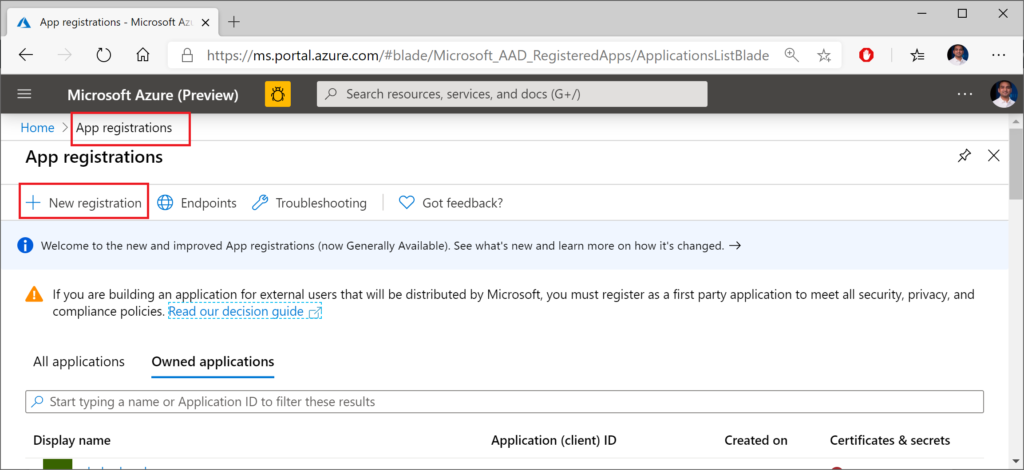
New App Registration in Azure Portal

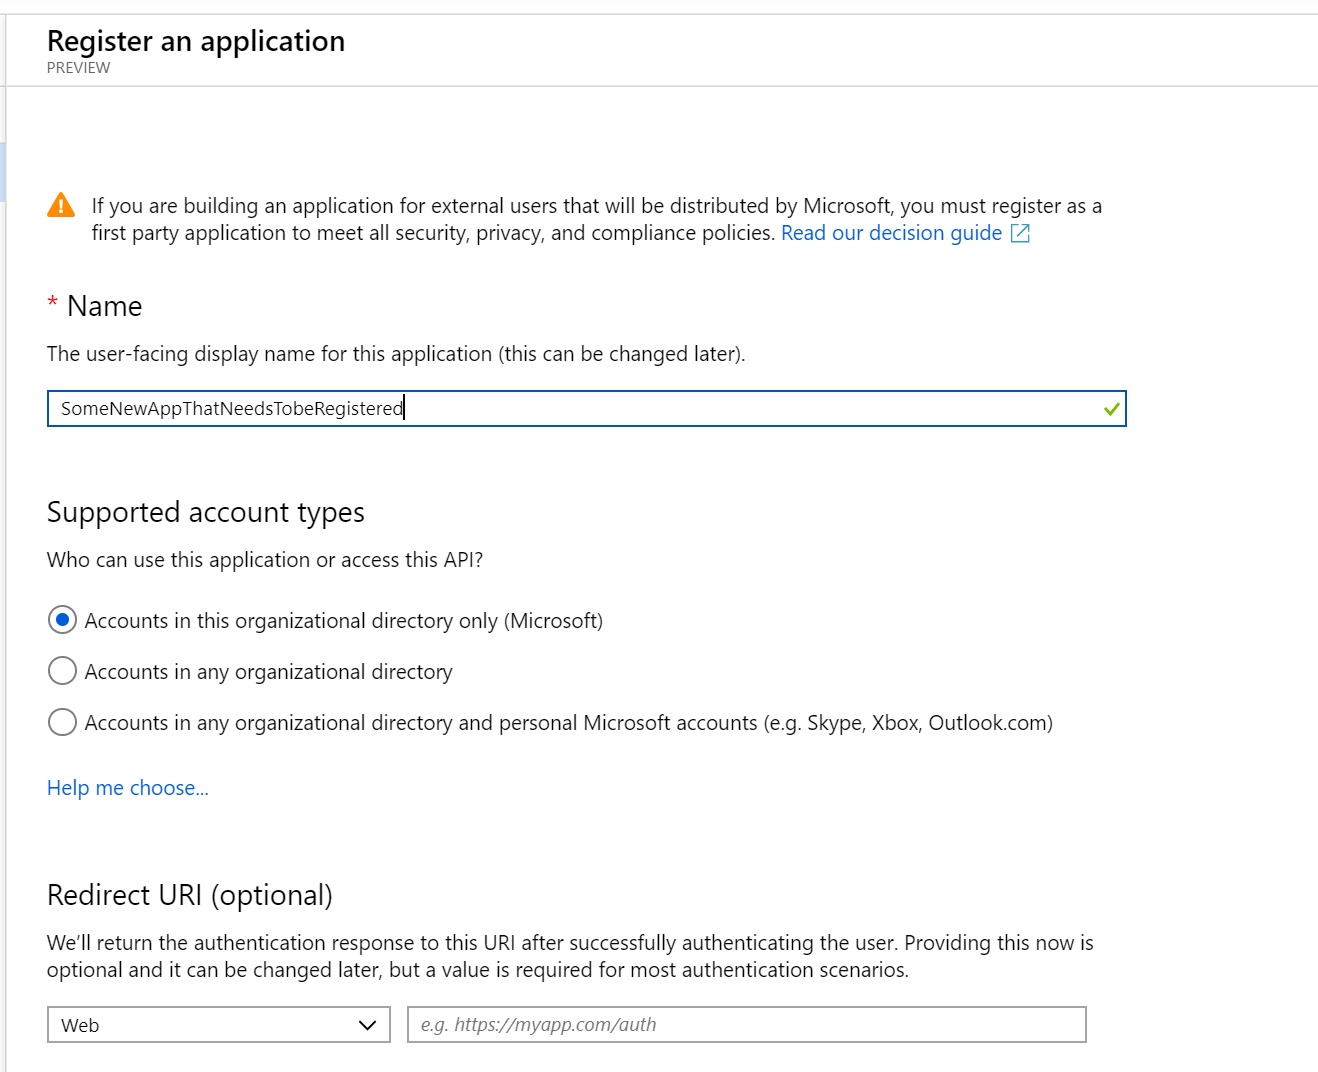
In the form that follows, fill out the values for:

  • Name (which you can change later)
  • Account Type (your org, any org, any org + personal MSA)
  • Redirect URI (where users will return after authentication)
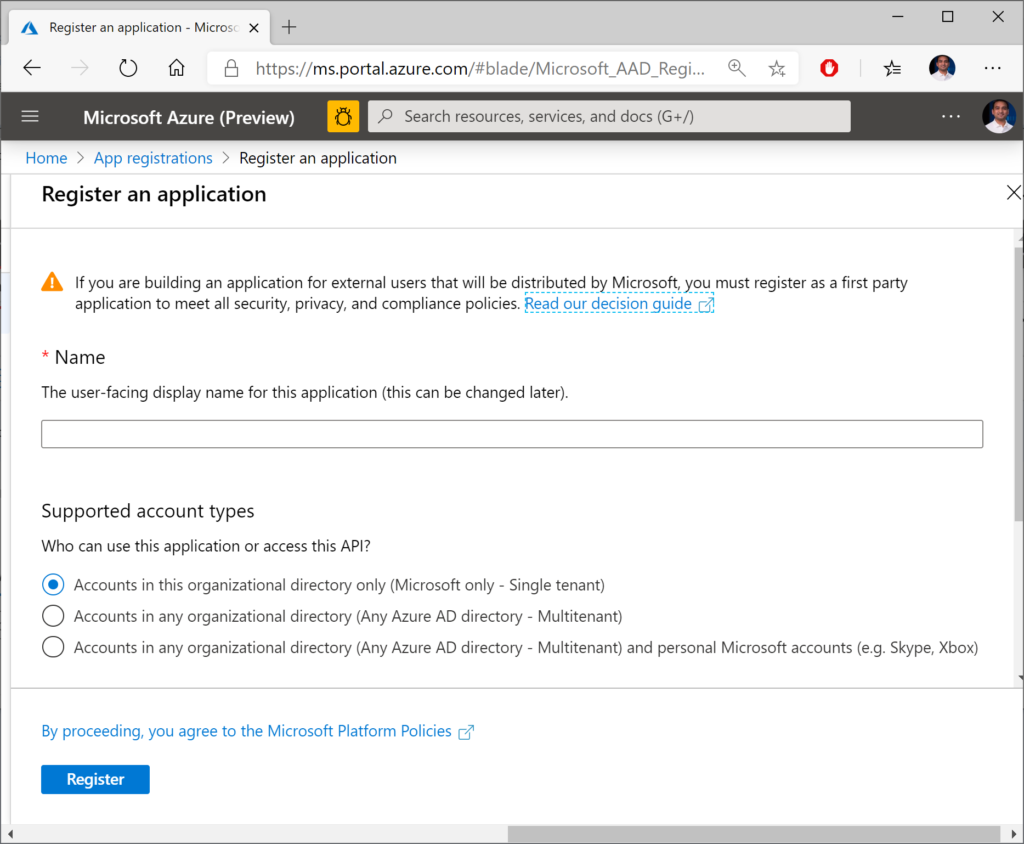
authentication
Register an application for authentication

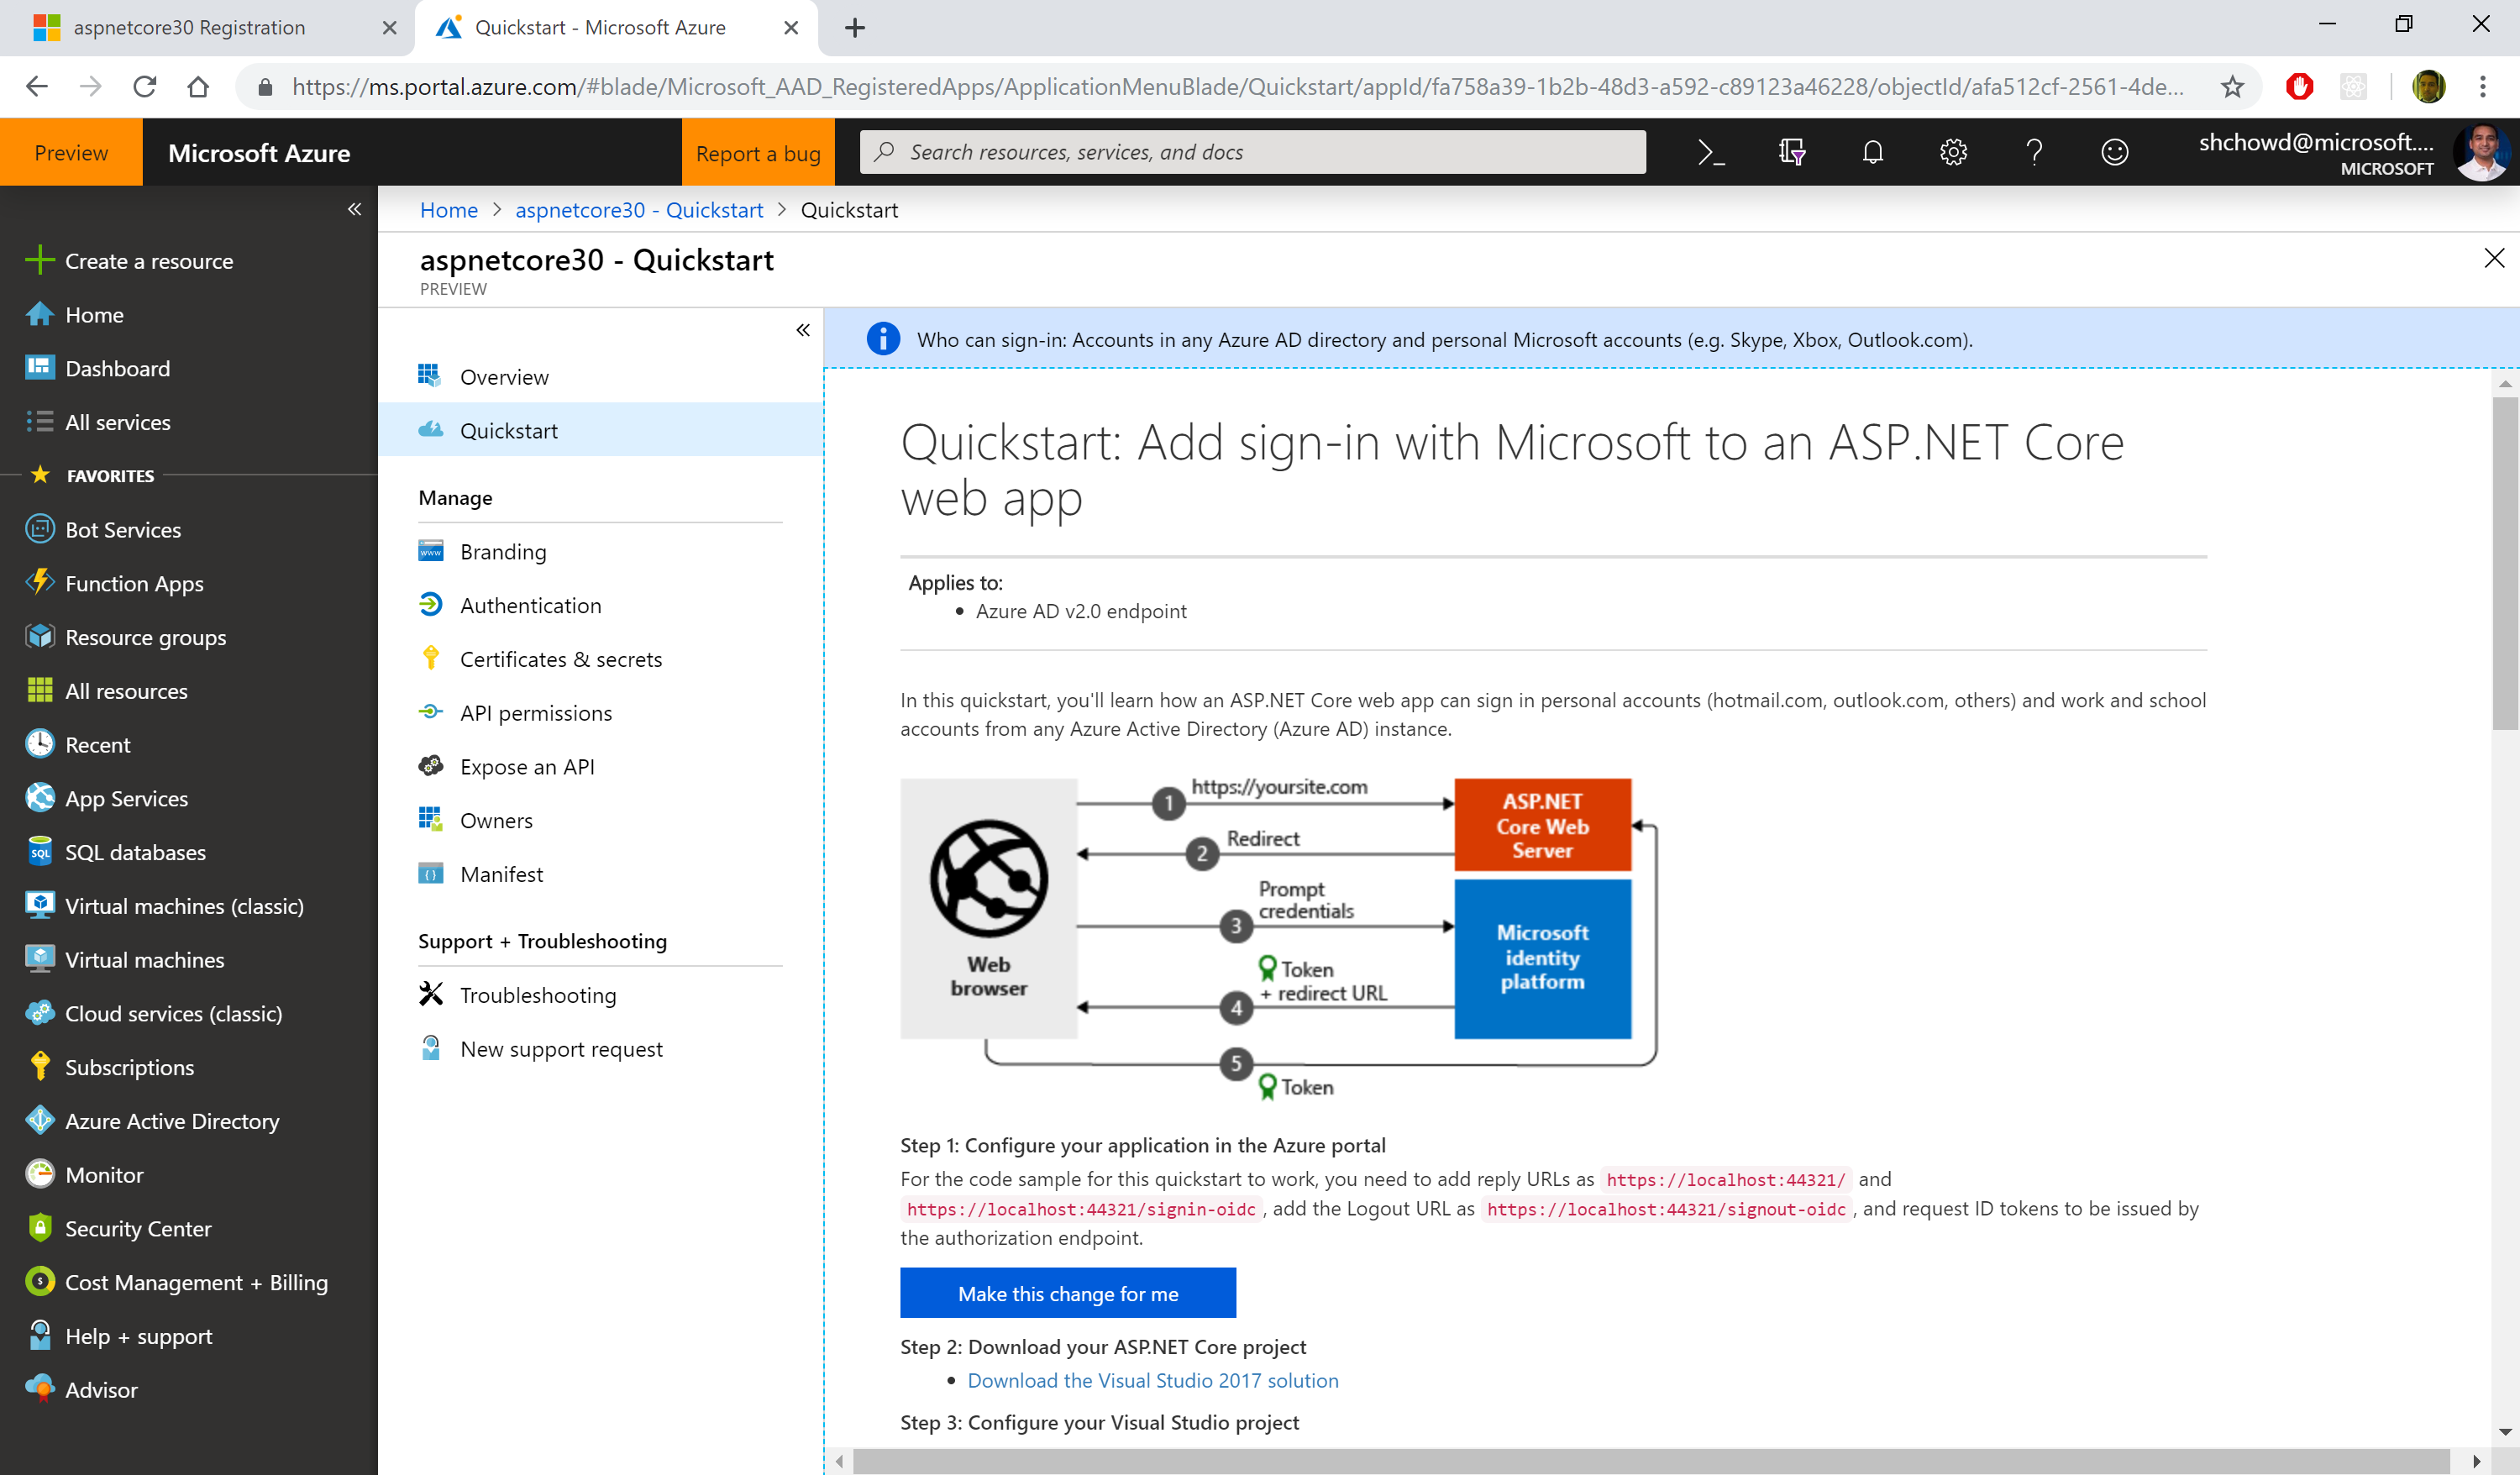
Now you should have options to configure your app and also download a pre-written application to get started. In the QuickStart section for your newly registered application (after selecting  the guide for “ASP .NET Core”, you should see a button to make the changes for you and also download a configured Visual Studio application.
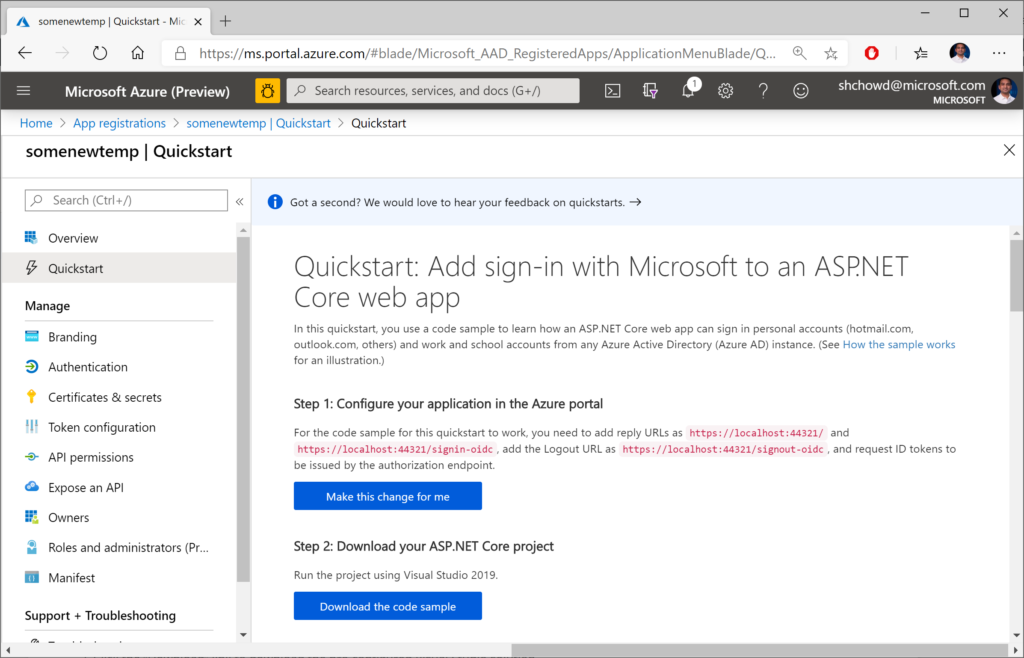
Quickstart screen for app registration

In the steps that follow:

  1. Click the “Make the changes for me” button to make the necessary configuration changes.
  2. Optional: Click the “Download” link to download the pre-configured Visual Studio solution, if you don’t already have a project.

At the time of this writing, the downloadable sample project is a VS2019 application for ASP .NET Core 2.2. You can download it to inspect it, but I would recommend creating a new project manually in VS2019. There may be some subtle differences between projects created by VS2019 with authentication turned on, versus what you get with the downloaded project.

For further customization using the Manifest file available to you, check out the official documentation on the Azure AD app manifest:

Using Authentication in Your Code

When creating a new project in VS2019, you get the following lines of code in your ConfigureServices() method, including calls to .AddAuthentication(). For different project types (MVC, Razor Pages, Blazor), you should also see some additional code setting up the authorization policy.

// contents of ConfigureServices() when created in VS2019

services.AddAuthentication(AzureADDefaults.AuthenticationScheme)
.AddAzureAD(options => Configuration.Bind("AzureAd", options));

The string value “AzureAd” is referenced in your appsettings file, e.g. appsettings.json in MVC, Razor Pages, or Blazor projects. The properties for this entry include the following:

  • Instance: URL for login page, e.g. https://login.microsoftonline.com
  • Domain: your AD tenant’s domain, e.g. microsoft.onmicrosoft.com
  • TenantId: your Tenant Id value, usually a GUID
  • ClientId: Your app’s Client Id, obtained from app registration
  • Callback Path: partial path for sign-in, e.g. /signin-oidc
{
  "AzureAd": {
    "Instance": "https://login.microsoftonline.com/",
    "Domain": "<REPLACE_DOMAIN_NAME>",
    "TenantId": "<REPLACE_TENANT_ID>",
    "ClientId": "<REPLACE_CLIENT_ID>",
    "CallbackPath": "/signin-oidc"
  },
  "Logging": {
    "LogLevel": {
      "Default": "Information",
      "Microsoft": "Warning",
      "Microsoft.Hosting.Lifetime": "Information"
    }
  },
  "AllowedHosts": "*"
}

You can see more information on appsettings.json values in the official docs. You can also open the apssettings.json from the portal-downloaded project to get your own app’s Id values. The following documentation is specifically written for v2, but offers explains for important fields such as ClientId and TenantId.

To get a refresher on Authentication and Authorization in ASP .NET Core 3.1, check out the following post on from earlier in this blog series.

For more on assigning users to specific roles, check out the official documentation at the following URL:

Finally, take a look at the Login.partial.cshtml partial view to observe the way a user’s identity is detected and shown in an MVC or Razor Pages web app. Here is a snippet from the samples:

@if (User.Identity.IsAuthenticated)
{
 <li class="nav-item">
 <span class="nav-text text-dark">Hello @User.Identity.Name!</span>
 </li>
...
}

NOTE: The Blazor web app wraps the authorized content in an <Authorized> tag within an <AuthorizedView. For more on the Blazor project, take a look at the Blazor post:

Depending on what you have access to, the User.Identity object may not contain everything you expect it to. Here are some things to take note of:

  • User.Identity should be null when not logged in
  • User.Identity should be non-null when logged in…
  • … however, User.Identity.Name may be null even when logged in
  • If User.Identity.Name is null, also check User.Identity.Claims
  • User.Identity.Claims should have more than 0 values when logged in

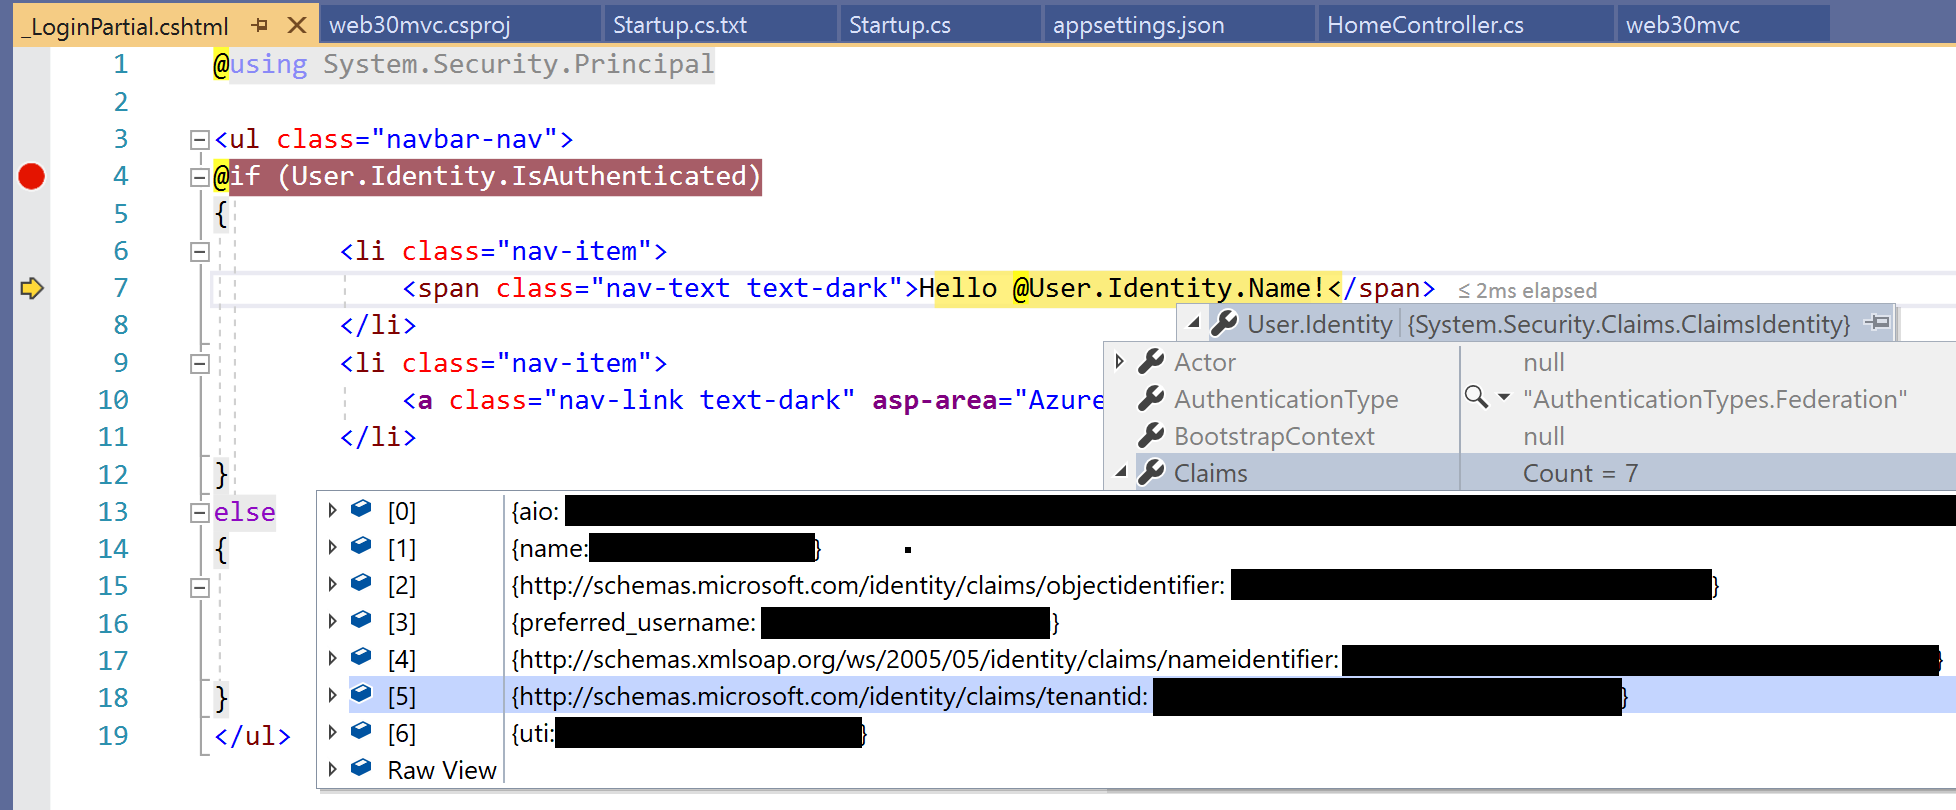
The following screenshot shows an example of the user information in my debugging environment when logged in:
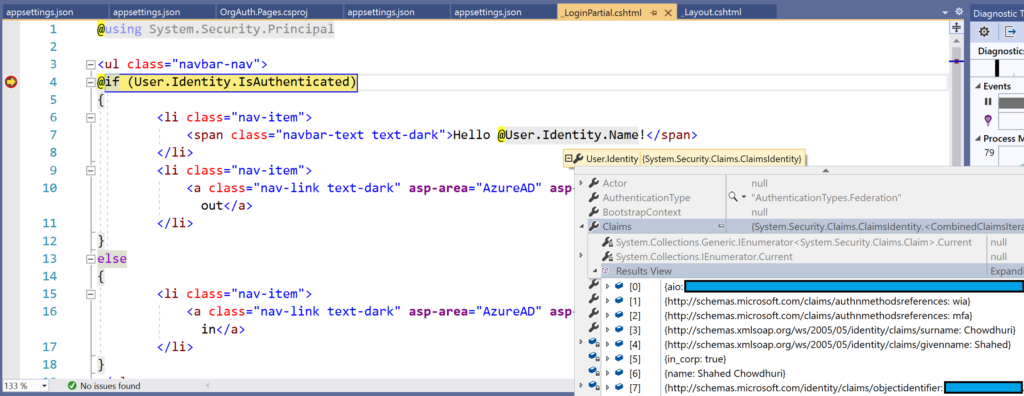
 User.Identity.Name with Claims in debugger
User.Identity.Name with Claims in debugger

Running the Samples

Running the sample web projects should redirect you to the Azure AD login page for your tenant. The login page should look identical for all 3 project types: MVC, Razor Pages or Blazor. If you’ve already logged in to one or more accounts in your browser, you should have one or more identities to select from.
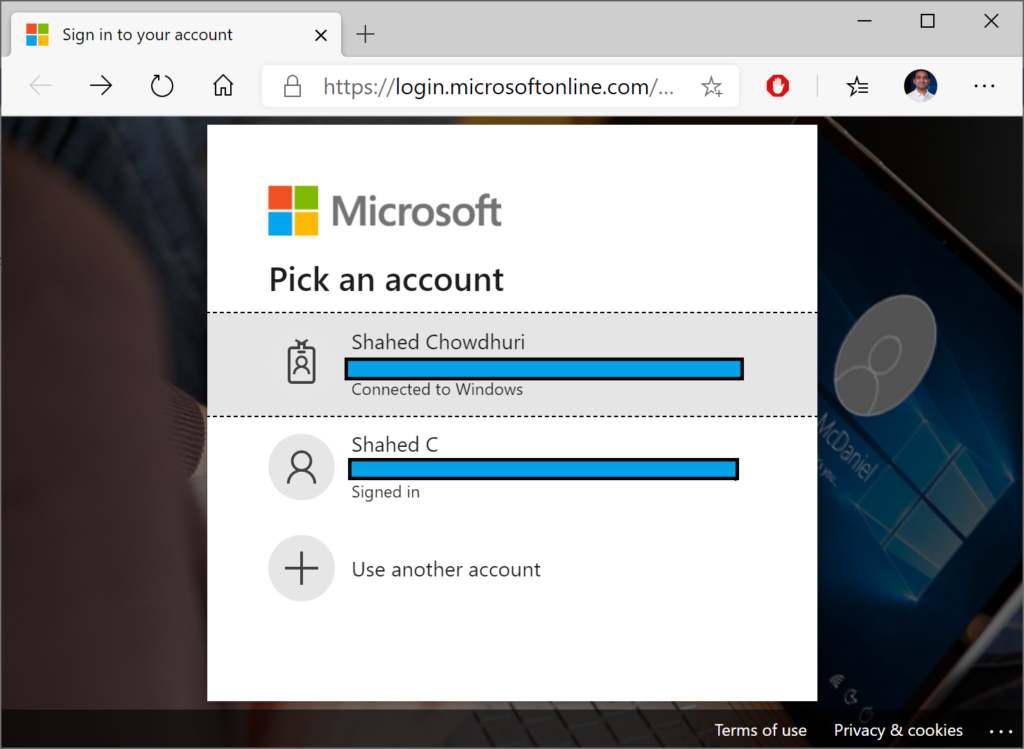
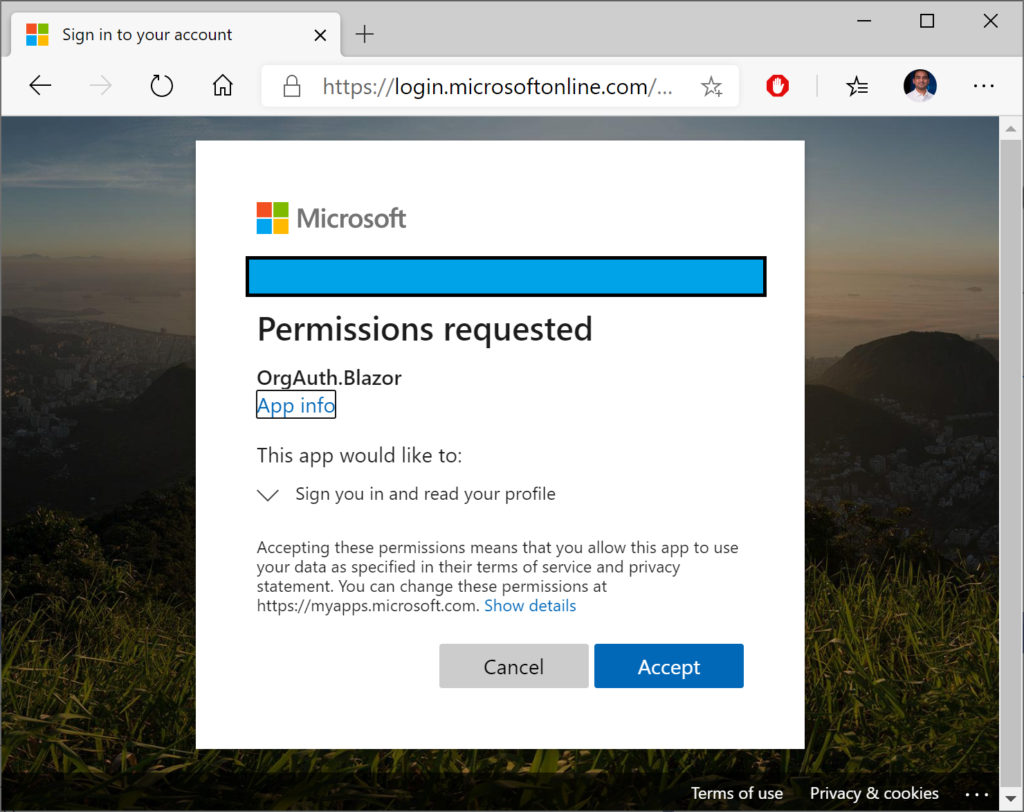
Once you’ve selected an account, you should see a confirmation screen (at least the first time) to Accept the authentication and login. This screen will look similar for all your projects, and the project name should be displayed in the middle.
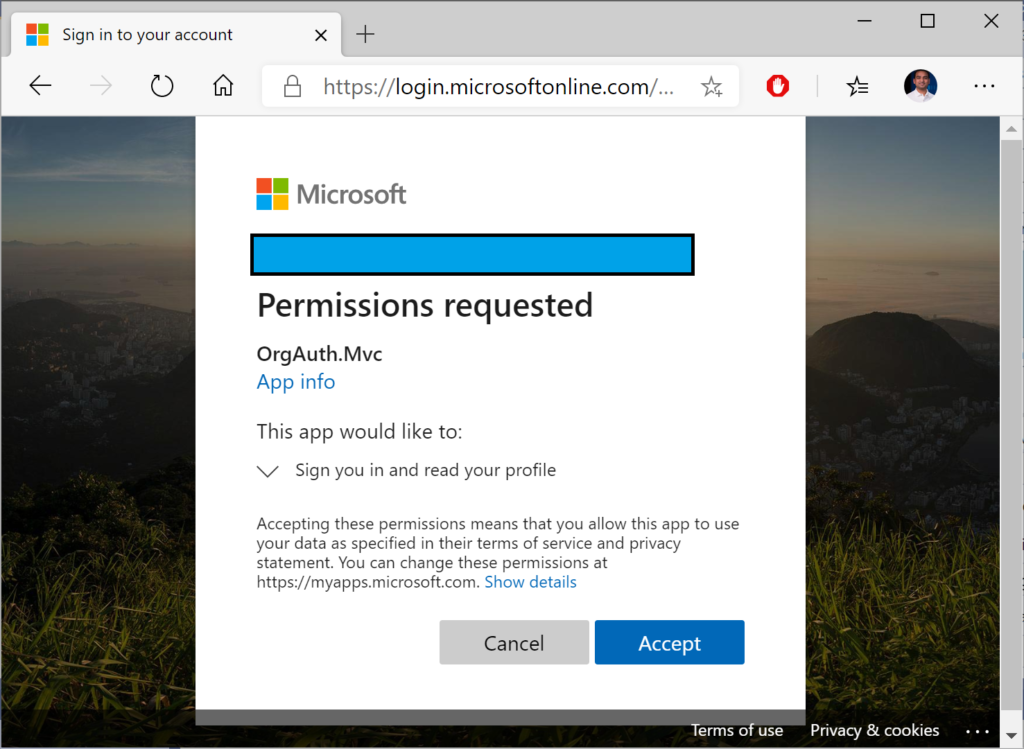
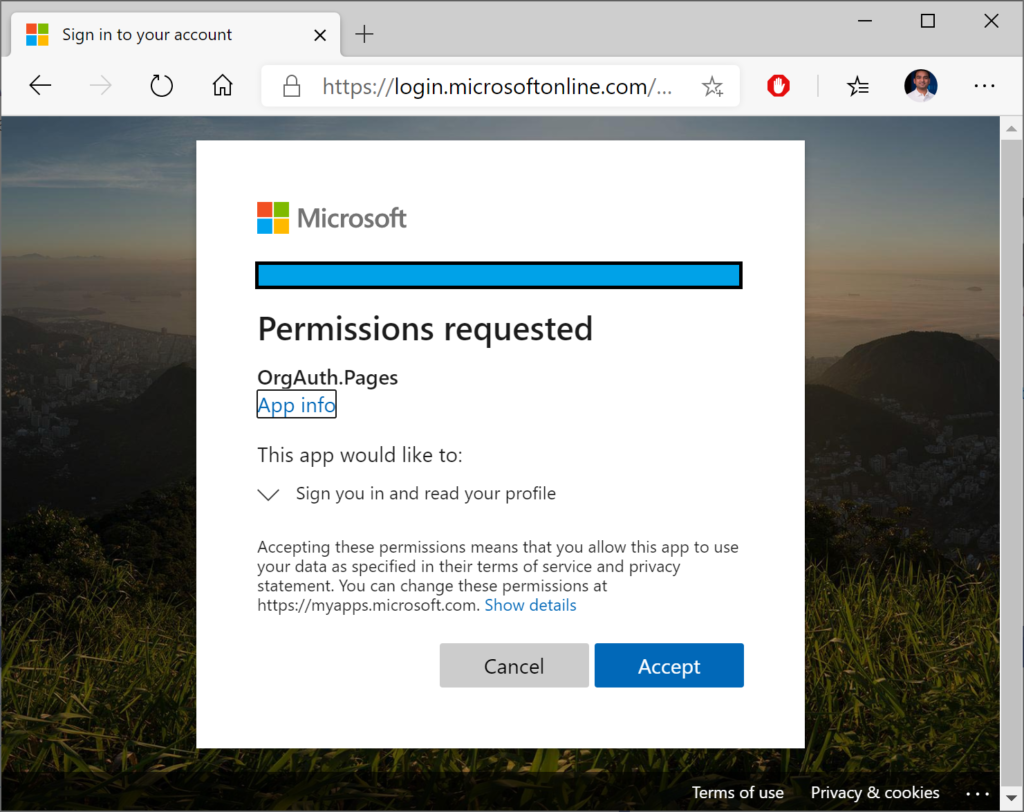
 MVC app authentication confirmation
MVC app authentication confirmation
Razor Pages app authentication confirmation
Blazor app authentication confirmation

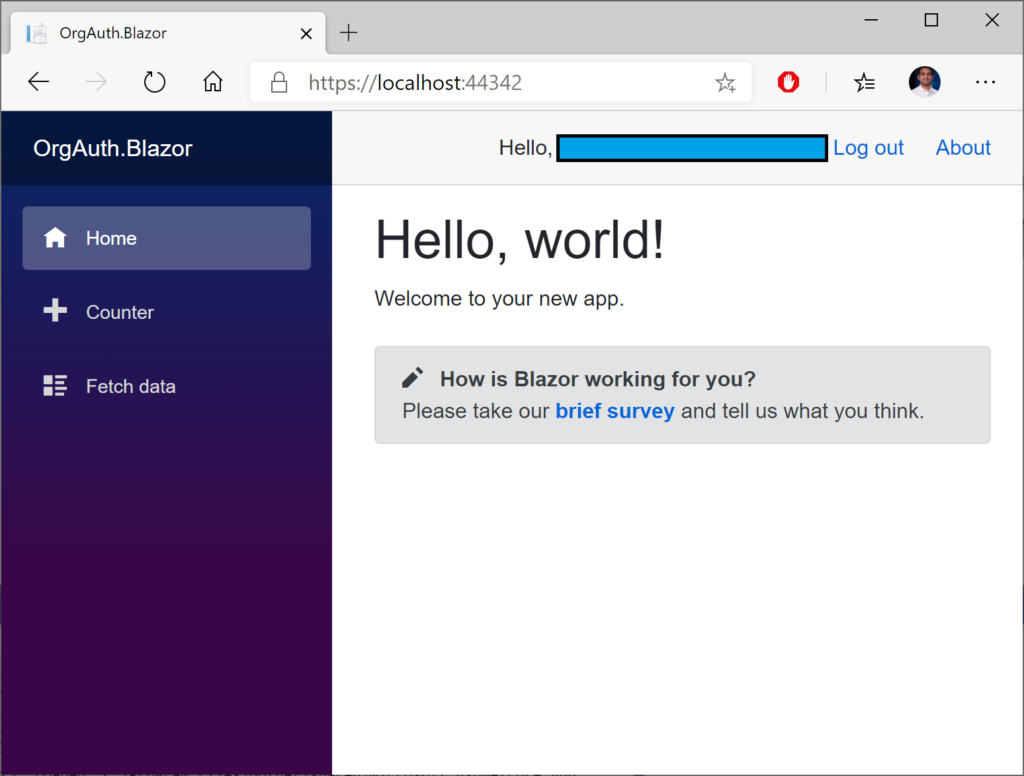
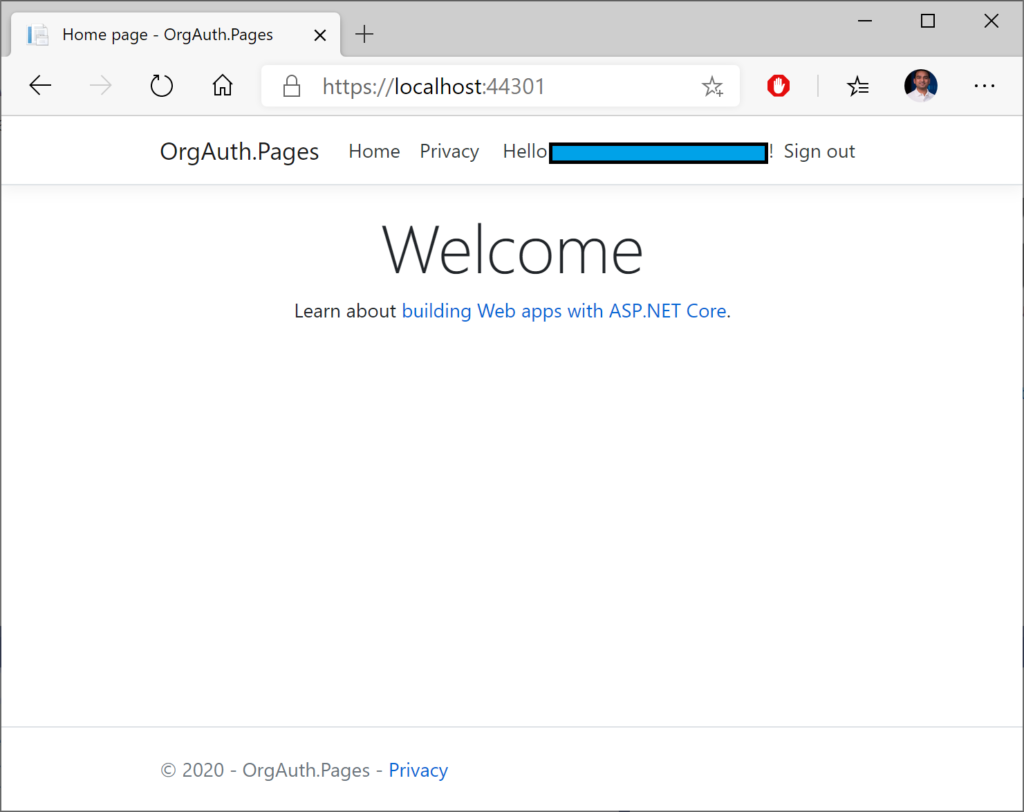
Finally, you should see each web application with some indication that you are currently logged in. In the template-generated sample apps, this is demonstrated by the “Hello” message in the header area.
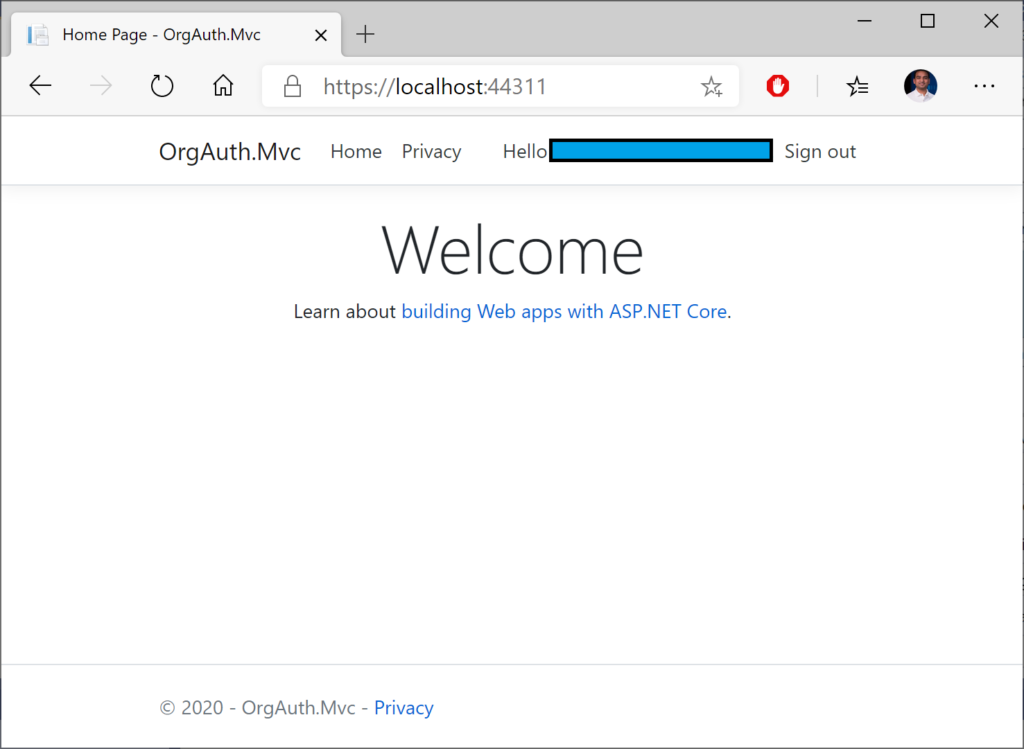
MVC web app, logged in
Razor Pages web app, logged in
 Blazor web app, logged in
Blazor web app, logged in

References

Authentication & Authorization in ASP .NET Core 3.1

By Shahed C on January 6, 2020
ASP .NET Core A-Z Series

This is the first of a new series of posts on ASP .NET Core 3.1 for 2020. In this series, we’ll cover 26 topics over a span of 26 weeks from January through June 2020, titled ASP .NET Core A-Z! To differentiate from the 2019 series, the 2020 series will mostly focus on a growing single codebase (NetLearner!) instead of new unrelated code snippets week.

If you need some guidance before you get started with this series, check out my late 2019 posts, which serve as a prelude to the 2020 series:

NetLearner on GitHub:

In this Article:

A is for Authentication & Authorization

Authentication and Authorization are two different things, but they also go hand in hand. Think of Authentication as letting someone into your home and Authorization as allowing your guests to do specific things once they’re inside (e.g. wear their shoes indoors, eat your food, etc). In other words, Authentication lets your web app’s users identify themselves to get access to your app and Authorization allows them to get access to specific features and functionality.

In this article, we will take a look at the NetLearner app, on how specific pages can be restricted to users who are logged in to the application. Throughout the series, I will try to focus on new code added to NetLearner or build a smaller sample app if necessary.

Authentication in ASP .NET Core

The quickest way to add authentication to your ASP .NET Core app is to use one of the pre-built templates with one of the Authentication options. The examples below demonstrate both the CLI commands and Visual Studio UI.

Here are the CLI Commands for MVC, Razor Pages and Blazor (Server), respectively:

> dotnet new mvc --auth Individual -o mvcsample
> dotnet new webapp --auth Individual -o pagessample
> dotnet new blazorserver --auth Individual -o blazorsample 

Things to note:

  • The dotnet new command is followed by the template name (mvc, webapp, blazorserver).
  • The –auth option allows you to specify the authentication type, e.g. Individual
  • The -o option is an optional parameter that provides the output folder name for the project to be created in.

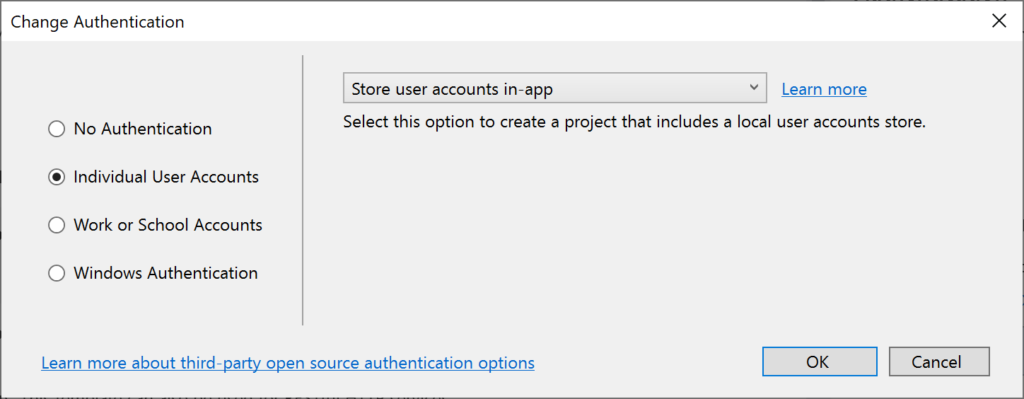
Here is the opening dialog in Visual Studio 2019, for creating a new project with Authentication:

Change Authentication upon creating a new project
 Select Authentication Type
Select Authentication Type

The above example uses “Individual” authentication, which offers a couple of options:

  • Store user accounts in-app: includes a local user accounts store
  • Connect to an existing user store in the cloud: connect to an existing Azure AD B2C application

Even if I choose to start with a local database, I can update the connection string to point to a SQL Server instance on my network or in the cloud, depending on which configuration is being loaded. If you’re wondering where your Identity code lives, check out my 2019 post on Razor UI Libraries, and jump to the last bonus section where Identity is mentioned.

From the documentation, the types of authentication are listed below.

  • None: No authentication
  • Individual: Individual authentication
  • IndividualB2C: Individual authentication with Azure AD B2C
  • SingleOrg: Organizational authentication for a single tenant
  • MultiOrg: Organizational authentication for multiple tenants
  • Windows: Windows authentication

To get help information about Authentication types, simply type ––help after the ––auth flag, e.g.

> dotnet new webapp --auth --help

Authentication in NetLearner

Within my NetLearner MVC app, the following snippets of code are added to the Startup.cs configuration:

public void ConfigureServices(IServiceCollection services)
{
...
   services.AddDbContext<LibDbContext>(options =>
   {
      options
         .UseSqlServer(Configuration.GetConnectionString("DefaultConnection"),
         assembly =>
         assembly.MigrationsAssembly
            (typeof(LibDbContext).Assembly.FullName));
   });

   services.AddDefaultIdentity<IdentityUser>(options => options.SignIn.RequireConfirmedAccount = true)
   .AddEntityFrameworkStores<LibDbContext>();
...
}
public void Configure(IApplicationBuilder app, IHostingEnvironment env)
{
...
 app.UseStaticFiles();
...
 app.UseAuthentication();
 app.UseAuthorization(); 
...
 app.Endpoints(...);
}

In the above, note that:

  • The ConfigureServices() method has calls to services.AddDbContext and server.AddDefaultIdentity. The call to add a DB Context will vary depending on which data store you choose for authentication. The call to AddDefaultIdentity ensures that your app calls AddIdentity, AddDefaultUI and AddDefaultTokenProviders to add common identity features and user Register/Login functionality.
  • The Configure() method has calls to app.UseAuthentication and app.UseAuthorization to ensure that authentication and authorization are used by your web app. Note that this appears after app.UseStaticFiles() but before app.UseEndpoints() to ensure that static files (html, css, js, etc) can be served without any authentication but MVC application-controlled routes and views/pages will follow authentication rules.
  • Similar to the MVC web project, you can also browse the Startup.cs file for the equivalent Razor Pages and Blazor web app projects.

Authorization in ASP.NET Core (MVC)

Even after adding authentication to a web app using the project template options, we can still access many parts of the application without having to log in. In order to restrict specific parts of the application, we will implement Authorization in our app.

If you’ve already worked with ASP .NET Core MVC apps before, you may be familiar with the [Authorize] attribute. This attribute can be added to a controller at the class level or even to specific action methods within a class.

[Authorize]
public class SomeController1: Controller
{
   // this controller class requires authentication
   // for all action methods
   public ActionResult SomeMethod()
   {
      //
   } 
}

public class SomeController2: Controller
{
   public ActionResult SomeOpenMethod()
   {
   }

   [Authorize]
   public ActionResult SomeSecureMethod()
   {
      // this action method requires authentication
   }
}

Well, what about Razor Pages in ASP .NET Core? If there are no controller classes, where would you add the [Authorize] attribute?

Authorization in ASP.NET Core (Razor Pages)

For Razor Pages, the quickest way to add Authorization for your pages (or entire folders of pages) is to update your ConfigureServices() method in your Startup.cs class, by calling AddRazorPagesOptions() after AddMvc(). The NetLearner configuration includes the following code:

services.AddRazorPages()
     .AddRazorPagesOptions(options =>
     {
         options.Conventions.AuthorizePage("/LearningResources/Create");
         options.Conventions.AuthorizePage("/LearningResources/Edit");
         options.Conventions.AuthorizePage("/LearningResources/Delete");
         options.Conventions.AuthorizePage("/ResourceLists/Create");
         options.Conventions.AuthorizePage("/ResourceLists/Edit");
         options.Conventions.AuthorizePage("/ResourceLists/Delete");
         options.Conventions.AllowAnonymousToPage("/Index");
     });

The above code ensures that the CRUD pages for Creating, Editing and Deleting any of the LearningResources are only accessible to someone who is currently logged in. Each call to AuthorizePage() includes a specific page name identified by a known route. In this case, the LearningResources folder exists within the Pages folder of the application.

Finally, the call to AllowAnonymousPage() ensures that the app’s index page (at the root of the Pages folder) is accessible to any user without requiring any login.

If you still wish to use the [Authorize] attribute for Razor Pages, you may apply this attribute in your PageModel classes for each Razor Page, as needed. If I were to add it to one of my Razor Pages in the LearningResources folder, it could look like this:

[Authorize]
public class CreateModel : PageModel
{
    ...
}

Authorization in Blazor

In a Blazor project, you can wrap elements in an <AuthorizeView> component, which may contain nested elements named <Authorized>, <NotAuthorized> and <Authorizing>.

<AuthorizeView>
   <Authorized Context="Auth">
     authorized elements go here
   </Authorized>
   <NotAuthorized>
     anonymous-accessed elements
   </NotAuthorized>
   <Authorizing>
     waiting message...
   </Authorizing>
</AuthorizeView>

The root element here has the following characteristics:

  • <AuthorizeView> element used as a container for nested elements
  • Optional role attribute, e.g. <AuthorizeView Roles=”Admin,RoleA”> used to set a comma-separated list roles that will be used to determine who can view the authorized nested elements
  • Optional context attribute, e.g. <AuthorizeView Context=”Auth”> to define a custom context, to avoid any conflicts with nested comments

The nested elements represent the following:

  • Authorized: shown to users who have been authorized to view and interact with these elements
  • NotAuthorized: shown to users who have not been authorized
  • Authorizing: temporary message shown while authorization is being processed

Testing Authorization in NetLearner

When I run my application, I can register and log in as a user to create new Learning Resources. On first launch, I have to apply migrations to create the database from scratch. Please refer to my 2018 post on EF Core Migrations to learn how you can do the same in your environment.

NOTE: the registration feature for each web app has been disabled by default. To enable registration, please do the following:

  1. Locate scaffolded Identity pages under /Areas/Identity/Pages/Account/
  2. In Register.cshtml, update the page to include environments in addition to Development, if desired.
  3. In Register.cshtml.cs, replace [Authorize] with [AllowAnonymous] to allow access to registration

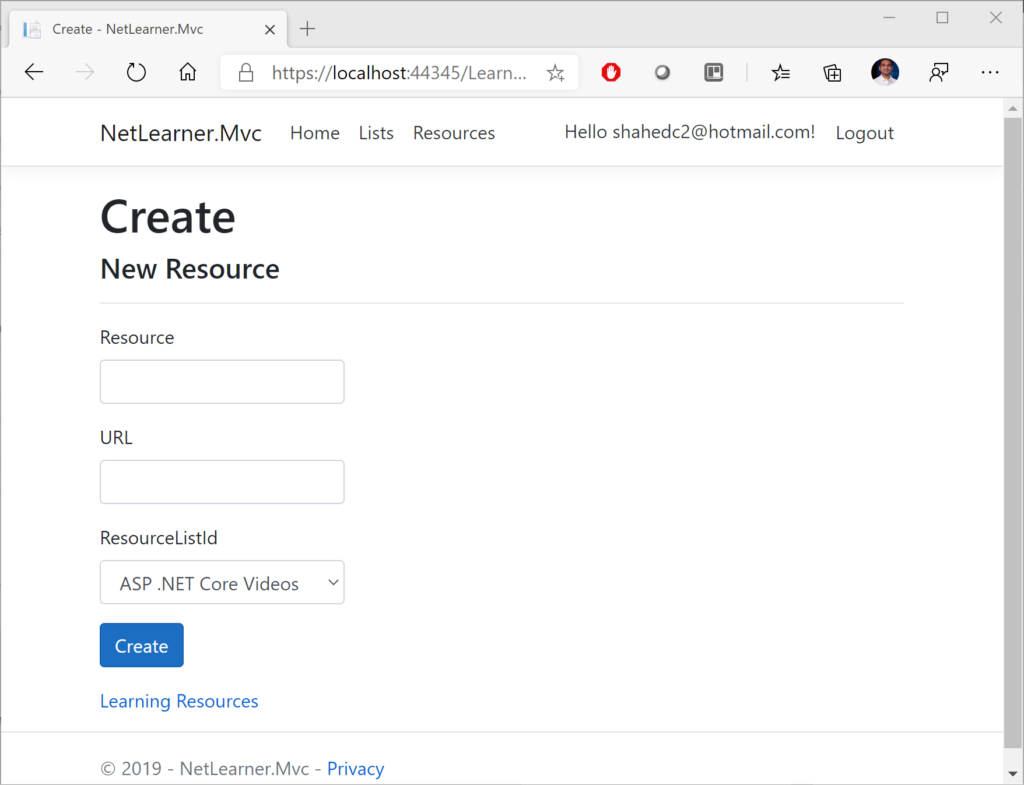
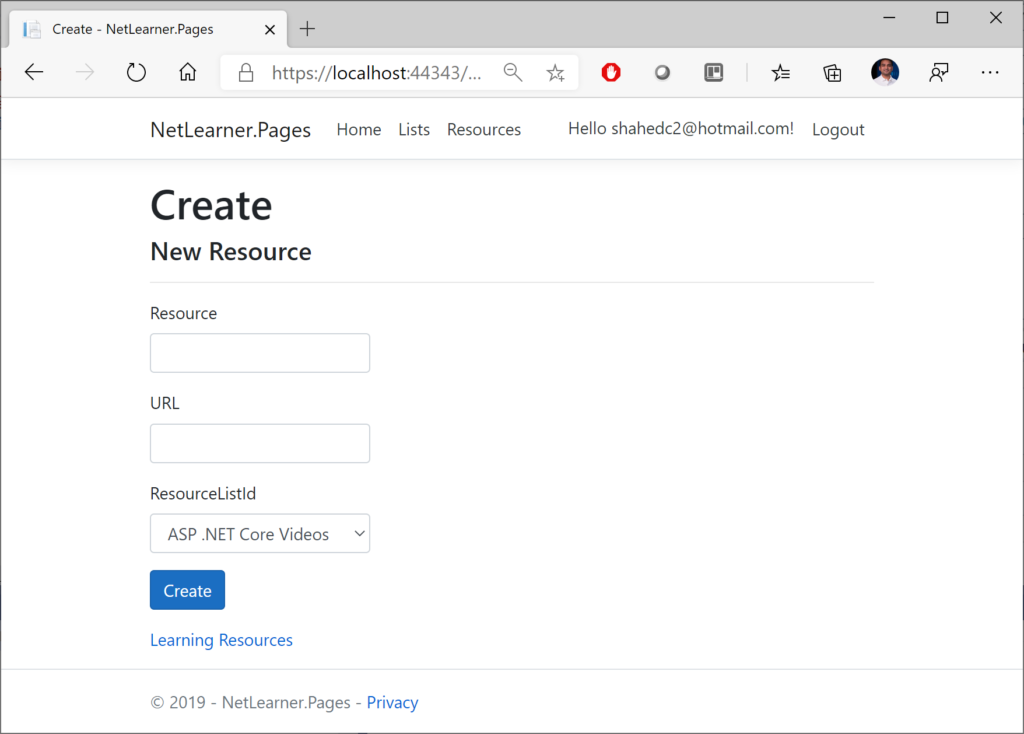
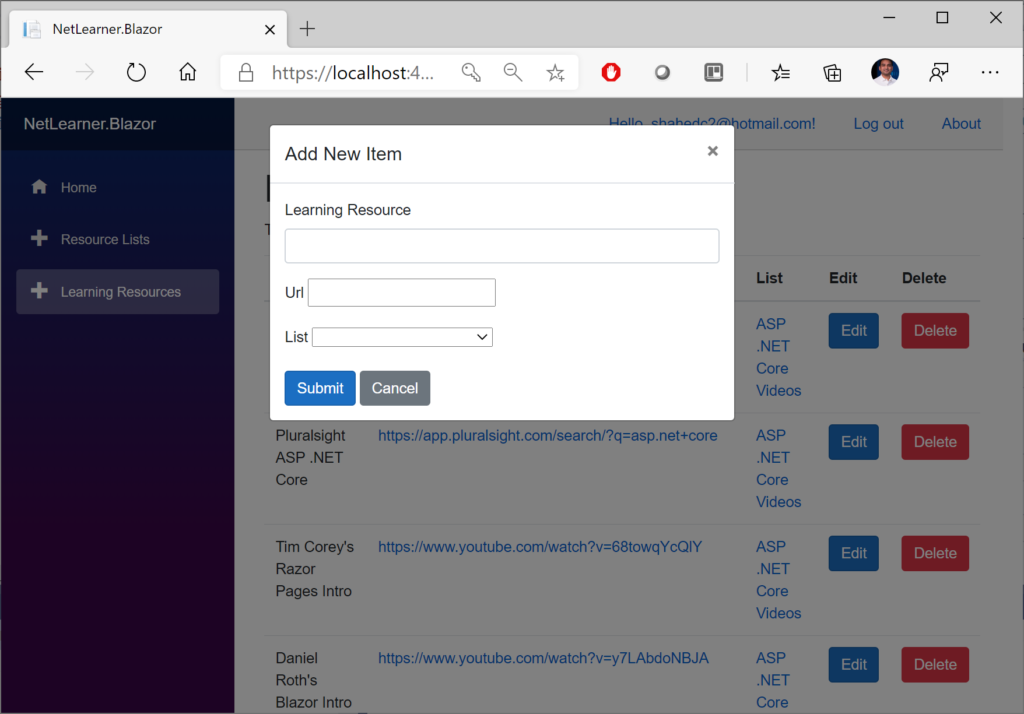
Here are the screenshots of the Create page for a user who is logged in:

NetLearner MVC: Create New Resource
 NetLearner Razor Pages: Create New Resource
NetLearner Razor Pages: Create New Resource
  NetLearner Blazor: Create New Resource
NetLearner Blazor: Create New Resource

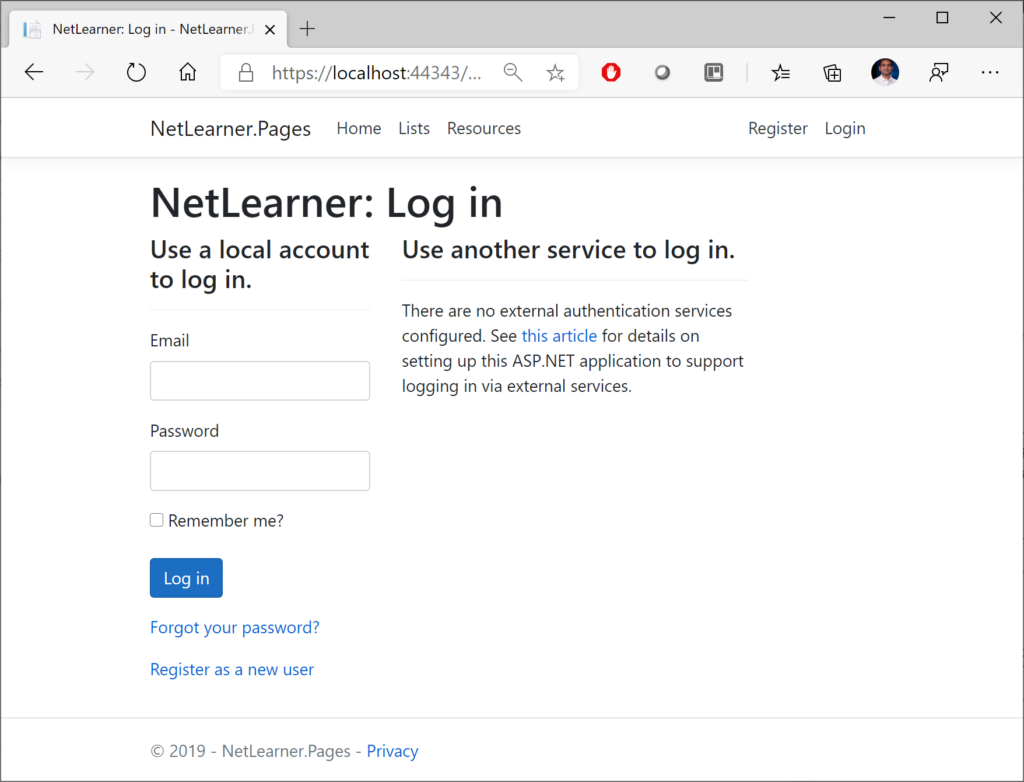
Here’s a screenshot of the page that an “anonymous” user sees when no one is logged in, indicating that the user has been redirected to the Login page. Note that all 3 web apps (MVC, Razor Pages and Blazor) have similar Identity pages. To allow manual customization, they were also auto-generated via scaffolding and included in all 3 projects.

NetLearner: Log in
NetLearner: Log in

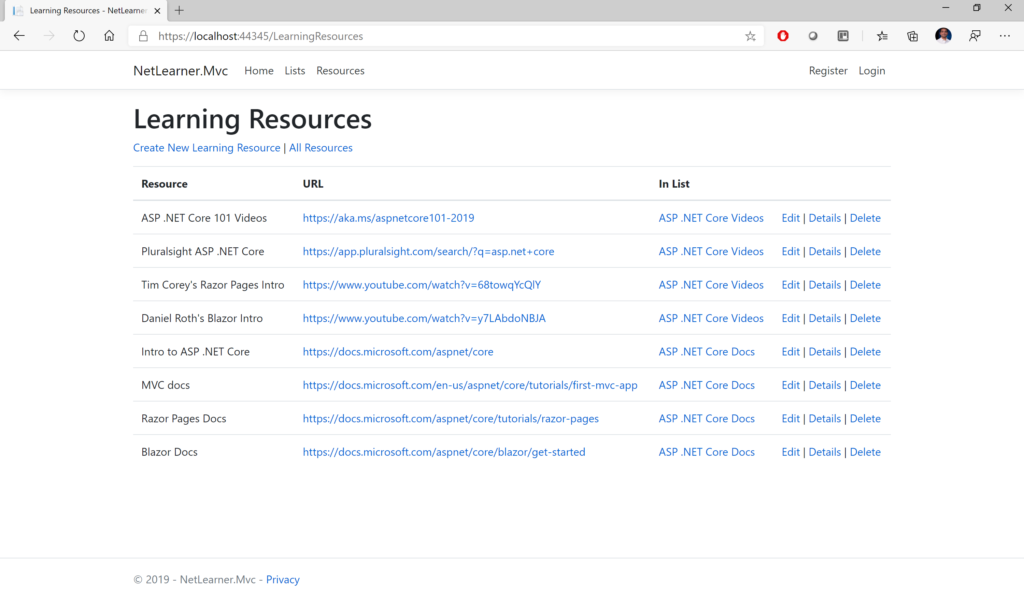
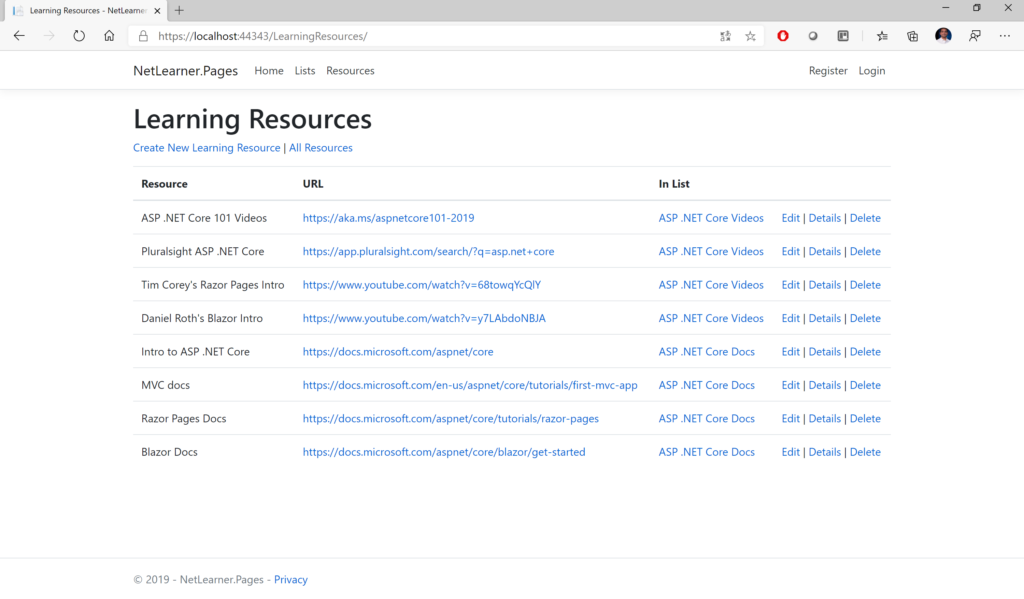
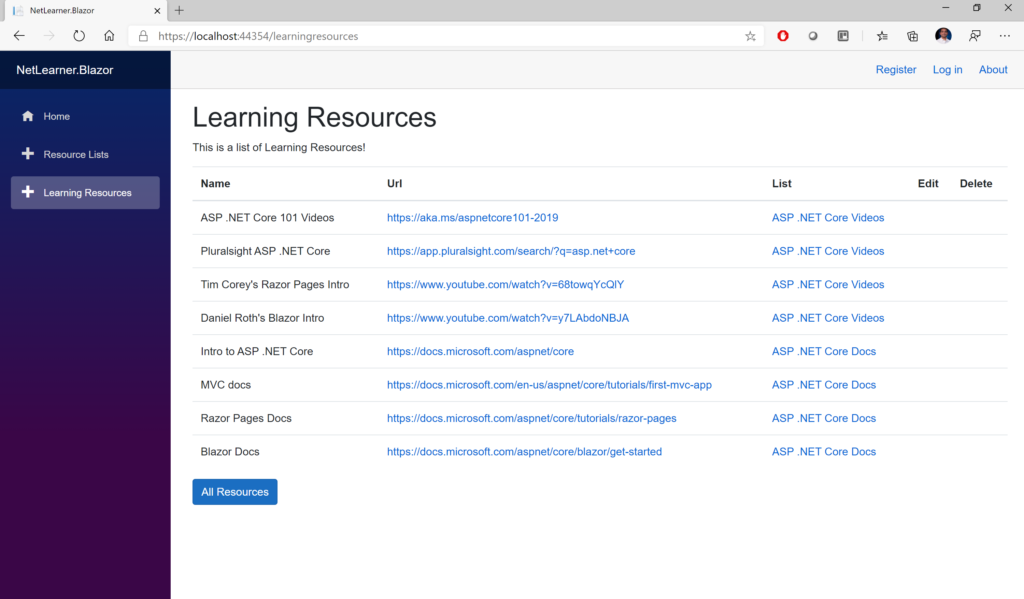
Here are the screenshots showing the list of Learning Resources, visible to anyone whether they’re logged in or not:

 NetLearner MVC: List of Learning Resources
NetLearner MVC: List of Learning Resources
  NetLearner Razor Pages: List of Learning Resources
NetLearner Razor Pages: List of Learning Resources
   NetLearner Blazor: List of Learning Resources
NetLearner Blazor: List of Learning Resources

Other Authorization Options

Razor Pages have multiple ways of restricting access to pages and folders, including the following methods (as described in the official docs):

  • AuthorizePage: Require authorization to access a page
  • AuthorizeFolder: Require authorization to access a folder of pages
  • AuthorizeAreaPage: Require authorization to access an area page
  • AuthorizeAreaFolder: Require authorization to access a folder of areas
  • AllowAnonymousToPage: Allow anonymous access to a page
  • AllowAnonymousToFolder: Allow anonymous access to a folder of pages

You can get more information on all of the above methods at the following URL:

References

To learn more about Authentication, Authorization and other related topics (e.g. Roles and Claims), check out the official docs:

Organizational Accounts for ASP .NET Core

By Shahed C on April 15, 2019

This is the fifteenth of a series of posts on ASP .NET Core in 2019. In this series, we’ll cover 26 topics over a span of 26 weeks from January through June 2019, titled A-Z of ASP .NET Core!

ASPNETCoreLogo-300x267 A – Z of ASP .NET Core!

In this Article:

O is for Organizational Accounts

If you’ve created new ASP .NET Core projects, you’ve probably seen an option to add authentication upon creation. In Visual Studio, the IDE provides radio buttons to select a specific type of Authentication. Using CLI commands (e.g. in the VS Code terminal) you can use the ‐‐auth flag to choose the type of authentication you’d like to add.

The possible values are:

  • None – No authentication (Default).
  • Individual – Individual authentication.
  • IndividualB2C – Individual authentication with Azure AD B2C.
  • SingleOrg – Organizational authentication for a single tenant.
  • MultiOrg – Organizational authentication for multiple tenants.
  • Windows – Windows authentication..

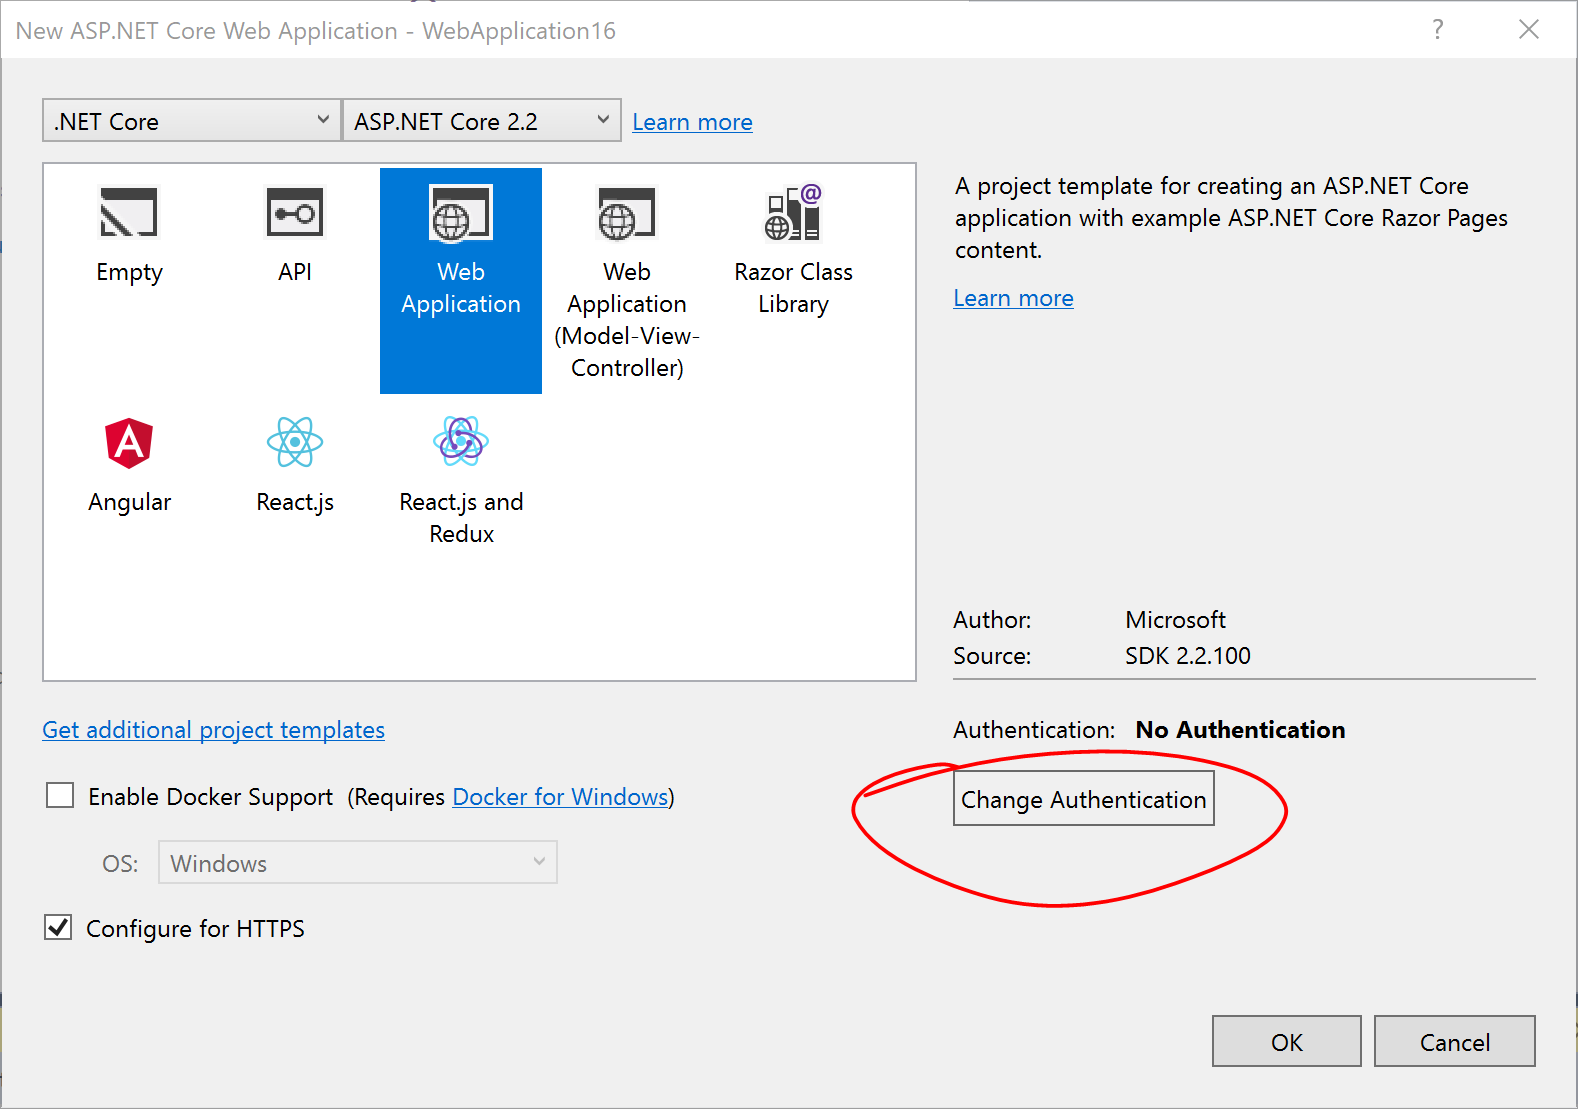
In this article, we will focus on the option for Work or School Accounts. This option can be used to authenticate users with AD (Active Directory, Azure AD or Office 365. In VS2019, a screenshot of the dialog is shown below:

AspNetCore-Auth-Azure

To follow along, take a look at the sample project on Github:

Web Org Authentication Sample: https://github.com/shahedc/AspNetCore2019Org

Adding Authentication

To add authentication to a new project quickly, here are the instructions for Visual Studio 2019.

If you choose to use the new splash screen:

  1. Click “Create a new project”
  2. Select “ASP .NET Core Web Application”
  3. Click Next
  4. Enter Project Name, Location, Solution Name
  5. Optional: check the checkbox to place in the same directory
  6. Click Create
  7. Select .NET Core 3.0 and then ASP .NET Core 3.0 from dropdowns
  8. Select a project type, e.g. Empty, Web Application (Razor Pages or MVC), etc
  9. Click the “Change” action link in the Authentication section

vs2019-project-new

This should allow you to change the authentication type to “Work or School Accounts” so that you may your organizational domain info. As always, you may select the little info buttons (lowercase i) to learn more about each field. Talk to your system administrator if you need more help on what domains to use.

vs2019-auth-options

NOTE: If you’re having trouble locating .NET Core 3.0 project types in Visual Studio, take a look at the previous blog post in this series on .NET Core 3.0 to get some help on how to enable it.

If you wish to skip the Splash Screen instead upon launching VS2019:

  1. Click “Continue without code” in the lower right area of the splash screen.
  2. In the top menu, click File | New | Project (or Ctrl-Shift-N)
  3. Follow the remaining steps outlined earlier in this section

To use CLI Commands in a Terminal window, use the dotnet new command followed by the ‐‐auth flag. The authentication type can be any of the aforementioned authentication types, e.g. Individual.

dotnet new mvc --auth Individual -o myproj

Configuring App Registration

If you’ve used “Individual User Accounts” before, you’ve probably used a database to store user data, either on-premises or in the cloud. If you’ve used “Work or School Accounts” (i.e. organizational accounts), you may have the old App portal at the following URL:

appdevreg-old

You may see a message suggesting that you should go to the Azure Portal to use the new App Registrations feature. Although this feature is currently in preview, you can start using it right now. If you click the link, it should take you directly to the App Registrations page, and may prompt you to log in first.

webreg-azure

If you’re not clear about how you got to this screen or how to come back to it later, here’s a set of steps that may help.

  1. Log in to the Azure Portal
  2. Search for App Registrations
  3. Arrive at the App Registrations page
  4. If necessary, click the banner that takes you to the preview experience.

webreg-portal-to-preview

The preview experience includes both your old and new app registrations. Click “New registration” to add a new app for authentication.

webreg-preview-add

In the form that follows, fill out the values for:

  • Name (which you can change later)
  • Account Type (your org, any org, any org + personal MSA)
  • Redirect URI (where users will return after authentication)

webreg-add-new

Now you should have options to configure your app and also download a pre-written application to get started. In the QuickStart section for your newly registered application (after selecting  the guide for “ASP .NET Core”, you should see a button to make the changes for you and also download a configured Visual Studio application.

webreg-azure-quickstart-aspnetcore

In the steps that follow:

  1. Click the “Make the changes for me” button to make the necessary configuration changes.
  2. Click the “Download” link to download the pre-configured Visual Studio solution.

webreg-azure-quickstart-aspnetcore-zoomed

At the time of this writing, the project type is a VS2017 application. You can download it to inspect it, but I would recommend creating a new project manually in VS2019. There are some subtle diferences between projects created by VS2019 with authentication turned on, versus what you get with the downloaded project.

For further customization using the Manifest file available to you, check out the official documentation on the Azure AD app manifest:

Using Authentication in Your Code

When creating a new project in VS2019, you get the following lines of code in your ConfigureServices() method, including calls to .AddAuthentication() and .addMvc().

// contents of ConfigureServices() when created in VS2019

services.AddAuthentication(AzureADDefaults.AuthenticationScheme)
.AddAzureAD(options => Configuration.Bind("AzureAd", options));

services.AddMvc(options =>
{
   var policy = new AuthorizationPolicyBuilder()
      .RequireAuthenticatedUser()
      .Build();
      options.Filters.Add(new AuthorizeFilter(policy));
})
.AddNewtonsoftJson();

If you download the pre-configured project from the Azure portal, you may notice an additional block of code in between .AddAuthentication() and .addMVC().

// contents of ConfigureServices() when downloaded from Portal

services.AddAuthentication(AzureADDefaults.AuthenticationScheme)
.AddAzureAD(options => Configuration.Bind("AzureAd", options));

services.Configure<OpenIdConnectOptions>(AzureADDefaults.OpenIdScheme, options =>
{
   options.Authority = options.Authority + "/v2.0/";
   options.TokenValidationParameters.ValidateIssuer = false;
});

services.AddMvc(options =>
{
   var policy = new AuthorizationPolicyBuilder()
      .RequireAuthenticatedUser()
      .Build();
   options.Filters.Add(new AuthorizeFilter(policy));
})
.SetCompatibilityVersion(CompatibilityVersion.Version_2_1);

This additional block calls services.Configure<OpenIdConnectOptions>() method to set up authentication for an Azure AD v2.0 endpoint. According to the documentation displayed in the Portal itself: “All users with a work or school, or personal Microsoft account can use your application or API. This includes Office 365 subscribers. To change the supported accounts for an existing registration, use the manifest editor. Take care, as certain properties may cause errors for personal accounts.

You can copy the this block of code manually into your VS2019 project, and refer to the sample project’s Startup.cs file.

services.Configure<OpenIdConnectOptions>(AzureADDefaults.OpenIdScheme, options =>
{
   options.Authority = options.Authority + "/v2.0/";
   options.TokenValidationParameters.ValidateIssuer = false;
});

There is also a difference in the Compatibility Version setting in the code. The downloaded project for VS2017 currently sets compatibility for v2.1 but you can manually set this to 3.0 when you create a project manually in VS2019, as seen in this snippet from the sample Startup.cs file.

services.AddMvc(options =>
{
   var policy = new AuthorizationPolicyBuilder()
      .RequireAuthenticatedUser()
      .Build();
   options.Filters.Add(new AuthorizeFilter(policy));
})
.SetCompatibilityVersion(CompatibilityVersion.Version_3_0);

Endpoint Routing in MVC

In the Configure() method of Startup.cs, the downloaded project contains familiar method calls to various Middleware components.

app.UseHttpsRedirection();
app.UseStaticFiles();
app.UseCookiePolicy();

app.UseAuthentication();

app.UseMvc(routes =>
{
   routes.MapRoute(
   name: "default",
   template: "{controller=Home}/{action=Index}/{id?}");
});

When you create an ASP .NET Core 3.0 project in VS2019, you may see the new Endpoint Routing feature, which makes it look like this:

app.UseHttpsRedirection();
app.UseStaticFiles();

app.UseRouting(routes =>
{
   routes.MapControllerRoute(
   name: "default",
   template: "{controller=Home}/{action=Index}/{id?}");
});

app.UseCookiePolicy();

app.UseAuthentication();
app.UseAuthorization();

You may notice the addition of app.UseRouting() appearing in between app.UseStaticFiles() and app.UseCookiePolicy, and there is no explicit call to app.UseMvc(). This doesn’t mean that the application is calling MVC ahead of time. Rather, the release notes explains it  well:

So think of UseRouting(…) as making a deferred routing decision – where middleware that appear after it run in the middle. Any middleware that run after routing can see the results and read or modify the route data and chosen endpoint. When processing reaches the end of the pipeline, then the endpoint is invoked.

You can read more about this in the writeup for v3.0 Preview 2:

App Settings and Identity

In your appsettings.json file, you can set values for your App Settings. This includes the following AzureAd settings:

  • Instance
  • Domain
  • ClientId
  • TenantId
  • CallbackPath
{
  "AzureAd": {
    "Instance": "https://login.microsoftonline.com/",
    "Domain": "<YOUR_SUB_DOMAIN>.onmicrosoft.com",
    "ClientId": "<YOUR_CLIENT_ID>",
    "TenantId": "<YOUR_TENANT_ID>",
    "CallbackPath": "/signin-oidc"
  },
  "Logging": {
    "LogLevel": {
      "Default": "Warning",
      "Microsoft.Hosting.Lifetime": "Information"
    }
  },
  "AllowedHosts": "*"
}

You can see more information on appsettings.json values in the official docs. You can also open the apssettings.json from the portal-downloaded project to get your own app’s Id values. The following documentation is specifically written for v2, but offers explains for important fields such as ClientId and TenantId.

To ensure that your authentication is working correctly, you can test it out by applying the [Authorize] attribute on a controller, e.g. the HomeController.cs class.

[Authorize]
public class HomeController : Controller
{
   //
}

To get a refresher on how to use the [Authorize] attribute, check out the post on Authorization from earlier in this blog series. For more on assigning users to specific roles, check out the official documentation at the following URL:

Finally, take a look at the Login.partial.cshtml partial view to observe the way a user’s identity is detected and shown. Here is a snippet from the sample:

@if (User.Identity.IsAuthenticated)
{
 <li class="nav-item">
 <span class="nav-text text-dark">Hello @User.Identity.Name!</span>
 </li>
}

Depending on what you have access to, the User.Identity object may not contain everything you expect it to. Here are some things to take note of:

  • User.Identity should be null when not logged in
  • User.Identity should be non-null when logged in…
  • … however, User.Identity.Name may be null even when logged in
  • If User.Identity.Name is null, also check User.Identity.Claims
  • User.Identity.Claims should have more than 0 values when logged in

The following screenshot shows an example of the user information in my debugging environment when logged in:

vs2019-login-identity-claims


References:


Authentication & Authorization in ASP .NET Core

By Shahed C on January 7, 2019

This is the first of a new series of posts on ASP .NET Core for 2019. In this series, we’ll cover 26 topics over a span of 26 weeks from January through June 2019, titled A-Z of ASP .NET Core!

ASPNETCoreLogo-300x267 A – Z of ASP .NET Core!

In this Article:

A is for Authentication & Authorization

Authentication and Authorization are two different things, but they also go hand in hand. Think of Authentication as letting someone into your home and Authorization as allowing your guests to do specific things once they’re inside (e.g. wear their shoes indoors, eat your food, etc). In other words, Authentication lets your web app’s users identify themselves to get access to your app and Authorization allows them to get access to specific features and functionality.

In this article, we will take a look at the NetLearner app, on how specific pages can be restricted to users who are logged in to the application. Throughout the series, I will try to focus on new code added to NetLearner or build a smaller sample app if necessary.

Authentication in ASP .NET Core

The quickest way to add authentication to your ASP .NET Core app is to use of the pre-built templates with one of the Authentication options. The examples below demonstrate both the CLI commands and Visual Studio UI.

CLI Commands:

> dotnet new webapp --auth Individual

Visual Studio 2017 new project with Authentication:

Change Authentication upon creating a new project

Change Authentication upon creating a new project

Select Authentication Type

Select Authentication Type

The above example uses “Individual” authentication, which offers a couple of options:

  • Store user accounts in-app: includes a local user accounts store
  • Connect to an existing user store in the cloud: connect to an existing Azure AD B2C application

Even if I choose to start with a local database, I can update the connection string to point to a SQL Server instance on my network or in the cloud, depending on which configuration is being loaded. If you’re wondering where your Identity code lives, check out my previous post on Razor UI Libraries, and jump to the last section where Identity is mentioned.

From the documentation, the types of authentication are listed below.

  • None: No authentication
  • Individual: Individual authentication
  • IndividualB2C: Individual authentication with Azure AD B2C
  • SingleOrg: Organizational authentication for a single tenant
  • MultiOrg: Organizational authentication for multiple tenants
  • Windows: Windows authentication

To get help information about Authentication types, simply type ––help after the ––auth flag, e.g.

> dotnet new webapp --auth --help

Authentication in NetLearner

Within my NetLearner app, the following snippets of code are added to the Startup.cs configuration:

public void ConfigureServices(IServiceCollection services)
{
...
   services.AddDbContext<ApplicationDbContext>(options =>
      options.UseSqlServer(
      Configuration.GetConnectionString("DefaultConnection")));

   services.AddDefaultIdentity<IdentityUser>()
      .AddDefaultUI(UIFramework.Bootstrap4)
      .AddEntityFrameworkStores<ApplicationDbContext>();
...
}
public void Configure(IApplicationBuilder app, IHostingEnvironment env)
{
...
 app.UseStaticFiles();
...
 app.UseAuthentication();
...
 app.UseMvc();
}

In the above, note that:

  • The ConfigureServices() method has calls to services.AddDbContext and server.AddDefaultIdentity. The call to add a DB Context will vary depending on which data store you choose for authentication. The call to AddDefaultIdentity ensures that your app calls AddIdentity, AddDefaultUI and AddDefaultTokenProviders to add common identity features and user Register/Login functionality.
  • The Configure() method has a call to app.UseAuthentication to ensure that authentication is used by your web app. Note that this appears after app.UseStaticFiles but before app.UseMvc to ensure that static files (html, css, js, etc) can be served without any authentication but MVC application-controlled routes and views/pages will follow authentication rules.

Continue reading